

Page 1
Contents
QUICK START GUIDE
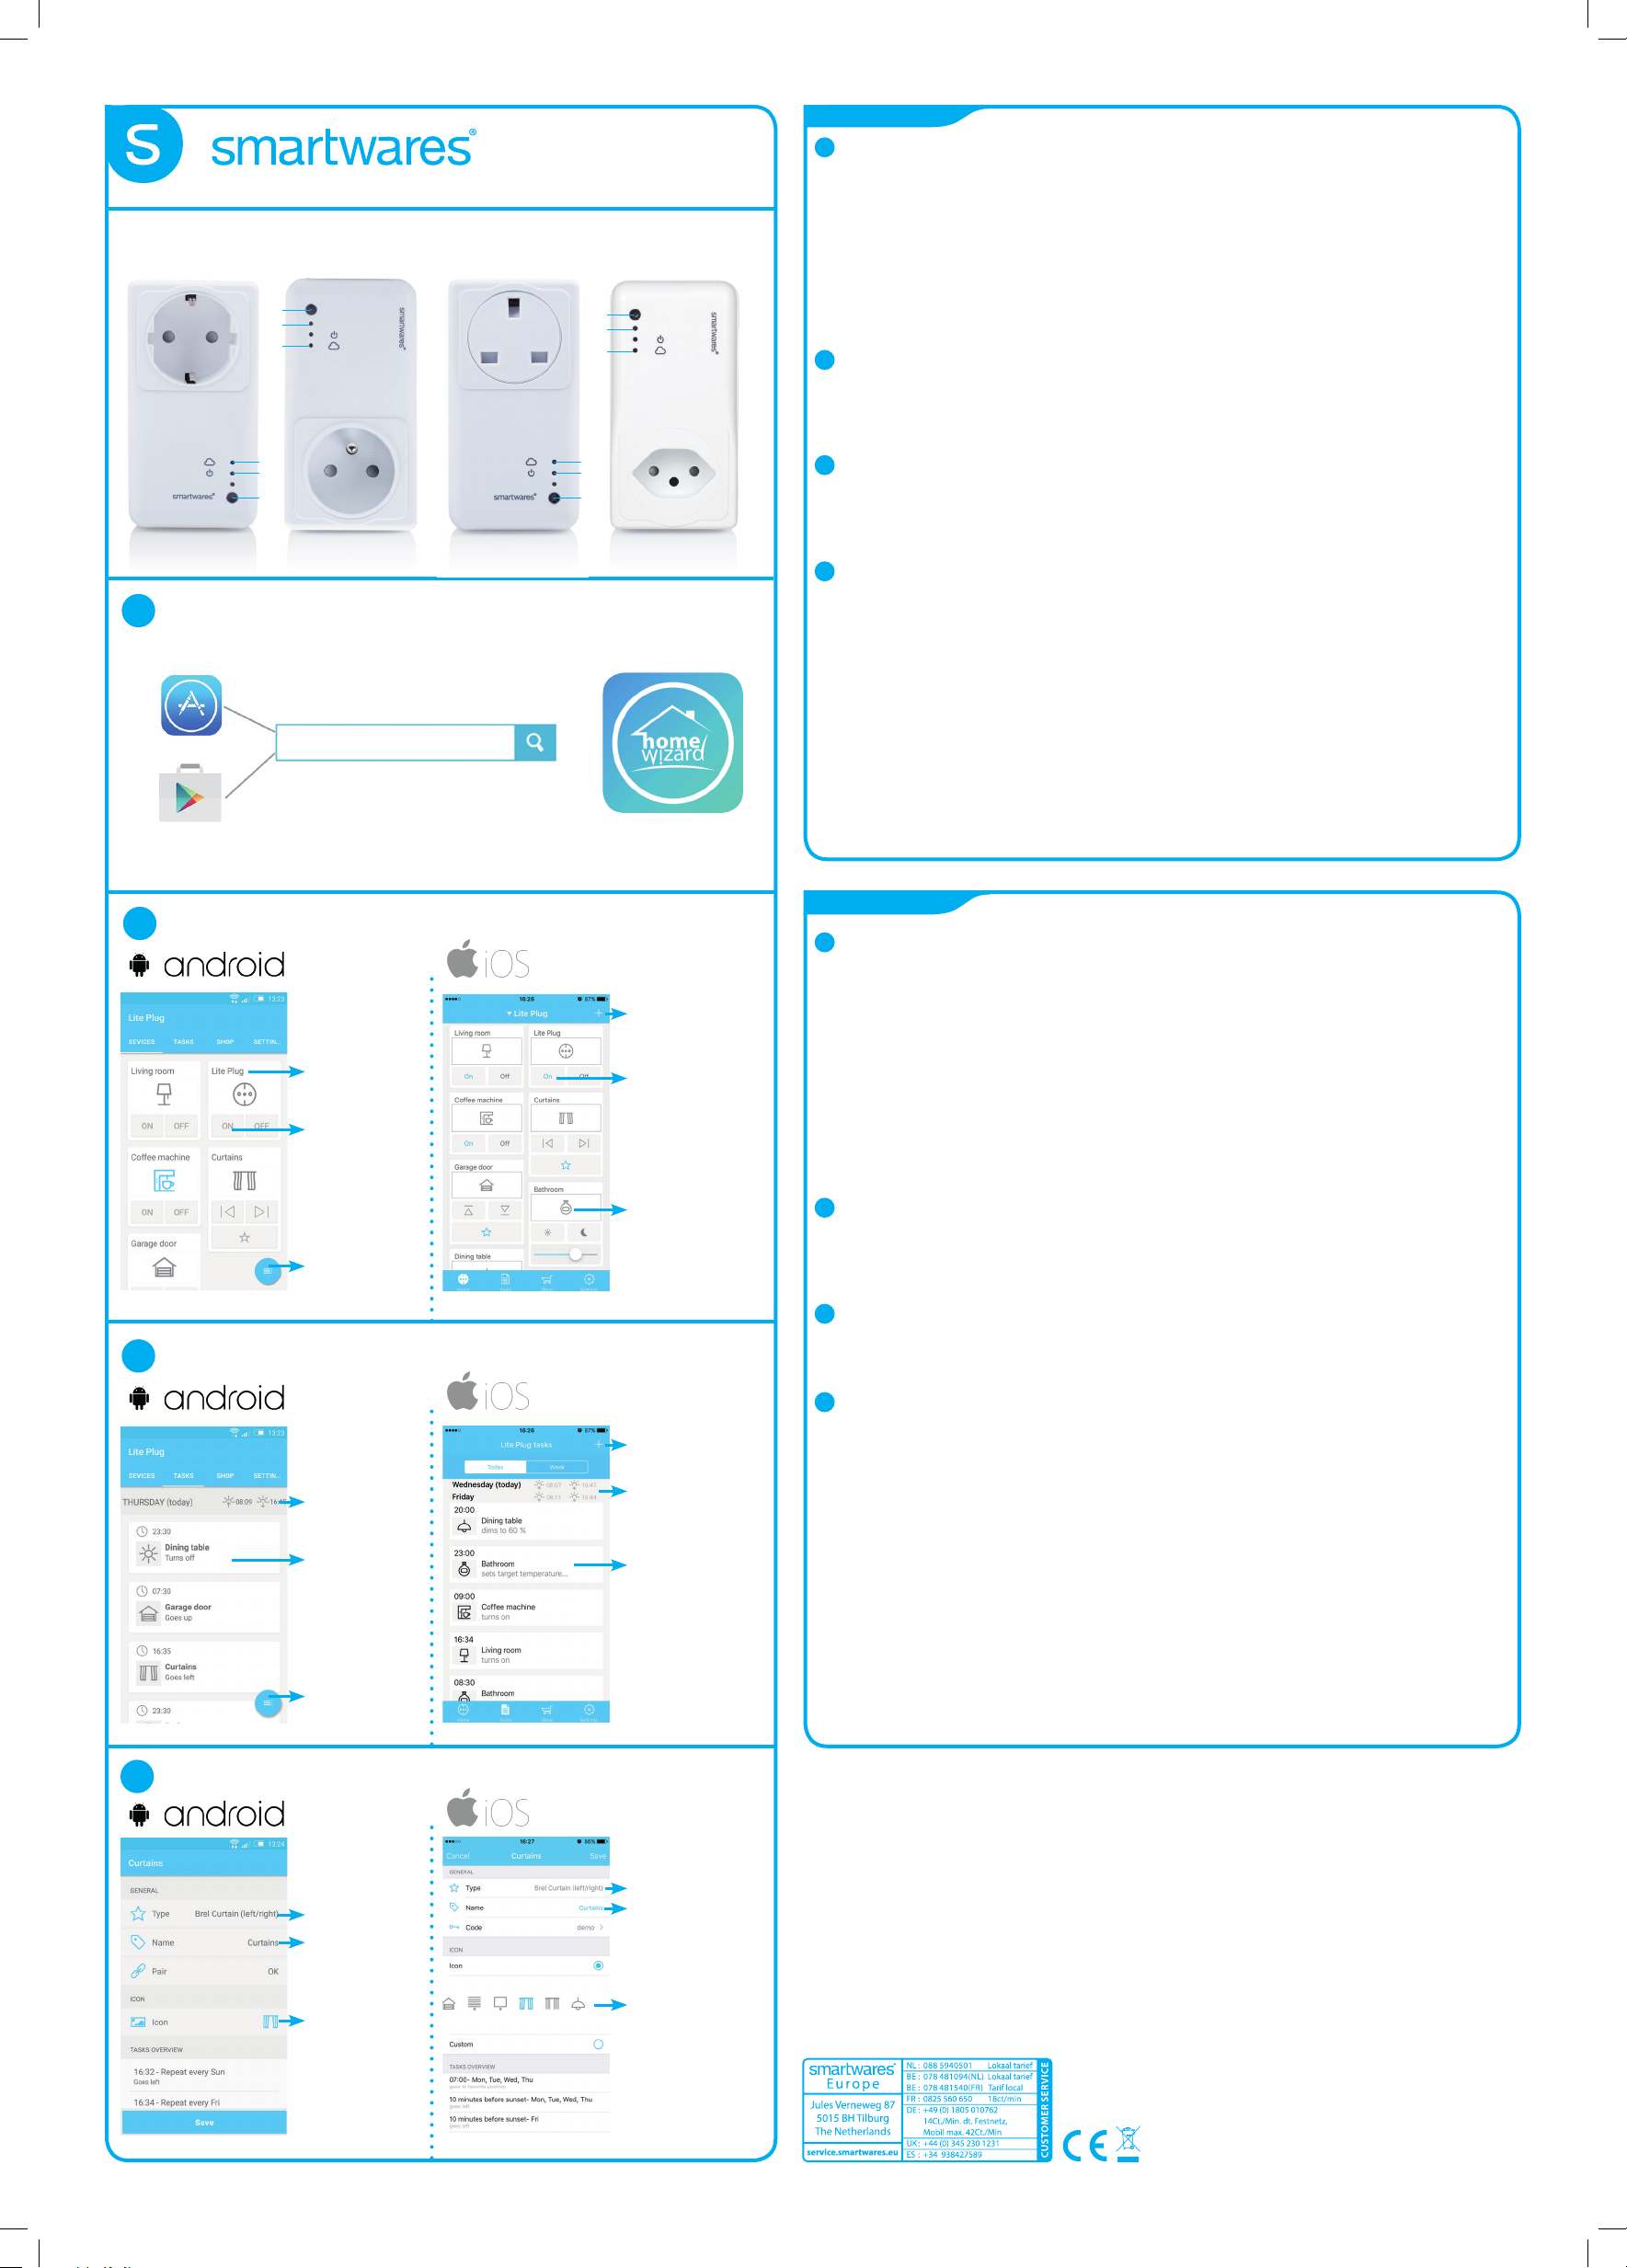
Smart switch
10.043.79 | 10.043.80 | 10.043.81 | 10.101.60
1. LED Cloud & WiFi | 2. LED Socket powered | 3. Button socket on/o
EN
1. Smart switch installation
a. Download the ‘‘HomeWizard Lite’ app from the Google Play Store or Apple Appstore on your phone
b. Follow the instructions in the Lite app
Adding devices
The Smart switch functions as a ‘hub’: you can control it with your smartphone, but it can also control
other devices such as switches, lights, roller blinds, curtains and radiator valves. To add devices:
10.043.79 | SH5-GW-T 10.043.80 | SH5-GW-T-F 10.043.81 | SH5-GW-T-UK
3.
2.
1.
1.
2.
3.
1
HomeWizard Lite
3.
2.
1.
1.
2.
3.
10.101.60 | SH5-GW-T-CH
• Press the + sign on the home screen of the app. Select the type and brand of the device you want to add and
follow the instructions to ‘pair’ the device. Pairing procedures can dier between products, detailed
instructions are given in the app after a selection is made.
2. Home screen
Control your devices from the home screen
a. Edit device details (icon, name, etc.)
b. Control device with the buttons
c. ‘Menu > +’ to add new devices
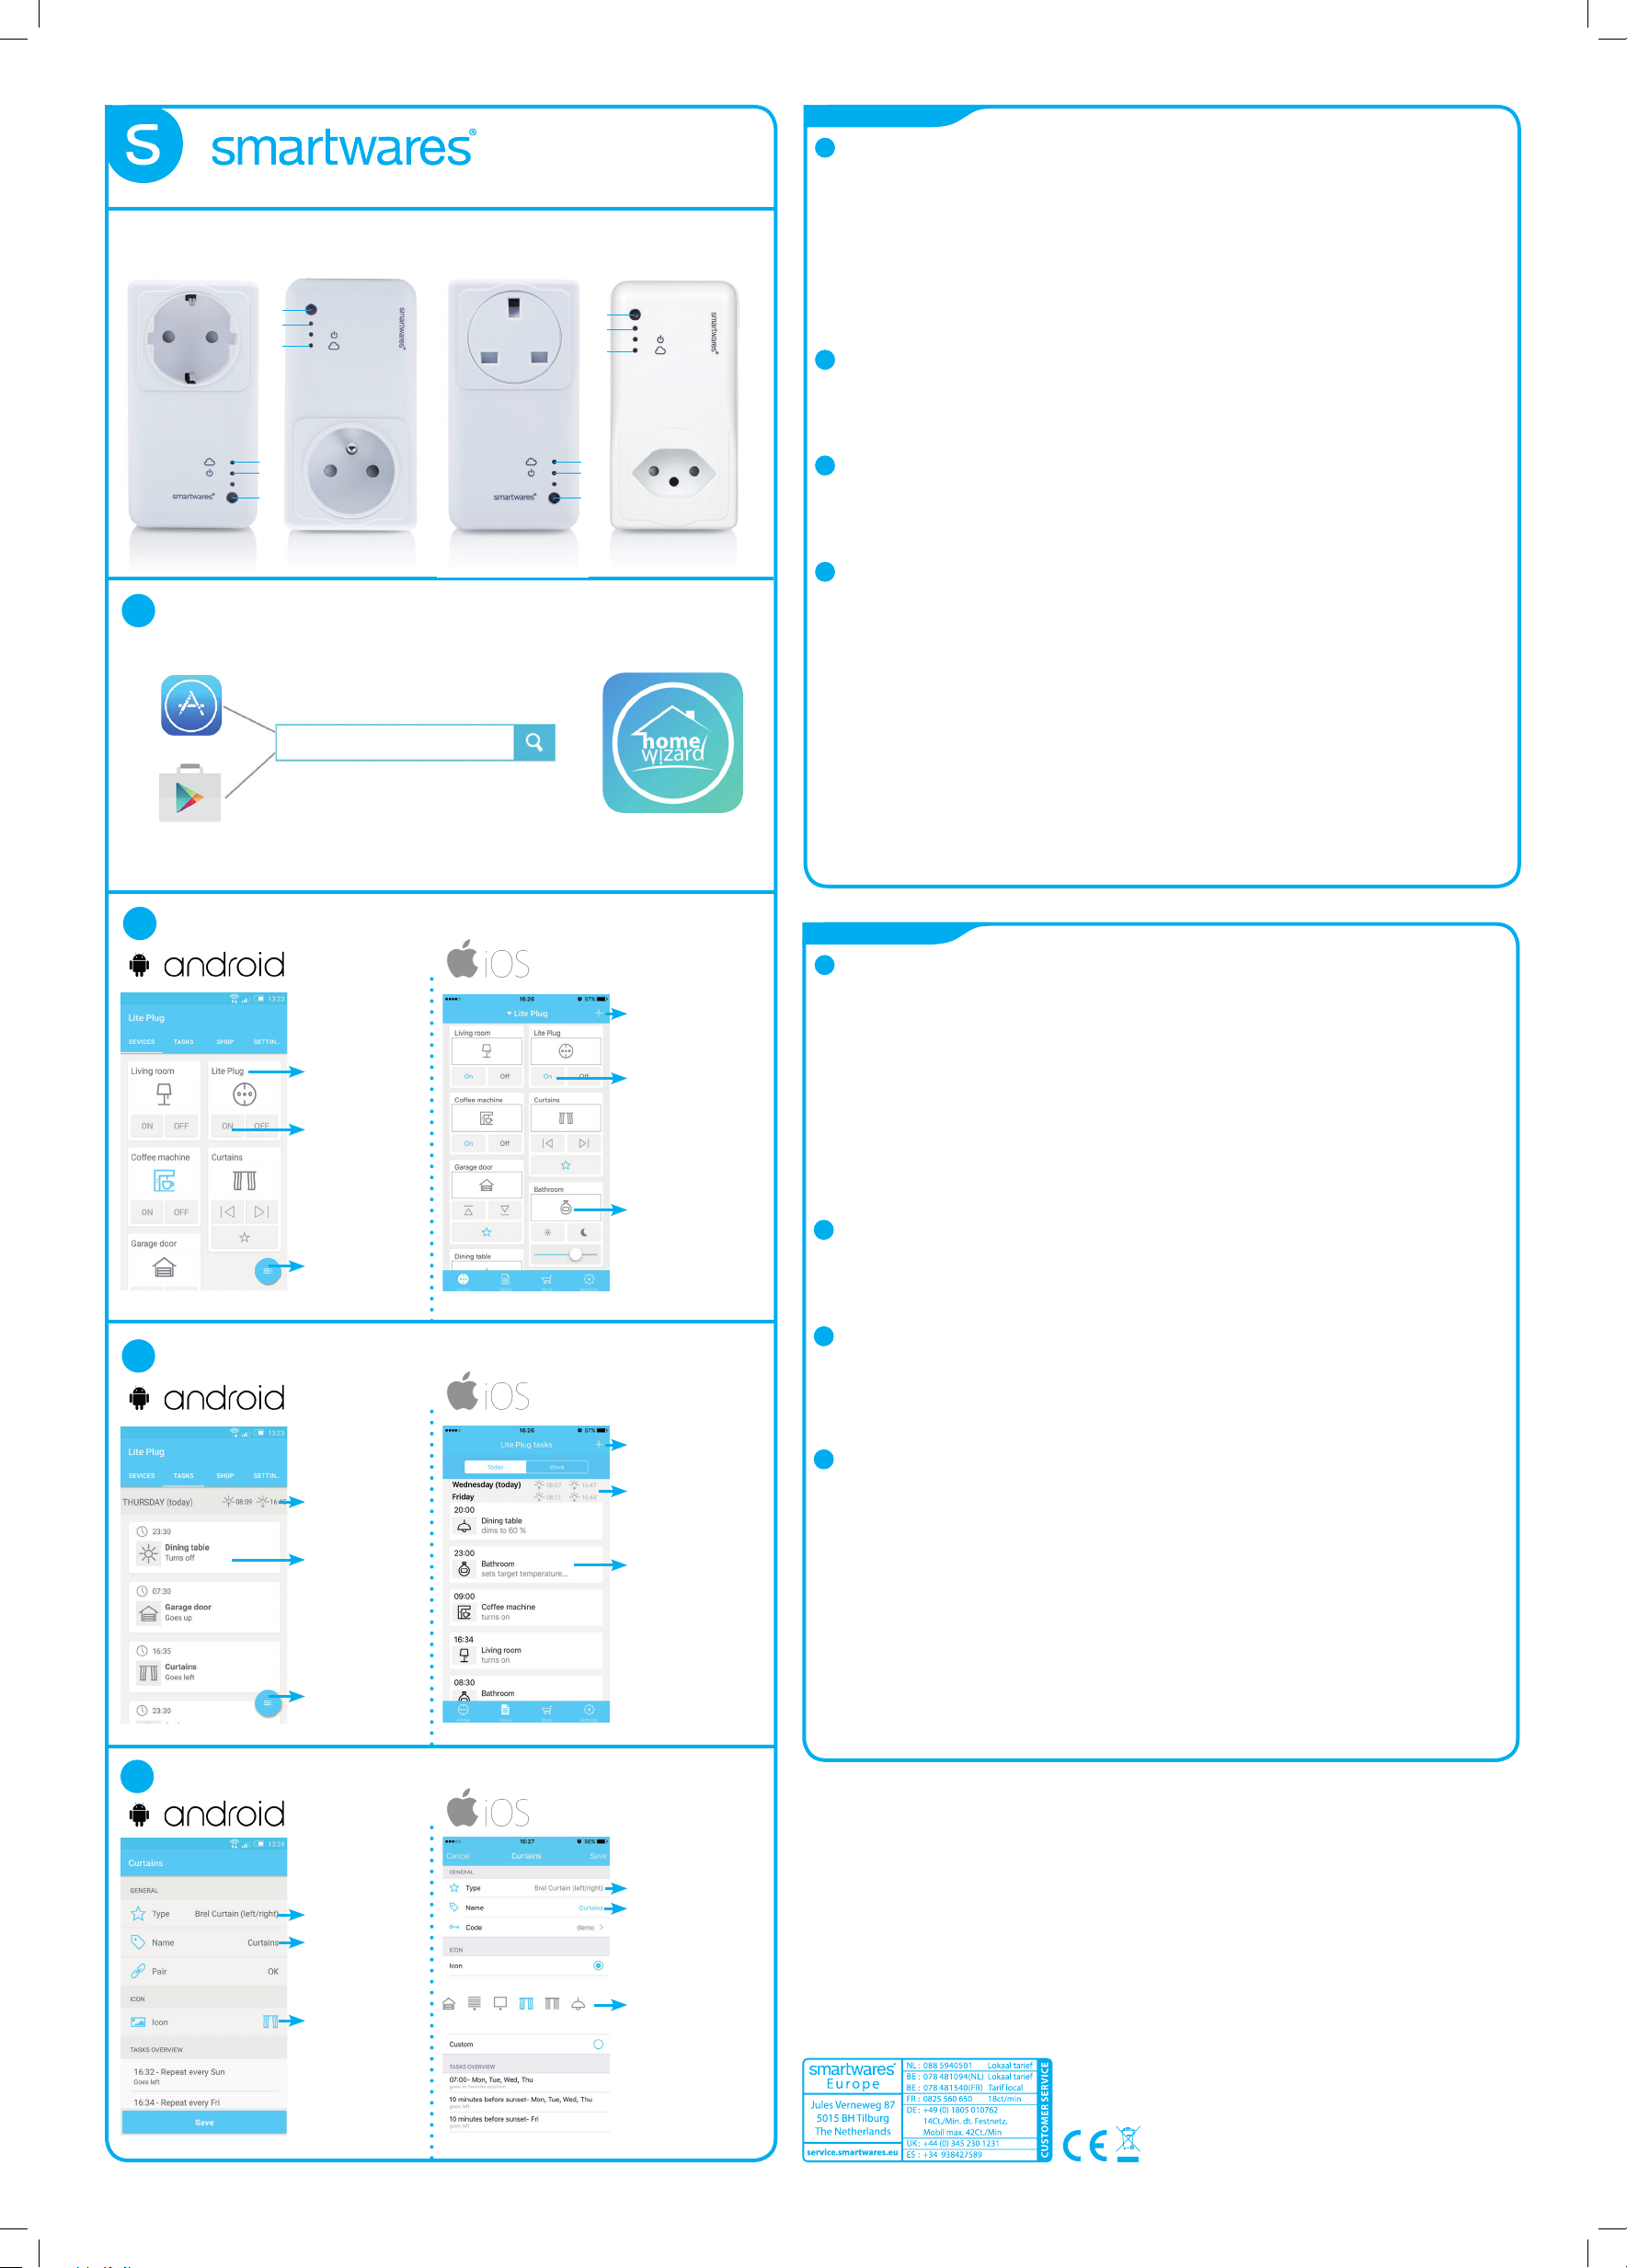
3. Schedules and tasks
Create schedules and tasks inside the app based on time or sunset/sunrise.
a. Today’s sunrise and sunset times
b. Press to edit task
c. ‘Menu > +’ to add new task
4. Device details
Edit device details (by pressing a device its icon on the home screen)
(!)
a. Change device type
b. Change device name
c. Change device icon or add a custom photo icon!
Troubleshooting (!)
• The device I want to add does not respond?
Move the Smart switch closer to the device you want to add and check compatibility.
• How do I control the Smart switch from multiple phones?
Log in with your existing account or go through the setup again with a new phone.
• Devices are not responding to Smart switch commands
Make sure the Smart switch is not near other wireless devices and/or large metal objects.
HomeWizard
Lite
DE
2
c. Add device
a. Press to edit
device details
b. Control
the device
on/o
c. Menu button
(add device)
b. Control the device
on/o
a. Press to edit
device details
3
1. Intelligenter Zwischenstecker - Installation
a. Laden Sie sich die “HomeWizard Lite” App aus dem Google Play Store oder dem Apple Appstore auf Ihr
Smartphone herunter.
b. Folgen Sie den Anweisungen in der Lite App
Geräte hinzufügen
Der intelligente Zwischenstecker funktioniert als ein `Hub`: Sie können diesen mit Ihrem Smartphone bedienen,
aber es ist ebenfalls möglich, andere Geräte wie z.B. Schalter, Lichter, Rollos, Vorhänge und Heizkörperthermostate
zu steuern.
• Betätigen Sie das + Zeichen auf der Startseite der App. Wählen Sie den Typ und die Marke des Gerätes welches Sie
hinzufügen wollen und folgen Sie den Anweisungen zum “Koppeln” des Gerätes. Der Koppelvorgang kann sich
bei den verschiedenen Produkten unterscheiden. Detaillierte Informationen werden in der App angezeigt, sobald
eine Auswahl getätigt wurde.
2. Startseite
Bedienen Sie Ihre Geräte über die Startseite.
a. Ändern von Gerätedetails (Icon, Name, etc.)
b. Geräte über die Buttons steuern
c. ‘Menu > +’ um neue Geräte hinzuzufügen
3. Zeitpläne und Aufgaben
Erstelle Zeitpläne und Aufgaben in der App, basierend auf der Zeit des Sonnenuntergangs / Sonnenaufgangs
a. Heutige Sonnenaufgangs- / Sonnenuntergangs-Zeit
b. ‘Menu > +’ um eine neue Aufgabe hinzuzufügen
4. Geräte Details
Gerätedetails bearbeiten (durch Drücken des Geräteicons auf der Startseite)
a. Ändern des Gerätetyps
b. Ändern des Gerätenamens
c. Ändern des Geräteicons oder ein benutzerdeniertes Foto als Icon hinzufügen
Fehlerbehebung (!)
• Das Gerät, welches hinzugefügt werden soll antwortet nicht?
Verlegen Sie den Home Controller näher an das Gerät, welches hinzugefügt werden soll und prüfen Sie
die Kompatibilität.
• Wie kann ich den Home Controller von mehreren Smartphones steuern?
Loggen Sie sich mit dem bestehenden Account ein, oder durchlaufen Sie das Setup erneut mit Ihrem
neuen Smartphone
• Geräte reagieren nicht auf die Signale des intelligenten Zwischensteckers
Stellen Sie sicher, dass der Home Controller nicht direkt neben anderen kabellosen Geräten und/oder
großen Metallobjekten betrieben wird.
a. Today’s
sunrise and
sunset times
b. Press to edit
task
c. Menu button
(add task)
c. Menu button
(add task)
a. Today’s sunrise
and sunset times
b. Press to edit task
4
a. Edit device type
a. Edit device type
b. Edit device name
b. Edit device
name
c. Change device
icon or add
photo icon
c. Change device
icon or add
photo icon
SPECIFICATIONS
WIFI b/g/n 2.4GHz
Frequency 433.92MHz
Input AC voltage 230V, 50Hz
Max switch output 3680W
Page 2
Contents
QUICK START GUIDE
Smart switch
10.043.79 | 10.043.80 | 10.043.81 | 10.101.60
1. LED Cloud & WiFi | 2. LED Socket powered | 3. Button socket on/o
IT
1. Installazione del Controller Smarthome
a. Scaricare l’applicazione “Homewizard Lite” da Google Play Store o dall’Apple Appstore sul cellulare
b. Seguire le istruzioni dell’app Lite
Aggiungere dispositivi
Il controller Smarthome funziona come un’ “hub”, è possibile controllarlo con lo smartphone, ma può anche con
trollare altri dispositivi quali interruttori, luci, tapparelle, tende e valvole termostatiche. Per aggiungere dispositivi:
10.043.79 | SH5-GW-T 10.043.80 | SH5-GW-T-F 10.043.81 | SH5-GW-T-UK
3.
2.
1.
1.
2.
3.
1
HomeWizard Lite
3.
2.
1.
1.
2.
3.
10.101.60 | SH5-GW-T-CH
HomeWizard
Lite
• Premere il simbolo + sulla schermata iniziale dell’app. Selezionare il tipo e la marca del dispositivo che si desidera
aggiungere e seguire le istruzioni per “abbinare” il dispositivo. Le procedure di abbinamento possono dierire da
un prodotto all’altro, le istruzioni dettagliate sono fornite nell’app dopo che la selezione è stata eettuata
2. Schermata iniziale
Controllare i dispositivi dalla schermata iniziale
a. Editare le speciche del dispositivo (icona, nome, ecc.)
b. Controllare il dispositivo utilizzando i pulsanti
c. ‘Menu > +’ per aggiungere nuovi dispositivi
3. Programmazioni e attività
Creare programmazioni e attività internamente all’app su base temporale o su fasce tramonto/alba.
a. Orari odierni di alba e tramonto
b. Premere per editare l’attività
c. ‘Menu > +’ per aggiungere una nuova attività
4. Specifiche dispositivo
Editare le speciche del dispositivo (premendo l’icona del dispositivo nella schermata iniziale)
(!)
a. Modicare il tipo di dispositivo
b. Modicare il nome del dispositivo
c. Modicare l’icona del dispositivo o aggiungere una foto dell’icona personalizzata!
Risoluzione di problemi (!)
• Il dispositivo che voglio aggiungere non risponde?
Spostare il controller Smarthome più vicino al dispositivo che si desidera aggiungere e vericare la compatibilità.
• Come posso controllare il controller Smarthome da più telefoni?
Eettuare l’accesso con il proprio account corrente o accedere nuovamente alle impostazioni con un nuovo
telefono.
• I dispositivi non rispondono ai comandi del controller Smarthome
Assicurarsi che il controller Smarthome non sia vicino ad altri dispositivi wireless e/o a oggetti metallici di grandi
dimensioni.
2
c. Add device
a. Press to edit
device details
b. Control
the device
on/o
c. Menu button
(add device)
b. Control the device
on/o
a. Press to edit
device details
3
c. Menu button
(add task)
a. Today’s
sunrise and
sunset times
b. Press to edit
task
c. Menu button
(add task)
a. Today’s sunrise
and sunset times
b. Press to edit task
FR
1. Installation de la Prise connectée
a. Téléchargez l’application ‘‘HomeWizard Lite’’ sur votre smartphone depuis Google Play Store ou Appstore
d’Apple.
b. Suivez les instructions de l’application.
Ajout d’appareils
La Prise connectée fonctionne comme un « HUB »: vous pouvez la contrôler avec votre smartphone,
vous pouvez contrôler d’autres appareils compatibles tels que des prises commandées, des éclairages, des volets
roulants, des stores et des valves thermostatique de radiateurs. Pour ajouter des appareils:
• Pressez l’icone + sur l’écran d’accueil de l’application. Sélectionnez la marque et le type d’appareil que vous
souhaitez ajouter et suivez les instructions pour associer cet appareil.
Les procédures d’association peuvent varier en fonction des appareils, des instructions détaillées sont donc
données après que vous ayez sélectionné le type d’appareil à ajouter
2. Ecran d’accueil
Pilotez vos appareils depuis l’écran d’accueil
a. Modiez les informations de chaque appareil (icône, nom, etc.)
b. Contrôlez chaque appareil avec les boutons
c. Pour ajouter de nouveaux produits faites: “Menu” puis “+”
3. Programmation et scénarios
Créez des programmations et des scénarios depuis l’application en fonction de l’heure, du coucher ou du
levé de soleil.
a. Heures de levé et couché de soleil du jour
b. Appuyez pour modier les scénarios
c. Pour ajouter une nouveau scénario faites: “Menu” puis “+”
4. Informations des appareils
Personnalisez les informations de l’appareil (en appuyant sur l’icône de l’ appareil sur l’écran d’accueil)
a. Modiez le type d’appareil
b. Modiez le nom de l’appareil
c. Changez l’icône ou ajoutez une icône personnalisée
Identification de panne (!)
• L’appareil que je souhaite ajouter ne répond pas?
Déplacez la Prise connectée à proximité de l’appareil que vous souhaitez ajouter et vériez sa compatibilité
• Peut-on piloter la Prise connectée depuis plusieurs smartphone?
Oui, connectez-vous avec votre compte existant ou réinstallez les appareils avec le nouveau smartphone.
• Les appareils ne répondent pas aux commandes de la Prise connectée?
Assurez-vous qu’il n’y est pas d’autres appareils sans l et/ou de grands éléments métalliques proche de la Prise
connectée.
Assurez-vous qu’il n’y est pas d’autres appareils sans l et/ou de grands éléments métalliques proche
de la Prise connectée.
4
a. Edit device type
a. Edit device type
b. Edit device
name
c. Change device
icon or add
photo icon
b. Edit device name
c. Change device
icon or add
photo icon
SPECIFICATIONS
WIFI b/g/n 2.4GHz
Frequency 433.92MHz
Input AC voltage 230V, 50Hz
Max switch output 3680W
Page 3

Contents
QUICK START GUIDE
Smart switch
10.043.79 | 10.043.80 | 10.043.81 | 10.101.60
1. LED Cloud & WiFi | 2. LED Socket powered | 3. Button socket on/o
ES
1. Instalación de Smart switch
a. Descargue en su teléfono la app ‘‘Homewizard Lite’’ de Google Play Store o Apple Appstore
b. Siga las instrucciones en la app Lite
Añadir dispositivos
El Smart switch funciona como ‘concentrador’: lo puede controlar con el teléfono inteligente, pero él
también puede controlar
otros dispositivos como interruptores, luces, persianas, cortinas y válvulas de radiador. Para añadir dispositivos:
10.043.79 | SH5-GW-T 10.043.80 | SH5-GW-T-F 10.043.81 | SH5-GW-T-UK
3.
2.
1.
1.
2.
3.
1
HomeWizard Lite
2
a. Press to edit
device details
b. Control
the device
on/o
c. Menu button
(add device)
3
a. Today’s
sunrise and
sunset times
b. Press to edit
task
3.
2.
1.
1.
2.
3.
10.101.60 | SH5-GW-T-CH
HomeWizard
Lite
c. Add device
b. Control the device
on/o
a. Press to edit
device details
c. Menu button
(add task)
a. Today’s sunrise
and sunset times
b. Press to edit task
• Pulse el signo + en la pantalla inicial de la app.Selecciones el tipo y marca del dispositivo que desea añadir y
siga las instrucciones para ‘emparejar’ el dispositivo.Los procedimientos de emparejamiento pueden ser diferentes
entre productos, en la app se dan instrucciones detalladas tras hacer una selección.
2. Pantalla inicial
Controle sus dispositivos desde la pantalla inicial
a. Edite detalles de dispositivo (icono, nombre, etc.)
b. Controle dispositivos con los botones
c. ‘Menú > +’ para añadir nuevos dispositivos
3. Calendarios y tareas
Cree calendarios y tareas dentro de la app basados en la hora o anochecer/amanecer.
a. Horas actuales de anochecer y amanecer
b. Pulse para editar tarea
c. ‘Menú > +’ para añadir nueva tarea
4. Detalles de dispositivos
Edite detalles de dispositivos (al pulsar el icono de un dispositivo en la pantalla inicial)
a. Cambiar tipo de dispositivo
b. Cambiar el nombre del dispositivo
c. Cambiar el icono de dispositivo y añadir un icono personalizado con foto
(!)
Resolución de problemas (!)
• El dispositivo que deseo añadir no responde
Mueva el Smart switch más cerca del dispositivo que desee añadir y compruebe la compatibilidad.
• ¿Cómo controlo el Smart switch desde varios teléfonos?
Inicie sesión en su cuenta y vaya de nuevo a la conguración con un nuevo teléfono.
• Dispositivos no responden a las órdenes del Smart switch
Asegúrese de que el Smart switch no esté cerca de otros dispositivos inalámbricos ni de objetos metáli
cos grandes.
PT
1. Instalação do Smart switch
a. Transra a aplicação ‘‘Homewizard Lite’’ do Google Play Store ou Apple Appstore no seu telefone
b. Siga as instruções na aplicação Lite
Adicionar dispositivos
Funções do Smart switch como um ‘hub’: pode controlá-lo com o seu smartphone, mas também pode
controlaroutros dispositivos, como interruptores, luzes, persianas, cortinas e válvulas de radiador. Para adicionar
dispositivos:
• Prima o sinal + no ecrã inicial da aplicação. Selecione o tipo e marca do dispositivo que pretende adicionar esiga as
instruções para ‘emparelhar’ o dispositivo. Os procedimentos de emparelhamento podem diferir entre produtos,
pelo que sãofornecidas instruções detalhadas na aplicação após efetuar uma seleção.
2. Ecrã inicial
Controle os seus dispositivos a partir do ecrã inicial
a. Edite os detalhes do dispositivo (ícone, nome, etc.)
b. Dispositivo de controlo com botões
c. ‘Menu > +’ para adicionar novos dispositivos
3. Agendas e tarefas
Crie agendas e tarefas dentro da aplicação com base na hora ou nascer/pôr do sol.
a. Hora do nascer e pôr do sol de hoje
b. Prima para editar a tarefa
c. ‘Menu > +’ para adicionar uma nova tarefa
4. Detalhes do dispositivo
4. Edite os detalhes do dispositivo (premindo o ícone do dispositivo no ecrã inicial)
a. Alterar tipo de dispositivo
b. Alterar nome do dispositivo
c. Alterar ícone do dispositivo ou adicionar um ícone com foto personalizado!
Resolução de problemas (!)
• O dispositivo que pretendo adicionar não responde?
Aproxime o Smart switch do dispositivo que pretende adicionar e verique a compatibilidade.
• Como controlo o Smart switch a partir de vários telefones?
Inicie sessão com a sua conta existente ou congure novamente com um novo telefone.
• Os dispositivos não estão a responder aos comandos do Smart switch
Certique-se de que o Smart switch não está perto de outros dispositivos sem os e/ou objetos metáli
cos grandes.
NL
1. Smart switch installatie
a. Download de ‘’HomeWizard Lite” app van de Google Play Store of Apple Appstore op the telefoon.
b. Volg de instructies in de Lite App op je telefoon
Apparaten toevoegen
De Smart switch functioneert als een ‘hub’: Je kunt hem bedienen vanaf je smartphone, maar via de
Smart switch kun je ook andere apparaten aansturen vanaf je telefoon zoals schakelaars, lampen, (rol)
gordijnen en radiator kranen. Om apparaten toe te voegen:
• Druk op het + icoon in het start scherm van de app. Selecteer het type en merk van het apparaat dat je wilt
c. Menu button
(add task)
4
a. Edit device type
a. Edit device type
b. Edit device
name
c. Change device
icon or add
photo icon
b. Edit device name
c. Change device
icon or add
photo icon
toevoegen en volg de instructies om het apparaat aan te ‘leren’. De procedure van het leren van apparaten aan
je Smart switch kan verschillen per apparaat. Instructies worden gegeven in de app zodra je je apparaat
geselecteerd hebt.
2. Start scherm
Bedien je apparaten vanaf het start scherm
a. Apparaat instellingen (icoon, naam, etc.)
b. Bedien apparaat met de functie knoppen
c. + voeg nieuwe apparaten toe
3. Schema’s en taken
Maak scherma’s en taken binnen de app gebaseerd op tijd of zonsopgang/zonsondergang.
a. Zonsopgang/zonsondergang tijden van vandaag
b. Taak instellingen bijwerken
c. + voeg een nieuwe taak toe
4. Apparaat instellingen
a. Bewerk apparaat type
b. Bewerk apparaat naam
c. Verander icoon of stel een foto icoon in.
Problemen oplossen (!)
• Het apparaat dat ik wil toevoegen reageert niet?
Plaats de Smart switch dichter bij het apparaat en controleer compatibiliteit.
• Hoe bedien ik de Smart switch vanaf meerdere telefoons?
Log in met je bestaande account of ga opnieuw door de installatie instructie.
• Apparaten reageren niet/soms op de Smart switch
Controleer of de Smart switch niet te dichtbij andere (storende) draadloze apparaten en/of
grote metalen objecten staat.
Page 4

10.043.79 | 10.043.80 | 10.043.81 | 10.101.60
Contents
QUICK START GUIDE
Smart switch
1. LED Cloud & WiFi | 2. LED Socket powered | 3. Button socket on/o
3.
2.
1.
3.
2.
1.
PL
1. Instalacja Smar t switch
a. Pobierz aplikację „Homewizard Lite” ze sklepu Google Play lub Apple Appstore na telefon
b. Postępuj zgodnie z instrukcjami zawartymi w aplikacji
Dodawanie urządzenia
Smart switch pełni rolę „koncentratora”: można nim sterować za pomocą smartfona, ale może on rów
nież sterować innymi urządzeniami, takimi jak Controlleri, światła, żaluzje, zasłony i zawory grzejników. Aby dodać
urządzenia:
• Naciśnij przycisk + na ekranie głównym aplikacji. Wybierz typ i markę urządzenia, które chcesz dodać i
postępuj zgodnie ze wskazówkami, aby „sparować” urządzenie. Procedury parowania mogą różnić się między
poszc zególnymi produktami, szczegółowe instrukcje podane są w aplikacji po dokonaniu wyboru.
2. Ekran główny
Steruj urządzeniami z ekranu głównego
a. Edytuj szczegóły urządzenia (ikonka, nazwa, itp.)
b. Steruj urządzeniem za pomocą przycisków
c. „Menu > +”, aby dodać nowe urządzenia
1.
2.
3.
10.043.79 | SH5-GW-T 10.043.80 | SH5-GW-T-F 10.043.81 | SH5-GW-T-UK
1
HomeWizard Lite
2
a. Press to edit
device details
b. Control
the device
on/o
c. Menu button
(add device)
3
a. Today’s
sunrise and
sunset times
b. Press to edit
task
c. Menu button
(add task)
4
a. Edit device type
b. Edit device
name
c. Change device
icon or add
photo icon
1.
2.
3.
10.101.60 | SH5-GW-T-CH
HomeWizard
Lite
c. Add device
b. Control the device
on/o
a. Press to edit
device details
c. Menu button
(add task)
a. Today’s sunrise
and sunset times
b. Press to edit task
a. Edit device type
b. Edit device name
c. Change device
icon or add
photo icon
3. Harmonogramy i zadania
Twórz harmonogram i zadania wewnątrz aplikacji na podstawie godziny lub zachodu/wschodu słońca.
a. Godziny dzisiejszego wschodu i zachodu słońca
b. Naciśnij, aby edytować zadanie
c. „Menu > +”, aby dodać nowe zadanie
4. Szczegóły urządzenia
Edytuj szczegóły urządzenia (naciskając ikonkę urządzenia na ekranie głównym)
(!)
a. Zmień typ urządzenia
b. Zmień nazwę urządzenia
c. Zmień ikonkę urządzenia lub dodaj niestandardową ikonę ze zdjęcia!
Rozwiązywanie problemów (!)
• Urządzenie, które chcę dodać nie odpowiada?
Przesuń Smart switch bliżej urządzenia, które chcesz dodać i sprawdź kompatybilność.
• Jak kontrolować Smart switch z wielu telefonów?
Zaloguj się przy użyciu istniejącego konta lub ponownie przeprowadź kongurację przy użyciu nowego telefonu.
• Urządzenia nie odpowiadają na polecenia Smart switch
Upewnij się, że Smart switch nie znajduje się w pobliżu innych urządzeń bezprzewodowych i/lub dużych
metalowych przedmiotów.
SV
1. Smart switch installation
a. Ladda ned appen ”Homewizard Lite’’ från Google Play Store eller Apple Appstore till din telefon
b. Följ instruktionerna i Lite-appen
Lägga till enheter
Smart switch fungerar som en ”hub”: du kan styra den med din smartphone, men den kan också styra
andra enheter, såsom brytare, lampor, elpersienner, gardiner och elementreglage. För att lägga till en enhet:
• Tryck på + tecknet på startskärmen för appen. Välj typ och märke för den enhet du vill lägga till och
följ instruktionerna för att ”parkoppla” enheten. Parkopplingsproceduren kan variera mellan olika produkter,
detaljerade instruktioner ges i appen efter att du har gjort dina val.
2. Hemskärmen
Styr dina enheter från hemskärmen
a. Redigera enhetsinformation (ikon, namn, m.m.)
b. Styr enheten med knapparna
c. ”Meny > +” för att lägga till nya enheter
3. Scheman och uppgifter
Skapa scheman och uppgifter i appen baserat på tid eller soluppgång/solnedgång.
a. Dagens soluppgångs- och solnedgångstider
b. Tryck för att redigera uppgift
c. ”Meny > +” för att lägga till ny uppgift
4. Enhetsinformation
Redigera enhetsinformation (genom att trycka på en enhets ikon på startskärmen)
a. Ändra enhetstyp
a. Ändra enhetsnamn
c. Ändra enhetens ikon eller lägg till en anpassad fotoikon!
Felsökning (!)
• Enheten jag vill lägga till svarar inte?
Flytta Smart switch närmare enheten du vill lägga till och Controllera kompatibiliteten.
• Hur styr jag Smart switch från era olika telefoner?
Logga in med ditt bentliga konto eller genomför installationen igen på en ny telefon.
• Enheter svarar inte på Smart switch kommandon
Se till att Smart switch inte är nära andra trådlösa enheter och/eller stora metallföremål.
SK
1. Inštalácia aplikácie Smart switch
a. Aplikáciu „Homewizard Lite“ si prevezmite do svojho telefónu z Google Play Store alebo Apple Appstore
b. Postupujte podľa pokynov v aplikácii Lite
Pridanie zariadení
Smart switch funguje ako „rozbočovač“: ovládať ju môžete pomocou svojho smartfónu, ale môže tiež
ovládať ďalšie zariadenia, ako napríklad vypínače, svetlá, rolety, záclony a ventily na radiátoroch. Pridanie zariadení:
• Na domovskej obrazovke tejto aplikácie stlačte tlačidlo so znamienkom +. Vyberte typ a značku zariadenia, ktoré
chcete pridať, a postupujte podľa pokynov na „párovanie“ zariadenia. Postupy párovania môžu sa môžu líšiť.
Podrobné pokyny sú uvedené v aplikácii po výbere zariadenia.
2. Domovská obrazovka
Svoje zariadenia ovládajte z domovskej obrazovky
a. Zadajte podrobnosti týkajúce sa zariadenia (ikona, názov a podobne.)
b. Zariadenie ovládajte pomocou tlačidiel
c. Ak chcete pridať nové zariadenia, prejdite do možnosti „Ponuka > +“
3. Harmonogramy a úlohy
V aplikácii si vytvorte harmonogramy a úlohy podľa času alebo západu alebo východu slnka.
a. Časy pre dnešný východ a západ slnka
b. Stlačením tohto tlačidla upravte úlohu
c. Ak chcete pridať novú úlohu, prejdite do možnosti „Ponuka > +“
4. Podrobnosti týkajúce sa zariadenia
Úprava podrobností týkajúcich sa zariadenia (stlačením ikony zariadenia na domovskej obrazovke)
a. Zmeňte typ zariadenia
b. Premenujte zariadenie
c. Zmeňte ikonu zariadenia alebo pridajte ikonu vlastnej fotograe!
Riešenie problémov (!)
• Zariadenie, ktoré chcem pridať, nereaguje?
Smart switch presuňte bližšie k zariadeniu, ktoré chcete pridať, a skontrolujte kompatibilitu.
• Ako mám ovládať Smart switch z viacerých telefónov?
Prihláste sa k existujúcemu účtu alebo s novým telefónom znova vykonajte proces nastavenia.
• Zariadenia nereagujú na príkazy z Smart switch
Uistite sa, že Smart switch sa nenachádza v blízkosti iných bezdrôtových zariadení a/alebo veľkých
kovových predmetov.
Page 5

10.043.79 | 10.043.80 | 10.043.81 | 10.101.60
Contents
QUICK START GUIDE
Smart switch
1. LED Cloud & WiFi | 2. LED Socket powered | 3. Button socket on/o
3.
2.
1.
3.
2.
1.
CS
1. Instalace ovladače Smart switch
a. Stáhněte si aplikaci „Homewizard Lite’’ z Obchodu Google Play nebo Obchodu s aplikacemi Apple na váš telefon
b. Postupujte podle pokynů na aplikaci Lite
Přidání zařízení
Ovladač Smart switch funguje jako ‘hlavní uzel sítě’: můžete jej ovládat pomocí svého Controller Smar
thome, ale můžete také
ovládat další zařízení, jako jsou spínače, světla, stahovací rolety, závěsy a ventily radiátorů. Pro přidání zařízení:
• Stiskněte znak + na domovské obrazovce aplikace. Vyberte typ a značku zařízení, které chcete přidat a
postupujte podle pokynů pro ‘spárování’ zařízení. Postupy párování se mohou lišit u různých výrobků, podrobné
pokyny jsou uvedeny v aplikaci poté, co učiníte výběr.
2. Domovská obrazovka
Svá zařízení ovládejte z domovské obrazovky
a. Upravte podrobnosti o zařízení (ikona, název atd.)
b. Zařízení ovládejte pomocí tlačítek
c. ‘Seznam nabídek > +’ pro přidání nových zařízení
1.
2.
3.
10.043.79 | SH5-GW-T 10.043.80 | SH5-GW-T-F 10.043.81 | SH5-GW-T-UK
1
HomeWizard Lite
2
a. Press to edit
device details
b. Control
the device
on/o
c. Menu button
(add device)
3
a. Today’s
sunrise and
sunset times
b. Press to edit
task
1.
2.
3.
10.101.60 | SH5-GW-T-CH
HomeWizard
Lite
c. Add device
b. Control the device
on/o
a. Press to edit
device details
c. Menu button
(add task)
a. Today’s sunrise
and sunset times
b. Press to edit task
3. Rozvrhy a úkoly
Vytvářejte rozvrhy a úkoly uvnitř aplikace v závislosti na době východu/západu slunce.
a. Časy dnešního východu a západu slunce
b. Stiskněte pro upravení úkolu
c. ‘Seznam nabídek > +’ pro přidání nového úkolu
4. Podrobnosti o zařízení
Upravte podrobnosti o zařízení (stisknutím ikony zařízení na domovské obrazovce)
(!)
a. Změňte typ zařízení
a. Změňte název zařízení
c. Změňte ikonu zařízení nebo přidejte ikonu vlastní fotograe!
Vyhledávání závad (!)
• Nereaguje zařízení, které chci přidat?
Pohněte ovladačem Smart switch blíže k zařízení, které chcete přidat a zkontrolujte slučitelnost.
• Jak mohu ovládat ovladač Smart switch z více telefonů?
Přihlaste se pomocí vašeho stávajícího účtu nebo s novým telefonem znovu projděte nastavením.
• Zařízení nereagují na příkazy ovladače Smart switch
Ujistěte se, že ovladač Smart switch není poblíž jiných bezdrátových zařízení a/nebo velkých kovových
předmětů.
TR
1. Smart switch kurulumu
a. Telefonunuzdaki Google Play Store veya Apple Appstore’dan “Homewizard Lite’’ uygulamasını indirin.
b. Lite uygulamasındaki talimatları takip edin.
Cihaz ekleme
Smart switch bir “bağlantı merkezi” olarak çalışır: onu akıllı telefonunuzla kontrol edebilirsiniz, buna
ek olarak o da düğmeler, ışıklar, stor perdeler ve radyatör muslukları gibi diğer cihazları kontrol edebilir. Cihaz
eklemek için:
• Uygulamanın ana ekranındaki + simgesine basin. Eklemek istediğiniz cihazın türünü ve markasını seçin ve cihazı
“eşleştirmek” için talimatları takip edin. Eşleştirme prosedürleri ürünler arasında farklılık gösterebilir, uygulamada
bir seçim yapılmasının ardından ayrıntılı talimatlar verilecektir.
2. Ana ekran
Cihazlarınızı ana ekrandan kontrol edin
a. Cihaz ayrıntılarını düzenleyin (simge, isim, vb.)
b. Düğmelerle cihazı kontrol edin
c. Yeni cihaz eklemek için ‘Menü > +’
3. Zamanlamalar ve görevler
Zamana veya güneş batışı/güneş doğuşuna göre uygulama içerisinde zamanlamalar ve görevler oluşturun.
a. Bugünün güneş doğuşu ve güneş batışı zamanları
b. Görevi düzenlemek için basın
c. Yeni görev eklemek için ‘Menü > +’
4. Cihaz ayrıntıları
Cihaz ayrıntılarını düzenleyin (ana ekranda bir cihaz simgesine tıklayarak)
a. Cihaz türünü değiştirin
b. Cihaz adını değiştirin
c. Cihaz simgesini değiştirin veya kendiniz özel bir fotoğraf simgesi ekleyin!
Sorun Giderme (!)
• Eklemek istediğim cihaz yanıt vermiyor?
Smart switch eklemek istediğiniz cihaza yakınlaştırın ve uyumluluğunu kontrol edin.
• Smart switch birden fazla telefon ile nasıl kontrol ederim?
Mevcut hesabınızla oturum açın veya yeni bir telefon ile kurulum sürecini tekrar uygulayın.
• Cihazlar Smart switch komutlarına yanıt vermiyor
Smart switch başka kablosuz aygıtların ve/veya büyük metal cisimlerin yakınında olmadığından
emin olun.
c. Menu button
(add task)
4
a. Edit device type
a. Edit device type
b. Edit device
name
c. Change device
icon or add
photo icon
b. Edit device name
c. Change device
icon or add
photo icon
SPECIFICATIONS
WIFI b/g/n 2.4GHz
Frequency 433.92MHz
Input AC voltage 230V, 50Hz
Max switch output 3680W
 Loading...