

Page 1

User
Manual
KVM-RKM-15/17/19-1RU-SD
1U 15” / 17” / 19” Rackmount
TFT LCD Monitor Drawer
Page 2

Rev. : 1.0
P.1
KVM-RKM-15-1RU-SD / KVM-RKM-17-1RU-SD / KVM-RKM-19-1RU-SD
User Manual
1. Table Of Content
1. Table of Content
P.1
2. Introduction
P.2
3. Features
P.2
4.
Package Contents
P.3
5. Optional Accessories
P.4
6. Per
i
pheral Products
P.4
7. Important Safeguards
P.5
8. Structure Diagram
P.6
9. Dimension Diagram
KVM-RKM-15-1RU-SD
P.7
KVM-RKM-17-1RU-SD
P.8
KVM-RKM-19-1RU-SD
P.9
10. LCD OSD Menu Operation
LCD Membrane Diagram
P.10
Main Menu
P.10
Sub Menu
P.11-12
11. Resolution Settings
For Windows
P.13
For Sun Servers
P.14
12. Technical Specification
P.15
Page 3

Rev. : 1.0
P.2
KVM-RKM-15-1RU-SD / KVM-RKM-17-1RU-SD / KVM-RKM-19-1RU-SD
User Manual
2.
Introduction
KVM-RKM series is a monitor with a flip-up design rack-m ountable draw er,
adjustable brackets, built in LCD OS D to provide effective assistant for an
administrator to control system monitor.
KVM-RKM series provides cost effective for your limited IT budget over using
CRT and rack mounting. A lso, it w ill be sp ace sav ing fo r your com p act
environment rack.
3.
Features
●
Allow viewing through closed glass cabinet door
●
Supplied with 12V 5A remote power adapter
●
Slide away flip-up monitor.
●
Lightweight aluminium construction – with a black anodize finish
●
Front-access lock for security
●
Standard D-sub 15-pin VGA input connector
●
Three models to choose from 15”, 17” or 19” LCD Panel
●
Built in On Screen Display controlled by integral membrane switches
Disclaime r
This in
f
ormation is s ub je ct to change without notice. The producer of this manual accepts no
responsibili
ty f
or damage or claims, resulting from misus e or misinteKVM-RKMretation
Page 4
Rev. : 1.0
P.3
KVM-RKM-15-1RU-SD / KVM-RKM-17-1RU-SD / KVM-RKM-19-1RU-SD
User Manual
4.
Package Contents
LCD Monitor
1 Piece
User Manual
1 Piece
DC
Power Adapter
1 Piece
Power
Cord
1 Piece
Mounting
Brac ket
1 Pair
Fasteners
4 Pieces
Key
for front ac cess lock
2 Pieces
VGA
c
able (6 feet)
1 Piece
Before Unpacking
It
is ve ry important to locate the LCD Monitor in a suitable environment.
●
The s ur
f
ace for placing and fixing the LCD Monitor should be stable and le vel or mounted
in
t
o a suitable cabinet.
●
Make sure
t
he place has good ventilation, is out of dir ect sunlight, away from sources o
f
excessive dust, dirt, heat, water, moisture and vibration.
●
Convenience
f
or connecting the LCD Monitor to the related facilities should be well
considers
too.
Unpacking
The LCD Monitor comes with the standard parts shown as above. Check and make sure they
are included and in good condi
t
ion. If anything is missing, or damage, contact the supplier
immedia
t
ely.
Page 5
Rev. : 1.0
P.4
KVM-RKM-15-1RU-SD / KVM-RKM-17-1RU-SD / KVM-RKM-19-1RU-SD
User Manual
5
.
Optional Accessories
●
15" - 19" Touch Screen
●
12V / 24V / 48V DC Power Supply
6. Peripheral Products
Model
Description
1U Rackmount Industrial Keyboard Drawer
KVM-SW-8KVM-RKMS2
1U 8-Port PS/2
KVM Switch
X-KVMC5-600/1000
CAT.5 PS/2 KVM Extender
ADP-USB-PS2
SUN / iMac USB to PS/2
adapter
Page 6

Rev. : 1.0
P.5
KVM-RKM-15-1RU-SD / KVM-RKM-17-1RU-SD / KVM-RKM-19-1RU-SD
User Manual
7. Important
Safeguards
Please read all of these instructions carefully before you use the device.
Save this manual for future reference.
●
Unplug the LCD M oni t or from th e power ou tl et be f or e clea ning.
●
Do not spray liquid cleaners or aerosol directly on the device. W et a cloth with a
neutral detergent (e.g. clean water) and squeeze it tight, then clean the screen
slightly with it.
●
Do not ex pos e the LCD Monitor directly to rain, wat er, moi sture or s unlight.
●
Avoid pr essure on the LCD scre en to prevent permanent damage to the display.
●
Do not attempt to service the device yourself. Improper operation may void your
warranty. Refer all servicing to qualified service personnel.
●
Safe storage environment of the LCD Monitor is ranging between –20
o
C and 60oC.
Permanent damage could occur if the LCD Monitor is stored outside the safe
range.
●
Unplug the LCD Monitor immediately and call qualified service personnel under
the following conditions:
1. The VGA signal cord is frayed or damaged.
2. If the monitor has been exposed to rain, liquid or water.
3. If the monitor has been dro pped or the casing has be en damaged.
What the warranty does not cover
1. Any pro duct , on w hich th e s erial num ber ha s b een de face d, m odifi ed or rem ove d.
2. Damage, deterioration or malf unction resulting from:
a) Accident, misuse, neglect, f ire, water, lightning, or other acts of nature,
unauthorized product modification, or failure to follow instructions supplied
with the product.
b) Repair or attempted repair by anyone not authorized by us.
c) Any damage of the product due to shipment.
d) Removal or installation of the product.
e) Causes external to the product, such as electric power fluctuation or failure.
f) Use of supplies or parts not meeting our specifications.
g) Normal wear and tear.
h) Any other causes which do es not rel ate to a product defect.
3. Removal, installation, and set-up service charges.
Page 7
Rev. : 1.0
P.6
KVM-RKM-15-1RU-SD / KVM-RKM-17-1RU-SD / KVM-RKM-19-1RU-SD
User Manual
8.
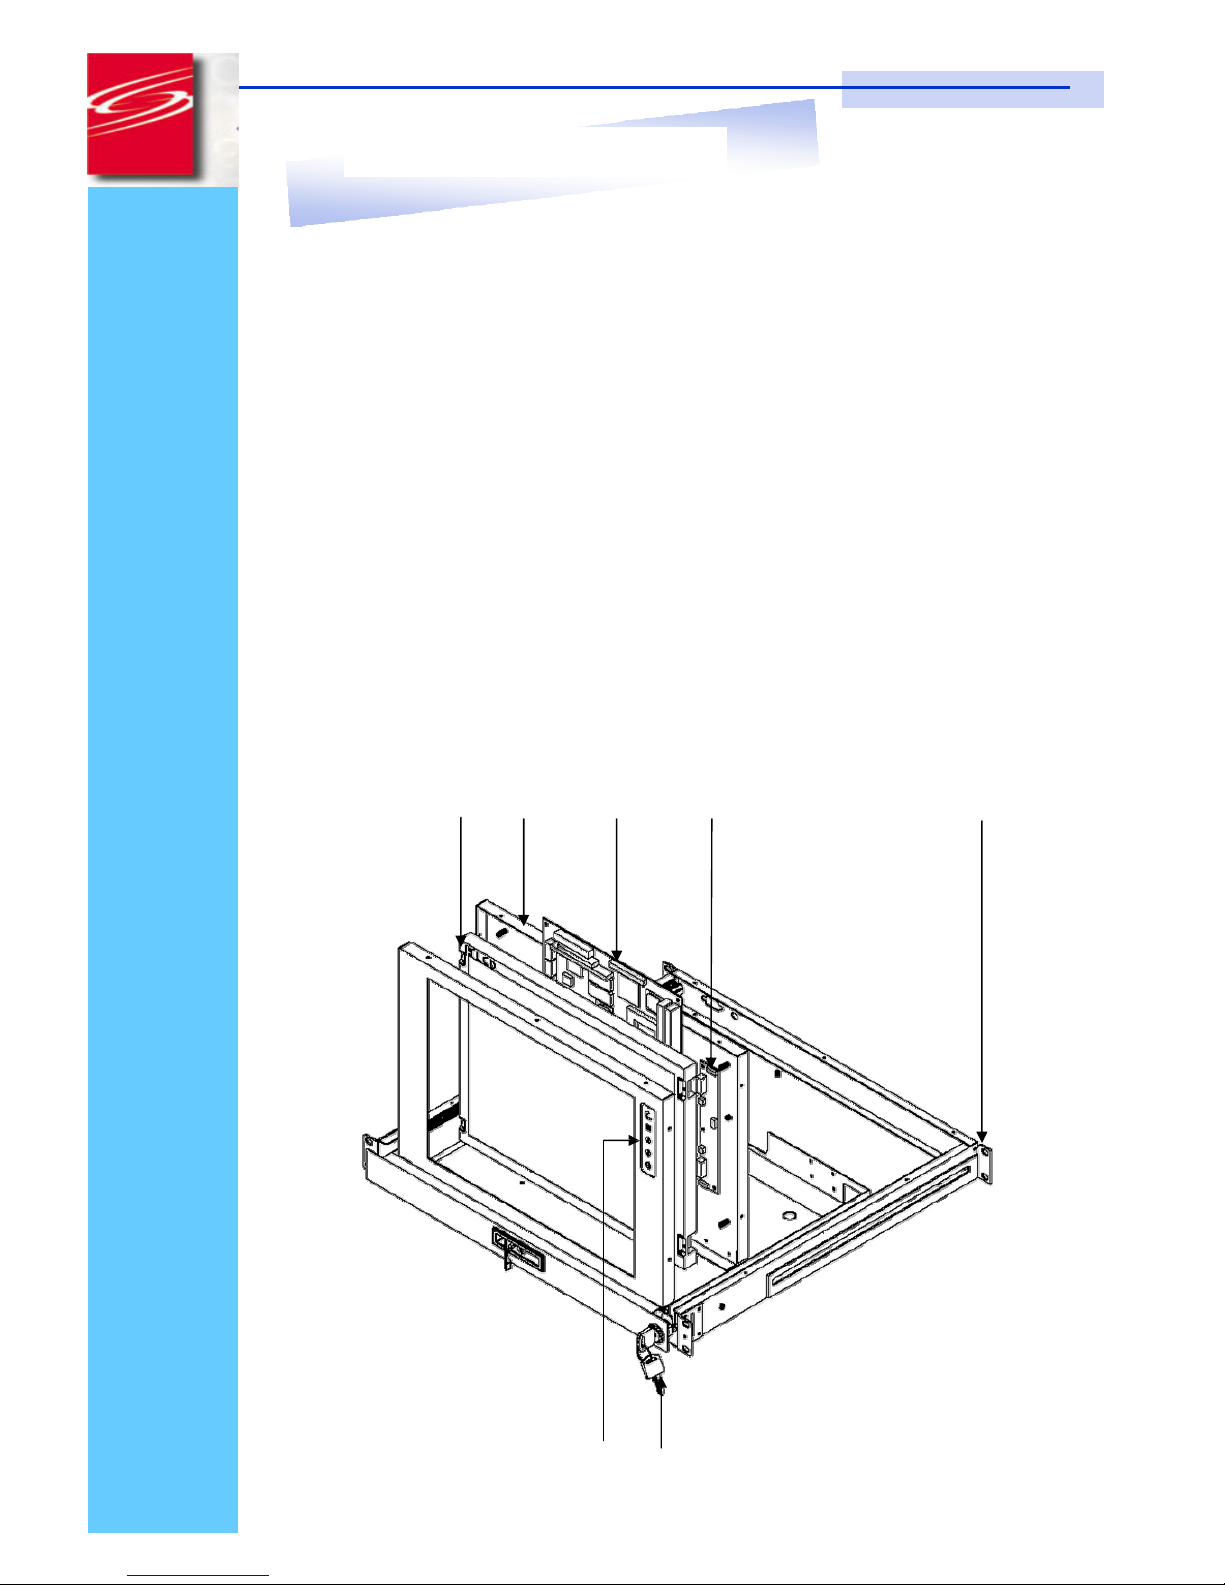
Structure Diagram
1.
Class A active matrix TFT LCD panel
2.
Rear metal case
3.
Analog to digital signal converter board
4.
LCD inverter
5.
Adjustable mounting bracket
6.
LCD membrane
7.
Security lock
Page 8
Rev. : 1.0
P.7
KVM-RKM-15-1RU-SD / KVM-RKM-17-1RU-SD / KVM-RKM-19-1RU-SD
User Manual
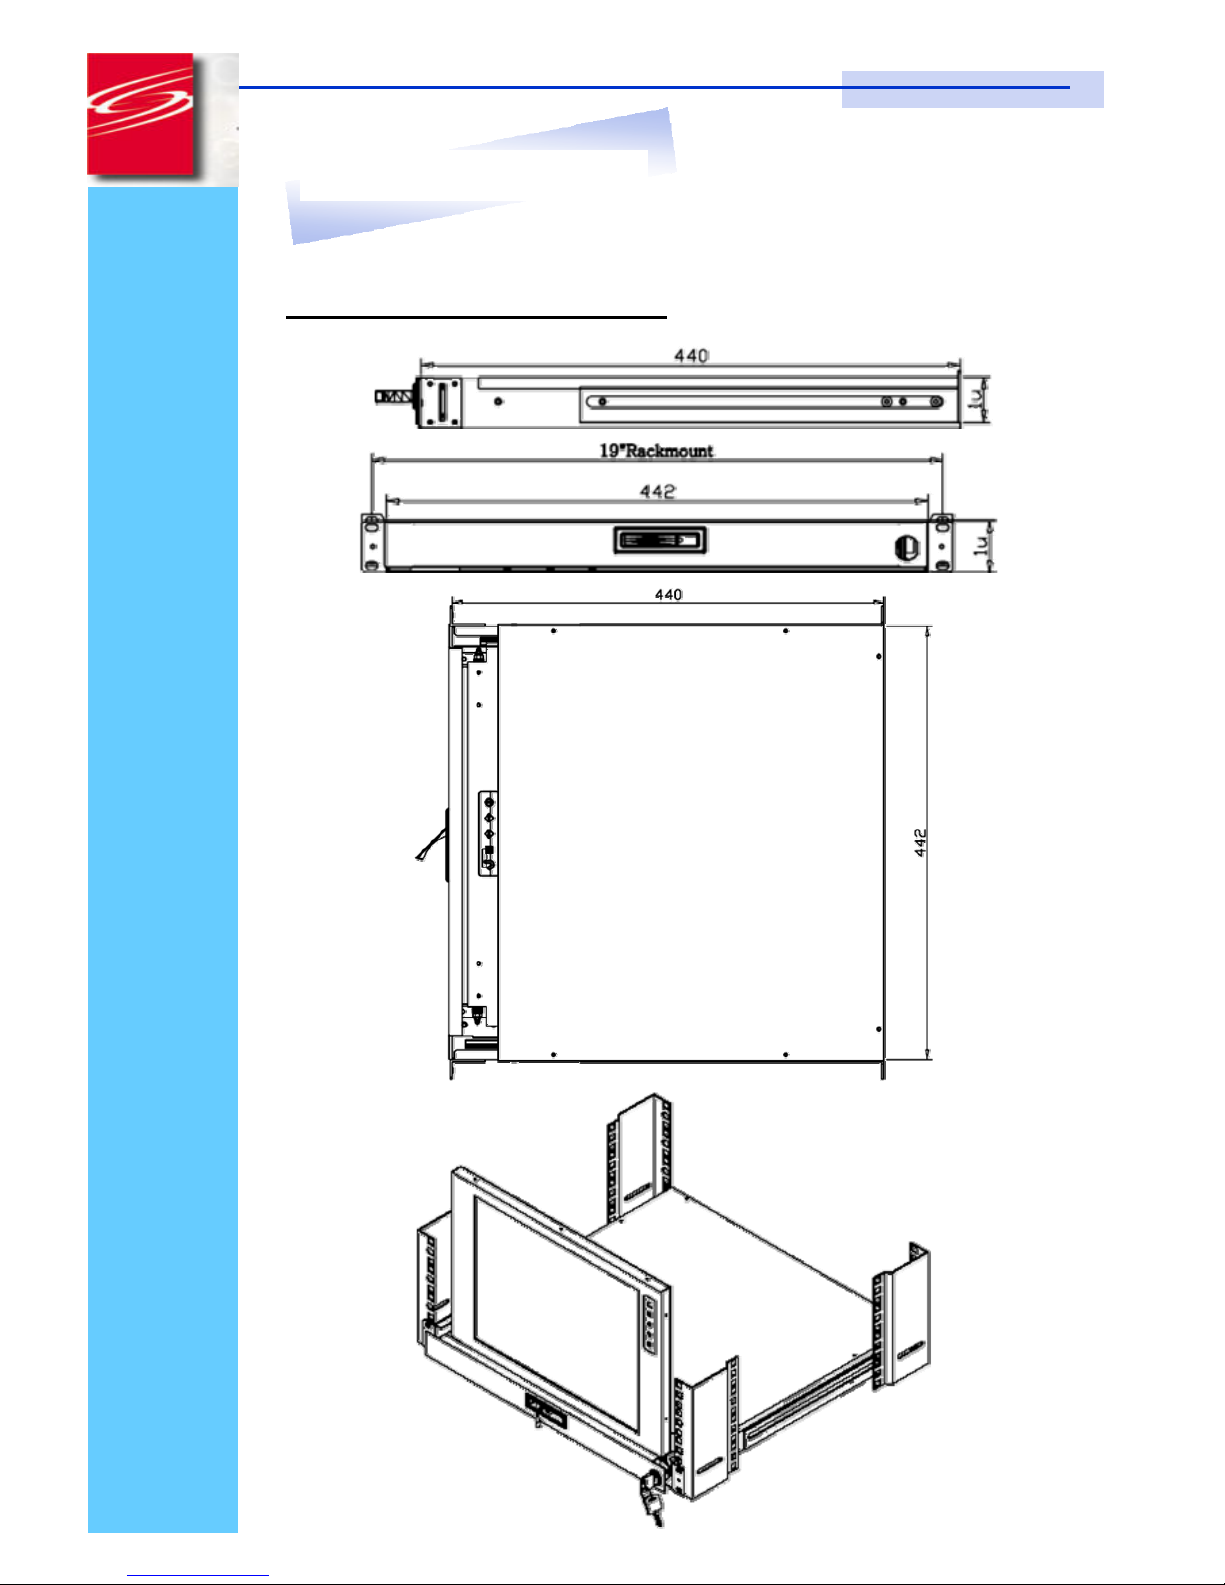
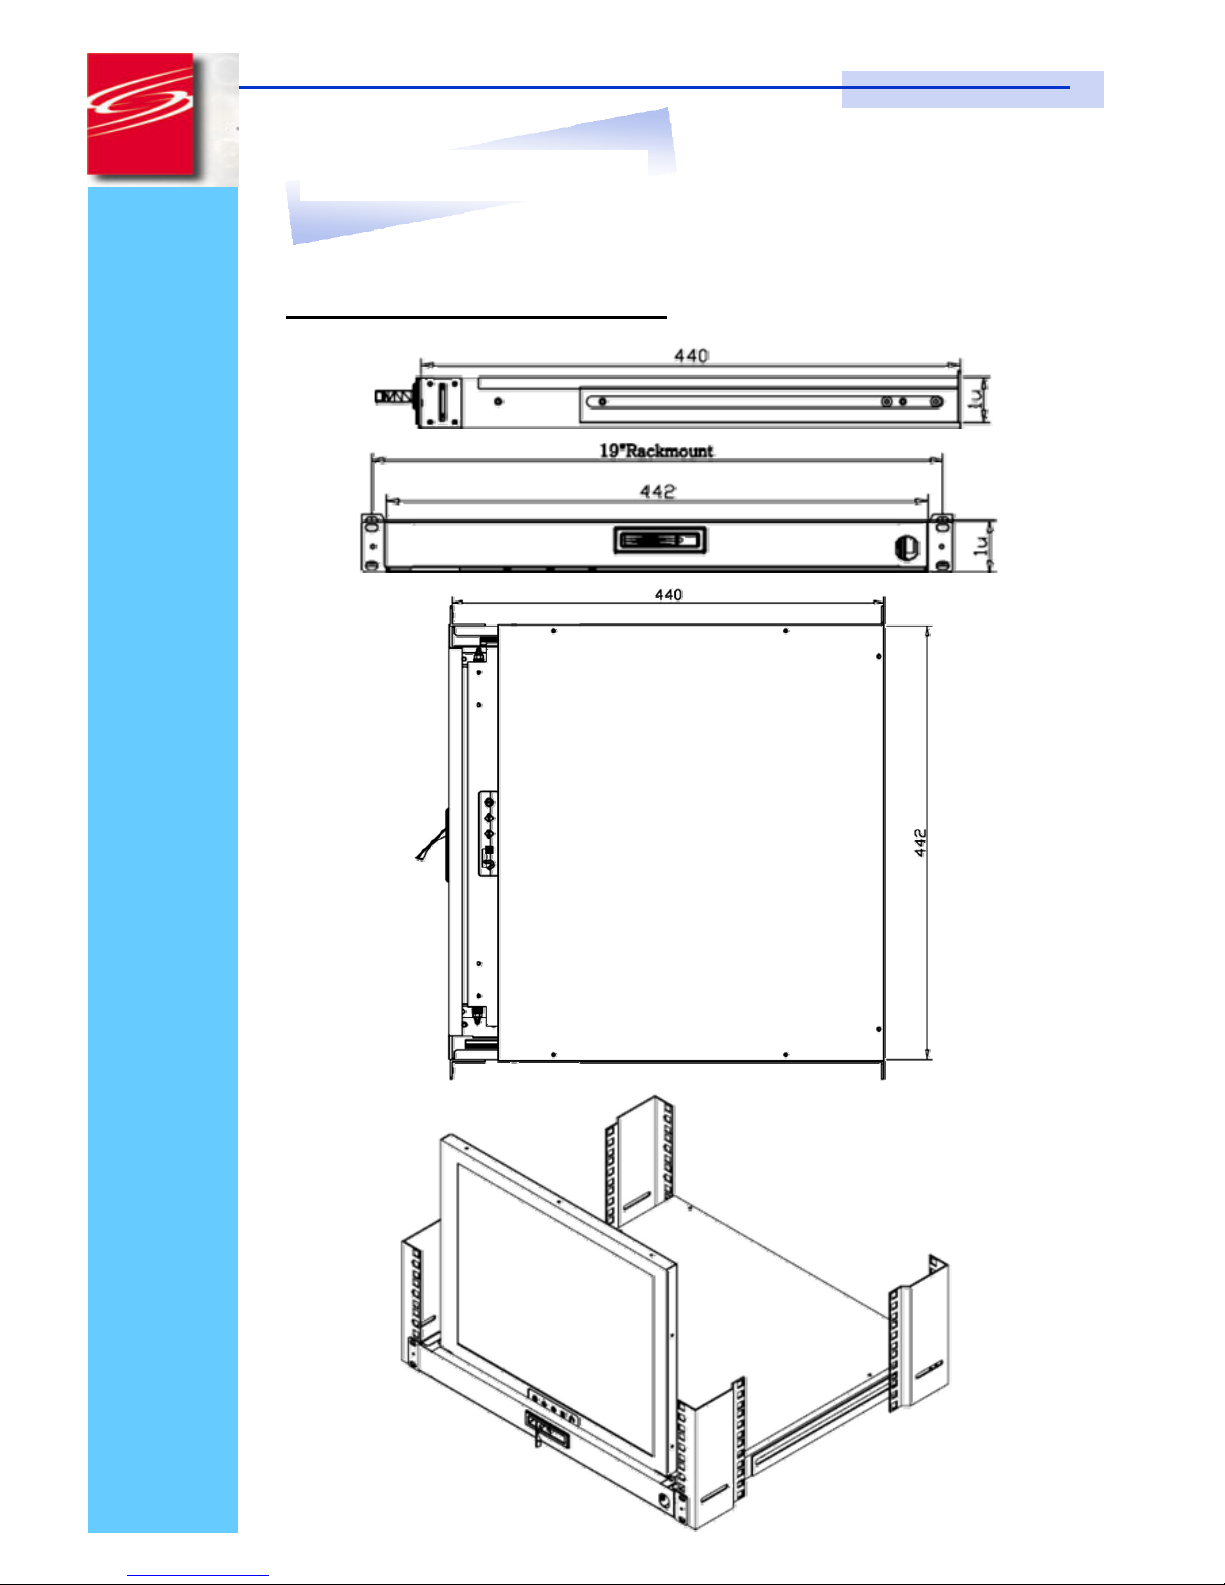
9. Dimension Diagram
KVM-RKM-15-1RU-SD
1U 15” LCD Drawer
Page 9
Rev. : 1.0
P.8
KVM-RKM-15-1RU-SD / KVM-RKM-17-1RU-SD / KVM-RKM-19-1RU-SD
User Manual
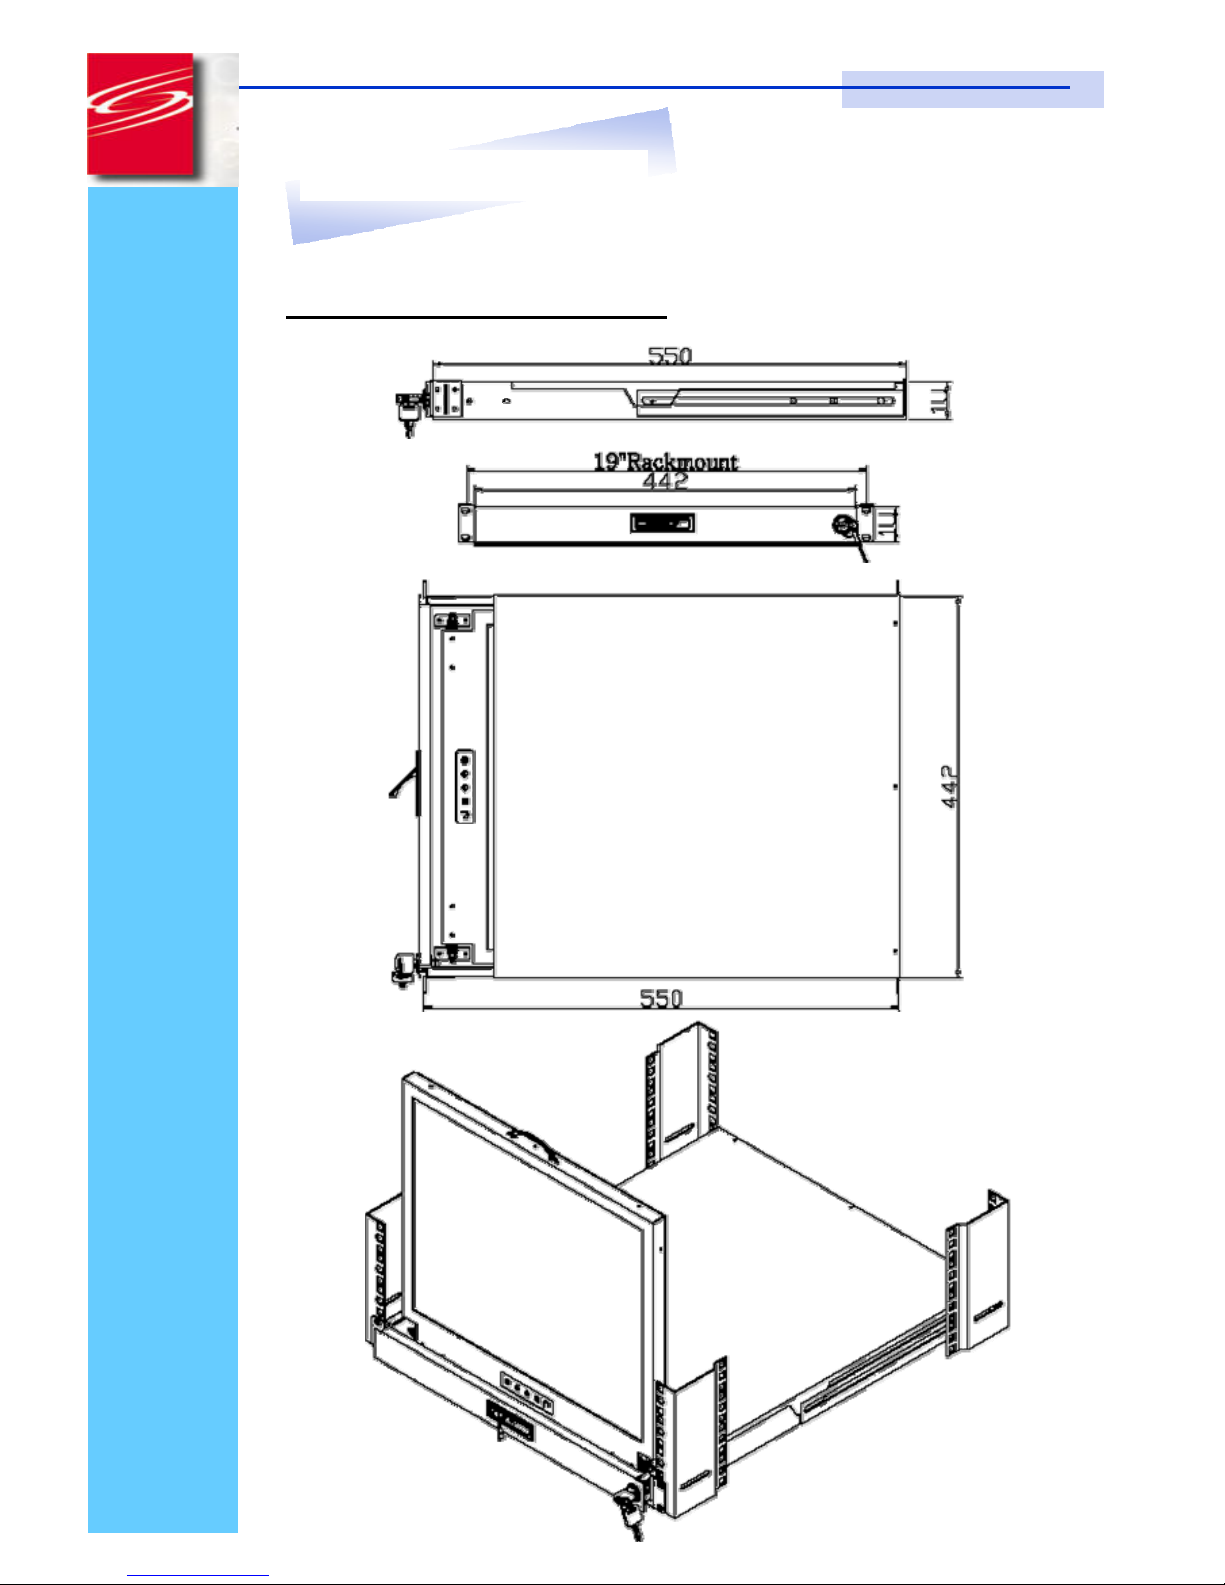
9. Dimension Diagram
KVM-RKM-17-1RU-SD
1U 15” LCD Drawer
Page 10
Rev. : 1.0
KVM-RKM-15-1RU-SD / KVM-RKM-17-1RU-SD / KVM-RKM-19-1RU-SD
User Manual
P.9
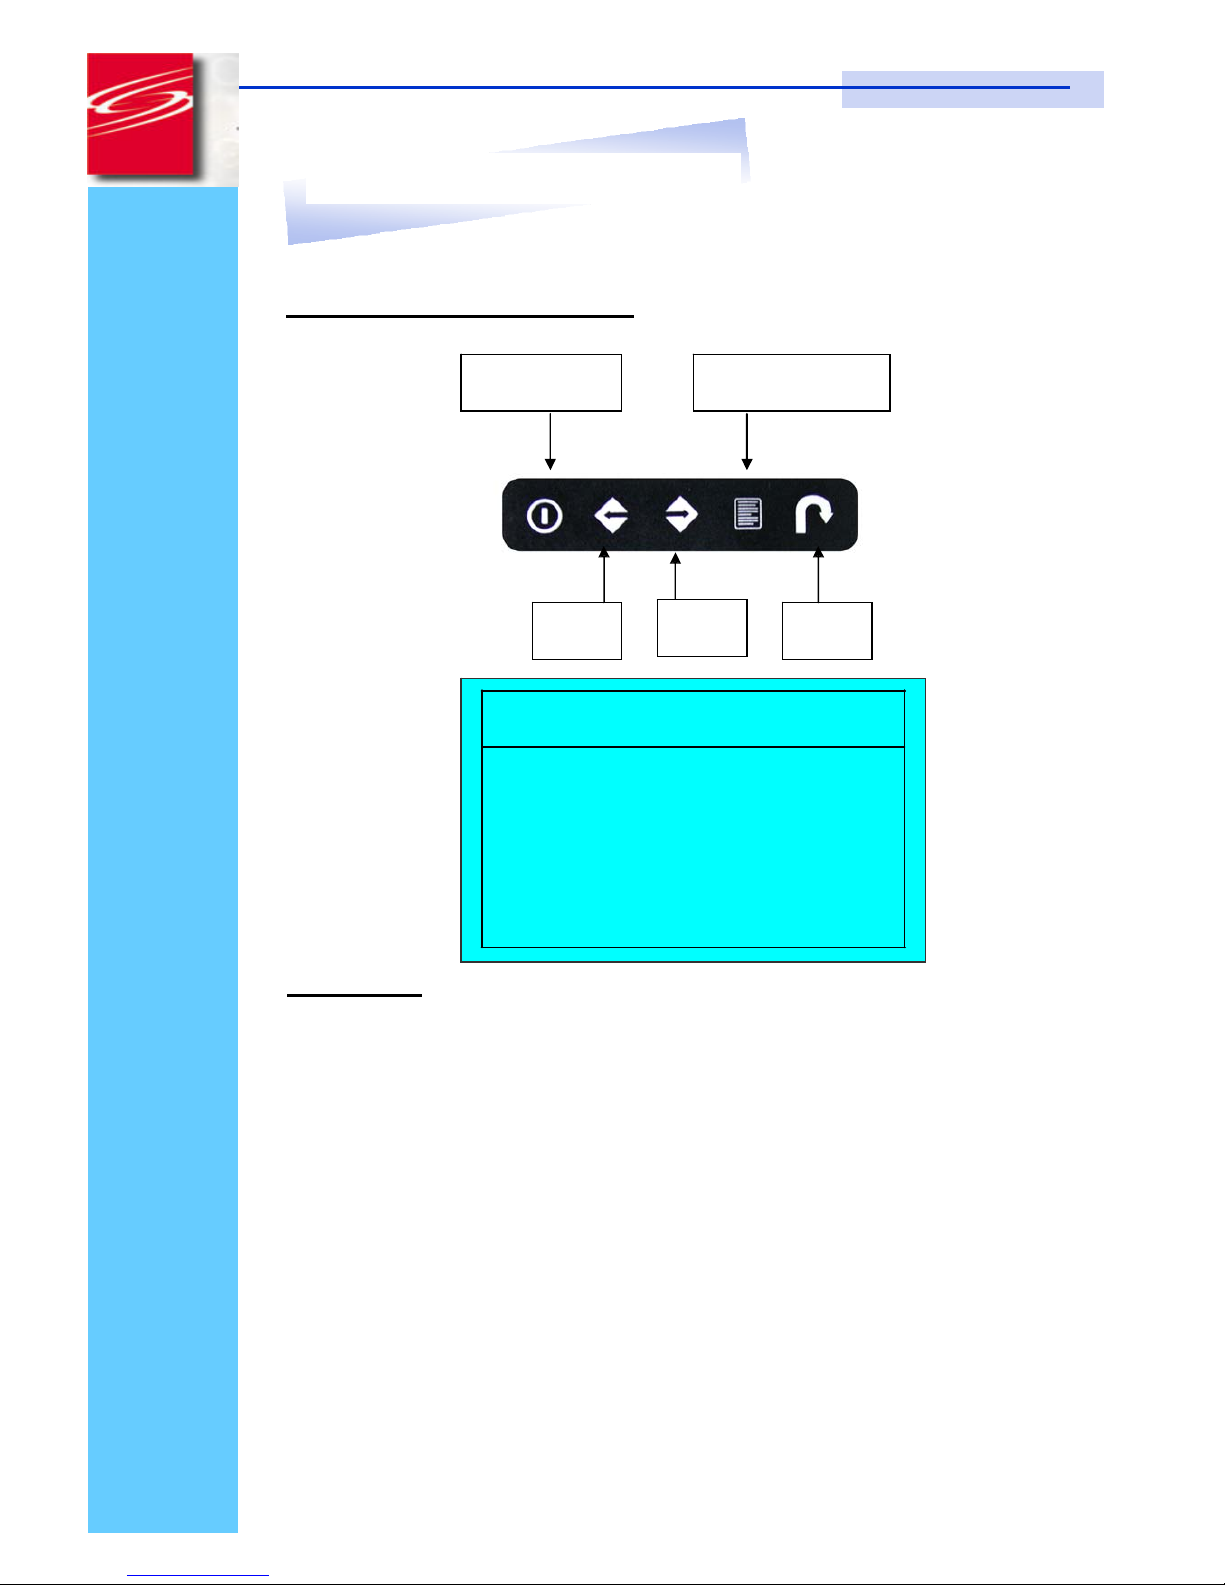
8. Dimension Diagram
KVM-RKM-19-1RU-SD
1U 15” LCD Drawer
Page 11
Rev. : 1.0
P.10
KVM-RKM-15-1RU-SD / KVM-RKM-17-1RU-SD / KVM-RKM-19-1RU-SD
User Manual
10. LCD OSD Menu Operation
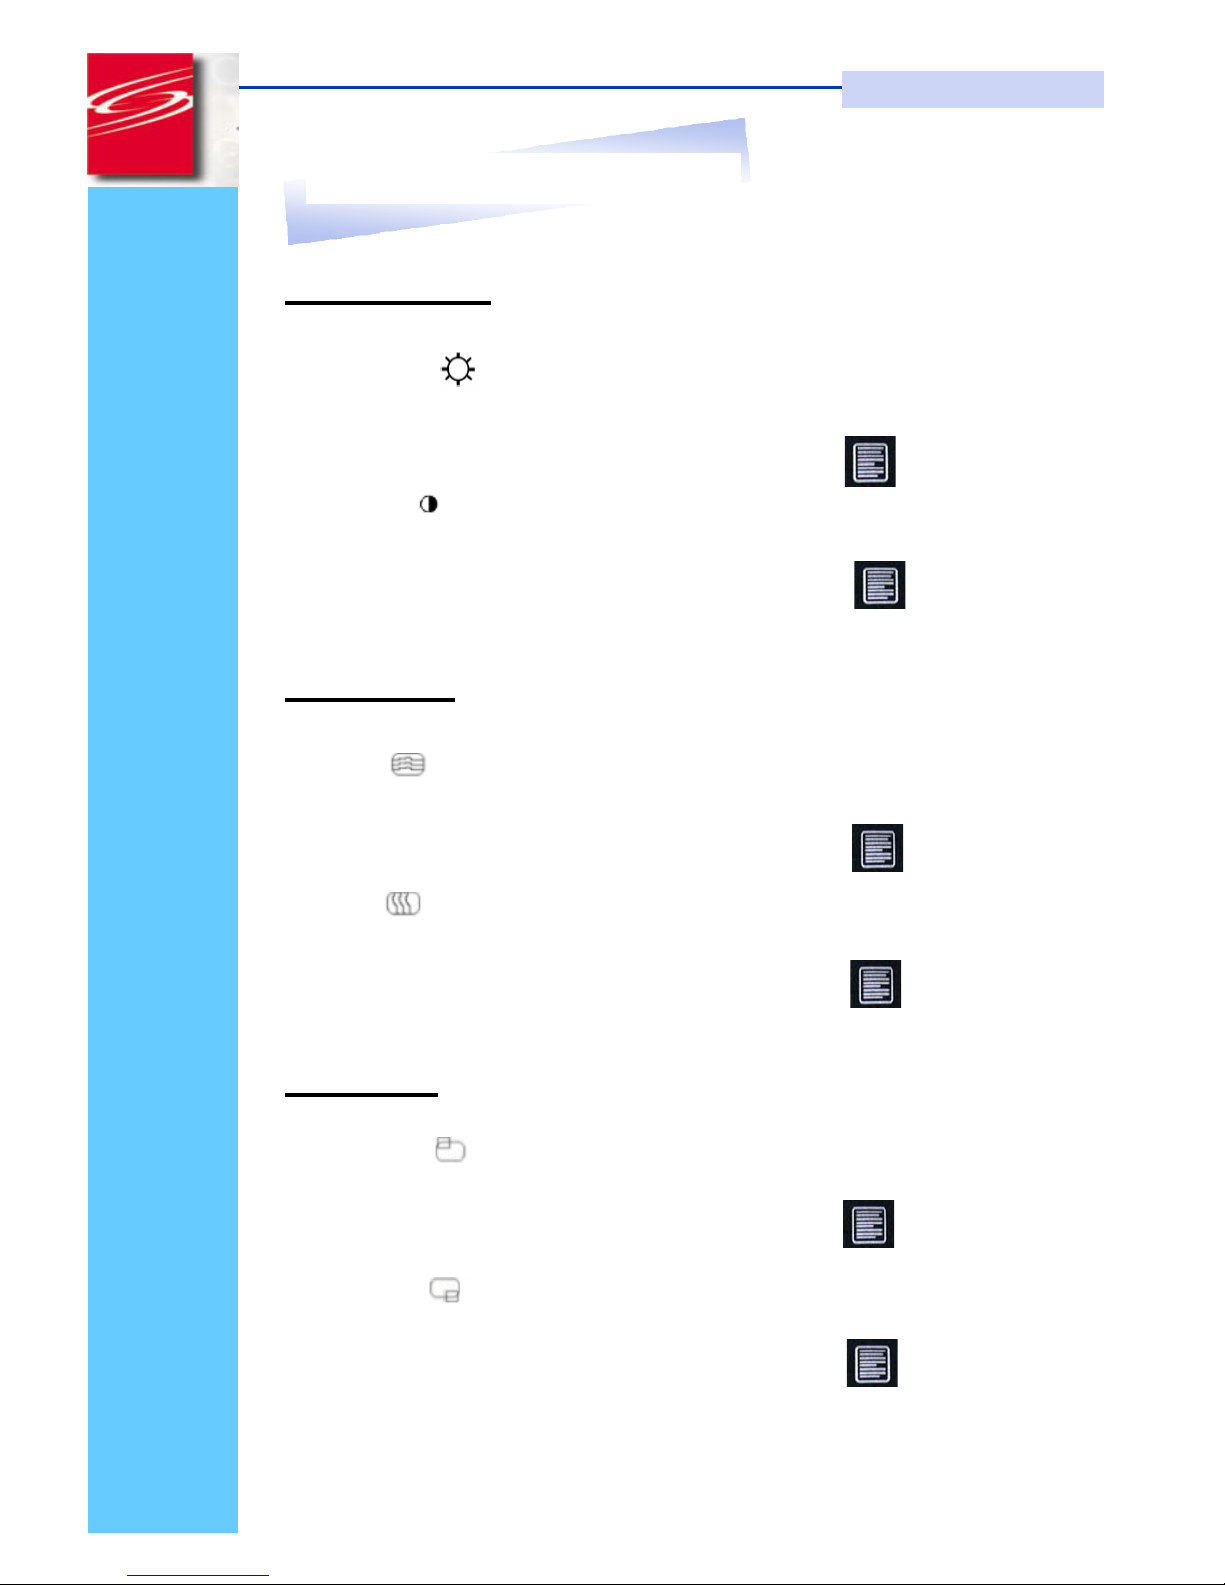
LCD Membrane Diagram
Power Menu/Selection
Left
Right
Exit
MAI N M ENU
BRIGHT/CONTRAST
AUTO ADJUST
PHASE/CLOCK
H/V POSITION
MISC
RESET
Main Menu
Bright / Contrast
●
To enter into the Bright, Black level & Contrast sub-menu
Auto Adjust
●
To perform automati c optimisations of all functions
●
An “ Adjusting” message is displayed during the process
Phase / Clock
●
To enter into the phase & clock sub menu
H/V Position
●
To enter into the Position sub-menu
MISC
●
To enter into the MISC sub-menu
Reset
●
Reset to the default factory settings
Page 12
Rev. : 1.0
P.11
KVM-RKM-15-1RU-SD / KVM-RKM-17-1RU-SD / KVM-RKM-19-1RU-SD
User Manual
10. LCD OSD Menu Operation
Bright / Contrast
1. Brightness
●
To perform brightness adjustment of the input RGB signal
●
Use the Left & R ight butto n to adjust and b utton to “Brightness”
2. Contrast
●
To adjust the contrast level of the input signal
●
Use the Left & Right button to adjust and button to “Contrast”
Phase / Clock
1. Phase
●
To adjust input video sampling clock’s phase
●
Use the Left & Right button to adjust and button to “Phase”
2. Clock
●
To adjust input video sampling clock
●
Use the Left & Right button to adjust and button to “Clock”
H/V Position
1. H.Position
●
To adjust the horizontal size of the frame
●
Use the Left & R ight butt on to adjust and button to “H.position”.
2. V.Position
●
To adjust the vertical position of the frame
●
Use the Left & Right button to adjust and button to “V.pos ition ”.
Page 13

Rev. : 1.0
P.12
KVM-RKM-15-1RU-SD / KVM-RKM-17-1RU-SD / KVM-RKM-19-1RU-SD
User Manual
10. LCD OSD Menu Operation
MISC
1. Information
●
The first header row shows the current resolution setup
●
The second header row shows the horizontal frequency of the current
input signal
●
The third header row shows the vertical frequency of the current input
signal
2. OSD Timer
●
To modify the duration of the OSD time-out
3. Color
a) 5500K
●
Select Color Temp at 5500K
b) 6500K
●
Select Color Temp at 6500K
c) 9500K
●
Select Color Temp at 9500K
d) User
●
Change Color Temp by manual
4. Language
●
To select the language of OSD menu 7 Languages :
(1) English
(2) Japanese (
日本語
)
(3) Chinese (
中文
)
(4) German
(5) Francais
(6) Espanol
(7) Italiano
Page 14
Rev. : 1.0
P.13
KVM-RKM-15-1RU-SD / KVM-RKM-17-1RU-SD / KVM-RKM-19-1RU-SD
User Manual
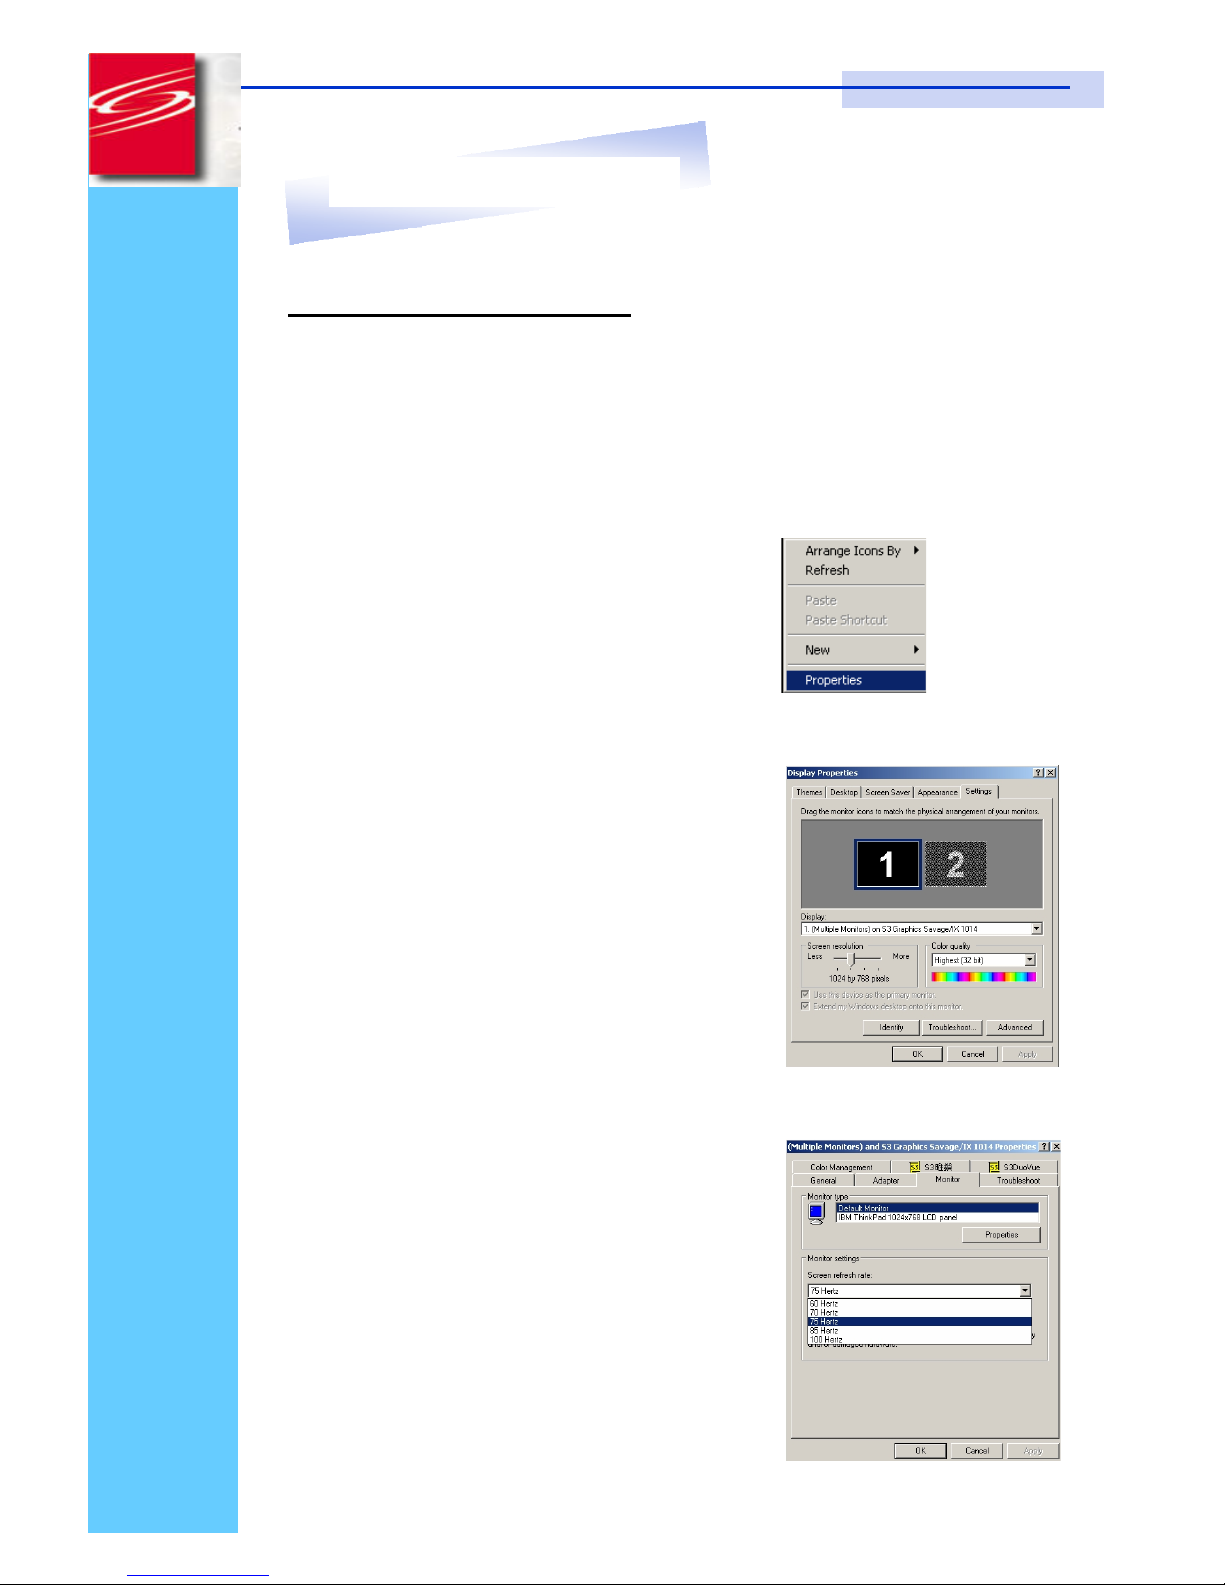
11. Resolution Settings
For Microsoft Windows
Step 1 – Press right click on the desktop
Step 2 – Choose “Properties”
Step 3 – Change the “Screen Resolution”
Step 4 – Change the “Screen refresh rate”
Page 15

Rev. : 1.0
P.14
KVM-RKM-15-1RU-SD / KVM-RKM-17-1RU-SD / KVM-RKM-19-1RU-SD
User Manual
11. Resolution Settings
For SUN Servers
●
Resolution configuration p rocedures should be run by qualified SUN
server administrator
●
Sun Servers are using resolution at 1152 x 900 x 76Hz.
●
Supported resolution mode for 15” LCD:
●
1024 x 768 x 70/75Hz
●
Supported resolution mode for 17” LCD:
●
1280 x 1024 x 75Hz
●
You need to change the Sun Server resolution before you connect to
LCD Display.
●
Please do the following procedures to change the resolution settings :
1. As root:
You may find the following comment “/user/sbin/m64config”.
2. To view current resolution:
Type “/user/sbin/m64config – prconf”.
3. To change to 1024x768 @ 70MHz:
Type “/user/sbin/m64config – res 1024x768x70 now”.
4. The screen will be rubbish.
5. Then type “pkill Xsun”.
And Type “pkill Xsession” to restart the Xsession.
Note : Remember to RESTART the server after these processes.
●
Under Common Desktop Environment (CDE).
●
To change the OpenBoot resolution, you can type the following
command in OK prompt.
1. In OK prompt, type “setenv output-device screen:r1024x768x70”.
2. Type “pri ntenv” to confi rm the resol ution has been changed
to 1024x768x70Hz.
3. Then type, “reset” to restart the system.
Note : Remember to RESTART the server after these processes
Page 16
KVM-RKM-15-1RU-SD / KVM-RKM-17-1RU-SD / KVM-RKM-19-1RU-SD
User Manual
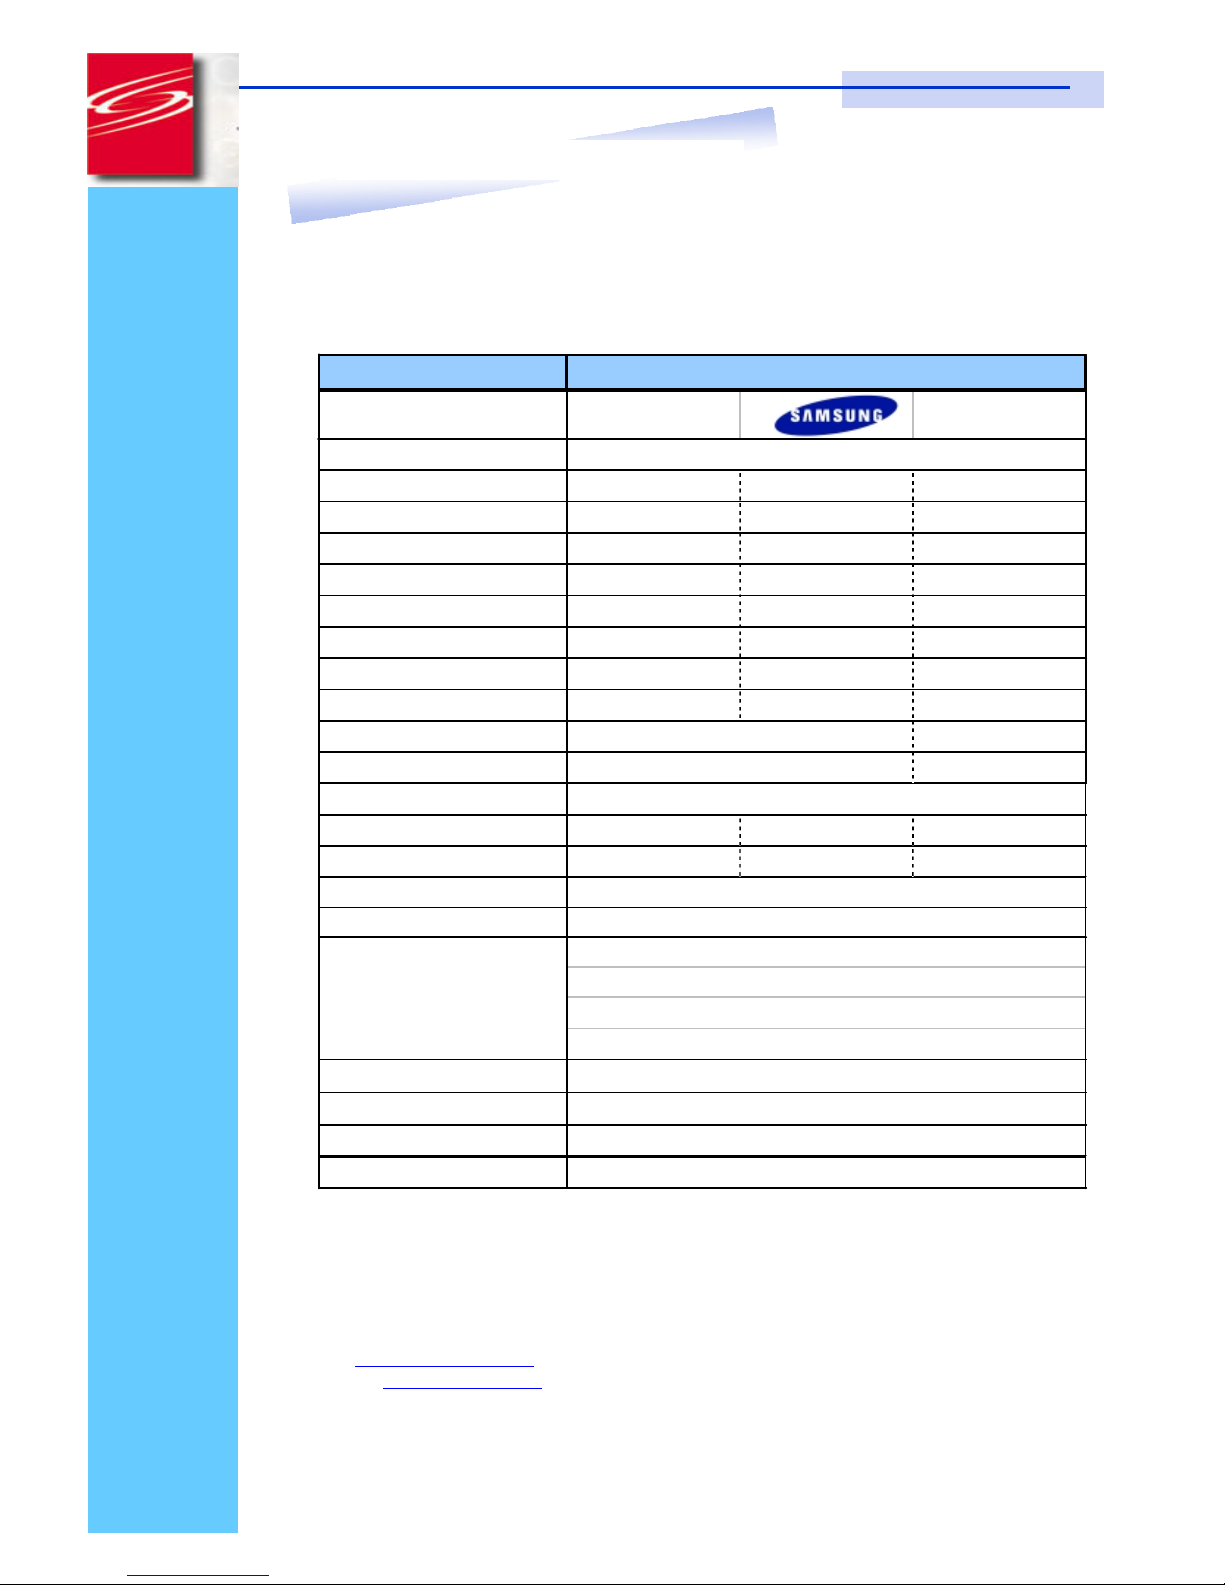
12. Technical Specification
I
tem
Descript
ion
LCD Screen
Ma nufa cturer
LCD Origin
South Korea
Pa nel
15” TFT
17” TFT
19” TFT
Re solution
1,024 x 768
1,280 x 1,024
1,280 x 1,024
Brightne ss
300 cd/m2
350 cd/m2
500 cd/m2
Color
16.2 Million
16.2 Million
16.7 Million
Contra st Ra tio
450:01:00
350:01:00
500:01:00
Vie w ing Angle
140° x 125°
140° x 120°
170° x 170°
Display Area
304 x 228 mm
337 x 270 mm
376 x 301 mm
Pix el Pitch
0.297 mm
0.264 mm
0.294 mm
Re sponse Time (Tr)
5ms
15ms
Re sponse Time (Tf)
20ms
10ms
Ba ck Light
4 x Cold Cathode Fluorescent Tube
Horizontal Sync.
48.4 kHz
64 ~ 80 kHz
64 kHz
Ve rtica l Sync.
65 MHz
60 ~ 75 Hz
60 Hz
Input Signal
Powe r Management
OSD Cont rol
Power Input
Vide o Input
Dimension
Analog RGB 0.7Vp-p
VESA DPMS
Brightness, Contract, Color, Clock
H.Position,
V.Position, Phase, Scaling
Auto
Config., Input Select, Multi-Window
Clear
EEPROM, OSD adjust
12V DC Adapter
15-pin D-Sub Connector
439(W ) x 44(H) x 550(D) mm
W e ight
KVM-RKM-15-1RU- SD : 10kg
/ 17 : 11.5kg
/ 19 :
13kg
SmartVM
23900 Mercantile Rd.
Cleveland OH 44122
Toll Free # 1-866-999-3210
Fax # 1-216-765-0548
Email : [email protected]
Website :- www.smartvm.com
*
All brand names, logo registered trademarks are properties of their respe ctive owners.
Rev. : 1.0
P.15
Print at 1/2007
 Loading...