

Page 1
KVM
EXTENDER
KVM-LΙΙ KVM-RΙΙ
(Local) (Remote)
KVM-EΙΙ
USER MANUAL V2.1
Package Contents
z KVM Extender Local Unit x 1
z KVM Extender Remote Unit x 1
z User manual x 1
z Power adapter DC 9V/600mA x 2
z 3-in-1 cable (3L-3512C) x 1
If any thing missed, please contact with your vendor.
Features
The extension of VGA, PS/2 keyboard, PS/2 mouse
signal up to 180 meter away by using the KVM
Extender and one CAT5 cable.
High VGA resolution up to 2048x1536.
Support Auto/Manual video quality adjustment.
Support video gain and equalization adjust.
Support 3 hot key to combine other equipment.
Compatible with the KVM-S1.
Three control privilege modes – “Share” & “Local only”
& “KB/MS disable”.
Extra console port is available on Local side.
Auto console selection between Local and Remote.
-1-
Specifications
Function
KVM-LΙΙ KVM-RΙΙ
PC Connector
1 x HD-15 Female
(VGA / KB / MS)
None
Monitor Connector 1 x HD-15 Female
Keyboard Connector 1 x 6 pin mini-DIN Female (PS/2)
Mouse Connector 1 x 6 pin mini-DIN Female (PS/2)
Mode Switch Button 1 None
RJ-45 Connector 1
Power 1
LEDs
Link 1
Video Resolution 2048×1536@60HZ
Cable Distance 180 m (Max.)
Power Adapter DC 9V 600mA
Housing Aluminum
Weight 235 g 230 g
Dimensions(LxWxH) 130x83.5x29.5 mm
Hardware Requirements
Required specifications
Console
1 x Highest resolution monitor.
1 x PS/2 mouse.
1 x PS/2 keyboard.
PC
1 x VGA, SVGA or Multisync card.
1 x 6-pin mini-DIN (PS/2) mouse port.
1 x 6-pin mini-DIN (PS/2) keyboard port.
Cable 1 x 3-in-1 KVM cable or equivalent.
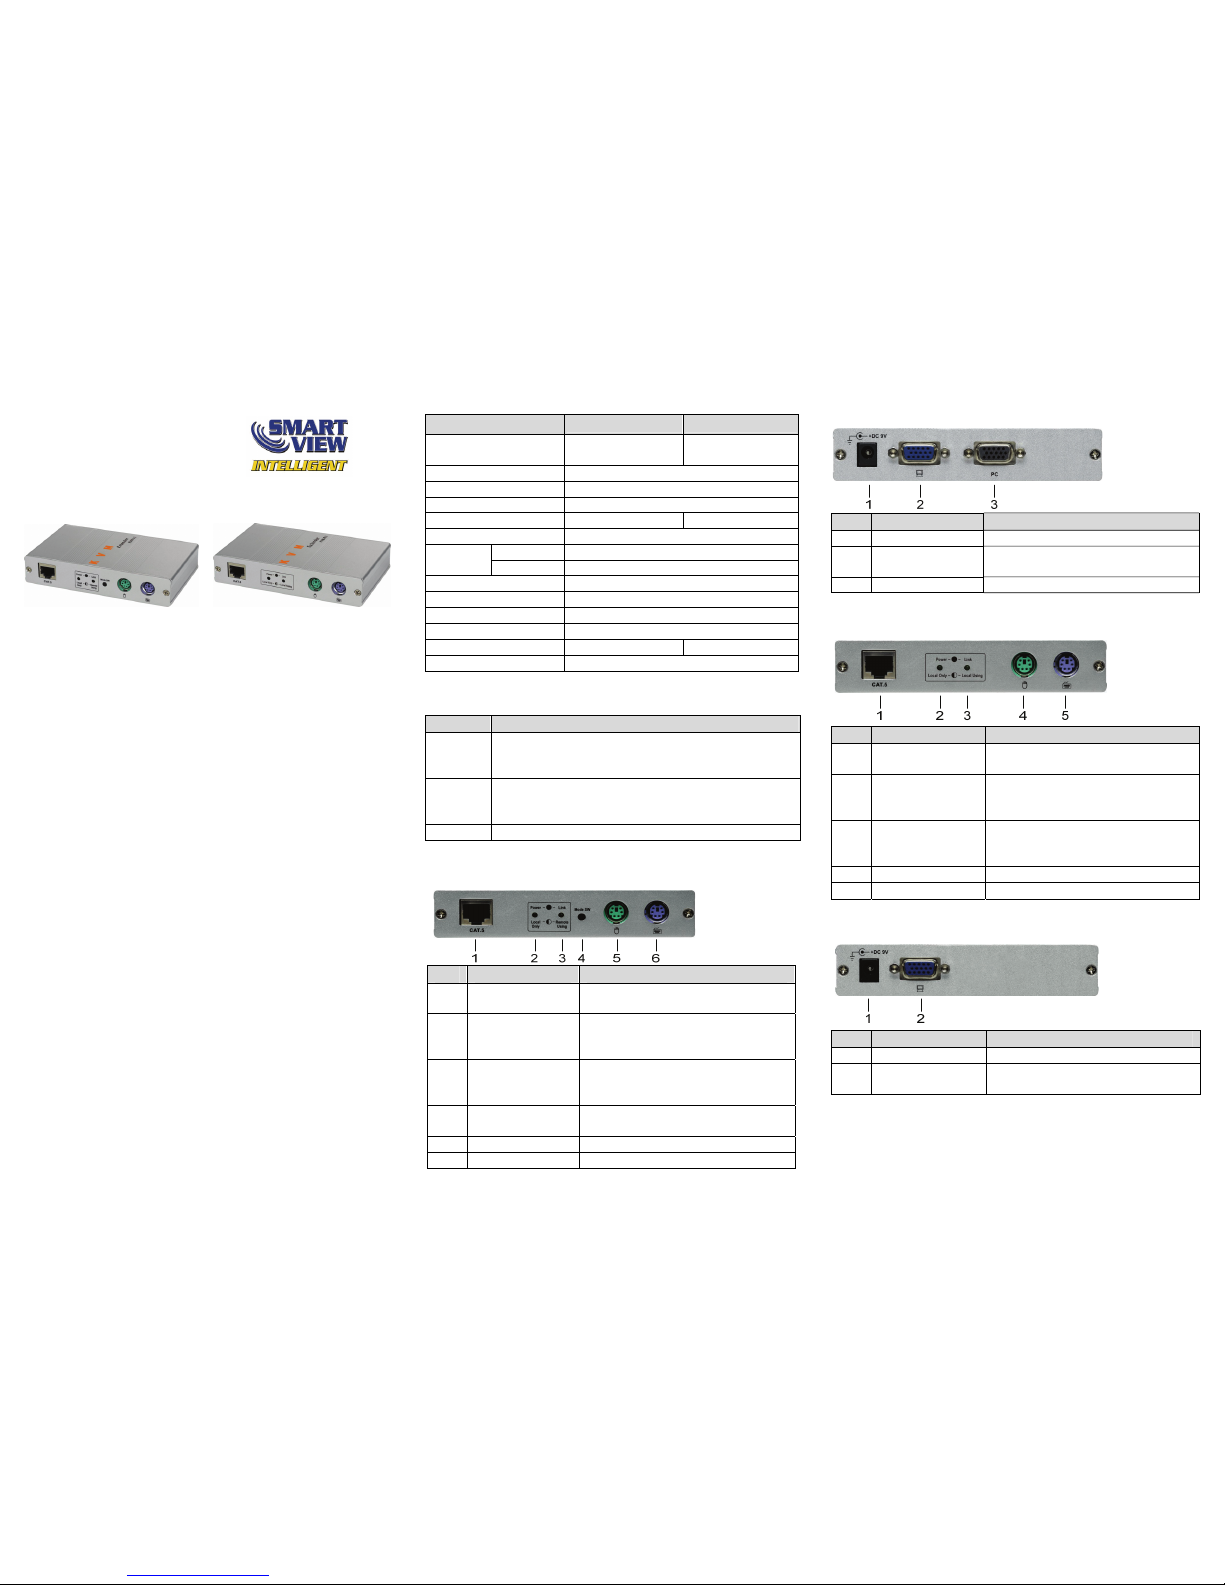
KVM-LΙΙ (LOCAL) FRONT VIEW
No Component Description
1
CAT.5
Connector
Plugs the CAT5 cable into this
connector.
2 Power LED
On when the unit power on.
Off when the unit has no power.
Flash when “Local Using only”.
3 Link LED
On when links successfully.
Off when no link to Remote unit.
Flash when Remote using.
4
Mode SW
Button
Toggle the mode switch between
“Share” & “Local only”
5 PS/2 Mouse The PS/2 Mouse plugs here.
6 PS/2 Keyboard The PS/2 Keyboard plugs here.
-2-
KVM-LΙΙ (LOCAL) REAR VIEW
No Component Description
1 Power Jack The power adaptor plugs here.
2
Monitor
Connector
The VGA cable (HD-15) connects
to the monitor plugs in here.
3 PC Connector The 3-in-1 cable to PC plugs here.
KVM-RΙΙ (REMOTE) FRONT VIEW
No Component Description
1
CAT.5
Connector
Plugs the CAT5 cable into this
connector.
2 Power LED
On when the unit power on.
Off when the unit has no power.
Flash when “Local Using only”.
3 Link LED
On when links successfully.
Off when no link to Local unit.
Flash when Local Using.
4 PS/2 Mouse The PS/2 Mouse plugs here.
5 PS/2 Keyboard The PS/2 Keyboard plugs here.
KVM-RΙΙ (REMOTE) REAR VIEW
No Component Description
1 Power Jack The power adaptor plugs in here.
2
Monitor
Connector
The VGA cable (HD-15) connects
to the monitor plugs in here.
*P.S. Power and Link LED flash simultaneously when
KVM-EΙΙ is in the “command mode”.
-3-
Page 2
Installation
PS/2 PS/2
3 in 1
custom
cable
HD-15
VGA
cable
Rear View Front View
DC 9V
600mA
Adaptor
Local
Monitor
Local
PS/2
Mouse
Local
PS/2
Keyboard
PC
PS/2 PS/2
HD-15
VGA
cable
KVM-R (Remote)
Rear View Front View
DC 9V
600mA
Adaptor
Remote
Monitor
Remote
PS/2
Mouse
RemotePS/2
Keyboard
KVM-L (Local)
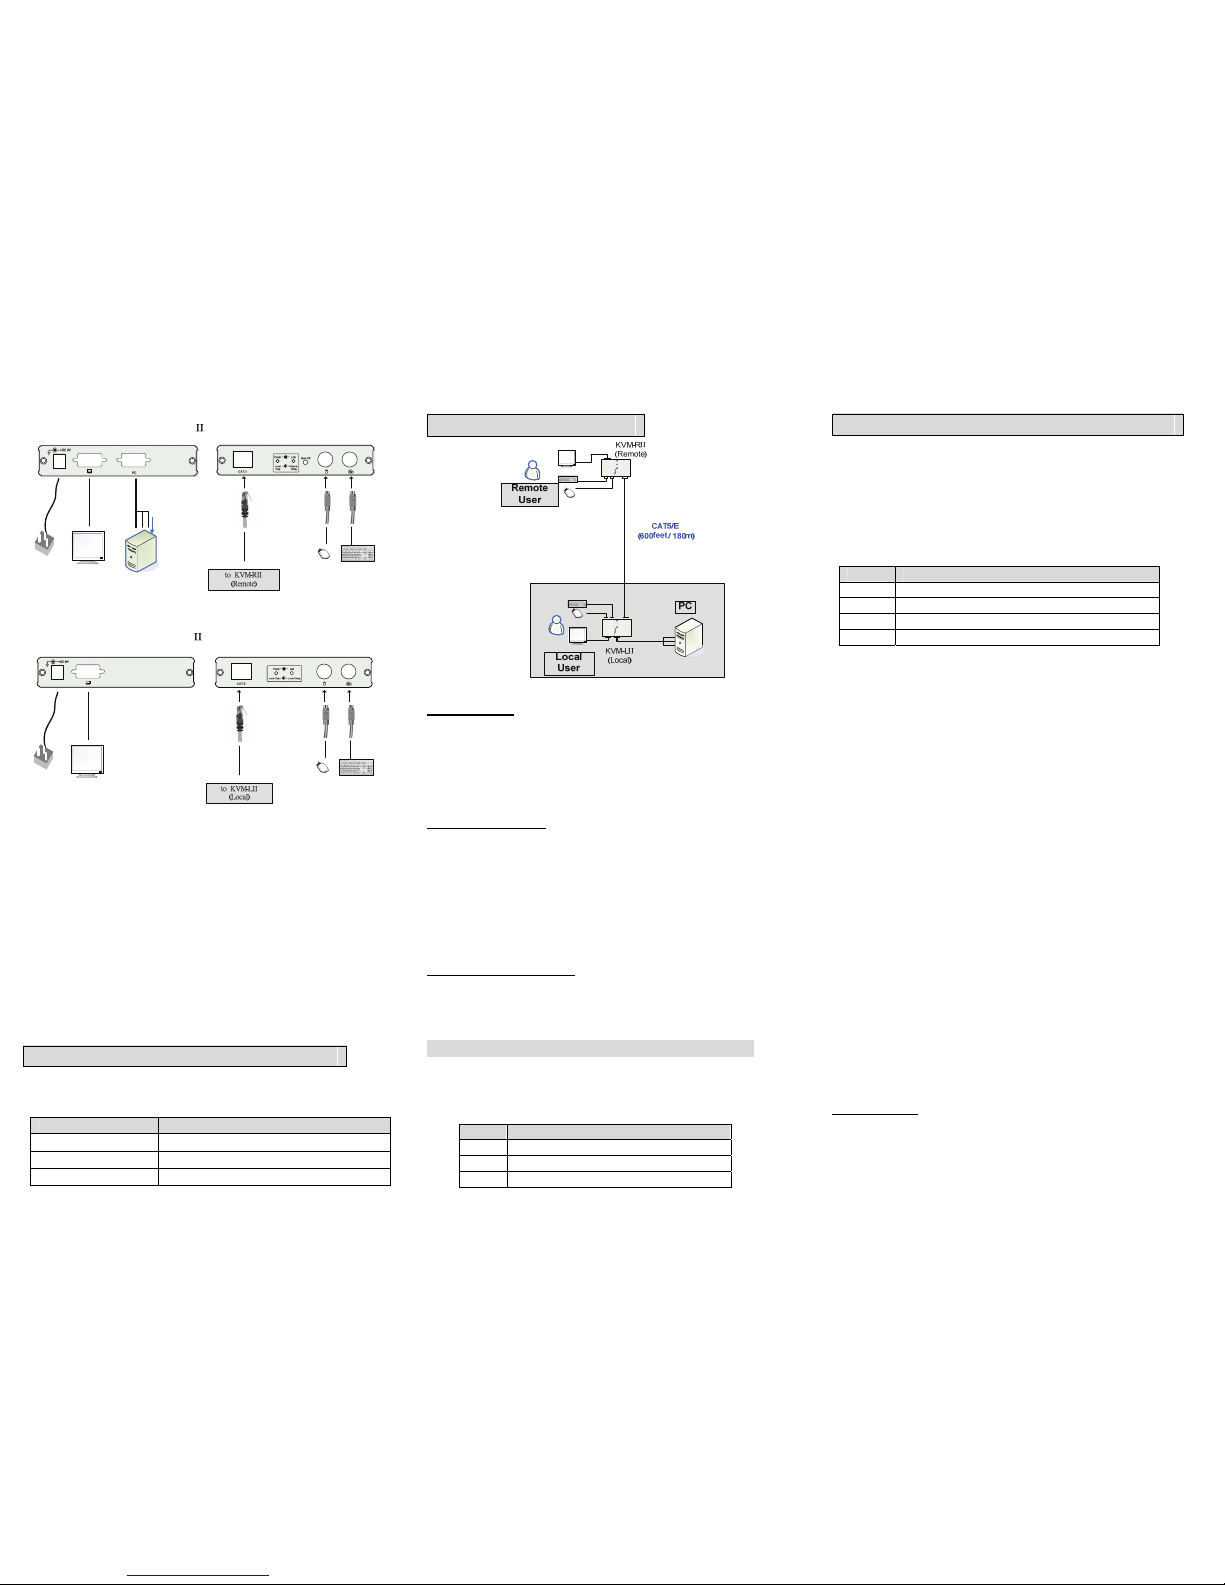
1. Connect PC console port by using standard 3-in-1
cable to Local. (First connects PS/2 mouse, then
connects PS/2 keyboard and VGA connector).
2. Connect CAT5 cable to Local.
3. Connect CAT5 cable to Remote.
4. Connect keyboard, mouse and monitor to Local.
5. Connect keyboard, mouse and monitor to Remote.
6. Power on PC and Local.
7. Check the VGA quality by the monitor. If the video
quality is not good. Please use hot key of Remote to
adjust the video quality.
Operation
Change hot key in Local and Remote
Press hot key (default: Scroll Lock) twice to enter the
command mode, and press below key to select, and
press “ESC” key to exit command mode.
Key Function
Scroll lock “Scroll lock” is the hot key.
Num lock “Num lock” is the hot key.
Shift (left/ right) “Ctrl” (left/ right) is the hot key.
-4-
Mode switch of KVM-EΙΙ
KVM-EΙΙ supports three modes:
Share mode:
The two users (Local and Remote) can access one
PC base on a first-come, first-served policy.
When the Local user accessing the PC, the Link
LED of Remote will flash to remind the other user
that it can’t access now, and vice versa.
Local only mode:
Only the Local user can access the PC. The
Remote user can’t access the PC (include the
video).
The Power LED of Local and Remote will flash to
remind both the Remote and the Local user that
right now only the Local can access the PC.
Only the Local user can switch the access mode.
KB/MS disable mode:
The Remote user can’t access the PC by keyboard
and mouse, but can see the video. The Local user
can access the PC and see the video.
The Local user can switch the mode by two ways:
Toggle the push button in the front panel of Local.
Press hot key (default: Scroll Lock) twice to enter
the command mode, and press below key. After
operation, press “ESC” key to exit command mode.
Key Function
L Switch to “Local only” mode.
S Switch to “Share” mode.
K Switch to “KB/MS disable” mode.
-5-
Configure Video quality by Remote User
Our KVM Extender provides 2 ways to adjust video
quality: Manually or Automatically. The user can
process the adjustment by hot key as follow.
Press hot key (default: Scroll Lock) twice of Remote to
enter the command mode, and press below key to select
video adjustment function. Then press ↑ or ↓ key to adjust
the value. When finished, press “ESC” key to end adjust.
Key Function
A
Adjust video quality Automatically.
N
Adjust video Gain.
E
Adjust video Equalization.
D
Set video and hot key to Default.
NOTE: All the video parameters have 32 levels to adjust.
You can also press & hold ↑ or ↓ to continually adjust
video, and if you adjust it to the last level then there will
be a “long” beep sound.
Troubleshooting
1. If the Power LED of Remote is not on, please make
sure power adapter is connected to Remote.
2. If no video signal is displayed on the monitor.
(1) Please check all of VGA cable and CAT5 cable
is loosened or disconnected.
(2) 3-in-1 cable was not attached to PC during boot
up process.
(3) Power adapter is not connected.
3. If video signal is foggy or un-clear, please check VGA
connector, or low the VGA resolution for long cable. It
is highly recommended to use “optimal CAT5 cable
length” to get the best video quality and not to waste
unnecessary CAT5 cable.
4. For the PC without PS/2 connector, please apply
PS/2-to-USB adapter to Local.
© C&C TECHNIC TAIWAN CO., LTD. All rights reserved.
Trademarks:
All the companies, brand names, and product names
referred to this manual are the trademarks or registered
trademarks belonging to their respective companies.
-6-
 Loading...