

Page 1

ST-2112D (450Mhz ~ 520Mhz)
UHF FM DIGITAL TRANSCEIVER
SERVICE MANUAL
SmarTrunk Systems, INC.
ST-2112D SM R1.2
Page 2

ST-2112D SM R 1.2 SMARTRUNK SYSTEMS, INC.
2
Table of Contents
1. Specifications: ............................................................................................................................... 5
2. ST-2112 EXPLODED VIEW .............................................................................................................. 6
3. ST-2112 SIMPLIFIED DIAGRAM ..................................................................................................... 7
4. - ST-2112 RF DESCRIPTION ................................................................................................................ 8
4.1. Circuit Configuration ................................................................................................................. 9
4.2. Receiver System ........................................................................................................................ 9
4.2.1. Front-end RF Receiver ........................................................................................................... 9
4.2.2. ANALOG Audio Processing .................................................................................................... 9
4.2.3. Virtual Squelch Circuit ........................................................................................................... 9
4.2.4. Virtual VOLUME CONTROL .................................................................................................. 10
4.2.5. Sub audio signaling ............................................................................................................. 10
4.2.6. ANALOG AUDIBLE SIGNALING ............................................................................................. 10
4.2.7. DIGITAL AUDIO PROCESSING .............................................................................................. 10
4.3. Transmitter System ................................................................................................................. 11
4.3.1. ANALOG TX SIGNAL ............................................................................................................. 11
4.3.2. DIGITAL TX AUDIO: .............................................................................................................. 11
4.3.3. Drive and Final Amplifier Stages ......................................................................................... 11
4.3.4. Automatic Transmit Power Control .................................................................................... 12
5. RC-2112 ALIGNMENT .................................................................................................................. 13
5.1. Introduction ............................................................................................................................ 13
5.2. ALIGNMENT:............................................................................................................................ 13
5.3. Alignment Procedure .............................................................................................................. 14
5.3.1. GENERAL ALIGNMENT CONSIDERATIONS: .......................................................................... 14
5.4. MAIN RADIO ALIGNMENT ....................................................................................................... 15
5.5. TRANSMITTER ALIGNMENT: ................................................................................................... 15
5.5.1. Main Clock alignment: ........................................................................................................ 16
5.5.2. Transmit Power alignment: ................................................................................................. 17
Page 3

ST-2112D SM R 1.2 SMARTRUNK SYSTEMS, INC.
3
5.5.2.1. High POWER LEVEL ALIGNMENT ..................................................................................... 17
5.5.2.2. Mid POWER LEVEL ALIGNMENT ...................................................................................... 18
5.5.2.3. LOW POWER LEVEL ALIGNMENT .................................................................................... 18
5.5.3. ANALOG MAXIMUM DEVIATION ........................................................................................ 18
5.5.4. Modulation Gain alignment: ............................................................................................... 18
5.5.5. FDMA DATA MODULATION alignment: .............................................................................. 19
5.5.6. TDMA DATA MODULATION alignment: .............................................................................. 20
5.5.7. EIA tones Level Alignment: ................................................................................................. 20
5.5.8. DTMF signaling level alignment: ......................................................................................... 20
5.5.9. DCS signaling alignment: ..................................................................................................... 21
5.5.10. CTCSS signaling alignment .................................................................................................. 21
5.5.11. FSK signaling alignment: ..................................................................................................... 22
5.6. RECEIVER ALIGNMENT ............................................................................................................ 23
5.6.1. DISCRIMINATOR GAIN ......................................................................................................... 23
6. COMPLEMENTARY RADIO ALIGNMENT ...................................................................................... 24
6.1. BATTERY WARNING LEVEL ...................................................................................................... 24
7. COMPLIMENTARY USER ALIGNMENT ......................................................................................... 25
7.1. OPTION ALIGNMENT: .............................................................................................................. 25
7.1.1. ANALOG Microphone gain: ................................................................................................. 25
7.1.2. ANALOG External Mic Gain: ................................................................................................ 25
7.1.3. ANALOG AGC ...................................................................................................................... 26
7.1.4. DIGITAL AGC ........................................................................................................................ 26
7.1.5. MINIMUM VOLUME LEVEL: ................................................................................................ 27
7.1.6. SQUELCH LEVEL: .................................................................................................................. 27
7.1.7. DISABLE RF POWER ............................................................................................................. 27
8. RADIO APPEARANCE ALIGNMENT .............................................................................................. 28
8.1. DISPLAYS AND LEDS: ............................................................................................................... 28
8.1.1. Auto backlight delay alignment: ......................................................................................... 28
8.1.2. Power on Text: .................................................................................................................... 28
Page 4

ST-2112D SM R 1.2 SMARTRUNK SYSTEMS, INC.
4
8.1.3. Leds: .................................................................................................................................... 29
8.2. Tones ....................................................................................................................................... 29
8.3. ANNUNCIATION ...................................................................................................................... 29
9. ST-2112 SCHEMATIC ................................................................................................................... 32
10. ST-2112 FROM BOARD SCHEMATIC ............................................................................................ 33
11 ST-2112 COMPONENT LOCATOR (TOP LAYER) ............................................................................... 34
12 ST-2112 COMPONENT LOCATOR (BOTTOM LAYER) ....................................................................... 35
13 ST-2112 PCB TOP LAYER .................................................................................................................. 36
14 ST-2112 PCB BOTTOM LAYER .......................................................................................................... 37
15 ST-2112 PCB GROUND LAYER ......................................................................................................... 38
16 ST-2112 PCB POWER LAYER ............................................................................................................ 39
17 ST-2112 FRONT BOARD COMPONENT LOCATOR (TOP LAYER) ....................................................... 40
18 ST-2112 FRONT BOARD COMPONENT LOCATOR (BOTTOM LAYER)............................................... 41
19 ST-2112D BOM ................................................................................................................................ 42
20 ST-2112 KEYBOARD & DISPLAY BOM .............................................................................................. 51
21 ACCESSORY PORT: ........................................................................................................................... 53
22 ST-2112 SERVICE MANUAL REVISIONS ........................................................................................... 55
Page 5
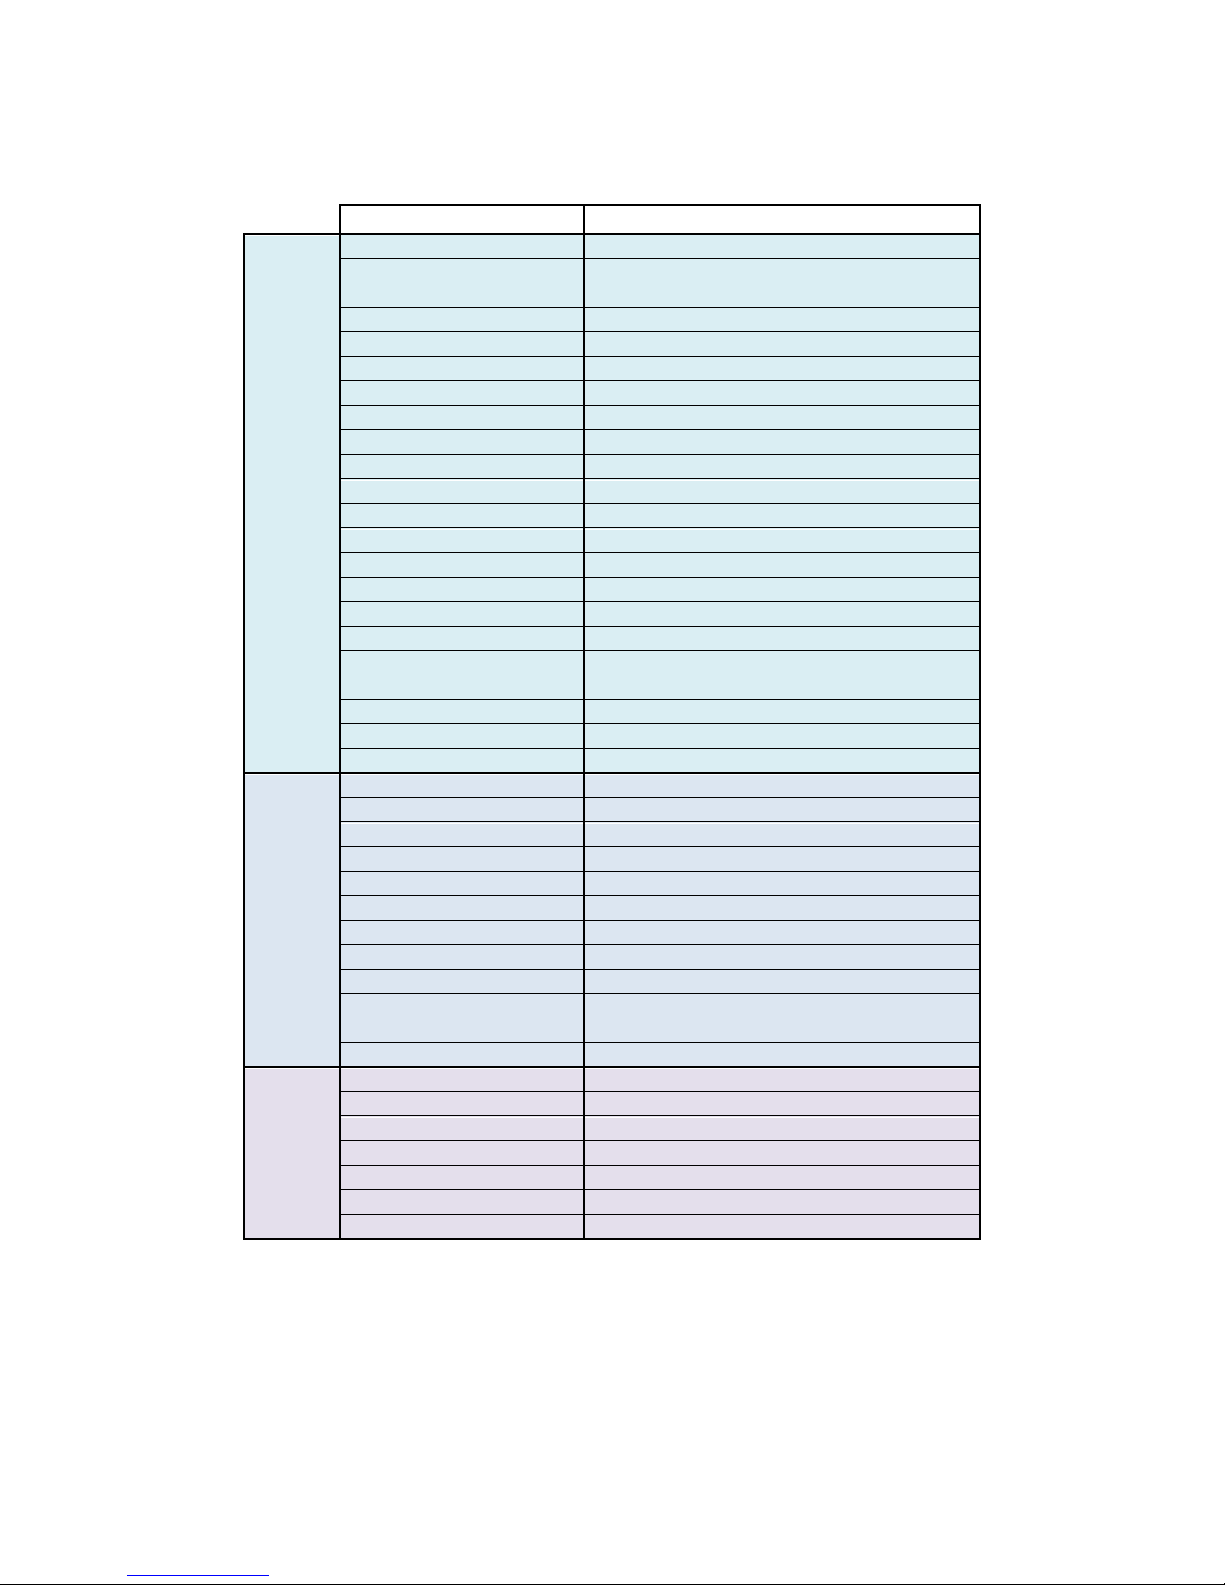
1. Specifications:
SPECIFICATION
ST-2112C
GENERAL
Frequency Range [Mhz]
450 TO 520
Channels
512
Groups/Banks
64
Power [Vdc]
6.4 to 8.8
Dimensions [mm]
130(H)x36(D)x52(W)
Weight [gr] (oz)
320 - (11.3)
Temperature range
- 30 °C ~ 60 °C (-22°F ~ +140°F)
Signaling
51 CTCSS tones / 183 DCS tones / 65534 SDR IDs
Reverse Burst
No
Display
128x64 (supports international characters)
Emergency call
Yes
GPS
Option
Channel Scan
Yes
BCLO / BTLO
Yes
Power Saver control
Yes
TOT
Yes
Radio Kill/Alive
Yes
Adjustable Power Selection
Auto + H/M/L
Key lock
Yes
Adjustable Squelch Level
16 Step
Password
Yes
Key Function selection
Yes
TRANSMIT
MAX RF power
4 W
Frequency Stability
>1PPM
Bandwidth [Khz]
6.25/12.5/25
Adjacent Channel Power
-65dBC (typ)
SNR
45dB typ
Analog harmonic distortion
3% typ (AF 1Khz, 60% deviation)
Data transmit rate
2400/4800/9600 bps
Max frequency deviation
2.5Khz@12.5Khz BW/5Khz@25Khz BW
Analog Modulation type
11K0F3E, 25K0F3E
TDMA Emissions
8K30F7E, 8K30F7D
FDMA Digital emissions
6K25F1E, 6K25F1D, 8K30F1E, 8K30F1D, 8K30F1W
Ext. Mic. Impedance
600 Ohms
RECEIV
ER
Analog Sensitivity
0.25uV (12dB Sinad)
Digital Sensitivity
0.25uV (3% BER)
Image rejection
60dB typ
Adjacent Channel selectivity
65dB typ @25KHz BW
HUM and NOISE ratio
45dB
Speaker Audio Power
1W
External audio power
1W
Specifications subject to change without notice or obligation
Page 6
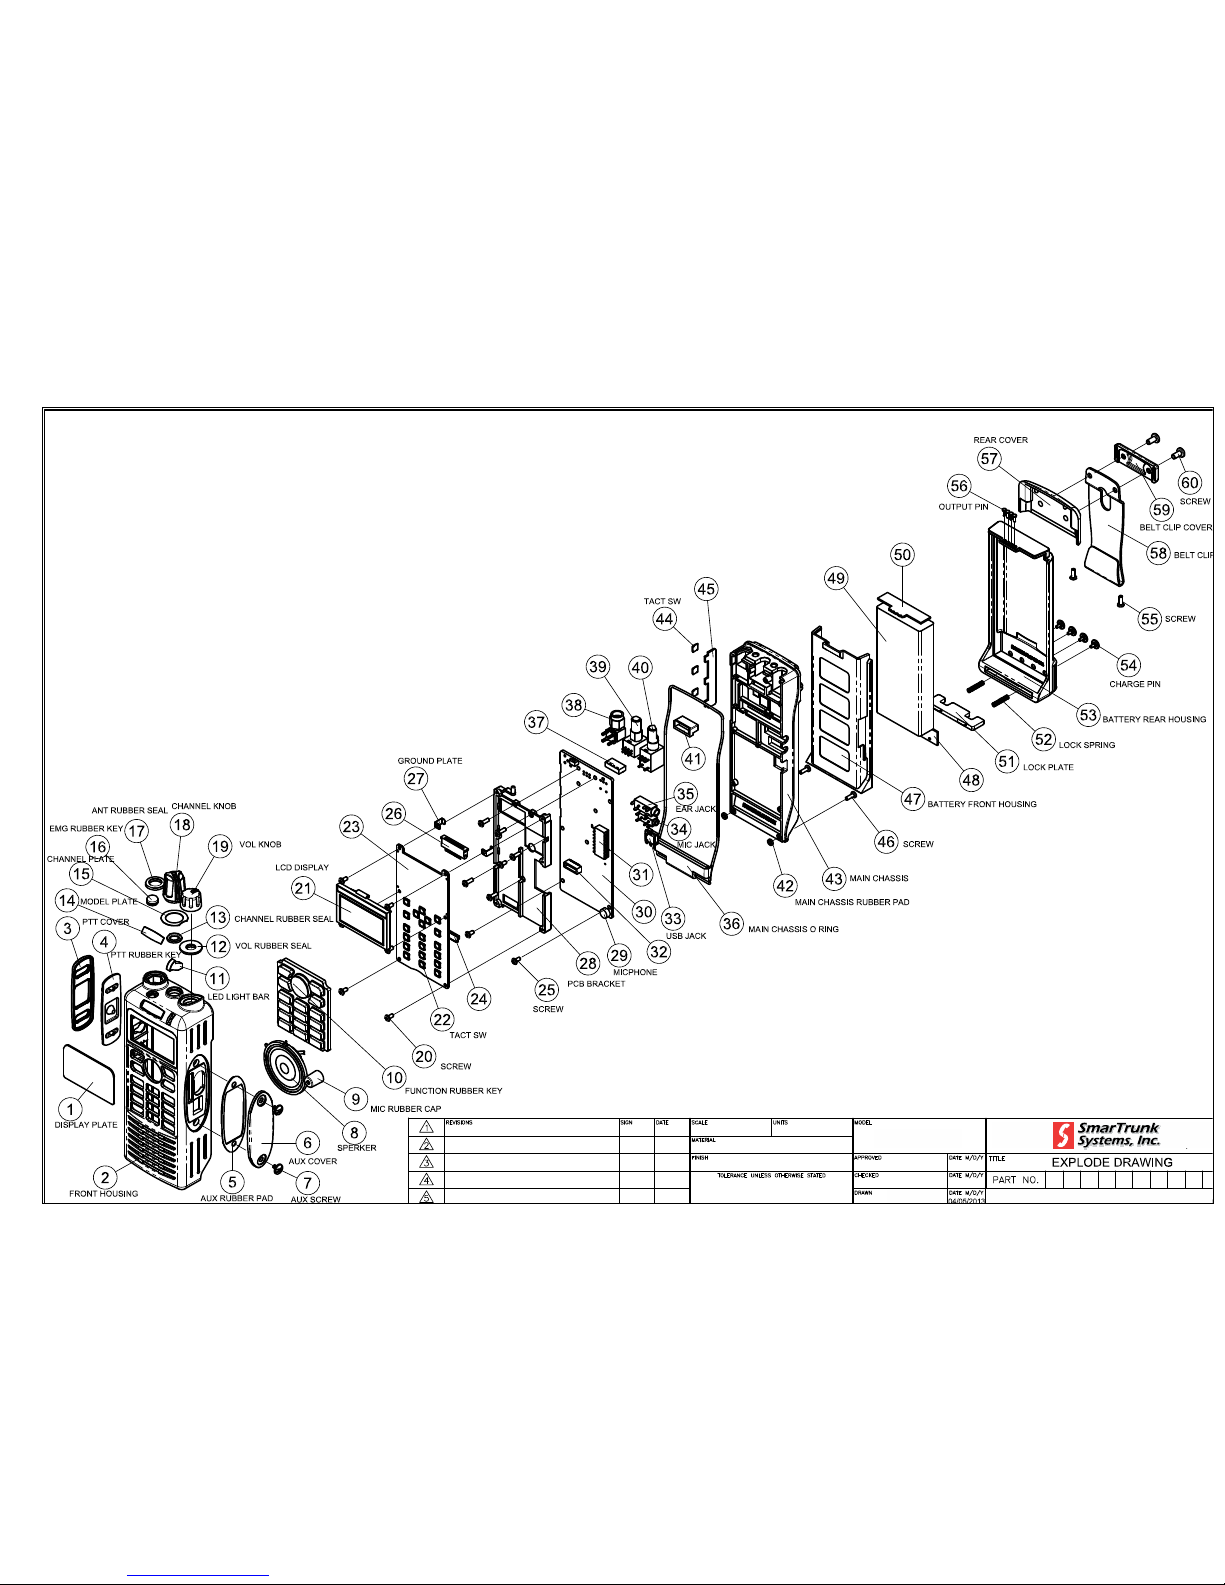
2. ST-2112 EXPLODED VIEW
ST-2112V
Jack Chang
Daniel Martin
2 . ST-2112 EXPLODED VIEW
Page 7
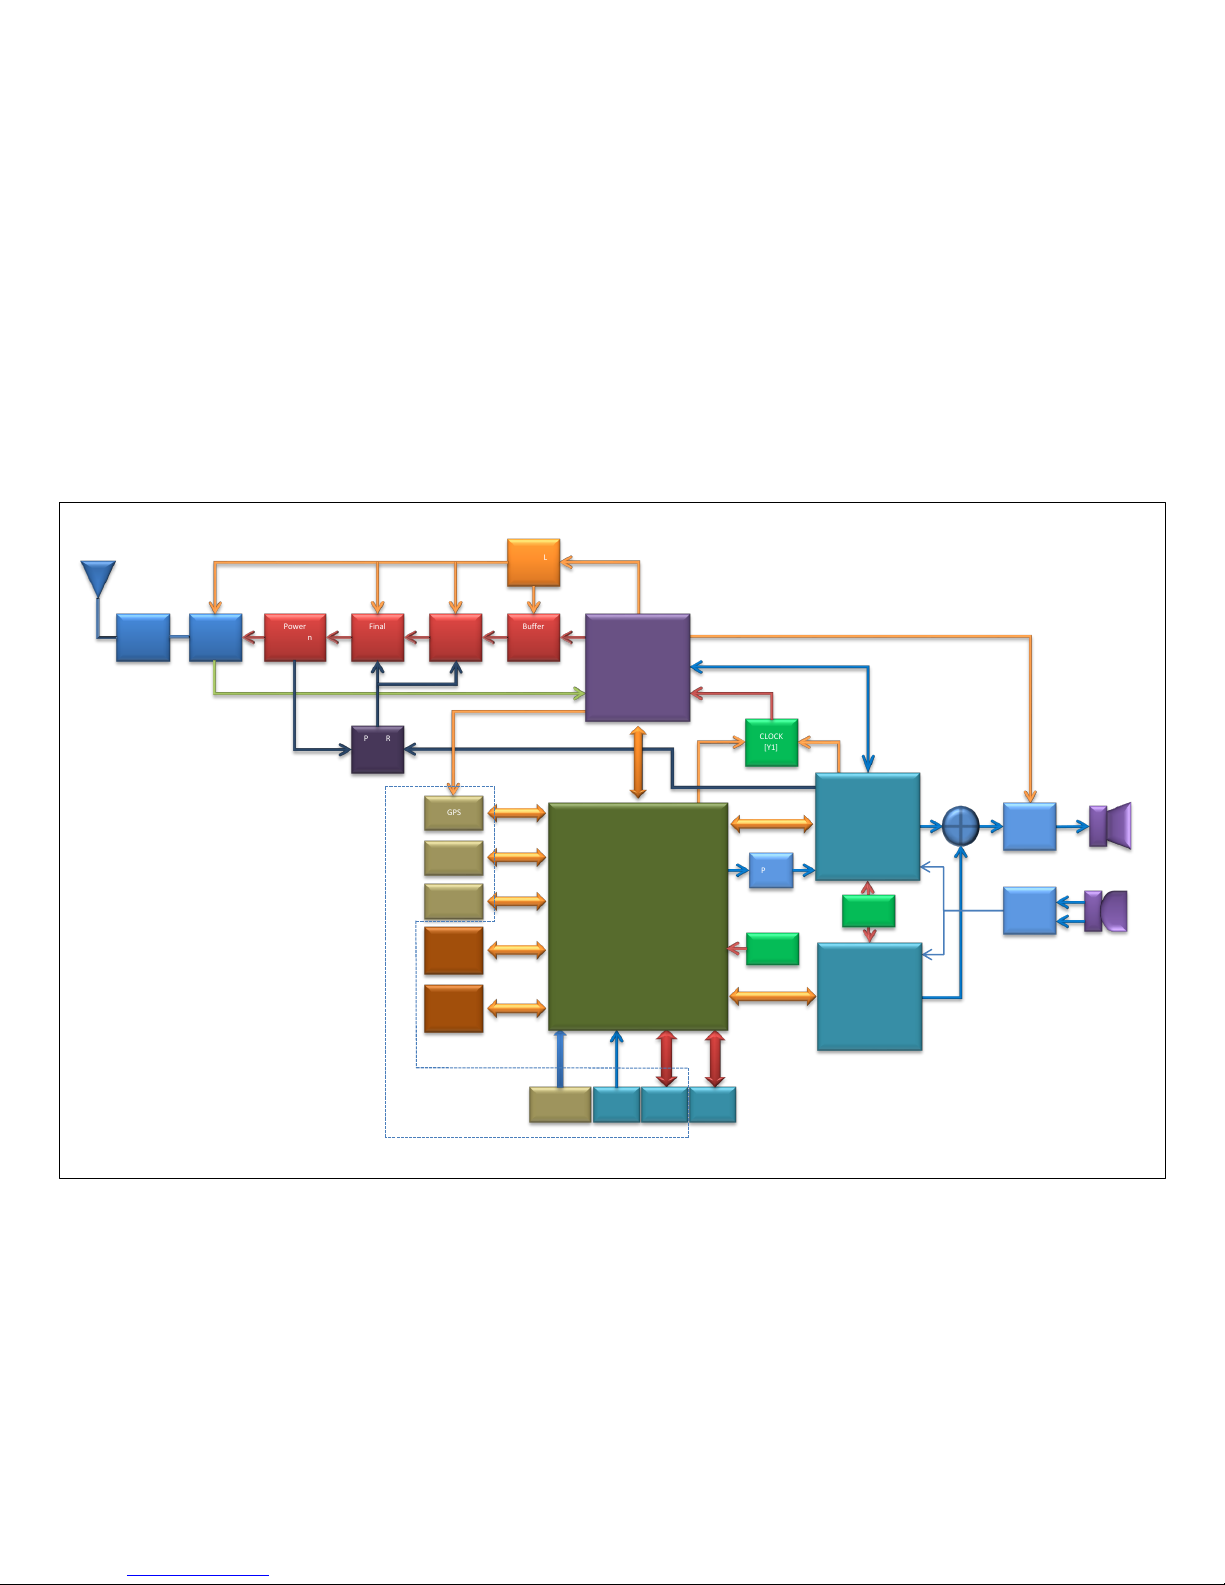
3. ST-2112 SIMPLIFIED DIAGRAM
LPF
Ant Sw
D1/D3
Final
AMP
Q1
Power
Detection
D2
Driver
Q3
Buffer
AMP
Q2
TX CTRL
[U3]
CLOCK
[Y1]
POWER
CTRL
[U2]
FLASH
MEMORY
[U4]
RAM
MEMORY
[U7]
DISPLAY
GPS
G-SENSOR
PWM
KEYBOARD
SIDE
KEYS
USB
SERIAL
PORT
Main Processor
[U8]
Radio
U1
Audio Processor
Modem
[U5]
VOCODER
[U6]
CLOCK
[Y2]
MIC
AMP
[U12]
AUDIO
PA
[U10]
CLOCK
[Y3]
JP2
Page 8

Notes:
Page 9
ST-2112D SM R 1.2 SMARTRUNK SYSTEMS, INC.
9
4. - ST-2112 RF DESCRIPTION
4.1. Circuit Configuration
The receiver is a single receiver with
built-in DSP fully integrated.
Incoming signals from the antenna,
after passing through LPF filter, are
fed direct to the DSP down
converter to get the baseband voice
from 0Hz to 3500Hz.
Demodulated signals are filtered
and conditioned onto a second DSP
based filter, which also includes a
high efficiency 4FSK modem.
For digital demodulation, the
recovered data is fed into a vocoder,
which converts the data to voice.
Analog voice from the analog path
or the analog voice recovered from
the vocoder, are fed into an audio
power amplifier.
Transmit signal frequency is
generated by integrated VCO and
PLL. RF frequency generated by the
integrated RF chip is amplified into
a 3-step amplifier then filtered by a
low pass filter to be applied to the
antenna.
4.2. Receiver System
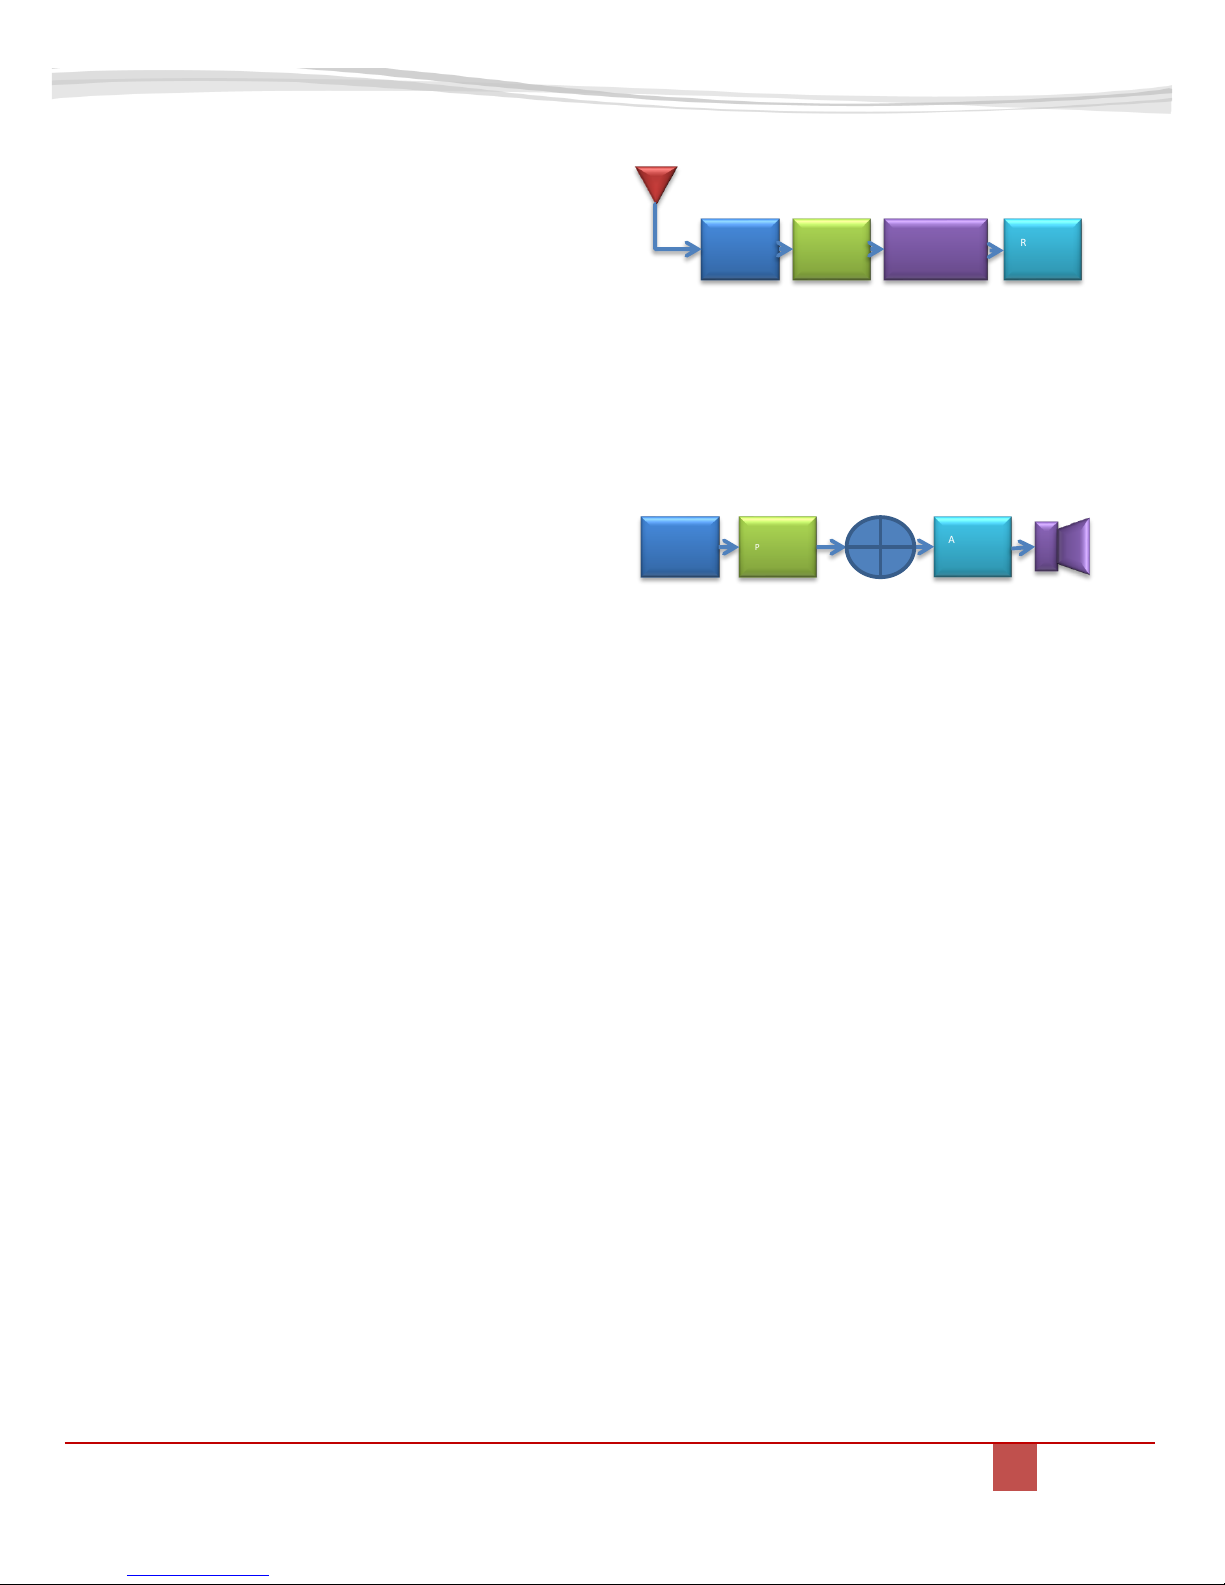
4.2.1. Front-end RF Receiver
Incoming RF signals from the
antenna are delivered to the
Receiver Unit and pass through a
Low-pass filter, antenna switching
diode, and then fed to the receiver
(U1) passing through a limiter BPF.
4.2.2. ANALOG Audio Processing
The RF signal is tuned by U1, which
includes a base band DSP audio
processing, recovering flat audio
from DC up to 3500 hz.
The detected audio is amplified,
filtered and conditioned inside of
U5 which also includes a deemphasize filtering shape for
received audio signals
The output of the filtered and
conditioned audio is delivered to an
audio power amplifier (U10) then to
the speaker passing through the
external audio connector switch.
4.2.3. Virtual Squelch Circuit
S/N ratio is measured by the
receiver (U1) as the result of the
analysis of the signal and the noise
of the carrier. The output is sent to
the main processor as a digital
frame, which is analyzed by radio
firmware, removing noise then
qualifying the signal level. If the
signal level is higher than the
LPF
SWITCH
PROTECTION
FILTER
RECEIVER
[U1]
RECEIVER
[U1]
AUDIO
PROCESSOR
[U5]
AMPLIFIER
[U10]
Page 10
ST-2112D SM R 1.2 SMARTRUNK SYSTEMS, INC.
10
expected for the current
programmed squelch threshold,
then the processor analyzes the
expected signaling programmed on
the current channel table.
In case of not any signaling is
required, or the signal has been
detected, the processor ask to the
audio processor (U5) to open the
audio path, unmuting the audio
amplifier (U10).
4.2.4. Virtual VOLUME CONTROL
The potentiometer position (RV1) is
measured by one analog to digital
converter on the audio processor
(U5), and then the information is
reported to the main processor. The
firmware immediately adjusts the
audio processor path gain to get the
appropriate overall circuitry volume
control.
Minimum volume, emergency and
private audio level are controlled
only by software overriding the
information received from the DAC
on U5.
4.2.5. Sub audio signaling
Received sub audio signaling like
CTCSS and DCS are received and
processed by the receiver (U1) then
detected on the audio processor
(U5). Once decoded, the sub audio
signaling is reported to the
processor where the firmware
compares it with the value
programmed into the current
channel programming.
If the received signaling matches
the channel programming, then the
main processor (U8) requests the
audio processor (U5) to open the
audio patch.
4.2.6. ANALOG AUDIBLE SIGNALING
DTMF signals, MDC1200 and tone
signals are processed and decoded
by the audio processor (U5).
Decoded information or received
tone is reported to the main
processor (U8).
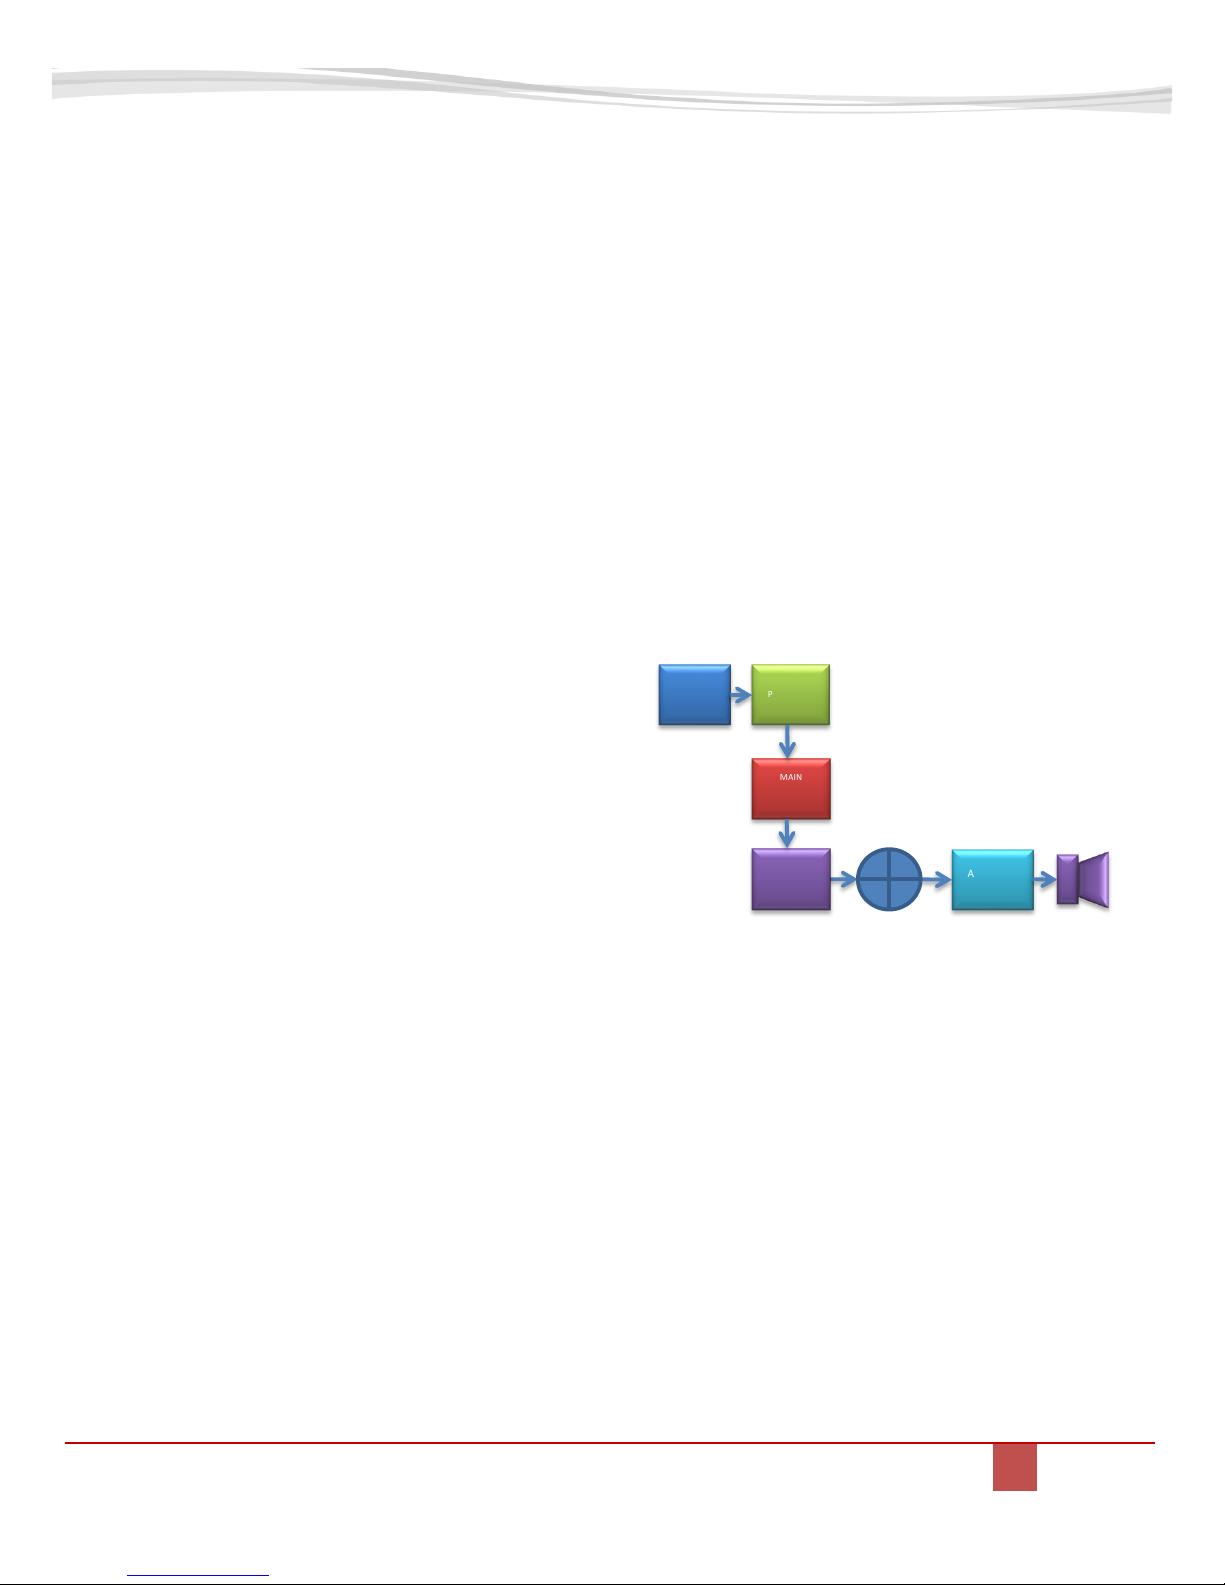
4.2.7. DIGITAL AUDIO PROCESSING
Digital received information is
processed by the receiver DSP (U1)
then delivered to the audio
processor (U5), which includes a
high speed (4FSK) modem.
Data decoded by the modem is
transferred to the main processor
(U8) which de-encrypts the
information, checks the integrity,
corrects the wrong bits and extract
the audio information form the
received frame.
The portion of the data received,
error free, is moved to the vocoder
(U6).
The vocoder re-builds the audio
from the compressed data then
applies filter it, adjust the volume
RECEIVER
[U1]
AUDIO
PROCESSOR
[U5]
AMPLIFIER
[U10]
MAIN
PROCESSOR
[U8]
VOCODER
U6]
Page 11
ST-2112D SM R 1.2 SMARTRUNK SYSTEMS, INC.
11
and fed it to the audio power
amplifier (U10).
4.3. Transmitter System
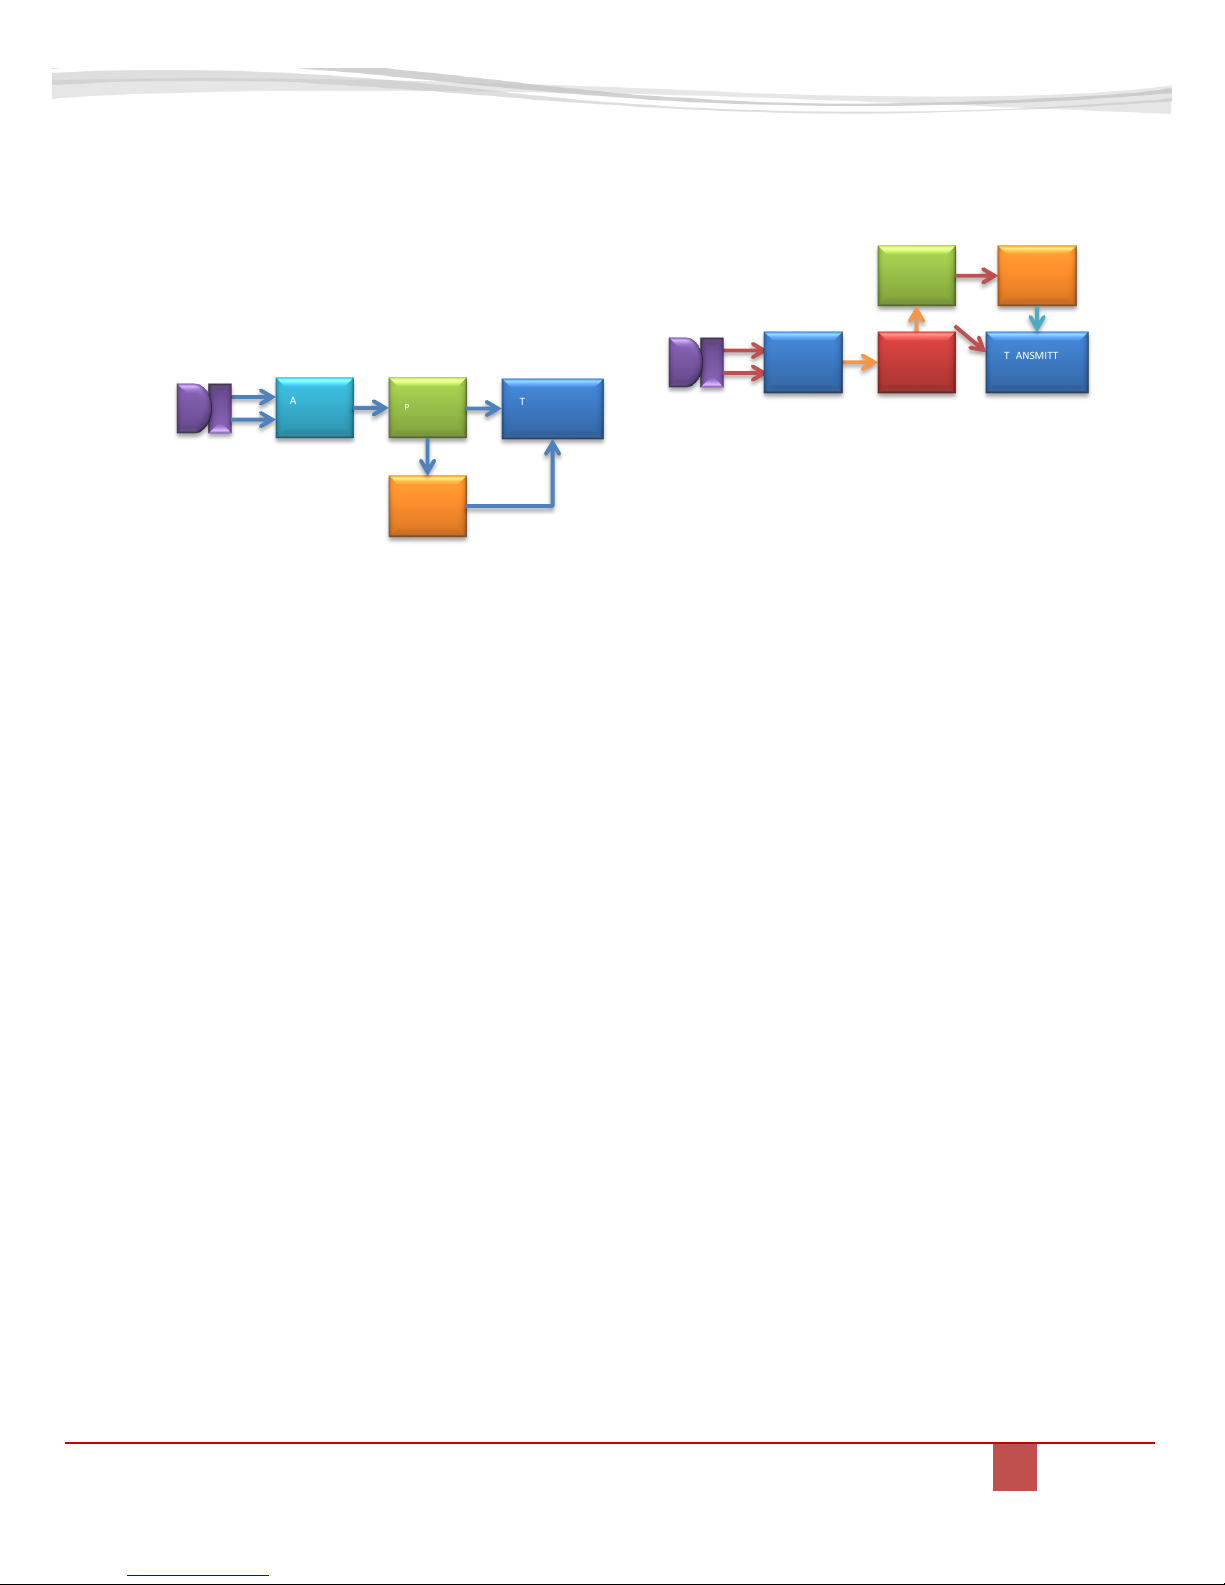
4.3.1. ANALOG TX SIGNAL
The AF signal from the internal
microphone (MK1) or external
microphone (J5) are processed as
differential signal, then it is
conditioned and transformed into
common mode by the microphone
pre-amplifier (U12).
The result of the conditioned inband filtered signal is fed to the
Audio Processor (U5), which
provides audio compander,
emphasize, limitation, encryption,
etc.
The high audio band of the signal
from 300 to 3500 Hz are directly fed
to the transmitter (U1), which
performs a direct modulation of a
generated carrier.
Low frequency signaling audio are
fed directly to Y1 VC TXCO main
clock generator and U1 with a
corresponding balance controlled
by software.
4.3.2. DIGITAL TX AUDIO:
The AF signal from the internal
microphone (MK1) or external
microphone (J5) are fed directly to
the vocoder chip (U6) which
perform the data codification,
delivering the digitized and encoded
audio as digital frames which are
processed by the Main Processor
U8, which add a FEC (Frame Error
Correction), encrypt the
information and add the user
related information as user ID, etc.
The final data frame is fed to the
Audio Processor (U5) which has a
built in modem, which operates for
FDMA or TDMA signals, controlling
the modulation of the Transmitter
(U1) through the VC TXCO for DC
to low frequencies and the direct
modulation for higher frequencies.
4.3.3. Drive and Final Amplifier Stages
Final RF is amplified on Q2
(2SC3356) then filtered to be fed to
Q3 (2SK3475) then finally amplified
by Q1 (2SK3476) up to 5 watts
output power.
The transmit signal then passes
through the antenna switch D1
(BAR63) and is low-pass filtered to
suppress harmonic spurious
radiation before delivery to the
antenna
AMPLIFIER
[U12]
AUDIO
PROCESSOR
[U5]
TRANSMITTER
[U1]
VC TXCO
[Y1]
AUDIO
PROCESSOR
[U5]
TRANSMITTER
[U1]
VC TXCO
[Y1]
MAIN
PROCESSOR
[U8]
VOCODER
[U6]
Page 12

ST-2112D SM R 1.2 SMARTRUNK SYSTEMS, INC.
12
4.3.4. Automatic Transmit Power
Control
The RF power detector (RB705D)
detects transmitted feedback then
sends the readout to audio
processor U5 (CMX-7141). Audio
amplifier compares the transmitted
power against the referred level
stored on current channel memory
adjusting the power control level
generated as reference by one DAC
output on the same Audio
processor (U5) then amplified by U2
(MCP6241U) controlling the gate
current on Q1 and Q17.
Evenly when power level is adjusted
by software on three levels (Hi, Med,
Lo) the power value can be adjusted
to any desired value between zero
and 5Watts by the alignment
software.
Notes:
Page 13

ST-2112D SM R 1.2 SMARTRUNK SYSTEMS, INC.
13
5. RC-2112 ALIGNMENT
5.1. Introduction
The ST-2112 series is carefully
aligned in factory for the specified
performance, across the frequency
range depending for each version.
Realignment should therefore not
be necessary except in the event of
a component failure, or altering
version type.
All component replacement and
service should be performed only by
an authorized SmarTrunk
representative, or the warranty
policy may be void.
The following procedures cover the
sometimes critical and tedious
adjustments that are not normally
required once the transceiver has
left the factory.
However, if damage occurs and
some parts subsequently are
placed, realignment may be
required. If a sudden problem
occurs during normal operation, it
is likely due to component failure;
realignment should not be done
until after the faulty component has
been replaced.
We recommend that servicing be
performed only by authorized
SmarTrunk service technicians
who are experienced with the
circuitry and fully equipped for
repair and align. Therefore, if a fault
is suspected, contact the dealer
from whom the transceiver was
purchased for instructions
regarding repair. Authorized
Smartrunk service technicians
realign all circuits and make
complete performance checks to
ensure compliance with factory
specifications after replacing any
faulty components.
Those who do undertake any of the
following alignments are cautioned
to proceed at their own risk.
Problems caused by unauthorized
attempts at realignment are not
covered by the warranty policy.
Also, SmarTrunk reserves the right
to change circuits and alignment
procedures in the interest of
improved performance, without
notifying owners.
Under no circumstances should
any alignment be attempted unless
the normal function and operation
of the transceiver are clearly
understood, the cause of the
malfunction has been clearly
pinpointed and any faulty
components replaced, and
realignment determined to be
absolutely necessary.
5.2. ALIGNMENT:
The following test equipment (and
thorough familiarity with its correct
use) is necessary for complete
realignment. Correction of
problems caused by misalignment
resulting from use of improper test
equipment is not covered under the
warranty policy.
While most steps do not require all
of the equipment listed, the
interactions of some adjustments
may require that more complex
adjustments be performed
afterwards. Do not attempt to
perform only a single step unless it
is clearly isolated electrically from
Page 14

ST-2112D SM R 1.2 SMARTRUNK SYSTEMS, INC.
14
all other steps. Have all test
equipment ready before beginning,
and follow all of the steps in a
section in the order presented.
Required Test Equipment
RF Signal Generator with
calibrated output level at 1
GHz
Deviation Meter (linear
detector)
In-line Wattmeter with 5 %
accuracy at 1 GHz
50 Ohm RF Dummy Load
with power rating 10W at 1
GHz
8 Ohm AF Dummy Load
(Attention: Audio output is
BTL output)
Regulated DC Power Supply
(standard 7.5 V DC, 3 A)
Frequency Counter with 0.2
ppm accuracy at 1GHz
Audio Generator
AC Voltmeter
DC Voltmeter
UHF Sampling Coupler
IBM PC / compatible
Computer with Microsoft®
Windows® XP or later
operating system
SmarTrunk SDR
Programming software
(version 1.0.2 or later)
USB A/B Programming Cable
5.3. Alignment Procedure
Alignment Preparation &
Precautions
A 50-Ohm RF Dummy Load and inline wattmeter must be connected
to the main antenna jack in all
procedures that request for
transmission, except where
specified otherwise. Correct
alignment is not possible with an
antenna.
After completing one-step, read the
following steps to determine
whether the same test equipment
will be required. If not, remove the
test equipment (except dummy load
and wattmeter, if connected) before
proceeding.
Correct alignment requires that the
ambient temperature be the same
as that of the transceiver and test
equipment, and that this
temperature be held constant
between 68°F and 86 °F (20°C ~ 30
°C). When the transceiver is
brought into the shop from hot or
cold air, it should be required to
wait few minutes to come to room
temperature before alignment.
Whenever possible, alignments
should be made with oscillator
shields and circuit boards firmly
affixed in place. Also, the test
equipment must be thoroughly
warmed up before beginning.
Note: Signal levels in dB referred to
in the alignment procedure are
based on 0 dBm EMF = 1 mV.
5.3.1. GENERAL ALIGNMENT
CONSIDERATIONS:
Evenly if the radio is powered off,
the alignment software will detect
it, but some of the test cannot be
performed correctly.
Please be sure you turn the radio on
before continue with this alignment
procedure.
Page 15
ST-2112D SM R 1.2 SMARTRUNK SYSTEMS, INC.
15
In case the battery has not enough
charge, the test will be aborted by
the software. Please ensure the
battery has more than 50% of
remaining charge to complete the
test.
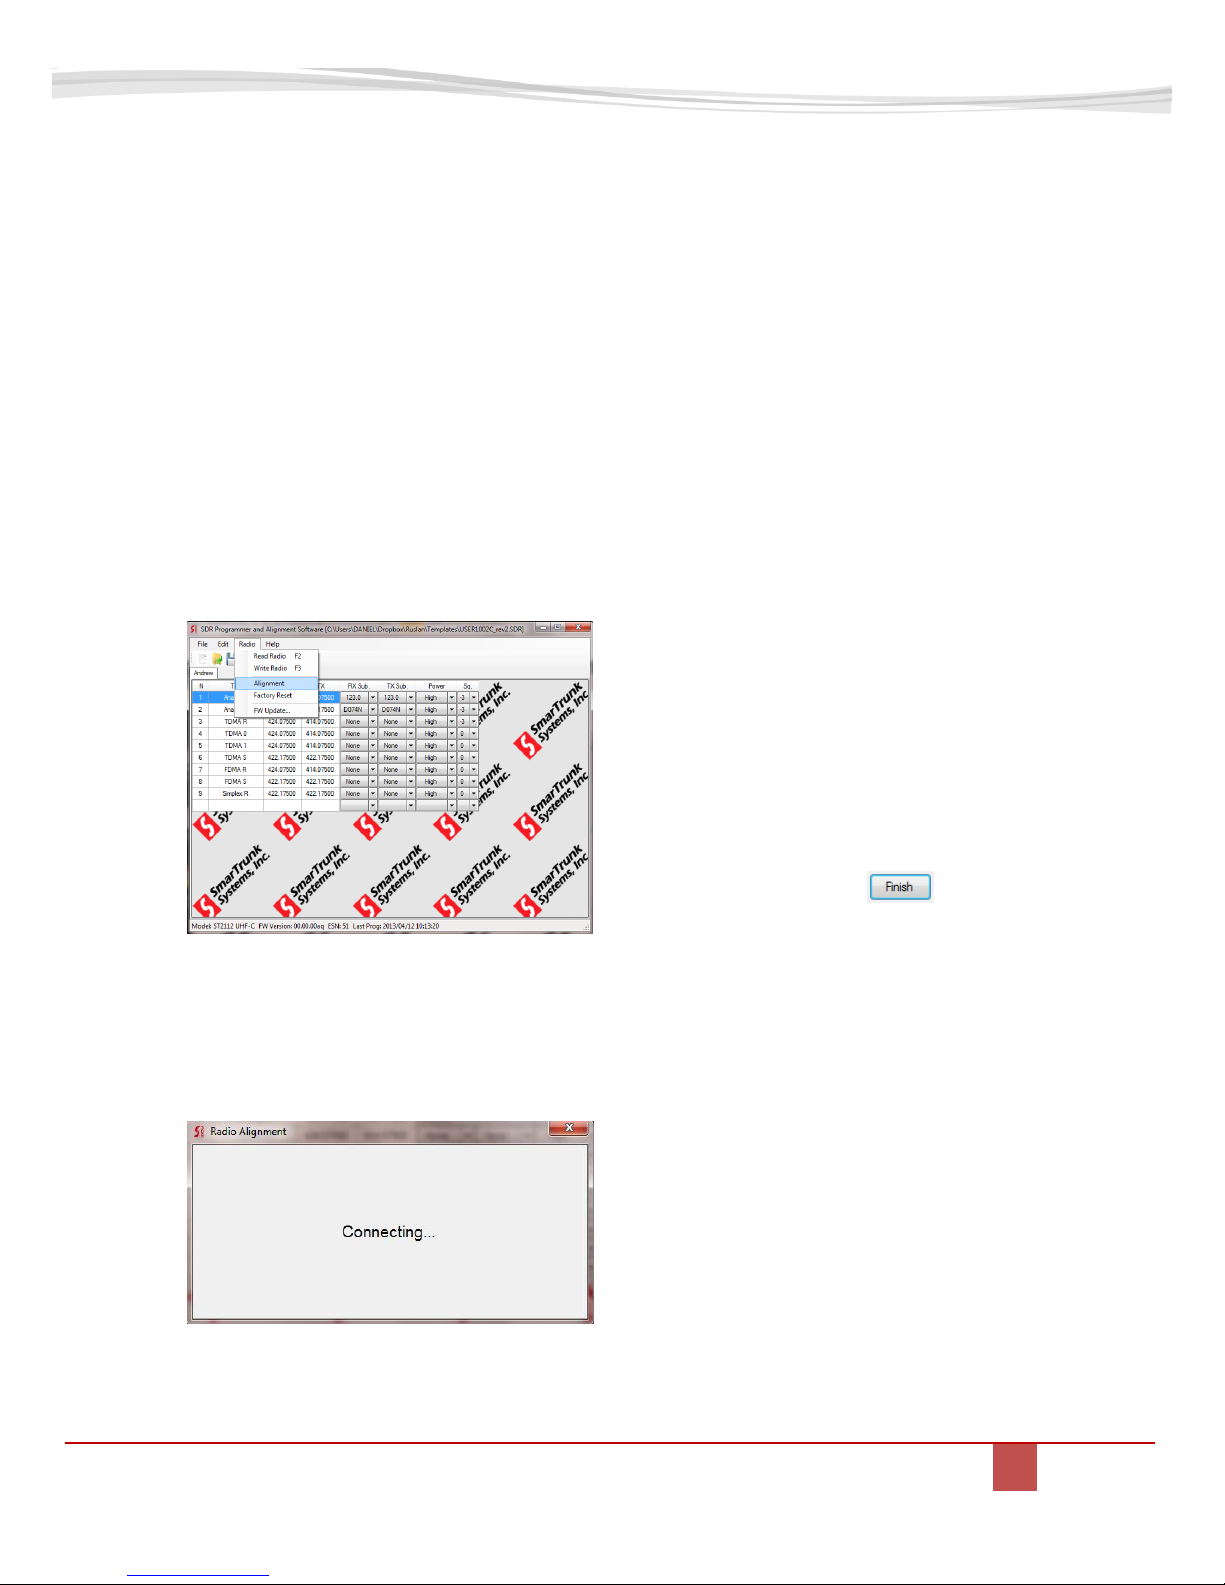
5.4. MAIN RADIO ALIGNMENT
Before setup any parameter, run
SDR programming software then
select Radio Alignment from top bar
menu.
A complementary message will be
displayed on the time the software
detects the radio connected to USB
port on the computer.
If the radio isn’t connected, then the
program will be timed out after 20
seconds.
As soon as the radio is detected,
actual radio parameters are loaded.
Once the radio is connected, a new
screen pops up showing all
alignment parameters. The
software downloads actual
alignment parameters stored into
radio memory, so the information
displayed on each alignment step is
the real value form the previous
alignment.
The radio also stores in a special
memory area, original values
assigned in factory. You can go
back to those values anytime for
any particular alignment step.
In case the radio is password
protected, dealer password is
required to access to this alignment
menu.
At any time, press to end
the alignment procedure then the
radio will returns to alignment
menu.
For any transmit related alignment
parameter, low power will be used.
5.5. TRANSMITTER ALIGNMENT:
Page 16
ST-2112D SM R 1.2 SMARTRUNK SYSTEMS, INC.
16
7.5V Power Supply
PC compatible
On Line Wattimeter
30dB pad
Deviation Meter
Frequency Counter
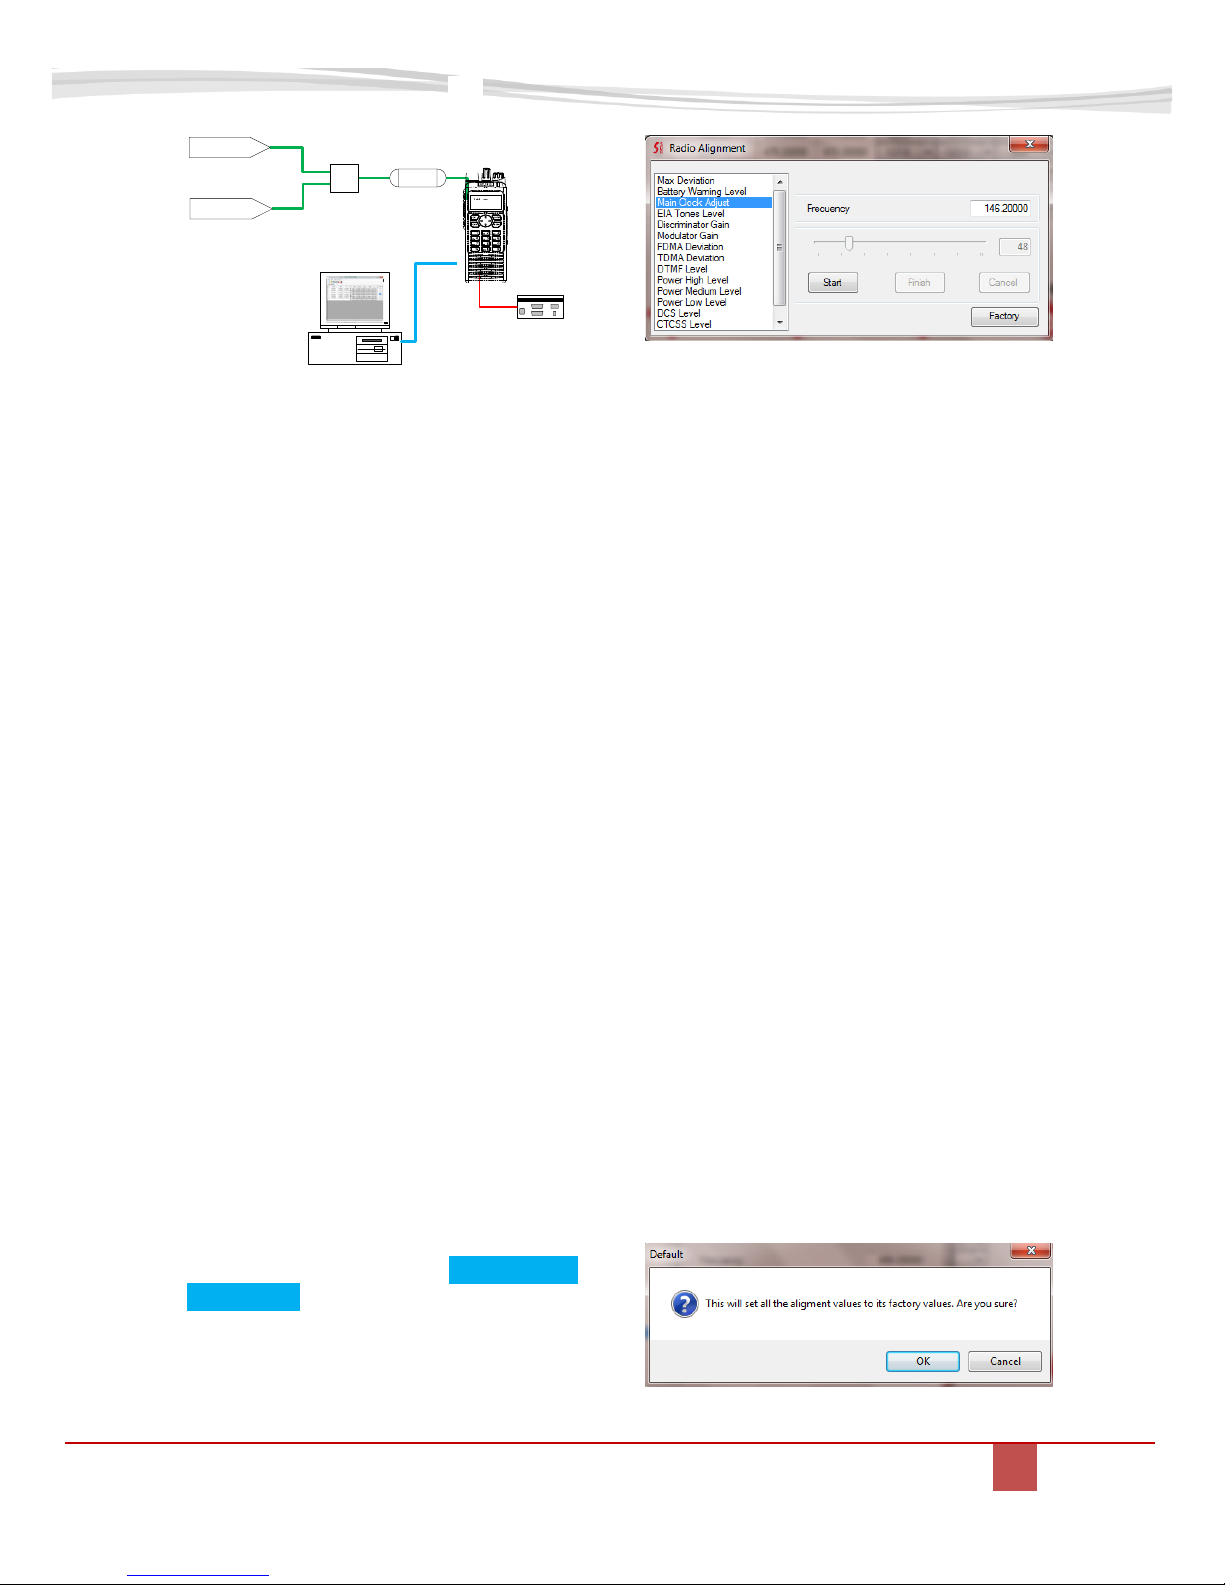
Setup the test equipment as shown
for transceiver alignment, apply 7.5
V DC power to the transceiver.
The RF parameters are typed on the
alignment software to facilitate the
alignment within all radio band
avoiding special programming of
the radio before start alignment
procedure.
All parameters can be aligned
without relationship to any other,
so there is no an order to align. On
this way, you can adjust only the
desired parameter, avoiding to
waste time realigning other
parameters than required.
Before proceed to align any
parameter, a desired frequency
must be loaded into both TX and
RX. Evenly when the radio has
stable characteristics for all
bandwidth, it is recommendable to
align on middle of the radio working
band.
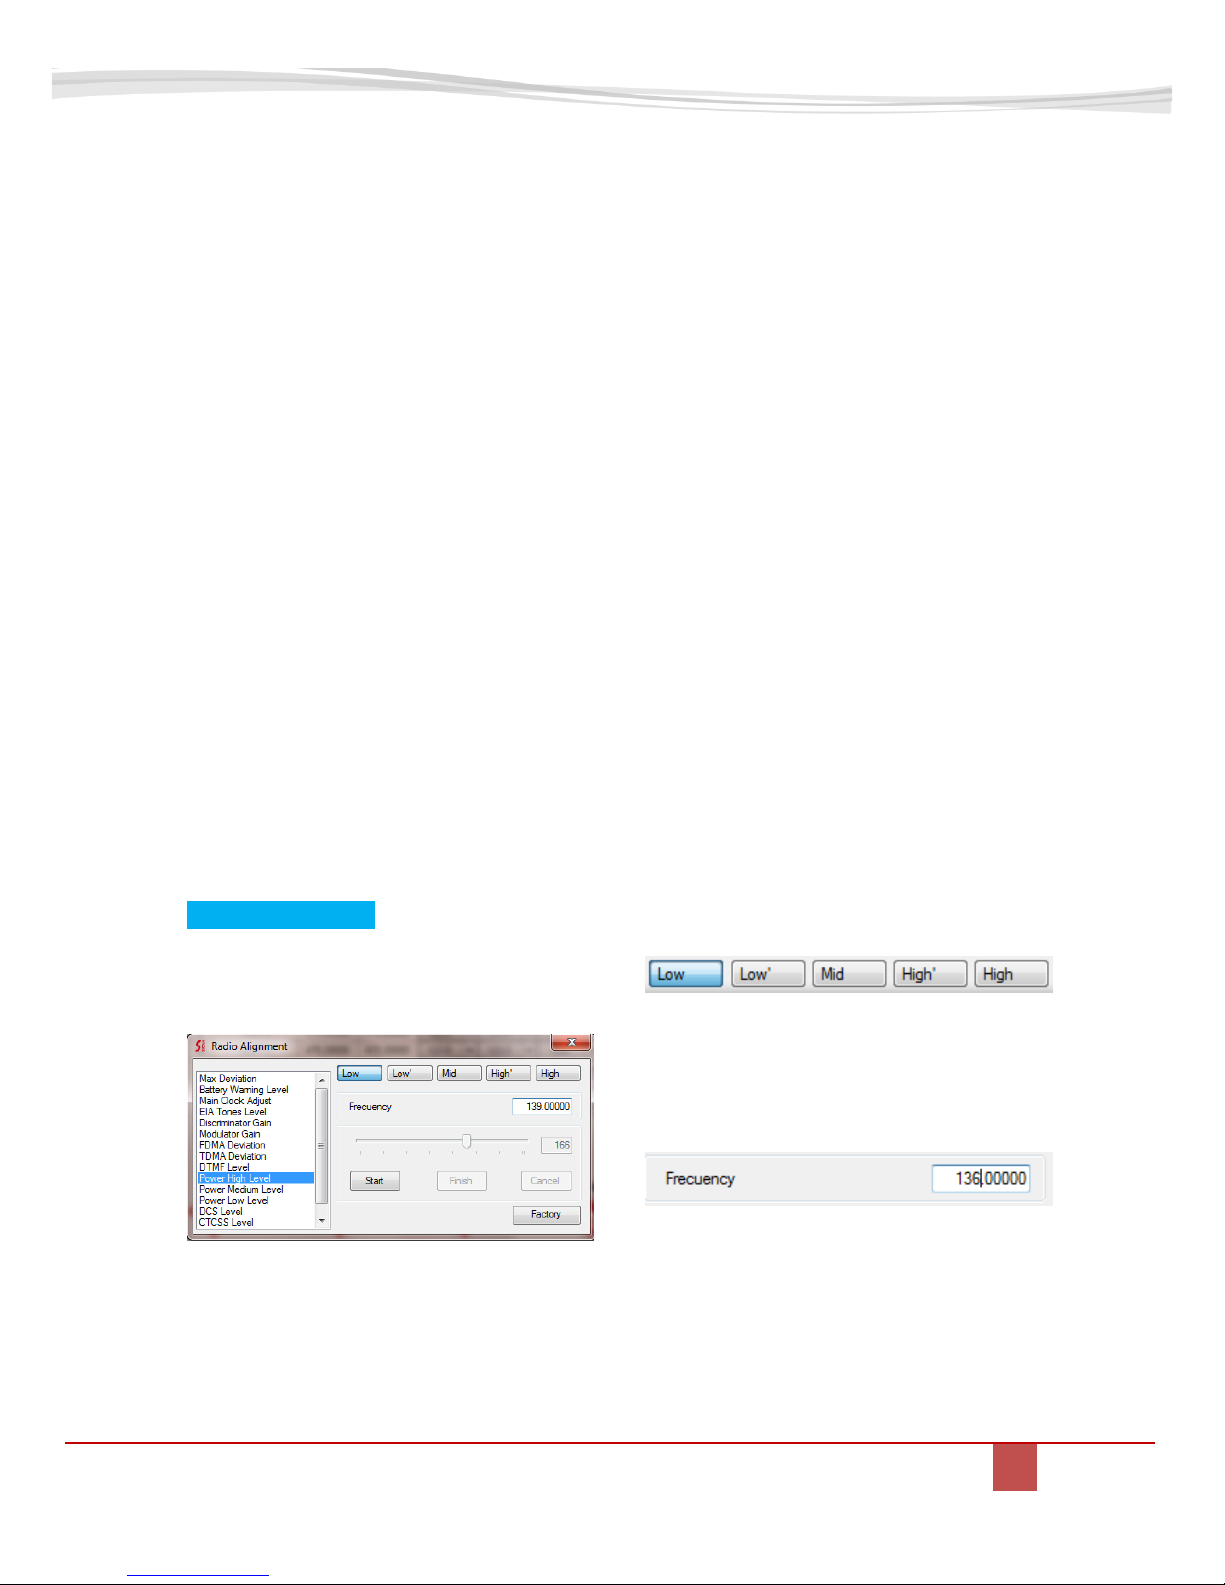
5.5.1. Main Clock alignment:
To align the main clock for radio Tx
and RX, please select Main Clock
Alignment option Alignment screen.
Fig 12: alignment menu
Actual alignment value will be
displayed on alignment slider.
Press [Start] then move the slider to
reach the desired value at the time
you checks the Frequency Counter
to reach the desired frequency as
shown on Frequency field of the
alignment screen.
As soon the desired value is
reached, press [Finish] to store the
value on radio memory.
If you want to retrieve factory
default, press [Factory] instead of
[Start]. You will be asked to confirm
the factory default alignment, and
then if you confirm it, original
values from factory will be loaded
into current alignment settings.
This confirmation screen will
appears any time you want to
realign any parameter to Factory
Default.
Page 17
ST-2112D SM R 1.2 SMARTRUNK SYSTEMS, INC.
17
5.5.2. Transmit Power alignment:
ST-2112 has three power levels to
be selected for each channel. High,
medium and low power level can be
aligned as per radio usage
requirement.
For power alignment, you can do a
fine tuning as per your desire
frequency sub-band. The software
lets you linearize the complete band
“cutting” the complete band into
five steps to let you focus into your
frequency bands.
Even when the software has already
assigned the most convenient
frequency points to consider the
alignment, you still can enter
exactly the frequency of your
interest.
5.5.2.1. High POWER LEVEL
ALIGNMENT
To align the High Power level select
Power High Level.
Software automatically retrieves
actual level to the alignment slider.
This level has been aligned in
factory, but you still can adjust it as
per your desires.
To realign, please select [Start] then
move the slider or introduce the
value manually at the time you
check the real transmit power on
the wattmeter connected to the
radio as recommended on TX
alignment diagram.
As soon as [Start] is pressed, the
radio start to transmit a carrier, so
please verify the antenna dummy
load is properly connected to avoid
any damage to the transmitter.
As soon the desired value is
reached, press [Finish] to store the
value into radio memory.
If you want to load default High
power only, keeping any other value
without any change, press [Factory]
instead of [Start]. A pop up window
will ask you to confirm the default
parameters upload to the radio
power.
Press [OK] to confirm.
As descripted previously, you can
manually select the frequency
range to align, divided into five
different sub-ranges.
You can also define the right
frequency of interest to align, typing
the desired one into the frequency
field:
If selected frequency is not
supported by radio hardware, the
frequency field will be filled on red.
In case the PLL is locked, then it
becomes filled on green.
Please be sure that the PLL is
locked as soon as you press [Start],
Page 18

ST-2112D SM R 1.2 SMARTRUNK SYSTEMS, INC.
18
otherwise the alignment should be
not correct.
5.5.2.2. Mid POWER LEVEL
ALIGNMENT
Repeat the same procedure to align
High Power, but select Power
Medium Level on the alignment
menu.
5.5.2.3. LOW POWER LEVEL ALIGNMENT
Repeat the same procedure to align
High Power, but select Power Low
Level on the alignment menu.
5.5.3. ANALOG MAXIMUM DEVIATION
Maximum deviation for analog
signals modulated from ST-2112
can be aligned by Max Deviation
alignment option from the
alignment menu.
Actual alignment value will be
displayed on alignment slider.
Press [Start] then move the slider to
reach the desired value at the time
you checks the deviation meter to
reach the desired signaling level for
narrow band operation. Radio will
generate a 1000Hz alignment
reference tone for alignment
proposes.
As soon the desired value is
reached, press [Finish] to store the
value on radio memory.
Wide band channels uses the same
limiter. No additional wide band
max deviation alignment is
required.
If you want to retrieve factory
default, press [Factory] instead of
[Start]. You will be asked to confirm
the factory default alignment, and
then if you confirm it, original
values from factory will be loaded
into current alignment settings
5.5.4. Modulation Gain alignment:
This is a critical parameter which
may not be realigned to different
values other than factory default.
Page 19

ST-2112D SM R 1.2 SMARTRUNK SYSTEMS, INC.
19
Lower gain means a very high
microphone gain must be assigned
to get the proper radio voice
deviation, and higher gain means a
risk because the max deviation
limit must be reached by any signal
which makes the limiter to
introduce distortion to avoid over
deviation.
Under your risk, if you still prefer to
realign the overall modulation gain,
you must select Modulator Gain on
Alignment screen.
Actual alignment value will be
displayed on alignment slider.
Press [Start] then move the slider to
reach the desired value at the time
you checks the deviation meter to
reach the desired signaling level for
narrow band operation.
For this alignment step, the radio
does not generate any signal. It only
stores the new value of the overall
modulation gain into the memory.
As soon the desired value is
reached, press [Finish] to store the
value on radio memory.
If you want to retrieve factory
default, press [Factory] instead of
[Start]. You will be asked to confirm
the factory default alignment, and
then if you confirm it, original
values from factory will be loaded
into current alignment settings.
5.5.5. FDMA DATA MODULATION
alignment:
To align 4FSK signaling deviation
for FDMA mode, select FDMA
Deviation on Alignment screen.
Actual alignment value will be
displayed on alignment slider.
Press [Start] then move the slider to
reach the desired value at the time
you checks the deviation meter to
reach the desired signaling level for
narrow band operation. Radio will
generate a 1000Hz reference tone
for alignment proposes.
As soon the desired value is
reached, press [Finish] to store the
value on radio memory.
If you want to retrieve factory
default, press [Factory] instead of
[Start]. You will be asked to confirm
the factory default alignment, and
then if you confirm it, original
values from factory will be loaded
into current alignment settings.
Page 20

ST-2112D SM R 1.2 SMARTRUNK SYSTEMS, INC.
20
5.5.6. TDMA DATA MODULATION
alignment:
To align 4FSK signaling deviation
for TDMA mode, select TDMA
Deviation on Alignment screen.
Actual alignment value will be
displayed on alignment slider.
Press [Start] then move the slider to
reach the desired value at the time
you check the deviation meter to
reach the desired signaling level for
narrow band operation. Radio will
generate a 1000Hz reference tone
for alignment proposes.
As soon the desired value is
reached, press [Finish] to store the
value on radio memory.
If you want to retrieve factory
default, press [Factory] instead of
[Start]. You will be asked to confirm
the factory default alignment, and
then if you confirm it, original
values from factory will be loaded
into current alignment settings.
5.5.7. EIA tones Level Alignment:
EIA signaling generated by ST-2112
must be aligned by selecting EIA
Tones Level alignment option from
the alignment menu.
Actual alignment value will be
displayed on alignment slider.
Press [Start] then move the slider to
reach the desired value at the time
you check the deviation meter to
reach the desired signaling level for
narrow band operation. Radio will
generate a 1000Hz reference tone
for alignment proposes.
As soon the desired value is
reached, press [Finish] to store the
value on radio memory.
If you want to retrieve factory
default, press [Factory] instead of
[Start]. You will be asked to confirm
the factory default alignment, and
then if you confirm it, original
values from factory will be loaded
into current alignment settings.
5.5.8. DTMF signaling level alignment:
DTMF signaling generated by ST2112 must be aligned by selecting
DTMF Level alignment option from
the alignment menu.
Page 21

ST-2112D SM R 1.2 SMARTRUNK SYSTEMS, INC.
21
Actual alignment value will be
displayed on alignment slider.
Press [Start] then move the slider to
reach the desired value at the time
you check the deviation meter to
reach the desired signaling level for
narrow band operation. Radio will
generate a 1000Hz alignment
reference tone for alignment
proposes.
As soon the desired value is
reached, press [Finish] to store the
value on radio memory.
If you want to retrieve factory
default, press [Factory] instead of
[Start]. You will be asked to confirm
the factory default alignment, and
then if you confirm it, original
values from factory will be loaded
into current alignment settings.
5.5.9. DCS signaling alignment:
DCS signaling encoded from ST2112 must be aligned by selecting
DCS Level alignment option from
the alignment menu.
Actual alignment value will be
displayed on alignment slider.
Press Start then move the slider to
reach the desired value at the time
you check the deviation meter to
reach the desired signaling level for
narrow band operation. Radio will
generate 134.4Hz audio tone for
alignment proposes.
As soon the desired value is
reached, press [Finish] to store the
value on radio memory.
If you want to retrieve factory
default, press [Factory] instead of
[Start]. You will be asked to confirm
the factory default alignment, and
then if you confirm it, original
values from factory will be loaded
into current alignment settings.
5.5.10. CTCSS signaling alignment
CTCSS signaling encoded from ST2112 can be aligned by selecting
CTCSS Level alignment option from
the alignment menu.
Page 22

ST-2112D SM R 1.2 SMARTRUNK SYSTEMS, INC.
22
Actual alignment value will be
displayed on alignment slider.
Press [Start] then move the slider to
reach the desired value at the time
you check the deviation meter to
reach the desired signaling level for
narrow band operation. Radio will
generate 123.0Hz audio tone for
alignment proposes.
As soon the desired value is
reached, press [Finish] to store the
value on radio memory.
If you want to retrieve factory
default, press [Factory] instead of
[Start]. You will be asked to confirm
the factory default alignment, and
then if you confirm it, original
values from factory will be loaded
into current alignment settings.
5.5.11. FSK signaling alignment:
To align FSK/PSK signaling
deviation, select FSK Mod Level on
Alignment screen.
Actual alignment value will be
displayed on alignment slider.
Press [Start] then move the slider to
reach the desired value at the time
you check the deviation meter to
reach the desired signaling level for
narrow band operation. Radio will
generate a 1000Hz alignment
reference tone for alignment
proposes.
As soon the desired value is
reached, press [Finish] to store the
value on radio memory.
If you want to retrieve factory
default, press [Factory] instead of
[Start]. You will be asked to confirm
the factory default alignment, and
then if you confirm it, original
values from factory will be loaded
into current alignment settings.
Page 23

ST-2112D SM R 1.2 SMARTRUNK SYSTEMS, INC.
23
5.6. RECEIVER ALIGNMENT
Setup the test equipment as shown
for Receiver alignment, apply 7.5 V
DC power to the transceiver.
The RF frequency must be loaded
on Receiver Frequency of the
alignment software to facilitate the
alignment within all radio band
avoiding special programming of
the radio before start alignment
procedure.
7.5V Power Supply
PC compatible
RF signal generator
RECEIVER ALIGNMENT SETUP
5.6.1. DISCRIMINATOR GAIN
This is a critical parameter which
may not be realigned to different
values other than factory default.
Under your risk, if you still prefer to
realign the overall modulation gain,
you must select Discriminator Gain
on Alignment screen.
Actual alignment value will be
displayed on alignment slider.
Press [Start] then move the slider to
reach the desired value.
As soon the desired value is
reached, press [Finish] to store the
value on radio memory.
Default value is 0.
If you want to retrieve factory
default, press [Factory] instead of
[Start]. You will be asked to confirm
the factory default alignment, and
then if you confirm it, original
values from factory will be loaded
into current alignment settings.
Page 24

ST-2112D SM R 1.2 SMARTRUNK SYSTEMS, INC.
24
6. COMPLEMENTARY RADIO
ALIGNMENT
6.1. BATTERY WARNING LEVEL
ST-2112 generates acoustic and
visual alerts when battery has
reached a low voltage.
Visual information is displayed on
battery icon which flashes with a
cross on it when the minimum
hardware value is reached.
Acoustic signaling is generated by
the radio when the battery warning
voltage is reached and this value
can be adjusted by the dealer.
To align battery warning levels,
select Battery Warning Level on
Alignment screen.
Actual alignment value will be
displayed on alignment slider.
Press [Start] then move the slider to
reach the desired value.
This value means the percentage of
charge when the radio starts the
warning signals to the user (visual
and acoustic).
As soon the desired value is
reached, press [Finish] to store the
value on radio memory.
Default value is 10 which
correspond to 10% of residual
charge to start the warning process.
If you want to retrieve factory
default, press [Factory] instead of
[Start]. You will be asked to confirm
the factory default alignment, and
then if you confirm it, original
values from factory will be loaded
into current alignment settings.
Page 25
ST-2112D SM R 1.2 SMARTRUNK SYSTEMS, INC.
25
7. COMPLIMENTARY USER ALIGNMENT
The above parameters only can be
aligned under dealer login and most
of them should be critical for proper
radio performance.
Additional complimentary
parameters should be also aligned
on user login mode; it means the
user can align it as per the most
convenient way for particular radio
usage.
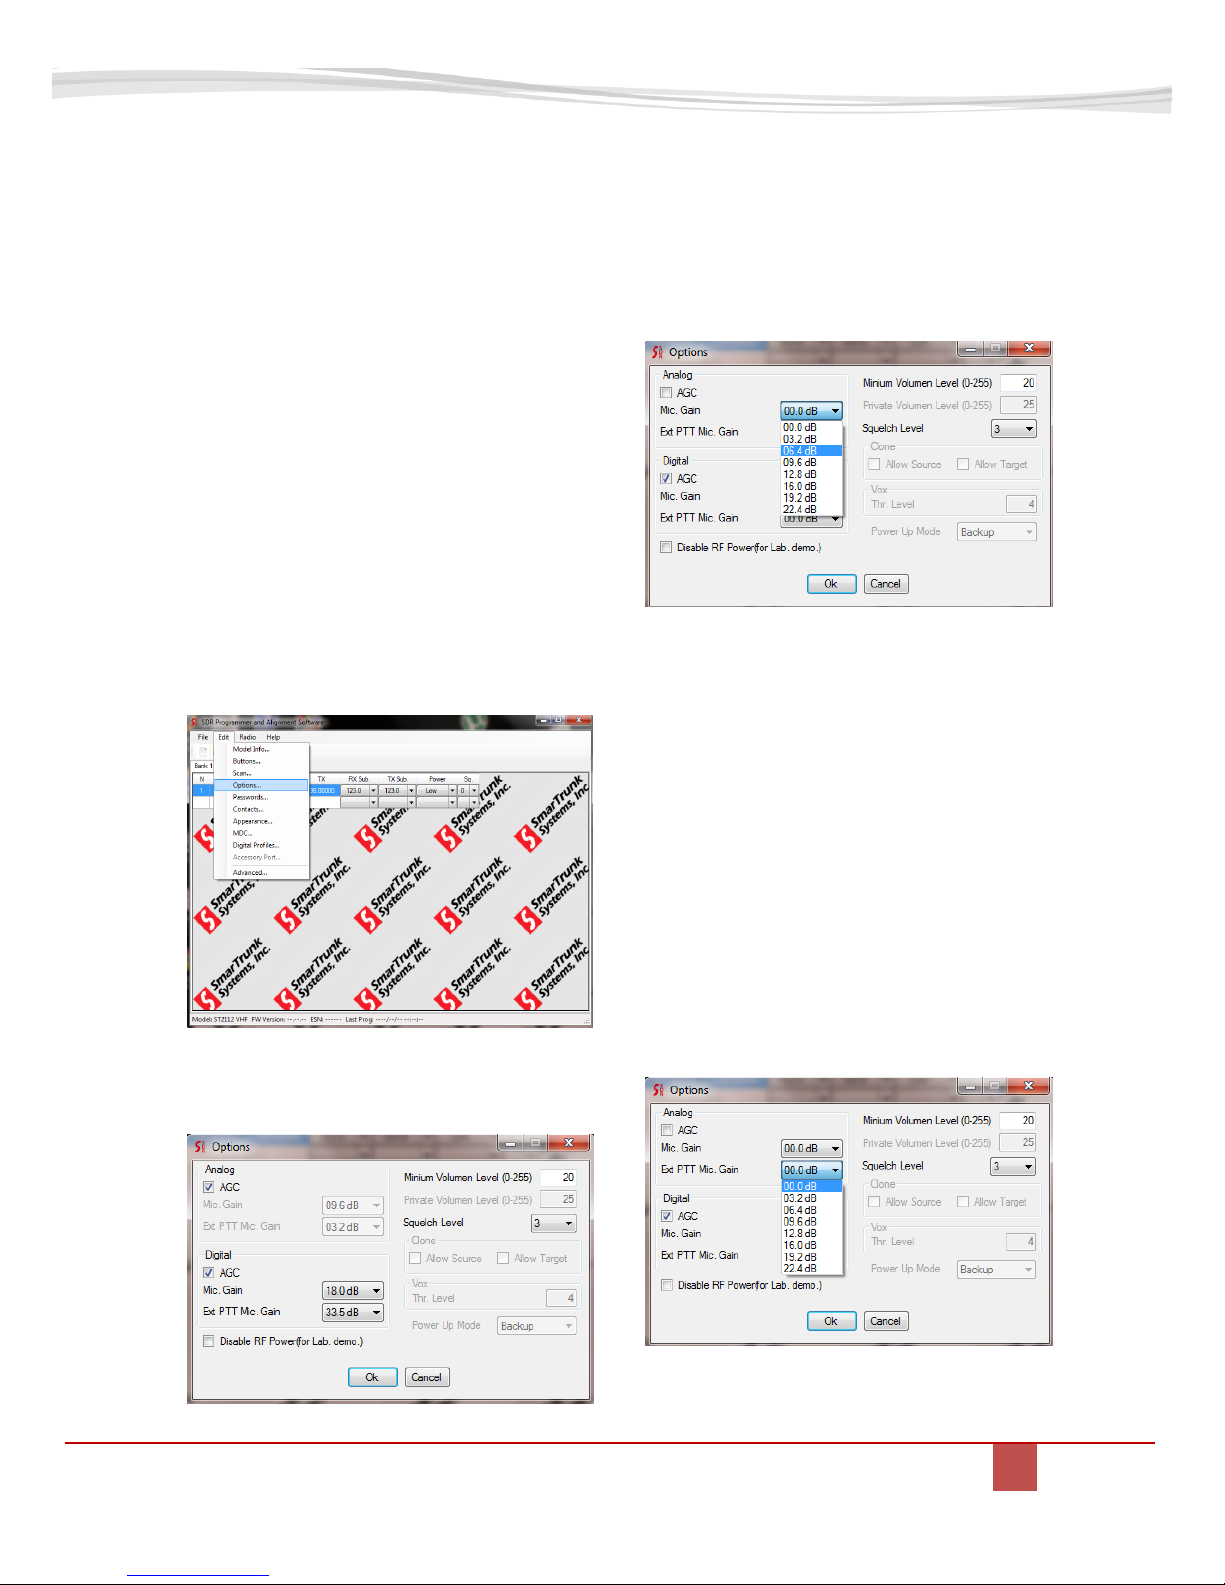
7.1. OPTION ALIGNMENT:
To access to the option alignment
menu, select Edit then Option form
the main software toolbar:
As soon as you click on Options…
the Options screen is popped up:
From this screen the user can
adjust:
7.1.1. ANALOG Microphone gain:
It aligns microphone sensitivity.
Alignment step is 3.2dB.
For noisy environments or when
voice encryption is used, we
recommend keeping it as low as
possible.
Press [OK] to store it in the file.
The value will be updated after the
file is transferred to the radio.
7.1.2. ANALOG External Mic Gain:
It aligns microphone sensitivity.
Alignment step is 3.2dB.
Page 26

ST-2112D SM R 1.2 SMARTRUNK SYSTEMS, INC.
26
For noisy environments or when
voice encryption is used, we
recommend keeping it as low as
possible.
Press [OK] to store it in the file.
The value will be updated after the
file is transferred to the radio.
7.1.3. ANALOG AGC
ST-2112 has an Automated Gain
Control for analog microphone.
This function adjusts the gain to
reach a dynamic gain value which
makes the analog voice deviation be
equivalent to the right deviation
produced by 50mV RMS on the
microphone output, and the
selected target gain.
If you want to use AGC, then you
must select the target equivalent
gain on the Mic Gain then check the
ACG Check Box.
For example, if you want a dynamic
gain which causes the same effect
that a gain of 6.4dB when the voice
on the microphone causes 50mV
RMS in the microphone output
(standard voice at 4 inches away
from the microphone), or 0dB gain
on the external microphone
connection, then you must program
the Analog Gain at 6.4dB and check
AGC as bellow:
Press [OK] to store it in the file.
The value will be updated after the
file is transferred to the radio.
7.1.4. DIGITAL AGC
ST-2112 has an Automated Gain
Control for digital microphone. This
function adjusts the gain to reach a
dynamic gain value which makes
the voice to be equivalent to the
right voice digitally played back in
the other end, produced by 50mV
RMS on the microphone output,
and the selected target gain.
If you want to use AGC, then you
must select the target equivalent
gain on the Mic Gain then check the
Digital ACG Check Box.
For example, if you want a dynamic
gain which causes the same effect
that a gain of 15.0dB when the
voice on the microphone causes
50mV RMS in the microphone
output (standard voice at 4 inches
away from the microphone), or
6.0dB gain on the external
microphone connection, then you
must program the Digital Gain at
15.0dB and the external gain on
6.0dB, then check Digital AGC as
bellow:
Page 27

ST-2112D SM R 1.2 SMARTRUNK SYSTEMS, INC.
27
Press [OK] to store it in the file.
The value will be updated after the
file is transferred to the radio.
7.1.5. MINIMUM VOLUME LEVEL:
This alignment lets the user to
ensure the speaker level should be
audible, evenly when the volume
control potentiometer is fully closed
counter clockwise.
Minimum volume level can be
aligned up to 250 (max) step 1.
7.1.6. SQUELCH LEVEL:
ST-2112 supports individual
squelch alignment for any channel
to be programmed individually on
each frequency defined into the
frequency chart of each bank. On
this way, the user can set a higher
threshold level for noisy channels
and lower for clear channels.
Once programmed, if due to the
proximity of the radio to a noisy
environment the squelch level is not
high enough, the user can adjust a
common reference for all the
channels in the radio by adjusting
the general squelch level.
Option screen on the edit menu,
lets you to program the default
squelch reference for all the
channels. This value can be
adjusted on the fly for the user if the
dealer program on squelch control
key or navigating through the radio
menu.
To set a desired squelch reference,
please select you desired squelch
level form the list:
Press [OK] to store it in the file.
The value will be updated after the
file is transferred to the radio.
7.1.7. DISABLE RF POWER
Use this box to check when you do
not want to use the RF power
amplifier. It is commonly used for
dealers to make a demonstration of
the radio features without
interfering to any other existing
user in the frequency or for
operation without antenna
connected to the radio.
Page 28

ST-2112D SM R 1.2 SMARTRUNK SYSTEMS, INC.
28
To disable the RF power amplifier,
check the box:
Press [OK] to store it in the file.
The value will be updated after the
file is transferred to the radio.
8. RADIO APPEARANCE ALIGNMENT
Radio appearance can be
customized as per user
requirement.
Select Edit then appearance from
radio top toolbars to access to the
appearance screen:
A soon as Appearance option is
selected, a new window will pop up:
8.1. DISPLAYS AND LEDS:
This screen lets you adjust the
behavior of the display and
keyboard backlight.
8.1.1. Auto backlight delay alignment:
The auto backlight mode,
automatically set on power off
status to the backlight, after any
event, to reduce the battery
demand.
To change the value of the delay
before the backlight is powered off;
please enter the quantity of desired
seconds for it.
8.1.2. Power on Text:
Type here the text to show on the
display when the radio is powered
on.
This string is very convenient for
radio identification or dealer
advertising at the time the radio is
powered on.
Page 29

ST-2112D SM R 1.2 SMARTRUNK SYSTEMS, INC.
29
The option to activate or deactivate
the power on text is disabled.
8.1.3. Leds:
Future version will allow the user to
disable the function of Rx and TX
led. Some application, as security,
sometime demands no lights on the
radio.
8.2. Tones
Second folder on appearance screen
allows the user to adjust the tones
which are played back in any event.
Tones can be changed by the
dealer.
Check Key PTT if you want to play
back a tone to acknowledge any
time PTT key is pressed.
Check De-Key PTT if you want to
play back a tone to acknowledges
any time PTT is released.
Check Keypad if you want to play
back a tone to acknowledge any
time any keyboard key is pressed.
Check Pre TOT if you want to play
back a tone to allert when time out
timer is close to expire (5 seconds
ahead).
Check Rotary if you want to play
back a tone to acknowledges any
time the rotary switch changes its
position.
8.3. ANNUNCIATION
Third folder on appearance screen,
allows the user to define if the radio
will play back any annunciation
message for some important events,
as per the associated check box.
Voice and language of the
annunciation events can be
adjusted as per user request.
Please refer to appendix III to learn
about it.
Check Bank if you want the radio
plays a concerning message back
any time current bank has been
changed.
Check Channel if you want the
radio plays a concerning message
back any time current channel has
been changed.
Check Squelch mode if you want
the radio plays a concerning
Page 30

ST-2112D SM R 1.2 SMARTRUNK SYSTEMS, INC.
30
message back any time squelch
function is changed.
Check Battery level if you want the
radio plays a concerning message
back any time battery level is below
the value programmed as Battery
Warning Level on alignment screen.
Check Power if you want the radio
plays a concerning message back
any time power level (high, med, low
or auto) has been changed.
Check GPS if you want the radio
plays a concerning message back
any time the GPS changes the
status: Powered on, Powered Off,
Fix, etc. (only on those versions
which includes GPS)
Check RSSI if you want the radio
plays a concerning message back
any time you ask for current RSSI.
Press OK once you finish the setting
of all desired messages. This
feature will be stored into the file
then it will be transferred to the
radio at the time the file is uploaded
to the radio.
Page 31

ST-2112D SM R 1.2 SMARTRUNK SYSTEMS, INC.
31
This page left blank intentionally
Page 32

9. ST-2112 SCHEMATIC
PAENA
CSRAM
Title
Size Doc ument Number Rev
Date: Sheet of
DM-0911-15 F
RC-2112 R1.4 REF LAYOUT 1.4
D
1 1Friday, July 11, 2014
U10
BH7824
CTLR
1
B_OUT
2
B_IN
3
SP_IN4SP1
5
VCC
6
GND
7
SP2
8
C44
1nF
C173
10nF
F1
C2Q 3
C175
1uF
+
C93
10uF 2K2
C174
1uF
R141 6. 8K
R106
10K
R107
120K
D6
DAN222
132
R45
47K
5VAF
C178
2.2uF
VOL
C179
1nF
J3
ROTARY
1
2
3
4
5
6
PWR_FB
C176 100nF
C194
100pF
18V+5V
C235
10nF
+
C231
10uFC248
10nF
U16
HT7218
Vin
1
GND
2
Sht
3
Vout
5
BP
4
C249
1nF
R126
10
C45
NC
C74
100nF
Q5
DTC114EM
R121
47K
C223
1nF
R115 10K
C193
47pF
R95
10K
R41
1K
C160
1uF
C148
1nF
C98
1uF
R90
10K
PWR_TUNE
C119
100nF
C120
10uF
R96
3K3
C158
1uF
C149
1nF
R91
10K
MOD2
R42
4K7
Y3
16Mhz
12
3 4
R79
47
C192
47pF
C140
100nF
t
RT1
33tk
1
2
C169
1nF
3VD
PROC ESS OR C LOC K
C5
100nF
UPCK
C155
NC
J6
CON4
1
2
3
4
C66
100nF
C89
NC
150
220K
10
1uF
MOD1
MOD2
15pF
C191
47pF
R81 1K
R85 1K
C144
1nF
CLKADJ
CLKADJ
C258
100nF
CSFM
TP3
1
TP1
1
TP2
1
C161
0
R94
10K
R89
33K
C156
100nF
SDA
SCL
3VA
C145
1nF
C147
NC
3VD
10pF
SCL
SDA
+7V +5V
C187
1nF
C190
100pF
C189
100pF
C188
1nF
10uF
BAR63
L18
LCB1608-600
C186
1nF
C80
2.2uF
C127
10nF
R32
22K
C81
NC
C184
1nF
5pF
U4
AT23DF321
CS
1
SO
2
WP
3
GND4SI
5
SCK
6
HOLD
7
VCC
8
VBUS
3VD
R93 10K
R31
100K
MOD1
C224
1nF
J7
HEADER 2
1
2
U5
CMX-7141
SMOSI
1
SSCK
2
SMISO
3
SCS
4
BOOTEN1
5
BOOTEN2
6
DVSS
7
IRQN
8
VDEC
9
GPIOA
10
GPIOB
11
SYSCLK113DVSS14TXENA15DISC16DISCFB17ALT18ALTFB19MICFB20MIC21AVSS22MOD123MOD2
24
VBIAS
25
AUDIO
26
ADC1
27
ADC2
28
ADC3
29
ADC4
30
AVDD
31
DAC1
32
DAC2
33
AVSS
34
DAC3
35
DAC4
36
DVSS
37
VDEC
38
XTAL/CLK
39
XTALN
40
DVDD
41
MOSI42MISO
43
SSOUT
44
DVSS
45
SCK
46
SYSCLK2
47
CSN
48
AGND
49
U6
CMX-618
AVDD
1
AVSS
2
BIAS
3
VSSREF
4
INPP
5
INPN
6
AVDD
7
AVSS
8
VSSPA
9
OUTP
10
OUTN
11
VDDPA
12
VDD13IOVDD14ECDI15ECDO16ECCLK17ECCS18EEC19RESC20NC21VSS22CSEL23IOVDD
24
SYNC
25
VSS
26
XTALIN
27
XTALOUT
28
IOVDD
29
RESETC
30
XTALSEL1
31
XTALSEL2
32
XTALSEL3
33
ENABXTAL
34
IOVDD
35
NC
36
NC37NC38NC39NC
40
VSS
41
SCLK
42
SMOSI43SMISO
44
CSC
45
IRQC
46
IOVDD
47
VDD
48
AGND
49
RADIO CLOCK
R4 NC
GPSRX
GPSTX
POWER CONTROL
SCK
MISO
MOSI
R14 1K
C64
100nF
IRQA
R58 1K
AUDIO
GPSTX
3VA
C65
1nF
ROW3
TX POWER SUPPLY
C49
5pF
ROW2
ROW1
NAV
GPSRX
C106
10uF
C105
10uF
10pF
Y2
TXCO19.2M
12
3 4
R40
47
C99
100nF
C47
100nF
C48
1nF
Q4
DTA114EM
R137
1K
C206
1nF
C207
1nF
C210
1nF
C211
1nF
C208
1nF
C209
1nF
C212
1nF
13nH
C76
NC
C216
1nF
L15
47nH
82pF
PWCTRL
L9
27nH
R52 1K
C50
NC
R15 1K
CSR
RDA POWER SUPPLY
C88
1nF
C97
1nF
R39
100
R44
100
3VD
XC2
XC1
XC2
XC1
CODEC
C213
1nF
C214
1nF
D3
BAR63
C215
1nF
PROG RA MMI NG
27nH
0
15nH 15nH
13nH 13nH 13nH
13nH
150pF
150
47pF
R68 22
R70 22
UPCK
22
R55
10K
3VD
CSD
VBAT
SUB
FNC
D0
D2
D1
D4
D3
D5
D6
2pF
U18
XC6201
VIN3VOUT
1
GND
2
D7
GPS
SCK
MISO
MOSI
+
C198
10uF
C183
1uF
SCK
MOSI
MISO
7pF
10pF
33pF
C25
1nF
C51
NC R25
560
U8
AT90USB
BIAS
1
SMTK
2
NC1
3
UDP
4
UDM
5
UVSS
6
UCAP
7
VBUS
8
UID
9
TX_LED
10
SCK
11
MOSI
12
MISO
13
SPEECH
14
IRQVOC
15
C3VR
16
IRQN17GPS18RESET20VCC121GND122NC223SYSCLK24SCL25SDA26RXD27TXD28RSWA29RSWB30RSWC31RSWD
32
EXTPTT
33
IRQR
34
CSFM
35
CSRAM
36
CSR
37
CSD
38
CSA
39
CSN
40
CBL
41
SUBD
42
RX_LED
43
D7
44
D6
45
D5
46
D4
47
D3
48
D249D150D0
51
VCC2
52
GND2
53
SIDE
54
VBAT55FMIC
56
ROW157ROW258ROW3
59
FNC
60
NAV
61
AVCC1
62
AGND
63
AVCC2
64
CHR
19
GND
65
13nH
R22
2K2
Q2
2SC33563
2
1
R111 1K
BAT
U11
MIC2290
IN
2
EN
3
GND4GND
8
SW
7
OUT
1
FB
6
NC
5
HS
9
L17
10uH
+
C181
10uF
R26
22C52
150p
6.8pF
R108
33K
R110
3K3+C182
10uF
RESET
R92 10K
C136
4.7uF
VCTRL
3VD
TEMP
D5
RR264M
RESET
MOSI
SCK
MISO
VBUS
UDP
UDM
UID
UVSS
150pF
C20
10nF
CBL
L5
47nH
P1
TEST 1
1
1
R16
470
MAIN CLOCK
15pF
C14
150pF
R12
10
TX5V
DET
C26
100pF
C33
8pF
C67
NC
CSA
150pF
220K
C62
100pF
L16
NC
L14
0
C34
**
L10
0
D4
HSM88AS
3
1
2
AUDIO
SIDE
SDA
C40
1nF
IRQA
BAR63
C168
10uF
C167
100nF
RXD
C219
100pF
TX5V
NAV
JP2
CONN18X2
1
1
2
2
3
3
4
4
5
5
6
6
7
7
8
8
9
9
10
10
11
11
12
12
13
13
14
14
15
15
16
16
17
17
181819
19
20
20
21
21
22
22
23
23
24
24
25
25
26
26
27
27
28
28
29
29
30
30
31
31
32
32
33
33
34
34
35
35
36
36
U2
MCP6241U
Vin+
1
VSS
2
Vin-
3
Vout
4
VDD
5
R43
82K
C90
10nF
R34
120K
C83
10nF
TP9
1
R35
470K
P4
HEADER 1
1
1
P5
HEADER 1
1
1
P6
HEADER 1
1
1
P7
HEADER 1
1
1
P8
HEADER 1
1
1
P9
HEADER 1
1
1
P10
HEADER 1
1
1
P11
HEADER 1
1
1
MOD1
MOD2
R17
47
VOL
AUDIO
OUTP
RV1
10k
3 1
2
4
5
R18
47K
C61
0
DET
MOUT
PWR_TUNE
3VD
PWFB
C123
100nF
C124
10uF
C222
10nF
18V
P12
HEADER 1
1
1
P13
HEADER 1
1
1
P14
HEADER 1
1
1
3VA
C138
10nF
C220
100pF
C16
10nF
C15
150pF
R83 4K7
3VD
PWR_TUNE
R13
10K
Q3
2SK34751
3
2
+7V
+
C257
22uF
P17
HEADER 1
1
1
P15
HEADER 1
1
1
P16
HEADER 1
1
1
3VD
3VR
3VD
L6
27nH
5VAF
+5V
C21
1nF
+7V
C77
NC
L2
BEAD
1
2
C153
100nF
C154
1nF
C4
10nF
C3
1nF
3VD
R72 330
RAD IO
C103
1nF
3VR
13nH
TXLED
RXLED
D8
LTST-C195KGJRKT
2 4
1 3
3VR
PINK VALUES CORR ESPOND TO ST-2112C
+
C63
10uF
C29
NC
C24
68pF
R76 330
P18
HEADER 1
1
1
+
C82
22uF
100pF
100pF
47pF
1uF
7pF 22pF
0.5pF 0.5pF
150pF
6.8pF
C118
1nF
L8
0
C117
100nF
C35
**
TP7
1
C36
**
TP8
1
TP5
1
TP6
1
C37
15pF
TP4
1
C38
56pF
R23
470
SPEECH
C19
1nF
Q1
2SK3476
1
3
2
22pF
10
R87
10K
SMTK
C43
NC
C41
NC
C42
NC
18V
15nH
C46
NC
R98
4K7
CSA
C141
1uF
C116
1nF
C115
100nF
R21
47
C17
1uF
J8
HEADER 2
1
2
C18
150pF
27pF
3VA
FNC
ROW3
ROW1
ROW2
C135
100nF
R19
10K
R10
10K
PWR_TUNE
PWFB
R11
47K
TEMP
C139
NC
L4
27nH
L1
LCB1608-600
1
2
+7V
C134
100nF
3VD
C13
1nF
C12
470pF
C1
150pF
Y1
12.8Mhz
12
3 4
+
C2
10uF
R100 1K
C84
1nF
CSN
C162
1nF
GREEN VALUES CORR ESPOND TO ST-2112V
IRQR
C230
1nF
SCL
R133 10K
CHR
MICP
MICN
5pF
7pF
C163
1nF
CBL
C128
1nF
C146
NC
R62
10K
R104
0.2
BAT
CHR
R86 1K
VBUS
R97 1K
100pF
3VR+5V
OUTP
C233
10nF
C164
1nF
+
C227
10uF
OUTP
R124
2.2
U14
HT7233
Vin
1
GND
2
Sht
3
Vout
5
BP
4+C228
10uF
SMTK
C137
100nF
C129
1nF
R82
10k
C180
100pF
J9
HEADER 2
1
2
C170
NC
18V
C87
NC
C150
100nF
C165
1nF
SMARTRUNK SYSTEMS, INC
C130
1nF
VCTRL
R9
1K
27pF
ACCESORY
LEDS
MAIN POWER SUPPLY AUDIO POWER SUPPLY
EXT PTT
PROCESSOR POWER SUPPLY
MICROPHONE
ANALOG POWER SUPPLY CODEC POWER SUPPLY
BATTERY
BATTERY CHARGER
MEMORIES
C152
100nF
R131
10
MAIN PROCESSOR
C255
10uF
C256
10uF
R129 6. 8K
13nH
C131
1nF
R117
47
J1
Antenna
1
2
3
4
5
6.8pF
0.5pF
C5VT
3VD
AUDIO PA
150pF
R132 10
C142
1nF
MICN
+5V
R27
2M2
+7V
C171
NC
+
C236
1uF
R127
2.2
U17
XC6201
VIN3VOUT
1
GND
2
+
C237
10uF
L7
3.3nH
CSRAM
CSFM
C78
150pF
R29
100
J2
USB
1
2
3
4
5
6
7
CSR
C32
1nF
C30
1pF
CSN
R80 0
C55
15pF
R30
100K
R78 0
C58
18pF
PWFB
C31
1pF
R73 0
R28
100
R77 0
L13
22nH
R75 0
C59
5pF
R74 1K
R61
10K
R66 1K
R71 1K
R59
10K
R69 1K
R60
10K
R67 1K
R65 1K
R63
10K
3VD
R7 1K
R5 1K
R6 1K
C143
NC
PAENA
D7
RB886
IRQN
IRQR
+7V
R128
2.2
PWR_FB
3VD
R54 1K
R53 1K
R51 1K
C121
1nF
R119
10K
R114
22K
VINT
R112
100K
C23
1nF
MODEM
2.4pF 2pF
15pF
TX5V
R8
100
C8
470pFL3.82uH
3VD
L12
22nH
C57
27pF
C54
12pF
MISO
SCK
MOSI
0.5pF
VBUS
15nH
3VD
MISO
U7
23K640
CS
1
SO
2
WP
3
GND4SI
5
SCK
6
HOLD
7
VCC
8
SCK
MOSI
C151
100nF
R138
100
SPEECH
DET
22
3VR
C7
1nF
L11
22nH
C56
39pF
C110
1nF
C27
82pF
D1
BAR88
R139
100K
FMIC
22uF
FMIC
MICP
C159 1uF
MOUT
EXTK
C244
1nF
C247
1nF
EXTK
3VD
R113
470
R116
4K7
C111
1nF
D9
RB886
C185
4.7uF
C199
100pF
U1
RDA1846
AVDD1
1
SCK
2
MOSI
3
AVDD2
4
XTAL1
5
XTAL2
6
MODE
7
CSR
8
AFO9NC110MIC11CC12AVDD313NC214RFIN15AVDD4
16
NC3
17
RFOUT
18
NC4
19
NC5
20
AVDD5
21
PABIAS
22
AVDD6
23
PDN
24
IO725IO626IO527IO4
28
MISO
29
INT
30
SUBD
31
SUB
32
GND
33
C100
100nF
R56
10K
C112
1nF
IRQVOC
MISO
CSVOC
MOSI
SCK
C226
1nF
SCK
15pF
15pF
CSVOC
C53
10pF
C241
1nF
IRQVOC
MOSI
C232
1nF
C200
100pF
TXLED
RXLED
C113
1nF
R57 22K
R64 1K
27nH
C201
1nF
2K2
C240
10nF
C202
1nF
R120
100K
C73
1nF
C72
100nF
C3VR
MOUT
2.4pF
C3VR
C60
0
3VD
+5V
LS1
SPEAKER
C68
150pF
C251
10nF
+
C243
10uF
C254
100nF
C253
1nF
R130
2.2
U19
HT7233
Vin
1
GND
2
Sht
3
Vout
5
BP
4
TXD
C252
10nF
TXD
U3
HT7250
Vin
1
GND
2
Sht
3
Vout
5
BP
4
TX5V
C177
100nF
C166
100pF
C203
1nF
C94
10nF
JP1
PROG
1
2
3
4
5
6
7
R37
2.2
R134
2K2
R135
1K
+7V
VINT
+
C91
10uF
R140 10K
EXTPTT
CSD
GPS
C101
10nF
C5VT
J4
3.5mm
1
2
3
4
5
+
C238
1uF
C71
1nF
C70
1nF
R2
10
3VA
SW4
SW KEY-YM061
12
3
4
5
6
7
8
R136
4K7
SIDE
+5V
C204
1nF
+
C95
10uF
C234
10nF
+
C229
10uF
PWCTRL
U15
HT7233
Vin
1
GND
2
Sht
3
Vout
5
BP
4
C246
1nF
R125
2.2
R105 22k
C245
10nF
R109 22k
C11
1nF
J5
TG-2915
1
2
3
4
5
C96
10nF
C10
100nF
SIDE UP
PTT
R33
100
SIDE DOWN
EMERGENCY
C126
100nF
C125
NC
SUB
5VAF
C205
1nF
VBAT
R122
33K
+
C239
10uF
R123
47K
C122
1nF
RCLK
RCLK
+
C86
10uF
TX5V
R36
56K
0
RXD
3VD
MK1
MIC
1
2
C217
1uF
C85
10nF
TX5V
D1
D0
D2
R46
47K
D3
D4
C102
10nF
REFERENCES
IF COMPONENT IS D IFERENT BETWEEN THE DI FERENT
MODELS, THEN YOU WILL FIND THREE VALUES UNDER THE COMPONENT.
BLUE VALUES CORRESPON D TO ST-2112V
D5
D7
D6
IRQN
C133
1nF
C250
1nF
150pF
5pF
R38
22K
R118
1K
R50
10K
C157 1uF
EXTPTT
C242
10uF
C132
10uF
3VA
U12
MCP6241U
Vin+
1
VSS
2
Vin-
3
Vout
4
VDD
5
C114
1nF
C221
4.7uF
Page 33

10. ST-2112 FROM BOARD SCHEMATIC
CSA
SCK
U4
LIS302
VDDIO
1
GND
2
VDD
3
GND
4
GND
5
VDD
6
CS7INT1
8
INT2
9
GND
10
GND
11
MISO
12
MOSI
13
SCK
14
CBL
3VD
C21
104
R43
220
3VD 3VA+5V+7V
D5
D3
D7
D1
JP1
HEADER 18X2
1
2
3
4
5
6
7
8
9
10
11
12
13
14
15
16
17
18 19
20
21
22
23
24
25
26
27
28
29
30
31
32
33
34
35
36
GPSRX
IRQA
MOSI
SCK
GPSTX
ROW3
D4
MISO
ROW1
ROW2
D5
D1
CSD
GPS
D6
D2
CSA
NAV
D3
FNC
SDA
SCL
CBL
D7
D0
TP3
1
TP2
1
TP1
1
R34
10
C28
105
CSD
D5
SCK
D6
MOSI
3VD
C29 225
D0
D1
D2
MOSI
MISO
IRQA
SDA
SCL
+7V
J1
CON8
1
2
3
4
5
6
7
8
C30 225
C31
334
R42
NC
VBL
F1
NC
R3
1K
R4
1K
R5
1K
R6
1K
D3
R38 27K
R41
22K
VBL
ROW3ROW2ROW1
NAV
SW1
1234
SW9
1234
SW8
1234
SW3
1234
SW2
1234
SW14
1234
SW13
1234
SW12
1234
SW10
1234
SW17
1234
SW15
1234
SW19
1234
SW18
1234
TP6
1
SW16
1234
SW20
1234
SW11
1234
R39
2K2
R35
1k
R29
2k2
R21
4k7
R40
1k
R33
4K7
R36
1k
R30
2k2
R22
4k7
R37
1k
R31
2k2
R23
4k7
R24
1K
R20
0
R19
0
R7
NC
D4
R10
NC
D7
D2
R8
330
C11
102
+5V
R9
10
C8
103
+
C7
106C10
104
U2
HT7233
Vin
1
GND
2
Sht
3
Vout
5
BP
4
TP4
1
SW7
1234
SW6
1234
SW5
1234
SW4
1234
R27
1k
R26
2k2
R25
4k7
FNC
ACCESY PORT POWER SUPPLY
U1
PEB-916
ANT1AGND12AGND23AGND34VBAT5GND16NC7AGND48AGND59AGND610VCC
11
AGND7
12
NRES
13
AGND8
14
GND2
15
NC
16
AGND9
17
NC
18
AGND10
19
1PPS
20
AGND1121AGND1222AGND13
23
GND
24NC25
AGND14
26NC27
AGND1528AGND16
29
TX0
30
RX1
31
NC
32
GND
33
NC
34
AGND17
35
AGND18
36
F2
200mA
C32
104
SMARTRUNK SYST EMS, INC
+
C2
106
JP2
HEADER 14
1
2
3
4
5
6
7
8
9
10
11
12
13
14
U5
MIMD10A
E2N
1
B2N
2
C1P3E1P
4
B1P
5
C2N
6
VBL
Title
Size Document N umber Rev
Date: Sheet of
DM-1001-111026 C
ST-2112 - FRON T BOARD
B
1 1Wednesday , Augus t 29, 2012
F2F1 F4F3
UP
RIGHTLEFT
GPSTX
GPSRX
R2
4K7
+7V
C1
NC
C12
103
+
C9
106
+5V
C14
102
C13
104
U3
HT7233
Vin
1
GND
2
Sht
3
Vout
5
BP
4
R11
10
D8
D4
R17
330
R12
330
R15
330
D6
GPS
3VD
C4
8PF
L1
ANT
R1
1K
6MNO5JKL4GHI
*
9WXYZ8TUV7PQRS
2ABC1
#0
3DEF
TP5
1
Page 34

11 ST-2112 COMPONENT LOCATOR (TOP LAYER)
Page 35

ST-2112D SM R 1.2 SMARTRUNK SYSTEMS, INC.
35
12 ST-2112 COMPONENT LOCATOR (BOTTOM LAYER)
Page 36

ST-2112D SM R 1.2 SMARTRUNK SYSTEMS, INC.
36
13 ST-2112 PCB TOP LAYER
Page 37

ST-2112D SM R 1.2 SMARTRUNK SYSTEMS, INC.
37
14 ST-2112 PCB BOTTOM LAYER
Page 38

ST-2112D SM R 1.2 SMARTRUNK SYSTEMS, INC.
38
15 ST-2112 PCB GROUND LAYER
Page 39

ST-2112D SM R 1.2 SMARTRUNK SYSTEMS, INC.
39
16 ST-2112 PCB POWER LAYER
Page 40

ST-2112D SM R 1.2 SMARTRUNK SYSTEMS, INC.
40
17 ST-2112 FRONT BOARD COMPONENT LOCATOR (TOP LAYER)
Page 41
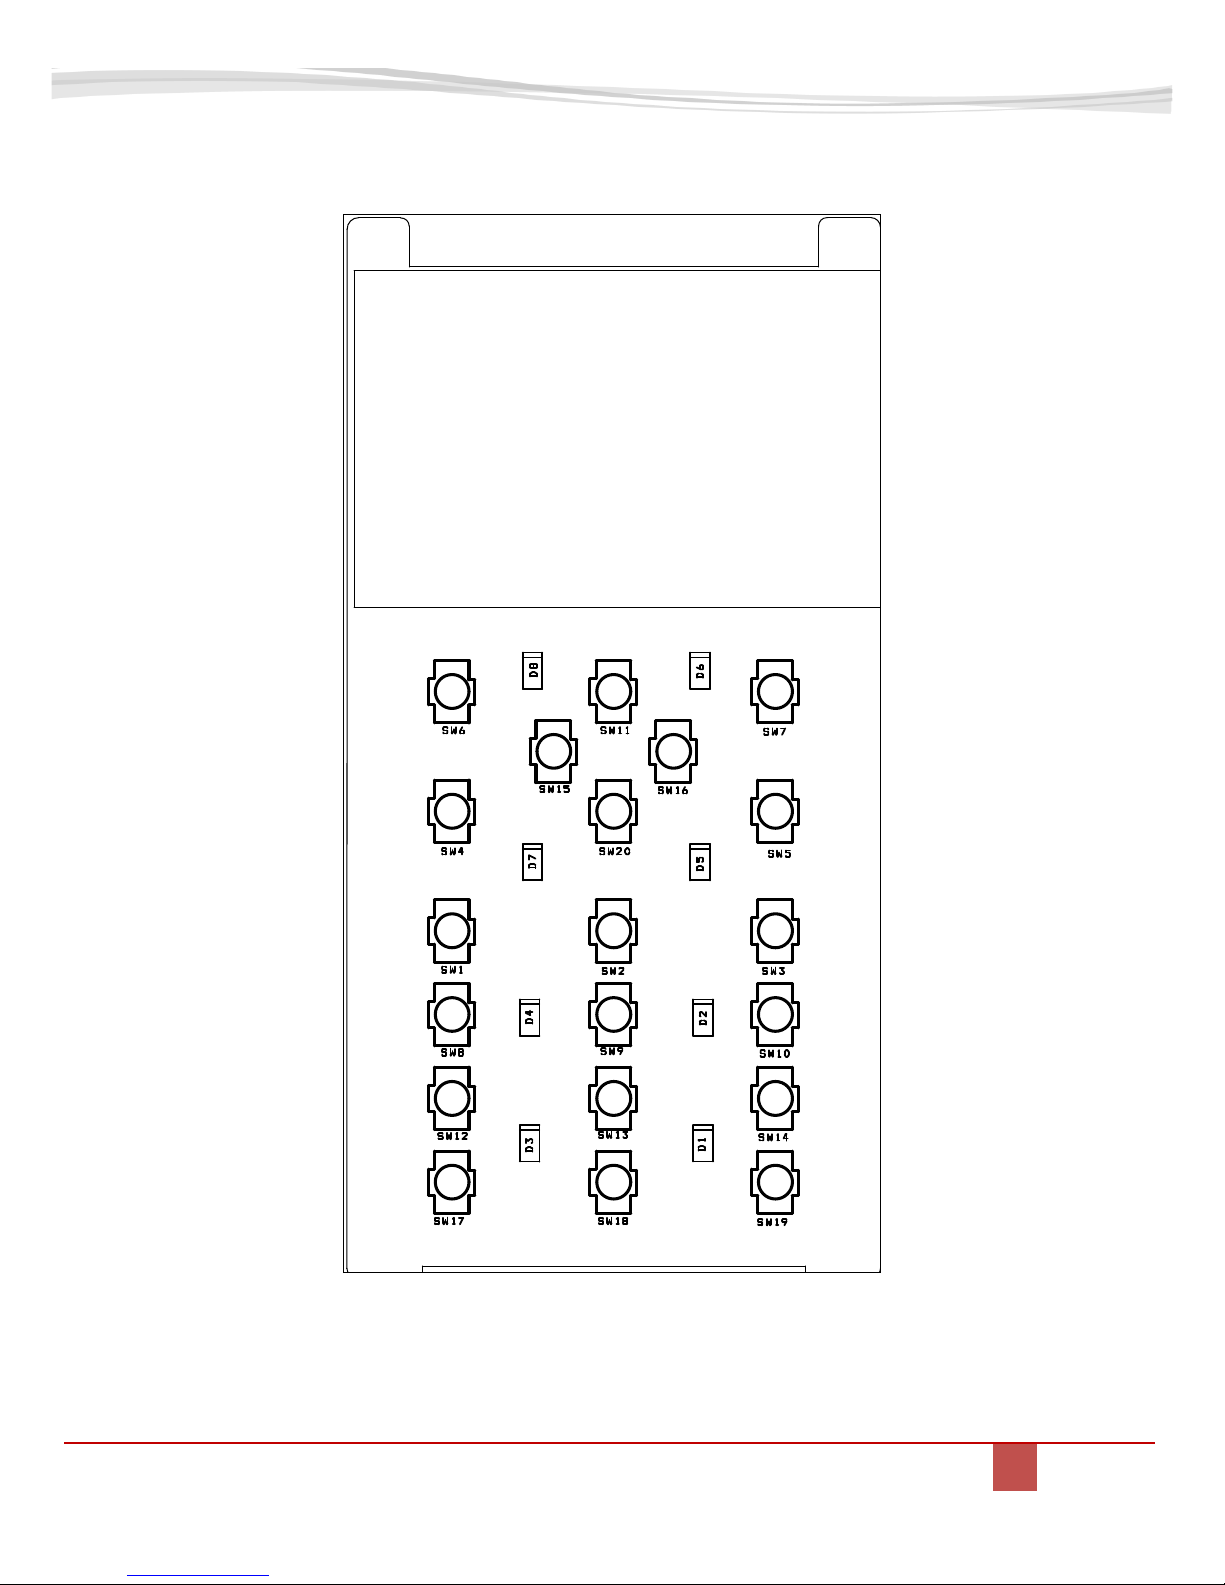
ST-2112D SM R 1.2 SMARTRUNK SYSTEMS, INC.
41
18 ST-2112 FRONT BOARD COMPONENT LOCATOR (BOTTOM LAYER)
Page 42

ST-2112D SM R 1.2 SMARTRUNK SYSTEMS, INC.
42
19 ST-2112D BOM
NAME
DESCRIPTION
VALUE
RANGER PN
MAIN PCB
EPL211010D
C1
CAP CER 150PF 50V C0G 0402
150pF
CK1151AK5A
C14
CAP CER 150PF 50V C0G 0402
150pF
CK1151AK5A
C15
CAP CER 150PF 50V C0G 0402
150pF
CK1151AK5A
C18
CAP CER 150PF 50V C0G 0402
150pF
CK1151AK5A
C68
CAP CER 150PF 50V C0G 0402
150pF
CK1151AK5A
C78
CAP CER 150PF 50V C0G 0402
150pF
CK1151AK5A
C12
CAP CER 150PF 50V C0G 0402
150pF
CK1151AK5A
C21
CAP CER 150PF 50V C0G 0402
150pF
CK1151AK5A
C95
CAP TANT 10UF 10V 10% 1206
10uF
CTY101066ZR
C2
CAP TANT 10UF 10V 10% 1206
10uF
CTY101066ZR
C91
CAP TANT 10UF 10V 10% 1206
10uF
CTY101066ZR
C182
CAP TANT 10UF 10V 10% 1206
10uF
CTY101066ZR
C237
CAP TANT 10UF 10V 10% 1206
10uF
CTY101066ZR
C239
CAP TANT 10UF 10V 10% 1206
10uF
CTY101066ZR
C181
CAP CER 10UF 10V Y5V 0805
10uF
CK0106AB7R
C63
CAP CER 10UF 6.3V X5R 20% 0603
10uF
CK6106AD6T
C86
CAP CER 10UF 6.3V X5R 20% 0603
10uF
CK6106AD6T
C93
CAP CER 10UF 6.3V X5R 20% 0603
10uF
CK6106AD6T
C105
CAP CER 10UF 6.3V X5R 20% 0603
10uF
CK6106AD6T
C132
CAP CER 10UF 6.3V X5R 20% 0603
10uF
CK6106AD6T
C198
CAP CER 10UF 6.3V X5R 20% 0603
10uF
CK6106AD6T
C227
CAP CER 10UF 6.3V X5R 20% 0603
10uF
CK6106AD6T
C228
CAP CER 10UF 6.3V X5R 20% 0603
10uF
CK6106AD6T
C229
CAP CER 10UF 6.3V X5R 20% 0603
10uF
CK6106AD6T
C231
CAP CER 10UF 6.3V X5R 20% 0603
10uF
CK6106AD6T
C242
CAP CER 10UF 6.3V X5R 20% 0603
10uF
CK6106AD6T
C243
CAP CER 10UF 6.3V X5R 20% 0603
10uF
CK6106AD6T
C255
CAP CER 10UF 6.3V X5R 20% 0603
10uF
CK6106AD6T
C136
CAP CER 4.7UF 6.3V 20% X5R 0402
4.7uF
CK6475AK6T
C185
CAP CER 4.7UF 6.3V 20% X5R 0402
4.7uF
CK6475AK6T
C221
CAP CER 4.7UF 6.3V 20% X5R 0402
4.7uF
CK6475AK6T
C19
CAP CER 1000PF 50V 0603 LOW DIST
1nF
CK1102AD5XR
C3
CAP 1000PF 50V CERAMIC X7R 0402
1nF
CK1102AK5X
C7
CAP 1000PF 50V CERAMIC X7R 0402
1nF
CK1102AK5X
C11
CAP 1000PF 50V CERAMIC X7R 0402
1nF
CK1102AK5X
C13
CAP 1000PF 50V CERAMIC X7R 0402
1nF
CK1102AK5X
C40
CAP 1000PF 50V CERAMIC X7R 0402
1nF
CK1102AK5X
Page 43

ST-2112D SM R 1.2 SMARTRUNK SYSTEMS, INC.
43
C48
CAP 1000PF 50V CERAMIC X7R 0402
1nF
CK1102AK5X
C65
CAP 1000PF 50V CERAMIC X7R 0402
1nF
CK1102AK5X
C70
CAP 1000PF 50V CERAMIC X7R 0402
1nF
CK1102AK5X
C71
CAP 1000PF 50V CERAMIC X7R 0402
1nF
CK1102AK5X
C73
CAP 1000PF 50V CERAMIC X7R 0402
1nF
CK1102AK5X
C84
CAP 1000PF 50V CERAMIC X7R 0402
1nF
CK1102AK5X
C88
CAP 1000PF 50V CERAMIC X7R 0402
1nF
CK1102AK5X
C97
CAP 1000PF 50V CERAMIC X7R 0402
1nF
CK1102AK5X
C103
CAP 1000PF 50V CERAMIC X7R 0402
1nF
CK1102AK5X
C110
CAP 1000PF 50V CERAMIC X7R 0402
1nF
CK1102AK5X
C111
CAP 1000PF 50V CERAMIC X7R 0402
1nF
CK1102AK5X
C112
CAP 1000PF 50V CERAMIC X7R 0402
1nF
CK1102AK5X
C113
CAP 1000PF 50V CERAMIC X7R 0402
1nF
CK1102AK5X
C114
CAP 1000PF 50V CERAMIC X7R 0402
1nF
CK1102AK5X
C116
CAP 1000PF 50V CERAMIC X7R 0402
1nF
CK1102AK5X
C118
CAP 1000PF 50V CERAMIC X7R 0402
1nF
CK1102AK5X
C121
CAP 1000PF 50V CERAMIC X7R 0402
1nF
CK1102AK5X
C122
CAP 1000PF 50V CERAMIC X7R 0402
1nF
CK1102AK5X
C128
CAP 1000PF 50V CERAMIC X7R 0402
1nF
CK1102AK5X
C129
CAP 1000PF 50V CERAMIC X7R 0402
1nF
CK1102AK5X
C130
CAP 1000PF 50V CERAMIC X7R 0402
1nF
CK1102AK5X
C131
CAP 1000PF 50V CERAMIC X7R 0402
1nF
CK1102AK5X
C133
CAP 1000PF 50V CERAMIC X7R 0402
1nF
CK1102AK5X
C142
CAP 1000PF 50V CERAMIC X7R 0402
1nF
CK1102AK5X
C144
CAP 1000PF 50V CERAMIC X7R 0402
1nF
CK1102AK5X
C145
CAP 1000PF 50V CERAMIC X7R 0402
1nF
CK1102AK5X
C148
CAP 1000PF 50V CERAMIC X7R 0402
1nF
CK1102AK5X
C149
CAP 1000PF 50V CERAMIC X7R 0402
1nF
CK1102AK5X
C154
CAP 1000PF 50V CERAMIC X7R 0402
1nF
CK1102AK5X
C162
CAP 1000PF 50V CERAMIC X7R 0402
1nF
CK1102AK5X
C163
CAP 1000PF 50V CERAMIC X7R 0402
1nF
CK1102AK5X
C164
CAP 1000PF 50V CERAMIC X7R 0402
1nF
CK1102AK5X
C165
CAP 1000PF 50V CERAMIC X7R 0402
1nF
CK1102AK5X
C169
CAP 1000PF 50V CERAMIC X7R 0402
1nF
CK1102AK5X
C179
CAP 1000PF 50V CERAMIC X7R 0402
1nF
CK1102AK5X
C184
CAP 1000PF 50V CERAMIC X7R 0402
1nF
CK1102AK5X
C186
CAP 1000PF 50V CERAMIC X7R 0402
1nF
CK1102AK5X
C187
CAP 1000PF 50V CERAMIC X7R 0402
1nF
CK1102AK5X
C188
CAP 1000PF 50V CERAMIC X7R 0402
1nF
CK1102AK5X
C201
CAP 1000PF 50V CERAMIC X7R 0402
1nF
CK1102AK5X
C202
CAP 1000PF 50V CERAMIC X7R 0402
1nF
CK1102AK5X
Page 44

ST-2112D SM R 1.2 SMARTRUNK SYSTEMS, INC.
44
C203
CAP 1000PF 50V CERAMIC X7R 0402
1nF
CK1102AK5X
C204
CAP 1000PF 50V CERAMIC X7R 0402
1nF
CK1102AK5X
C205
CAP 1000PF 50V CERAMIC X7R 0402
1nF
CK1102AK5X
C206
CAP 1000PF 50V CERAMIC X7R 0402
1nF
CK1102AK5X
C207
CAP 1000PF 50V CERAMIC X7R 0402
1nF
CK1102AK5X
C208
CAP 1000PF 50V CERAMIC X7R 0402
1nF
CK1102AK5X
C209
CAP 1000PF 50V CERAMIC X7R 0402
1nF
CK1102AK5X
C210
CAP 1000PF 50V CERAMIC X7R 0402
1nF
CK1102AK5X
C211
CAP 1000PF 50V CERAMIC X7R 0402
1nF
CK1102AK5X
C212
CAP 1000PF 50V CERAMIC X7R 0402
1nF
CK1102AK5X
C213
CAP 1000PF 50V CERAMIC X7R 0402
1nF
CK1102AK5X
C214
CAP 1000PF 50V CERAMIC X7R 0402
1nF
CK1102AK5X
C215
CAP 1000PF 50V CERAMIC X7R 0402
1nF
CK1102AK5X
C216
CAP 1000PF 50V CERAMIC X7R 0402
1nF
CK1102AK5X
C223
CAP 1000PF 50V CERAMIC X7R 0402
1nF
CK1102AK5X
C224
CAP 1000PF 50V CERAMIC X7R 0402
1nF
CK1102AK5X
C226
CAP 1000PF 50V CERAMIC X7R 0402
1nF
CK1102AK5X
C230
CAP 1000PF 50V CERAMIC X7R 0402
1nF
CK1102AK5X
C232
CAP 1000PF 50V CERAMIC X7R 0402
1nF
CK1102AK5X
C241
CAP 1000PF 50V CERAMIC X7R 0402
1nF
CK1102AK5X
C244
CAP 1000PF 50V CERAMIC X7R 0402
1nF
CK1102AK5X
C246
CAP 1000PF 50V CERAMIC X7R 0402
1nF
CK1102AK5X
C247
CAP 1000PF 50V CERAMIC X7R 0402
1nF
CK1102AK5X
C249
CAP 1000PF 50V CERAMIC X7R 0402
1nF
CK1102AK5X
C253
CAP 1000PF 50V CERAMIC X7R 0402
1nF
CK1102AK5X
C44
CAP 1000PF 50V CERAMIC X7R 0402
1nF
CK1102AK5X
C250
CAP 1000PF 50V CERAMIC X7R 0402
1nF
CK1102AK5X
C166
CAP CERAMIC 100PF 50V NP0 0402
100pF
CK1101AK5A
C180
CAP CERAMIC 100PF 50V NP0 0402
100pF
CK1101AK5A
C189
CAP CERAMIC 100PF 50V NP0 0402
100pF
CK1101AK5A
C190
CAP CERAMIC 100PF 50V NP0 0402
100pF
CK1101AK5A
C194
CAP CERAMIC 100PF 50V NP0 0402
100pF
CK1101AK5A
C199
CAP CERAMIC 100PF 50V NP0 0402
100pF
CK1101AK5A
C200
CAP CERAMIC 100PF 50V NP0 0402
100pF
CK1101AK5A
C219
CAP CERAMIC 100PF 50V NP0 0402
100pF
CK1101AK5A
C220
CAP CERAMIC 100PF 50V NP0 0402
100pF
CK1101AK5A
C26
CAP CERAMIC 22PF 50V NP0 0402
22pF
CK1220AK4A
C23
CAP CER 100PF 100V 10% NP0 0603
100pF
CK4101AD5A
C32
CAP CER 150PF 100V 10% NP0 0603
150pF
CK4151AD4A
C8
CAP CERAMIC 47PF 50V NP0 0402
470pF
CK1471AK4A
C4
CAP CERAMIC .01UF 50V X7R 0402
10nF
CK5103AK5X
Page 45
ST-2112D SM R 1.2 SMARTRUNK SYSTEMS, INC.
45
C20
CAP CERAMIC .01UF 50V X7R 0402
10nF
CK5103AK5X
C83
CAP CERAMIC .01UF 50V X7R 0402
10nF
CK5103AK5X
C85
CAP CERAMIC .01UF 50V X7R 0402
10nF
CK5103AK5X
C90
CAP CERAMIC .01UF 50V X7R 0402
10nF
CK5103AK5X
C94
CAP CERAMIC .01UF 50V X7R 0402
10nF
CK5103AK5X
C96
CAP CERAMIC .01UF 50V X7R 0402
10nF
CK5103AK5X
C101
CAP CERAMIC .01UF 50V X7R 0402
10nF
CK5103AK5X
C102
CAP CERAMIC .01UF 50V X7R 0402
10nF
CK5103AK5X
C127
CAP CERAMIC .01UF 50V X7R 0402
10nF
CK5103AK5X
C138
CAP CERAMIC .01UF 50V X7R 0402
10nF
CK5103AK5X
C173
CAP CERAMIC .01UF 50V X7R 0402
10nF
CK5103AK5X
C222
CAP CERAMIC .01UF 50V X7R 0402
10nF
CK5103AK5X
C233
CAP CERAMIC .01UF 50V X7R 0402
10nF
CK5103AK5X
C234
CAP CERAMIC .01UF 50V X7R 0402
10nF
CK5103AK5X
C235
CAP CERAMIC .01UF 50V X7R 0402
10nF
CK5103AK5X
C240
CAP CERAMIC .01UF 50V X7R 0402
10nF
CK5103AK5X
C245
CAP CERAMIC .01UF 50V X7R 0402
10nF
CK5103AK5X
C248
CAP CERAMIC .01UF 50V X7R 0402
10nF
CK5103AK5X
C251
CAP CERAMIC .01UF 50V X7R 0402
10nF
CK5103AK5X
C252
CAP CERAMIC .01UF 50V X7R 0402
10nF
CK5103AK5X
C5
CAP .10UF 16V CERAMIC Y5V 0402
100nF
CK5104AK5X
C10
CAP .10UF 16V CERAMIC Y5V 0402
100nF
CK5104AK5X
C47
CAP .10UF 16V CERAMIC Y5V 0402
100nF
CK5104AK5X
C64
CAP .10UF 16V CERAMIC Y5V 0402
100nF
CK5104AK5X
C66
CAP .10UF 16V CERAMIC Y5V 0402
100nF
CK5104AK5X
C72
CAP .10UF 16V CERAMIC Y5V 0402
100nF
CK5104AK5X
C74
CAP .10UF 16V CERAMIC Y5V 0402
100nF
CK5104AK5X
C99
CAP .10UF 16V CERAMIC Y5V 0402
100nF
CK5104AK5X
C115
CAP .10UF 16V CERAMIC Y5V 0402
100nF
CK5104AK5X
C117
CAP .10UF 16V CERAMIC Y5V 0402
100nF
CK5104AK5X
C119
CAP .10UF 16V CERAMIC Y5V 0402
100nF
CK5104AK5X
C123
CAP .10UF 16V CERAMIC Y5V 0402
100nF
CK5104AK5X
C126
CAP .10UF 16V CERAMIC Y5V 0402
100nF
CK5104AK5X
C134
CAP .10UF 16V CERAMIC Y5V 0402
100nF
CK5104AK5X
C135
CAP .10UF 16V CERAMIC Y5V 0402
100nF
CK5104AK5X
C137
CAP .10UF 16V CERAMIC Y5V 0402
100nF
CK5104AK5X
C140
CAP .10UF 16V CERAMIC Y5V 0402
100nF
CK5104AK5X
C150
CAP .10UF 16V CERAMIC Y5V 0402
100nF
CK5104AK5X
C151
CAP .10UF 16V CERAMIC Y5V 0402
100nF
CK5104AK5X
C152
CAP .10UF 16V CERAMIC Y5V 0402
100nF
CK5104AK5X
C153
CAP .10UF 16V CERAMIC Y5V 0402
100nF
CK5104AK5X
Page 46

ST-2112D SM R 1.2 SMARTRUNK SYSTEMS, INC.
46
C156
CAP .10UF 16V CERAMIC Y5V 0402
100nF
CK5104AK5X
C167
CAP .10UF 16V CERAMIC Y5V 0402
100nF
CK5104AK5X
C176
CAP .10UF 16V CERAMIC Y5V 0402
100nF
CK5104AK5X
C177
CAP .10UF 16V CERAMIC Y5V 0402
100nF
CK5104AK5X
C100
CAP .10UF 16V CERAMIC Y5V 0402
100nF
CK5104AK5X
C258
CAP .10UF 16V CERAMIC Y5V 0402
100nF
CK5104AK5X
C254
CAP .10UF 16V CERAMIC Y5V 0402
100nF
CK5104AK5X
C16
CAP CER 1.0UF 6.3V X5R 20% 0402
1uF
CK6105AK6T
C17
CAP CER 1.0UF 6.3V X5R 20% 0402
1uF
CK6105AK6T
C98
CAP CER 1.0UF 6.3V X5R 20% 0402
1uF
CK6105AK6T
C141
CAP CER 1.0UF 6.3V X5R 20% 0402
1uF
CK6105AK6T
C157
CAP CER 1.0UF 6.3V X5R 20% 0402
1uF
CK6105AK6T
C158
CAP CER 1.0UF 6.3V X5R 20% 0402
1uF
CK6105AK6T
C159
CAP CER 1.0UF 6.3V X5R 20% 0402
1uF
CK6105AK6T
C160
CAP CER 1.0UF 6.3V X5R 20% 0402
1uF
CK6105AK6T
C174
CAP CER 1.0UF 6.3V X5R 20% 0402
1uF
CK6105AK6T
C175
CAP CER 1.0UF 6.3V X5R 20% 0402
1uF
CK6105AK6T
C236
CAP CERAMIC 1UF 16V Y5V 0603
1uF
CK5105AD7RR
C238
CAP CERAMIC 1UF 16V Y5V 0603
1uF
CK5105AD7RR
C24
CAP CER 82PF 50V 5% NP0 0603
82pF
CK1820AD4AR
C56
CAP CER 6.8PF 50V 5% NP0 0603
6.8pF
CK9689AD4A
C59
CAP CER 6.8PF 50V 5% NP0 0603
6.8pF
CK9689AD4A
C25
CAP CER 7PF 50V NP0 0402
7pF
CK1070AK2A
C33
CAP CER 8PF 50V NP0 0402
8pF
CK1080AK2A
C30
CAP CERAMIC 0.5PF 50V C0G 0402
.5pF
CK1059AK1A
C31
CAP CERAMIC 0.5PF 50V C0G 0402
.5pF
CK1059AK1A
C46
CAP CER 15PF 250V 10% SMD 0603
15pF
CK9150AD4A
C37
CAP CER 15PF 50V SMD 0603
15pF
CK1150AD4A
C55
CAP CERAMIC 2PF 100V NPO 0603
2pF
CK4020AD1A
C54
CAP CERAMIC 2.4PF 100V NPO 0603
2.4pF
CK4249AD1A
C58
CAP CER 5PF 250V C0G SMD
5pF
CK9050AD1A
C57
CAP CER 5PF 250V C0G SMD
5pF
CK9050AD1A
C42
CAP CER 27PF 250V SMD 0603
27pF
CK9270AD4A
C82
CAP CER 22UF 6.3V 20% X5R 0603
22uF
CK6226AD6T
C257
CAP CER 22UF 6.3V 20% X5R 0603
22uF
CK6226AD6T
C178
CAP CER 2.2UF 16V Y5V 0603
2.2uF
CK5225AD7R
C80
CAP CER 2.2UF 4.0V X5R 20% 0402
2.2uF
CK6225AK6T
C41
CAP CER 10PF 50V NPO SMD 0603
10pF
CK1100AD4A
C24
CAP CER 47PF 50V 1% NP0 0603
47pF
CK1470AD4A
C191
CAP CER 47PF 50V 1% NP0 0402
47pF
CK1470AK4A
C192
CAP CER 47PF 50V 1% NP0 0402
47pF
CK1470AK4A
Page 47

ST-2112D SM R 1.2 SMARTRUNK SYSTEMS, INC.
47
C193
CAP CER 47PF 50V 1% NP0 0402
47pF
CK1470AK4A
C62
CAP CER 47PF 50V 1% NP0 0402
47pF
CK1470AK4A
C38
CAP CER 56PF 50V 1% NP0 0603
56pF
CK1560AD4A
C183
CAP CER 1UF 16V Z Y5V 0402
1uF
CK5105AK7R
C217
CAP CER 1UF 16V Z Y5V 0402
1uF
CK5105AK7R
C106
CAP CER 10UF 6.3V 20% X5R 0402
10uF
CKC106AK6T
C120
CAP CER 10UF 6.3V 20% X5R 0402
10uF
CKC106AK6T
C124
CAP CER 10UF 6.3V 20% X5R 0402
10uF
CKC106AK6T
C168
CAP CER 10UF 6.3V 20% X5R 0402
10uF
CKC106AK6T
C257
CAP CER 10UF 6.3V 20% X5R 0402
10uF
CKC106AK6T
D3
DIODE RF SGL 50V 100MA SOD-323
BAR63
EDBAR0063Y
D1
DIODE RF SGL 50V 100MA SOD-323
BAR63
EDBAR0063Y
D7
DIODE
RB886CS
EDRB886CSY
D9
DIODE
RB886CS
EDRB886CSY
D4
SILICON SCHOTTKY BARRIER DIODE
HSM88AS
EDHSM0088A
D5
DIODE 400V 0.7A SOD-123
RR264M
EDRR00264M
D6
DIODE SWITCH 80V 100MA EMD3
DAN222
EDDAN0222Y
D8
LED GREEN/RED BICOLOR 0606 SMD
LTST-
C195KGJRKT
EX01Y40203
F1
FUSE 3A 32V 0603 FAST C2Q
C2Q 3
EX02Y40258
J2
CONN RCPT MINI USB2.0 5POS
USB
EX07N49886
J6
BATTERY CONNCETOR RIGHT ANGLE
CON4
EX07Y49885
L2
BEAD COIL
BEAD
YCBAD18592
L18
BEAD COIL
BEAD
YCBAD18592
L1
BEAD COIL
BEAD
YCBAD18592
L3
CHOKE COIL
.82uH
YCMCI8243D
L4
SPRING COIL
27nH
YCSPG18424
L9
CHOKE COIL
15nH
YCMCI1533D
L10
CHOKE COIL
15nH
YCMCI1533D
L6
CHOKE COIL
27nH
YCMCI2733D
L5
CHOKE COIL
27nH
YCMCI2733D
L8
RES 0.0 OHM 1/10W JUMP 0603
0
RCY060004ZR
L14
RES 0.0 OHM 1/10W JUMP 0603
0
RCY060004ZR
L7
RES 0.0 OHM 1/10W JUMP 0603
0
RCY060004ZR
L15
CHOKE COIL
47nH
YCWCI4733B
L11
Fixed Inductors Air Core RF Inductor 13.7 nH 5 % 2.7 A
13nH
YCSPG18426
L12
Fixed Inductors Air Core RF Inductor 13.7 nH 5 % 2.7 A
13nH
YCSPG18426
L13
Fixed Inductors Air Core RF Inductor 13.7 nH 5 % 2.7 A
13nH
YCSPG18426
L15
Fixed Inductors Air Core RF Inductor 13.7 nH 5 % 2.7 A
13nH
YCSPG18426
L17
INDUCTOR 10UH 500-MA 0603
10uH
YCTLI1064C
Q1
TR
2SK3476
TY2SK3476Z
Page 48

ST-2112D SM R 1.2 SMARTRUNK SYSTEMS, INC.
48
Q2
TRANSISTOR NPN 1GHZ SOT-23
2SC3356
TY2SC3356Z
Q3
TR
2SK3475
TY2SK3475Z
Q4
TRANS PREBIAS PNP 150MW VMT3
DTA114EM
TYDTA114EM
RT1
THERMISTOR 33K OHM NTC 0402 SMD
33tk
RTU143334Y
R10
RES 10K OHM 1/16W 5% 0402 SMD
10K
RCY041034Z
R19
RES 10K OHM 1/16W 5% 0402 SMD
10K
RCY041034Z
R50
RES 10K OHM 1/16W 5% 0402 SMD
10K
RCY041034Z
R55
RES 10K OHM 1/16W 5% 0402 SMD
10K
RCY041034Z
R59
RES 10K OHM 1/16W 5% 0402 SMD
10K
RCY041034Z
R60
RES 10K OHM 1/16W 5% 0402 SMD
10K
RCY041034Z
R61
RES 10K OHM 1/16W 5% 0402 SMD
10K
RCY041034Z
R62
RES 10K OHM 1/16W 5% 0402 SMD
10K
RCY041034Z
R63
RES 10K OHM 1/16W 5% 0402 SMD
10K
RCY041034Z
R82
RES 10K OHM 1/16W 5% 0402 SMD
10K
RCY041034Z
R87
RES 10K OHM 1/16W 5% 0402 SMD
10K
RCY041034Z
R90
RES 10K OHM 1/16W 5% 0402 SMD
10K
RCY041034Z
R91
RES 10K OHM 1/16W 5% 0402 SMD
10K
RCY041034Z
R92
RES 10K OHM 1/16W 5% 0402 SMD
10K
RCY041034Z
R93
RES 10K OHM 1/16W 5% 0402 SMD
10K
RCY041034Z
R94
RES 10K OHM 1/16W 5% 0402 SMD
10K
RCY041034Z
R95
RES 10K OHM 1/16W 5% 0402 SMD
10K
RCY041034Z
R106
RES 10K OHM 1/16W 5% 0402 SMD
10K
RCY041034Z
R115
RES 10K OHM 1/16W 5% 0402 SMD
10K
RCY041034Z
R119
RES 10K OHM 1/16W 5% 0402 SMD
10K
RCY041034Z
R133
RES 10K OHM 1/16W 5% 0402 SMD
10K
RCY041034Z
R140
RES 10K OHM 1/16W 5% 0402 SMD
10K
RCY041034Z
R13
RES 10K OHM 1/16W 5% 0402 SMD
10K
RCY041034Z
R141
RES 6.8K OHM 1/16W 5% 0402 SMD
6.8K
RCY046824Z
R129
RES 6.8K OHM 1/16W 5% 0402 SMD
6.8K
RCY046824Z
R5
RES 1.0K OHM 1/16W 5% 0402 SMD
1K
RCY041024Z
R6
RES 1.0K OHM 1/16W 5% 0402 SMD
1K
RCY041024Z
R7
RES 1.0K OHM 1/16W 5% 0402 SMD
1K
RCY041024Z
R9
RES 1.0K OHM 1/16W 5% 0402 SMD
1K
RCY041024Z
R14
RES 1.0K OHM 1/16W 5% 0402 SMD
1K
RCY041024Z
R15
RES 1.0K OHM 1/16W 5% 0402 SMD
1K
RCY041024Z
R51
RES 1.0K OHM 1/16W 5% 0402 SMD
1K
RCY041024Z
R52
RES 1.0K OHM 1/16W 5% 0402 SMD
1K
RCY041024Z
R53
RES 1.0K OHM 1/16W 5% 0402 SMD
1K
RCY041024Z
R54
RES 1.0K OHM 1/16W 5% 0402 SMD
1K
RCY041024Z
R58
RES 1.0K OHM 1/16W 5% 0402 SMD
1K
RCY041024Z
R64
RES 1.0K OHM 1/16W 5% 0402 SMD
1K
RCY041024Z
Page 49

ST-2112D SM R 1.2 SMARTRUNK SYSTEMS, INC.
49
R65
RES 1.0K OHM 1/16W 5% 0402 SMD
1K
RCY041024Z
R66
RES 1.0K OHM 1/16W 5% 0402 SMD
1K
RCY041024Z
R67
RES 1.0K OHM 1/16W 5% 0402 SMD
1K
RCY041024Z
R69
RES 1.0K OHM 1/16W 5% 0402 SMD
1K
RCY041024Z
R71
RES 1.0K OHM 1/16W 5% 0402 SMD
1K
RCY041024Z
R74
RES 1.0K OHM 1/16W 5% 0402 SMD
1K
RCY041024Z
R81
RES 1.0K OHM 1/16W 5% 0402 SMD
1K
RCY041024Z
R85
RES 1.0K OHM 1/16W 5% 0402 SMD
1K
RCY041024Z
R86
RES 1.0K OHM 1/16W 5% 0402 SMD
1K
RCY041024Z
R97
RES 1.0K OHM 1/16W 5% 0402 SMD
1K
RCY041024Z
R100
RES 1.0K OHM 1/16W 5% 0402 SMD
1K
RCY041024Z
R111
RES 1.0K OHM 1/16W 5% 0402 SMD
1K
RCY041024Z
R118
RES 1.0K OHM 1/16W 5% 0402 SMD
1K
RCY041024Z
R135
RES 1.0K OHM 1/16W 5% 0402 SMD
1K
RCY041024Z
R137
RES 1.0K OHM 1/16W 5% 0402 SMD
1K
RCY041024Z
R73
RES 0.0 OHM 1/16W 0402 SMD
0
RCY040004Z
R75
RES 0.0 OHM 1/16W 0402 SMD
0
RCY040004Z
R77
RES 0.0 OHM 1/16W 0402 SMD
0
RCY040004Z
R78
RES 0.0 OHM 1/16W 0402 SMD
0
RCY040004Z
R80
RES 0.0 OHM 1/16W 0402 SMD
0
RCY040004Z
C60
RES 0.0 OHM 1/16W 0402 SMD
0
RCY040004Z
C61
RES 0.0 OHM 1/16W 0402 SMD
0
RCY040004Z
C161
RES 0.0 OHM 1/16W 0402 SMD
0
RCY040004Z
R8
RES 100 OHM 1/16W 5% 0402 SMD
100
RCY041014Z
R28
RES 100 OHM 1/16W 5% 0402 SMD
100
RCY041014Z
R29
RES 100 OHM 1/16W 5% 0402 SMD
100
RCY041014Z
R33
RES 100 OHM 1/16W 5% 0402 SMD
100
RCY041014Z
R39
RES 100 OHM 1/16W 5% 0402 SMD
100
RCY041014Z
R44
RES 100 OHM 1/16W 5% 0402 SMD
100
RCY041014Z
R138
RES 100 OHM 1/16W 5% 0402 SMD
100
RCY041014Z
R11
RES 47K OHM 1/16W 5% 0402 SMD
47K
RCY044734Z
R18
RES 47K OHM 1/16W 5% 0402 SMD
47K
RCY044734Z
R45
RES 47K OHM 1/16W 5% 0402 SMD
47K
RCY044734Z
R46
RES 47K OHM 1/16W 5% 0402 SMD
47K
RCY044734Z
R121
RES 47K OHM 1/16W 5% 0402 SMD
47K
RCY044734Z
R123
RES 47K OHM 1/16W 5% 0402 SMD
47K
RCY044734Z
R12
RES 22 OHM 1/16W 5% 0402 SMD
22
RCY042204Z
R26
RES 22 OHM 1/16W 5% 0402 SMD
22
RCY042204Z
R68
RES 22 OHM 1/16W 5% 0402 SMD
22
RCY042204Z
R70
RES 22 OHM 1/16W 5% 0402 SMD
22
RCY042204Z
R32
RES 22K OHM 1/16W 5% 0402 SMD
22K
RCY042234Z
Page 50

ST-2112D SM R 1.2 SMARTRUNK SYSTEMS, INC.
50
R38
RES 22K OHM 1/16W 5% 0402 SMD
22K
RCY042234Z
R57
RES 22K OHM 1/16W 5% 0402 SMD
22K
RCY042234Z
R105
RES 22K OHM 1/16W 5% 0402 SMD
22K
RCY042234Z
R109
RES 22K OHM 1/16W 5% 0402 SMD
22K
RCY042234Z
R114
RES 22K OHM 1/16W 5% 0402 SMD
22K
RCY042234Z
R16
RES 470 OHM 1/16W 5% 0402 SMD
470
RCY044714Z
R113
RES 470 OHM 1/16W 5% 0402 SMD
470
RCY044714Z
R17
RES 47 OHM 1/16W 5% 0402 SMD
47
RCY044704Z
R21
RES 47 OHM 1/16W 5% 0402 SMD
47
RCY044704Z
R40
RES 47 OHM 1/16W 5% 0402 SMD
47
RCY044704Z
R79
RES 47 OHM 1/16W 5% 0402 SMD
47
RCY044704Z
R117
RES 47 OHM 1/16W 5% 0402 SMD
47
RCY044704Z
R22
RES 2.2K OHM 1/16W 5% 0402 SMD
2K2
RCY042224Z
R41
RES 2.2K OHM 1/16W 5% 0402 SMD
2K2
RCY042224Z
R134
RES 2.2K OHM 1/16W 5% 0402 SMD
2K2
RCY042224Z
R23
RES 150 OHM 1/10W 5% 0603 SMD
150
RCY061514Z
R25
RES 560 OHM 1/16W 5% 0402 SMD
560
RCY045614Z
R27
RES 2.2M OHM 1/10W 5% 0603 SMD
2M2
RCY062254Z
R30
RES 100K OHM 1/16W 5% 0402 SMD
100K
RCY041044Z
R31
RES 100K OHM 1/16W 5% 0402 SMD
100K
RCY041044Z
R112
RES 100K OHM 1/16W 5% 0402 SMD
100K
RCY041044Z
R120
RES 100K OHM 1/16W 5% 0402 SMD
100K
RCY041044Z
R139
RES 100K OHM 1/16W 5% 0402 SMD
100K
RCY041044Z
R34
RES 120K OHM 1/16W 5% 0402 SMD
120K
RCY041244Z
R107
RES 220K OHM 1/16W 5% 0402 SMD
220K
RCY042244Z
R35
RES 470K OHM 1/16W 5% 0402 SMD
470K
RCY044744Z
R36
RES 56K OHM 1/16W 5% 0402 SMD
56K
RCY045634Z
R37
RES 10 OHM 1/16W 5% 0402 SMD
10
RCY041004Z
R2
RES 10 OHM 1/16W 5% 0402 SMD
10
RCY041004Z
R126
RES 10 OHM 1/16W 5% 0402 SMD
10
RCY041004Z
R131
RES 10 OHM 1/16W 5% 0402 SMD
10
RCY041004Z
R132
RES 10 OHM 1/16W 5% 0402 SMD
10
RCY041004Z
R127
RES 2.2 OHM 1/16W 5% 0603 SMD
2.2
RCY062294Z
R42
RES 4.7K OHM 1/16W 5% 0402 SMD
4K7
RCY044724Z
R83
RES 4.7K OHM 1/16W 5% 0402 SMD
4K7
RCY044724Z
R98
RES 4.7K OHM 1/16W 5% 0402 SMD
4K7
RCY044724Z
R116
RES 4.7K OHM 1/16W 5% 0402 SMD
4K7
RCY044724Z
R136
RES 4.7K OHM 1/16W 5% 0402 SMD
4K7
RCY044724Z
R43
RES 82K OHM 1/16W 5% 0402 SMD
82K
RCY048234Z
R76
RES 330 OHM 1/16W 5% 0402 SMD
330
RCY043314Z
R72
RES 330 OHM 1/16W 5% 0402 SMD
330
RCY043314Z
Page 51

ST-2112D SM R 1.2 SMARTRUNK SYSTEMS, INC.
51
R104
RES .20 OHM 1/8W 5% 0805
0.2
RCY010294Z
R89
RES 33K OHM 1/16W 5% 0402 SMD
33K
RCY043334Z
R108
RES 33K OHM 1/16W 5% 0402 SMD
33K
RCY043334Z
R122
RES 33K OHM 1/16W 5% 0402 SMD
33K
RCY043334Z
R96
RES 3.3K OHM 1/16W 5% 0402 SMD
3K3
RCY043324Z
R110
RES 3.3K OHM 1/16W 5% 0402 SMD
3K3
RCY043324Z
R124
RES 2.2 OHM 1/16W 5% 0402 SMD
2.2
RCY042294Z
R125
RES 2.2 OHM 1/16W 5% 0402 SMD
2.2
RCY042294Z
R128
RES 2.2 OHM 1/16W 5% 0402 SMD
2.2
RCY042294Z
R130
RES 2.2 OHM 1/16W 5% 0402 SMD
2.2
RCY042294Z
SW4
PUSH SWITCH SMD
SW KEY-
YM061
EWPS33083X
U1
SINGLE CHIP RADIO TRANSCEIVER
RDA1846
YNRD01846Z
U2
IC OPAMP SNGL 1.8V R-R SC70-5
MCP6241U
YNMR6241UT
U12
IC OPAMP SNGL 1.8V R-R SC70-5
MCP6241U
YNMR6241UT
U3
IC REG LDO 5.0V .3A SOT23-5
HT7250
YNHT07250Z
U5
dPMR MODEM IC
CMX-7141
YNCM07141Q
U6
VOCODER IC
CMX-618
YNCM00618Q
U7
IC SRL SRAM 64K 3.6V 8-TSSOP
23K640
YNMR23K640
U8
IC AVR MCU 64K 64QFN
AT90USB
YNAT1286MU
U10
IC AMP HDPH/SPEAKER UNBAL 8MSOP
BH7824
YNRO07824Z
U11
IC REG BOOST ADJ 0.5A 8MLF
MIC2290
YNML02290Z
U16
LDO LINEAR REGULATOR 1.8V 300mA
HT7218
YNHT07218Z
U18
IC REG LDO 5V 0.2A SOT89-3
XC6201
YNTX1P502P
U17
IC REG LDO 5V 0.2A SOT89-3
XC6201
YNTX1P502P
Y2
TCXO 19.2MHZ 3.3V TCXO/+-0.5PPM
TXCO19.2M
EFO192000Y
JP2
BOARD TO BOARD 18X2 CONN
CONN18X2
EX07Y49871
Q5
NPN PRE BIASED TRANSISTOR
DTC114EM
TYDTC114EM
U4
FLASH MEMORY 32MBIT
AT23DF321
YNAT25321A
Y1
VC-TXCO 12.8Mhz 3V +-12/2PPM
VC-TXCO
EFO128000Y
U14
LDO LINEAR REGULATOR 3.3V 300mA
HT7233
YNHT07233Z
U15
LDO LINEAR REGULATOR 3.3V 300mA
HT7233
YNHT07233Z
U19
LDO LINEAR REGULATOR 3.3V 300mA
HT7233
YNHT07233Z
Y3
TCXO 16MHZ 3.3V TCXO/+-0.5PPM
CRYSTRAL
16Mhz
EFO160000Y
20 ST-2112 KEYBOARD & DISPLAY BOM
ITEM
QTY
DESCRIPTION
SMTK PN
1
1
KEY PCB
EPL211030Z
Page 52

ST-2112D SM R 1.2 SMARTRUNK SYSTEMS, INC.
52
2
2
RESISTOR 0 ohm (0402)
RCY040004Z
3
1
RESISTOR 10 ohm (0402)
RCY041004Z
4
4
RESISTOR 330 ohm (0402)
RCY043314Z
5
1
RESISTOR 200 ohm (0402)
RCY042014Z
6
9
RESISTOR 1K (0402)
RCY041024Z
7
5
RESISTOR 2.2K (0402)
RCY042224Z
8
5
RESISTOR 4.7K (0402)
RCY044724Z
9
1
RESISTOR 22K (0402)
RCY042234Z
10
1
RESISTOR 27K (0402)
RCY042734Z
11
1
CAP. 0.1UF (0402)
CK5104AK5X
12
2
CAP. 2.2UF (0402)
CK6225AK6T
13
1
CAP. 0.33UF (0402)
CK0334AK5X
14
1
CAP. 4.7UF
CK0475AD7R
15
8
LED (0603)
EX01Y40205
16
0
FUSE 0.2A 32V (0402)
EX02Y40259
17
1
IC MIMD10A-7-F
YNDCOMD10A
18
20
TACTILE SW
EWPS33086X
19
1
PCB CONNECTOR 36P
EX07Y49872
20
1
PCB FHA8-M108000GA
EX07Y49911
Page 53

21 ACCESSORY PORT:
In the side of the radio, you will find four connectors:
1 – USB: USB 2.0 compliance
2 – External mic, External PTT and RX serial data (2.5mm)
4
3
2
1
Mic (-)
RX Serial (TTL)
Mic (+)/PTT
Page 54

ST-2112D SM R 1.2 SMARTRUNK SYSTEMS, INC.
54
3 – External Speaker, TX serial data (3.5mm)
4 – Accessory port
Pin
Function
Comments
GND
Ground
Main radio GND
SDA
High Speed Serial data I/O
0-3V up to 400Khz
SCL
High Speed Serial Clock
0-3V up to 400Khz
I/O 3
Digital Input/Output
1K Ohm, 0-3.3V
I/O 2
Digital Input/Output
1K Ohm, 0-3.3V
I/O 1
Digital Input/Output
1K Ohm, 0-3.3V
I/O 0
Digital Input/Output
1K Ohm, 0-3.3V
+V
Accesory power
3.3Vdc @ 200 mA
Speaker (-)
TX Serial (TTL)
Speaker (+)
8
1
Page 55

ST-2112D SM R 1.2 SMARTRUNK SYSTEMS, INC.
55
22 ST-2112 SERVICE MANUAL REVISIONS
AUTHOR
RELEASE
DATE
REMARKS
DANIEL MARTIN
1.1
JUN-2013
INITIAL RELEASE VERSION
DANIEL MARTIN
1.2
JUN-2013
ADDED SOFTWARE ZONE SPECIFICATION
Copyright 2014
Printed in Malaysia
www.smartrunk.com
ST-2112D SM R1.2
 Loading...