

Page 1
PLEASE THINK BEFORE YOU PRINT
Knowledge base
Maintaining your SMART
UF75 or UF75w projector
Cleaning the projector
WARNING
Cleaning a wall-mounted projector can result in a fall or injury. Use caution when
climbing a ladder, and consider removing the projector from its wall-mounting
bracket to clean it or to replace the projector lamp.
CAUTION
• Never touch the mirror with your hands or a brush, and do not scrub the
surface of the mirror with the supplied cleaning cloth. Instead, use the
supplied cleaning cloth to clean the mirror gently, and do not put any cleaning
solvents on the cloth or the mirror.
• Before you clean the projector, press the Power button twice on the Extended
Control Panel (ECP) or remote control to put the system into Standby mode,
and then allow the lamp to cool for at least 30 minutes.
• Do not spray cleaners, solvents or compressed air directly on the projector.
Do not use spray cleaners or solvents near any part of the projector because
they can damage or stain the unit. Spraying the system could spread a
chemical mist on some of the projector’s components and lamp, resulting in
poor image quality and damage to the product which may not be covered by
your warranty.
• Do not allow liquids or commercial solvents of any kind to flow into the
projector base or head.
IMPORTANT
• When cleaning the interactive whiteboard system:
– Wipe the exterior of the projector with a lint-free cloth.
Page 2

2 | KNOWLEDGE BASE – MAINTAINING YOUR SMART UF75 OR UF75W
PROJECTOR
– If necessary, use a soft cloth moistened with a mild detergent to clean the
projector housing.
– For optimum performance, clean the projector every 12 months. Increase
this frequency according to environmental conditions.
• Do not use abrasive cleaners, waxes or solvents.
• When cleaning the projector’s mirror:
– Use a bellows bulb or air blower bulb (commonly found in audio-visual
supply stores) to blow off dust. Never touch the mirror or lens with your
bare hands or a brush.
– If wiping the mirror or lens is unavoidable, wear protective gloves and
gather the supplied cleaning cloth into a ball. Gently run the cleaning cloth
across the mirror from the center to the edge, using the cleaning cloth like
you would a feather duster.
• When cleaning the projector’s lens:
– Never touch the lens with your bare hands or a brush.
– If wiping the lens is unavoidable, wear protective gloves and gather the
supplied cleaning cloth into a ball. Gently run the cleaning cloth across
the lens from the center to the edge, using the cleaning cloth like you
would a feather duster.
WARNING
• Replace the lamp when the projector displays its lamp life warning message.
If you continue to use the projector after this message appears, the lamp can
shatter or burst, scattering glass throughout the projector.
• If the lamp shatters or bursts, leave and then ventilate the area.
• Next do the following:
– Avoid touching the glass fragments because they can cause injury.
– Wash your hands thoroughly if you have come into contact with lamp
debris.
– Once the area has been ventilated, thoroughly clean the area around the
projector, and discard any edible items placed in that area because they
could be contaminated.
– Call your authorized SMART reseller
for instructions. Do not attempt to
replace the lamp.
• Uncovering the lamp while the projector is mounted on the wall-mounting
bracket can lead to product damage or personal injury from falling pieces of
glass if the lamp is broken.
Page 3
3 | KNOWLEDGE BASE – MAINTAINING YOUR SMART UF75 OR UF75W
Lamp cover
PROJECTOR
• When replacing the projector lamp:
– Put the projector into Standby mode and wait 30 minutes for the lamp to
cool completely.
– Do not remove any screws other than those specified in the lamp
replacement instructions.
– Wear protective eyewear while changing the lamp. Failure to do so can
cause injuries including loss of eyesight if the lamp shatters or bursts.
– Use only replacement lamps approved by SMART Technologies. Contact
your authorized SMART reseller
for replacement parts.
– Never replace the lamp module with a previously used lamp module.
– Always handle the fragile lamp module with care to prevent premature
lamp failure or exposure to mercury. Use gloves when touching the lamp.
Do not touch the lamp with your fingers.
– Recycle or dispose of the lamp as hazardous waste in accordance with
local regulations.
Removing and replacing the projector lamp module
When the lamp reaches the end of its life, a message appears reminding you to
replace the lamp. Make sure you have a replacement projector lamp before
proceeding with the following instructions.
You need a Phillips No. 2 screwdriver and a flat screwdriver to complete these
procedures.
To remove the old lamp 1. Press the Power button twice on the remote control or the ECP to put the
projector into Standby mode.
2. Wait at least 30 minutes for the projector to cool down.
3. Disconnect the power cable from the projector.
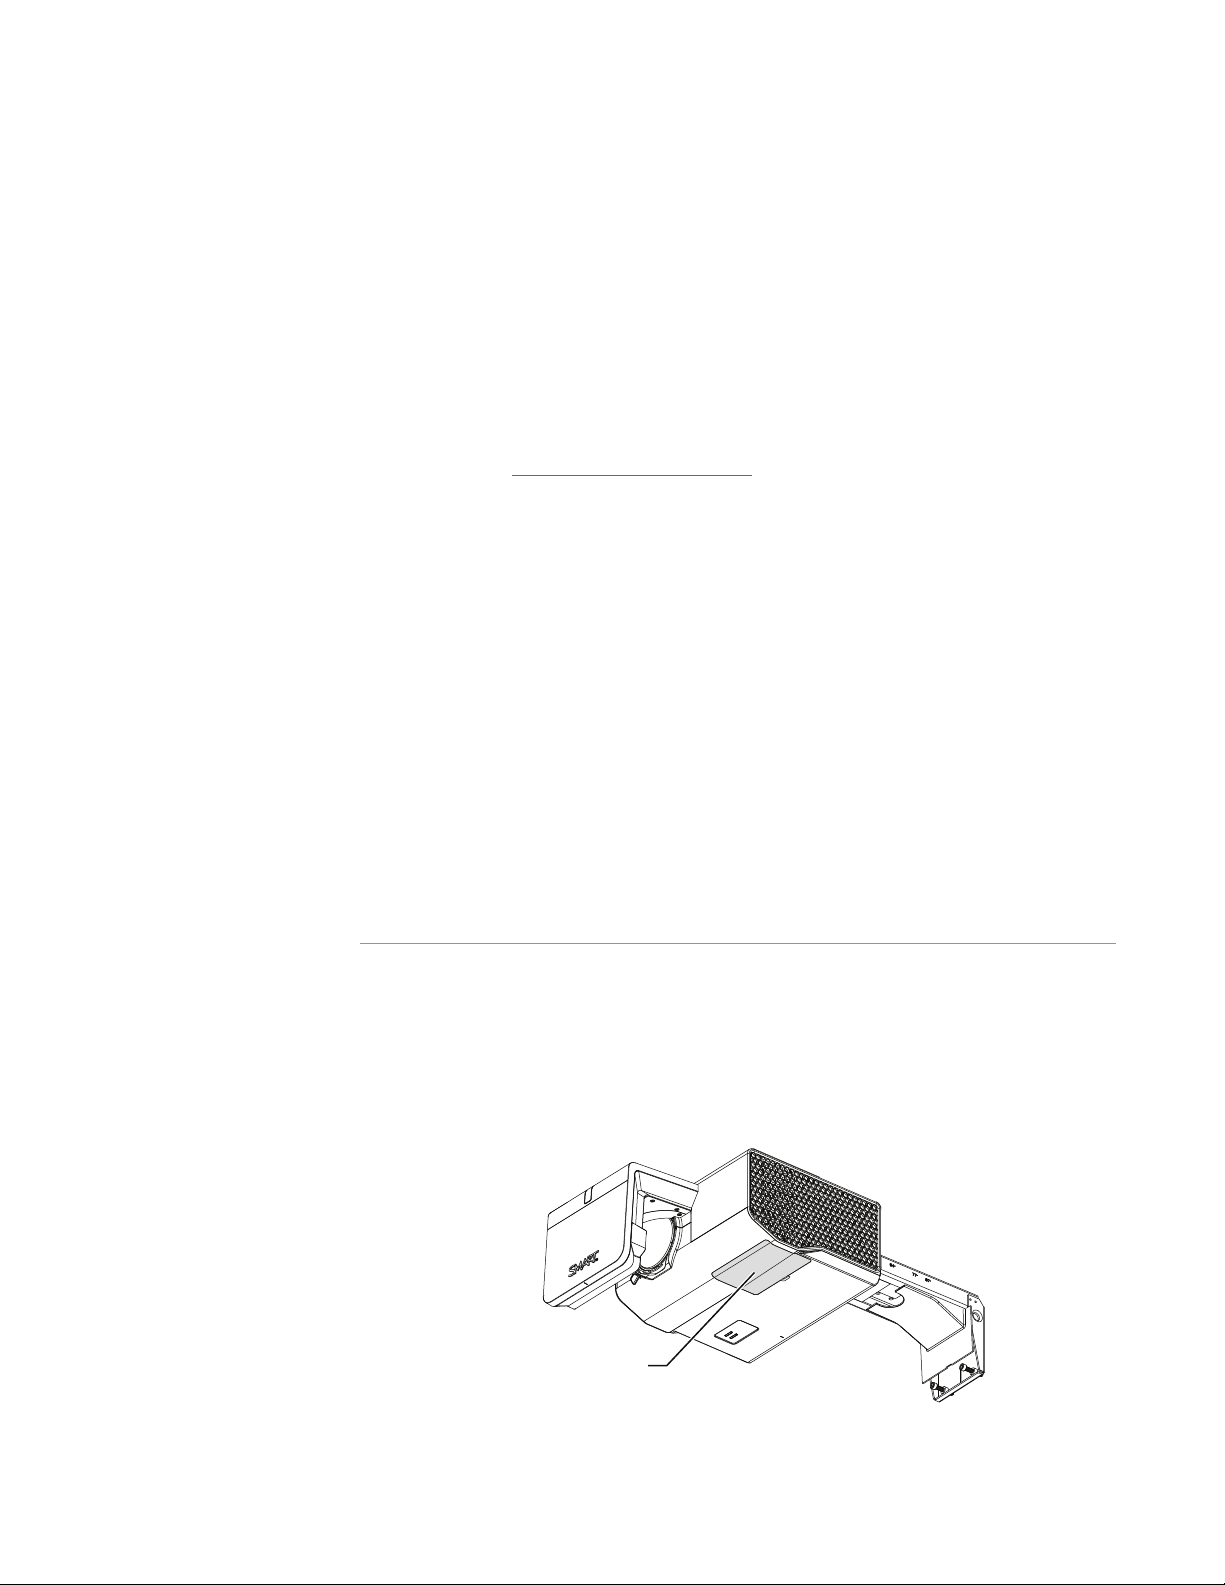
4. Remove the lamp cover from the projector, and then put it in a safe place.
Page 4

4 | KNOWLEDGE BASE – MAINTAINING YOUR SMART UF75 OR UF75W
PROJECTOR
TIP
If the cover is difficult to remove, insert a flat screwdriver or small coin into the
slot on the bottom of the lamp cover to gently pry the cover open.
5. Use a Phillips screwdriver to loosen the two captive screws from the bottom of the
lamp module.
NOTE
Loosen the captive screws. Don’t remove them.
6. Use the handle on the bottom of the lamp module to slide out the lamp and
remove it from the projector.
7. Put the old lamp in a secure container, and handle it gently until you recycle it.
8. Use a vacuum with a soft bristle attachment to gently clean the area, being careful
not to touch any optical components.
Page 5

5 | KNOWLEDGE BASE – MAINTAINING YOUR SMART UF75 OR UF75W
PROJECTOR
9. Use the same attachment to vacuum the vents on either side of the projector.
To install the new lamp 1. Remove the new lamp module from its packaging.
2. Carefully place the lamp module into the projector by holding the lamp module by
the handle vertically and guiding it into its slot.
3. Gently press the power end of the lamp module against the projector to ensure
the power plug makes contact with the projector’s power receptacle.
NOTE
You should be able to place the lamp module into the projector easily without
applying much force.
4. Use the Phillips screwdriver to tighten the captive screws.
5. Carefully replace the lamp cover.
6. Connect the power cable.
7. Press the Power button once on the remote control or the ECP to confirm that the
projector is operating and that the lamp module is correctly installed.
To complete the projector
lamp installation
1. Turn on the projector.
2. Adjust the projected image if necessary. See Focusing and adjusting projected
image below.
Page 6

6 | KNOWLEDGE BASE – MAINTAINING YOUR SMART UF75 OR UF75W
3. Access the service menu to reset the lamp hour counter. See Resetting the lamp
4. Activate the projector’s alert e-mails and lamp warnings if they’ve been
PROJECTOR
timer in your SMART Board interactive whiteboard system user’s guide
deactivated. See the appropriate sections in your SMART Board interactive
whiteboard system user’s guide
.
.
Focusing and adjusting the projected image
You can use any or all of these adjustments to refine the image. Adjust each setting a
little at a time.
You need a Phillips No. 2 screwdriver to complete these procedures.
To focus the projected
image
To adjust the projected
image
Move the focus adjustment lever up or down until the image is clear.
1. Unlock the projector by moving the lock lever to the left.
2. Align the top edge of the projected image with the top edge of the interactive
whiteboard’s bezel or frame by moving the projector manually. Fill as much of the
screen as possible.
bezel or
frame
Fill as much of the screen as possible,
aligning the top of the projected image
with the top of the bezel or frame.
projected
image
Page 7

7 | KNOWLEDGE BASE – MAINTAINING YOUR SMART UF75 OR UF75W
4
2
1
3
PROJECTOR
TIP
Move the focus lever until it is almost in the locked position. The friction will
help you to maintain control when you’re moving the projector to the desired
position.
3. Move the lock lever to the right to lock the projector.
4. Using a Phillips screwdriver, loosen the four side screws and then move the
projector backward or forward on the boom until the top edge of the image fills the
screen from edge to edge.
TIP
Tighten the screws in the order shown while holding the projector steady with
one hand.
Page 8

8 | KNOWLEDGE BASE – MAINTAINING YOUR SMART UF75 OR UF75W
PROJECTOR
To adjust the vertical
keystone of the projected
image
Loosen or tighten the lower screws on the projector mounting plate, turning both
screws equally a quarter or half turn at a time.
• Turn the adjustment screws clockwise to push the projector up, widen the
bottom of the image and move the bottom edge of the image down.
• Turn the adjustment screws counterclockwise to push the projector down,
narrow the bottom of the image and move the bottom edge of the image up.
NOTE
The top edge of the image moves very little from its position.
To adjust the horizontal
keystone of the projected
image
Turn the projector to the left or right to adjust the image.
TIP
Move the focus lever until it’s almost in the locked position. The friction will
help you to maintain control when you’re moving the projector to the desired
position.
• Rotate the projector to the right to lengthen the right edge of the image,
shorten the left edge image and move the entire image to the right.
• Rotate the projector to the left to shorten right edge of the image, lengthening
the left edge of the image and move the entire image to the left.
Page 9

9 | KNOWLEDGE BASE – MAINTAINING YOUR SMART UF75 OR UF75W
PROJECTOR
To center the projected
image
If the image is off center, use a wrench to turn the adjustment screw on the
mounting base.
• Rotate the adjustment screw clockwise to move the entire image to the left.
• Rotate the adjustment screw counterclockwise to move the entire image to
the right.
Resetting the lamp timer
After you replace the lamp, access the projector service menu to reset the lamp hour
counter. To prevent accidental errors, only a system administrator should perform this
procedure.
CAUTION
• Always reset the lamp hours after you replace the lamp, because lamp
service reminders are based on the current hours of use.
• Do not adjust any settings in the service menu other than those listed in this
guide. Changing other settings can affect the operation of your projector and
invalidates your warranty.
To reset the lamp timer 1. Press the remote control buttons quickly in the following sequence to access the
service menu: Down-Up-Up-Left-Up.
2. Scroll to Lamp Hour Reset, and then press OK.
Both Lamp Hour values (Standard and Economy) are reset to zero.
CAUTION
Do not use the Lamp Hour Reset feature unless you have just replaced the
lamp. Resetting the lamp hour counter on an old lamp can result in lamp
failure and damage to the product which may not be covered by your
warranty.
NOTE
You’re unable to reset the Display Hours value because it’s the running total
of hours the projector has been in use.
Page 10

3. Press the Menu button on the remote control.
The SMART UF75 Settings menu appears.
4. Select to confirm that the lamp hours are reset to zero.
Maintaining your interactive whiteboard
For more information on maintaining your interactive whiteboard, see your SMART
Board interactive whiteboard user’s guide
.
smarttech.com/support
smarttech.com/contactsupport
© 2011 SMART Technologies ULC. All rights reserved. SMART Board, smarttech, the SMART logo and all SMART taglines are trademarks or
registered trademarks of SMART Technologies ULC in the U.S. and/or other countries. All third-party product and company names may be
trademarks of their respective owners. Contents are subject to change without notice. 08/2011.
 Loading...