

Page 1
Installation and User’s Guide
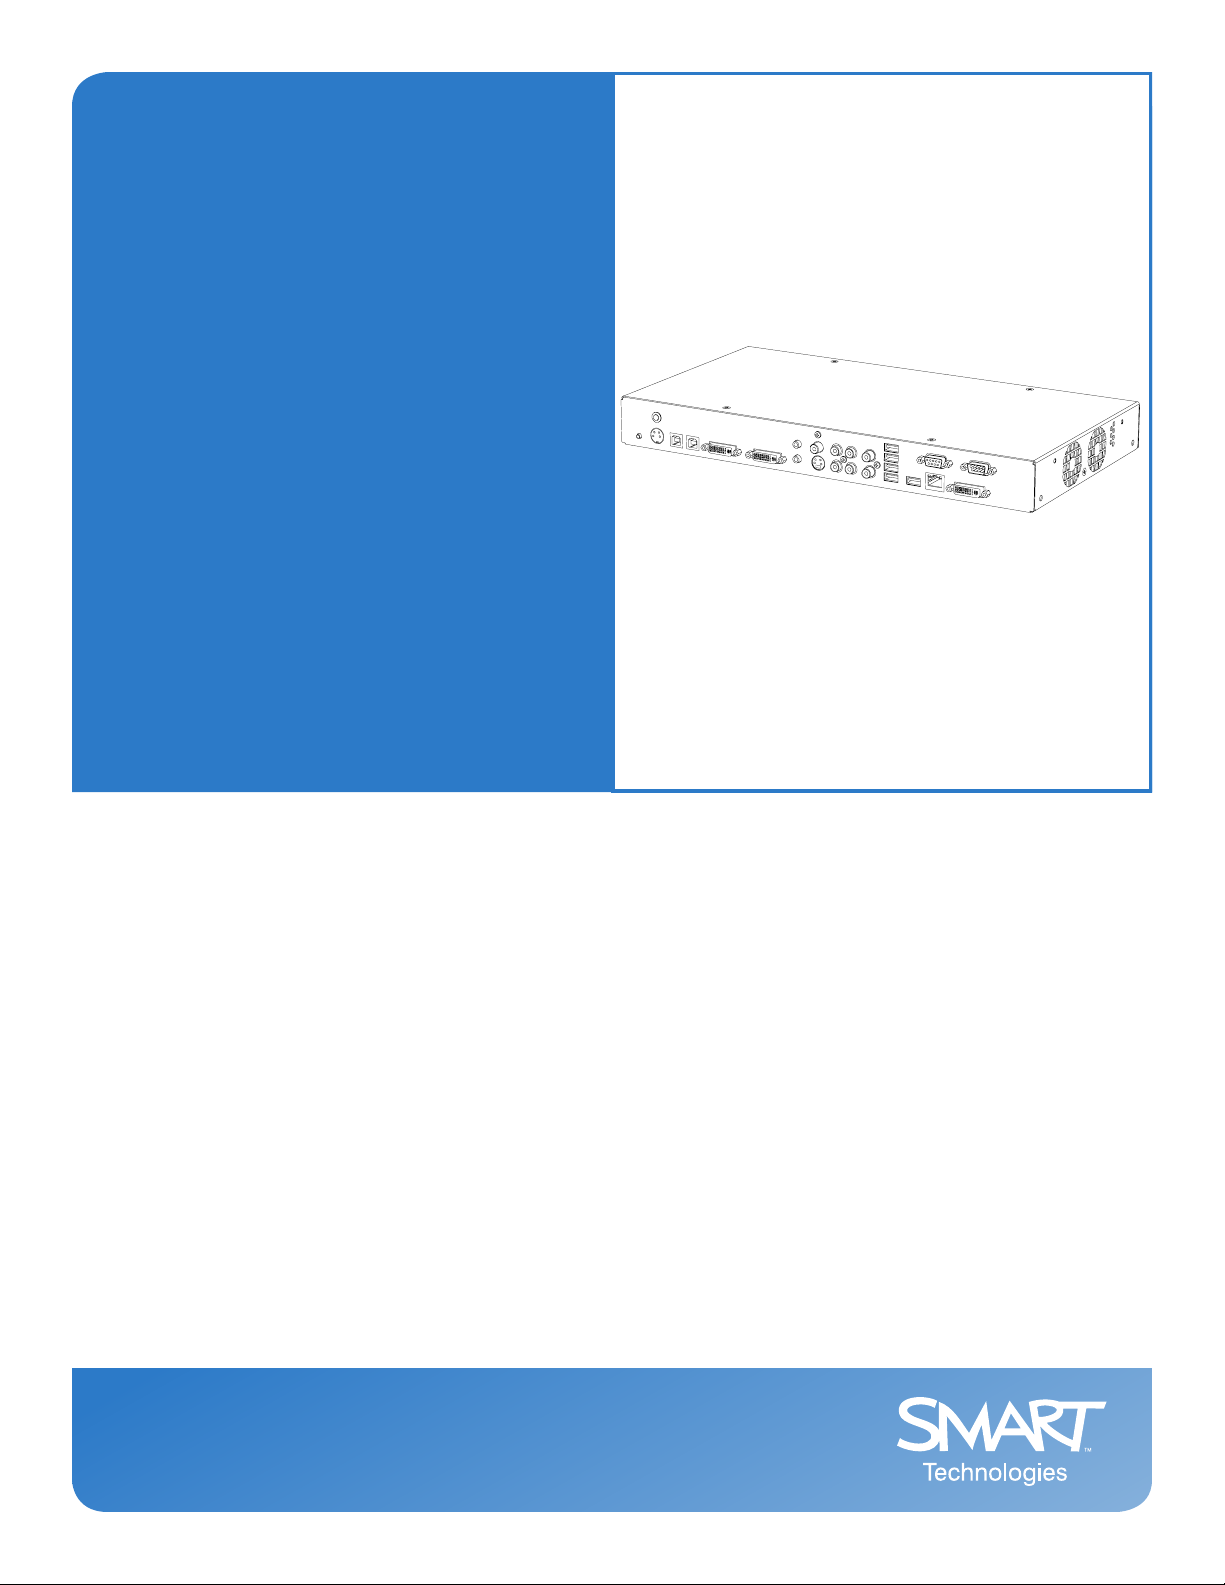
SMART Hub SE240
Page 2

Product Registration
If you register your SMART product, we’ll notify you of new features and
software upgrades.
Register online at www.smarttech.com/registration.
Keep the following information available, in case you need to contact
Technical Support:
Serial Number: _______________________________________
Date of Purchase: _____________________________________
Trademark Notice
SMART Board, Sympodium, Actalyst, Notebook, Bridgit, LinQ, the SMART logo and smarttech are trademarks or registered trademarks of
SMART Technologies ULC in the U.S. and/or other countries. Microsoft and Windows are either registered trademarks or trademarks of
Microsoft Corporation in the U.S. and/or other countries. All other third-party product and company names may be the trademarks of
their respective owners.
Copyright Notice
© 2008 SMART Technologies ULC. All rights reserved. No part of this publication may be reproduced, transmitted, transcribed, stored in a
retrieval system or translated into any language in any form by any means without the prior written consent of SMART Technologies ULC.
Information in this manual is subject to change without notice and does not represent a commitment on the part of SMART.
Patent No. US5448263; US6141000; US6326954; US6337681; US6540366; US6741267; US6747636; US6803906; US6919880;
US6947032; US6954197; US6972401; US7151533; US7184030; US7236162; US7283126; US7289113; CA2058219; CA2453873;
EP1297488; ES2279823; CN1310126; DE60124549; and ZL0181236.0. Other patents pending.
07/2008
Page 3
Important Information
WARNING
Failure to follow the installation instructions shipped with the SMART Hub SE240
could result in personal injury and damage to the product.
WARNING
Ensure that any cables extending across the floor to the SMART Hub SE240 are
properly bundled and marked to avoid a trip hazard.
WARNING
Make sure an electrical socket is near the SMART Hub SE240 and remains easily
accessible during use.
WARNING
To reduce the risk of fire or electric sh ock, do not expose the SMART Hub SE240 to
rain or moisture.
WARNING
Do not open or disassemble the SMART Hub SE240. Opening the casing voids
your warranty.
WARNING
CAUTION
The external power supply (when required) needs to meet the Limited Power
Source (LPS) requirements of CSA/UL/IEC/EN 60950-1.
Avoid setting up and using the SM ART Hub SE240 in an area with excessive levels
of dust, humidity and smoke.
Important Information i
Page 4

ii Important Information
Page 5

Table of Contents
Important Information i
About the SMART Hub SE240 1
SMART Hub SE240 Features......................................................................................................... 1
SMART Hub SE240 Firmware Features......................................................................................... 2
Standard Accessories...... ... ... .... ... ... .......................................................................... .... ... ... ...........2
Installing the SMART Hub SE240 5
Environmental Requirements.......................................................................................................... 5
Before Installing the SMART Hub SE240 ....................................................................................... 5
Installing the SMART Hub SE240................................................................................................... 6
Configuring the SMART Hub SE240 15
Orienting Your SMART Product....................................................................................................15
Configuring Multiple SMART Hub SE240 Units............................................................................ 17
Securing Configuration Settings.................................................................................................... 20
Connecting Computers to the SMART Hub SE240 ...................................................................... 22
Connecting Video Sources to the SMART Hub SE240................................................................. 24
Configuring the Display Settings................................................................................................... 25
Configuring Networking and Conferencing Settings ..................................................................... 29
Configuring Room Control Settings...............................................................................................35
Configuring Language and General System Settings................................................................... 40
Using the SMART Hub SE240 45
Basic Tools.................................................................................................................................... 45
Starting a SMART Hub SE240 Session........................................................................................ 49
Whiteboarding...............................................................................................................................50
Collaborating.................................................................................................................................59
Connecting to Computers and Video Sources.............................................................................. 68
Using Your SMART Product with Computer and Video Source Inputs......................................... 71
Ending a SMART Hub SE240 Session................... ...................................................................... 74
Maintaining the SMART Hub SE240 75
Updating the SMART Hub SE240 Firmware.................................................................................75
Maintaining the SMART Hub SE240 Hardware............................................................................ 80
Troubleshooting the SMART Hub SE240 81
Connecting the SMART Hub SE240.......................................... ... .... ... ... ...................................... 81
Resetting the SMART Hub SE240................................................................................................ 81
General SMART Hub SE240 Troubleshooting.............................................................................. 82
Regulatory Compliance 85
Waste Electrical and Electronic Equipment Regulations .................. ... ... ... ... .... ... ... ... .... ... ... ... ... ... 85
Restriction of Certain Hazardous Substances (RoHS) Directives................................................. 85
Table of Contents iii
Page 6

Customer Support 87
Online Support................. ... .......................................................................... .... ... ... ... .... ...............87
Training......................................................................................................................................... 87
Contacting SMART Technical Support.......................................................................................... 87
General Inquiries........................................................................... .... ... ... ... ... .... ... ... ......................87
Warranty........................................................................................................................................ 88
Registration...................................................................................................................................88
Index 89
iv Table of Contents
Page 7
About the SMART Hub SE240
The SMART Hub SE240 is a device you connect to SMART Board™ interactive whiteboards,
SMART Boards for Flat-Panel Displays, Actalyst™ interactive overlays and Sympodium™
interactive pen displays. It lets you to do the following with your SMART products without
connecting to a computer:
• whiteboarding
• collaborating with others using Bridgit™ conferencing software
• viewing and working with computer or video source input on your SMART products’ displays
This chapter introduces you to the SMART Hub SE240 and presents its features.
• SMART Hub SE240 Features (this page)
• SMART Hub SE240 Firmware Features (p age 2)
• Standard Accessories (page 2)
– Power Supply (page 2)
– Cables and Adapters (page 3)
SMART Hub SE240 Features
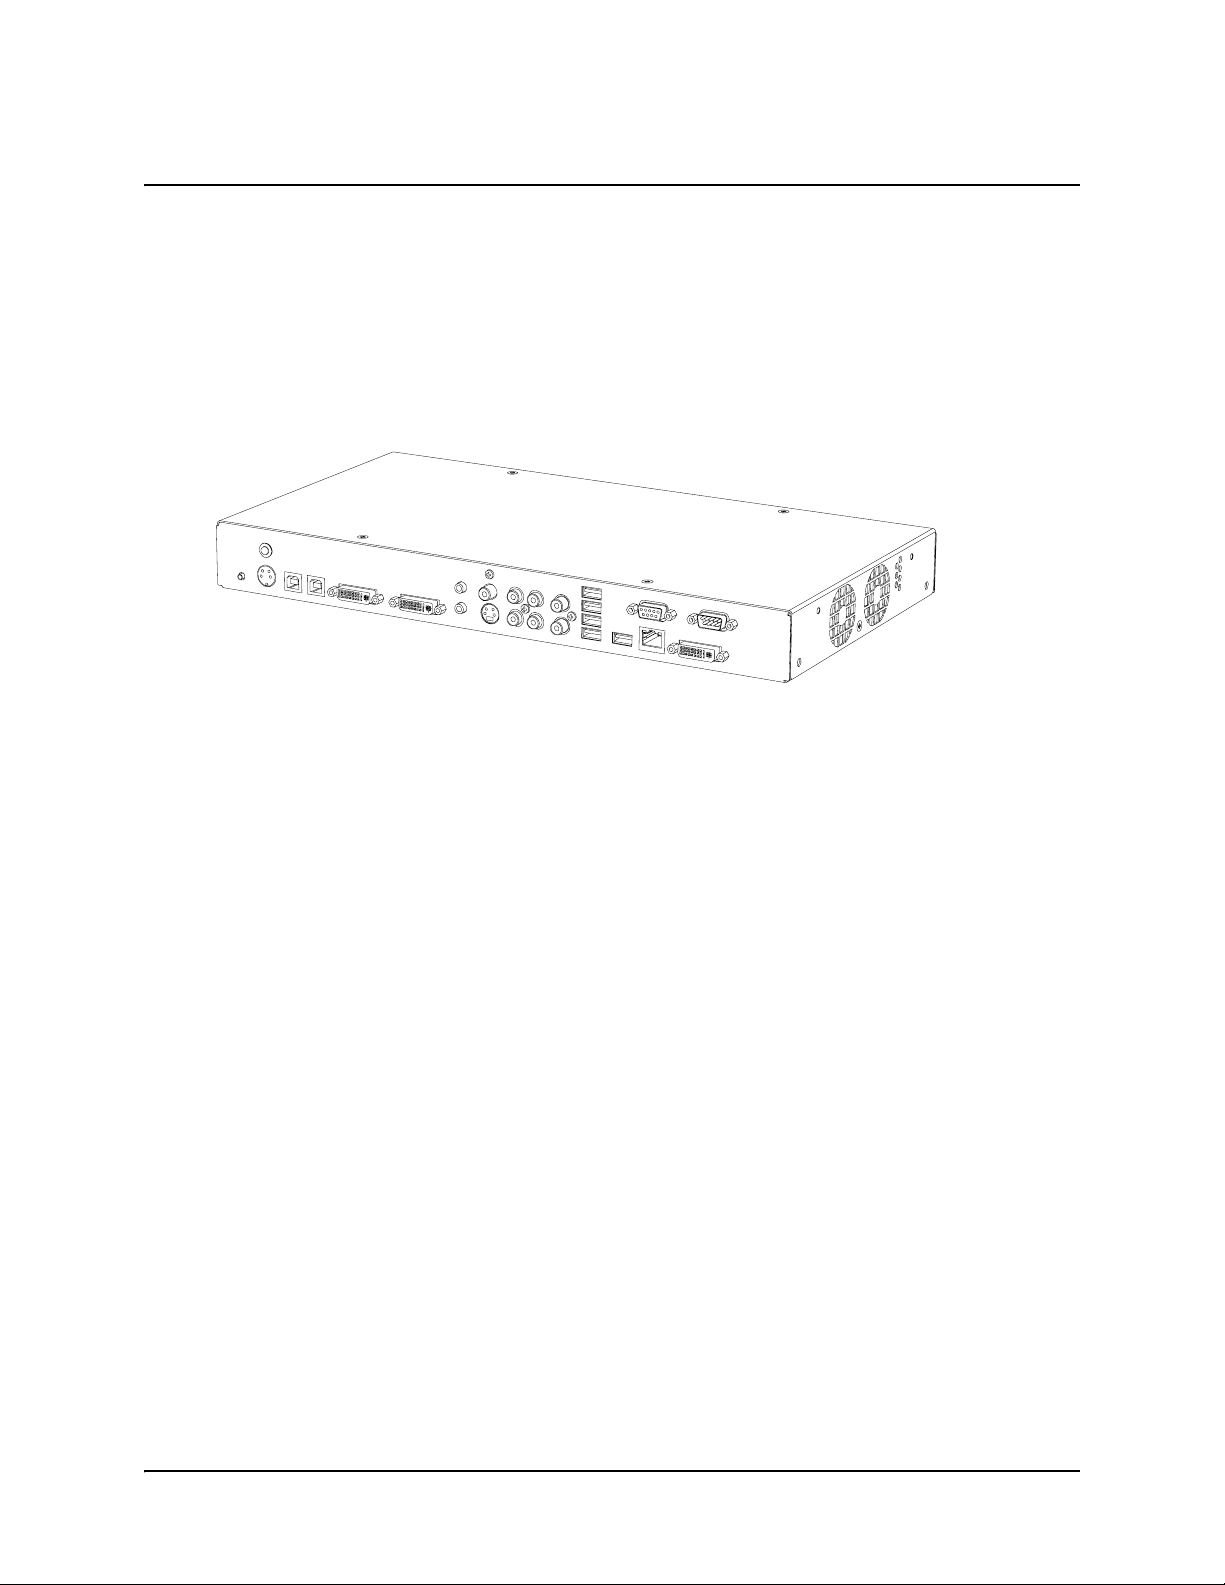
The SMART Hub SE240’s comp act size allows you to integrate it into your boardroom or
classroom easily. You can mount the SMART Hub SE240 in four ways:
• 19" (48.3 cm) rack mounting
• wall mounting
• table top or shelf mounting
• under-shelf mounting
The SMART Hub SE240 includes connectors for:
• SMART products
• speakers
• up to two computers
• up to two video sources
• other peripheral devices (including USB storage devices)
About the SMART Hub SE240 1
Page 8
The SMART Hub SE240 supports the following input and output formats:
Computer Input Video Source Input Output
•VGA
• SVGA
•XGA
•XWGA
• SXGA
•MAC
The SMART Hub SE240 includes 256 MB DDR RAM, and its two fans cool the appliance while
producing less than 30 dB noise at 16.4' (5 m).
• NTSC/PAL/SECAM SDTV
(480i, 576i)
• EDTV (480p, 576p)
•XGA
•WXGA
• SXGA
SMART Hub SE240 Firmware Features
The SMART Hub SE240 firmware includes the following features:
• Whiteboard for writing digital ink notes and drawings and saving them for later use
• Capability to collaborate with others through Bridgit software
NOTE: Bridgit software is not included with the SMART Hub SE240.
• LinQ™ software for connecting to remote computers through a network
• digital ink features for computer and video source inputs
Standard Accessories
SMART Technologies provides the following accessories with the SMART Hub SE240. If you need
to purchase replacements, contact your authorized SMART reseller.
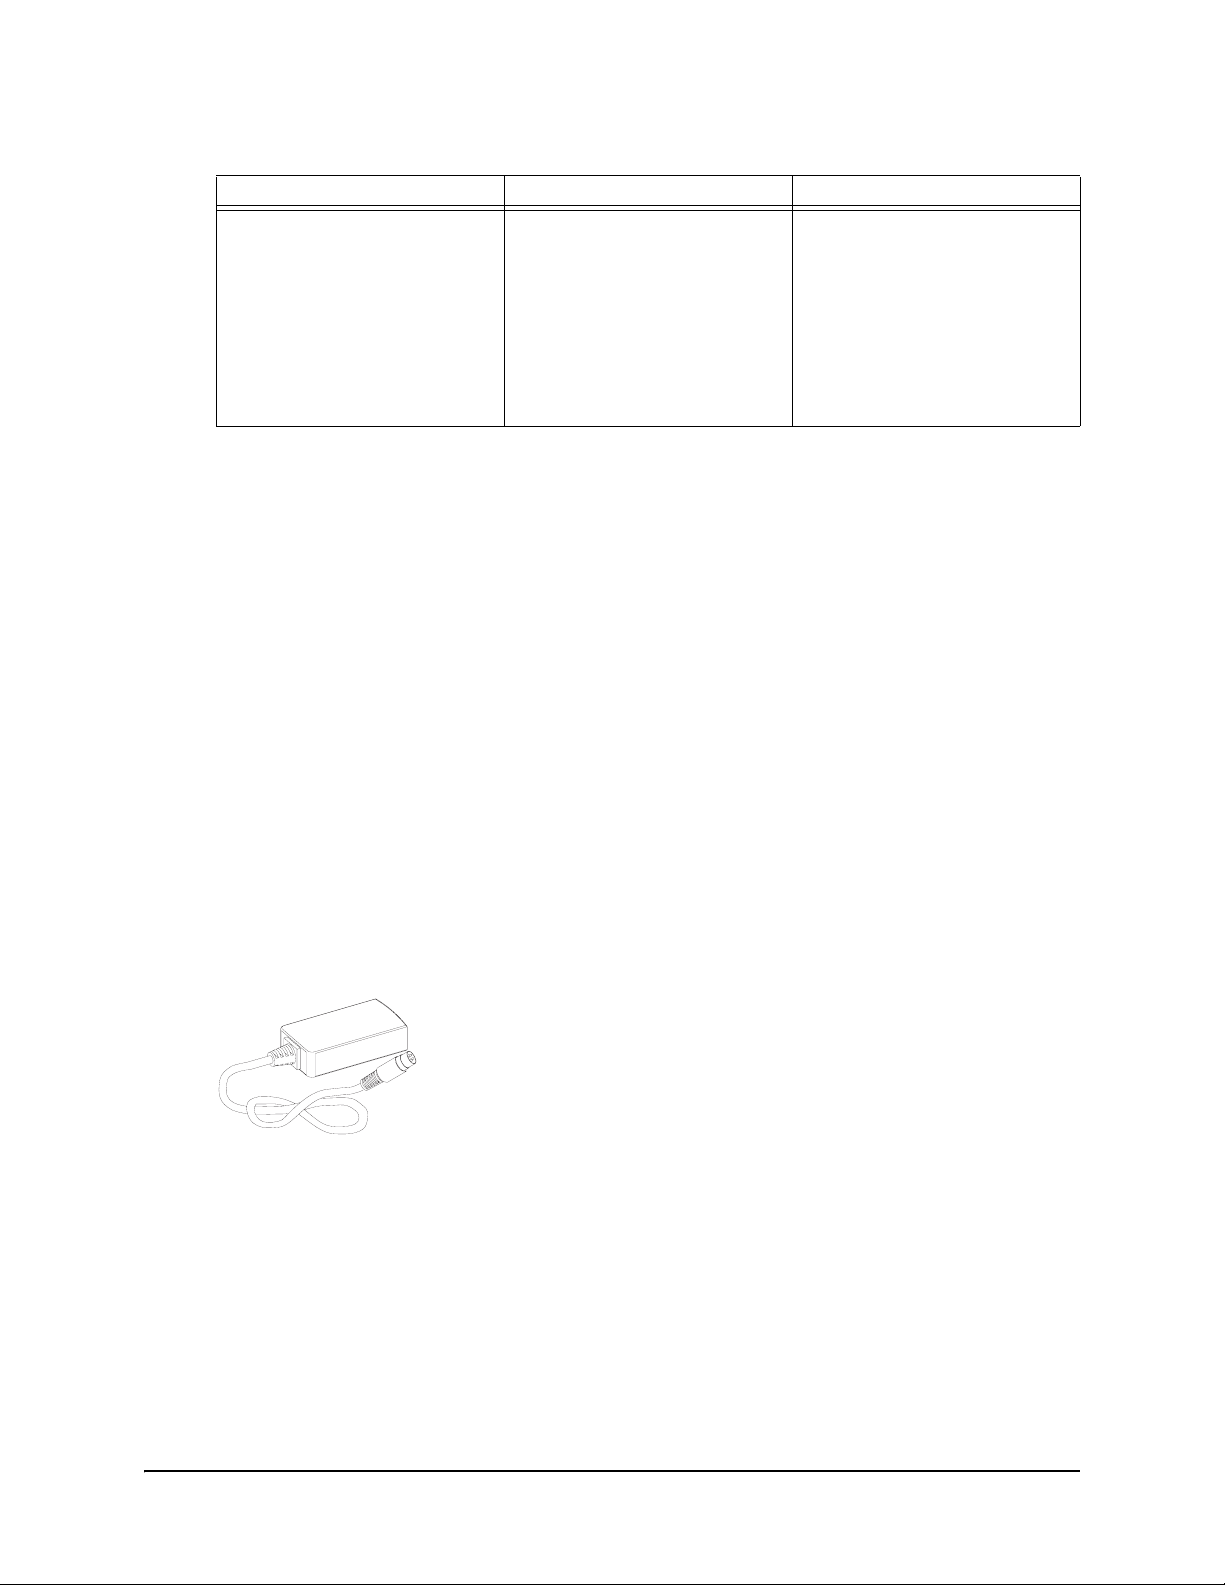
Power Supply
SMART Technologies provides a 12V, 5.0A power supply with the SMART Hub SE240.
NOTE: The cable you need to connect the power supply to a power outlet is also included with the
SMART Hub SE240 and depends on your region.
2 About the SMART Hub SE240
Page 9
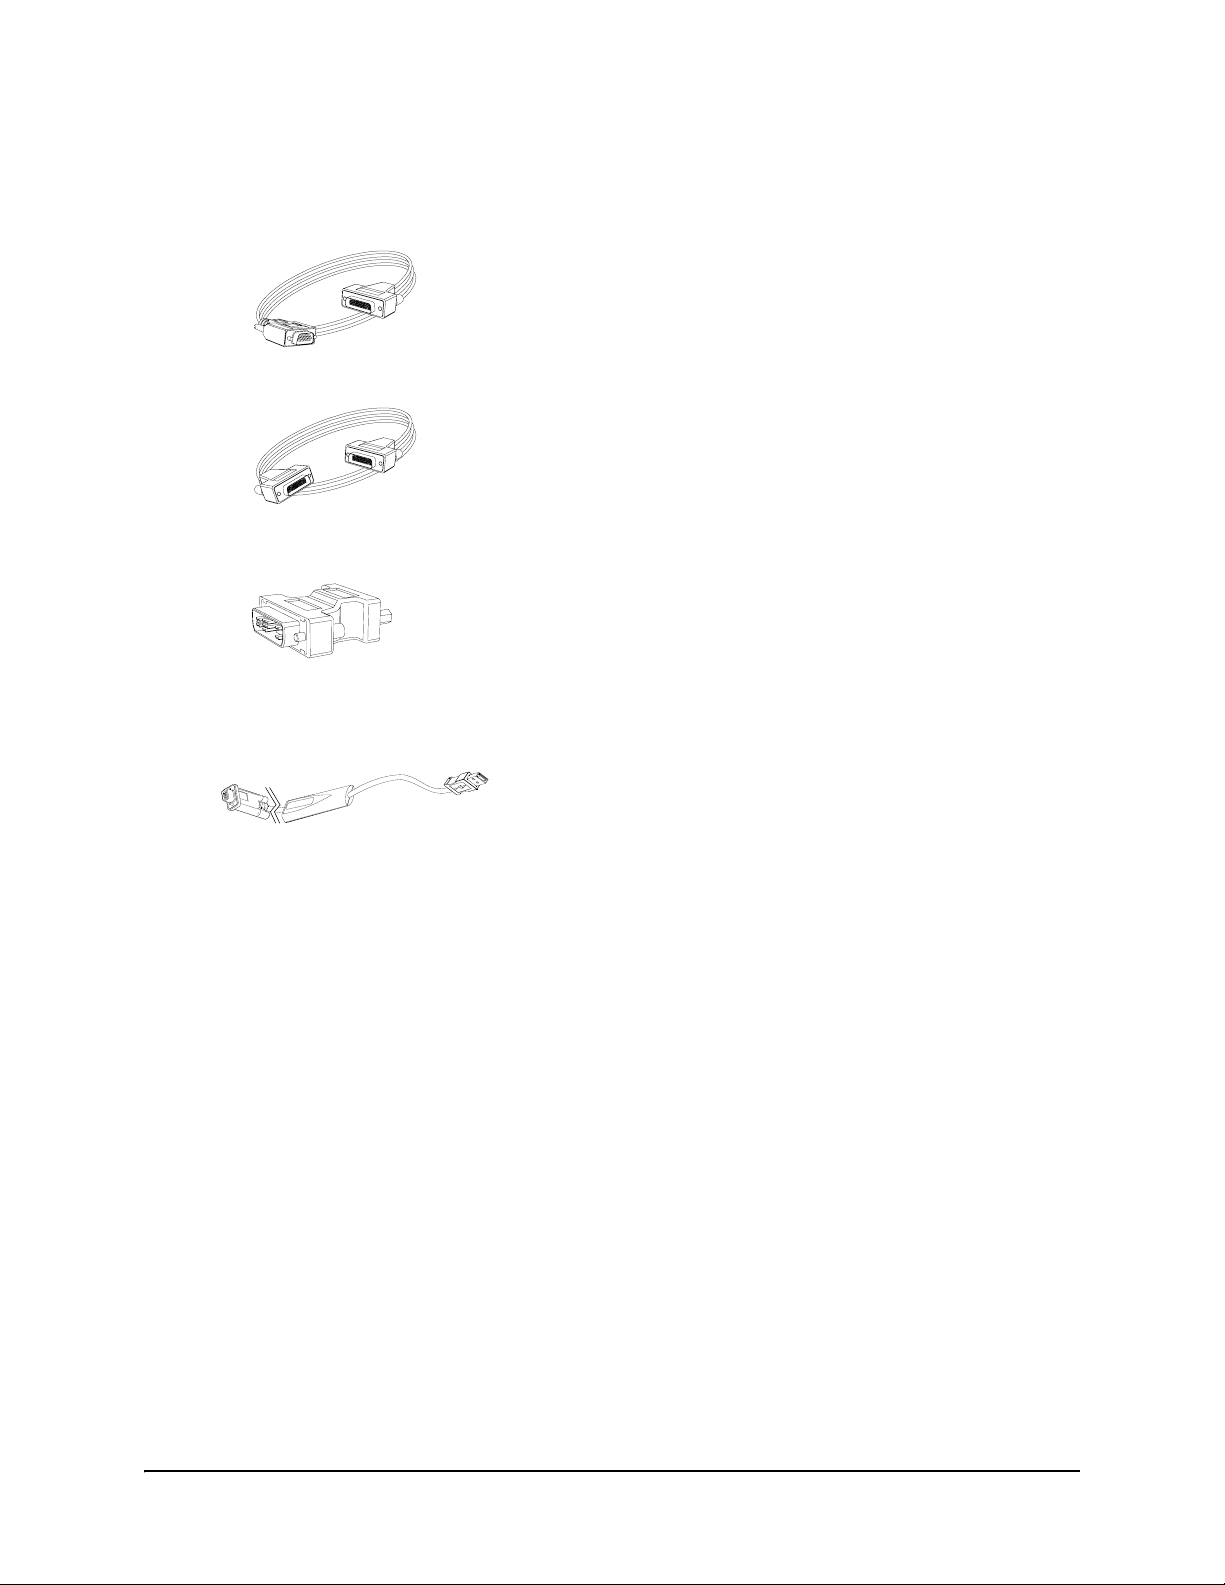
Cables and Adapters
SMART Technologies provides the following cables with the SMART Hub SE240:
• 6' (1.8 m) DVI male to VGA male cable
• 6' (1.8 m) DVI male to DVI male cable
• DVI male to VGA female adapter to connect the SMART Hub SE240 to a proj ector or display
using a VGA cable
If your SMART product has a serial connector rather than a USB connector, your SE240S model
will ship with a USB to serial adapter so that you can connect the SMART Hub SE240 to your
SMART product.
NOTE: You can purchase additional cables from your authorized SMAR T reseller.
About the SMART Hub SE240 3
Page 10

4 About the SMART Hub SE240
Page 11

Installing the SMART Hub SE240
Before installing the SMART Hub SE240, review the following topics. This chapter contains
installation instructions as well as environmental and safety information.
• Environmental Requirements (this page)
• Before Installing the SMART Hub SE240 (this page)
• Installing the SMART Hub SE240 (page 5)
Environmental Requirements
Before installing the SMART Hub SE240, review the following environmental requirements.
Storage Temperature and Humidity
You can store the SMAR T Hub SE240 in temperatur es ranging from -4°F to 140°F (-2 0°C to 60°C)
and humidity ranging from 0% to 80% (non-condensing).
Water and Fluid Resistance
The SMART Hub SE240 is for indoor use only and does not meet any salt-spray or water ingress
requirements. Do not pour or spr ay any liquids dir ectly onto the product. The se liquids can get into
areas where they could damage sensitive electronic components.
Dust and Scratching
The SMART Hub SE240 is for use in office and classroom environme nts and is not for industrial
use, where heavy dust and pollutants can cause malfunctions or imp aired operation. Th e design is
for pollution degree 1 (P1) as per EN61558-1, which is defined as “No pollution or only dry nonconductive pollution”.
Electrostatic Discharge
The SMART Hub SE240 meets the requirements of EN61000-4-2 severity level 4 for direct and
indirect ESD. No malfunction or damage up to 15 kV (both polarities) with a 330 ohm, 150 pF
probe (air discharge). Unmated connectors meet 8 kV for direct (contact) discharge.
Conducted and Radiated Emissions
The narrowband radiated electric field from the SMART Hub SE240 meets the limits for Class B
performance as defined in EN55022/CISPR 22.
Before Installing the SMART Hub SE240
Choose a location for the SMART Hub SE240 that’s as close a possible to your SMART product,
its projector or display, and a network connection. You can mount the SMART Hub SE240 on a
rack, wall, tabletop, or shelf.
Tools Required
You need a Phillips® No. 2 screwdriver to connect the mounting brackets to the SMART Hub
SE240. You may need additional screwdrivers or an electric drill with appropriate bits depending
on the screws you use to mount the unit to a rack, wall, tabletop or shelf.
Installing the SMART Hub SE240 5
Page 12
Additional Cables Required
The SMART Hub SE240 comes with the cables and accessories documented on page 2. Y ou may
need the following additional cables:
• a USB cable to connect the SMART Hub SE240 to your SMART product
NOTE: Your SMART product comes with a USB cable if it has a USB connector.
• a Cat 5 cable to connect the SMART Hub SE240 to your network
• two DVI cable, two USB cables and two S tereo Mini cables to connect the SMAR T Hub SE2 40
to computers
• an S-video cable and five RCA cables to connect the SMART Hub SE240 to video sources
• two RCA cables to connect the SMART Hub SE240 to speakers
Installing the SMART Hub SE240
Install the SMART Hub SE240 in three stages:
1. Mount the SMART Hub SE240.
2. Connect the SMART Hub SE240.
3. Verify that the SMART Hub SE240 firmware is current.
Mounting the SMART Hub SE240
You can mount the SMART Hub SE240 in one of the following configurations:
• 19" (48.3 cm) rack mounting (rack not included)
• wall mounting
• tabletop or shelf mounting
• under-shelf mounting
IMPORTANT
When mounting the SMART Hub SE240, ensure it s fans are not ob structed, to allow
for proper cooling.
6 Installing the SMART Hub SE240
Page 13
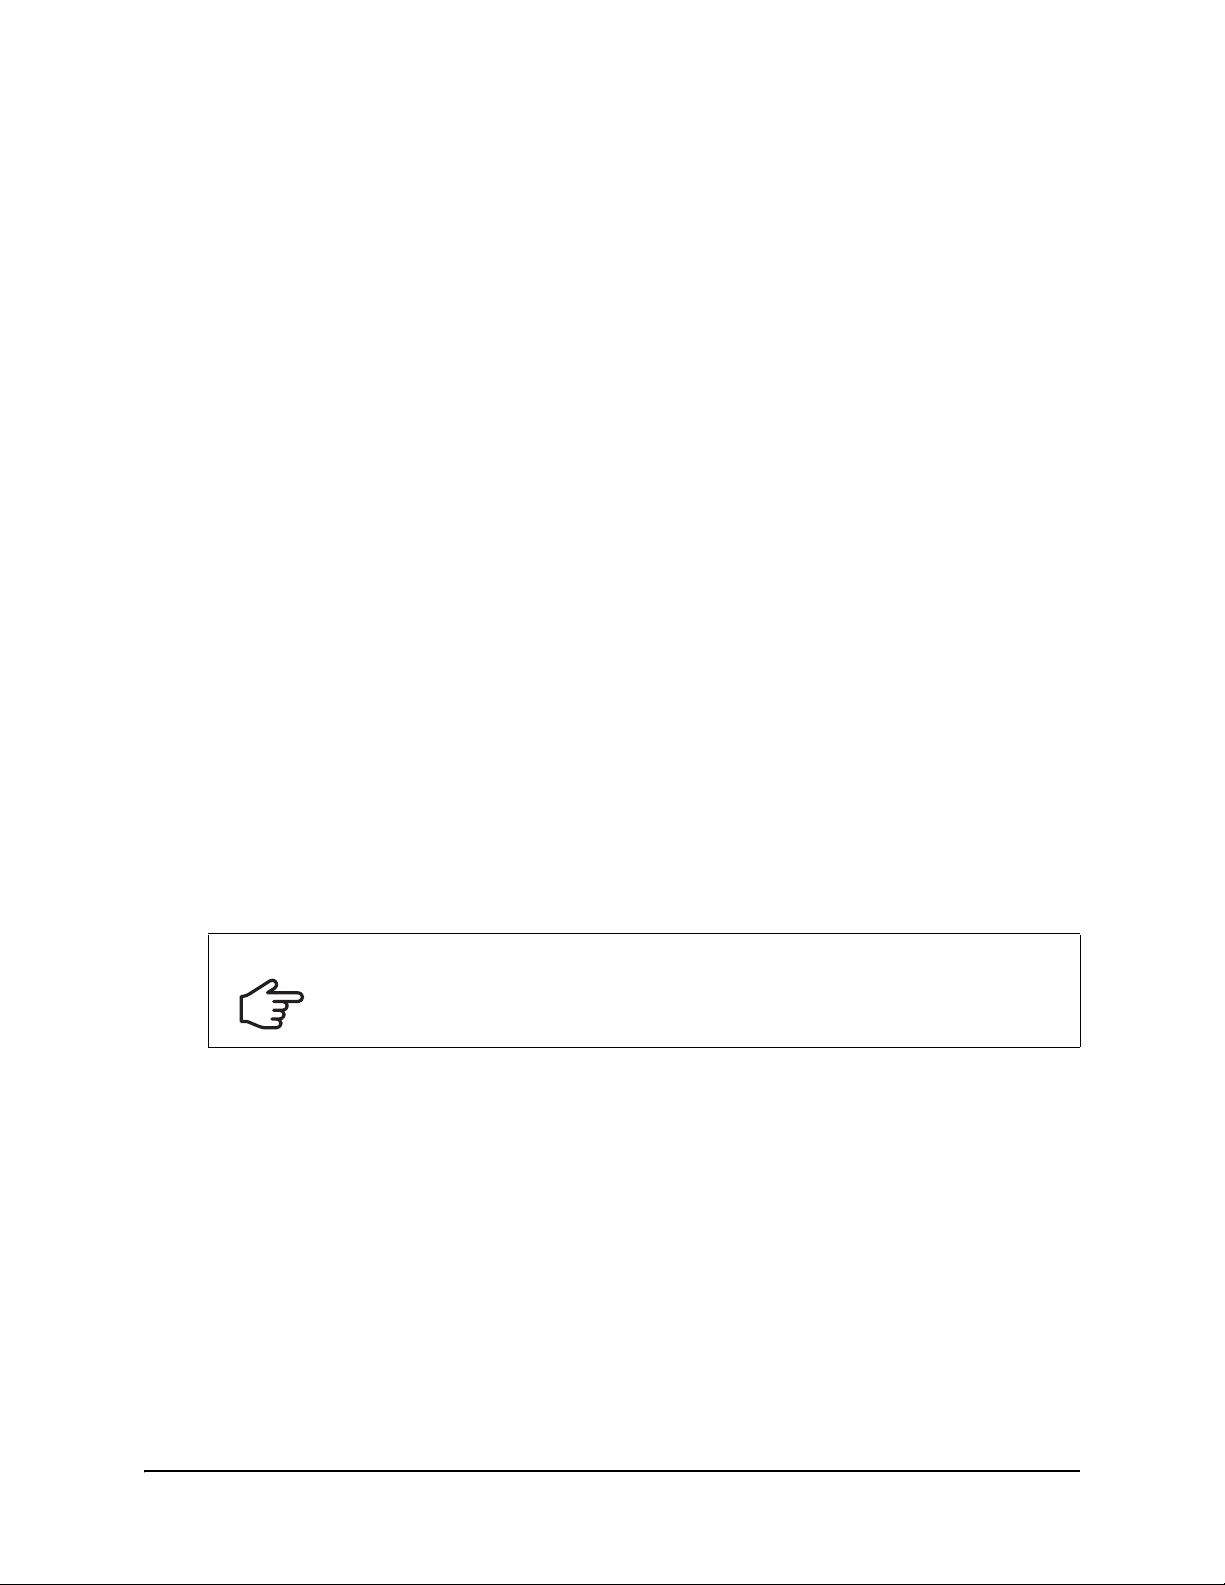
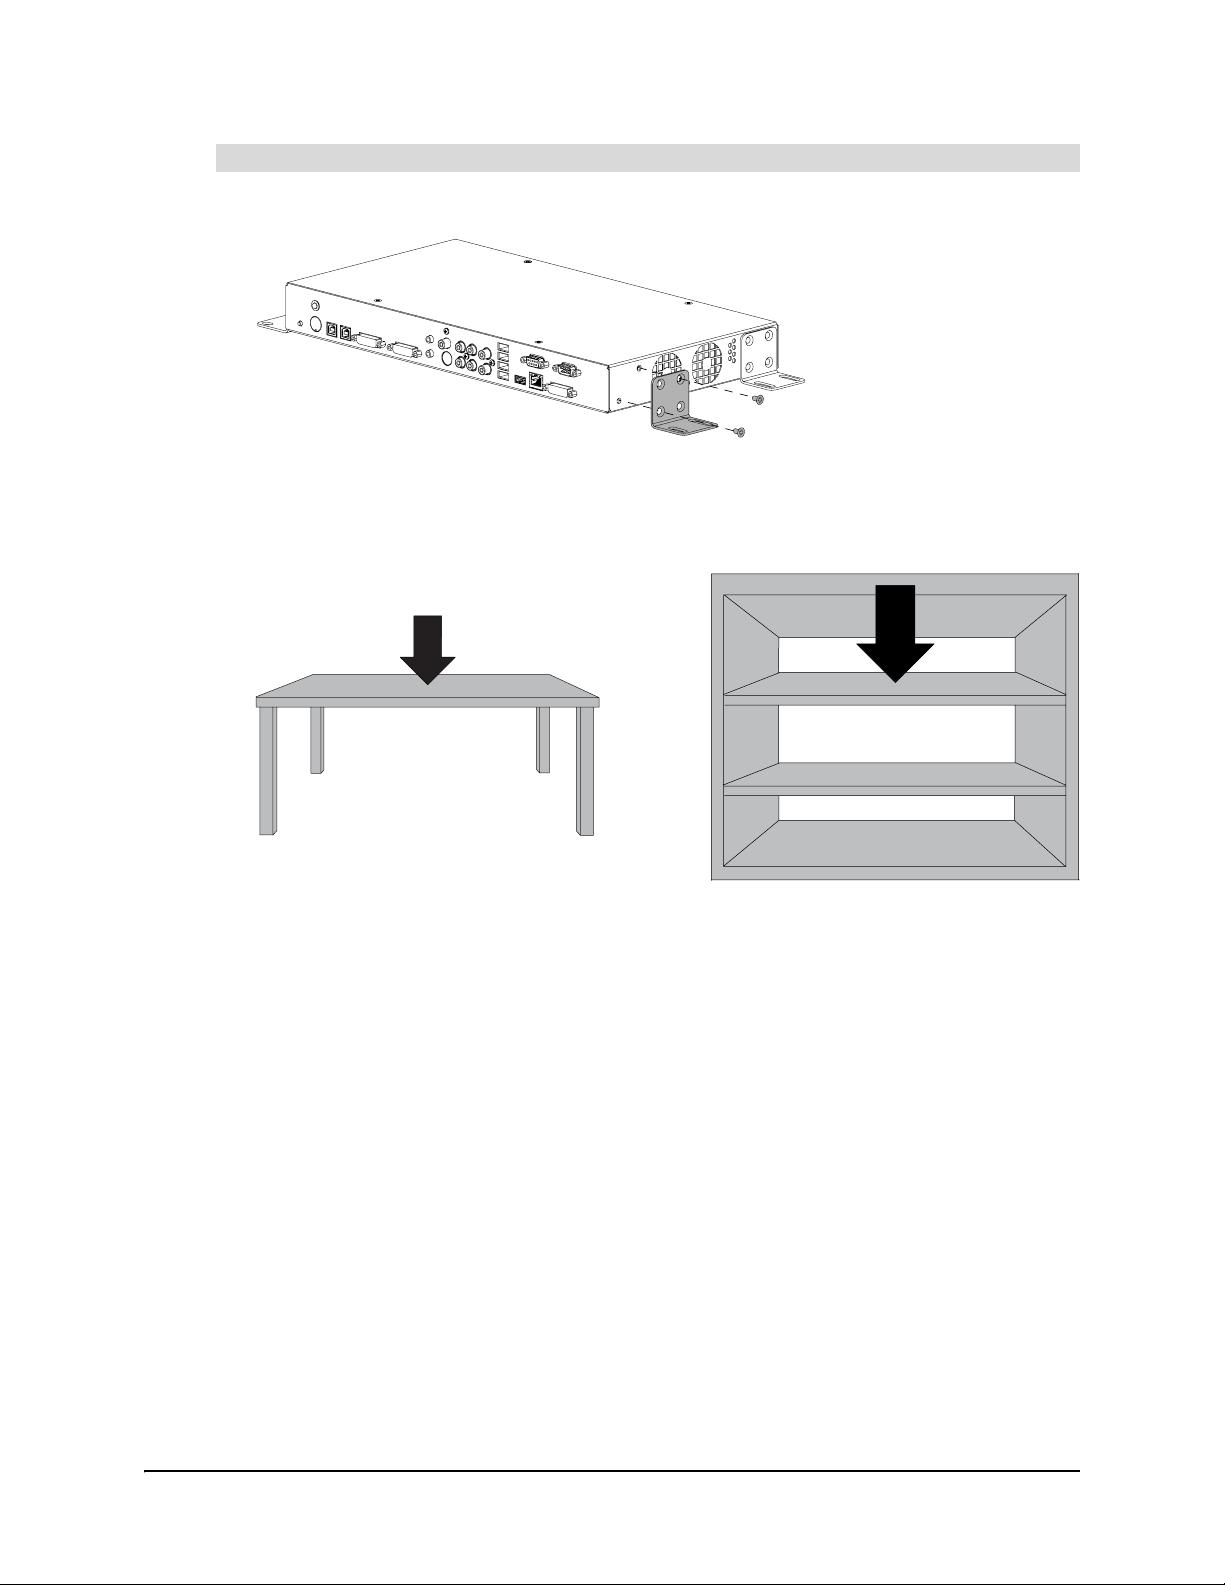
To mount the SMART Hub SE240 on a 19" (48.3 cm) rack
1. Attach the mounting brackets to the sides of the SMART Hub SE240 using the screws
provided with the unit.
There are several methods to attach the brackets to the side of the SMART Hub SE240 for
rack mounting. Use the method that works best for your rack.
The following diagram shows a method in which you use two brackets and align the base of
the mounting brackets with the back of the unit:
2. Mount the SMART Hub SE240 to the rack.
NOTE: Use screws appropriate for the rack.
Installing the SMART Hub SE240 7
Page 14
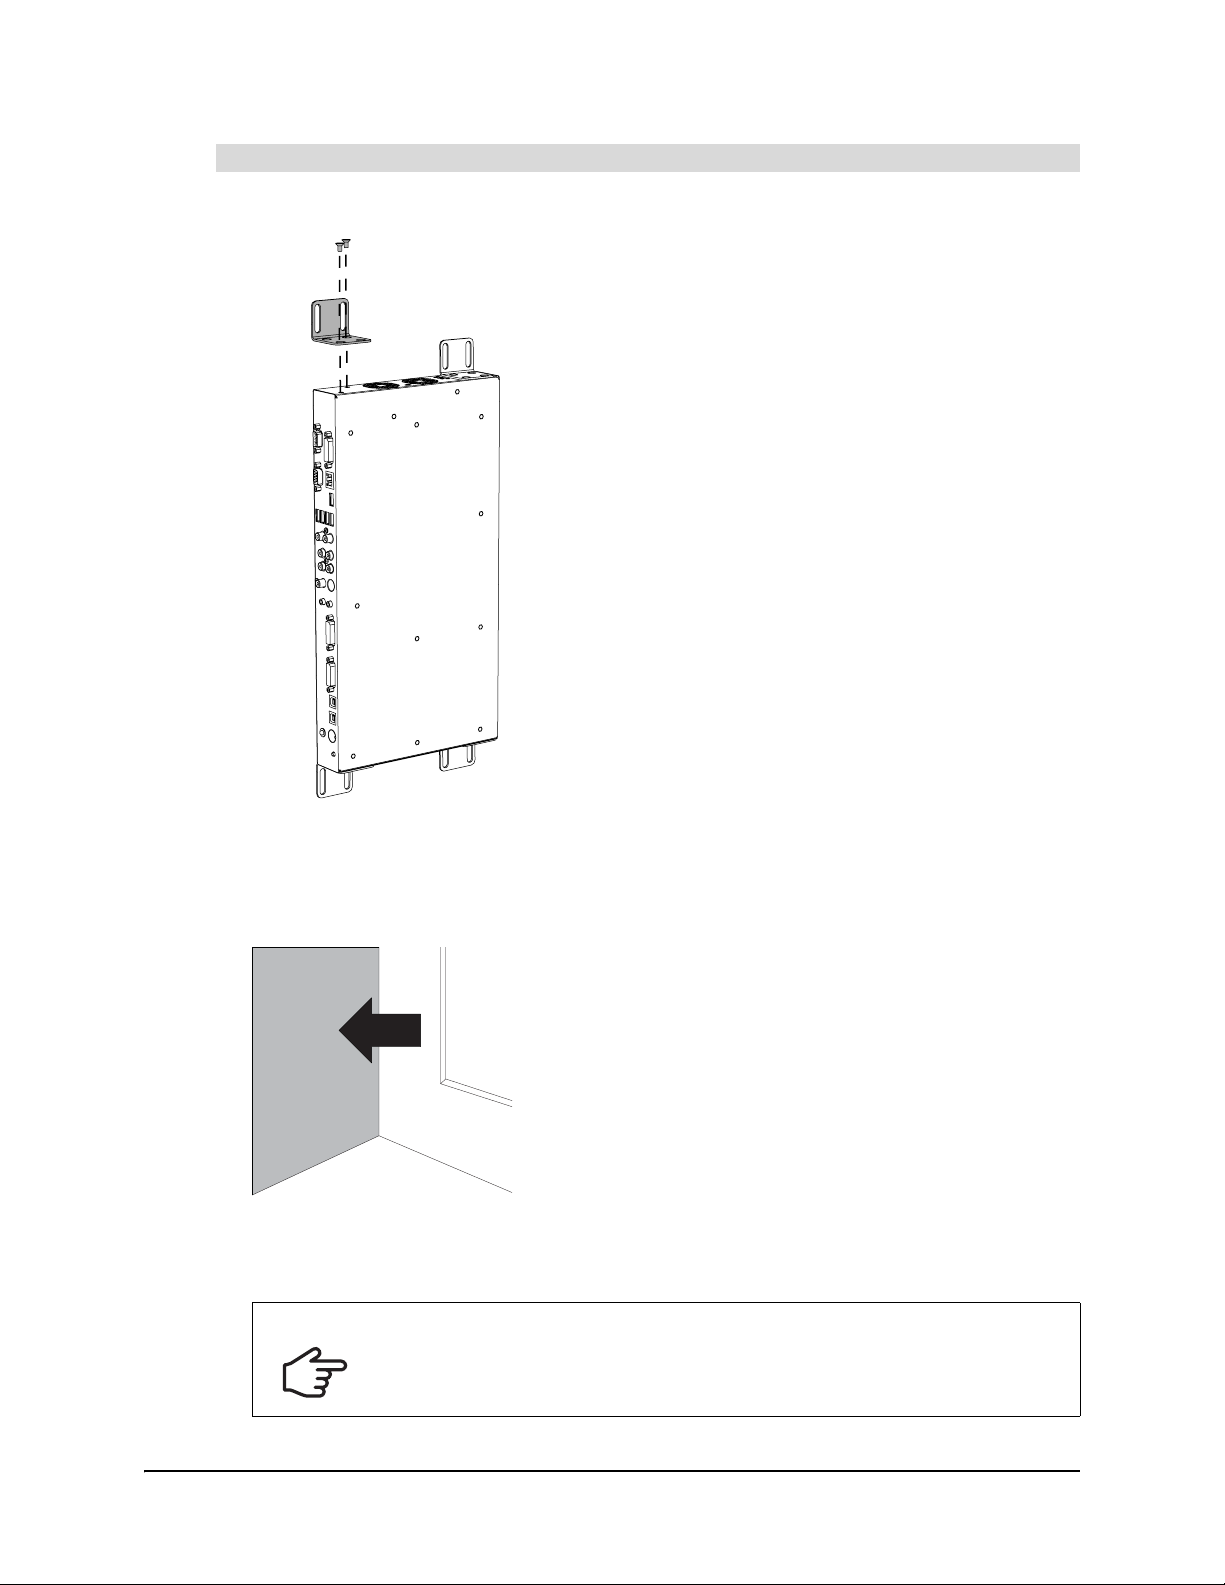
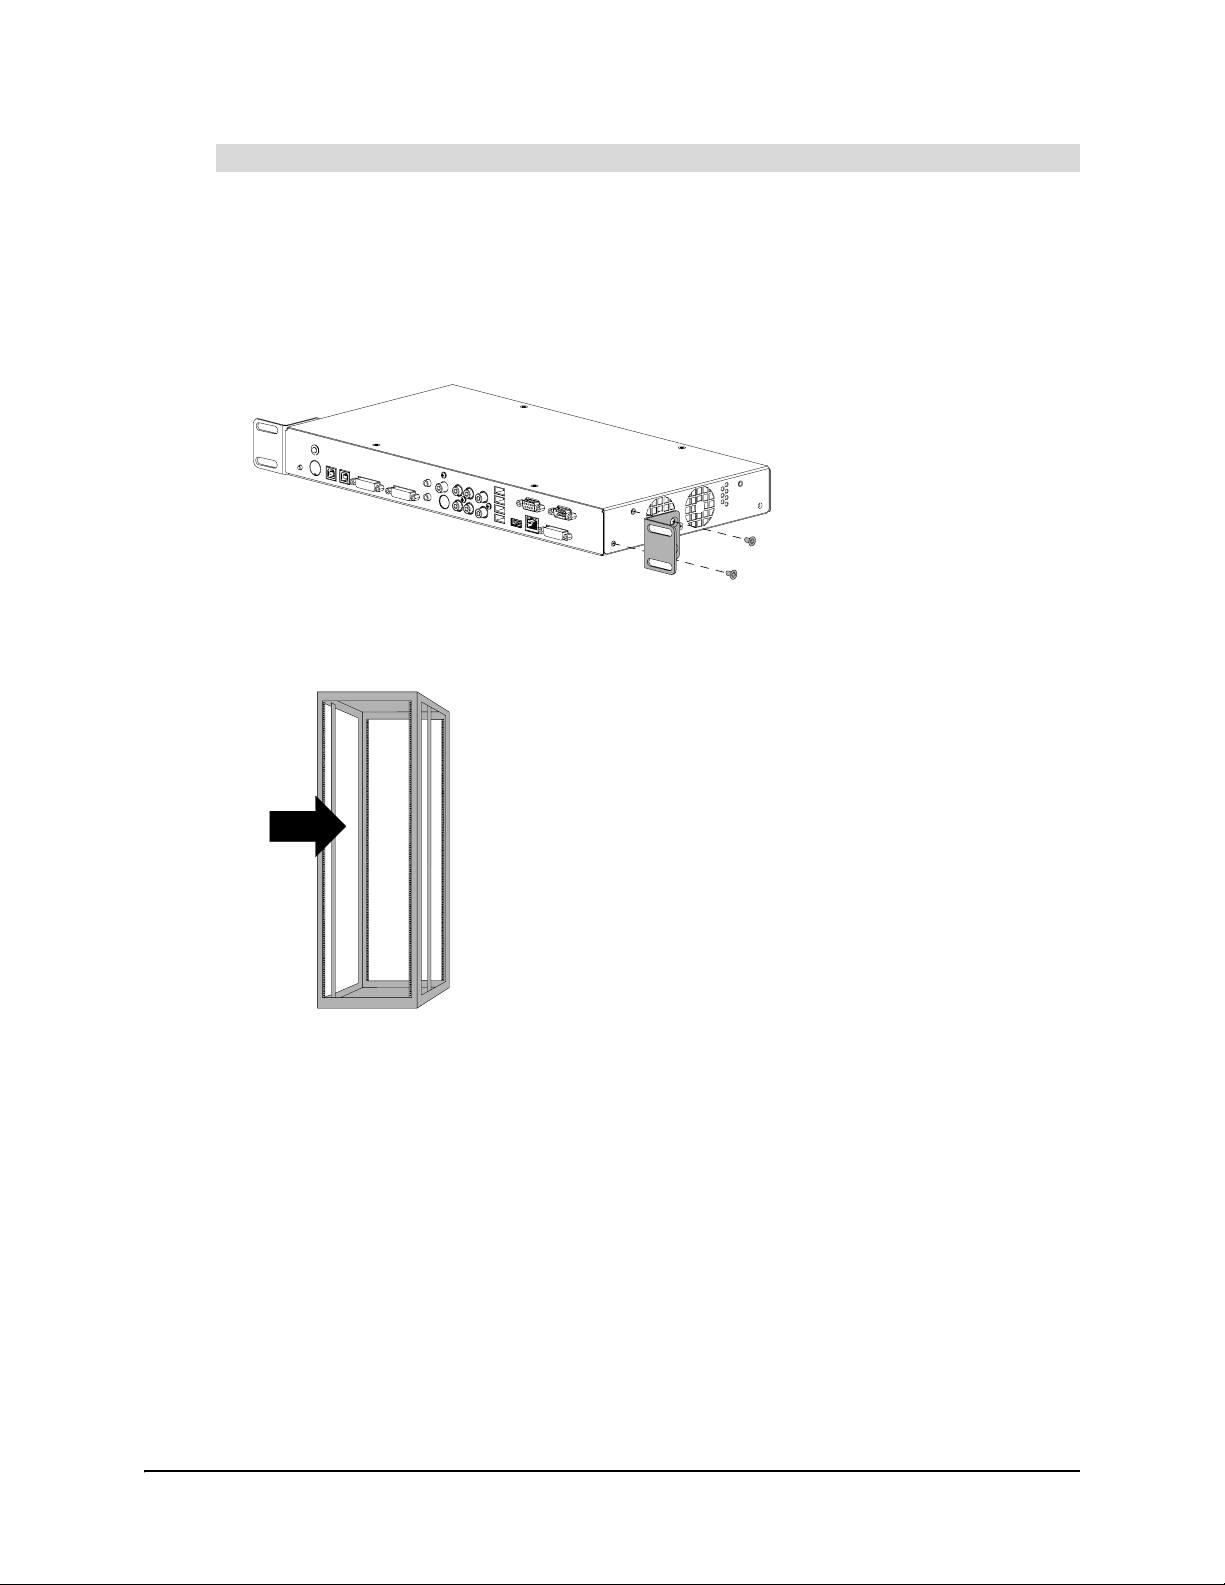
To mount the SMART Hub SE240 on a wall
1. Align the base of the mounting brackets with the bottom of the unit.
2. Attach the mounting brackets to the sides of the SMART Hub SE240 using the screws
provided with the unit.
3. Mount the SMART Hub SE240 to the wall.
NOTE: Use screws and anchors appropriate for the wall on which you’re mounting the
SMART Hub SE240.
IMPORTANT
When mounting the SMART Hub SE240 on a wall, ensure that the side of the
unit with the fans is on top.
8 Installing the SMART Hub SE240
Page 15
To mount the SMART Hub SE240 on a table- or shelf-top
1. Align the base of the mounting brackets with the bottom of the unit.
2. Attach the mounting brackets to the sides of the SMART Hub SE240 using the screws
provided with the unit.
3. Mount the SMART Hub SE240 to the table- or shelf-top.
NOTE: Use screws appropriate for the table- or shelf-top on which you’re mounting the
SMART Hub SE240.
Installing the SMART Hub SE240 9
Page 16
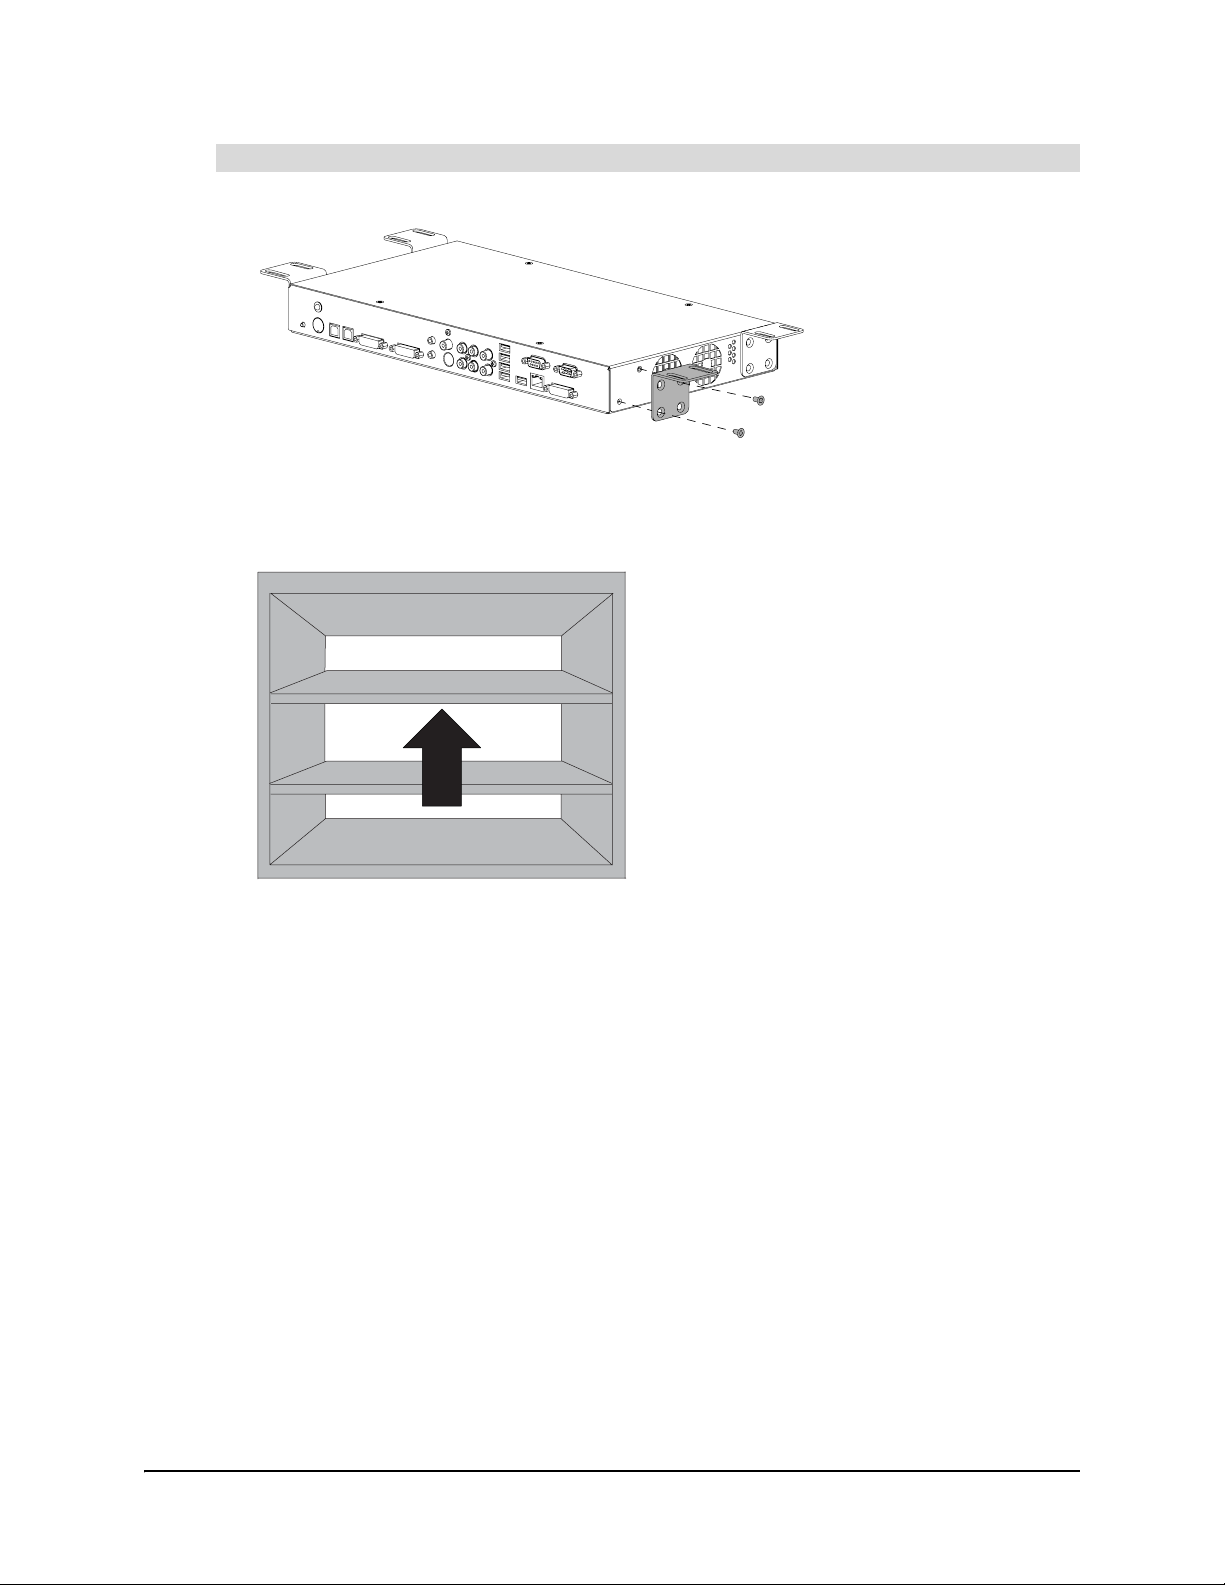
To mount the SMART Hub SE240 under a shelf
1. Align the base of the mounting brackets with the top of the unit.
2. Attach the mounting brackets to the sides of the SMART Hub SE240 using the screws
provided with the unit.
3. Mount the SMART Hub SE240 under the shelf.
NOTE: Use screws appropriate for the shelf under which you’re mounting the SMART Hub
SE240.
10 Installing the SMART Hub SE240
Page 17
Connecting the SMART Hub SE240
After mounting the SMART Hub SE240, connect it to your SM ART product and peripher al devices.
To connect the SMART Hub SE240
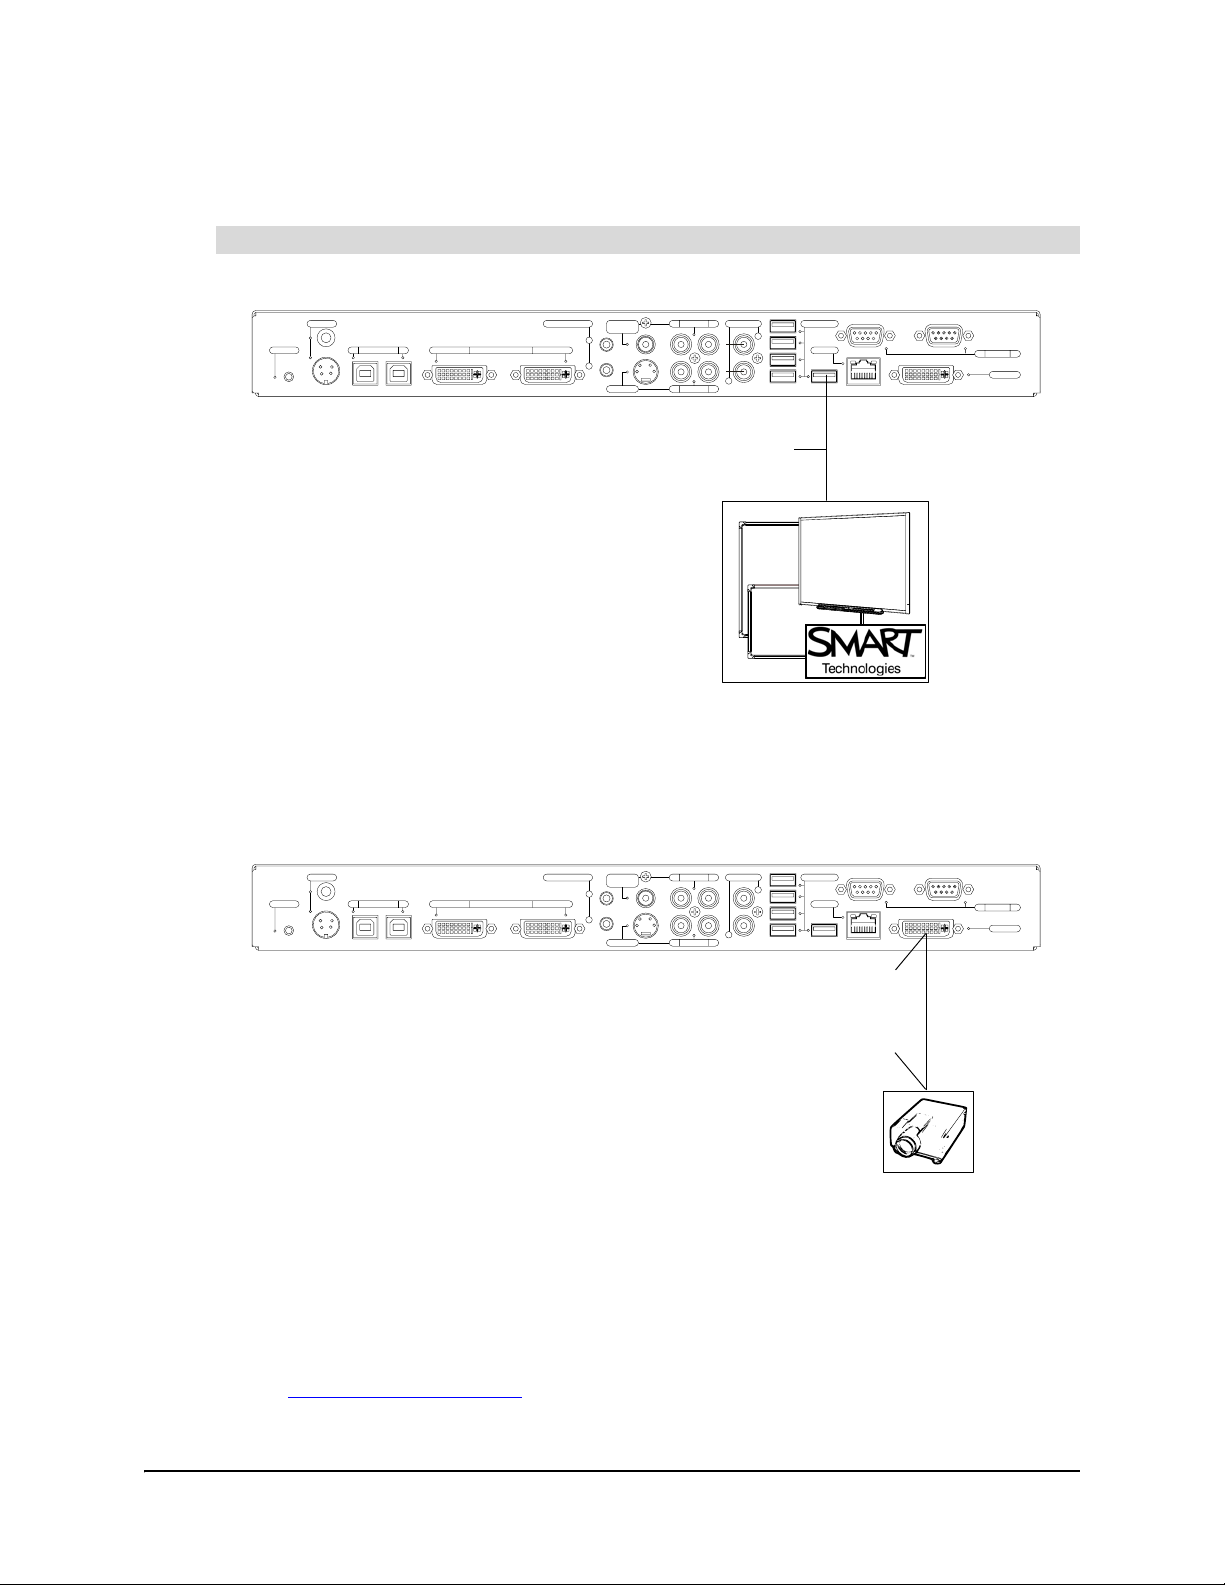
1. Connect the SMART Hub SE240 to your SMART product.
12V DC
Reset
Computer 21 Video InComputer 1
Computer 2
Computer Audio
Composite
Video
1
2
S-video
USB Cable (provided with
your SMART product)
NOTE: Use a cable (rather than a wireless solution) to connect the SMART Hub SE240 to
your SMART product.
Audio InLR
Audio In LR
Audio Out USB
R
L
Network
RS-232 BA
Video Out
If your SMART product has a serial connector rather than a USB connector, use the USB to
serial adapter provided with the SE240S model.
2. Connect the SMART Hub SE240 to your SMART product’s projector or display.
12V DC
Reset
Computer 21 Video InComputer 1
Computer 2
Computer Audio
Composite
Video
1
2
S-video
Audio InLR
Audio Out USB
R
Network
L
Audio In LR
DVI Male Connector
DVI or VGA Connector
RS-232 BA
NOTES
– The SMART Hub SE240 includes two video cables (page 2) . Use these cables to connect
the SMART Hub SE240 to your projector or display.
– SMART recommends using a DVI cable, when possible, for optimal performance.
– You can connect multiple SMART products to a single SMART Hub SE240. All SMART
products connected to the unit share a common display. For more information, contact
SMART Technical Support
.
Video Out
Installing the SMART Hub SE240 11
Page 18
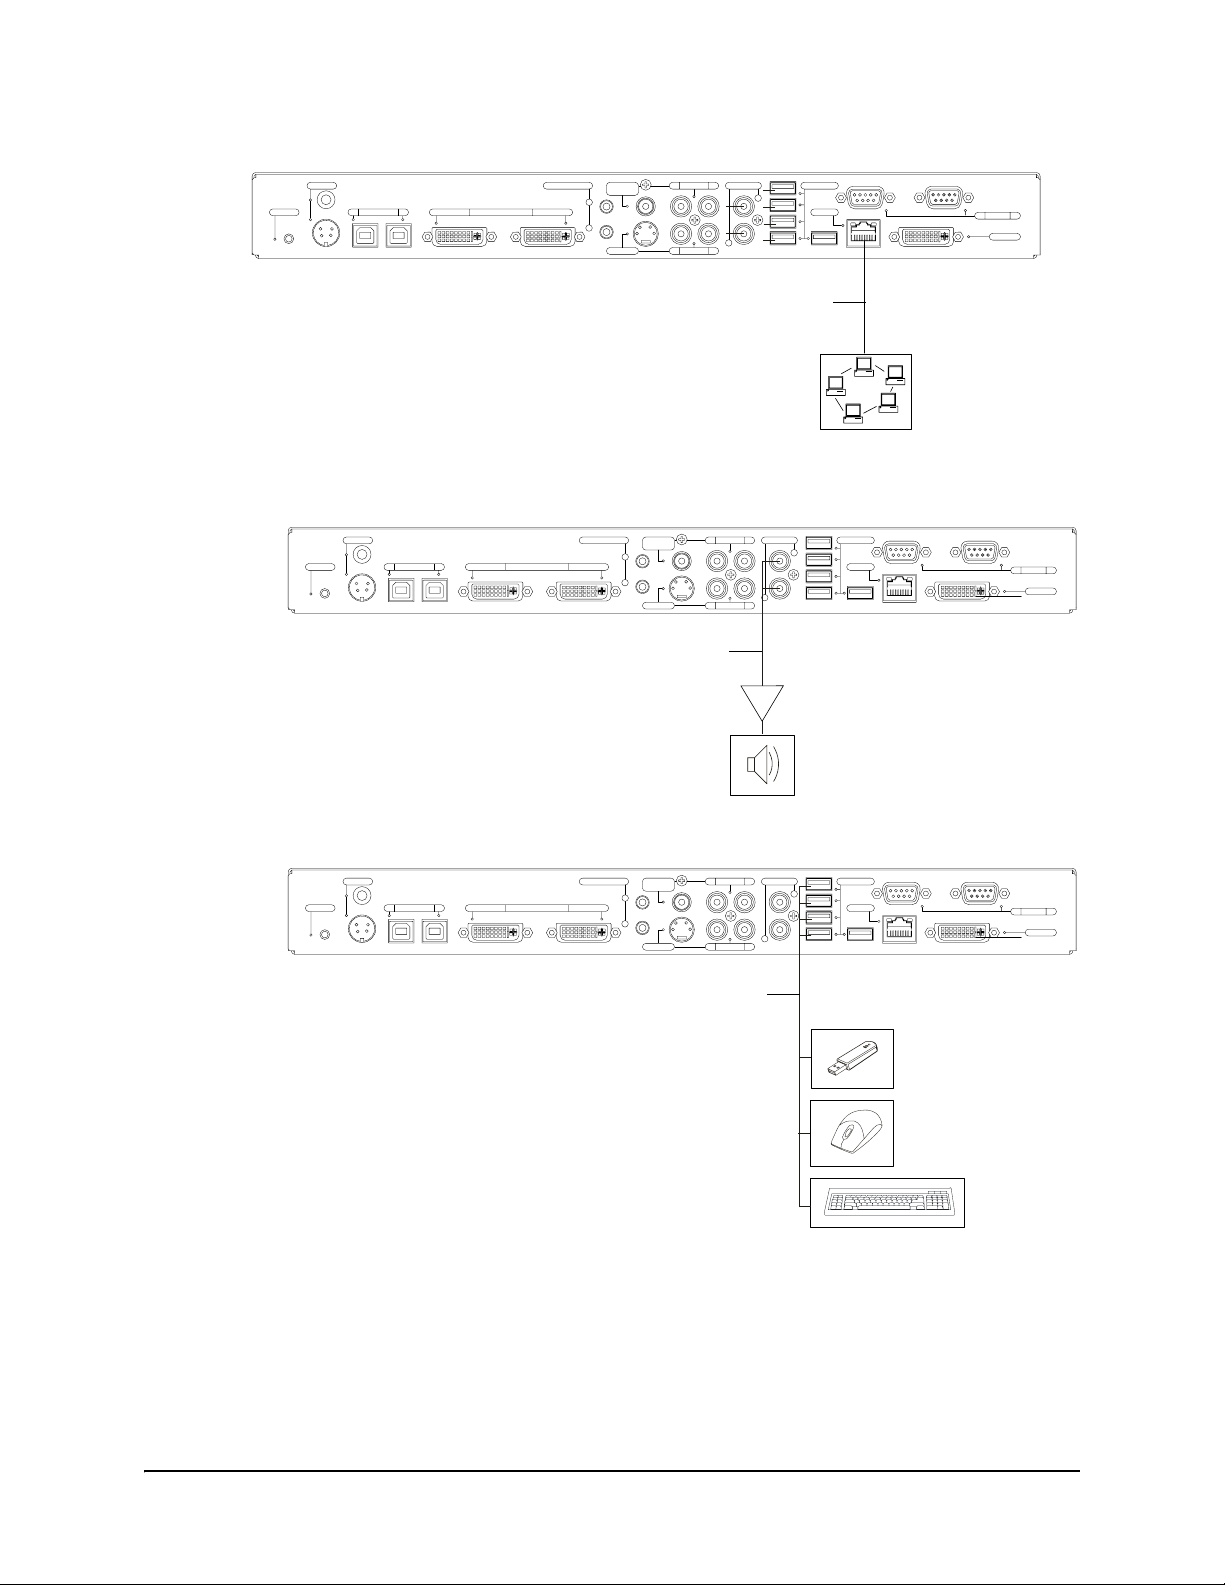
3. Connect the SMART Hub SE240 to your network.
12V DC
Reset
Computer 21 Video InComputer 1
Computer 2
Computer Audio
Composite
Video
1
2
S-video
Audio InLR
Audio In LR
Audio Out USB
R
L
Cat 5 Cable
Network
4. Connect the SMART Hub SE240 to the following devices, if desired:
– amplifier or powered speakers
RS-232 BA
Video Out
Audio InLR
Audio In LR
Audio Out USB
R
L
Computer 2
Computer Audio
Composite
Video
1
2
S-video
12V DC
Reset
Computer 21 Video InComputer 1
RCA Cables
– keyboard and other peripheral devices with USB connectors
12V DC
Reset
Computer 21 Video InComputer 1
Computer 2
Computer Audio
Composite
Video
1
2
S-video
USB Cables
Audio InLR
Audio In LR
Audio Out USB
R
L
Network
Network
RS-232 BA
Video Out
RS-232 BA
Video Out
12 Installing the SMART Hub SE240
Page 19
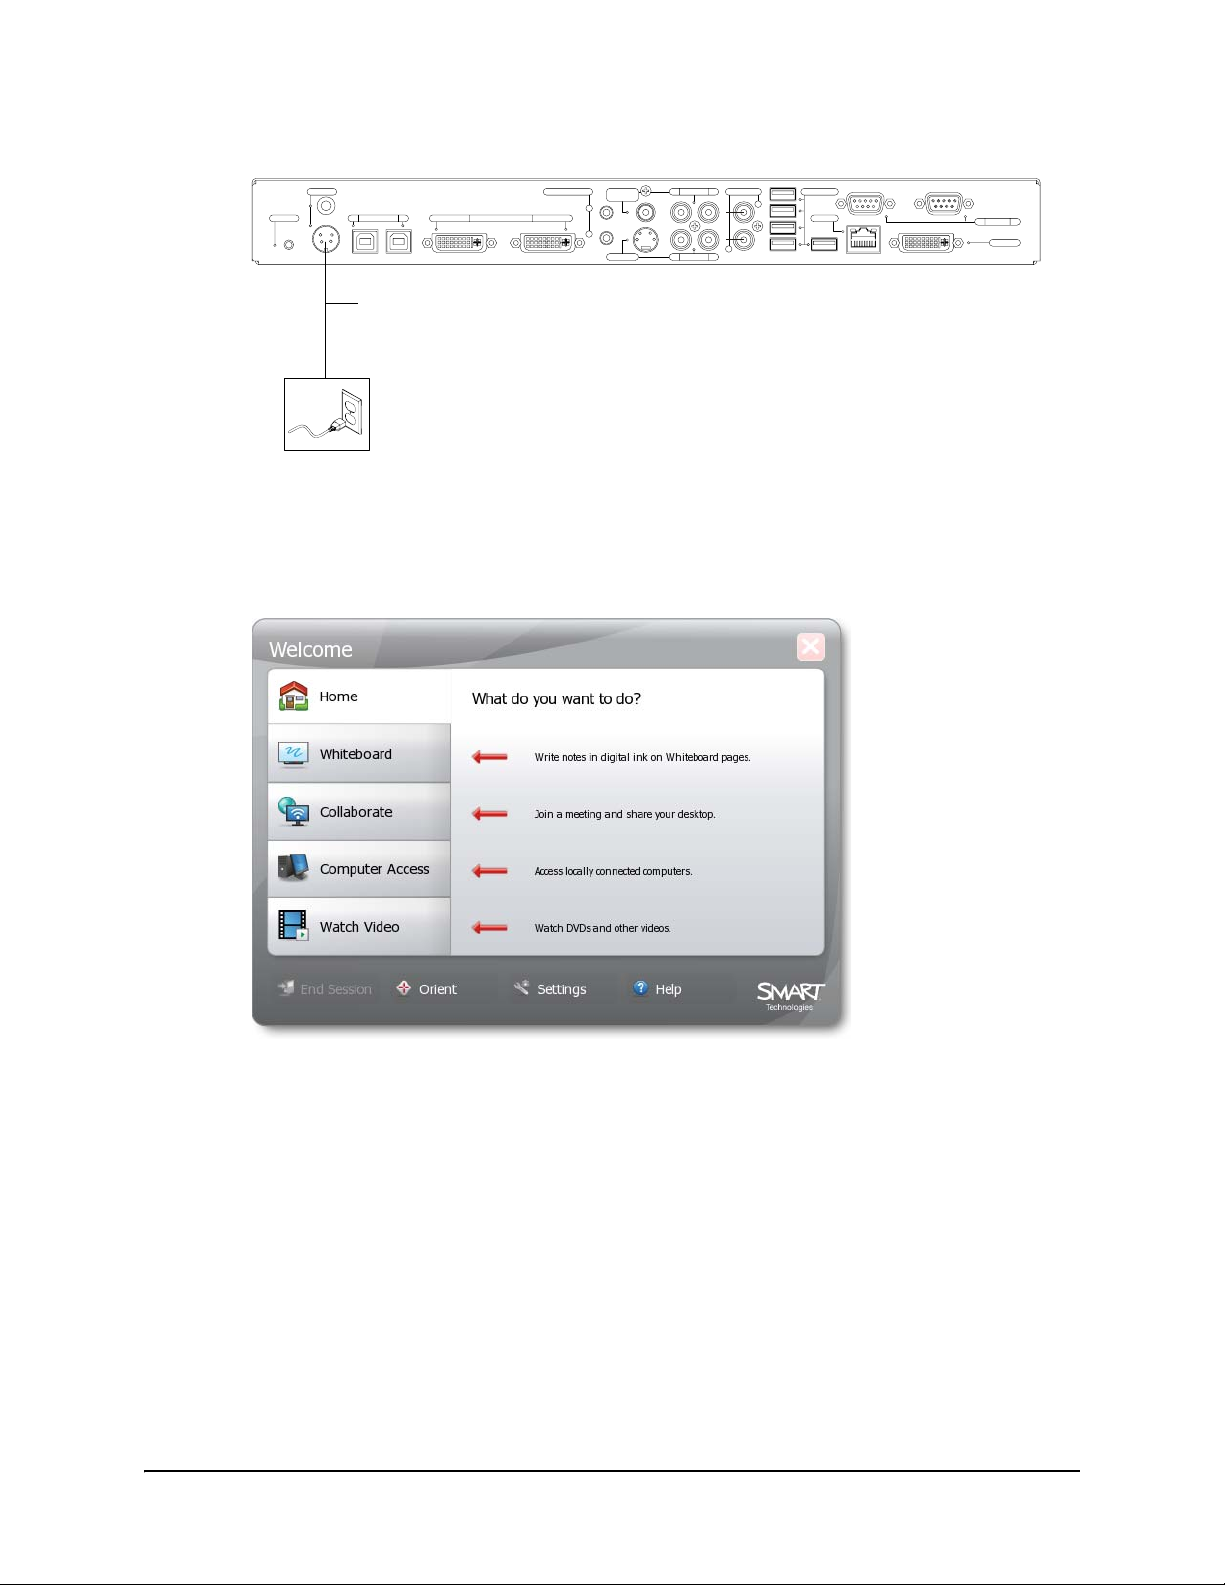
5. Connect the SMART Hub SE240 to a power supply.
Audio InLR
Audio In LR
Audio Out USB
R
L
Network
Computer 2
Computer Audio
Composite
Video
1
2
S-video
12V DC
Reset
Computer 21 Video InComputer 1
Power Supply (provided with the
SMART Hub SE240)
NOTE: For instructions on connecting computers and video sources to the SMART Hub
SE240, see page 22 and page 24.
6. Turn on your SMART product and its projector or display.
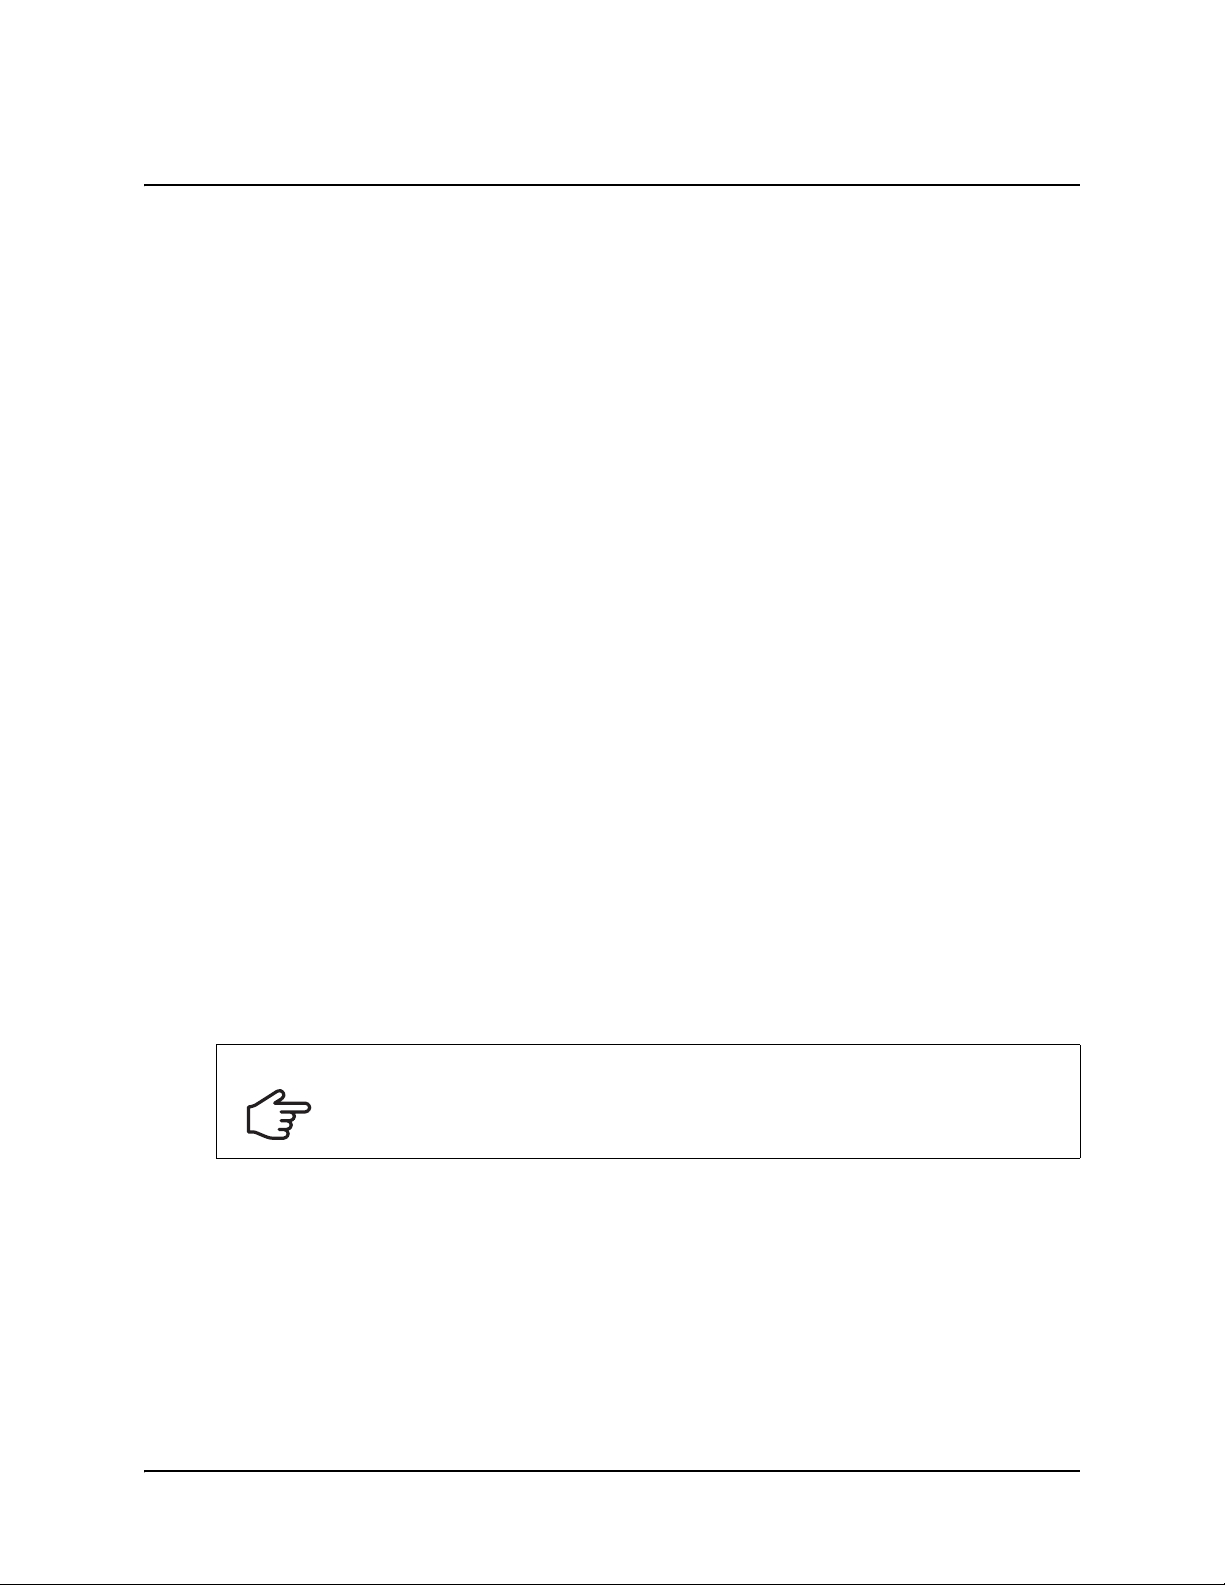
The Welcome Center appears on the display.
RS-232 BA
Video Out
You’ve connected the SMART Hub SE240.
Verifying that the SMART Hub SE240 Firmware is Current
After installing the SMART Hub SE240, verify that its firmware is current. For instructions, see
page 75.
Installing the SMART Hub SE240 13
Page 20

14 Installing the SMART Hub SE240
Page 21
Configuring the SMART Hub SE240
This chapter explains how to configure the SMART Hub SE240 after installa tion. It includes
information on connecting the SMART Hub SE240 to computers, vid eo sources and a network.
• Orienting Your SMART Product (this page)
• Configuring Multiple SMART Hub SE240 Units (page 17)
• Securing Configuration Settings (page 20)
• Connecting Computers to the SMART Hub SE240 (page 22)
• Connecting Video Sources to the SMART Hub SE240 (page 24)
• Configuring the Display Settings (page 25)
• Configuring Networking and Conferencing Settings (page 29)
• Configuring Room Control Settings (page 35)
• Configuring Language and General System Settings (page 40)
Orienting Your SMART Product
When your SMART product uses its default orientation data, the touch point on the screen
corresponds to the projected image, provided the projected image fills the entire interactive
screen. However, the projected touch point might be offset from the actual touch point in some
situations. Resolve this problem by orienting the SMART product.
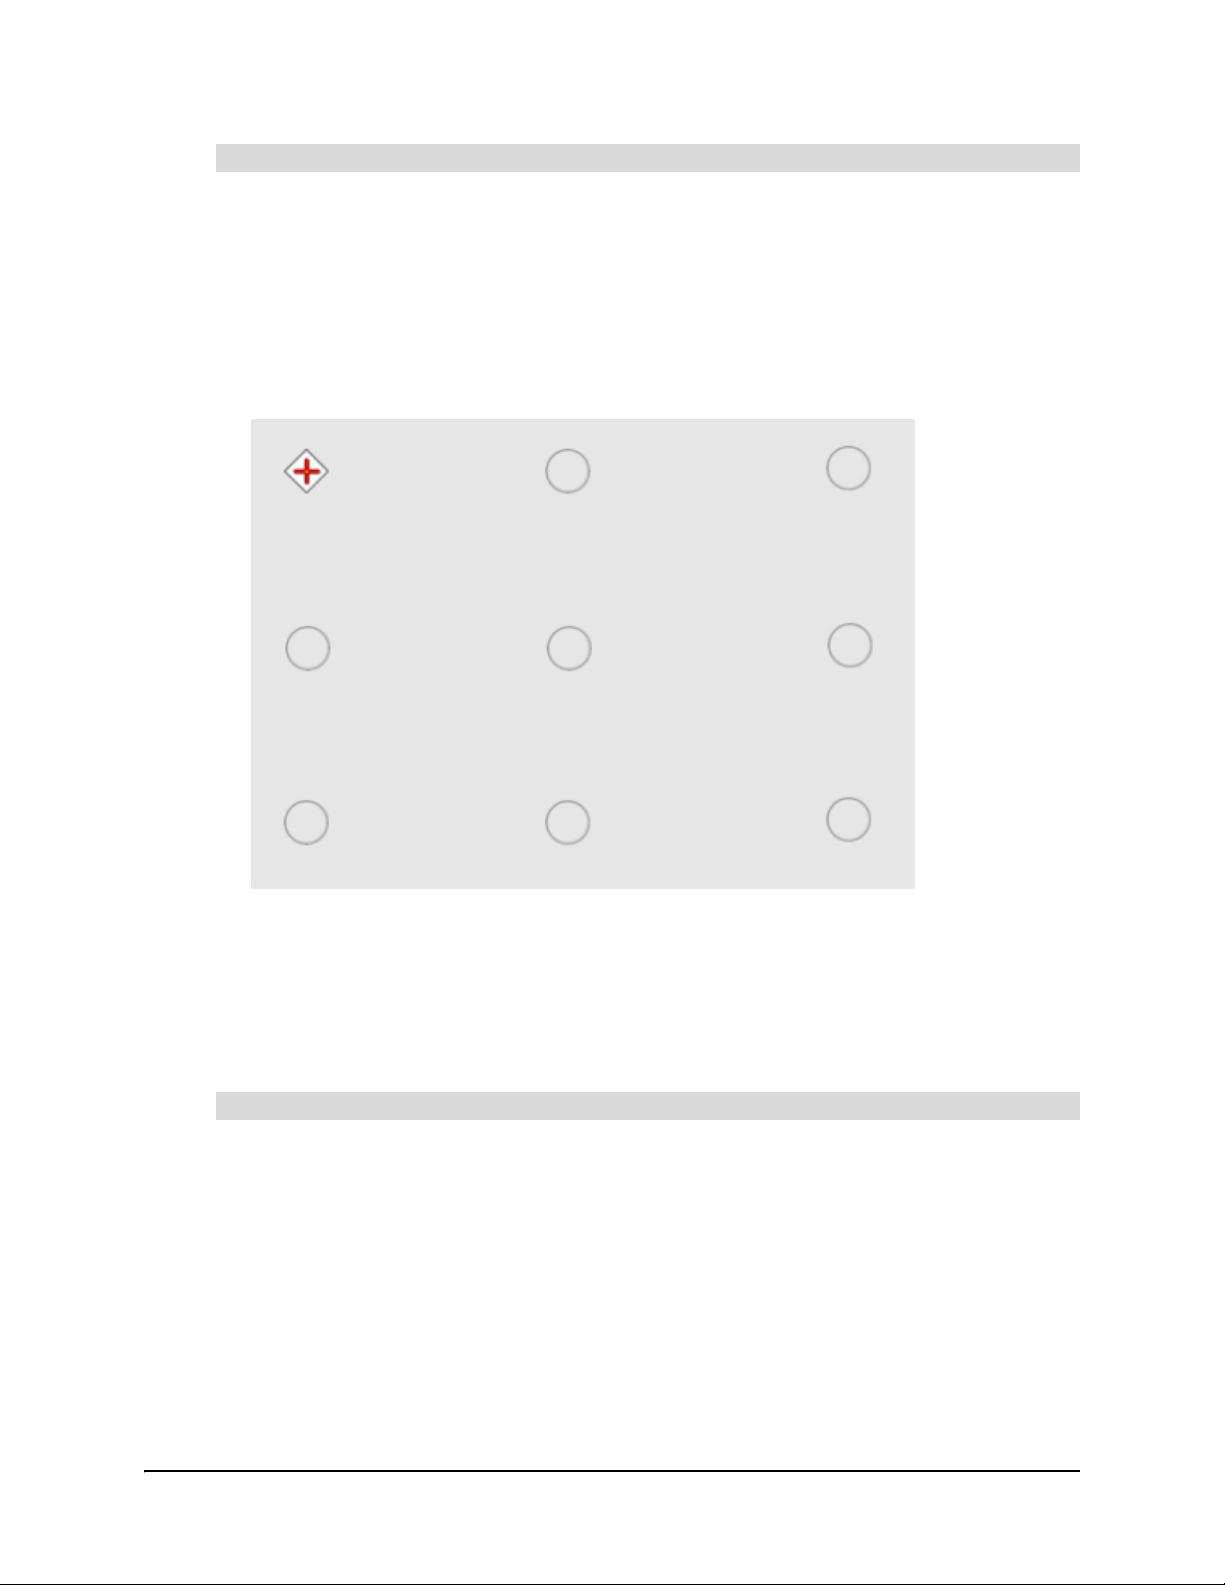
Complete a 9-point orientation using the SMART Hub SE240’s firmware. The orientation data
saves to your SMART product’s flash memory. Therefore, the orientation data remains the same
when you connect different computers and video sources to the SMART Hub SE240.
If a computer with Notebook™ software is connected to the SMART Hub SE240, you can
complete a 4-, 9-, 12- or 20-point orientation using Notebook software. If you complete such an
orientation, the orientation data saves to the computer rather than your SMART product’s flash
memory . Therefore, the orien tation dat a changes when you co nnect dif ferent computers a nd video
sources.
IMPORTANT
If you have never orientated the SMART product, connect a mouse to the SMART
Hub SE240 and use it to complete the orientation procedure for the first time.
Configuring the SMART Hub SE240 15
Page 22
To orient your SMART product using the SMART Hub SE240’s firmware
1. Press Menu, and then press Orient.
OR
Press both pen tray buttons simultaneously. (This option is only available for SMAR T product s
with pen trays.)
2. If multiple SMART products are connected to the SMAR T Hub SE240, press the surface of the
SMART product you want to orient.
The orientation screen appears.
3. Using a pen from your SMART product’s pen tray, press, hold and release the center of the
first target.
4. Repeat step 4 for each target.
The orientation data saves to the SMART product’s flash memory.
You’ve oriented your SMART product.
To orient your SMART product using Notebook software
1. Connect the computer with Notebook software to the SMART Hub SE240 (see page 22).
2. Open Notebook software’s Welcome Center and press Orient.
OR
Open Notebook software’s Control Panel and press Orient/Align the SMART Board.
OR
Press both pen tray buttons simultaneously. (This option is only available for SMAR T product s
with pen trays.)
The orientation screen appears.
16 Configuring the SMART Hub SE240
Page 23
3. Using a pen from your SMART product’s pen tray, press, hold and release the center of the
first target.
4. Repeat step 3 for each target.
The orientation data saves to Notebook software.
You’ve oriented your SMART product.
NOTE: For more information on orienting your SMART product using Notebook software, see
Notebook software online Help
.
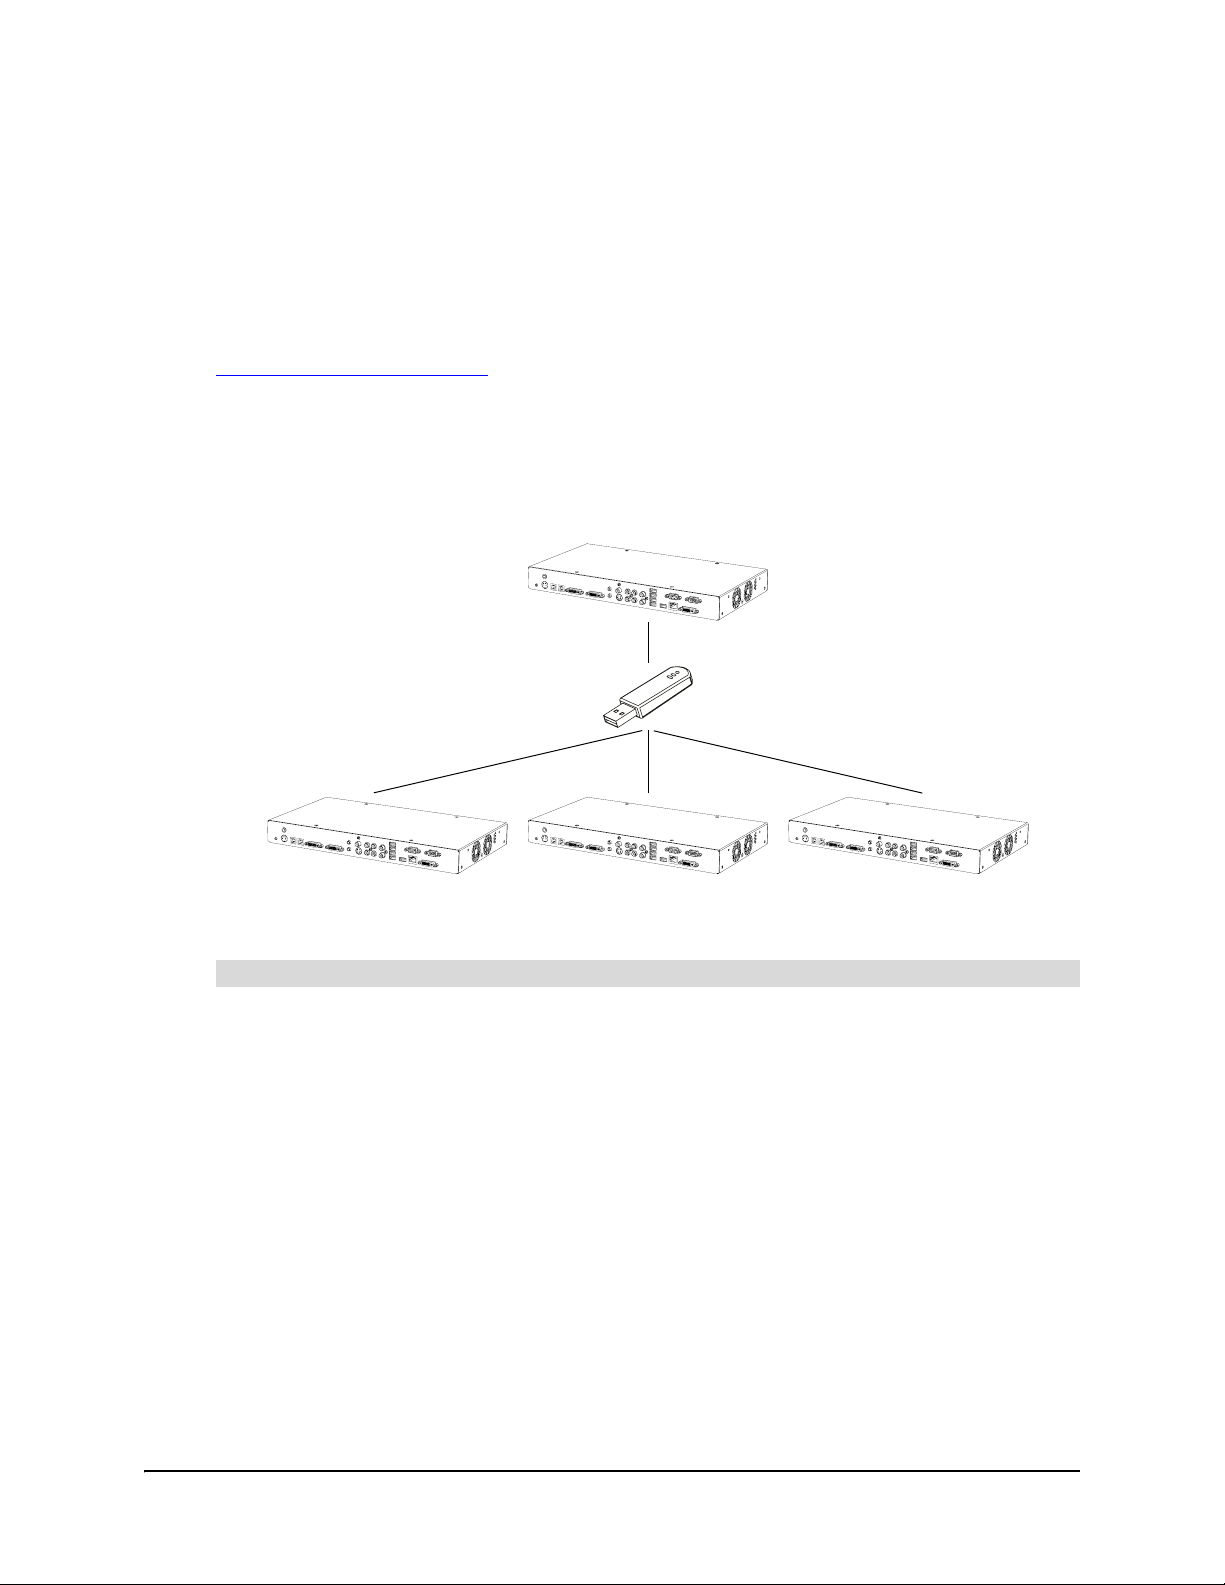
Configuring Multiple SMART Hub SE240 Units
If you have more than one SMART Hub SE240, you don’t have to configure each unit separately.
Instead, configure one unit, export the configuration setting to a USB storage device, and then
import the configuration settings to the other units.
NOTE: The export process doesn’t include orientation data on the USB storage device.
To export configuration settings to a USB storage device
1. Connect a USB storage device to the SMART Hub SE240.
2. Press Menu.
The Welcome Center appears.
3. Press Settings.
The Settings dialog box appears.
4. If a password is required to change the config ur ation settings, type the p asswor d in the box at
the bottom of the menu, and then press OK.
NOTE: For information on the configuration settings password, see page 20.
Configuring the SMART Hub SE240 17
Page 24

5. Press Administration.
6. Ensure the Enable USB storage device support check box is selected.
7. Press Export Settings.
A dialog box appears.
8. Select the SMART Hub SE240 system settings check box to export configuration settings
and the E-mail Contacts check box to export contacts.
9. Press OK.
A dialog box appears.
10. Press OK.
You’ve exported the configuration settings from one SMART Hub SE240 unit to a USB storage
device. You can now import those configuration settings to other SMART Hub SE240 units.
18 Configuring the SMART Hub SE240
Page 25

To import configuration settings from a USB storage device
1. Connect the USB storage device to the SMART Hub SE240.
2. Press Menu.
The Welcome Center appears.
3. Press Settings.
The Settings dialog box appears.
4. If a password is required to change the config ur ation settings, type the p asswor d in the box at
the bottom of the menu, and then press OK.
NOTE: For information on the configuration settings password, see page 20.
5. Press Administration.
6. Ensure the Enable USB storage device support check box is selected.
7. Press Import Settings.
A dialog box appears.
8. Select the SMART Hub SE240 system settings check box to import configuration settings
and the E-mail Contacts check box to import contacts.
Configuring the SMART Hub SE240 19
Page 26
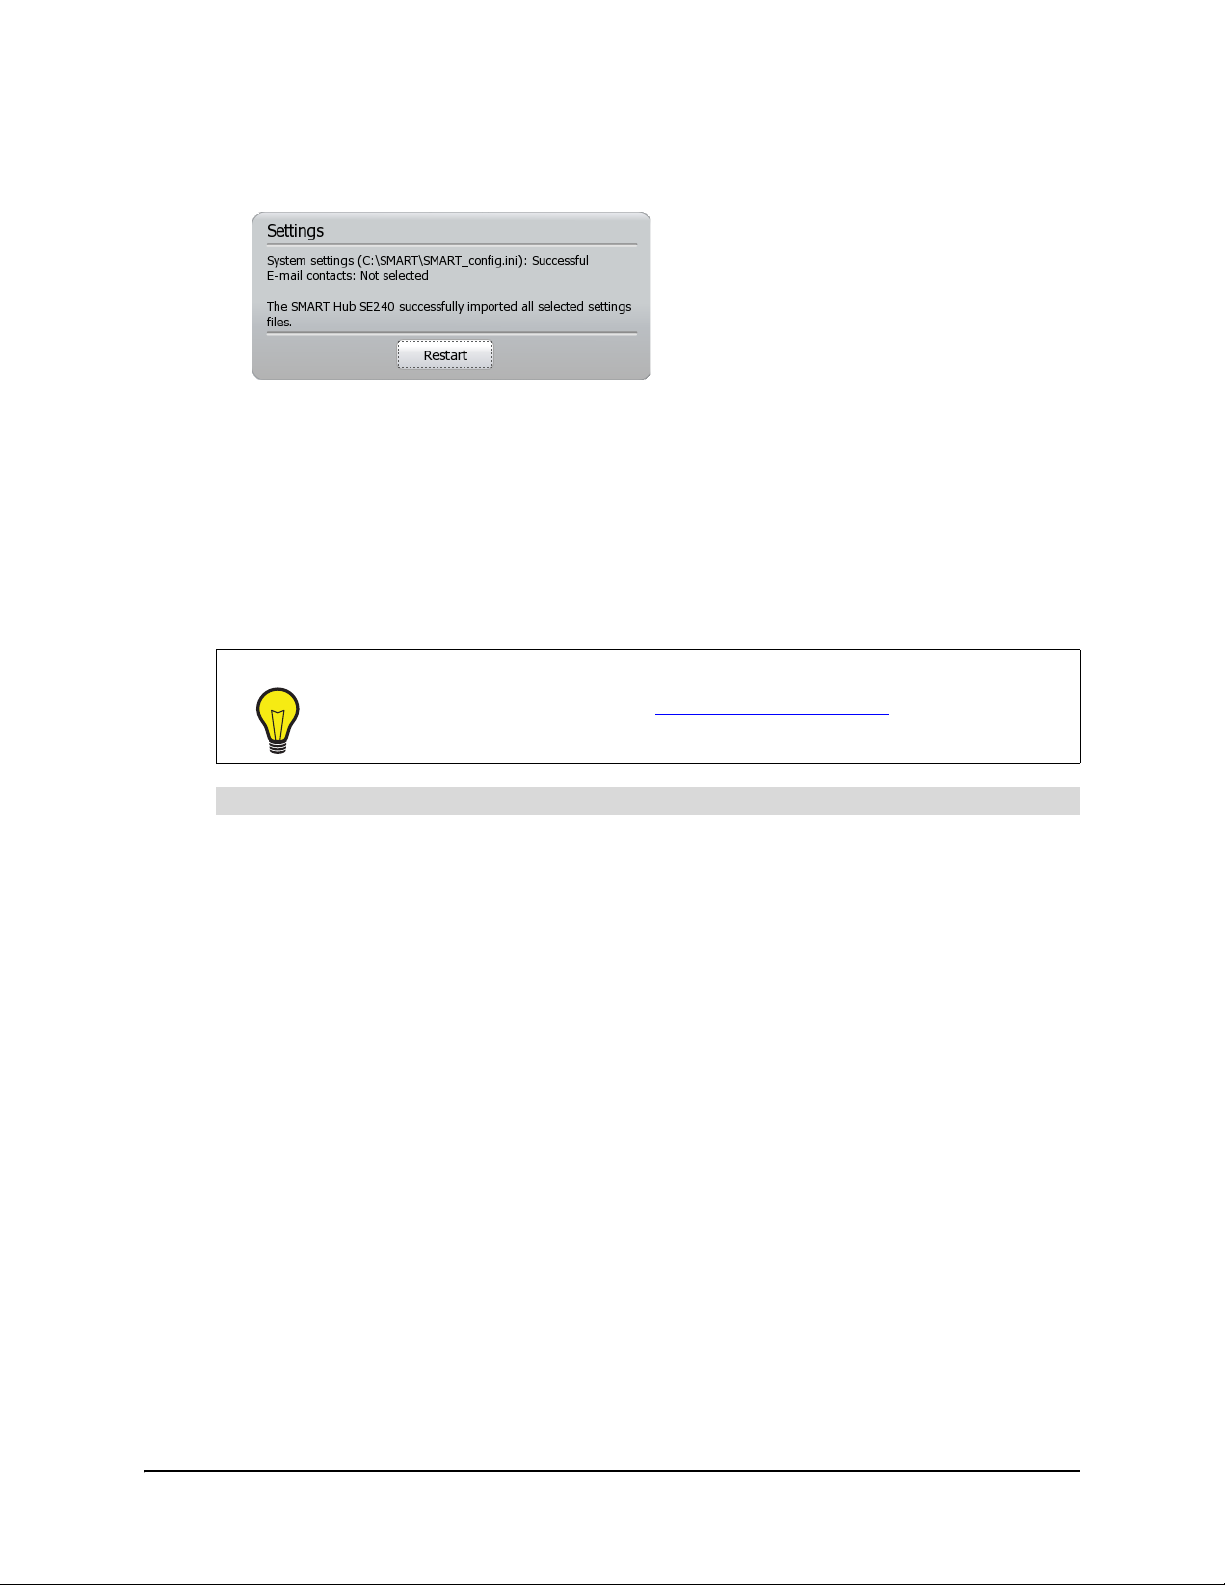
9. Press OK.
A dialog box appears.
10. Press Restart to end the current session and start a new session using the imported
configuration settings.
You’ve imported configuration settings from a USB storage device to a SMART Hub SE240 unit.
Securing Configuration Settings
You can assign a password to the configuration settings. Users must enter this password to
change the configuration settings.
TIP
If you forget the password, contact SMART Technical Support.
To secure configuration settings
1. Press Menu.
The Welcome Center appears.
2. Press Settings.
The Settings dialog box appears.
20 Configuring the SMART Hub SE240
Page 27
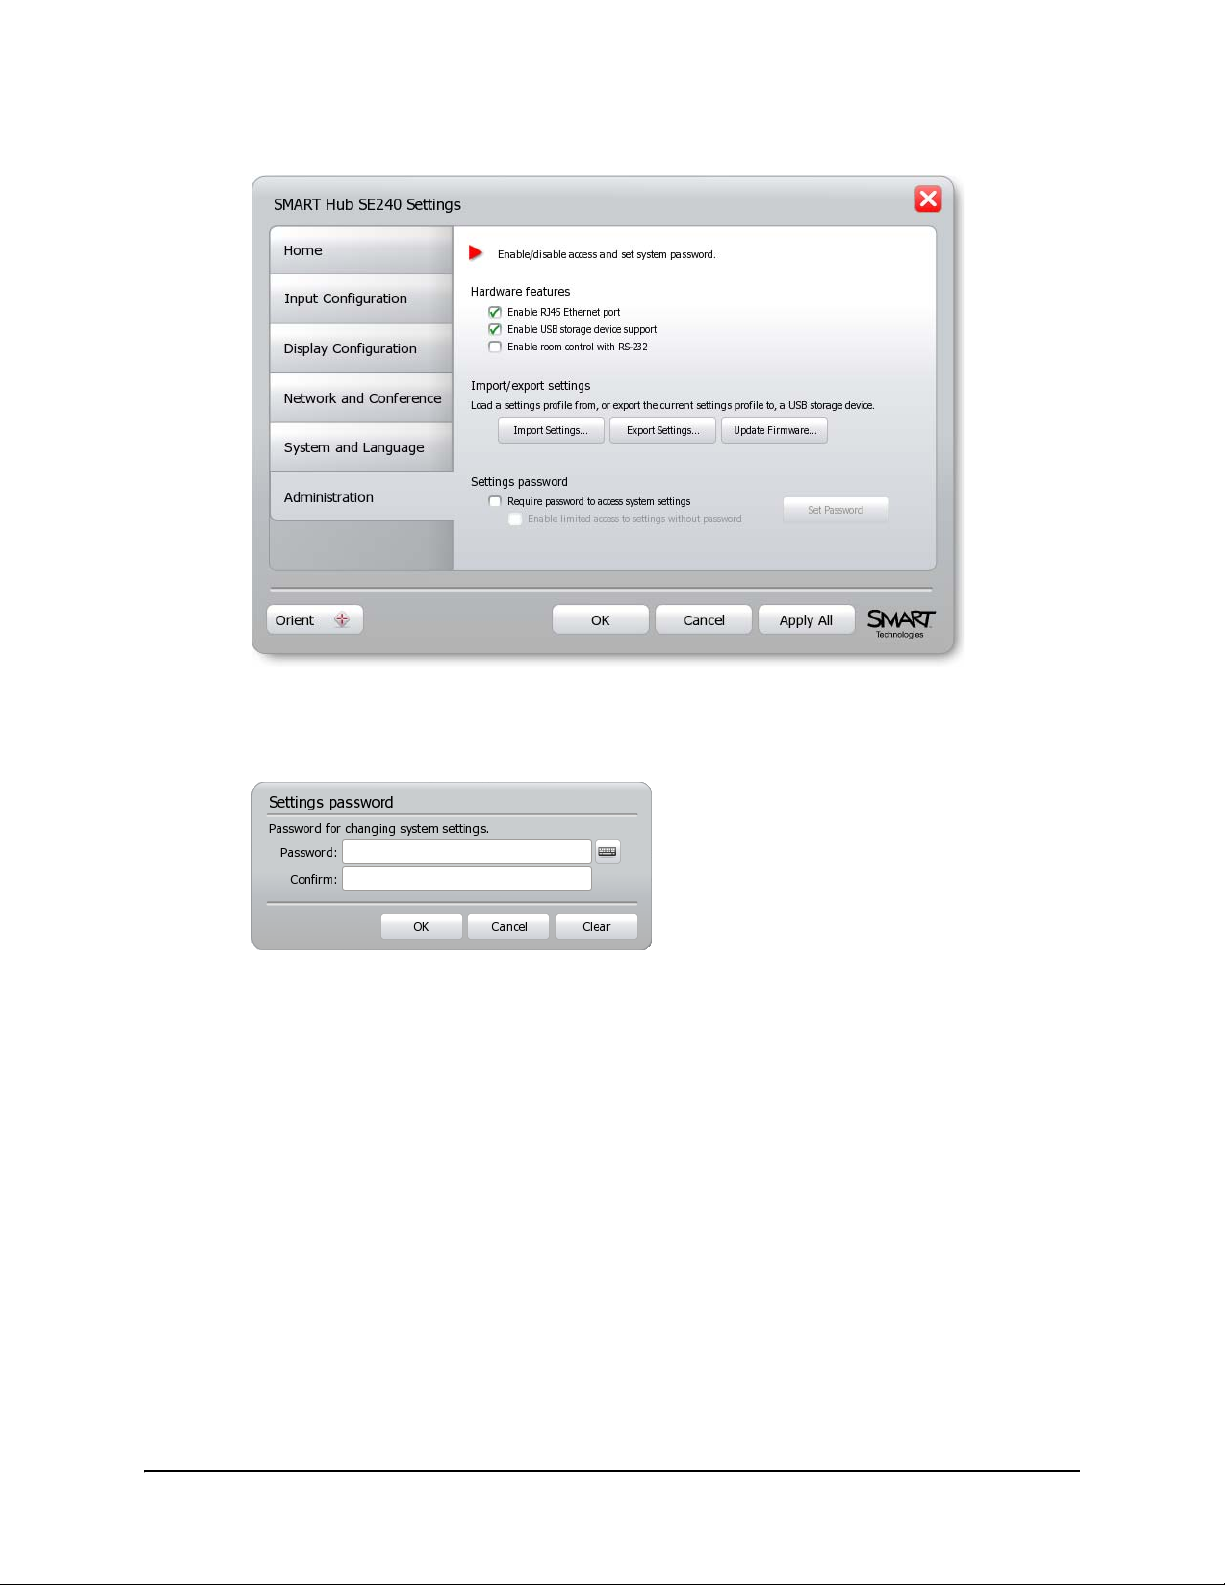
3. Press Administration.
4. Select the Require password to access system settings check box to require users to enter
a password to change the configuration settings.
The Settings password dialog box appears.
NOTE: If the Require password to access system settings check box was previously
selected, press Set Password to open the Settings Administrator Password dialog box.
5. Type the password in the Password and Confirm boxes.
6. Press OK.
7. Select the Enable limited access to settings without password check box to allow users to
change the display settings (see page 25) and language settings (see page 41) but no other
settings.
8. Press Apply All.
You’ve secured the configuration settings.
Configuring the SMART Hub SE240 21
Page 28
Connecting Computers to the SMART Hub SE240
You can connect two computers to the SMART Hub SE240.
NOTE: You can connect additional computers to the SMART Hub SE240 through LinQ software
(see page 33).
After connecting a computer to the SMART Hub SE240, you can view its input on your SMART
product’s display and do the following:
• Draw digital ink notes.
• Freeze the display.
• Take screen captures.
• Use the on-screen keyboard and right-click features of the SMART Hub SE240 firmware.
For more information, see page 71.
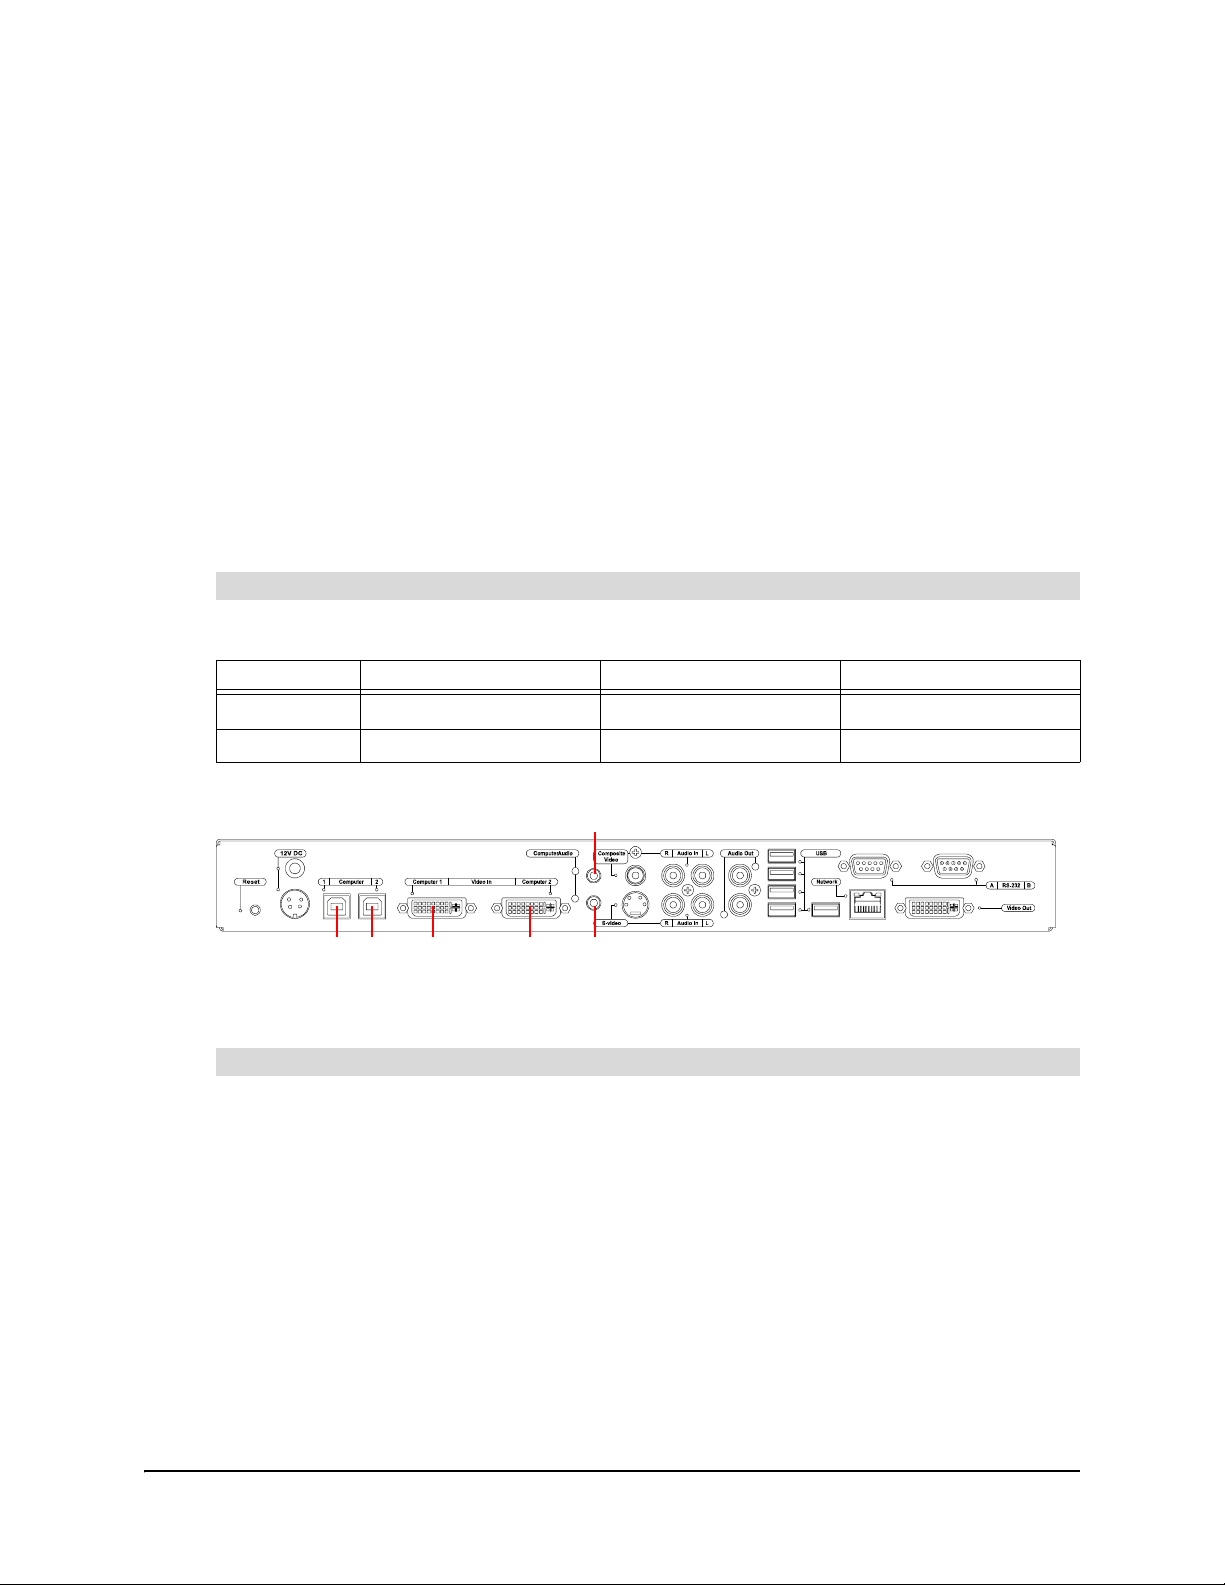
To connect a computer
Connect the computer to the SMART Hub SE240 using the appropriate cables and connectors.
Computer SMART Product (A) Video (B) Audio (C)
1 USB B receptacle 1 DVI connector 1 Stereo mini connector 1
2 USB B receptacle 2 DVI connector 2 Stereo mini connector 2
The following diagram shows the location of the connectors on the SMART Hub SE240.
1C
1A 2A 1B 2B 2C
NOTE: The SMART product and audio connections are optional.
To configure the SMART Hub SE240 for the computer
1. Press Menu.
The Welcome Center appears.
2. Press Settings.
The Settings dialog box appears.
22 Configuring the SMART Hub SE240
Page 29

3. If a password is required to change the config ur ation settings, type the p asswor d in the box at
the bottom of the menu, and then press OK.
NOTE: For information on the configuration settings password, see page 20.
4. Press Input Configuration.
5. Open the DVI 1 tab if you are configuring the SMART Hub SE240 for the first computer.
OR
Open the DVI 2 tab if you are configuring the SMART Hub SE240 for the second computer.
6. If desired, clear the Add a button for this input in the shortcut menu check box to remove
the button for the computer input from the shortcut menu.
NOTE: For information on the shortcut menu, see page 46.
7. In the Input device name box, type a name for the computer.
8. In the Input Type list, select Analog or Digital.
9. Press Apply All.
You’ve configured the SMART Hub SE240 for the computer.
Configuring the SMART Hub SE240 23
Page 30
Connecting Video Sources to the SMART Hub SE240
You can connect up to two video sources to the SMART Hub SE240. Video sources include DVD
players, VCRs and similar devices.
After connecting a video source to the SMART Hub SE240, you can view it s input on your SMAR T
product’s interactive screen and do the following:
• Draw digital ink notes.
• Freeze the display.
• Take screen captures.
For more information, see page 71.
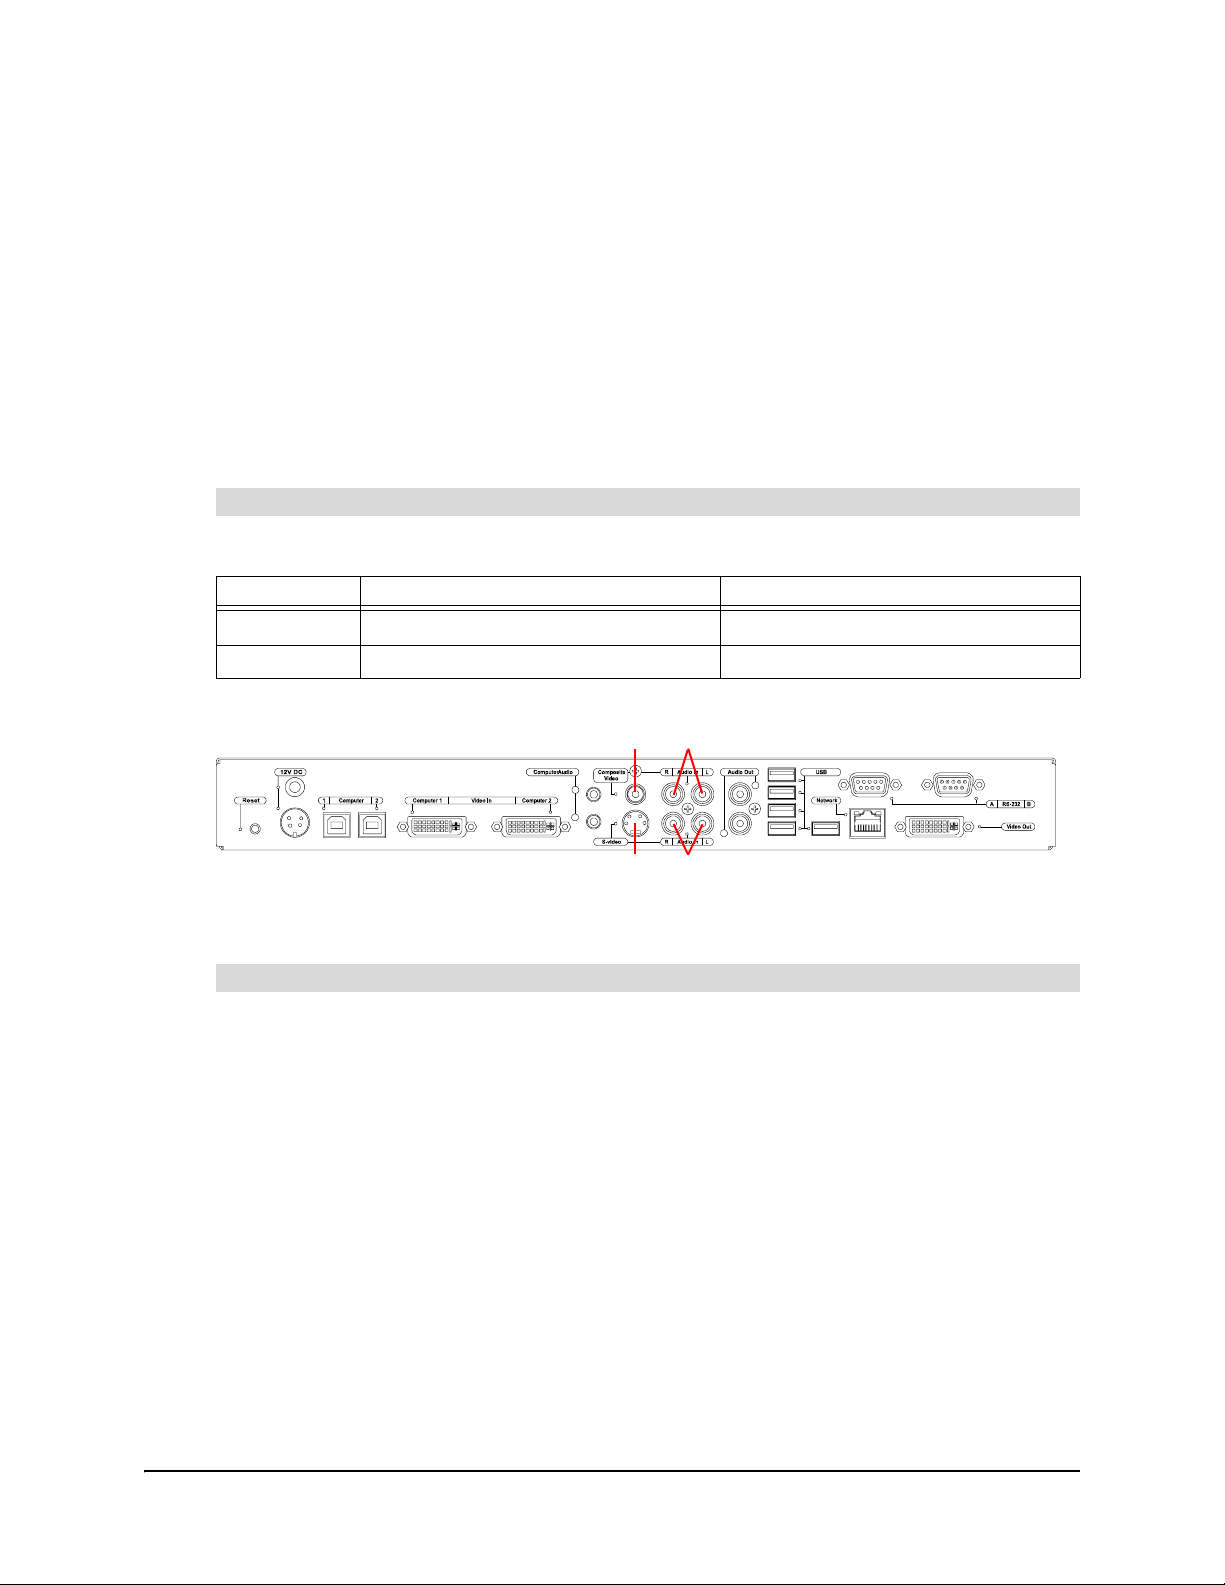
To connect a video source
Connect the video source to the SMART Hub SE240 using the appropr iate cables and connectors.
Video Source Video (A) Audio (B)
1 4-pin mini-DIN connector RCA audio connector set 1
2 RCA video connector RCA audio connector set 2
The following diagram shows the location of the connectors on the SMART Hub SE240.
2B
1A2A1B
NOTE: The audio connections are optional.
To configure the SMART Hub SE240 for the video source
1. Press Menu.
The Welcome Center appears.
2. Press Settings.
The Settings dialog box appears.
3. If a password is required to change the config ur ation settings, type the p asswor d in the box at
the bottom of the menu, and then press OK.
NOTE: For information on the configuration settings password, see page 20.
24 Configuring the SMART Hub SE240
Page 31

4. Press Input Configuration.
5. Press S-Video if you’re configuring the SMART Hub SE240 for the first video source.
OR
Press Composite if you’re configuring the SMART Hub SE240 for the second video source.
6. If desired, clear the Add a button for this input in the shortcut menu check box to remove
the button for the video source input from the shortcut menu.
NOTE: For information on the shortcut menu, see page 46.
7. In the Input device name box, type a name for the video source.
8. Press Apply All.
You’ve configured the SMART Hub SE240 for the video source.
Configuring the Display Settings
You can configure the SMART Hub SE240’s resolution, aspect ratio and timeout settings to work
with your SMART product’s display.
Configuring the SMART Hub SE240 25
Page 32

To configure the display settings
1. Press Menu.
The Welcome Center appears.
2. Press Settings.
The Settings dialog box appears.
3. If a password is required to change the config ur ation settings, type the p asswor d in the box at
the bottom of the menu, and then press OK.
NOTE: For information on the configuration settings password, see page 20.
4. Press Display Configuration.
NOTE: The top portion of the Display Configuration tab shows information on the projector or
display connected to the SMART Hub SE240. You can refresh this information by pressing
Refresh.
5. In the Resolution list, select a resolution.
TIP
26 Configuring the SMART Hub SE240
If the selected resolution is not supported by the projector or display, press
CTRL+ALT+SHIFT+0 to reset the display settings. The SMART Hub SE240
display may take several minutes to reappear.
Page 33

6. In the Aspect ratio list, select an aspect ratio:
– Standard preserves the computer or video source input’s aspect ratio.
(Letterboxing)
(Pillar-boxing)
Computer or
Video Source Input
SMART Product
Output
– Full screen changes the computer or video source input to match your SMART product’s
aspect ratio.
Computer or
Video Source Input
SMART Product
Output
Configuring the SMART Hub SE240 27
Page 34

– Cropped crops the computer or video source input to match your SMART product’s
aspect ratio.
Computer or
Video Source Input
SMART Product
Output
– Enhanced widescreen changes the computer or video source input to a widescreen
(16:9) aspect ratio.
Computer or
Video Source Input
SMART Product
Output
7. In the Enter sleep mode after list, select the number of minutes you want to pass before the
SMART Hub SE240 times out.
8. In the Shut down projector after list, select the number of minutes you want to pass before
the projector shuts down, or No Timeout to not shut down the projector.
NOTE: If the SMART Hub SE240 is connected to a computer or video source, the values in
the Enter sleep mode after and Shut down projector after lists don’t take effect until after
the computer or video source times out.
9. Press Apply All.
You’ve configured the display.
28 Configuring the SMART Hub SE240
Page 35

Configuring Networking and Conferencing Settings
Connect the SMART Hub SE240 to a network to take advantage of its networking and
conferencing features. These features include:
• sending Whiteboard files to specified e-mail addresses
• connecting to LinQ software client computers
• using Bridgit conferencing software to collaborate with anyone , anywhere in the world
IMPORTANT
You must be familiar with basic networking, Simple Network Management Protocol
(SNMP) and Simple Mail Transfer Protocol (SMTP) to complete the following
procedures. If you are not familiar with these concepts, refer this guide to an
information technology professional in your organization.
To configure basic networking settings
1. Press Menu.
The Welcome Center appears.
2. Press Settings.
The Settings dialog box appears.
3. If a password is required to change the config ur ation settings, type the p asswor d in the box at
the bottom of the menu, and then press OK.
NOTE: For information on the configuration settings password, see page 20.
4. Press Network and Conference.
5. In the Device name/network ID box, type a name for the SMART Hub SE240.
NOTE: The SMART Hub SE240 uses this name in Bridgit software conferences as the
participant’s name, and in LinQ software as the server name.
Configuring the SMART Hub SE240 29
Page 36

6. Press Network Address (if this tab doesn’t currently appear).
7. Select the Use DHCP (automatically detect network settings) option to configure
networking settings automatically.
OR
Select the Manually specify network settings and addresses op tion to configure
networking settings manually, and then type the appropriate information (as supplied by your
network administrator) in the following boxes:
– IP address
– Subnet mask
– Default gateway
– DNS server 1
– DNS server 2
8. Press Apply All.
You’ve configured the basic networking settings of the SMART Hub SE240.
To configure e-mail (SMTP) settings
1. Press Menu.
The Welcome Center appears.
2. Press Settings.
The Settings dialog box appears.
3. If a password is required to change the config ur ation settings, type the p asswor d in the box at
the bottom of the menu, and then press OK.
NOTE: For information on the configuration settings password, see page 20.
4. Press Network and Conference.
30 Configuring the SMART Hub SE240
Page 37

5. Press E-Mail (SMTP).
6. In the SMTP server name box, type the name of the SMTP server (for example, mail).
7. In the Port number box, type the port number of the SMTP server (for example, 25).
NOTE: 25 is the default port number for SMTP.
8. In the Domain name box, type the domain name of the SMTP server (for example,
yourcompany.com).
9. Press Apply All.
You’ve configured the SMTP settings of the SMART Hub SE240.
To configure network management (SNMP) settings
1. Press Menu.
The Welcome Center appears.
2. Press Settings.
The Settings dialog box appears.
3. If a password is required to change the config ur ation settings, type the p asswor d in the box at
the bottom of the menu, and then press OK.
NOTE: For information on the configuration settings password, see page 20.
4. Press Network and Conference.
Configuring the SMART Hub SE240 31
Page 38

5. Press Management, Room Control.
6. Select the Enable remote management of SMART Hub SE240 check box to enable the
SNMP settings of the SMART Hub SE240.
7. Select the Use the settings password as the SNMP read/write strings option to use the
general settings password for the SNMP read/write strings.
OR
Select the Manually assign SNMP read/write strings option, and then enter the app ro pri ate
information (as supplied by your network administrator) in the following boxes to manually
assign the SNMP read/write strings:
– Read community string
– Write community string
NOTE: In SNMP, comm unity strings are text strings that act as passwords. Get requests are
only valid if their community strings match the value in the Read community string box, and
set requests are only valid if their community strings match the value in the
Write community string box.
8. In the Trap destination address box, type the IP address to which the SMART Hub SE240
should send traps (as supplied by your network administrator).
NOTE: Traps are unsolicite d, asynchronous events that devices such as the SMART Hub
SE240 generate to indicate status changes.
9. Press Apply All.
You’ve configured the SNMP settings of the SMART Hub SE240.
NOTE: To fully utilize the SNMP features, download the SMART Hub SE240’s Management
Information Base (MIB) files from www.smarttech.com/SE240firmware
software uses MIB files to interpret the devices that it monitors.
. SNMP management
32 Configuring the SMART Hub SE240
Page 39

To configure LinQ software
1. Press Menu.
The Welcome Center appears.
2. Press Settings.
The Settings dialog box appears.
3. If a password is required to change the config ur ation settings, type the p asswor d in the box at
the bottom of the menu, and then press OK.
NOTE: For information on the configuration settings password, see page 20.
4. Press Network and Conference.
5. Press Conferencing.
6. Select the Enable sharing with LinQ software check box to connect to LinQ software client
computers.
7. Select the Prompt before viewing a shared desktop using LinQ check box to prompt users
before connecting to LinQ software client computers.
8. Press Apply All.
You’ve configured LinQ software.
Configuring the SMART Hub SE240 33
Page 40

To configure Bridgit conferencing software
IMPORTANT
1. Press Menu.
The Welcome Center appears.
2. Press Settings.
The Settings dialog box appears.
3. If a password is required to change the config ur ation settings, type the p asswor d in the box at
the bottom of the menu, and then press OK.
NOTE: For information on the configuration settings password, see page 20.
4. Press Network and Conference.
5. Press Conferencing.
To use the Bridgit conferencing software features in the SMART Hub SE240, you
must do one of the following:
• Purchase and install Bridgit server software.
• Purchase a subscription for the Bridgit conferen cin g service.
• Install a trial version of Bridgit software for 30 days, and then purchase the
server software or service from SMART Technologies
• Be invited to a conference by a person or organization with Bridgit software.
For more information on these options, see the Bridgit p age of the SMAR T su pport
site.
.
6. Select the Enable conferences with Bridgit software check bo x to use Bridg it conferen cing
software.
34 Configuring the SMART Hub SE240
Page 41

7. In the Bridgit server box, type the URL of the Bridgit conferencing software server (for
example, bridgit.yourcompany.com).
8. In the Default conference box, type a default, easy-to-identify name for all Bridgit software
conferences created with the SMART Hub SE240.
9. In the Viewing password box, type a password that participants must enter to view Bridgit
software conferences created with the SMART Hub SE240.
10. In the Creation Password box, type a password that participants must enter to create Bridgit
software conferences with the SMART Hub SE240.
11. Press Apply All.
You’ve configured Bridgit conferencing software.
Configuring Room Control Settings
Y ou ca n control the SMAR T Hub SE240 externally with a computer or room control system using a
TELNET session established over a TCP/IP network connection or through a serial (RS-232)
connection. This allows you to select inputs, control audio volume, request inform ation such as
projector lamp usage or network settings and complete other tasks.
This section describes how to configure the SMART Hub SE240 for external control using a
computer or room control system, and the commands you use to change and view the pr ojector or
display settings.
Enabling and Using Room Control Settings through the Serial Interface
To enable and use the SMART Hub SE240’s room control settings:
1. Connect the computer or room control system to the SMART Hub SE240.
2. Enable the SMART Hub SE240’s room control mode.
3. Configure the connected computer or room control system’s serial interface.
4. Program your room control system to use the SMART Hub SE240’ s room control commands.
Configuring the SMART Hub SE240 35
Page 42

To connect the computer or room control system to the SMART Hub SE240
Connect the SMART Hub SE240 to the computer or room control system using the female RS-232
connector.
Female RS-232 Connector
IMPORTANT
The female RS-232 connector is for room control only.
To enable the SMART Hub SE240’s room control mode
1. Press Menu.
The Welcome Center appears.
2. Press Settings.
The Settings dialog box appears.
3. If a password is required to change the config ur ation settings, type the p asswor d in the box at
the bottom of the menu, and then press OK.
NOTE: For information on the configuration settings password, see page 20.
4. Press Administration.
36 Configuring the SMART Hub SE240
Page 43

5. Select the Enable room control with RS-232 check box.
6. Press Apply All.
You’ve enabled the SMART Hub SE240’s room control mode through the serial interface.
To configure your serial interface settings
The SMART Hub SE240’s serial interface settings aren’t configurable. Therefore, configure your
computer’s serial communication program, such as Microsoft® HyperTerminal, or your room
control system’s serial communication settings to the following values.
Setting Value
Data rate 9600 bps
Data bits 8
Parity None
Stop bits 1
Flow control None
To verify that the serial interface is in room control mode
1. Turn on your communication program.
2. Configure your communication program as documented in the previous section.
3. Press Enter.
If your configuration is correct and the SMART Hub SE240 is in room control mode, the >
character appears.
4. Type ?, and then press Enter to see a list of available commands.
Enabling and Using Room Control Settings through TELNET
Instead of connecting the SMART Hub SE240 to roo m control through the seri al interface, you can
connect through TELNET.
To connect the computer or room control system to the SMART Hub SE240
through TELNET
1. Connect the SMART Hub SE240 and the computer or room control system to the same
network.
For more information on connecting the SMART Hub SE240 to a network, see page 29.
2. Press Menu.
The Welcome Center appears.
3. Press Settings.
The Settings dialog box appears.
4. If a password is required to change the config ur ation settings, type the p asswor d in the box at
the bottom of the menu, and then press OK.
NOTE: For information on the configuration settings password, see page 20.
Configuring the SMART Hub SE240 37
Page 44

5. Press Network and Conference.
6. Press Management, Room Control.
7. Select the Enable room control via telnet check box.
8. In the Port number text box, type the port number for TELNET.
NOTE: 23 is the default port number for TELNET.
9. Press Apply All.
You’ve connected a computer or room control system to the SMAR T Hub SE240 thro ugh TELNET.
Command Summary
The SMART Hub SE240 responds to the following types of commands:
• power state
• input selection
• video and audio
• conferencing
• system information
NOTES
• Press Enter after each command.
• Commands aren’t case-sensitive.
38 Configuring the SMART Hub SE240
Page 45

Power State Commands
The following table presents the power state commands.
Command Description
on
off
Turns on the SMART Hub SE240.
Turns off the SMART Hub SE240.
NOTE: Alternatively, use the command
get powerstate
Requests the SMART Hub SE240 power state.
Possible returned values when using the SMART Hub SE240
with a Unifi 45 projector:
•
startup
•
on
•
shutdown
•
off
Possible returned values when not using the SMART Hub
SE240 with a Unifi 45 projector:
•
on
•
standby
Input Selection Commands
The following table presents the input selection commands.
Command Description
off now.
set input dvi-1
set input dvi-2
set input composite
set input s-video
set input whiteboard
get input
Selects the first computer input
Selects the second computer input
Selects the composite video source input
Selects the S-video source input
Selects Whiteboard
Requests the projector’s current input
Configuring the SMART Hub SE240 39
Page 46

Video and Audio Commands
The following table presents the video and audio commands.
Command Description
set brightness {+ or -}
set brightness {0 to 100}
get brightness
set contrast {+ or -}
set contrast {0 to 100}
get contrast
set volume {+ or -}
set volume {0 to 100}
get volume
Increases or decreases the brightness in increments
Sets the brightness to an absolute value from 0 (off) to
100 (full brightness)
Requests the projector’s current brightness setting
Increases or decreases the contrast in increments
Sets the contrast to an absolute value from
0 (minimum contrast) to 100 (maximum contrast)
Requests the projector’s current contrast setting
Increases or decreases the volume in increments
Sets the volume to an absolute value from 0 (off) to
100 (full volume)
Requests the projector’s current volume setting
System Information Commands
The following table presents the system information co mmands.
Command Description
get lamphrs
Requests the number of hours that the pr ojector lamp ha s be en
in use (from
0 to 3000)
NOTE: This command only returns a value if the SMART Hub
SE240 is connected to a Unifi 45 projector.
get syshrs
get ipaddr
get macaddr
get fwver
Requests the number of hours that the system has been in use
Requests the IP address
Requests the MAC address
Requests the firmware version
Configuring Language and General System Settings
The SMART Hub SE240’s user interf ace is set to English by default. You can change the language
to one of the following:
•French
•German
• Italian
•Spanish
40 Configuring the SMART Hub SE240
Page 47

IMPORTANT
In addition, you can view the SMART Hub SE240’s system information, including the firmware
version, Internet Protocol (IP) address and Media Access Control (MAC) address.
The initial version of the SMART Hub SE240 firmware doe s not support these other
languages. A later version of the firmware will support these languages. For
instructions on updating to the latest version of the firmware, see page 75.
To set the SMART Hub SE240’s user interface language
1. Press Menu.
The Welcome Center appears.
2. Press Settings.
The Settings dialog box appears.
3. If a password is required to change the config ur ation settings, type the p asswor d in the box at
the bottom of the menu, and then press OK.
NOTE: For information on the configuration settings password, see page 20.
4. Press System and Language.
5. In the Language list, select your preferred language.
6. Press Apply All.
You’ve set the SMART Hub SE240’s user interface language.
Configuring the SMART Hub SE240 41
Page 48

To view system information
1. Press Menu.
The Welcome Center appears.
2. Press Settings.
The Settings dialog box appears.
3. If a password is required to change the config ur ation settings, type the p asswor d in the box at
the bottom of the menu, and then press OK.
NOTE: For information on the configuration settings password, see page 20.
4. Press System and Language.
5. View the system information.
You’ve viewed the system information.
To disable system hardware settings
1. Press Menu.
The Welcome Center appears.
2. Press Settings.
The Settings dialog box appears.
3. If a password is required to change the config ur ation settings, type the p asswor d in the box at
the bottom of the menu, and then press OK.
NOTE: For information on the configuration settings password, see page 20.
42 Configuring the SMART Hub SE240
Page 49

4. Press Administration.
5. Clear the Enable RJ45 Ethernet port check box to disable networking settings.
6. Clear the Enable USB storage device support check box to disable USB storage device
settings.
7. Press Apply All.
You’ve disabled system hardware settings.
Configuring the SMART Hub SE240 43
Page 50

44 Configuring the SMART Hub SE240
Page 51

Using the SMART Hub SE240
This chapter explains how to use the features of the SMART Hub SE240 with your SMART
product. The SMART Hub SE240’s features include Whiteboard, Bridgit conferencing software
and the ability to connect to computers and video sources.
• Basic Tools (this page)
• Starting a SMART Hub SE240 Session (page 49)
• Whiteboarding (page 50)
• Collaborating (page 59)
• Connecting to Computers and Video Sources (page 68)
• Using Your SMART Product with Computer and Video Source Inputs (page 71)
• Ending a SMART Hub SE240 Session (page 74)
Basic Tools
Regardless of the SMART Hub SE240 features you use, you’ll find these tools useful:
• Welcome Center
• shortcut menu
• toolbar
• on-screen keyboard
• right-click
• volume adjustment and mute
• online Help
Using the SMART Hub SE240 45
Page 52

Welcome Center
The Welcome Center allows you to create or open Whiteboard files, Bridgit software conferences,
and computer and video source sessions, as well as open the Settings dialog box to configur e the
SMART Hub SE240 (see page 15) and end the current session (see page 74).
The Welcome Center appears when you start a SMART Hub SE240 session. If you’re in a
Whiteboard file, Bridgit software conference, or computer or video source session, open the
Welcome Center by pressing Menu in the toolbar.
Shortcut Menu
The shortcut menu allows you to move between Whiteboard files, Bridgit software conferences,
and computer and video source sessions without opening the Welcome Center.
The LinQ/Bridgit dialog box only
The currently open
session is outlined
in yellow.
NOTE: A session only displays in the shortcut menu if you select its input’s Add a button for this
input in the shortcut menu check box (see page 22 and page 24).
To open the shortcut menu, press to the right of Menu in the tool bar. Press a session’ s button to
move to that session, or press outside of the shortcut menu to close it.
displays if there are open
Bridgit software conferences or
LinQ software connections.
46 Using the SMART Hub SE240
Page 53

Toolbar
The toolbar appears at the bottom of the display in Whiteboard files, Br idgit sof tware con ferences,
and computer and video source sessions. The buttons in the too lbar differ depending on the type
of session.
Whiteboard Toolbar
Computer or Video Source Toolbar
NOTE: See the quick reference included with the SMART Hub SE240 for descriptions of the
toolbar buttons.
To minimize the toolbar, press Minimize . After minimizing the toolbar, you can move it to
different positions on the display by pressing the appropriate buttons.
Move to the Left-Middle
Position
Move to the Left-Top
Position
Move to the Left-Bottom
Position
Move to the Left-Middle
Position
Move to the Bottom-Left
Position
Move to the Bottom-Middle
Position
Move to the Left-Bottom
Position
Move to the Bottom-Left
Position
Move to the Bottom-Right
Position
Move to the Right-Middle
Position
Move to the Right-Top
Position
Move to the Right-Bottom
Position
Move to the Right-Middle
Position
Move to the Bottom-Right
Position
Move to the Bottom-Middle
Position
Move to the Right-Bottom
Position
Using the SMART Hub SE240 47
Page 54

SMART Keyboard
If there’s no keyboard connected to the SMART Hu b SE240, you can use SMART Keyboard to
type information.
To open SMART Keyboard
Press Keyboard .
SMART Keyboard appears.
NOTE: SMART Keyboard uses the QWERTY layout.
Right-Click
If you connect a computer to the SMART Hub SE240 (see page 68) and there’s no mouse
connected to the SMART Hub SE240, you can simulate a right-click by pressing Right-Click ,
and then pressing the interactive screen with your finger.
Volume Adjustment and Mute
If the SMART Hub SE240 is connected to speakers, adjust and mute the volume by pressing
Volume .
Adjust the volume by moving the slider to the right to increase volume, or to the left to decrease
the volume. Mute the volume by pressing Volume .
NOTE: Volume adjustment and mute aren’t available in Whiteboard or any computer or video
source connection without audio input.
48 Using the SMART Hub SE240
Page 55

Online Help
The SMART Hub SE240 includes online Help.
To view the online Help
Open the Welcome Center, and then press Help.
The Help Topics window appears.
Starting a SMART Hub SE240 Session
There are two situations in which you need to start a new SMART Hub SE240 session.
Situation Procedure
Y our SMART product is off. Turn on your SMART product as documented in
its user’s guide.
Your SMART product is on but the display is
blank.
The SMART Hub SE240 has timed out and is in
sleep mode. (For information on setting the
number of minutes before the unit times out,
see page 25.)
Swipe your finger or a pen from the pen tray
across the display of your SMART product.
Using the SMART Hub SE240 49
Page 56

When you start a new session, the Welcome Center appears.
Whiteboarding
Whiteboard allows you to capture notes and drawings in digital ink on your SMART product.
Use Whiteboard for brainstorming, note taking and other activities for which you want to use your
SMART product’s digital ink tools without connecting to a computer.
Getting Started
To use Whiteboard, create or open a Whiteboard file.
50 Using the SMART Hub SE240
Page 57

To create a Whiteboard file
1. Press Menu.
The Welcome Center appears.
2. Press Whiteboard.
Using the SMART Hub SE240 51
Page 58

3. Press Whiteboard.
OR
Press New File.
A new file opens.
You’ve created a new Whiteboard file.
52 Using the SMART Hub SE240
Page 59

To open a Whiteboard file
1. Connect the USB storage device that contains the Whiteboard file to the SMART Hub SE240.
2. Press Menu.
The Welcome Center appears.
3. Press Whiteboard.
4. Press Open File.
The Open dialog box appears.
5. In the Look in list, select the USB storage device’s drive letter.
Using the SMART Hub SE240 53
Page 60

6. Browse to and select the file.
7. Press Open.
The file opens.
You’ve opened an existing Whiteboard file.
Using Whiteboard
After creating or opening a Whiteboard file, you can:
• draw digital ink
• erase digital ink
• add a page to the file
• delete a page from the file
• minimize and restore the toolbar
54 Using the SMART Hub SE240
Page 61

To draw digital ink
1. Pick up a pen from your SMART product’s pen tray.
OR
Press Pen .
The pen toolbar appears.
2. In the pen toolbar, select the appropriate color and thickness options.
3. Draw digital ink.
To erase digital ink
1. Pick up the eraser from your SMART product’s pen tray.
OR
Press Eraser .
2. Erase digital ink.
Using the SMART Hub SE240 55
Page 62

To add a page to the Whiteboard file
Press Add Page .
A new page appears after the curre ntly selected page.
To delete a page from the Whiteboard file
Open the page you want to delete, and then press Delete Page .
The page deletes.
NOTE: If there’s only one page in the file, pressing Delete Page clears the page rather than
deleting it.
Saving or E-mailing a Whiteboard File
You can save your Whiteboard file on a USB storage device or e-mail it in one of the following
formats:
• Whiteboard file (.notebook)
• JPEG archive (.zip)
•PDF (.pdf)
56 Using the SMART Hub SE240
Page 63

After saving a file on a USB storage device, you can open, view and edit it in Whiteboard or on a
computer with Notebook software.
To save a Whiteboard file
1. Connect a USB storage device to the SMART Hub SE240.
2. Press Save .
The Save dialog box appears.
3. In the Look in list, select the USB storage device’s drive letter.
4. Browse to the folder where you want to save the file.
NOTE: Create a new folder for the file by pressing New Folder .
5. In the File name box, type a file name.
6. In the Save as type list, select a file type:
– Whiteboard File (.notebook)
– JPEG Archive (.zip)
– Portable Document Format (.pdf)
NOTE: If you select JPEG Archive (.zip), the SMART Hub SE240 saves each page in the
Whiteboard file as a JPEG image file inside an archive file.
7. Press Save.
You’ve saved the Whiteboard file to a USB storage device.
Using the SMART Hub SE240 57
Page 64

To e-mail a Whiteboard file
1. Press E-mail .
The E-mail dialog box appears.
2. In the Recipient list, select the recipient.
OR
In the E-mail address box, type the recipient’s e-mail address.
NOTES
– Add a new recipient or edit the list of recipient s by pressing the appropriate button in the
upper-right corner of the E-mail dialog box:
Add a New Recipient
Edit the List of Recipients
– If you’re using SMART Keyboard to enter e-mail addresses, press Shift to view the key for
the @ symbol.
58 Using the SMART Hub SE240
Page 65

3. In the Save as type list, select a file type:
– Whiteboard File (.notebook)
– JPEG Archive (.zip)
– Portable Document Format (.pdf)
NOTE: If you select JPEG Archive (.zip) file, the SMART Hub SE240 saves each p age in the
Whiteboard file as a JPEG image file inside an archive file.
4. Press Send E-mail.
You’ve e-mailed the Whiteboard file.
Collaborating
Bridgit conferencing software is a client/server application that lets you collaborate with anyone,
anywhere in the world. Using Bridgit conferencing software, you can:
• share your display
• view other participants’ displays
• communicate with others through chat
• use your SMART product to write digital ink notes
NOTE: You must connect the SMAR T Hub SE240 to a network and configur e it as documented on
page 29 to use Bridgit conferencing software.
IMPORTANT
To use the Bridgit conferencing software features in the SMART Hub SE240, you
must do one of the following:
• Purchase and install Bridgit server software.
• Purchase a subscription for the Bridgit conferen cin g service.
• Install a trial version of Bridgit software for 30 days, and then purchase the
server software or service from SMART Technologies
• Be invited to a conference by a person or organization with Bridgit software.
For more information on these options, see the Bridgit page of the SMART
support site.
.
Getting Started
To get started with Bridgit conferencing software, create or join a conference.
Using the SMART Hub SE240 59
Page 66

To create a Bridgit software conference
1. Press Menu.
The Welcome Center appears.
2. Press Collaborate.
3. Press Create Conference.
The Create Conference dialog box appears.
4. In the Conference box, type a name for the conference.
NOTE: You define the default name in this box in the SMART Hub SE240 settings (see
page 29).
5. In the Password and Confirm boxes, type a password for the conference (if you want to
assign a password to the conference).
IMPORTANT
If you do not assign a password to the conference, any person with Bridgit
conferencing software and access to the server can join the conference.
60 Using the SMART Hub SE240
Page 67

6. Press Create.
The Bridgit software conference screen appears.
Do not proceed to step 7.
OR
The Password Required dialog box appears if the server administrator has assigned a
password for creating conferences.
Proceed to step 7.
7. In the Creation Password box, type the password for creating conferences, and then press
OK.
The Bridgit software conference screen appears.
You’ve created a Bridgit software conference.
Using the SMART Hub SE240 61
Page 68

To join a Bridgit software conference
1. Press Menu.
The Welcome Center appears.
2. Press Collaborate.
3. Press Join Conference.
The Conference Connection dialog box appears.
62 Using the SMART Hub SE240
Page 69

4. Select the Bridgit software conference you want to join, and then press Join.
The Join Conference dialog box appears if the Bridgit software conference owner has
assigned a password for joining the conference.
Proceed to step 5.
OR
The Bridgit software conference screen appears.
Don’t proceed to step 5.
5. In the Password box, type the password, and then press OK.
The Bridgit software conference screen appears.
You’ve joined an existing Bridgit software conference.
Using Bridgit Conferencing Software
After creating or joining a Bridgit software conference, you can :
• share your display with other participants
• view other participants’ displays
• chat with other participants
Using the SMART Hub SE240 63
Page 70

To share your display
1. Press Share This Display or Share .
A blue border appears around your display.
NOTE: If you’re a participant in another person’ s Bridg it softwa re conference, the other per son
must approve your request before you can share your display.
2. Open a Whiteboard file or a computer or video source session.
For information on Whiteboard files, see page 50.
For information on computer and video source sessions, see page 68 and page 71.
Y ou’ve shared your displa y with the other particip ants in the Bridgit software confe rence. The other
participants can view and contribute to the Whiteboard files and computer and video sessions
you open.
To stop sharing your display
Press Stop Sharing .
The blue border around your display disappears.
You’ve stopped sharing your display with the other participants in the Bridgit software conference.
64 Using the SMART Hub SE240
Page 71

To view another participant’s display
Other participants can share their displays. When they do, a red border ap pear s ar ou nd
the display.
Depending on how the owner or presenter configures the Bridgit sof tware conference settings (see
page 66), you can draw digital ink on the participant’s display or request remote control of the
other participant’s display.
To request remote control of another participant’s display
Press Request Remote Control .
The Request for Remote Control dialog box appears on the other participant’s display, and the
Bridgit dialog box appears on your display.
If the other participant presses Yes in the Request for Remote Control dialog box, you can control
the other participant’s display from your display.
Using the SMART Hub SE240 65
Page 72

To relinquish remote control of another participant’s display
Press Relinquish Remote Control .
You’ve relinquished remote control of the other participant’s display.
To chat with other participants
1. Press Participant List .
The Participant List dialog box appears.
2. Press .
3. Type a message.
4. Press Send.
You’ve sent a chat message to all participants in the Bridgit software conference.
NOTE: If another participant sends you a chat message and the Participant List dialog box isn’t
open, a message appears below the Bridgit conferencing software toolbar:
Configuring the Bridgit Software Conference Settings
If you’re the owner or presenter of a Bridgit software conference, you can configure whether other
participants can:
• draw digital ink notes when you’re sharing your display
• share their displays
•chat
• request remote control when you’re sharing your display
66 Using the SMART Hub SE240
Page 73

To configure the Bridgit software conference settings
1. Press Options .
The Conference Options dialog box appears.
2. Select the Allow others to draw check box to allow other participants to draw digital ink notes
when you’re sharing your display.
3. Select the Allow others to share their desktop check box to allow other participant s to share
their displays.
4. Select the Allow others to use chat check box to allow other participants to chat.
5. Select the Allow others to use remote control check box to allow other participants to
request remote control when you’re sharing your display.
6. Press OK.
Leaving a Bridgit Software Conference
You can leave a Bridgit software confer ence at any time.
If you’re the owner of the conference, the conference ends when you leave. Bridgit conferencing
software automatically disconnects the other participants in the conference.
If you’re not the owner of the conference, the conference continues until the owner leaves.
Using the SMART Hub SE240 67
Page 74

To leave a Bridgit software conference
Press Exit Conference .
OR
1. Press Menu.
The Welcome Center appears.
2. Press Collaborate.
3. Press Exit Conference.
You’ve left the Bridgit software confe rence.
Connecting to Computers and Video Sources
You can connect the SMART Hub SE240 to up to two computers and two video sources (see
page 22 and page 24).
After connecting the SMART Hub SE240 to a computer or video source, you can view the
computer or video source’s input on your SMART product’s interactive screen.
NOTE: You can connect a computer with Notebook software 9.7 SP1 or later to the
SMART Hub SE240 and use the digital ink features of the software. The SMART Hub SE240
doesn’t support earlier versions of Notebook software.
68 Using the SMART Hub SE240
Page 75

To connect to a local computer
1. Press Menu.
The Welcome Center appears.
2. Press Computer Access.
3. Press one of the computer input buttons.
NOTE: The default label of the first DVI input button is Computer 1, and the default label of
the second DVI input button is Computer 2. However, you can change these labels. For m ore
information, see page 22.
The computer’s input appears.
You’ve connected to a local computer.
Using the SMART Hub SE240 69
Page 76

To connect to a LinQ software client computer
1. Start LinQ software on the client computer.
NOTE: You can download LinQ software for client computers from the SMART Technologies
website.
2. Press Menu.
The Welcome Center appears.
3. Press Computer Access.
4. Press one of the buttons in the LinQ Connected Clients group box.
The computer’s input appears.
You’ve connected to a LinQ software client computer.
70 Using the SMART Hub SE240
Page 77

To connect to a video source
1. Press Menu.
The Welcome Center appears.
2. Press Watch Video.
3. Press one of the video source input buttons.
NOTE: The default label of the S-video input button is Video 1 , and the default label of the
composite input button is Video 2. However, you can chan ge these labels. For more
information, see page 24.
The video source’s input appears.
You’ve connected to a video source.
Using Your SMART Product with Computer and Video Source Inputs
When viewing computer or video source input, you can draw digital ink notes on the display. If you
want to save your digital ink notes, you can take a screen capture of the display.
To draw digital ink
1. Pick up a pen from your SMART product’s pen tray.
OR
Press Pen .
The pen toolbar appears.
2. In the pen toolbar, select color and thickness options.
3. Draw digital ink.
Using the SMART Hub SE240 71
Page 78

To erase digital ink
1. Pick up the eraser from your SMART product’s pen tray.
OR
Press Eraser .
2. Erase digital ink.
To clear the display
Press Clear.
Your digital ink notes clear from the display.
To freeze the display
Press Freeze.
The display freezes.
NOTE: To unfreeze the display, press Resume.
IMPORTANT
Pressing Freeze only freezes the image on the display. It does not pause the
computer or video input.
To take a screen capture
1. Press Capture.
2. Press Menu.
The Welcome Center appears.
72 Using the SMART Hub SE240
Page 79

3. Press Whiteboard.
4. Press Whiteboard.
A Whiteboard file opens. The last page in the file contains a screen capture of the display.
Using the SMART Hub SE240 73
Page 80

Ending a SMART Hub SE240 Session
When you’ve finished using the SMART Hub SE240, you can end your session. Ending your
session:
• closes open Whiteboard files
• closes open Bridgit software conferences
• disconnects LinQ software client computers
To end a SMART Hub SE240 session
1. Press Menu, and then press End Session.
The End Session dialog box appears.
2. Press Yes.
The Save Changes? dialog box appears.
3. Press Save to save the changes.
OR
Press E-mail to e-mail the changes.
OR
Press Discard to discard the changes.
The SMART Hub SE240 session ends, closing open Whiteboard files and Bridgit software
conferences and disconnecting LinQ so ftware client compu te r s.
74 Using the SMART Hub SE240
Page 81

Maintaining the SMART Hub SE240
In this chapter, you’ll find the following information and procedures to keep the SMART Hub SE240
operating reliably.
• Updating the SMART Hub SE240 Firmware (this page)
• Maintaining the SMART Hub SE240 Hardware (page 80)
Updating the SMART Hub SE240 Firmware
SMART Technologies periodically releases firmware updates that introduce new functionality or
correct known issues with existing functionality.
You can update the SMART Hub SE240 firmware through a computer or a USB storage device.
Determining if an Update is Required
Determine the current version of the firmware installed on the SMART Hub SE240 and the latest
version available on the SMART Technologies website before downloading and installing any
updates.
To determine if an update is required
1. Press Menu.
The Welcome Center appears.
2. Press Settings.
The Settings dialog box appears.
3. If a password is required to change the config ur ation settings, type the p asswor d in the box at
the bottom of the menu, and then press OK.
4. Press System & Language.
The current version of the firmware appears in the System Information section of the tab.
5. In your browser, go to www.smarttech.com/SE240firmware
the firmware.
If the latest version of the firmware on the SMART Technologies website is newer (in other words,
higher) than the current version, you’ll need to complete an update.
to determine the latest version of
Updating the Firmware through a Computer
Updating the firmware through a computer involves:
1. installing the SMART Hub SE240 updater
2. placing the SMART Hub SE240 in boot loader mode
3. connecting the SMART Hub SE240 to the computer
4. updating the firmware
Maintaining the SMART Hub SE240 75
Page 82

NOTE: You need a Windows computer with Internet access that you can connect to the SMART
Hub SE240 through a USB cable. The computer must have a monitor or be a laptop so that you
can view and interact with the wizards during the update process.
To install the SMART Hub SE240 updater
1. In your browser, go to www.smarttech.com/SE240firmware
2. Click Download, and then follow the on-screen instructions.
3. After the file finishes downloading, open it.
The SMART Hub SE240 Update wizard appears.
4. Click Next.
.
5. Select the I accept the terms in the license agreement option, and then click Next.
6. Click Next.
7. Click Install.
The wizard installs the SMART Hub SE240 updater in the default destination folder. This may
take several minutes.
8. Click Finish.
The SMART Hub SE240 Update wizard closes.
You’ve installed the SMART Hub SE240 updater for the latest firmware version on your computer.
76 Maintaining the SMART Hub SE240
Page 83

To connect the SMART Hub SE240 to the computer
1. Press and hold down Reset on the SMART Hub SE240 until the indicator light turns solid
yellow.
2. Connect a USB cable from the second USB B receptacle on the SMART Hub SE240 to your
computer.
Second USB B Receptacle
The Found New Hardware wizard appears.
3. Select the No, not this time option, and then click Next.
4. Select the Install the software automatically option, and then click Next.
The Hardware Installation window appears.
Maintaining the SMART Hub SE240 77
Page 84

5. Click Continue Anyway.
6. Click Finish.
The Found New Hardware wizard closes.
You’ve connected the SMART Hub SE240 to the computer.
NOTE: You only need to complete the new hardware installation procedure once.
To update the firmware
1. In Windows Explorer, browse to C:\Program Files\SMART Hub SE240 Update Wizard , and
then double-click SMART Hub SE240 x.x.x.x-Updater.exe, where x.x.x.x is the current
version of the firmware.
The SMART Hub SE240 Update wizard appears.
2. Click Next.
3. Press and hold down Reset on the SMART Hub SE240 until the indicator light turns solid
yellow.
4. If you haven’t done so already, connect a USB cable from the se cond USB B receptacle on the
SMART Hub SE240 to your computer as documented on page 77.
5. Click Next.
6. Select the Yes option, and then click Next.
The wizard updates the firmware.
NOTE: This may take several minutes.
7. Press Next.
78 Maintaining the SMART Hub SE240
Page 85

8. Click Finish.
The SMART Hub SE240 Update wizard closes.
9. Reset the SMART Hub SE240 (see page 81).
NOTE: The initial reset after updating the firmware may take several minutes.
You’ve updated the SMART Hub SE240 firmwa re to the latest version.
Updating the Firmware Through a USB Storage Device
You can also update the firmware through a USB storage device.
To update the firmware through a USB storage device
1. Connect the USB storage device to a computer with Internet access.
2. In your browser, go to www.smarttech.com/SE240firmware
3. Download the latest version’s bootloader and application files to the following location on the
USB storage device:
\SMART\
4. Disconnect the USB storage device from the computer, and then connect it to one of the
USB A receptacles on the SMART Hub SE240.
5. Press Menu.
The Welcome Center appears.
6. Press Settings.
The Settings dialog box appears.
7. If a password is required to change the config ur ation settings, type the p asswor d in the box at
the bottom of the menu, and then press OK.
NOTE: For information on the configuration settings password, see page 20.
.
USB A Receptacles
Maintaining the SMART Hub SE240 79
Page 86

8. Press Administration.
9. Press Firmware Update.
A dialog box appears.
10. Select the Bootloader check box, and then press OK.
11. Press Restart.
12. Repeat steps 5 to 11 for the application file.
NOTE: The initial reset after updating the firmware may take several minutes.
You’ve updated the SMART Hub SE240 firmware to the latest version.
Maintaining the SMART Hub SE240 Hardware
The SMART Hub SE240 hardware requires little maintenance. However, clean its fans at least
once per year using a vacuum cleaner or can of compressed air to ensure best per formance.
NOTE: If the SMART Hub SE240’ s environment is unusually dusty, you may need to clean its fans
more frequently.
80 Maintaining the SMART Hub SE240
Page 87

Troubleshooting the SMART Hub SE240
In this chapter, you’ll find the following information and procedures to help you troubleshoot and
resolve problems with the SMART Hub SE240.
• Connecting the SMART Hub SE240 (this page)
• Resetting the SMART Hub SE240 (this page)
• General SMART Hub SE240 Troubleshooting (page 82)
Connecting the SMART Hub SE240
The following image presents the connections for the SMART Hub SE240.
Network
Power
Source
Computer 1 Computer 2 Video
Source
1
Video
Source
2
SMART Product
Audio
Line Out
USB Storage Devices, Keyboard,
Mouse
Projector or Display
NOTE: You can connect your SMART product to any of the USB A receptacles.
Resetting the SMART Hub SE240
On rare occasions, the SMART Hub SE240 can stop responding or behave in unexpected ways.
You can reset the SMART Hub SE240 to end th e current session and begin a new, restored one.
IMPORTANT
Before resetting the SMART Hub SE240, ensure all cables are securely connected
and in the correct receptacles (see p age 11).
To reset the SMART Hub SE240
Press and release Reset, and then wait 30 seconds.
Reset
Troubleshooting the SMART Hub SE240 81
Page 88

The current SMART Hub SE240 session ends, and th e Welcome Center appears.
NOTE: If the Welcome Center doesn’t appear after 30 seconds, press and release Reset again.
General SMART Hub SE240 Troubleshooting
Use this table to help troubleshoot general issues with the SMART Hub SE240.
Symptom/Observation Action/Solution
Your SMART Board inte ractive
whiteboard or other product
doesn’t respond to touch.
You’re unable to connect to a
computer or video source.
• Ensure the SMART Hub SE240 is properly connected to your
SMART product. See page 11.
• If you’re connecting to a SMART product with a serial
connector, ensure you use the USB to serial adapter provide d
with the SMART Hub SE240.
• If you’re using a mouse and keyboard with the SMART Hub
SE240, ensure they’re properly connected and working.
• If possible, end the current session. Otherwise, press Reset
on the back of the SMART Hub SE240, and then wait 30
seconds before starting a new session.
• If the issue persists, contact SMART Technical Support.
• Ensure the SMART Hub SE240 is properly connected to your
computer or video source. See page 22 and page 24.
• Press Menu to open the Welcome Center, press Computer
Access or Watch Video, and then select your input device.
• If you’re attempting to connect a laptop, ensure the laptop is
in presentation mode. See the laptop’s online He lp or manual
for instructions.
82 Troubleshooting the SMART Hub SE240
Page 89

Symptom/Observation Action/Solution
You’re unable to use the
SMART Hub SE240’s
networking features (Bridgit
conferencing software, LinQ
software and e-mail).
You’re unable to save
Whiteboard files on your USB
storage device.
There’s no sound from the
speakers connected to the
SMART Hub SE240.
• Ensure the SMART Hub SE240 is properly connected to your
network. See page 11.
• Press Menu to open the Welcome Center, press Settings,
and then assign an IP address to the SMART Hub SE240 and
enable networking features. See page see page 29 and
page 42.
• If you’re attempting to connect a computer, press Menu to
open the Welcome Center, press Settings, press Input
Configuration, and then select the correct input type for the
computer. For example, if you are connecting the SMART
Hub SE240 using a DVI to VGA cable, select Analog.
• If you’re attempting to connect to a LinQ software client
computer, ensure you’ve installed LinQ software on the
computer and that you’ve connected it to the same subnet at
the SMART Hub SE240.
• Ensure there’s enough space on the USB storage device to
save your files.
• Ensure the USB storage device is compatible with the
SMART Hub SE240. See document 124102
compatible USB storage devices.
• Press Menu to open the Welcome Center, press Settings,
and then ensure the USB storage device features are
enabled. See page 42.
• Ensure the SMART Hub SE240 is properly connected to an
amplifier or powered speakers.
• Turn on the speakers.
for a list of
• Ensure the volume isn’t muted. See page 48.
Troubleshooting the SMART Hub SE240 83
Page 90

84 Troubleshooting the SMART Hub SE240
Page 91

Regulatory Compliance
Waste Electrical and Electronic Equipment Regulations
Waste Electrical and Electronic Equipment regulations apply to all electrical and electronic
equipment sold within the European Union.
When you dispose of any electrical or electronic equipment, including SMART products, we
strongly encourage you to contact your local WEEE recycling agency for recycling and dispo sal
advice.
Y our SMART pr oduct required the extraction and use o f natural resources for its produ ction. It may
contain hazardous substances. By disposing of electrical and electronic equipment appropriately,
you lower the impact of these substances upon health and the environment and reduce the
pressure on natural resources. Recycling agencies can reuse or recycle most of the materials from
your product.
Please think about how you intend to dispose of any product that has a WEEE symbol or
accompanying WEEE guidelines.
If you need more information on the collection, reuse and recycling of electrical and electronic
equipment, please contact your local WEEE recycling agency.
Alternatively, contact your local reseller or SMART Technologie s for information on the
environmental performance of our products.
Restriction of Certain Hazardous Substances (RoHS) Directives
SMART Technologies supports global efforts to ensure that electronic equipment is manufactured,
sold and disposed of in a safe and environmentally friendly manner.
This product meets the requirements of the European Union's Restriction of Certain Hazardous
Substances (RoHS) Directive 2002/95/EC, as well as the People's Republic of China's Control of
Pollution Caused by Electronic Information Products (China RoHS).
Subsequently, this product also complies with other, less stringent directives that have arisen in
various geographical areas, and that incorporate the European Unio n's RoHS directive as a basis.
For more information, refer to your local regulations or visi t www.smarttech.com
Regulatory Compliance 85
.
Page 92

86 Regulatory Compliance
Page 93

Customer Support
Online Support
Visit www.smarttech.com/support to view and download user’s guides, “how-to” and
troubleshooting articles, software and more.
Training
Visit www.smarttech.com/trainingcenter for training materials and information about our
training services.
Contacting SMART Technical Support
SMART Technical Support welcomes your call. However, if you experience difficulty with your
SMART product, you may want to contact your local reseller first. Your local reseller may be able
to resolve the issue without delay.
All SMART products include online, telephone, fax and e-mail support:
Online: www.smarttech.com/contactsupport
Telephone: +1.403.228.5940 or
Toll Free 1.866.518.6791 ( U.S./Canada)
(Monday to Friday, 5 a.m. – 6 p.m. Mountain Time)
Fax: +1.403.806.1256
E-mail: support@smarttech.com
General Inquiries
Address: SMART Technologies
1207 – 11 Ave SW, Suite 300
Calgary, AB T3C 0M5
CANADA
Switchboard: +1.403.245.0333 or
Toll Free 1.888.42.SMART (U.S./Canada)
Fax: +1.403.228.2500
E-mail: info@smarttech.com
Part No. Customer Support 87
Page 94

Warranty
Product warranty is governed by the terms and conditions of SMART’s “Limited Equipment
Warranty” that shipped with the SMART product at the time of purchase.
Registration
To help us serve you, register online at www.smarttech.com/registration.
88 Customer Support Part No.
Page 95

Index
#
19" (48.3 cm) rack, 7
4-pin mini-DIN connectors, 24
A
Actalyst interactive overlays, 1
See also SMART product connections
adapters, 3
Adobe PDF, See PDF
amplifiers, 12
anchors, 8
archive files, 56
aspect ratio, 27
B
bits, 5
Bridgit conferencing software
configuring, 34–35
configuring settings for, 67
troubleshooting, 83
using, 59–68
brightness, 40
C
cables, 3, 6
Cat 5 cables, 6
chat, 66
collaboration, 59–68
community strings, 32
composite video, 25, 39
compressed air, 80
computer connections, 22–23, 69–70, 77–79, 82
conducted emissions, 5
conferencing software, See Bridgit conferencing
software
configuring multiple units, 17–20
connections, 11–13, 22–25, 68–71, 77–79, 82
contrast, 40
cooling system, 80
D
desktops, See displays
DHCP, 30
digital ink notes
clearing, 72
drawing, 55, 71
erasing, 55, 72
displays
clearing, 72
freezing, 72
relinquishing remote control of, 66
requesting remote control of, 65
sharing, 64
stop sharing, 64
viewing another participant’s, 65
disposal, 85
DNS servers, 30
downloads, 76
drills, 5
drivers, 77–78
dust, 5
DVD players, 24–25, 71
DVI, 3, 6, 11, 22, 39
E
EDTV, 2
electric drills, 5
electrostatic discharge, 5
e-mail, 30–31, 56–59, 83
EN55022/CISPR 22, 5
EN61000-4-2, 5
EN61558-1, 5
end, 74, 81
English, 40
environmental requirements, 5
eraser, 55, 72
Ethernet cables, See Cat 5 cables
Ethernet connections, See network connections
European Union, 85
exporting configuration settings, 17–18
F
fans, 80
files
archive (zip), 56
JPEG, 56
PDF, 56
Whiteboard, 50–54, 56–59
Index 89
Page 96

firmware, 75–80
flash drives, See USB storage devices
fluid resistance, 5
French, 40
G
gateways, 30
German, 40
H
hardware, 80
hardware settings, 42–43
Help, See online Help
home, See Welcome Center
humidity, 5
HyperTerminal, 37
maintenance, 75–80
menus
Settings, 15–43
shortcut, 46
Welcome Center, 46
MIB files, 32
Microsoft HyperTerminal, 37
Minimize button, 47
mounting, 6–10
mouse devices, 82
multiple units, 17–20
mute, 48
N
network connections, 12, 29–32, 43
Notebook software, 16–17, 57, 68
notifications, 32
I
importing configuration settings, 19–20
interactive overlays, See Actalyst interactive
overlays
interactive pen displays, See Sympodium
interactive pen displays
interactive whiteboards, See SMART Board
interactive whiteboards
IP addresses, 30, 40, 41, 83
Italian, 40
J
JPEG, 56
K
keyboards, 12, 48, 82
L
language settings, 40–41
laptops, 82
letterboxing, 27
LinQ software
configuring, 33
connecting to computers with, 70
troubleshooting, 83
O
online Help, 49
on-screen keyboard, See SMART Keyboard
orientation, 15–17
overlays, See Actalyst interactive overlays
P
pages (Whiteboard)
adding, 56
deleting, 56
passwords
for Bridgit conferencing software, 35, 60–61,
63
for configuration settings, 20–21
pause, 72
PDF, 56
pen displays, See Sympodium interactive pen
displays
pens, 55, 71
peripheral devices, 12
Phillips® No. 2 screwdrivers, 5
pillar-boxing, 27
power supply, 2, 13
projectors, 11
Q
M
MAC addresses, 40, 41
90 Index
quick reference, 47
QWERTY layout, 48
Page 97

R
rack mounting, 7
radiated emissions, 5
RCA cables, 6, 24
recycling, 85
Registering Your Slate, 88
regulatory compliance
RoHS directives, 85
WEEE equipment regulations, 85
releases, See versions
remote control, 65–66
Reset button, 81–82
resolution, 26
right-click, 48
room control, 35–40
RS-232, See serial connectors
RS-45, See network connections
S-video cables, 6, 24
SXGA, 2
Sympodium interactive pen displays, 1
See also SMART product connections
system maintenance, 75–80
system settings, 40–43
T
table top mounting, ??–9, 9–??
Technical Support
Contacting, 87
TELNET, 37–38
temperature, 5
timeout, 28
toolbars, 47
traps, 32
troubleshooting, 82–83
S
scratching, 5
screen captures, 72–73
screens, See displays
screwdrivers, 5
screws, 6–10
SDTV, 2
SE240S model, 3, 11
securing configuration settings, 20–21
serial connectors, 3, 11, 35–40
Settings menu, 15–43
shelf mounting, ??–9, 9–??
shortcut menu, 46
shutdown, 74, 81
SMART Board interactive whiteboards, 1
See also SMART product connections
SMART Keyboard, 48
SMART product connections, 11
SMTP, 29, 30–31
SNMP, 29, 31–32
Spanish, 40
speakers, 12, 48, 83
startup, 49–50
stereo mini connectors, 22
storage temperature and humidity, 5
subnet masks, 30
subnets, 83
SVGA, 2
S-video, 39
U
under-shelf mounting, 10
updates, 75–80
USB cables, 6, 11, 22
USB storage devices, 17–20, 43, 53, 57, 79–80,
83
V
vacuum cleaners, 80
VCRs, 24–25, 71
versions
currently installed, 75
latest, 76–80
VGA, 2, 3, 11
video source connections, 24–25, 71, 82
volume, 40, 48
W
wall mounting, ??–8, 8–??
Warranty, 88
Waste Electrical and Electronic Equipment
(WEEE) regulations, 85
water resistance, 5
Welcome Center, 46
Whiteboard, 39, 50–59, 72–73
Whiteboard file format (.notebook), 56
whiteboards, See SMART Board interactive
whiteboards
Index 91
Page 98

wizards
driver installer, 77–78
firmware updater, 78–79
update installer, 76
WXGA, 2
X
XGA, 2
XWGA, 2
Z
zip files, 56
92 Index
Page 99

Page 100

SMART Technologies
1207 – 11 Avenue SW, Suite 300
Calgary, AB T3C 0M5
CANADA
www.smarttech.com/support
wwww.smarttech.com/contactsupport
Support +1.403.228.5940 or Toll Free 1.866.518.6791
 Loading...