

Page 1

Page 2

Guidelines for Rescue Services
smart
2006
Guidelines for Rescue Services, smart, 2006
Page 3

Information and copyright
Ordering workshop information
All printed workshop information from GSP/TI can be ordered as follows:
Within Germany:
From our GSP/TI shop on the internet at the following link:
http://gsptishop.daimlerchrysler.com
or alternatively
Email: service.information@daimlerchrysler.com
Outside Germany:
Please get in touch with the contact person responsible for your market.
Inquiries relating to smart aftersales
Telephone: +4970319071024
or
DaimlerChrysler AG
GSP/TIP
HPC R822
D70546 Stuttgart
© 2006 Copyright DaimlerChrysler AG & smart GmbH
This document, including all its parts, is protected by copyright.
Any further processing or use requires the previous written consent of DaimlerChrysler
AG and of smart GmbH. This applies in particular to reproduction, distribution, alter
ation, translation, microfilming and storage and/or processing in electronic systems,
including databases and online services.
03.06
Guidelines for Rescue Services, smart, 2006
Page 4

Contents
Preface 5
Overview
Proper casualty rescue 6
Extinguishing vehicle fires 7
Rescue
Securing and supporting 8
Removing the windows 10
Removing the doors 13
Pushing away the instrument panel 17
Removing the roof 21
Observing occupant restraint systems 27
Seat adjustment/head restraints 34
Steering wheel adjustment/roll bar 35
Model classes
General 36
smart fortwo 38
smart roadster 40
smart forfour 41
Annex
List of abbreviations 42
Index 43
Guidelines for Rescue Services, smart, 2006 Page 3
Page 5

Contents
Page 4 Guidelines for Rescue Services, smart, 2006
Page 6

Preface
Dear reader,
One of DaimlerChrysler's top priorities has tradi
tionally been to guarantee the highest possible
standards of safety. This emphasis on safety is
especially pronounced also in vehicles of the
"smart" brand, the ultracompact line within the
Mercedes Car Group.
Our comprehensive safety concept also extends to
providing you, the rescue crews, with specific infor
mation about our vehicles and their safety systems.
The top priority of the rescue crew is to save lives.
You must be able to gain access to the accident
victims as quickly as possible without exposing
yourselves or the victims to additional dangers.
This is why we are providing you, the specialist, with
this vital and reliable information. The object is to
foster familiarity with the structures and safety
systems in the individual vehicle versions and
various model series. The automobiles manufactured
by smart differ from conventional cars in a number
of respects. This guideline manual responds to this
fact by serving up information compiled especially
for the use of rescue personnel. It describes the
relevant technical features incorporated in the
smart city coupé, smart roadster and smart forfour
model series.
Because the concept behind the sportoriented
roadster has been largely derived from the city
coupé, the two share a number of common features:
• Steel body with plastic paneling
• Aluminum doors
•Roof concepts
• Location of drive unit and tank etc.
This guide is intended to assist you in performing
the duties that you usually carry out while working
under considerable stress. So that every action will
be carried out with precision when the time comes,
this advance information booklet must cover all vital
points as they relate to specific scenarios. We hope
that this guide can be judged a success in this
respect. At the same time, we would greatly appre
ciate any suggestions and feedback you can offer
based on your own practical experience.
smart gmbh
Technical Communication (E/PD)
in collaboration with
DaimlerChrysler AG
Parts Engineering and
Technical Information (GSP/TI)
Guidelines for Rescue Services, smart, 2006 Page 5
Page 7

Overview
Proper casualty rescue
Whereas formerly priority was given to quickly
rescuing the trapped casualty from his predicament,
the primary concern nowadays is medical and
psychological assistance. The aim of this is to
prepare the casualty as well as possible for the
rescue work.
The medical and rescue personnel can then work in
concert to free the casualty from the vehicle.
The most urgent immediate measures at the
scene of the accident are:
• Maintaining or restoring the vital functions
(respiration/circulation)
• Keeping the respiratory passages clear and
rectifying any breathing difficulties
• Assessing shock and initiating measures to
stabilize the casualty
• Rendering psychological support to the casualty
• Treating lifethreatening injuries
• Stopping major bleeding
• Immobilizing certain body parts
i The main priority is to render medical and
psychological aid to the casualty!
i The safety of the medical and rescue crews
themselves should not be neglected:
• Wear protective clothing
• Wear eye protection
• Wear protective mouth mask
• Secure the accident vehicle
Immobilizing the neck
As the head often experiences extreme movements
in traffic accidents, there is an increased risk of
spinal injury in the neck region. To prevent further
damage to the cervical vertebrae, it is essential to
immobilize the neck before any further rescue
action is undertaken. The most common method of
immobilization is to use a cervical collar ("Stifnek").
This is a plastic collar which is placed around the
neck and closed with a velcro fastener.
If access to the casualty is difficult, the head
restraint can be removed first before fitting the
cervical collar.
i The he ad restraints shou ld only be cut aw ay
in exceptional cases!
• Cutting the head restraints away exposes the
casualty to additional movements
• The head restraint can no longer be used to
stabilize the casualty's head
• Cutting away the head restraints produces
sharp edges
Page 6 Guidelines for Rescue Services, smart, 2006
Page 8

Overview
Extinguishing vehicle fires
Extinguish fires in accordance with the guidelines of the professional fire services!
Body:
Magnesium is increasingly being used in safety
relevant reinforcement structures in the body.
For example, the instrument panel structure in
smart vehicles is made of magnesium.
When combatting fires within the vehicle's inte
rior and in the area around the instrument panel,
it is therefore vital to observe the special
instructions issued by the fire department with
respect to the materials employed in these areas!
Restraint systems:
If a fire breaks out inside the vehicle, it may acti
vate any untriggered front airbags, sidebags and
windowbags or the pyrotechnical emergency
tensioning retractors.
Gas generators are designed to ignite as soon as
the temperature inside the gas generator
reaches 160180° C.In such cases the ignition
squib and the solid fuel burn without destroying
the gas generator. During combustion a specific
volume of gas is released at a specific pressure.
i Magnesium is a Class D flammable material
according to the EN2 European Standard on
"flammable materials of various kinds".
i When the front airbags, sidebags,
windowbags and emergency tensioning
retractors are triggered, controlled
combustion takes place. The components do not
explode.
Windowbags
The gas generators of the windowbags are filled
not with solid fuel, but with compressed gas.
Guidelines for Rescue Services, smart, 2006 Page 7
i The compressed gas generators of the
windowbags must not be cut, as otherwise the
compressed gas may suddenly escape!
i Before cutting the corresponding body
panels the inner paneling of the A, B or Cpillars
must be removed using a suitable tool and the
exact installation location of the gas generators
determined!
Page 9
Rescue
Securing and supporting
a Risk of injury Action
Unintended movements of the bodywork during
rescue operations may cause further injury to the
casualties.
On arrival at the scene of the accident, the first
priority of the rescue crew should be to ascertain
and assess the condition of the casualties.
If possible, proper rescue of the occupants should
only be undertaken when the vehicle has been suffi
ciently secured and, if possible, in consultation with
the emergency physician (does not apply to emer
gency crash rescue!).
Trapped casualties are in direct physical contact
with the accident vehicle. Therefore the supports
must guarantee that the vehicle cannot move during
the subsequent rescue operations.
To prevent dangerous movements from occurring
while rescuing the casualties, the vehicles
involved should first be secured.
P00.60203400
The support must remain secure throughout the
entire duration of the rescue operation and must be
able to withstand the use of hydraulic equipment.
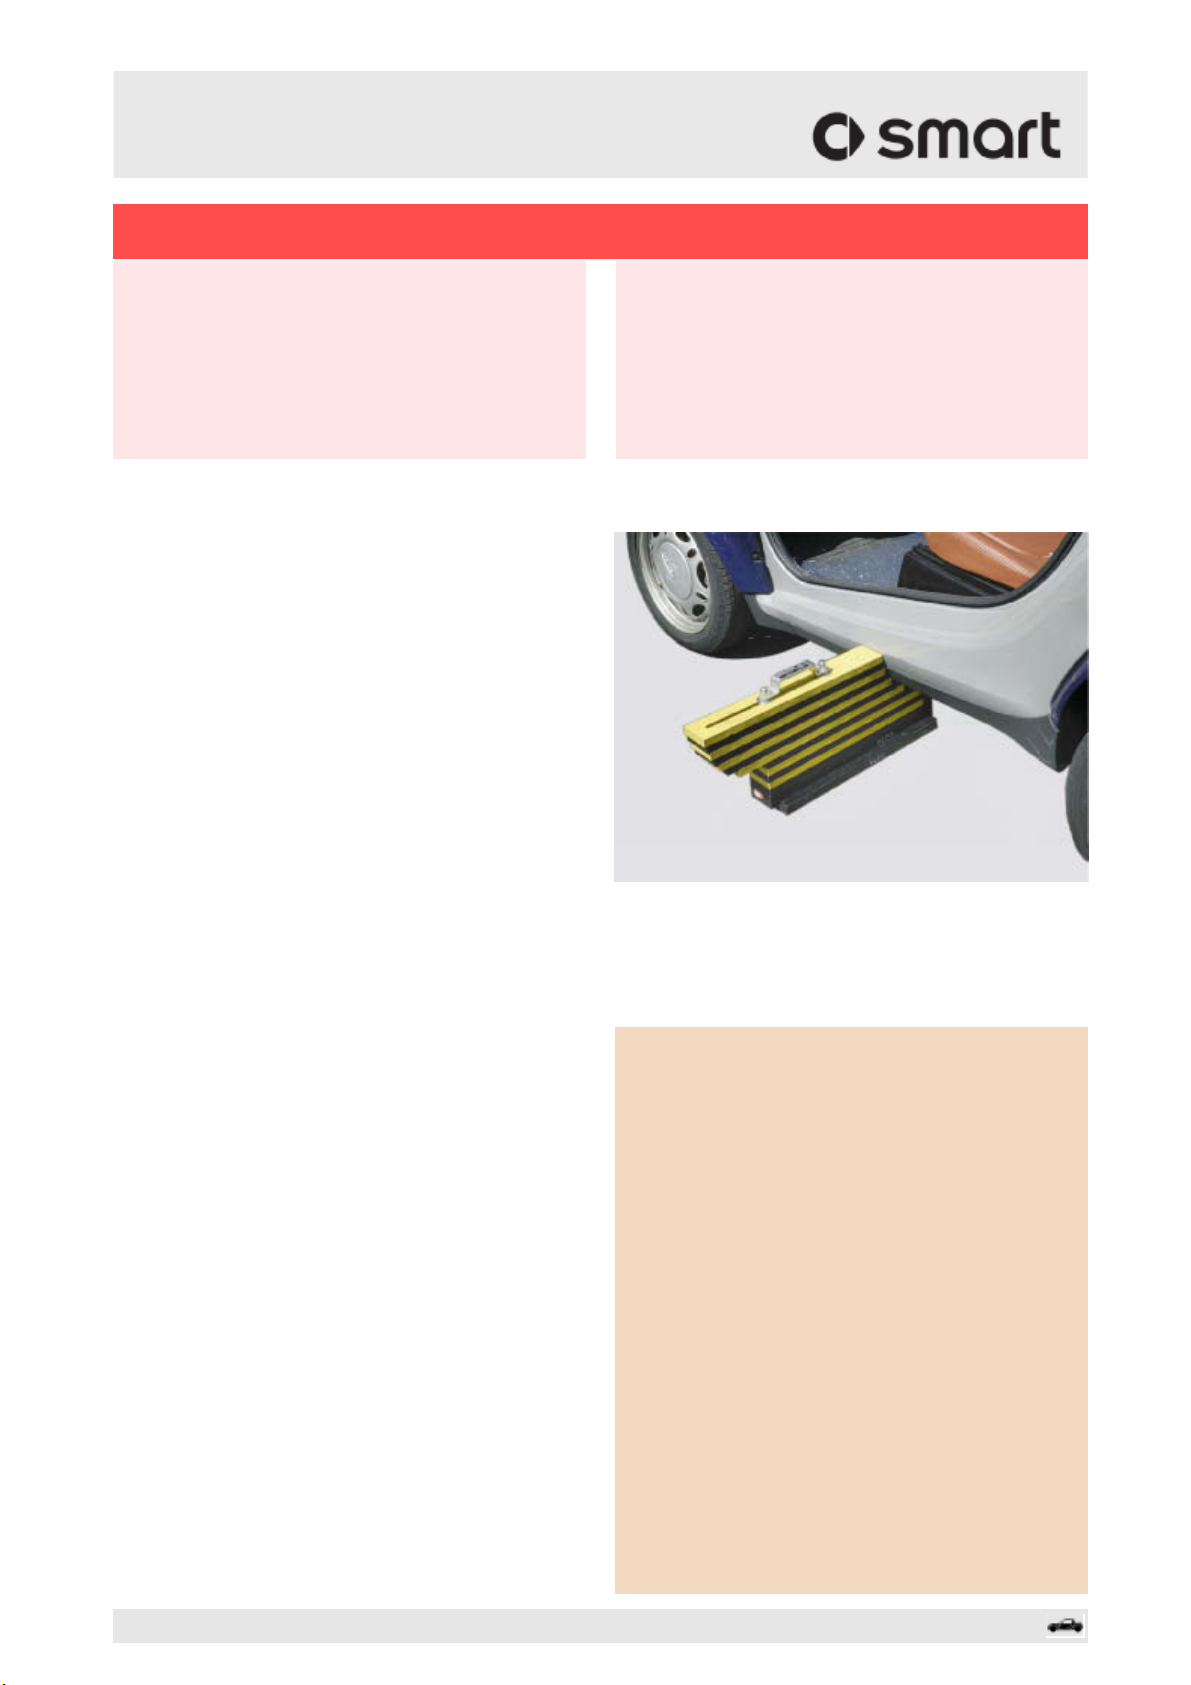
When using sliding support blocks to support the
vehicle, the air can be let out of the tires after the
blocks have been slipped underneath.
i The vehicle must be supported with wooden
planks, sliding support blocks or similar in
order to ensure a gentle and smooth rescue!
When positioning the sliding support blocks,
care must be taken to ensure that subsequent
rescue actions are not impeded.
i Never use the vehicle's tow eyes to secure
or recover the car. The strength of the body in
the area of the towing eyes may not be sufficient
following an accident.
Page 8 Guidelines for Rescue Services, smart, 2006
Page 10
Rescue
Securing and supporting
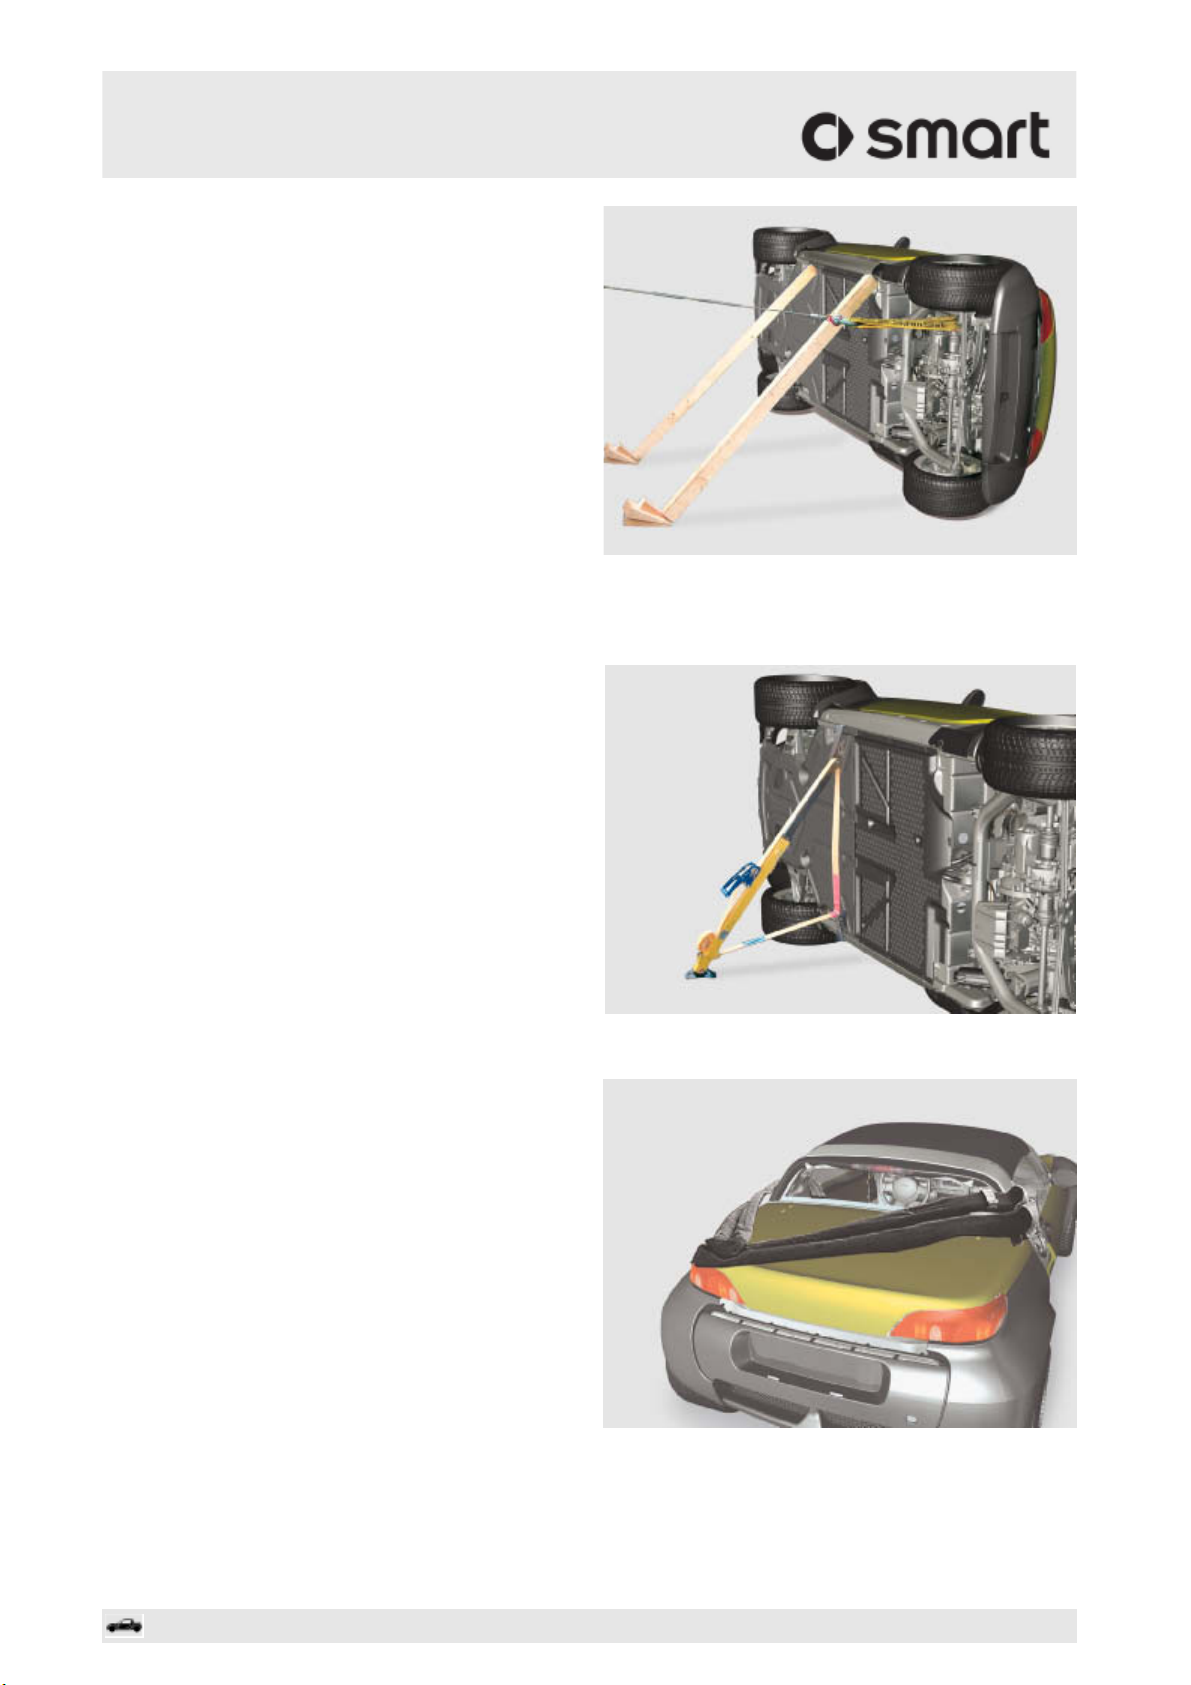
Vehicles lying on their side must be secured to
prevent them from sliding and tipping over, e.g.
using supporting struts, wheel chocks, ropes and
straps.
• Secure vehicle using supporting struts
• Attach straps by looping them around vehicle
parts, such as axles or other securely bolted
or welded parts on the vehicle.
• Attach steel cable to strap and tighten using
pulling unit (grip puller) or cable winch
• Secure opposite vehicle side using wheel
chocks
P00.60206900
The STAB FAST passenger car support system is
available as an alternative, with which vehicles
can still be stabilized even when in complicated
positions.
If the vehicle is on sloping ground, an endless
sling is useful for securing the vehicle. It can also
be used for recovering the vehicle.
The endless sling should be attached either by
threading it through the window openings (also
with the windows removed) or by slinging it
around vehicle components such as axles or other
parts rigidly bolted/welded onto the vehicle.
P00.60207000
Care should be taken to pass the sling around a
number of components if possible, in order to
distribute the forces evenly.
Guidelines for Rescue Services, smart, 2006 Page 9
P00.60207100
Page 11

Rescue
Removing the windows
a Risk of injury Action
Work on windows and glass roofs may produce
glass splinters which can cause injuries to the
occupants and rescuers.
a Risk of injury Action
Always remove the windows when working on adja
cent components.
Windows may shatter, throwing out tiny, sharp
glass particles which may cause injuries to the
occupants and rescuers.
Windows in parts adjacent to those being worked on
must always be removed before using hydraulic
tools. This applies above all to the windows in the
doors. If the windows are not removed, they will be
subjected to considerable pressure together with
the associated body panels, e.g. when opening the
doors with a spreader.
Vehicles in the smart model series are generally
equipped with two types of safety glass.
The windshield and door windows are made of lami
nated safety glass (VSG), the rear and side windows
on almost all vehicle are made of singlepane safety
glass (ESG).
Cover the occupants before commencing work,
preferably with a transparent sheet.
Wear protective clothing, safety glasses and a
protective mouth mask.
Cover the occupants before commencing work,
preferably with a transparent sheet.
Wear protective clothing, safety glasses and a
protective mouth mask.
At a certain compressive force the windows will be
unable to withstand the pressure and will burst
suddenly and violently. The ejected fragments can
inflict injuries.
Page 10 Guidelines for Rescue Services, smart, 2006
Page 12
Rescue
Removing the windows
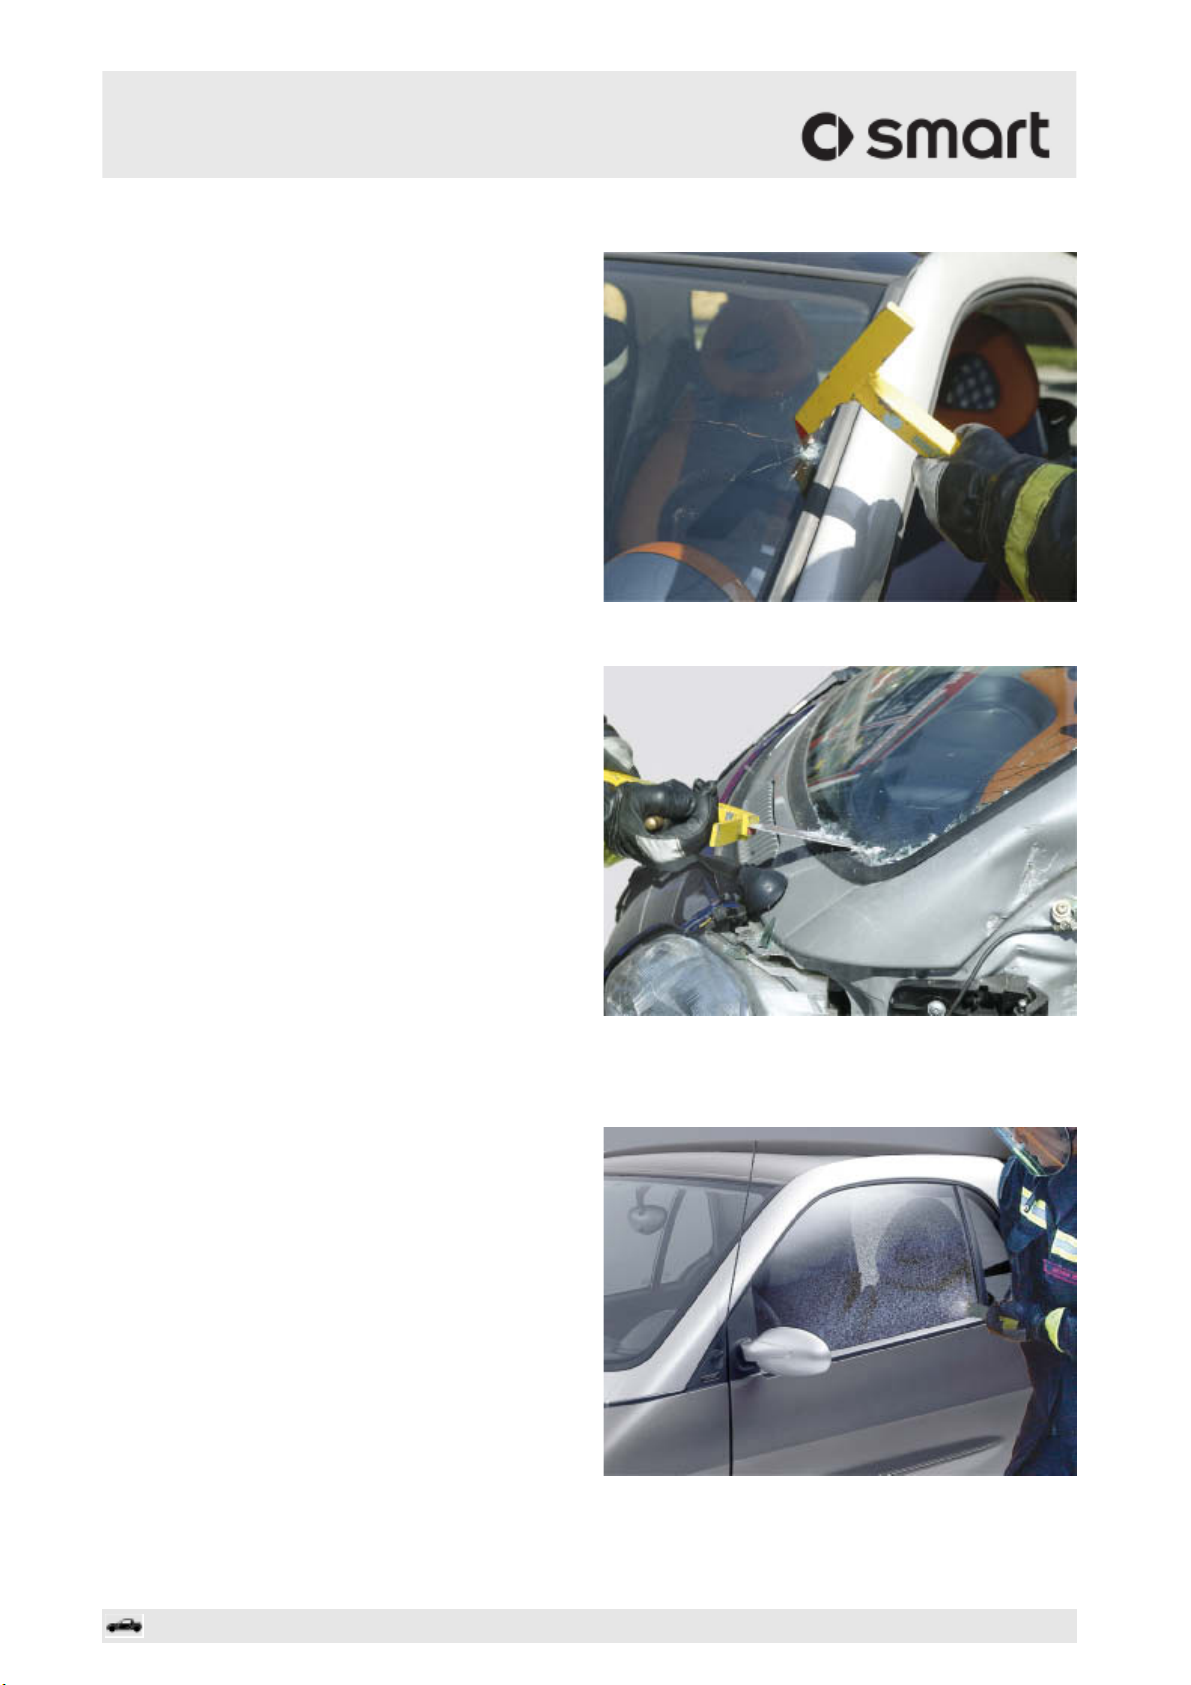
Remove windows using a glass saw:
The glass saw is usually the tool of choice for
cutting out laminated glass windows:
• First knock a hole in the window
• Then remove the window by cutting around the
edges
P67.00203700
With a glass saw, the actual cutting occurs on the
pull stroke and not on the push stroke as with
conventional saws. The advantage of this is that
the casualty inside the vehicle is less exposed to
the glass particles produced.
Removing windows using a spring center punch
The side windows, rear window and glass roof are
made of singlepane safety glass (ESG) and can be
removed using a spring center punch:
• Stick adhesive foil or tape over the window
• Position the spring center punch in one of the
bottom corners
• Punch the window with the spring center punch
• The window shatters into small shards which
stick to the film or adhesive tape.
• Remove the window outwards
• Remove remaining fragments of glass from the
window frame (remove the rubber edge strip)
P67.00203800
P67.00203900
Guidelines for Rescue Services, smart, 2006 Page 11
Page 13
Rescue
Removing the windows
Glass roof on smart forfour (model 454)
• Stick adhesive foil or tape over the window
• Knock a hole in one of the corners of the
glass roof
• Cut out the window along the edge of the
opening in the roof using a glass saw
• Remove the window outwards
Both the glass roof and the plastic roof are
adhesivebonded to the body structure.
The panes of the quarter windows behind the B
pillars on the smart fortwo (model 450) are manu
factured from breakproof plastic (polycarbonate)
and are held in place by clips. They can be pried
out using a suitable tool, such as a crowbar.
Glass roof on smart forfour (model 454)
P65.10321500
P67.00204000
Quarter window on smart fortwo (model 450)
i Before windows are sawn or opened with
special removal tools, the occupants must be
covered, preferably with a transparent sheet, to
prevent any potential risk of injury.
The following applies to the rescue personnel:
Wear protective clothing, safety glasses and a
protective mouth mask in addition to the helmet
visor!
Page 12 Guidelines for Rescue Services, smart, 2006
Page 14
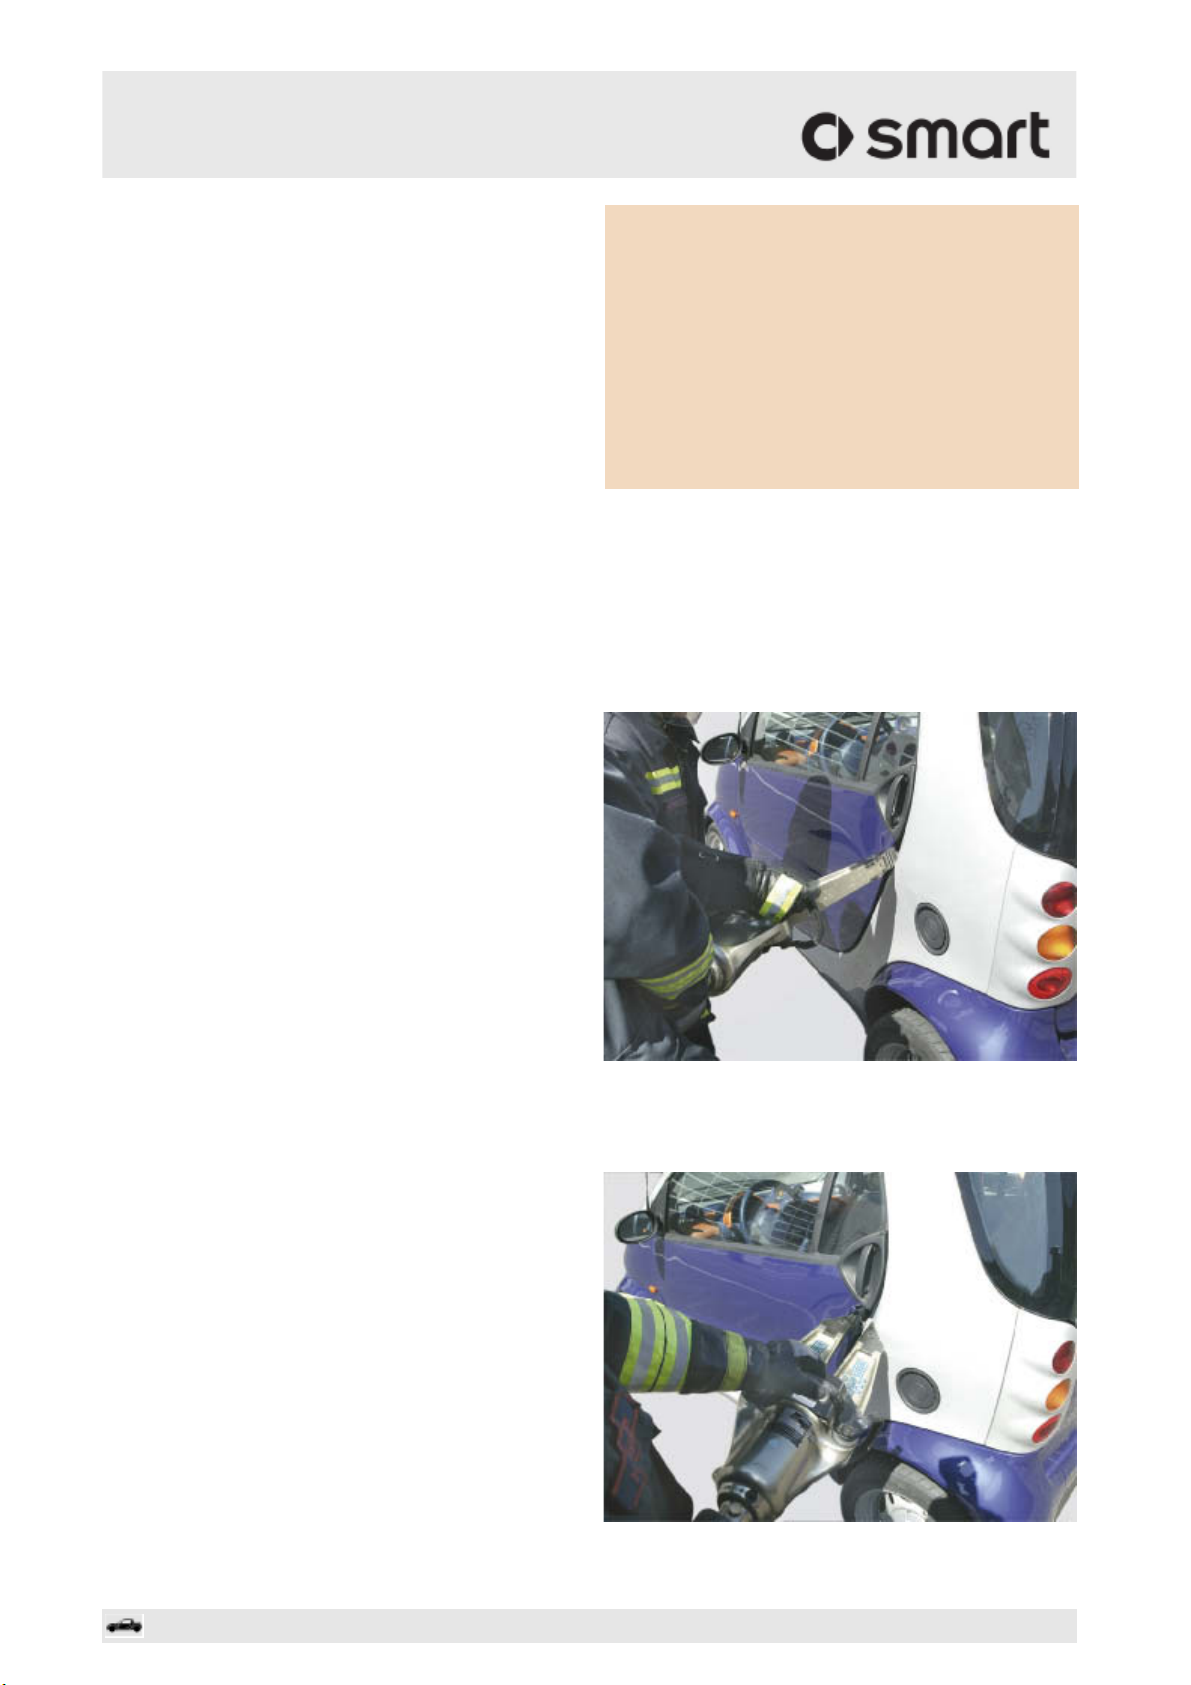
Rescue
Removing the doors
First check whether the door catch can be opened
in spite of the deformed door.
It may be possible to open the door enough to
allow the spreader to be pushed into the resulting
i Do not use excessive force to ram the
spreader into the door gap, in order to avoid any
unintended movement of the car body. Proceed
carefully with the casualty in mind.
gap. If the lock cannot be opened, the following
procedure is recommended:
smart fortwo (model 450) and smart roadster (model 452)
Opening on the lock side
• Position one tip of the spreader in the door
gap near the lock
• Rotate the spreader to the left and right along
its axis to bend the bodywork and obtain an
opening large enough to accommodate both
tips of the spreader
• Press both tips of the spreader into the
opening produced, in order to expand the
opening in a number of small spreading
operations. Keep pushing the tips towards the
door lock until the door springs open.
Guidelines for Rescue Services, smart, 2006 Page 13
P72.00211500
P72.00211400
Page 15

Rescue
Removing the doors
• If the plastic cover panel on the door
obstructs your efforts, you can give it a sharp
tug by hand to remove it.
P72.00211600
Because the hinges are forged steel, and thus
extremely strong, the recommended procedure is
to open the door on the lock side, where the
spreader can act against the more pliant
aluminum of the door structure.
smart forfour (model 454)
Opening on the lock side
The following procedure is recommended to open
the doors on the lock side on the smart forfour:
• Remove door paneling (plastic panel)
• Cut through the door frame (1) above (cut A)
and below (cut B) the door lock using rescue
shears
• Cut through the cross strut (2) beside the door
lock (cut C)
• Open the door and spread the hinges with the
spreader until they break off
• Cut the electrical lines
• Remove the door
Should it be absolutely necessary to open the
door on the hinge side, apply the spreader at the
upper hinge, inserting it from above. Hold the
spreader vertically.
P72.00215400
1 Door frame
2 Cross strut
3Door lock
Page 14 Guidelines for Rescue Services, smart, 2006
Page 16

Rescue
Removing the doors
smart forfour (model 454)
Opening on the hinge side
• Remove door paneling (plastic panel)
• Position the spreader between the hinge and
the Apillar or fender
• Spread the hinge until it breaks off
P72.00215600
The following procedure can also be used:
• Remove door paneling (plastic panel)
• Cut through the door frame (1) above (cuts A)
and below (cuts B) the hinges using rescue
shears
• Cut through the window frame (2)
1 Door frame
P72.00215700
2Window frame
P72.00215800
Guidelines for Rescue Services, smart, 2006 Page 15
Page 17

Rescue
Removing the doors
• Cut through the crossmember (3) (cut C)
• Cut the electrical lines
• Insert the spreader from above and pull the
door outwards
• Cover sharpedged parts
3Crossmember
P72.00215900
P72.00216000
P72.00216100
Page 16 Guidelines for Rescue Services, smart, 2006
Page 18

Rescue
Pushing away the instrument panel
a Risk of injury Action
When vehicle parts are cut open or cut off, sharp
edges are produced, which can cause injury to the
casualties or to the rescue personnel.
Cover the relevant parts with protective covers
or pillar padding.
a Risk of injury Action
The gas generators of windowbags are filled with
compressed gas and they must not be cut!
The gas generator will burst and sharpedged
parts may be ejected at high speeds.
The loud noise may result in casualties suffering
a blast trauma.
Remove the inner paneling in the area of the roof
frame above the Bpillar on the smart forfour
using suitable tools and check whether gas
generators are installed in the area of the
planned cuts. Mark the installation location on
the outside of the vehicle.
smart fortwo coupé (model 450)
The following procedure can be used to push away
the instrument panel:
• Carefully support and stabilize the vehicle
• Cut through the Apillars on the smart fortwo
coupé above the instrument panel
Not cut
i On the smart fortwo cabrio, smart roadster
and roadster coupé, the Apillars are rein
forced on the inside by a highstrength steel
tube that makes them impossible to cut through!
P62.00207900
Guidelines for Rescue Services, smart, 2006 Page 17
Page 19

Rescue
Pushing away the instrument panel
• Crush the rocker panel near the Apillars
using the spreader
• Cut through the rocker panel using rescue
shears
P63.00204900
• Make a depression at the bottom towards the
rear of the rocker panel near the Bpillar and
install the telescopic rescue ram
• Position the other end of the rescue ram on the
Apillar level with the instrument panel. To
prevent the base of the rescue ram from
breaking through, make sure that the
supporting points are strong.
• Extend the rescue ram as far as necessary
• To prevent vehicle parts from springing back,
the rescue ram should be left under pressure
until the casualty or casualties have been
rescued from the vehicle
P63.00205000
P63.00205100
Page 18 Guidelines for Rescue Services, smart, 2006
Page 20

Rescue
Pushing away the instrument panel
As an alternative to placing a rescue ram in the
door opening, a chain can be slung around the
steering column below the steering wheel. A
second chain is then slung around the front axle
from the front. Then use the spreader to pull the
two chains together: This pulls the steering wheel
and steering column forward.
A cable sling can be attached to the brake pedal
to pull the pedal in the desired direction in order
to free a trapped foot, etc.
P62.00208000
smart forfour (model 454)
• Carefully support and stabilize the vehicle
• Cut through the Apillar above the instrument
panel
P62.00208100
P62.00208800
Guidelines for Rescue Services, smart, 2006 Page 19
Page 21

Rescue
Pushing away the instrument panel
• Make a relief cut at the bottom of the Apillar
• Position a rescue ram in the area of the joint
(arrow) between the instrument panel
crossmember and the Apillar.
P62.00208900
i Due to its construction, the Apillar is not
strong enough to allow the use of a rescue ram.
The ram deforms the Apillar and fender without
pushing the instrument panel forward out of
the way.
• Position the rescue ram on the Bpillar. To
prevent the base of the rescue ram from
breaking through, make sure that the
supporting points are strong. The rocker
panel attachments (1) available with the rescue
ram are particularly well suited for stabilizing
purposes.
• Extend the rescue ram as far as necessary
• To prevent vehicle parts from springing back,
the rescue ram should be left under pressure
until the casualty or casualties have been
rescued from the vehicle.
P62.00209000
P62.00209100
Page 20 Guidelines for Rescue Services, smart, 2006
Page 22

Rescue
Removing the roof
a Risk of injury Action
When vehicle parts are cut open or cut off, sharp
edges are produced, which can cause injury to the
casualties or to the rescue personnel.
When the Cpillars are cut, the frameless single
pane safety glass rear window will probably
break.
Cover the relevant parts with protective covers
or pillar padding.
Remove the rear window (see chapter "Removing
the windows", p. 11)
a Risk of injury Action
The gas generators of windowbags are filled with
compressed gas and they must not be cut!
The gas generator will burst and sharpedged
parts may be ejected at high speeds.
The loud noise may result in casualties suffering
a blast trauma.
Remove the inner paneling in the area of the roof
frame above the Bpillar on the smart forfour
using suitable tools and check whether gas
generators are installed in the area of the
planned cuts. Mark the installation location on
the outside of the vehicle.
smart fortwo coupé (model 450)
The roof plays a major role in lending rigidity to
the vehicle. When cutting away the roof, it is
absolutely essential to ensure that the vehicle is
adequately supported so as to prevent the vehicle
from collapsing and causing further injury to the
occupants.
Furthermore, important fixed points on the body
work, which may be necessary later in the rescue,
could be destabilized or destroyed by cutting
away the roof.
Guidelines for Rescue Services, smart, 2006 Page 21
P62.00208200
Page 23

Rescue
Removing the roof
The smart fortwo coupé is fitted with an adhesive
bonded roof in either glass or plastic. Because
the glass roof consists of singlepane safety
glass, the recommended procedure is to cut out
the entire roof structure as described in the
following section. This procedure prevents flying
glass particles from increasing the injury risk.
This procedure should also be employed on the
plastic roof.
When removing the roof entirely:
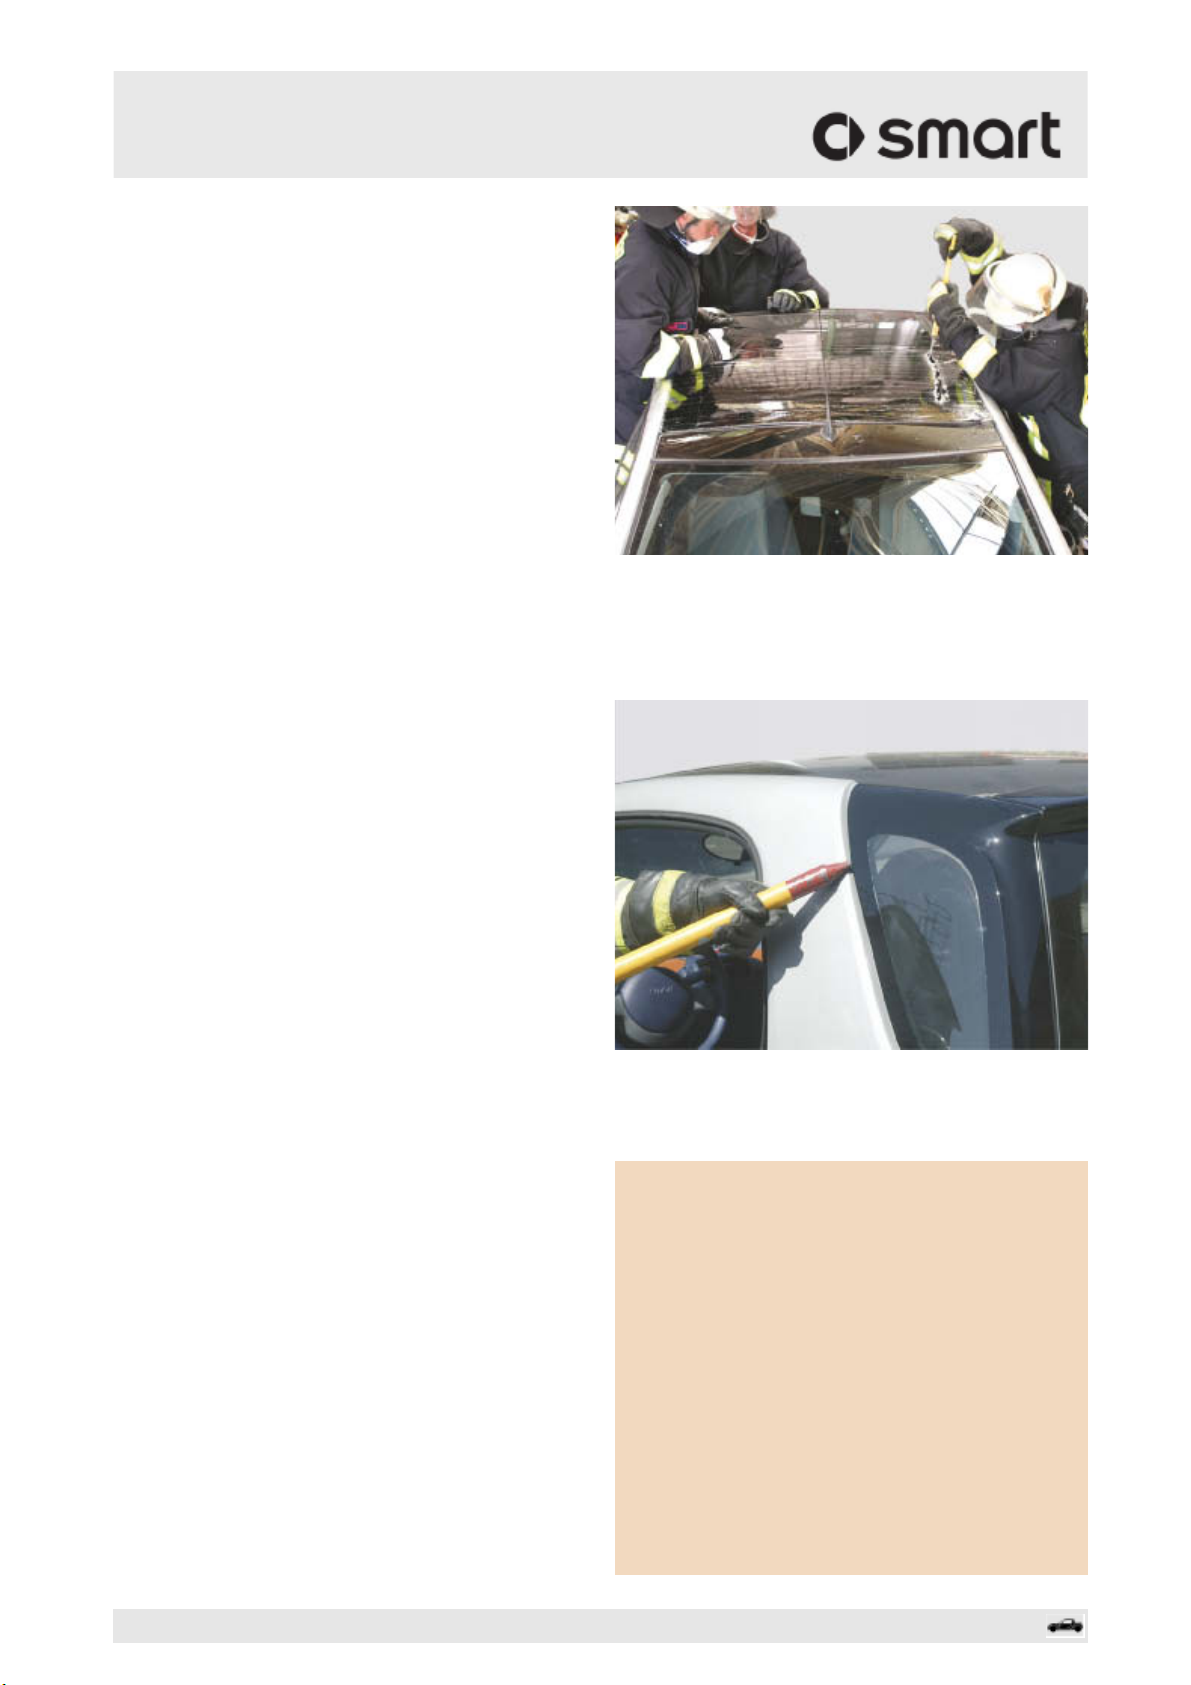
• Cut through the Apillars (about 10 cm below
the roof)
• Saw out the windshield at the Apillars and
above the instrument panel. The upper side
(roof side) of the windshield remains intact. It
remains attached to the weather stripping, and
is removed along with the roof itself once the
A, B and Cpillars have been cut. The roof
should be lifted off in a movement toward the
front or the side.
• Cut through the Bpillars about 10 cm above
the seat belt anchor point
P62.00208300
P63.00205200
Page 22 Guidelines for Rescue Services, smart, 2006
Page 24

Rescue
Removing the roof
• Cut through the Cpillars below the gasfilled
spring struts of the folding rear window.
i When the Cpillars are cut, the frameless
singlepane safety glass rear window will
probably break.
smart forfour (model 454): Folding back the roof
P63.00205300
• Cut through the Apillars
• Saw out the windshield at the Apillars and
above the instrument panel. The upper side
(roof side) of the windshield remains intact. It
remains attached to the weather stripping, and
is removed along with the roof itself once the
A, B and Cpillars have been cut.
• Cut through the Bpillars below the seat belt
height adjustment mechanism
P62.00208800
P65.00210700
Guidelines for Rescue Services, smart, 2006 Page 23
Page 25

Rescue
Removing the roof
• Cut through the Cpillars as far as the roof
frame
P65.00210800
• Cut through the roof frame
• Fold the roof back and secure it to prevent it
from springing back
P65.00210900
P65.00211000
Page 24 Guidelines for Rescue Services, smart, 2006
Page 26

Rescue
Removing the roof
Soft top/coupé roof on smart fortwo cabrio and smart roadster
a Risk of injury Action
When opening the soft top or the coupé roof,
there is a risk of injury due to the moving parts.
Furthermore, the occupants' freedom of move
ment may be restricted.
smart fortwo cabrio (model 450)
The smart cabrio is equipped with a folding
top/rear soft top. It is locked and released auto
matically when the switch is pressed.
The control switch is located on the center
console to the right of the gearshift lever.
Before and while opening the roof, always ensure
that the casualties' freedom of movement is not
restricted and that nobody will be injured by the
moving parts of the soft top.
When the folding top/rear soft top is open, the two
side supports can be removed. The release levers
for the side supports are located at the top of the
Bpillars.
• Press the release button (1): The rear side
supports rise at the rear while still remaining
secured
• Press the release button again
• Extract the side supports (2)
Guidelines for Rescue Services, smart, 2006 Page 25
P77.39207000
P77.33207800
Page 27

Rescue
Removing the roof
smart roadster/roadster coupé (model 452)
The smart roadster and roadster coupé are
equipped with a soft top or a coupé roof as stan
dard equipment.
Soft top:
The locking and release mechanisms for the soft
top are attached to the windshield frame and are
operated automatically when the switch is
pressed.
The control switch is located in the center console
in front of the gearshift lever.
The soft top can only be opened completely if the
voltage supply is present and the ignition is
switched on.
P77.39214600
When the folding top is open, the two side
supports can be removed.
• Press the integrated safety switch (1)
• Fold the release lever (2) down
• Remove the side support
Coupé roof
The coupé roof installed on the smart roadster
and smart roadster coupé consists of two roof
panels with side supports, joined at the center of
the vehicle.
• Press the integrated safety switch (3)
• Fold the release lever (4) down
• Unlock the side supports (see above)
• Pull the two side sections of the roof upward to
remove
P77.33207500
P77.50211900
Page 26 Guidelines for Rescue Services, smart, 2006
Page 28

Rescue
Observing occupant restraint systems
a Risk of injury Action
When disconnecting the batteries or when cutting
electrical lines, the ground lines must always be
disconnected or cut first, otherwise there is a
risk of short circuit.
If this is not possible, insulated tools must be
used to disconnect or cut the cables.
a Risk of injury Action
There is a risk of injury in the deployment area of
undeployed airbags.
If, during rescue work, where the battery has not
been disconnected, parts of the vehicle undergo
significant movement or electrical lines are cut,
then an airbag (front airbag, sidebag or
windowbag) may be deployed. If this happens,
then the airbag as well as loose objects and glass
splinters may be thrown against the casualty or
the rescuers, causing injuries.
Cover the occupants before commencing work,
preferably with a transparent sheet.
Wear protective clothing/safety glasses.
Disconnect all batteries. If this is not possible,
keep well away from undeployed airbags.
Do not perform cutting work near undeployed
airbags.
Avoid heating near undeployed airbags.
Do not place any objects near untriggered
airbags.
i Merely cutting through the steering wheel
rim or the spokes will not usually trigger the
airbag.
Guidelines for Rescue Services, smart, 2006 Page 27
Page 29

Rescue
Observing occupant restraint systems
Occupant restraint system (SRS Supplemental Restraint System):
All smart vehicles are equipped with seat belts
and an additional occupant restraint system (SRS).
The system encompasses:
• Indicator lamp in the instrument cluster
• Emergency tensioning retractors
• Belt force limiters
•Airbags
The driver airbag (1) in the smart model series is
located in the steering wheel housing.
The front passenger airbag (2) in the smart fortwo
coupé and cabrio is located below the instrument
panel.
The front passenger airbag (3) in the smart road
ster, roadster coupé and smart forfour is located
in the instrument panel above the glove box
1 Driver airbag (all model series)
P91.60268100
P91.60273400
2 Front passenger airbag
(smart fortwo)
3 Front passenger airbag
P91.60268200
(smart roadster and smart forfour)
Page 28 Guidelines for Rescue Services, smart, 2006
Page 30

Rescue
Observing occupant restraint systems
The sidebags (4) in all model series are located in
the outsides of the backrests (front seats only in
the smart forfour).
The windowbags (5) in the smart forfour model
series (model 454) are located at the top in the
side of the roof frame.
The gas generators (6) are located in the area of
the rear door behind the Bpillars.
4Sidebags
P91.60268300
P91.60323800
5Windowbag
6 Gas generator
a Risk of injury Action
In contrast to the other airbag units, the gas
generators of the windowbags do not contain solid
fuel, but are filled with highlycompressed gas
and must not be cut!
If a gas generator bursts, and sharpedged parts
may be ejected at high speeds, causing injuries to
the occupants and the rescuers.
The loud noise may result in casualties suffering
a blast trauma.
Guidelines for Rescue Services, smart, 2006 Page 29
For this reason, we urgently recommend
removing the appropriate inner paneling and
checking whether and where gas generators for
windowbags are installed before commencing any
cutting work. Mark the installation location on
the outside of the vehicle.
i Of the current smart model series, only the
smart forfour (model 454) is equipped with
windowbags. The gas generators are located at
the top in the roof frame.
Page 31

Rescue
Observing occupant restraint systems
The illustration at the side shows the driver and
front passenger airbags in their deployed and
fully inflated state in the smart fortwo as an
example.
P91.60268400
i The air sack inflates within a few
milliseconds during the collision. After full
deployment, the air sack of the driverside and
passengerside front airbag immediately
deflate.
i Various safety devices are available on the
market which are intended to protect the
casualties and the rescue teams from airbag
deployments.
The airbag systems in smart vehicles are
designed so that they can no longer be triggered
by the airbag sensor systems after the battery
has been disconnected. Such safety devices are
therefore unnecessary.
Page 30 Guidelines for Rescue Services, smart, 2006
Page 32

Rescue
Observing occupant restraint systems
a Risk of injury Action
If using safety devices intended to protect
against airbag deployments after an accident,
there is a danger that these devices may be cata
pulted by the deploying airbag, presenting an
additional injury hazard for casualties and
rescuers alike.
We advise against the use of "protective devices"
that are intended to prevent a pressure buildup
by piercing holes in the airbag fabric because, if
the airbag is triggered, the hot ignition gases can
escape unhindered and cause burns.
Cover the occupants before commencing work,
preferably with a transparent sheet.
Wear protective clothing/safety glasses.
Disconnect all batteries. If this is not possible,
keep well away from undeployed airbags.
Avoid heating near undeployed airbags.
Do not place any objects near untriggered
airbags.
a Risk of injury Action
From contact with the airbag during deployment,
occupants may suffer slight reddening of the skin
and abrasions, e.g. on the insides of the forearms
or in the face.Slight irritation of the respiratory
passages cannot be ruled out.
i The white, powdery residues left inside the
vehicle after deployment of an airbag are
nontoxic. They consist for the most part of
talcum, which acts as a lubricant for the airbag
fabric.
The condition of the casualties must be assessed
as accurately as possible, and taking these
aspects into account, before deciding on further
suitable precautionary measures.
i The triggering strategies for the supple
mental restraint systems are subject to modifi
cation if necessary, e.g. due to new findings in
accident research.
Guidelines for Rescue Services, smart, 2006 Page 31
Page 33

Rescue
Observing occupant restraint systems
The airbag's air sack inflates within a few milli
seconds during the collision. The air sack reaches
its maximum volume in approximately 45 ms.
Immediately after maximum volume is reached, the
airbag starts to deflate. The gas escapes through
an air hole or through the fabric and the airbag
collapses (exception: windowbags).
Triggered airbags that are hanging down can be
pushed upwards or to the side so as to create the
necessary space for the rescue action. Airbags
do not need to be cut out or covered. A triggered
airbag has no medical risks for the occupants or
the rescue crew.
In cases where the rescue or treatment of casual
ties has to be carried out within the radius of an
untriggered airbag, the following points must be
observed:
• Switch off the ignition
• Disconnect or cut the electrical lines on the
battery (on both batteries in vehicles with two
batteries)
• Do not perform cutting work in the immediate
vicinity of the airbag units concerned
• If there are no occupants on the rear seats,
move the front seats as far to the rear as
possible
Avoid overheating the area around the airbag
unit, such as the steering wheel impact plate, the
instrument panel on the passenger side and the
door linings. If an airbag unit is heated to over
160 °C, it is likely to be triggered.
Page 32 Guidelines for Rescue Services, smart, 2006
Page 34

Rescue
Observing occupant restraint systems
Seat belts
The seat belt buckles can usually be opened
normally after a crash.
However, it is often easier to cut the belts at an
easily accessible point. In this way the rescue
crew do not need to lean over the casualty, which
might cause further discomfort or injury.
Furthermore, leaving the belt buckle fastened
provides the police with evidence that the belt
was being worn.
Emergency tensioning retractors
The emergency tensioning retractors are acti
vated in frontal collisions with a sufficiently high
deceleration acting in the longitudinal direction
or in rearend collisions with a sufficiently high
acceleration acting in the longitudinal direction.
The emergency tensioning retractors are inte
grated into the seat belt inertia reel mechanisms.
Because different activation strategies are used
the retractors may therefore be triggered both
when the belt is being worn and when it is not.
i When the emergency tensioning retractors
are activated, the belt is retracted by max.
150 mm. The retractors cannot be triggered
after the battery has been disconnected.
Guidelines for Rescue Services, smart, 2006 Page 33
Page 35

Rescue
Seat adjustment/head restraints
a Risk of injury Action
When vehicle parts are cut open or cut off, sharp
edges are produced, which can cause injury to the
casualties or to the rescue personnel.
Seat adjustment
Vehicles in the smart model series feature manual
seat adjustment mechanisms as standard equip
ment. The release levers for fore/aft adjustment
(1) are located at the fronts of the seats, with
backrest adjustment (2) for the driver seat only
on the outside of the seat.
Deformation of the seat rails often means that
the seats can no longer be pushed back after an
accident.
In these cases, the instrument panel can be
pushed away from the casualty using a hydraulic
rescue ram. This is described in more detail in the
chapter entitled "Pushing away the instrument
panel" (p. 17).
Cover the relevant parts with protective covers
or pillar padding.
P91.10264600
1 Fore/aft adjustment release
2 Backrest adjustment
Head restraints
On the following smart vehicles the head
restraints are integrated in the backrests:
• smart fortwo coupé and cabrio (model 450)
• smart roadster and roadster coupé
(model 452)
Page 34 Guidelines for Rescue Services, smart, 2006
In the smart forfour (model 454), all the seats
feature manually adjustable head restraints.
To remove, pull the head restraint upwards; it can
then be lifted off.
Page 36

Rescue
Steering wheel adjustment/roll bar
Steering wheel adjustment
The height of the steering wheel can be adjusted
according to requirements.
•Press the lock (1) downwards
• Adjust the steering wheel
• Press the lock (1) upwards
Roll bar
On the smart fortwo cabrio, the smart roadster
and the smart roadster coupé the roll bars are
integrated in the body structure (shown on smart
fortwo cabrio).
P46.15224200
PP91.50205500
Guidelines for Rescue Services, smart, 2006 Page 35
Page 37

Model classes
General
Location of airbags: Location of battery:
The airbags in the smart model series are located:
• In the steering wheel (driver airbag)
• Above or in place of the glove box in the
instrument panel (front passenger airbag)
• In the outsides of the backrests (front
sidebags)
• In the area of the roof pillars and side roof
frames (windowbags: smart forfour only)
The location of each airbag can be identified by
the "SRS AIRBAG" or "AIRBAG" symbol on the
airbag or in immediate vicinity of installation
location.
Location of fuel tank
The fuel tank in the smart model series is located
in the area in front of the rear axle or under the
load compartment floor.
The fuel lines run in protected areas and are
made of plastic. In the engine compartment they
are routed so that the deformation caused by a
collision will not usually break the fuel lines. The
fuel pump is shut down automatically when one of
the airbags is triggered.
smart fortwo coupé and cabrio:
In the front passenger footwell
smart roadster and roadster coupé:
In the front trunk under the luggage well
smart forfour:
On the left in the engine compartment
Page 36 Guidelines for Rescue Services, smart, 2006
Page 38

Model classes
General
Location of structural reinforcements
The structural reinforcements of relevance to
rescue operations are all located in the region of
the passenger cell.
The illustration shows the design of the TRIDION
cells with structural reinforcements (red) as
found on the smart cabrio (upper illustration) and
smart roadster (lower illustration).
P00.00352500
The actual layout of the structural reinforcement
elements varies according to the individual model
series.
i The doors on smart vehicles consist of
aluminum structures with plastic paneling on
the outside and conventional trim panels on the
inside.
P00.00354200
The illustrations on the following pages show the
possible locations of airbags, batteries, struc
tural reinforcements and fuel tanks.
Some of the airbags are only available as special
equipment. In other words, not all the airbags
listed are necessarily present in each vehicle
model.
Guidelines for Rescue Services, smart, 2006 Page 37
Page 39

Model classes
smart fortwo
smart fortwo coupé (model 450.3)
P00.00352600
Location:
Airbag
1 Driver airbag
2 Front passenger airbag
3 Sidebags (in the backrests)
4Fuel tank
5 Battery (in front passenger footwell)
Battery
Tank
Page 38 Guidelines for Rescue Services, smart, 2006
P00.00352700
Page 40

Model classes
smart fortwo
smart fortwo cabrio (model 450.4)
P00.00325800
Location:
Airbag
Battery
Tank
1 Driver airbag
2 Front passenger airbag
3 Front sidebags (in the backrests)
4 Fuel tank
5 Battery (in front passenger footwell)
6 Structural reinforcement of Apillars/
windshield frame
7 Structural reinforcement of Cpillars
8 Structural reinforcement of roll bar
Structural reinforcements
Guidelines for Rescue Services, smart, 2006 Page 39
P00.00352900
Page 41

Model classes
smart roadster
smart roadster/roadster coupé (model 452)
P00.00353000
Location:
Airbag
Battery
1 Driver airbag
2 Front passenger airbag
3 Sidebags (in the backrests)
4Fuel tank
5 Battery (front luggage well)
6 Structural reinforcement of Apillars/
windshield frame
Tank
Structural reinforcements
Page 40 Guidelines for Rescue Services, smart, 2006
P00.00353100
Page 42

Model classes
smart forfour
smart forfour (model 454)
P00.10390800
Location:
Airbag
Gas generators
1 Driver airbag
2 Front passenger airbag
3 Front sidebags (in the backrests)
4 Windowbags
5 Fuel tank
6 Battery (left side of engine compartment)
Battery
Tank
Guidelines for Rescue Services, smart, 2006 Page 41
P00.10390900
Page 43

Annex
List of abbreviations
ESG
Singlepane safety glass
ESP
Electronic Stability Program
LED
Light emitting diode
SRS
Supplemental restraint system
VSG
Laminated safety glass
Page 42 Guidelines for Rescue Services, smart, 2006
Page 44

Annex
Index
A
Airbags
Driver airbag . . . . . . . . . . . . . . . . . . . 28
Front passenger airbag
Gas generators
Location
Sidebag
Windowbag
. . . . . . . . . . . . . . . . . . . . . . 29
. . . . . . . . . . . . . . . . . . 29
. . . . . . . . . . . . . . . . . . . . . . 36
. . . . . . . . . . . . . . . . . . . . . 29
. . . . . . . . . . . . . 28
B
Battery . . . . . . . . . . . . . . . . . . . . . . . . 36
C
Cervical collar . . . . . . . . . . . . . . . . . . . . 6
Chain . . . . . . . . . . . . . . . . . . . . . . . . . 19
Coupé roof . . . . . . . . . . . . . . . . . . . . 25, 26
E
Emergency tensioning retractors . . . . . . . . 33
Endless sling . . . . . . . . . . . . . . . . . . . . . 9
F
Fire classes . . . . . . . . . . . . . . . . . . . . . . 7
Folding top . . . . . . . . . . . . . . . . . . . . 25, 26
Fuel tank . . . . . . . . . . . . . . . . . . . . . . . 36
G
Gas generator . . . . . . . . . . . . . . . . . . . . . 7
Glass roof . . . . . . . . . . . . . . . . . . . . . . 12
Glass saw . . . . . . . . . . . . . . . . . . . . . . . 11
H
Head restraints . . . . . . . . . . . . . . . . . . . 34
Removal
. . . . . . . . . . . . . . . . . . . . . . . 6
I
Immediate measures at scene of accident . . . . 6
L
Laminated safety glass . . . . . . . . . . . . 10, 11
M
Magnesium . . . . . . . . . . . . . . . . . . . . . . 7
P
Plastic roof . . . . . . . . . . . . . . . . . . . . . . 22
R
Restraint systems . . . . . . . . . . . . . . . . . . 7
Rocker panel attachment . . . . . . . . . . . . . . 20
Roll bar
Integrated roll bar . . . . . . . . . . . . . . . . . 35
S
Seat adjustment . . . . . . . . . . . . . . . . . . . 34
Seat belts . . . . . . . . . . . . . . . . . . . . . . . 33
Singlepane safety glass . . . . . . . . . . . 10, 11
Sliding support blocks . . . . . . . . . . . . . . . . 8
Soft top
See folding top . . . . . . . . . . . . . . . . . . . 25
STAB FAST . . . . . . . . . . . . . . . . . . . . . . . 9
Steering wheel adjustment
Lock . . . . . . . . . . . . . . . . . . . . . . . . . 35
Stepped wedge
See sliding support block . . . . . . . . . . . . . 8
Structural reinforcements . . . . . . . . . . . . . 37
W
Windowbag . . . . . . . . . . . . . . . . . . . . . . . 7
Guidelines for Rescue Services, smart, 2006 Page 43
 Loading...