

Page 1
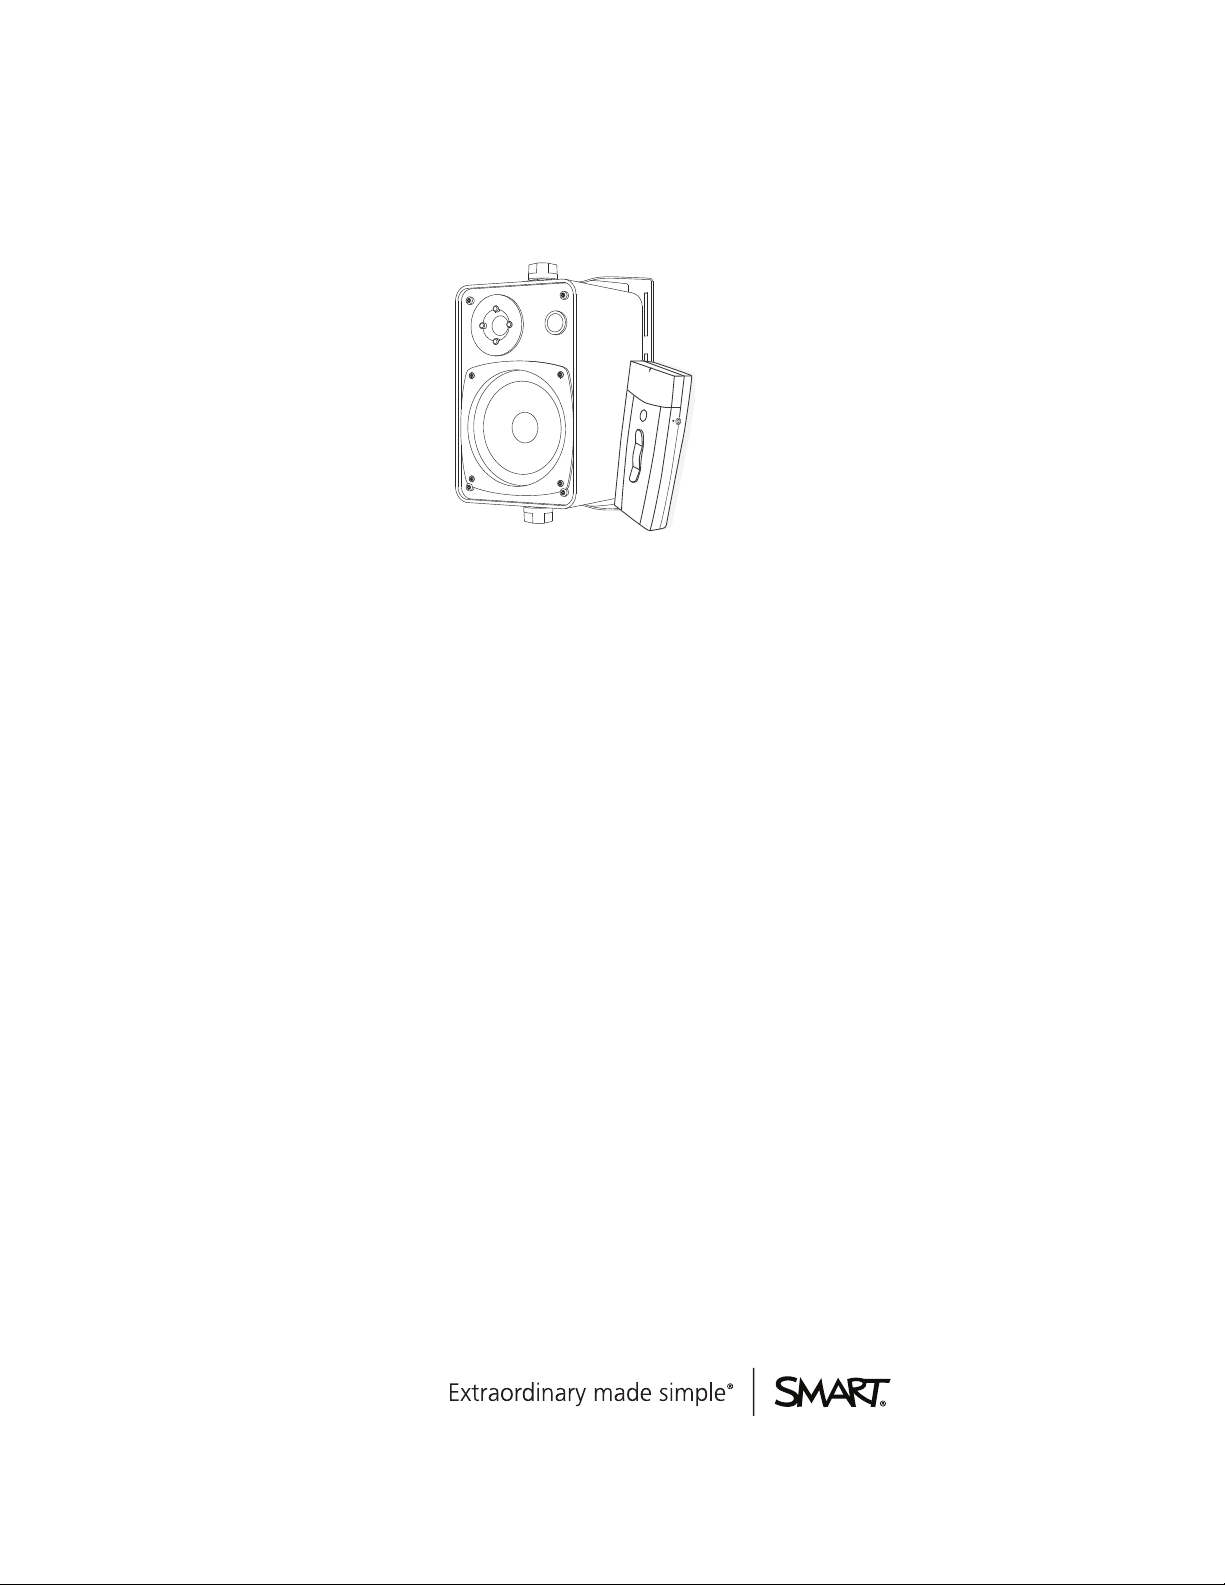
SMART Audio™ 340
Classroom amplification system
System administrator’s and user’s guide
Page 2

Product registration
If you register your SMART product, we’ll notify you of new features and software upgrades.
Register online at smarttech.com/registration.
Keep the following information available in case you need to contact SMARTSupport.
Serial number:
Date of purchase:
FCC warning
This equipment has beentested andfoundto comply w ith the li mits for a Cl ass A digital device, pursuantto Part 15 of the FCC Rules. T heselimits are designed to provide
reasonable protection against harmful interferencewhen the equipment is operatedi n a commercial environment. This equipment generates, uses and can r adiate radio
frequency energy and, if not i nstalled and usedi n accordance with the manufacturer’s instructions, may cause harmful interference to radio communications. Operation of
this equipment in a residential area is likely to cause harmful interferencein which case the user wi ll be required to correct the interferenceat his own expense.
Trademark notice
SMARTAudio, SMARTBoard, SMARTNotebook, SMARTM eetingPro, smarttech, theSMART logoand all SMART taglines are trademarks or registeredtrademarks of
SMARTTechnologiesULC in the U .S. and/or other countries. W indows andMicrosoft are either a registered trademark or a trademark of M icrosoft Corporation in the U.S.
and/or other countries. Mac and Macintosh are trademarks of AppleInc., r egistered in the U.S. and other countries. Blu-ray is a trademark of the Blu-ray Di sc Association.
All other third-party product andcompany names may be trademarks of their respective owners.
Copyright notice
© 2012 SMARTTechnologiesULC. All rights reserved. N o part of this publication may be reproduced, tr ansmitted, transcribed, stored in a retrieval system or translated
into any language in any form by any means without the prior wr itten consent of SMARTTechnologiesULC. Information in this manual is subject to change without notice
and does not represent a commitment on the part of SMART.
Patents pending.
07/2012
Page 3

Important information
W A R N I N G
l Failure to follow the installation instructions shipped with your SMART product could result in
personal injury and damage to the product which may not be covered by your warranty.
l To reduce the risk of fire or electric shock, do not expose the SMART product to rain or
moisture.
l Ensure that any cables extending across the floor to your SMART product are properly
bundled and marked to avoid a trip hazard.
l Do not open or disassemble the SMART product. You risk electrical shock from the high
voltage inside the casing. Opening the casing also voids your warranty.
l To reduce the risk associated with leaking batteries:
o
do not leave the battery in the product for an extended period
o
do not heat, disassemble, or short the battery, or expose it to fire or high temperature
o
avoid eye and skin contact if batteries have leaked
o
dispose of exhausted batteries and product components in accordance with applicable
regulations
l Do not charge the battery with any power adapter other than the one supplied. Do not charge
other battery types in your SMART product with the supplied power adapter. Both of these
actions can cause damage to the product and can cause a fire or personal injury.
l If the SMART product becomes excessively warm or emits an unusual smell while the
battery is recharging, immediately disconnect the power adapter from the power outlet and
turn the product off.
l Do not place items other than your microphone in your microphone charging cradle. Items
can create an electrical short leading to product damage, fire or personal injury.
l Ensure your ceiling or ceiling tiles are strong enough to support the ceiling-mounted product
components and use tethers if provided or required. Failure to securely install components
might lead to components falling which can cause personal injury and product damage that
may not be covered by your warranty. Refer to product documentation to find component
weights.
l Ensure the installation of your SMART product meets local building codes and regulations.
iii
Page 4

I M P O R T A N T I N F O R M A T I O N
C A U T I ON
l Avoid setting up and using the SMART product in an area with excessive levels of dust,
humidity and smoke.
l If your SMART product requires replacement parts, use replacement parts specified by
SMARTTechnologies or parts with the same characteristics as the original.
l Make sure the electrical socket your SMART product is plugged in to remains easily
accessible during use.
l Do not drop the portable components of your SMART product. Dropping your microphone
can damage it and void the warranty for that item.
l When connecting product components, ensure cables are connected to correct locations.
Incorrectly connected components can result in product damage.
l Do not use your SMARTAudio™ classroom amplification system in a facility control system
or any other environment that requires extremely high reliability, or where the use of a
wireless device can cause interference. The product can interfere with other electronic
devices or cause them to malfunction, or other wireless devices may interfere with the
product or cause it to malfunction. Where use is prohibited, turn off the product. SMART
Technologies does not accept any liability for damages.
iv
Page 5

Contents
Important information iii
Chapter 1: Getting started 1
About your SMARTAudio classroom amplification system 2
Overview of the SMARTAudio system 3
Physical components 4
Using SMART software 6
Choosing audio inputs 6
Controlling audio inputs 7
Chapter 2: Using the control unit 9
Turning on or turning off your SMARTAudio system 9
Connecting auxiliary audio input devices 10
Chapter 3: Using the microphone 11
Introduction 12
Assembling the microphone 12
Charging the microphone 14
Turning on and turning off the microphone 15
Connecting the microphone to the room module 15
Speaking into the microphone 16
Connecting an auxiliary microphone 16
Connecting an auxiliary audio input device 16
Controlling an auxiliary audio input device from your microphone 17
Using a second microphone 18
Customizing your microphone 19
Chapter 4: Using SMARTNotebook software to change your settings 23
About using SMARTsoftware 23
Installing SMARTAudio software 24
Integrating SMARTAudio software with SMARTNotebook software 24
Starting SMARTAudio software 25
Changing your SMARTAudio system settings 25
Chapter 5: Customizing your settings 29
Installing SMARTAudio configuration software 30
Using SMARTAudio configuration files 31
Setting the volume 33
Speaker control settings 34
v
Page 6

C O N T E N T S
Setting the response to a page 37
Setting microphone features 39
Changing the audio input names and trims 42
Other system settings 42
Chapter 6: Troubleshooting your SMARTAudio system 45
Resetting your system 45
Updating the control unit firmware 46
Troubleshooting using the microphone status light 47
Troubleshooting why your voice doesn’t come through the speakers 48
Troubleshooting issues with an auxiliary audio input device 48
Appendix A: Hardware environmental compliance 49
Waste Electrical and Electronic Equipment regulations (WEEE directive) 49
Restriction of Certain Hazardous Substances (RoHS directive) 49
Batteries 49
Packaging 50
Covered electronic devices 50
China’s Electronic Information Products regulations 50
vi
Page 7

Chapter 1
About your SMARTAudio classroom amplification system 2
Overview of the SMARTAudio system 3
Physical components 4
Control unit 4
The SMARTAudio 340 system top view 4
SMARTAudio system bottom view 4
Room module 4
Wall-mounted speakers 4
Ceiling-mounted speakers 5
Microphone 5
Microphone charging cradle 5
Optional accessories 5
Using SMART software 6
Choosing audio inputs 6
Speaking into your microphone 6
Playing audio files from your computer 6
Connecting an audio input device to your microphone 6
Connecting an audio input device to the control unit 6
Connecting an audio input device to your interactive whiteboard 7
Connecting your paging system to the room module 7
Controlling audio inputs 7
1
Page 8

C H A P T E R 1
Getting started
About your SMARTAudio classroom
amplification system
The SMARTAudio system amplifies teacher and student voices, reducing teacher vocal strain and
ensuring that everyone can clearly hear what is being said from anywhere in the room. The systems
include a wireless microphone that either the teacher or students can use, a control unit that provides
a USB interface to the computer and a room module that combines an amplifier and an infrared
sensor.
Your SMARTAudio system features seamless integration with SMARTNotebook™ collaborative
learning software. Pressing the SMARTAudio icon in SMARTNotebook software brings up an
intuitive user interface that enables educators to control up to five audio inputs with the touch of a
finger. Adjusting the volume is quick and simple, saving valuable class time while maintaining lesson
flow.
You can order the system with ceiling-mounted or wall-mounted speakers.
2
Page 9

C H A P T E R 1
Getting started
Overview of the SMARTAudio system
This cabling diagram shows the relationship between all of the components in the SMARTAudio
system. For more information on installing and cabling your SMARTAudio system, see the
SMARTAudio 340 Classroom amplification system Installation guide (smarttech.com/kb/155320).
3
Page 10
Aux In
Out
To R M
19 VD C
RESET
PAGIN G
INPUT
6-12VDC
INPUT
NINI
TO CU
RELAY
OUTPU T
N.C. N.O.COM
SMART Bus
Expansion
Sensors
C H A P T E R 1
Getting started
Physical components
Your SMARTAudio system includes the following:
l Control unit and its power supply
l Microphone, sleeve and lanyard
l Microphone charging cradle and its power supply
l Ceiling-mounted room module, infrared sensor and amplifier
l Either four ceiling-mounted speakers or four wall-mounted speakers
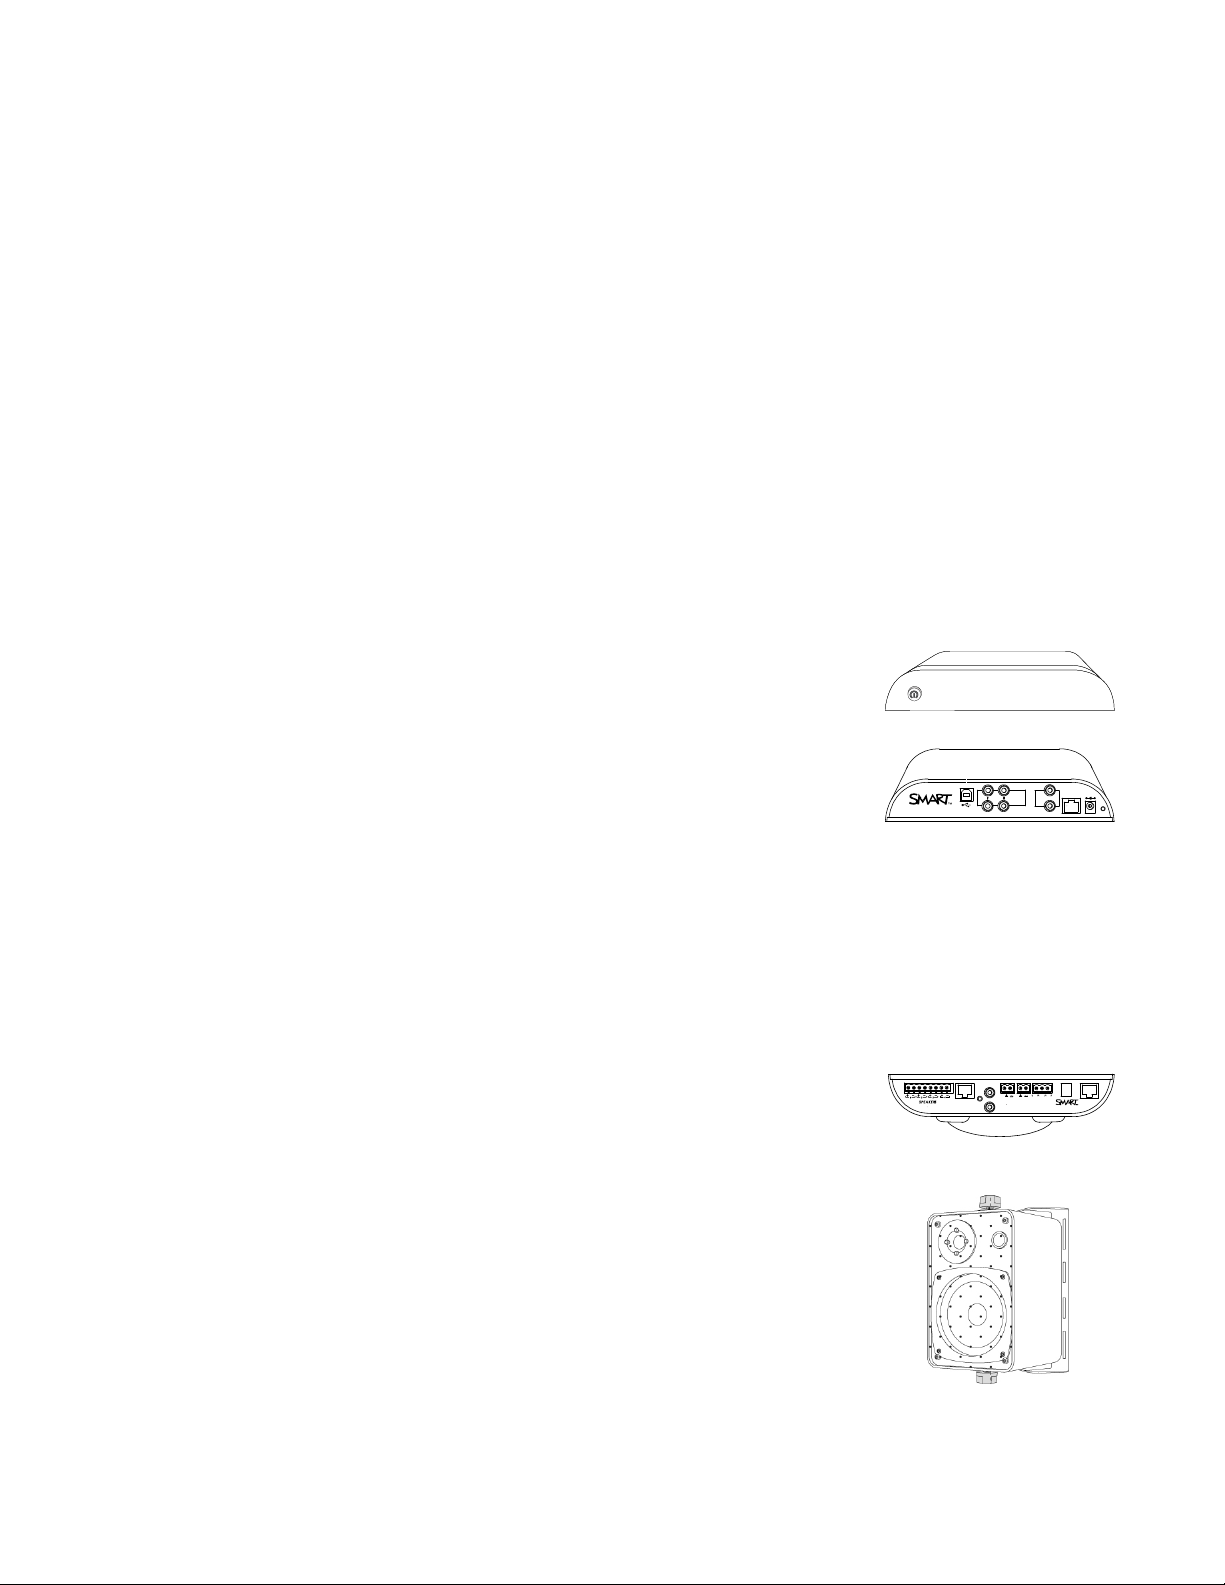
Control unit
The control unit is a wall-mounted panel that connects the
SMARTAudio system to your computer. For more information on using
the control unit, see Using the control unit on page 9.
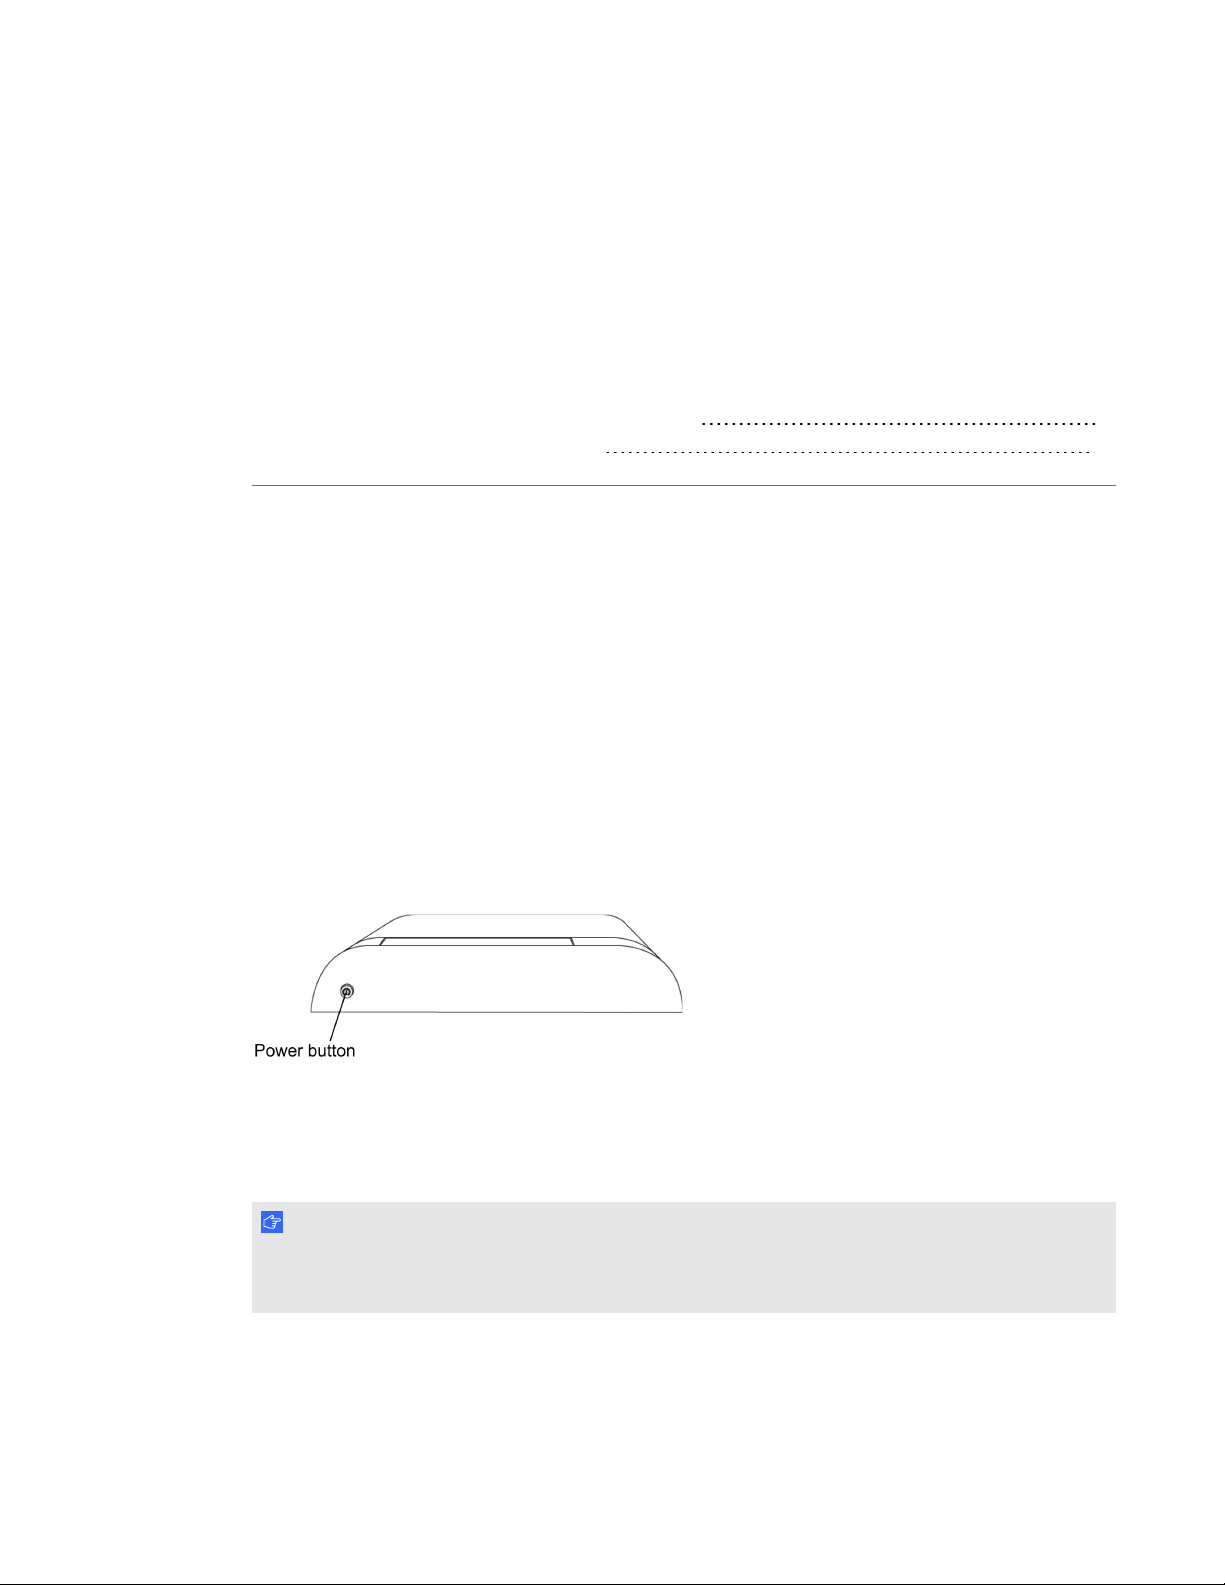
The SMARTAudio 340 system top view
The top of the SMARTAudio 340 system includes a Power button.
SMARTAudio system bottom view
The underside of the control unit has a removable panel. Under the
panel are the following:
USB connection to the computer
l
RCA connections for auxiliary input devices such asDVD/Blu-
l
rayplayers and VCRs
Connectors for assistive listening devices
l
RJ45 connection for the Cat 5e cable to the room module
l
System power input
l
System Reset button
l
Room module
The ceiling-mounted room module contains the infrared sensor and the
speaker amplifiers. It is connected to all of the speakers and to the
control unit.
Wall-mounted speakers
The four 30 W wall-mounted speakers receive both power and audio
input through speaker wire from the room module.
4
Page 11

C H A P T E R 1
Getting started
Ceiling-mounted speakers
The four 30 W ceiling-mounted speakers receive both power and audio
input through speaker wire from the room module.
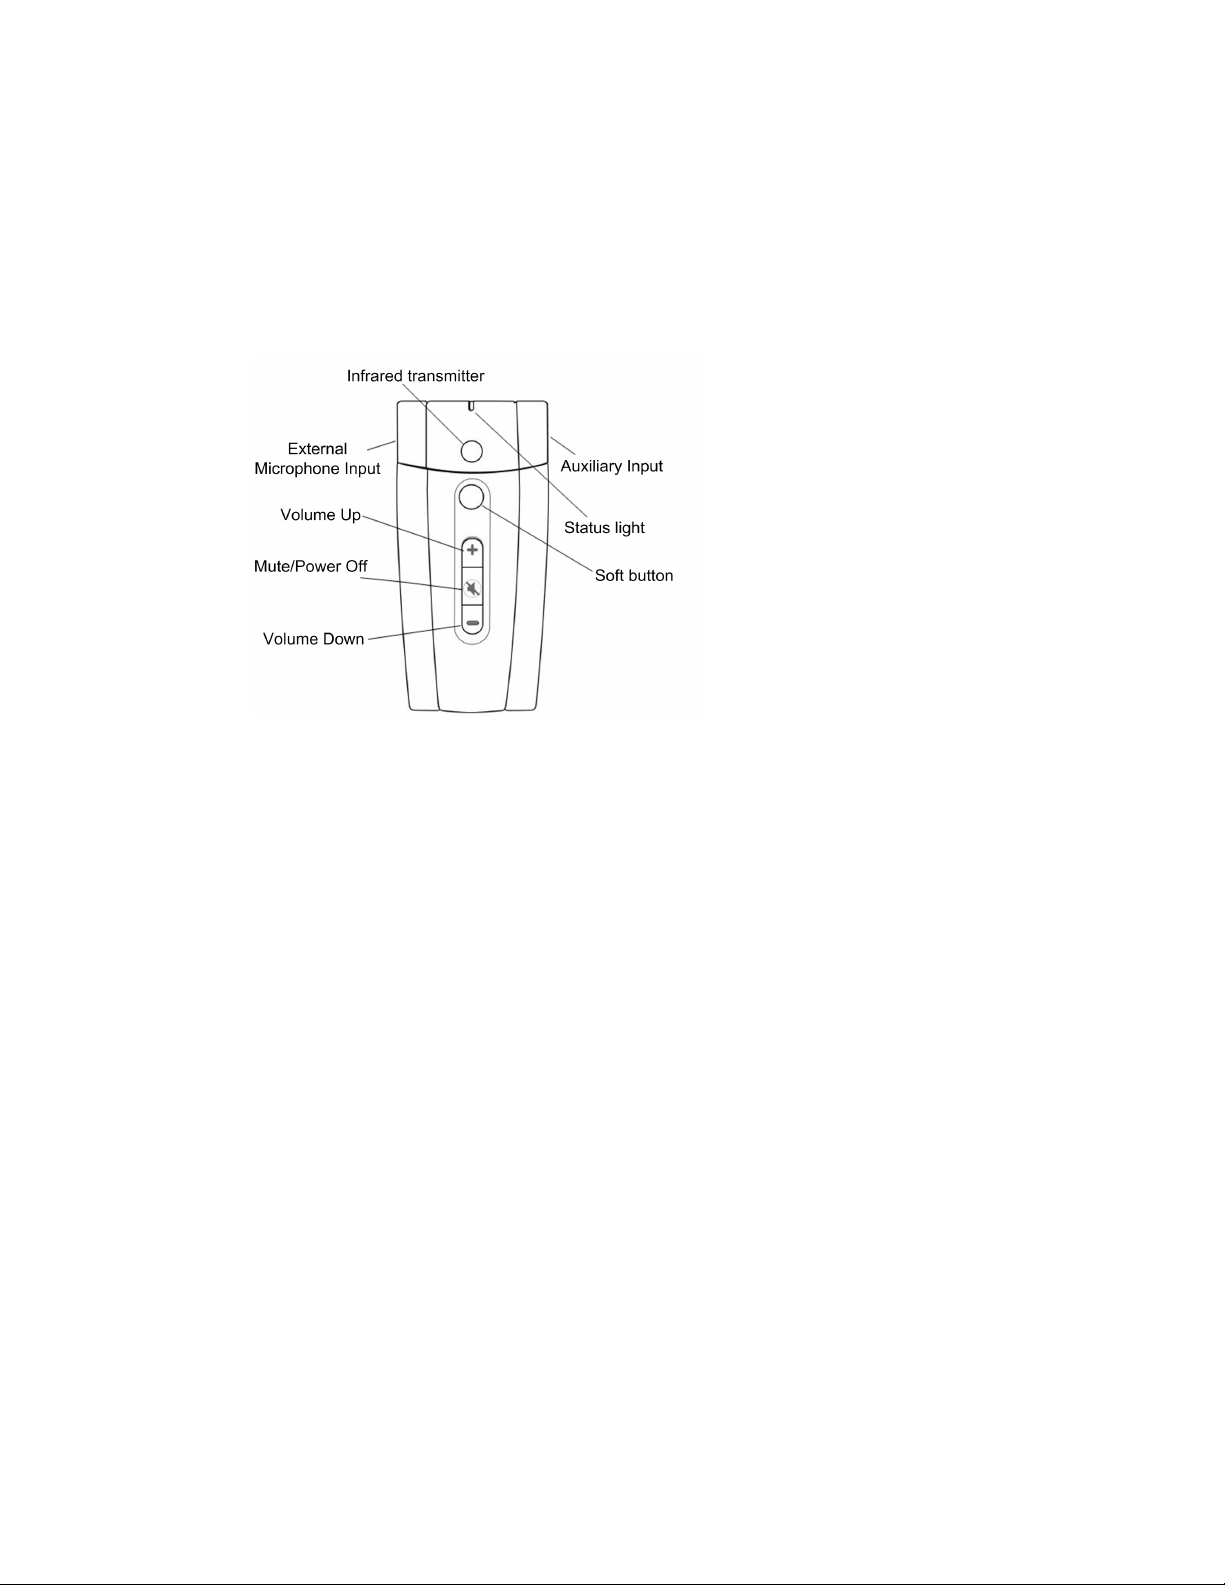
Microphone
Your SMARTAudio system transmits an infrared signal by line of sight
up to 15' (4.6 m) to a receiver in the room module or an expansion
sensor. The microphone has power, volume and mute buttons.
You can connect external wired microphones to the 3.5 mm jack on the
side of the microphone.
You can wear it on your belt, hold it in your hands or attach the included
lanyard to the microphone and then wear it around your neck. You can
also add an auxiliary microphone such as a headset.
Microphone charging cradle
You can charge the microphone in the wall-mounted microphone
charging cradle provided with your SMARTAudio system
Optional accessories
Part no. Name Description
CAS-HSMIC SMARTAudio system wired
headset microphone
CAS-LVMIC SMARTAudio system wired
lavaliere microphone
CAS-300-IRMIC SMARTAudio system wireless
infrared transmitter microphone
CAS-300-IRSENS SMARTAudio system expansion
infrared sensors
For hands-free operation, you can use an
auxiliary headset microphone or a
lavaliere microphone that you attach to
your collar, tie or other clothing.
You can use a second microphone as a
backup or as a student microphone.
You can connect one or two expansion
sensors to the room module to increase
audio coverage in a large room, or to fill in
the blind spots. An expansion sensor
includes a 15' (4.5 m) cable.
5
Page 12

C H A P T E R 1
Getting started
Using SMART software
Your SMARTAudio system operates without additional software. However, the following software
could extend your usage of the SMARTAudio system.
l SMARTAudio software enables you to control your SMARTAudio system. You can use it
alone or integrated with SMARTNotebook software.
l SMARTAudio configuration software enables a system administrator to customize the
SMARTAudio system settings.
l SMARTNotebook software enables you to access commonly used audio settings, such as
volume control, while teaching at your interactive whiteboard.
You can install SMART software from the included CD, or from the software download page
(smarttech.com/downloads).
Choosing audio inputs
You can connect audio inputs from a variety of sources to your SMARTAudio system.
Speaking into your microphone
When you speak into your microphone, your voice transmits by infrared signal to the room module or
expansion sensors and is broadcast from the speakers. For more information on speaking into the
microphone, see Speaking into the microphone on page 16.
Playing audio files from your computer
You can play audio or video files on your connected computer, and the audio broadcasts from the
speakers.
Connecting an audio input device to your microphone
You can connect an audio input device, such as an auxiliary microphone or portable audio player,
directly to the 3.5 mm jack on your microphone. The audio input transmits by infrared signal to the
room module or expansion sensors and is broadcast from the speakers. For more information on
connecting an audio input device to your microphone, see Connecting an auxiliary audio input device
on page 16.
Connecting an audio input device to the control unit
You can connect an audio input device, such as a CD player, DVD/Blu-ray™ player or VCR, to the
control unit. The audio then broadcasts from the speakers.
6
Page 13

C H A P T E R 1
Getting started
Connecting an audio input device to your interactive whiteboard
You can connect an audio input device, such as a CD player, DVD/Blu-ray player or VCR, to your
interactive whiteboard’s External Control Panel (ECP) or Appliance Control Panel (ACP). The audio
then broadcasts from the speakers.
Connecting your paging system to the room module
You can connect your existing paging system to the room module. A page then broadcasts from the
speakers. You can configure the system to reduce the volume of all other audio input devices when a
page is broadcast.
Controlling audio inputs
You can use your microphone to mute or adjust volume of your voice, an auxiliary audio input device
or devices connected to the control unit or your interactive whiteboard.
Alternatively, you can use SMARTAudio software installed on your computer to control volume.
7
Page 14

Page 15
Chapter 2
Turning on or turning off your SMARTAudio system 9
Connecting auxiliary audio input devices 10
The control unit has the following roles in your SMARTAudio system:
l Provides power to the room module and the speakers through the Cat 5e cable to the room
module
l Connects to your computer for audio adjustments using the SMARTAudio software
Turning on or turning off your SMARTAudio
system
Your control unit features a Power button that you can use to turn on and turn off your SMARTAudio
system, including your room module and speakers.
g To turn on or turn off your SMARTAudio system
Press the Power button on the control unit.
I M P O R T A N T
The microphone has its own Power button. For more information, see Turning on and turning off the
microphone on page 15.
9
Page 16

C H A P T E R 2
Using the control unit
Connecting auxiliary audio input devices
You can connect auxiliary audio input devices to the control unit, such as a CD player, DVD/Blu-ray
player, VCR or other media device, and then transmit audio from these devices as an alternative to
speaking into your microphone.
When your SMARTAudio system is turned on, you can control the volume and mute features using
the auxiliary input controls, as well as using SMARTAudio software, or the microphone.
g To connect an auxiliary audio input device
1. Ensure that the audio input device is turned off.
2. Remove the bottom cover from the control unit.
3. Connect two RCA input cables from your audio input device to the Aux 2 inputs.
4. Replace the cover on the control unit.
10
Page 17

Chapter 3
Introduction 12
Assembling the microphone 12
Installing or replacing the microphone battery 13
Using the microphone’s protective sleeve 13
Connecting the lanyard to the microphone 13
Charging the microphone 14
Turning on and turning off the microphone 15
Connecting the microphone to the room module 15
Speaking into the microphone 16
Adjusting microphone volume 16
Connecting an auxiliary microphone 16
Connecting an auxiliary audio input device 16
Controlling an auxiliary audio input device from your microphone 17
Using a second microphone 18
Setting up a second microphone 18
Customizing your microphone 19
Setting your microphone to disable volume buttons 20
Enabling automatic shut off when charging 21
11
Page 18
C H A P T E R 3
Using the microphone
Introduction
Your microphone uses a line of sight infrared signal to transmit your voice to the room module or an
expansion sensor. The maximum distance for this is 15' (4.6 m).
You can recharge the microphone’s batteries using the included charging cradle.
Assembling the microphone
Your microphone has a battery, a protective sleeve and a lanyard.
g To start using your microphone:
1. Install the battery in the microphone (see Installing or replacing the microphone battery on the
next page).
2. Slide the microphone into the protective sleeve.
3. Connect the lanyard to the microphone, if desired (see Connecting the lanyard to the
microphone on the next page).
4. Charge the microphone by placing the microphone in the charging cradle (see Charging the
microphone on page 14).
5. Turn on the microphone (see Turning on and turning off the microphone on page 15).
6. Connect the microphone to the room module (see Connecting the microphone to the room
module on page 15).
7. Adjust the volume (see Speaking into the microphone on page 16).
12
Page 19

C H A P T E R 3
Using the microphone
You can add an auxiliary microphone such as a headset, and you can connect an external audio
source, such as a handheld audio player, to your microphone. You can also use a second microphone
to pass around the class.
Installing or replacing the microphone battery
The microphone uses a replaceable, rechargeable 3.7V lithium ion battery.
g To place or replace a battery in the microphone
1. Remove the back panel of the microphone.
2. Remove the old battery, if required.
3. Remove the plastic film from the replacement battery.
4. Insert the replacement battery into the microphone with the label facing out and down.
5. Replace the back panel.
Using the microphone’s protective sleeve
The microphone has a protective sleeve. Slide the microphone into the sleeve to reduce audio
transfer from tapping the microphone and to protect the microphone from damage.
N O T E
The microphone is more stable if it is charged in its protective sleeve.
Connecting the lanyard to the microphone
The microphone has a lanyard for hands-free use.
g To connect the lanyard to the microphone
Slide the lanyard mounting plate into the back of the microphone.
13
Page 20

C H A P T E R 3
Using the microphone
Charging the microphone
You can charge the microphone in the microphone charging cradle or by connecting the included
ACpower adapter's plug directly to the bottom of the microphone. It takes approximately one hour to
charge the microphone.
A full charge provides approximately seven hours of use depending on how frequently you use the
microphone, the battery's age and the room temperature.
W A R N I N G
l Do not charge the battery with any power adapter other than the one supplied. Do not charge
other battery types in your SMART product with the supplied power adapter. These actions
can cause damage to the product and can cause a fire or personal injury.
l If the SMART product becomes excessively warm or emits an unusual smell while the
battery is charging, immediately disconnect the power adapter from the power outlet and turn
off the product.
N O T E
The microphone is more stable if it is charged in its protective sleeve. For more information, see
Using the microphone’s protective sleeve on the previous page.
g To charge the microphone in the microphone charging cradle
1. Connect the AC power adapter to the microphone charging
cradle.
2. Place the microphone in the charger facing out.
The red light flashes when the microphone is charging, and
turns solid red when the microphone is fully charged.
14
Page 21

C H A P T E R 3
Using the microphone
Turning on and turning off the microphone
g To turn on the microphone
Press any button on the microphone.
The microphone status light flashes red, and then turns solid green.
I M P O R T A N T
If you do not see a light or you see an amber light, see Troubleshooting using the microphone status
light on page 47.
g To turn off the microphone
Press the Mute/Power Off button for four seconds.
The microphone status light turns off.
T I P
You can set your microphone to turn off automatically when you place it in the microphone charging
cradle, and to turn on when you remove it. For more information, see Customizing your microphone
on page 19.
Connecting the microphone to the room module
When your microphone is connected to the room module or an expansion sensor, the status light is
solid green. If the status light is amber or flashing red, the microphone isn’t connected.
g To connect the microphone to the room module
1. Stand within 15' (4.6 m) of the room module or an expansion sensor.
2. Point the microphone’s infrared transmitter at the room module or an expansion sensor.
3. Press the Mute/Power off button for four seconds to turn off the microphone.
4. Press any button to turn it on again.
15
Page 22

C H A P T E R 3
Using the microphone
Speaking into the microphone
Your microphone transmits your voice up to 15' (4.6 m) to the room module or an expansion sensor.
I M P O R T A N T
l Hold your microphone so the infrared transmitter faces out.
l If you hear a static sound suddenly, the microphone is either out of range or is pointed against
a non-reflective surface. Position your microphone so the infrared transmitter points toward
the room module or an expansion sensor.
Adjusting microphone volume
You can increase or decrease the volume of transmission from the microphone, as well as mute and
restore volume.
g To increase or decrease the microphone volume
Press the Volume Up or Volume Down button.
g To mute or restore the microphone volume
Press the Mute/Power Off button.
When you mute the microphone, the microphone status light flashes green. When you restore
the microphone volume, the microphone status light turns solid green.
Connecting an auxiliary microphone
Your microphone doesn’t require an external auxiliary microphone.
However, if you prefer, you can use an auxiliary microphone, such as a
wired headset or a lavaliere microphone, for hands-free use.
g To connect an auxiliary microphone
Connect the auxiliary microphone to the 3.5 mm jack on the side of the microphone.
Connecting an auxiliary audio input device
You can also connect an external audio input device, such as a handheld audio player, to your
microphone.
16
Page 23

C H A P T E R 3
Using the microphone
Use the microphone buttons to adjust the volume of the device that you connected and then you can
speak over the device.
g To connect an auxiliary audio input device
1. Turn on the audio input device, and then reduce the volume on the
device.
2. Connect the audio input device output plug to the microphone’s
3.5 mm auxiliary input jack.
3. Increase the volume on the audio input device until the audio input
device is clearly and comfortably heard over the SMARTAudio
system.
g To mute or restore volume for an auxiliary audio input device
Press the Mute/Power Off button on the microphone.
The audio input from the device is muted or restored, and the volume of your voice remains the
same.
Controlling an auxiliary audio input device from your microphone
You can use the microphone to increase and lower the volume or mute the most recently active audio
input device connected to the control unit.
This enables you to decrease or mute the volume, provide commentary, and then return to
transmitting audio without returning to your computer or the audio input device.
g To increase or decrease the volume of an auxiliary audio input device
1. Press the Mute/Power Off button on your microphone so that your voice doesn’t transmit.
The microphone status light flashes green.
2. Adjust the volume of the device connected to the control unit using the volume control buttons
on the microphone.
17
T I P
You must press a volume button several times before you notice a difference.
Page 24

C H A P T E R 3
Using the microphone
g To mute or restore the volume to an auxiliary audio input device
Press the Soft button on your microphone.
The audio input from the device is muted or restored, and the volume of your voice remains the
same.
Using a second microphone
You can purchase a second infrared microphone as a back-up or to use as a second microphone. For
example, a teacher can use the primary microphone and the students can pass around a second
microphone.
T I P
You can set the student microphone so students can’t adjust the volume on their microphone or on
any auxiliary audio input devices. For more information, see Setting your microphone to disable
volume buttons on page 20.
Setting up a second microphone
The SMARTAudio system microphone can transmit on two channels: channel 1 and channel 2.
When you connect a second microphone, you must set it to use the unused channel.
Your microphone mode determines how to set your second microphone to an unused channel.
l In Find Channel mode (default), the microphone chooses an available channel.
l In Assigned Channel mode, the microphone transmits on the channel you assign it.
In Assigned Channel mode, you can set a microphone to transmit on either channel 1 or channel 2.
g To check the microphone mode
1. If the microphone is turned on, turn it off by pressing the Mute/Power Off button for four
seconds.
2. Turn on the microphone by pressing any button.
3. Observe the microphone status light.
If the microphone status light flashes red once, the microphone is set to Assigned Channel
mode and channel 1.
If the microphone status light flashes red twice, the microphone is set to Assigned Channel
mode and channel 2.
18
Page 25

C H A P T E R 3
Using the microphone
g To set a microphone to Assigned Channel mode
1. Turn off the microphone by pressing the Mute/Power Off button for four seconds, and then wait
10 seconds.
2. Press the Soft button and the Mute/Power Off button for three seconds, and then release the
buttons.
The microphone status light flashes red rapidly.
3. If you want to set the microphone to channel 1, press the Soft button.
If you want to set the microphone to channel 2, press the Volume Up button.
The microphone status light turns solid green.
Customizing your microphone
You can customize your microphone to change some of its settings. For example, you can set your
microphone to do the following:
l Only the Mute/Power Off button works and students are unable to adjust the volume while you
pass the microphone around.
l The microphone turns off when you place it in a charger and turns on when you remove it.
19
Page 26

C H A P T E R 3
Using the microphone
Setting your microphone to disable volume buttons
You can disable all of the buttons except the Mute/Power Off button. When disabled, students are
unable to adjust the volume while you pass the microphone around.
g To set your microphone to disable the volume buttons
1. Turn on the microphone.
2. Press the Soft button and the Volume Down button for five seconds.
The microphone status light flashes red, yellow and green alternately indicating that you’re in
Local Programming mode.
3. Press the Mute/Power Off button for one second to change the state of the Button Disable
mode.
I M P O R T A N T
o
Four quick green flashes of the microphone status light indicates that the feature is on
and only the mute button works.
o
Four quick red flashes of the microphone status light indicates that the feature is off
and all buttons work.
4. Press the Soft button and the Volume Down button for three seconds to exit Local
Programming mode.
OR
Wait 30 seconds and the microphone automatically exits Local Programming mode.
20
Page 27

C H A P T E R 3
Using the microphone
Enabling automatic shut off when charging
You can set your microphone to automatically turn off when you place it in the microphone charging
cradle and to turn on when you remove it.
g To enable automatic shut off when charging
1. Turn on the microphone.
2. Press the Soft button and Volume Down button for five seconds.
The microphone status light flashes red, yellow and green alternately indicating that you’re now
in Local Programming mode.
3. Press the Volume Down button to change the state for the microphone Automatic On and
Automatic Off mode.
I M P O R T A N T
o
Four quick green flashes of the microphone status light indicates that the feature is on
and the microphone turns off when in the charger and turns on when removed.
o
Four quick red flashes of the light indicates that the feature is off and you must turn on
or off the microphone manually.
4. Press the Soft button and Volume Down button for three seconds to exit Local Programming
mode.
OR
Wait 30 seconds and the microphone automatically exits Local Programming mode.
21
Page 28

Page 29

Chapter 4
software to change your settings
About using SMARTsoftware 23
Installing SMARTAudio software 24
Integrating SMARTAudio software with SMARTNotebook software 24
Starting SMARTAudio software 25
Changing your SMARTAudio system settings 25
Adjusting the volume 25
Adjusting the speaker tone 26
Checking your microphone battery level 26
About using SMARTsoftware
You can use SMARTNotebookcollaborative learning software to conveniently control your
SMARTAudio system from your interactive whiteboard.
After you install SMARTAudio software and integrate it with your SMARTNotebook software you
can then press the SMART Audio icon on the SMARTNotebook software toolbar, to do the
following:
l Adjust the volume of up to two microphones.
l Mute or adjust the volume of audio files playing on your computer.
l Mute or adjust the volume of audio files playing on connected audio input devices.
l Mute all your audio input devices.
l Adjust the brightness of the speaker tone.
23
Page 30

C H A P T E R 4
Using SMARTNotebook software to change your settings
Installing SMARTAudio software
Install SMARTAudio software from the included CD, or go to the download page
(smarttech.com/downloads).
g To install SMARTAudio software (Windows computers)
1. Disconnect the USB cable that connects your computer to your control unit.
2. Insert the included CD in your computer, and then browse to the SMARTAudioSetup.exe file.
You can also go to the download page (smarttech.com/downloads), select the SMARTAudio
software downloads, and then download SMARTAudioSetup.exe to your desktop.
3. Double-click the SMARTAudioSetup.exe file, and then follow the on-screen instructions.
g To install SMARTAudio software (Mac computers)
1. Disconnect the USB cable that connects your computer to your control unit.
2. Insert the included CD in your computer, and then browse to the SMARTAudio Install.dmg
file.
You can also go to the download page (smarttech.com/downloads), select the SMARTAudio
software downloads, and then download SMART Audio Install.dmg to your desktop.
3. Double-click the SMART Audio Install.dmg file, and then follow the on-screen instructions.
Integrating SMARTAudio software with
SMARTNotebook software
If you don’t see the SMARTAudio icon on your SMARTNotebook software toolbar, you can add it
to integrate SMARTAudio software with SMARTNotebook software.
g To integrate SMARTAudio software with SMARTNotebook software
1. Start SMARTNotebook software, and then select View > Customize Toolbar.
The Customize Toolbar window appears.
Drag the SMARTAudio icon to your SMARTNotebook software toolbar.
2.
3. Press Done.
24
Page 31

C H A P T E R 4
Using SMARTNotebook software to change your settings
Starting SMARTAudio software
You can start SMARTAudio software by selecting SMARTAudio 2011 from the Start menu
(Windows computers) or the Dock (Mac computers).
Alternatively, if you placed the SMARTAudio icon in SMARTNotebook software, you can use the
icon to start SMARTAudio software.
g To start SMARTAudio software from SMARTNotebook software
Start SMARTNotebook software, and then press the SMARTAudio icon on the toolbar.
1.
SMARTAudio software appears.
2. Press Connect.
Changing your SMARTAudio system settings
Your SMARTAudio system settings enable you to adjust input volumes, check your microphone
battery level and adjust the brightness of the speaker tone.
Adjusting the volume
Your SMARTAudio system mixes all audio inputs from the following sources:
Audio source Description
Aux 1 The connection from your SMART projector to the control unit, that streams any
audio inputs connected directly to your interactive whiteboard
Aux 2 The connection from any audio input device to the control unit
USBAudio Audio or video files playing on the computer and transmitted to the control unit
through the USB connection
Mic 1 The default microphone channel
Mic 2 Secondary microphone channel
T I P
You can rename Aux 1, Aux 2 or USBAudio to a term more descriptive of the audio input. For more
information, see Changing the audio input names and trims on page 42.
You can adjust the volume of any audio input. You can also mute any or all of the inputs, and then
restore their volume later.
25
Page 32

C H A P T E R 4
Using SMARTNotebook software to change your settings
T I P
You can also adjust the volume of inputs at the input source. To adjust the input from the
SMARTAudio system microphone, see Controlling an auxiliary audio input device from your
microphone on page 17.
g To adjust the volume of an auxiliary audio input device
Press the SMART Audio icon on the SMARTNotebook software toolbar.
1.
SMARTAudio software appears.
2. Slide the input’s volume slider up or down for the input.
g To mute an auxiliary audio input device
Start SMARTAudio software, and then press the un-muted speaker icon below the input
volume slider.
g To restore an auxiliary audio input device’s volume
Start SMARTAudio software, and then press the muted speaker icon below the input
volume slider.
Adjusting the speaker tone
The SMARTAudio system enables you to adjust the brightness of the speaker tone.
g To adjust the brightness of the speaker tone
Press the SMARTAudio icon on the SMARTNotebook software toolbar.
1.
SMARTAudio software appears.
2. Locate the Speaker Tone area.
3. Press High, Medium or Low.
Checking your microphone battery level
You can use SMARTAudio software to check your microphone battery level.
N O T E
If your microphone battery level is below 10%, the microphone status light flashes red. For more
information, see Troubleshooting using the microphone status light on page 47.
26
Page 33

C H A P T E R 4
Using SMARTNotebook software to change your settings
g To check microphone battery levels
Press the SMART Audio icon on the SMARTNotebook software toolbar.
1.
SMARTAudio software appears.
2. Locate the Microphone Battery area.
I M P O R T A N T
If this area indicates No mic found, your microphone is either not turned on (see Turning on
and turning off the microphone on page 15) or not connected to the room module or an
expansion module.
27
Page 34

Page 35

Chapter 5
Installing SMARTAudio configuration software 30
Using SMARTAudio configuration files 31
Opening a configuration file 32
Downloading a configuration file 32
Uploading a configuration file 33
Saving a configuration file 33
Setting the volume 33
Speaker control settings 34
Setting speaker and room equalization 35
Setting amplifier trim 36
Saving and recalling equalization settings 36
Setting the response to a page 37
Setting page volume 37
Setting the volume during a page 38
Setting the volume during a 6-12V input 38
Setting microphone features 39
Setting the low battery indication 39
Setting the microphones to turn off when charging 40
Setting Button Disable mode 40
Setting auxiliary volume control from the microphone 40
Setting auxiliary ducking 41
Setting a Soft button short response 41
Setting a Soft button long response 42
Changing the audio input names and trims 42
Other system settings 42
Enabling the microphone user to change active input device volume 43
Setting the relay settings 43
Room module connections 44
29
Page 36

C H A P T E R 5
Customizing your settings
You can use your SMARTAudio system once you install it without any special settings.
However, a system administrator can install and use SMARTAudio configuration software to
customize settings to meet requirements and to improve your audio experience.
I M P O R T A N T
Do not install SMARTAudio configuration software on teacher computers unless you want to give
them access to the configuration settings.
Teachers should access SMARTAudio software from the Start menu (Windows computers) or the
Dock (Mac computers) or from SMARTNotebook software.
Installing SMARTAudio configuration software
Install SMARTAudio configuration software from the included CD, or go to the download page
(smarttech.com/downloads).
I M P O R T A N T
You require a computer with a Windows operating system to install and run SMARTAudio
configuration software. After you configure your SMARTAudio system, you can download the
configuration file to your control unit, and then copy the settings in SMARTAudio software from a
computer with either a Windows operating system or a Mac operating system software.
g To install SMARTAudio configuration software
1. Disconnect the USB cable that connects your Windows computer to your control unit.
2. Insert the included CD in your computer, and then browse to the
SMARTAudioConfigSetup.exe file.
You can also go to the administrator downloads page
(smarttech.com/AdministratorDownloads), select SMART Audio Configuration software,
and then download the SMARTAudioConfigSetup.exe file to your desktop.
3. Double-click the SMARTAudioConfigSetup.exe file, and then follow the on-screen
instructions.
30
Page 37

C H A P T E R 5
Customizing your settings
Using SMARTAudio configuration files
The SMARTAudio configuration files include many settings that affect the operation of your
SMARTAudio system. These files are stored in the control unit as LPTfiles, but you can also store
them on a computer or on a USB drive as a backup.
You can edit an LPT file using SMARTAudio configuration software. Access a file in one of the
following ways:
l Start SMARTAudio configuration software in your Windows computer to see the default
settings in a file. For more information, see Opening a configuration file on the next page.
l Start SMARTAudio configuration software in your Windows computer connected to a control
unit, and then download the control unit’s LPT file to the computer. For more information, see
Downloading a configuration file on the next page.
l Open an LPT file on a Windows computer or USB drive. For more information, see Opening a
configuration file on the next page.
You can then edit the following audio settings in the LPT file.
l System volume (see Setting the volume on page 33)
l Speaker controls (see Speaker control settings on page 34)
l Paging control and 6-12V input settings (see Setting the response to a page on page 37)
l Microphone settings (see Setting microphone features on page 39)
l Auxiliary audio input device names and trims (see Changing the audio input names and trims
on page 42)
l To edit other system settings, see Other system settings on page 42.
After you edit the LPT file, you can do one of the following:
l Upload the settings to a connected control unit. For more information, see Uploading a
configuration file on page 33.
l Save the settings as an LPT file to upload to a control unit at another time. For more
information, see Saving a configuration file on page 33.
31
Page 38

C H A P T E R 5
Customizing your settings
Opening a configuration file
You can open a configuration file with SMARTAudio configuration software, and then upload it to a
connected control unit. This could be part of implementing settings or restoring a backup of settings.
g To open a configuration file
1. Select Start > All Programs > SMART Technologies > SMART Tools.
2. Click Audio Configuration Software.
The SMART Audio Configuration Software screen appears.
I M P O R T A N T
If the Windows operating system does not see a SMART device, a warning appears.
Connect your computer to a SMARTAudio system control unit with a USB cable.
3. Select File > Open.
4. Browse to and select the LPT file.
SMARTAudio configuration software settings are loaded from the file.
Downloading a configuration file
You can download the configuration file from the control unit to your Windows computer to do one of
the following:
l Configure specific settings
l Store a backup of the control unit’s settings
l Copy the specific settings, and then upload them to another control unit in another room
g To download a configuration file
1. Start SMARTAudio configuration software, and then click Download Configuration File
from CU on the Setup tab.
The file downloads from the control unit to your computer.
2. Edit the file, if you desire.
3. Select File > Save to save the configuration file to your computer.
32
Page 39

C H A P T E R 5
Customizing your settings
Uploading a configuration file
After you edit the settings, you can upload the configuration file to the control unit or to another control
unit in another room.
g To upload configurations to the control unit
1.1. Start SMARTAudio configuration software, and then select the Setup tab.
2. Click the Upload Configuration File to the CU button.
SMARTAudio configuration software settings are uploaded from your computer to the control
unit.
Saving a configuration file
After you edit your settings, you can save the configuration file to your computer as a backup or to
upload to another SMARTAudio system control unit.
g To save a configuration file
1. Start SMARTAudio configuration software, and then select the File > Save or File > Save
as.
2. Type a file name, and then click OK.
SMARTAudio software settings are saved to the file.
Setting the volume
The Volume tab enables you to do the following:
l Set a master default volume for all audio input devices.
l Set specific default volumes for specific audio input devices.
You can set an auxiliary input volume from -30 dB to 8 dB. You can set microphone volumes from -40
dB to 6 dB.
Other volume controls are based on these settings.
g To set the master default volume
Move the Master slider on the Volume tab up or down.
OR
Change the volume by moving the up or down arrow.
33
Page 40

C H A P T E R 5
Customizing your settings
g To set the default volume of an auxiliary input device
Move the Aux-1, Aux-2 or USB Audio slider on the Volume tab up or down.
OR
Move the up or down arrow to change the volume.
N O T E
You can give these inputs more descriptive names, such as "CD player," using
SMARTAudio configuration software. For more information, see Changing the audio input
names and trims on page 42.
g To set the default microphone volume
Move the Mic 1or Mic 2 slider on the Volume tab up or down.
OR
Move the up or down arrow to change the volume.
I M P O R T A N T
You must have a microphone turned on, set to the channel and connected to the room
module to set input volume. For more information, see Using a second microphone on page
18.
N O T E
Mic 1 controls the volume for channel 1 and Mic 2 controls the volume for channel 2.
Speaker control settings
The Speaker Control tab enables you to do the following:
l Select speaker and room equalization settings for the speakers connected to the room module
and for the audio characteristics of the room.
l Trim the amplifiers (speakers).
l Save room-specific equalizations.
T I P
All settings in this tab can be saved as an equalization group in the LPT file. This enables you to
save different rooms’ equalization settings in one LPT file. For more information, see Saving and
recalling equalization settings on page 36.
34
Page 41

C H A P T E R 5
Customizing your settings
Setting speaker and room equalization
Your SMARTAudio system has two independent equalization circuits:
l Speaker equalization is a set of equalization curves for industry standard speakers.
T I P
The SMART Audio Room Speaker library is part of the firmware and can be updated.
l Room equalization consists of seven bands of parametric equalization. It’s helpful when you
have room-specific anomalies, such as bass buildup, ringing or areas of feedback.
N O T E
To select the filter type or other parametric settings, use the Room Equalization Parameters
menu.
g To set speaker equalization
Select your speaker in the Speaker EQ drop-down list on the Speaker Control tab.
If your speaker type isn’t listed, select Flat.
g To set room equalization
Raise or lower the slider on the Speaker Control tab for each band in the Room Equalization
area.
OR
Raise or lower the up and down arrows on the Level box.
For bands 2 to 6 you can select the type of filter (Peak, Notch, High Pass and Low Shelf), the center
frequency and the bandwidth of the equalization curve.
g To set room equalization parameters
Set the Filter Type, Frequency and Bandwidth for each band on the Speaker Control tab.
N O T E
You can also set the frequency for band 1 (bass) and band 7 (treble).
35
Page 42

C H A P T E R 5
Customizing your settings
Setting amplifier trim
If a speaker is too loud or too quiet for a portion of the room, you can adjust the speaker trim from -12
dB to 6 dB in 1 dB increments.
N O T E
Adjusting the trim too high can cause feedback.
g To set amplifier trim
Use the up and down arrows in the Amplifier Trims area on the Speaker Control tab to adjust
the trim.
N O T E
The default setting is 0 dB.
Saving and recalling equalization settings
You can save equalization settings in the room module to enable you to respond to different situations
in the same SMARTAudio system installation or to save several rooms’ equalization settings in the
same LPT file, and then later apply them to each individual room.
g To save equalization settings
1. Create your equalization settings on the Speaker Control tab.
2. Select the name you prefer for the current equalization from the Save EQ drop-down list.
3. Click the Save Selected EQ button.
g To recall equalization settings
Select an equalization from the RecallEQ drop-down list on the Speaker Control tab.
36
Page 43

C H A P T E R 5
Customizing your settings
Setting the response to a page
You can use SMARTAudio configuration software to define how your SMARTAudio system
responds to an incoming page.
W A R N I N G
Paging systems often deliver important safety information. Have a professional installer connect
the room module to an existing paging system so that pages are heard reliably.
When you install your room module, you can connect it to your existing paging system with either a
paging input or a 6-12V connection.
The Paging tab enables you to do the following:
l Set paging input trim to your room module.
l Lower the volume of the current audio to the SMARTAudio system when a page is broadcast.
l Lower the volume on a 6-12V input so that when a page is broadcast at the 6-12V input, the
volume of the current audio lowers automatically.
Setting page volume
You can connect your existing paging system to your room module, and then set the incoming page
volume. The following are common scenarios:
l Trim the incoming page to -19 dB so that the page doesn’t play over your SMARTAudio
system speakers, because it uses other speakers in the room. You can still use the Page
ducking feature for other SMARTAudio system inputs. For more information, see Setting the
volume during a page on the next page.
l Trim to increase or decrease the volume of the page that plays over your SMARTAudio
system speakers.
g To increase or decrease the volume of a page
Use the Paging Input Trim arrow buttons on the Paging tab to adjust the page input trim from
-19 dB to 6 dB.
37
Page 44

C H A P T E R 5
Customizing your settings
Setting the volume during a page
For an external page to duck the SMARTAudio system, the room module requires one of the
following:
l An audio signal at the paging input (even if the page plays on speakers that aren’t part of the
SMARTAudio system)
l A signal at the 6–12V input. This is only a signal and doesn’t result in the page playing over the
SMARTAudio system.
When a signal is present at the paging input, the volume of the other SMARTAudio system inputs is
automatically lowered the designated amount.
g To set the speaker volume during a page
Select a ducking level in the Duck on Page drop-down list on the Paging tab.
Ducking level Volume change during a paging input
none No change
low -6 dB
medium -12 dB
high -18 dB
Setting the volume during a 6-12V input
When you apply a signal to the 6-12V input, the volume of the other SMARTAudio system inputs
lowers the designated amount.
g To set the speaker volume during a 6-12V input
Select a ducking level in the Duck on 6-12v drop-down list on the Paging tab.
Ducking level Volume change during a 6-12V input
none No change
low -6 dB
medium -12 dB
high -18 dB
38
Page 45

C H A P T E R 5
Customizing your settings
Setting microphone features
The Microphones tab enables you to do the following:
l Set a low battery microphone status light indicator.
l Enable automatic shut off when charging.
l Disable the buttons on the microphone.
l Enable auxiliary audio input device volume control from the microphone.
l Enable you to reduce the volume of audio input devices at the control unit when you are
speaking into the microphone.
l Designate a response for quickly pressing the Soft button.
l Designate a response for pressing and holding the Soft button.
I M P O R T A N T
After you use SMARTAudio configuration software to upload the microphone settings to a control
unit, you must download them from the control unit to each microphone by pressing the Volume
Up and Volume Down buttons for four seconds.
Setting the low battery indication
By default, the microphone status light doesn’t flash to indicate a low battery. You can program the
microphone status light to flash when the battery is low.
l At 10% battery charge the light flashes red twice per second.
l At 5% battery charge the light flashes red four times per second.
g To set the low battery indication light to flash
Select Low battery LED indicator on the Microphones tab.
39
Page 46

C H A P T E R 5
Customizing your settings
Setting the microphones to turn off when charging
Automatic On and Automatic Off mode turns off microphones when they’re placed in the microphone
charging cradle and turns them on when they’re removed.
N O T E
This is a global setting for all microphones in the system. You can also program a specific
microphone for a specific response. For more information, see Enabling automatic shut off when
charging on page 21.
g To set the microphones to turn off in the charging cradle
Select Auto off when charging on the Microphones tab.
Setting Button Disable mode
Button Disable mode disables the buttons of the microphone, preventing users from changing volume
settings. The Mute/Power Off button isn’t disabled with this feature.
N O T E
This is a global setting for all microphones in the system. You can also program a specific
microphone for a specific response. For more information, see Setting your microphone to disable
volume buttons on page 20.
g To disable the buttons on the microphone
Select Disable buttons on microphone on the Microphones tab.
Setting auxiliary volume control from the microphone
You can set auxiliary volume control to use the microphone to increase the volume, decrease the
volume or mute the most recently active auxiliary audio input device at the control unit without
returning to your computer or the input device. For more information, see Controlling an auxiliary audio
input device from your microphone on page 17.
You can then press the Mute/Power Off button on the microphone to take control of the volume for
the audio input device.
N O T E
Auxiliary audio input refers to external input sources at the control unit, not at the microphone.
40
Page 47

C H A P T E R 5
Customizing your settings
g To set auxiliary audio input volume
If you want to prevent the user from using the microphone to control input volumes, select
Disable buttons on microphone on the Microphones tab.
If you want to enable the user to use the microphone to control input volume when the
microphone is muted, select On mute in the Aux Volume Control drop-down list on the
Microphones tab.
Setting auxiliary ducking
The auxiliary ducking settings enables you to reduce the volume of the control unit’s auxiliary audio
inputs when you’re speaking into the microphone.
This is helpful if you want to talk over a DVD/Blu-ray or other audio input device at the control unit.
g To set an auxiliary ducking level
Select a ducking level in the Aux Ducking drop-down list on the Microphones tab.
Ducking level Volume change during microphone transmission
none No change
low -6 dB
medium -12 dB
high -18 dB
Setting a Soft button short response
You can designate a response for when a user presses the Soft button on a microphone for less than
four seconds. Typically you can use this to mute auxiliary audio inputs but it can trigger a relay or
have no action.
g To set a Soft button short response
If you want to mute auxiliary audio inputs at the control unit, select Aux Mutein the Soft Button
- Short drop-down list on the Microphones tab.
If you want to trigger a relay in the relay input, select Relay.
If you don’t want a response when you quickly press the Soft button, select No Action.
41
Page 48

C H A P T E R 5
Customizing your settings
Setting a Soft button long response
You can designate a response for when a user presses the Soft button on a microphone for longer
than four seconds. Typically you can use this to mute auxiliary audio inputs but it can also trigger a
relay or have no action.
g To set a Soft button long response
If you want to mute auxiliary audio inputs at the control unit, select Aux Mutein the Soft Button
- Long drop-down list on the Microphones tab.
If you want to trigger a relay in the relay input, select Relay.
If you don’t want a response when you press the Soft button for longer than four seconds,
select No Action.
Changing the audio input names and trims
The Input Names/Trims tab enables you to do the following:
l Change the name of any audio input at the control unit so that it’s more recognizable in
SMARTAudio configuration software. Each input can be named from one of the preset input
labels or can be user defined.
l Trim the audio inputs that arrive at the control unit to reduce their volume.
g To change the name of an auxiliary audio input device
1. Identify the input you want to rename on the InputNames/Trims tab.
2. Select the name you want for that input from the drop-down list. You can also select User
Defined, and then type a name for the input device.
g To change the trim of an auxiliary audio input device
Select the input you want to trim on the InputNames/Trims tab, and then set the trim.
Other system settings
The System Settings tab enables you to do the following:
l Change the volume of the active input device at the microphone.
l Set a response for the room module relay.
l Set a trigger for the room module relay.
42
Page 49

C H A P T E R 5
Customizing your settings
Enabling the microphone user to change active input device volume
When your SMARTAudio system is set to Auto Select, the control unit automatically detects the
active audio input. This enables the microphone user to change the volume of the active audio input
device without changing the volume of the other audio input device.
For more information on changing the volume of the audio input devices with the microphone, see
Controlling an auxiliary audio input device from your microphone on page 17.
g To enable a microphone user to change the volume of audio input devices
If you want to enable the microphone user to only change the volume of the active audio input
device, select Auto Select on the SystemSettings tab.
If you want to enable the microphone user to change the volume of all audio input devices, clear
Auto Select.
Setting the relay settings
You can install a relay at the room module to trigger a relay response on command, such as dimming
lights, turning on an auxiliary audio input device or sending a signal to another location.
The command to the relay trigger can be one of the following:
l A teacher pressing the Soft button of the microphone
l An input at the 6-12V input
l Either the teacher pressing the Soft button or by an input at the 6-12V input
The relay can provide one of the following:
l Latching response
l 200 ms pulse
l 400 ms pulse
l 600 ms pulse
This is a single pole, double throw (SPDT) relay with normally open (N.O.), normally closed (N.C.)
and common (COM) contacts.
A relay can be in an activated or deactivated state, as shown below.
State Relay path
Activated The N.O. contact is closed and the N.C. contact is open.
Deactivated The N.O. contact is open and the N.C. contact is closed.
43
Page 50

C H A P T E R 5
Customizing your settings
Room module connections
The room module includes relevant connections.
g To set the relay settings
Select the preferred mode on the SystemSettings tab from the following table:
Setting Result
Latching Relay is active until the next pulse is received.
200 ms pulse Relay is active for 200 milliseconds.
400 ms pulse Relay is active for 400 milliseconds.
600 ms pulse Relay is active for 600 milliseconds.
g To set the relay trigger
If you want both the Soft button and the 6-12V input to trigger the relay, select either on the
SystemSettings tab.
If you want the Soft button to trigger the relay, select mic.
If you want the 6-12V input to trigger the relay, select 6–12v.
N O T E
If you select 6-12V input as a relay trigger, the input can also set duck audio volume on the
same signal. For more information, see Setting the volume during a 6-12V input on page 38.
44
Page 51

Chapter 6
SMARTAudio system
Resetting your system 45
Updating the control unit firmware 46
Troubleshooting using the microphone status light 47
Troubleshooting why your voice doesn’t come through the speakers 48
Troubleshooting issues with an auxiliary audio input device 48
You might be able to solve the issue with your SMARTAudio system by performing these checks.
l Check your cable connections.
l Ensure SMARTAudio software is installed.
l Reset the control unit to its startup state (see below).
l Update the control unit firmware.
Resetting your system
g To reset the system
1. Remove the control unit bottom cover.
2. Press the labeled system Reset button for three seconds.
The system resets.
3. Replace the control unit bottom cover.
45
Page 52

C H A P T E R 6
Troubleshooting your SMARTAudiosystem
Updating the control unit firmware
I M P O R T A N T
Do not update the control unit firmware unless you’re advised to by SMARTSupport
(smarttech.com/support).
g To update the control unit firmware
1. Launch the SMART Firmware Update.
On Windows 64-bit operating systems, browse to C:\Program Files (x86)\SMART
Technologies\SMART Product Drivers\SMARTFirmwareUpdater.exe
On Windows 32-bit operating systems, browse to C:\Program Files\SMART
Technologies\SMART Product Drivers\SMARTFirmwareUpdater.exe
On Mac operating system software, browse to Applications\SMARTProduct
Drivers\Additional Tools\SMARTFirmwareUpdater.app
The SMART Firmware Upgrade Wizard appears.
2. Click Next.
The wizard scans your computer and displays a list of connected SMART interactive products.
3. Select your SMARTproduct in the product update list.
4. Click Next.
The updater updates your firmware.
I M P O R T A N T
Do not disconnect your control unit from your computer during the update.
5. Click Finish when the update is complete, and then orient your interactive whiteboard.
46
Page 53

C H A P T E R 6
Troubleshooting your SMARTAudiosystem
Troubleshooting using the microphone status light
The normal state for the microphone status light is solid green. Use the following table if the light isn’t
on or if it isn’t solid green.
The microphone status
light is...
Off. Your microphone is turned off. Press any button on your
Flashing red twice per
second.
Flashing red four times per
second.
Solid amber. Your room module isn’t receiving
Flashing green. The microphone is muted. Press the Mute/Power Off button
Solid green. Normal operation No action required
Cause Solution
microphone.
Your microphone battery isn’t
charged.
Battery power is at 10% of its full
charge.
Battery power is at 5% of its full
charge.
power.
You’re out of range of your room
module.
Charge your microphone battery in
the microphone charging cradle.
Charge the battery.
Charge the battery.
Press the Power button on the
control unit.
Move within 15' (4.6 m) of the room
module or the expansion sensor.
to restore the microphone’s
volume.
47
Page 54

C H A P T E R 6
Troubleshooting your SMARTAudiosystem
Troubleshooting why your voice doesn’t come through the speakers
Use the following table if your voice doesn’t come through the speakers when you speak into the
microphone.
Cause Solution
Your volume is too low on the
microphone.
Your microphone volume is too low in
SMARTAudio software.
Your microphone isn’t communicating
with the room module.
The SMARTAudio system is turned
off.
Two microphones are set to the same
channels.
Increase the volume.
Increase the volume using SMARTAudio software.
Turn your microphone toward the room module or an
expansion sensor, and then move to within 15' (4.6 m) of
the room module.
Turn on the SMARTAudio system.
Check the microphone mode, and then change one
microphone to Find Channel mode.
Troubleshooting issues with an auxiliary audio input device
Use the following table if you can’t hear an auxiliary audio input device playing on your SMARTAudio
system.
Cause Solution
The file isn’t playing. Play the file.
Your computer audio output is muted. Restore the volume for your computer.
The input device is muted at your
control unit.
The SMARTAudio system is turned
off.
There is no USB connection from your
computer to the control unit.
Increase the volume using SMARTAudio software .
Turn on the SMARTAudio system.
Connect a USB cable from your computer to the control
unit.
48
Page 55

Appendix A
compliance
SMARTTechnologies supports global efforts to ensure that electronic equipment is manufactured,
sold and disposed of in a safe and environmentally friendly manner.
Waste Electrical and Electronic Equipment regulations (WEEE directive)
Waste Electrical and Electronic Equipment regulations apply to all electrical and electronic equipment
sold within the European Union.
When you dispose of any electrical or electronic equipment, including SMARTTechnologies
products, we strongly encourage you to properly recycle the electronic product when it has reached
the end of its life. If you require further information, please contact your reseller or
SMARTTechnologies for information on which recycling agency to contact.
Restriction of Certain Hazardous Substances (RoHS directive)
This product meets the requirements of the European Union’s Restriction of Certain Hazardous
Substances (RoHS) directive 2002/95/EC.
Consequently, this product also complies with other regulations that have arisen in various
geographical areas, and that reference the European Union’s RoHS directive.
Batteries
Batteries are regulated in many countries. Check with your reseller to find out how to recycle used
batteries.
49
Page 56

A P P E N D I X A
Hardware environmental compliance
There are special regulations that must be met when shipping a product that has a lithium ion battery
packaged with the product or shipping a lithium ion battery. When returning a SMARTTechnologies
product which contains a lithium ion battery or returning a lithium ion battery, call
SMARTTechnologies RMA for information on the special shipping regulations.
l 1.866.518.6791, Option 4 (U.S./Canada)
l 1.403.228.5940 (all other countries)
Packaging
Many countries have regulations restricting the use of certain heavy metals in product packaging. The
packaging used by SMARTTechnologies to ship products complies with applicable packaging laws.
Covered electronic devices
Many U.S. states classify monitors as covered electronic devices and regulate their disposal.
Applicable SMARTTechnologies products meet the requirements of the covered electronic devices
regulations.
China’s Electronic Information Products regulations
China regulates products that are classified as EIP (Electronic Information Products).
SMARTTechnologies products fall under this classification and meet the requirements for China’s
EIP regulations.
50
Page 57

Page 58

SMARTTechnologies
smarttech.com/support
smarttech.com/contactsuppor t
 Loading...