

Page 1

Installation and User’s Guide
SMART Document Camera 280
Page 2

Product Registration
If you register your SMART product, we’ll notify you of new
features and software upgrades.
Register online at
www.smarttech.com/registration.
Keep the following information available, in case you need to
contact Technical Support:
Serial Number ____________________________________________
Date of Purchase _________________________________________
FCC Warning
This device complies with Part 15 of the FCC Rules. Operation is subject to the following two conditions: (1) this device may not
cause harmful interference, and (2) this device mus t accept any inter ference received, including interference that may cause
undesired operation.
This equipment has been tested and found to comply with the limits for a Class B digital device, pursuant to Par t 15 of FCC
Rules. These limits are designed to provide reasonable protection against harmful interference in a residential installation.
This equipment generates, uses and can radiate radio frequency energy and, if not installed and used in accordance with the
instructions, may cause harmful interference to radio communications. However, there is no guarantee that inter ference will
not occur in a particular installation.
You can determine whether the equipment is causing interference by disconnecting it from your computer. If the interference
stops , it was probably caused by the equipment.
If the equipment does cause interference to radio or television reception, you may be able to correct the interference by using
one or more of the following measures:
•
Rotate the television or radio antenna until the interference stops.
•
Move the equipment farther away from the television or radio.
•
Plug the equipment and computer into an outlet that is on a different circuit from the television or radio.
If necessary, consult SMART Technologies ULC or an experienced radio /television technician for help.
Changes or modifications to this product not authorized by SMART Technologies ULC could void the FCC Certification and
negate your authority to operate the product.
Trade mar k N oti ce
The SMART logo and smar ttech are trademarks or registered trademarks of SMART Technologies ULC in the U.S. and/or other
countries. Windows is either a registered trademark or a trademark of Microsoft Corporation in the U.S. and/or other countries.
All other third-part y product and company names may be trademarks of their respective owners. Patent No. US54 48263;
US6141000; US6320597; US6326954; US6337681; US6540366; US6741267; US6747636; US7151533; and CA2058219.
Other patents pending.
Copyright Notice
© 2008 SMART Technologies ULC. All rights reserved. No part of this publication may be reproduced, transmit ted, transcribed,
stored in a retrieval system or translated into any language in any form by any means without the prior written consent of
SMART Technologies ULC. Information in this manual is subject to change without notice and does not represent a commitment
on the part of SMART.
09/2008
Page 3

Important Information
IMPORTANT
WARNING
WARNING
WARNING
Read all the safety and operating instructions before operating the product.
Retain the safety and operating instructions for future reference.
Adhere to all warnings on the product and in the operating instructions.
Follow all operating and user instructions.
Do not push objects of any kind into the openings in this product as this could
result in a fire or electric shock.
Do not attempt to service this product yourself as opening or removing covers
can result in an electric shock or other hazards. Refer all servicing to qualified
service personnel.
The lightning flash with arrowhead symbol, within an equilateral triangle, is
intended to alert you to the presence of uninsula ted “dange rous volt a ge” with in
the product's enclosure that may be of sufficient magnitude to constitute a risk
of electric shock. This marking is located on the bottom of the product.
Do not overload wall outlets, extension cords, or integral convenience
receptacles as this can result in a fire or electric shock.
WARNING
WARNING
Do not use this product near water.
Never spill liquid of any kind on the product.
Do not place this product on an unstable surface. If the product falls, this co uld
result in serious injury to a person and serious damage to the produ ct. Use this
product with carts, stands, tripods, brackets or tables only if they are
recommended by this product’s manufacturer. Follow the manufacturer's
instructions when you mount the product and use mounting accessories
recommended by the manufacturer.
Place the AC adapter cord and the video cable where they will not be pulled.
Take care to prevent the unit from falling or overturning.
Take care if you move the product on a cart. Quick stops, excessive force and
uneven surfaces may cause the product to overturn. If the product falls, this
could result in serious injury to a person and serious damage to the product.
99-00864-20 D0 Important Information i
Page 4

WARNING
This product is equipped with either a polarized 2-wire AC line plug (a plug
having one blade wider than the other) or a 3-wire grounding type plug (a plug
having a third, grounding pin).
The 2-wire polarized plug fits into the power outlet one way only. This is a
safety feature. If you are unable to insert the plug fully into the outlet, try
reversing the plug. If you are still unable to insert the plug fully into the outlet,
contact your electrician to replace the o utlet. Do not mod ify the plu g in any wa y.
The 3-wire grounding type plug fits into a grounding type power outlet. This is a
safety feature. If you’re unable to insert the plug into the outlet, contact your
electrician to replace the outlet. Do not modify the plug in any way.
WARNING
WARNING
WARNING
WARNING
When the product requires replacement parts, the service technician must use
replacement parts specified by this product’s manufacturer or with the same
characteristics as the original part. If the service technician substitutes an
unauthorized part, this could result in a fire, electric shock or other hazards.
If a service technician services or repairs this product, ask the service
technician to perform safety checks and determine that the product is in pr oper
operating condition.
The exclamation point within an equilateral triangle is intended to alert the user
to the presence of important operating an d maintenance (servicing) instructions
in the literature accompanying the product.
If you connect a nonshielded equipment interface cable to this equipment, you
void the FCC Certification or Declaration of this device and may cause
interference levels which exceed the limits established by the FCC for this
equipment. It is the responsibility of the user to obtain and use a shielded
equipment interface cable with this device. If this equipment has more than one
interface connector, do not leave cables connected to unused interfaces.
Changes or modifications not expressly approved by the manufacturer could
void the user’s authority to operate the equipment.
WARNING
Do not stare directly into the lamp or shine the lamp directly into someone’s
eyes. If you use the document camera to capture images of people, turn the
lamp off.
CAUTION
Disconnect this product from the power outlet before you clean the product.
Clean this product using a damp cloth. Do not clean this product using liquid
cleaners, aerosol cleaners, or any volatile solvent such as thinner or benzene.
CAUTION
Do not use attachments unless they are recommended by the pr od u ct’s
manufacturer as they may cause hazard s.
ii Important Information 99-00864-20 D0
Page 5

CAUTION
Do not block or cover any of the openings or slots of this product. The slots and
openings provide ventilation, ensure reliable operation of the product and
protect it from overheating. Do not place the product on a surface that would
block the openings or slots. Do not place the product on a built-in installation
such as a bookcase or rack unless you provide proper ve ntilation and adhere to
the manufacturer's instructions.
CAUTION
CAUTION
CAUTION
CAUTION
Operate this product only from the type of power source indicated on the
marking label. If you’re not sure of an outlet’s power supply, consult your local
power company. For products intended to operate from battery power, or other
sources, refer to the operating instructions.
Route power supply cords so that they are not likely to be walked on or pinched
by items placed upon or against them. Take particular care of the cord where it
connects to the product or a power outlet.
If possible, turn off and disconnect this product before thunderstorms.
However, don’t touch the product or its power plug during a thunderstorm as
there is a risk of electrical shock.
Turn off and disconnect this product if you won’t use it for an extended period.
Disconnect this product from the power outlet and refer servicing to qualified
service personnel under the following conditio n s :
• If the power supply cord or plug is damaged
• If liquid is spilled, or an object falls, on the product
• If the product is exposed to rain or water
CAUTION
CAUTION
• If the product does not operate correctly under normal operating conditions
• If the product is dropped or damaged in any way
• If the product exhibits a distinct change in performance
Do not adjust controls that are not covered by the operating instructions as
adjusting other controls can cause damage and may require extensive work by
a qualified technician to restore the produc t to its normal oper a tion .
Do not use or store this product near heat sources such as radiators, heat
registers, stoves, or other products (including amplifiers) that produce heat.
Do not leave this product under direct sunlight as this could result in
discoloration, deformation or damage to the product.
Use the product under the rated electrical conditions. The power cord
applicable to the local power specifications is attached. Be sure to use the
power cord applicable to your local power specifications.
99-00864-20 D0 Important Information iii
Page 6

CAUTION
CAUTION
CAUTION
Do not keep this product in any humid, dusty, salt bearing wind or vibrating
location. Use it under the following environmental conditions:
• Temperature: 0°C - 40°C (32°F - 104°F)
• Humidity: 30% - 85% (Non-condensing)
Do not point the camera lens directly into the sun as this cou ld cause damage
to the camera.
Don’t hold the camera column or the camera head when you carry the
document camera. Hold the main unit with both hands when you carry it.
CAUTION
CAUTION
IMPORTANT
Do not hold the magnetic strip close to a cathode ray tube (Braun tube), a
speaker, a CD-p layer, a DVD, a cellular phone, or any other item who se normal
operation may be interrupted or fail due to the strip’s magnetic field.
Save the data from an SD memory card to another hardware device, such as a
computer, before you insert the memory card into the document camera. If the
document camera malfunctions, the memory card may lose data.
If some pixels do not operate properly, and luminescent or black spots appear
on the screen, due to the use of CCD Area Image Sensors, this is a
phenomenon peculiar to the sensors and is not a malfunction.
iv Important Information 99-00864-20 D0
Page 7

Table of Contents
Important Information i
Introduction 1
Camera Column and Camera Head................................................................................... 2
Lamp............................................................................................................................2
Zoom Dial.................................................................................................................... 2
AF Button..................................................................................................................... 3
Control Panel ..................................................................................................................... 4
Rear Panel......................................................................................................................... 5
SD Card Slot.................................... ... .... ... .......................................... ... ... ... .... ... ... ........... 5
Stage, Magnetic Strip and Anti-Glare Sheet....................................................................... 5
Setting Up and Turning On the Document Camera 7
Setting Up the Document Camera..................................................................................... 7
Turning On the Document Camera.................................................................................... 9
Installing SMART Notebook Software................................................................................ 9
Using the On-Screen Display Menu................................................................................... 9
Turning Off and Storing the Document Camera 11
Cleaning the Document Camera’s Lens .................................................... ... .... ... ............ 12
Using the Document Camera 13
Using the Document Camera in SMART Notebook Software.......................................... 13
Displaying Printed Materials............................................................................................. 14
Displaying Printed Materials Using the Stage.................................................................. 15
Displaying a Three Dimensional Object........................................................................... 16
Displaying a Wall Surface or Distant Object..................................................................... 17
Displaying a Microscope Slide......................................................................................... 18
Displaying Image Data from an SD Memory Card........................................................... 19
Transferring Image Data from the SD Memory Card to a Computer................................ 22
Changing the Image Selection......................................................................................... 24
Using Image Mate Software............................................................................................. 24
Changing the Focus, Brightness and Graphics Mode 25
Adjusting the Focus.......................................................................................................... 25
Adjusting the Brightness .................................................................................................. 25
Changing the Graphics Mode .......................................................................................... 26
Troubleshooting the Document Camera 27
Regulatory Compliance 29
Waste Electrical and Electronic Equipment Regulations ................................................. 29
Restriction of Certain Hazardous Substances (RoHS) Directives.................................... 29
Customer Support 3
Online Support.................................... .... ... ... .......................................... ... ... .... ... ... ... ...... 3
Training............................................................................................................................ 3
Contacting SMART Technical Support............................................................................. 3
General Inquiries. ... ... .... ... ... ... .... .......................................... ... ... ... .... ... ... ... ...................... 3
Warranty........................................................................................................................... 3
Registration...................................................................................................................... 3
99-00864-20 D0 Table of Contents v
0
0
0
0
0
0
0
Page 8

vi 99-00864-20 D0
Page 9

Introduction
The SMART Document Camera 280 enables you to capture images and display them with a
connected projector or display. You can change the configuration of the camera column and
camera head to capture and display printed materials, three dimensional objects, microscope
slides, or distant surfaces or objects. You can also display image data from a connected
computer or an SD memory card.
Y ou can focus the camera imag e automatically and magnify it up to a 5.2× zoom ratio. You can
magnify a digital image up to a 8.0× zoom ratio.
Y ou can control the document came ra from SMART Notebook sof tware or the camera’ s control
panel. You can customize the camera’s behavior in Camera mode using the on-screen
display menu.
Rear View
Front View
Number Name Number Name
1 Camera head 7 Stage positioning
2 Illumination lamp switch 8 Rear panel
3 Zoom dial 9 Side panel
4 AF button 10 Magnetic sheet
5 Camera column 11 Stage
6 Control panel 12 Anti-glare sheet
99-00864-20 D0 Introduction 1
Page 10

Camera Column and Camera Head
The camera column and camera head rotate, en abling you to capture at different angles. You
can also rotate the column and head towards the main unit to minimize the risk of damage to
the document camera when it’s not in use.
Lamp
The camera head includes a lamp.
Illumination lamp
You can turn the lamp on or off by sliding the illumination lamp switch.
CAUTION
NOTE: This product is equipped with a bright LED lamp that may diminish in brightness
over time.
Do not stare directly into the lamp or shine the lamp directly into someone’s
eyes. If you use the document camera to capture images of people, turn off
the lamp.
Do not touch the lamp while it is on. The lamp is very hot when it is in use.
Zoom Dial
The zoom dial enables you to change the magnification of a camera image. You can also
enlarge or reduce the size of a digital image if you’re using the documen t camera to display
images from an SD memory card.
WIDE
TELE
The zoom ratio is 5.2× for optical images and 8× for digital images.
2 Introduction 99-00864-20 D0
Page 11

AF Button
The AF button enables you to automatically focus the camera image.
Push
You can also manually focus the image using the options in SMART Notebook. For more
information, see page 13.
99-00864-20 D0 Introduction 3
Page 12

Control Panel
The buttons on the control panel enable you to turn the document camera on or off, display
and control the on-screen display menu, save images to an SD memory card, switch output
modes and control the brightness of the image.
1
3
4
7
9
Number Button Name
1 Power
2 Image Save and Up Arrow
3Left Arrow
4 Menu
5 Right Arrow
6 SD Mode and Down Arrow
7PC
8 Camera
9 Increase Brightness
10 Reduce Brightness
2
5
6
8
10
4 Introduction 99-00864-20 D0
Page 13

Rear Panel
The rear panel enables you to connect the document camera to a projector or television
display, and then present images from the document camera on the connecte d hard ware . You
can also display image data from a connected computer.
1
2
Number Name
3
4
5
6
1 DC IN 12V
2 RGB OUT
3 RGB IN
4 Video OUT
5 OUTPUT (DIP switch)
6 USB (2.0 compliant)
SD Card Slot
The slot in the side panel enables you to insert an SD memory card and display image data
from the memory card, or save camera images to the memory card.
Stage, Magnetic Strip and Anti-Glare Sheet
The stage helps you to present printed materials. You can attach your printed material to the
stage using the magnetic sheet. If glare makes the images difficult to see, you can cover the
affected area with the supplied anti-glare sheet.
99-00864-20 D0 Introduction 5
Page 14

6 Introduction 99-00864-20 D0
Page 15
Setting Up and Turning On the Document Camera
This chapter explains the basic procedure for setting up the document camera.
Setting Up the Document Camera
To set up the document camera
1. Position the document camera.
CAUTION
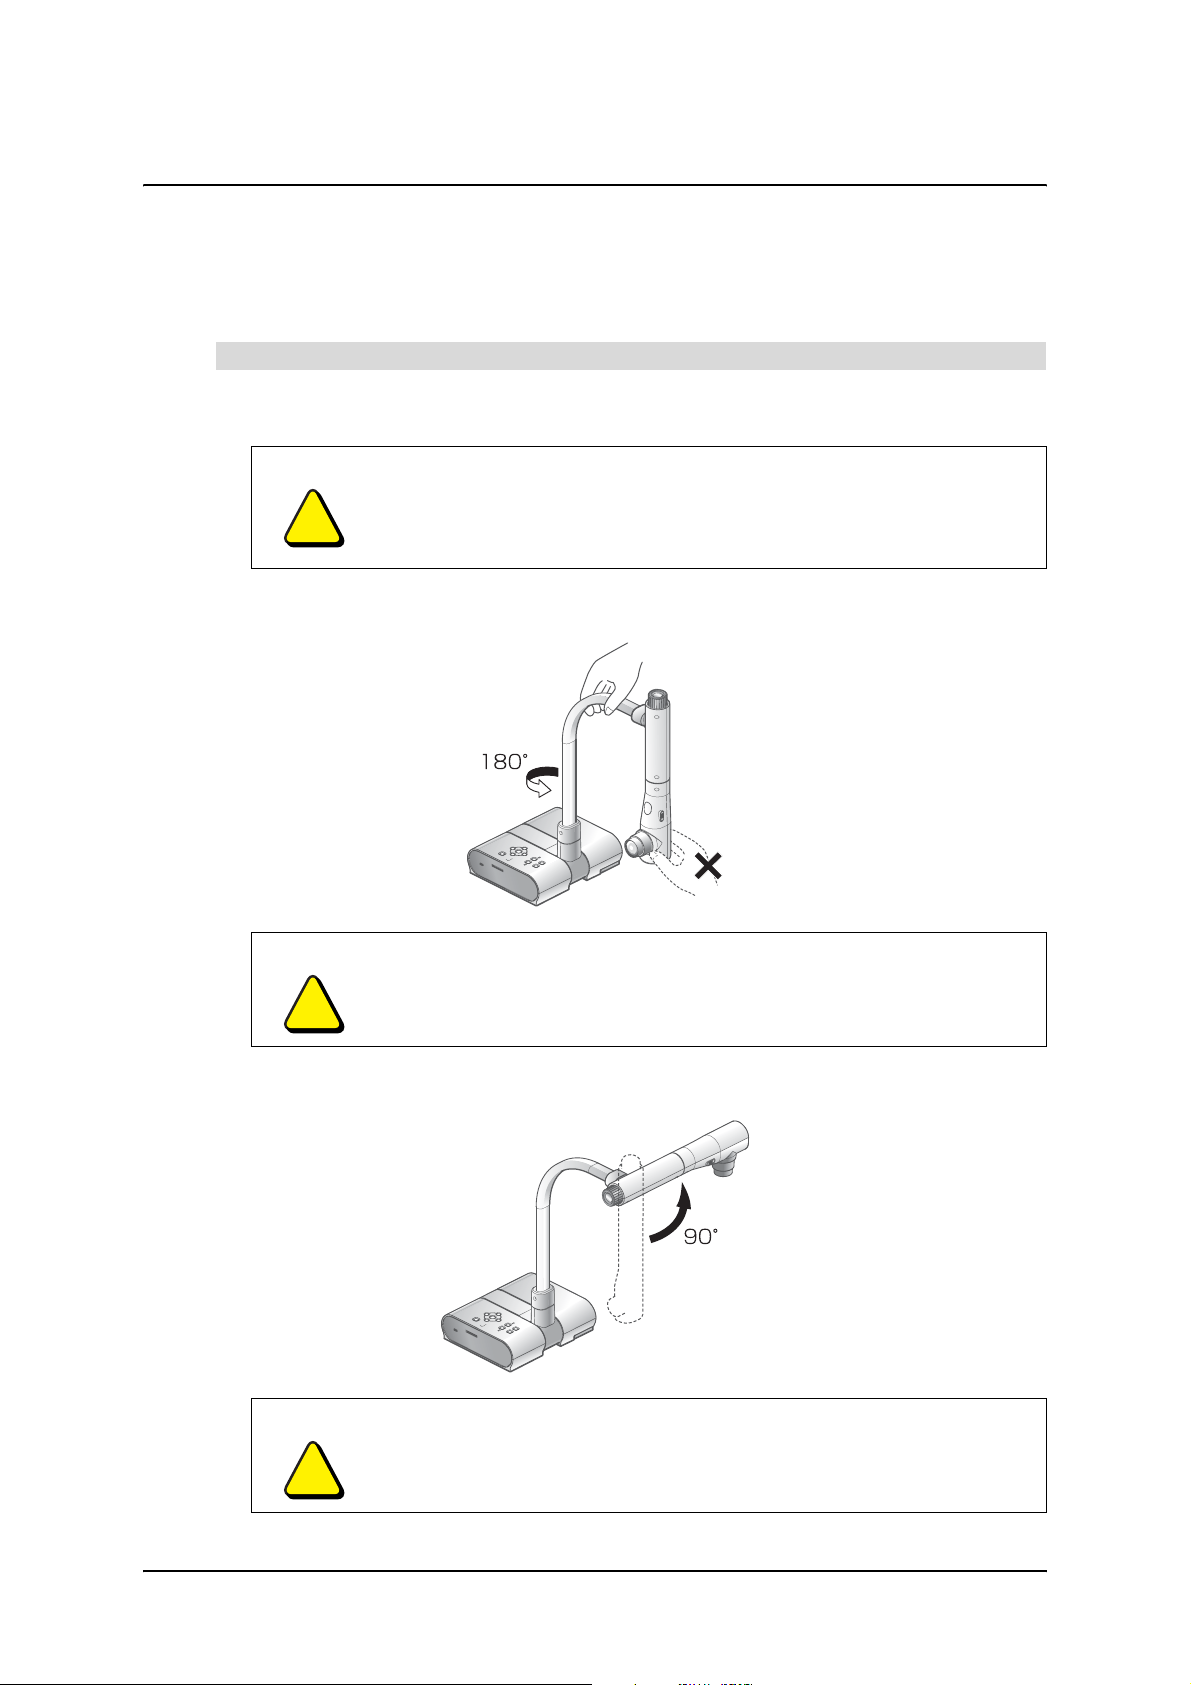
2. Rotate the column as shown in the figure below.
CAUTION
Do not hold the document camera by the camera column or the camera
head when you carry it. Hold the document camera with both hands when
you carry it.
Take care to prevent damage to the camera head.
Never rotate the camera column in the opposite direction.
Do not hold the camera head when you rotate the cam era column. Instead,
hold the camera column as you rotate it.
3. Rotate the camera head until it’s in the position shown in the figure below.
CAUTION
Do not apply excessive force to the camera head.
99-00864-20 D0 Setting Up and Turning On the Document Camera 7
Page 16

To connect the document camera to a computer and projector
1. Set the left Output DIP switch on the rear panel of the document camera to RGB.
2. Connect the analog RGB cable to the RGB OUT receptacle on the rear panel of the
document camera.
3. Connect the other end of the RGB cable to the input receptacle on the projector.
NOTE: If you have a DLP projector , change the Mode setting to Graphics in the
on-screen display menu (see page 26).
4. Connect a second analog RGB cable to the RGB IN recept acle on the rear panel of the
document camera.
5. Connect the other end of the second analog RGB cable to the computer.
NOTES
– If you’re using a desktop computer, disconnect your computer’s display, and then
connect the second analog RGB cable to the computer receptacle you use for
your display.
– The projector acts as your display.
6. Connect the included USB cable to the USB receptacle on the rear panel of the
document camera.
7. Connect the other end of the USB cable to your computer.
8. Connect the AC adapter to the DC IN 12V receptacle on the rear panel of the
document camera.
9. Connect the other end of the AC adapter to a power outlet.
To connect the document camera to an NTSC-system television display
1. Set the left Output DIP switch on the rear panel of the document camera to Video.
2. Set the right Output DIP switch on the rear panel of the document camera to NTSC.
CAUTION
Do not change the DIP switch setting when the document camera is
turned on.
3. Connect the video cable with the RCA plug to the VIDEO OUT receptacle on the
rear panel of the document camera.
4. Connect the other end of the video cable to the television display.
5. Connect the AC adapter to the DC IN 12V receptacle on the rear panel of the
document camera.
6. Connect the other end of the AC adapter to a power outlet.
8 Setting Up and Turning On the Document Camera 99-00864-20 D0
Page 17

To connect the document camera to a PAL system television display
1. Set the left Output DIP switch on the rear panel of the document camera to Video.
2. Set the right Output DIP switch on the rear panel of the document camera to PAL.
CAUTION
Do not change the DIP switch setting when the document camera is
turned on.
3. Connect the video cable with the RCA plug to the VIDEO OUT receptacle on the rear
panel of the document camera.
4. Connect the other end of the video cable to the television display.
5. Connect the AC adapter to the DC IN 12V receptacle on the rear panel of the
document camera.
6. Connect the other end of the AC adapter to a power outlet.
Turning On the Document Camera
NOTE: When you connect the document camera to the computer using a USB cable for the
first time, and then turn on the document camera, the document camera automatically installs
the necessary drivers on the computer.
To turn on the document camera
Press the Power button on the document camera control panel.
Installing SMART Notebook Software
NOTE: The document camera works with the latest version of SMART Notebook. For more
information on upgrading SMART so ftware, see http://www2.smarttech.com/st/en-US/Support/
Downloads/default.htm.
To install SMART Notebook software
Insert the SMART Notebook CD into your computer’s CD drive to launch the software
installation screen, and then follow the on-screen instructions.
Using the On-Screen Display Menu
You can use the on-screen display menu in Camera mode to customize the behavior of the
document camera. You can view and control the on-screen display menu using the document
camera control panel.
To view the on-screen display menu
1. Press the Camera button on the document camera control panel to switch to
Camera mode.
2. Press the Menu button to view the on-screen display menu.
3. Press the up and down arrow buttons to select a menu item.
4. Press the right arrow button to display a menu item’s submenu.
99-00864-20 D0 Setting Up and Turning On the Document Camera 9
Page 18

5. Press the left arrow button to return to the previous menu.
6. Press the Menu button to confirm your selection.
7. Press the Menu button again to close the on-screen display menu.
10 Setting Up and Turning On the Document Camera 99-00864-20 D0
Page 19

Turning Off and Storing the Document Camera
This chapter explains the basic procedure for turning off the document camera and storing
it safely.
CAUTION
Do not disconnect cables from the rear panel when the document camera is
turned on.
To turn off the document camera
1. If the lamp is on, slide the illumination lamp switch to turn the lamp off.
2. Press the Camera button on the document camera control panel to display the
camera image.
CAUTION
Do not turn off the document camera until it displays the camera image.
3. Press the Power button on the document camera control panel for three seconds to
turn off the document camera.
To store the document camera
1. Disconnect the cables from the rear panel.
2. Rotate the camera head as shown in the figure below.
CAUTION
Do not apply excessive force to the camera head.
99-00864-20 D0 Turning Off and Storing the Document Camera 11
Page 20

3. Rotate the column as shown in the figure below.
CAUTION
4. Place the document camera in a safe location.
CAUTION
Never rotate the camera column in the opposite direction.
Do not hold the camera head when you rotate the cam era column. Instead,
hold the camera column as you rotate it.
Do not hold the document camera by the camera column or the camera
head when you carry it. Hold the document camera with both hands when
you carry it.
Take care to prevent damage to the camera head.
Cleaning the Document Camera’s Lens
If the lens is dirty, gently wipe the lens with a soft and dry cloth.
CAUTION
Do not use volatile solvents like paint thinner or benzene to clean the lens.
12 T ur n ing Off and Sto rin g th e Do cum e nt Cam er a 99-00864-20 D0
Page 21

Using the Document Camera
Using the Document Camera in SMART Notebook Software
Your document camera includes a copy of SMART Notebook 10. You can use SMART
Notebook software to display and capture images and present them on your interactive
whiteboard. You can also use SMART Notebook’s full range of features to manipulate and
annotate images to enhance your lesson plan.
To display document camera images in SMART Notebook
1. Set up the document camera (see page 7) and turn it on (see page 9).
2. Start SMART Notebook.
3. Place an item under the document camera lens.
4. Press the document camera button on the SMART Notebook toolbar.
OR
Select Insert > Picture From SMART Document Camera.
The SMART Document Camera window appears.
5. You can control the document camera from the SMART Document Camera window.
– To change the image magnification, press the plus or minus buttons to the right of the
magnification icon .
– To adjust the image focus automatically, press the AF (Auto Focus) button.
OR
To adjust the image focus manually, press the plus or minus buttons to the right of the
focus icon .
NOTE: The image focus controls are very sensitive, and you may have to press the
buttons repeatedly to obtain the required focus.
– To change the image brightness, press the plus or minus buttons to the right of the
brightness icon .
To insert a document camera image in SMART Notebook
1. Display the document camera image in SMART Notebook (see previous procedure).
2. Press Capture and Close in the SMART Document Camera window.
OR
Press Capture to new page in the SMART Document Camera window to insert the image
in a new page.
The image in the SMART Document Camera window becomes an object in
SMART Notebook.
99-00864-20 D0 Using the Document Camera 13
Page 22

Displaying Printed Materials
You can set up the document camera to display printed materials.
To display printed materials
1. Set up the document camera and connect it to your computer (see page7).
2. Place a document under the camera lens.
3. Rotate the zoom dial on the camera until the document image is at the
desired magnification.
OR
In SMART Notebook, press the plus or minus buttons to the right of the magnification
icon until the document image is at the desired magnification.
4. Press the AF button on the document camera to focus the image.
OR
In SMART Notebook, press the AF button in the SMART Document Camera window to
focus the image. You can also fine tune the focus with the plus or minus buttons to the
right of the focus icon .
5. Press the brightness buttons on the document camera control panel to adjust the
image brightness.
OR
In SMART Notebook, press the plus or minus buttons to the right of the brightness ico n
to adjust the brightness.
14 Using the Document Camera 99-00864-20 D0
Page 23

Displaying Printed Materials Using the Stage
You can set up the document camera to display printed materials using the included stage,
magnetic sheet and anti-glare sheet.
To display printed materials using the stage
1. Set up the document camera and connect it to your computer (see page7).
2. Align the stage with the document camera using the stage positioning as a guide.
3. Place a document on the stage. Attach the documen t to the stag e with the magne tic sheet.
4. If glare makes the document difficult to see, cover the affected area with the
anti-glare sheet.
5. Rotate the zoom dial on the camera until the document image is at the desired
magnification.
OR
In SMART Notebook, press the plus or minus buttons to the right of the magnification
icon until the document image is at the desired magnification.
6. Press the AF button on the document camera to focus the image.
OR
In SMART Notebook, press the AF button in the SMART Document Camera window to
focus the image. You can also fine tune the focus with the plus or minus buttons to the
right of the focus icon .
7. Press the brightness buttons on the document camera control panel to adjust the
image brightness.
OR
In SMART Notebook, press the plus or minus buttons to the right of the brightness ico n
to adjust the brightness.
99-00864-20 D0 Using the Document Camera 15
Page 24

Displaying a Three Dimensional Object
You can adjust the angle of the camera column and colu m n he a d to ca pt ur e a thr e e
dimensional object from the side.
Adjust
Adjust
Adjust
To display a three dimensional object
1. Set up the document camera and connect it to your computer (see page7).
2. Adjust the angle of the camera column and camera head as shown in the previous figure.
NOTE: Position the object so that it is at least 50 mm away from the camera head. If you
position it closer, the camera is unable to focus.
3. Rotate the zoom dial on the camera until the obje ct image is at the desired magnification.
OR
In SMART Notebook, press the plus or minus buttons to the right of the magnification
icon until the object image is at the desired magnification.
4. Press the AF button on the document camera to focus the image.
OR
In SMART Notebook, press the AF button in the SMART Document Camera window to
focus the image. You can also fine tune the focus with the plus or minus buttons to the
right of the focus icon .
5. Press the brightness buttons on the document camera control panel to adjust the
image brightness.
OR
In SMART Notebook, press the plus or minus buttons to the right of the brightness ico n
to adjust the brightness.
16 Using the Document Camera 99-00864-20 D0
Page 25

Displaying a Wall Surface or Distant Object
You can rotate the camera head to face horizonta lly to display a distant wall surface or object.
Forward shooting Backward shooting
To display a wall surface or distant view
1. Set up the document camera (see page 7).
NOTE: Position the document camera so that it is at least 50 mm away from the wall
surface or object. If you position it closer to the wall surface or object, the camera is unable
to focus.
WARNING
2. Rotate the camera head to face forward or backward.
3. If you rotate the camera head so that the camera faces forward, change the Image
Rotation setting to On in the on-screen display menu. For more information on changing
settings in the on-screen display menu, see page 9.
If you use the document camera to capture images of people, turn the lamp
off. Do not stare directly into the lamp or shine the lamp directly into
someone’s eyes.
99-00864-20 D0 Using the Document Camera 17
Page 26
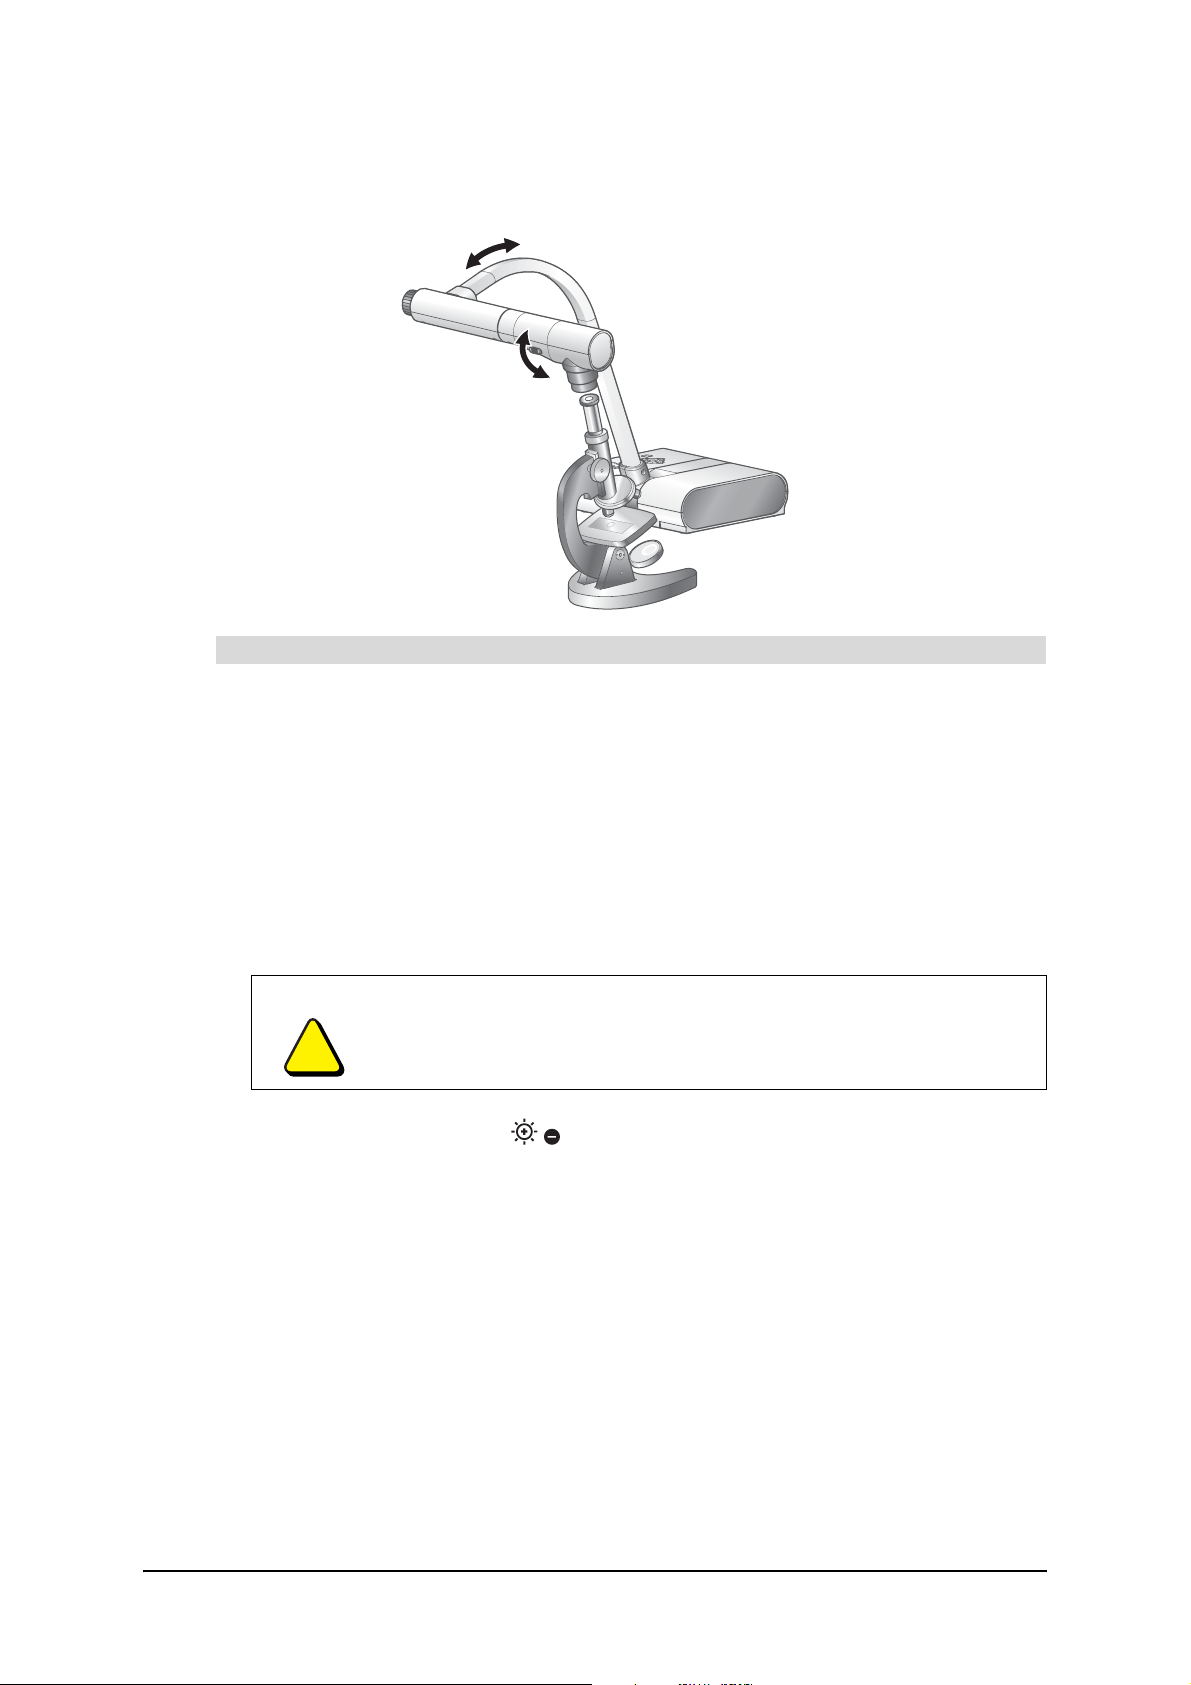
Displaying a Microscope Slide
You can present an image of a slide under a microscope.
Adjust
Adjust
To present a microscope slide
1. Place an object, such as a prepared slide, under the mic ro sco pe.
2. Adjust the focus of the microscope.
3. Set up the document camera (see page 7).
4. Rotate the camera column and the camer a head as shown above.
5. Change the Microscope setting to Set in the document camera’s on-screen display menu.
For more information on changing settings in the on-screen display menu, see page 9.
NOTE: The document camera automatically changes the Mode setting to Graphics.
6. Adjust the focus of the microscope.
CAUTION
Take care to prevent the document camera from hitting the microscope,
which could cause damage to the document camera, to the microscope or
to a microscope slide.
7. Press the brightness buttons on the document camera control panel to adjust
image brightness.
NOTE: After you finish using the document camera with the microscope, change the
Microscope setting in the on-screen display menu to Off. For more information on
changing settings in the on-screen display menu, see page 9.
18 Using the Document Camera 99-00864-20 D0
Page 27
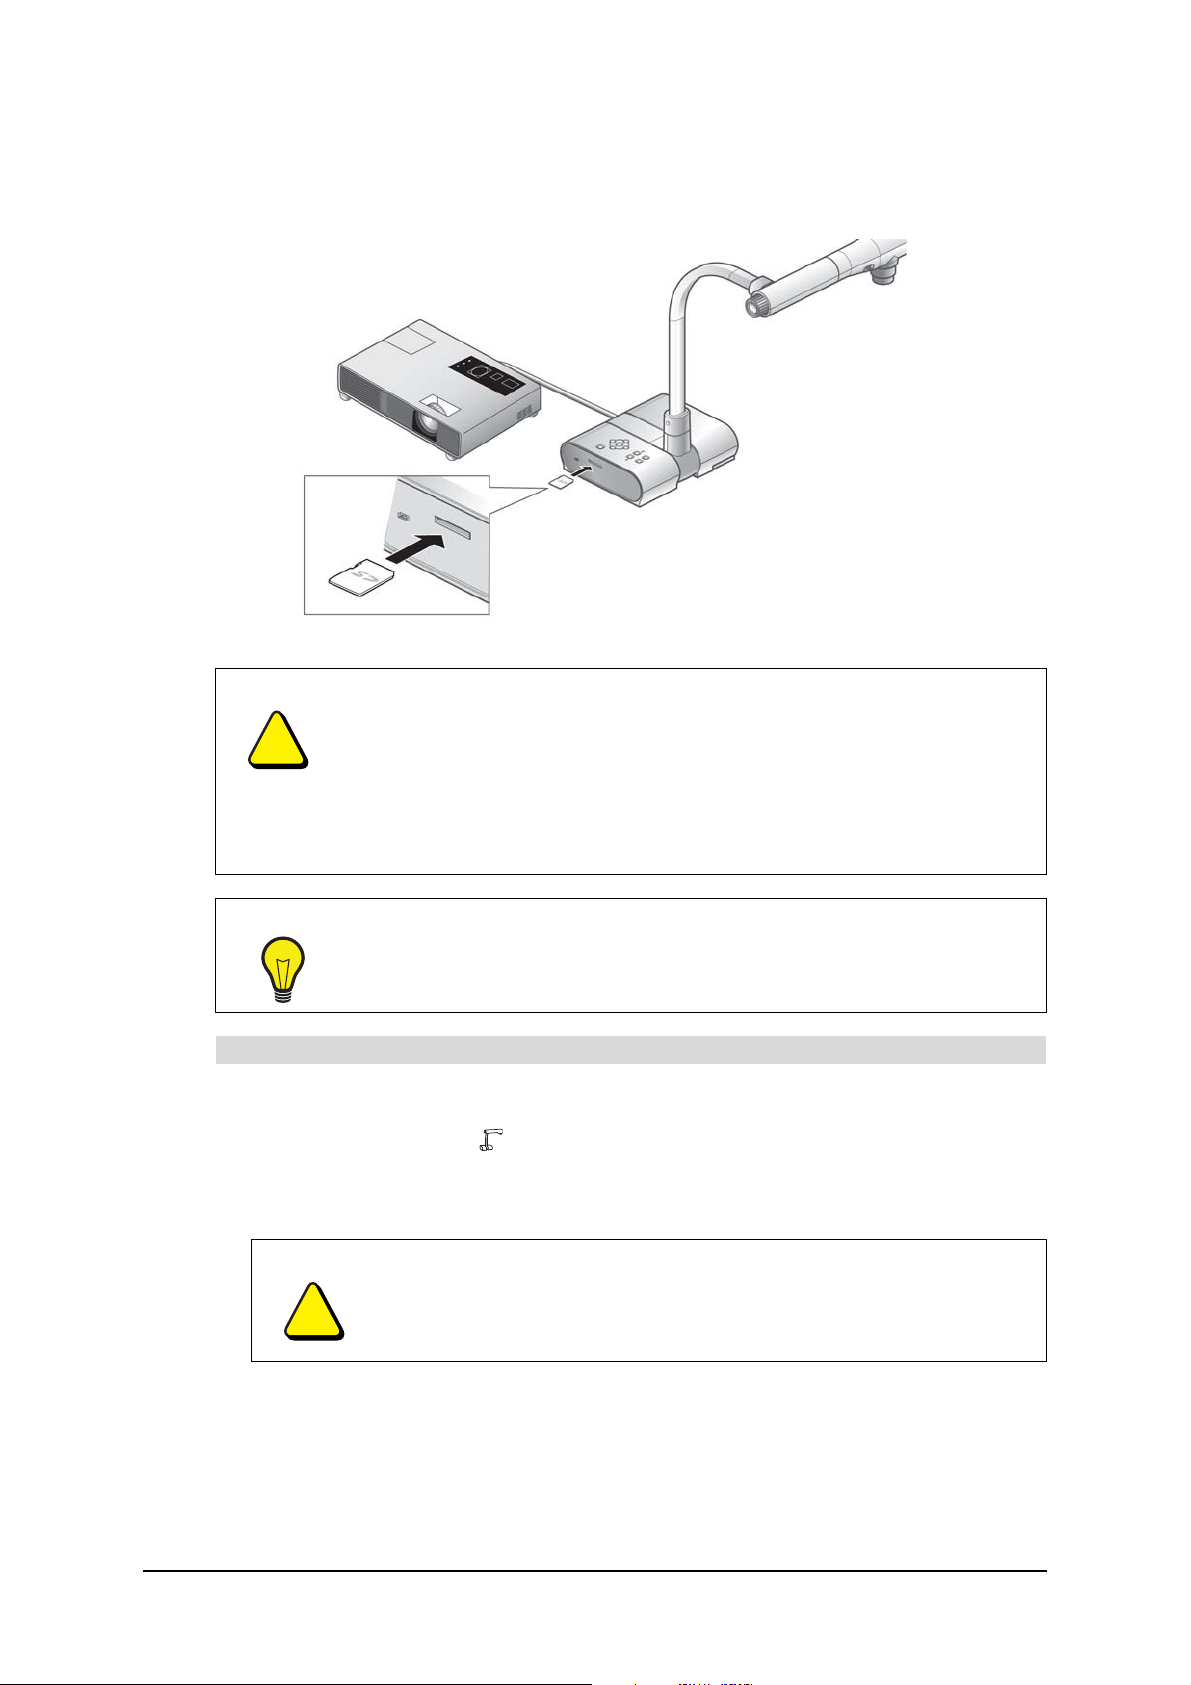
Displaying Image Data from an SD Memory Card
You can display image data from an SD (Secure Digital) memory card (not provided).
CAUTION
TIP
Avoid static electricity when handling SD memory car ds. SD memory ca rds ar e
vulnerable to static electricity and exposure to static electricity can cause the
memory card to malfunction or corrupt its contents.
Do not insert an SDHC memory card. These memory cards are not compatible
with the document camera.
SMART Technologies assumes no liability for any damage caused by the loss
of data in the memory card or any passive damage.
For best results, use a Panasonic® 256MB or 512MB SD memory card.
To insert the SD memory card
1. Set up the document camera (see page 7).
2. Press the Camera button on the document camera control panel to present the camera
image on the connected projector or television display.
3. Insert the memory card into the SD slot on the side panel.
CAUTION
Do not insert a memory card into the document camera unless the
connected projector or television display shows the camera image.
Insert the memory card with the labeled side up. Do not force an
upside-down memory card into the slot.
99-00864-20 D0 Using the Document Camera 19
Page 28

To save an image
CAUTION
TIP
1. Press the Camera button on the document camera control panel to switch to
Camera mode.
2. If the projector or television display shows the on-screen display menu, press the Menu
button on the document camera control panel to close the menu.
3. Press the Image Save button on the document camera control panel to save
the image.
NOTES
– If you save an image while the document camera is digitally zooming, the document
camera saves the image at the default zoom ratio.
Y ou are unable to save an image to an SD memory card if the memory card
is write-protected.
Do not remove the SD memory card from the document camera when the
document camera is reading from or writing to the memory card.
SMART Technologies is not liable if the document camera fails to save
an image.
If you haven’t saved an image since you turned on the document camera,
save an image as a test.
– The document camera does not save the image with the correct date and time.
To display the image
1. If the projector or television display shows the on-screen display menu, press the Menu
button on the document camera control panel to close the menu.
2. Press the SD Mode button on the document c ame ra control panel to switch to SD mode.
The projector or television display shows an image from the SD memory card.
NOTES
– The connected projector or television display shows only images from the SD memory
card that you saved with the document camera.
– If you try displaying image data with a format that isn’t compatible with the document
camera, the connected projector or television display shows a black or gray image.
– If you try displaying image data from an SD memory card without first inserting the
memory card, the connected projector or display shows a black image and the
message “NO CARD.”
3. Press the arrow buttons on the document came ra con tro l panel to display th e ne xt or
previous image.
4. Rotate the zoom dial to enlarge or reduce the size of the image. To view a different pa rt of
an enlarged image, press the arrow buttons on the document camera control panel. To
reset the default zoom ratio, press the AF button.
20 Using the Document Camera 99-00864-20 D0
Page 29

To delete an image
1. If the projector or television display shows the on-screen display menu, press the Menu
button on the document camera control panel to close the menu.
2. Press the SD Mode button on the document c ame ra control panel to switch to SD mode.
The projector or television display shows an image from the SD memory card.
3. Press the arrow buttons on the document came ra con tro l panel to display th e ne xt or
previous image until you see the image you want to delete.
4. Press the Menu button on the document camera control panel.
The on-screen display menu appears. For more information on using the on-screen
display menu, see page 9.
5. Select Delete in the on-screen display menu, and then press the right arrow button to
display its submenu.
6. If you want to delete the current image only, select Current, and then press the Menu
button to confirm your selection.
OR
If you want to delete all images on the SD memory card, select All, and then press the
Menu button to confirm your selection.
7. Select Yes, and then press the Menu button to delete the image or images.
OR
Select No, and then press the Menu button to cancel.
To display a slide show
1. If the projector or television display shows the on-screen display menu, press the Menu
button on the document camera control panel to close the menu.
2. Press the SD Mode button on the document c ame ra control panel to switch to SD mode.
The projector or television display shows an image from the SD memory card.
3. Press the Menu button on the document camera control panel.
The on-screen display menu appears. For more information on using the on-screen
display menu, see page 9.
4. Select Start Slide Show in the on-screen display menu, and then press the rig ht arrow
button to display its submenu.
5. Select Start?, and then press the Menu button to start the slide show.
6. After you finish the slide show, press the Menu button to stop the
slide show.
To format the SD memory card
1. If the projector or television display shows the on-screen display menu, press the Menu
button on the document camera control panel to close the menu.
2. Press the SD Mode button on the document c ame ra control panel to switch to SD mode.
The projector or television display shows an image from the SD memory card.
99-00864-20 D0 Using the Document Camera 21
Page 30

3. Press the Menu button on the document camera control panel.
The on-screen display menu appears. For more information on using the on-screen
display menu, see page 9.
4. Select Format Media in the on-screen display menu, and then press the right arrow button
to display its submenu.
5. Select Format?, and then press the Menu button to confirm your selection.
To remove the SD memory card
CAUTION
Remove the memory card before you turn off the document camera.
1. After you finish using the SD memory card, p ress th e Camera button on the document
camera control panel to display the camera image on the connected proje ctor or display.
CAUTION
Do not remove an SD memory card from the document camera unless the
connected projector or display shows the camera image.
2. Push the SD memory card to remove it from the slot.
Transferring Image Data from the SD Memory Card to a Computer
If you connect a computer to the document camera using a USB cable, you can transfe r image
data from an SD memory card (not provided) to a computer.
NOTE: You can transfer image data to your computer only if the computer is running the
Microsoft® Windows® 2000 (SP4 or later), Windows XP (SP2 or later), or Windows Vista®
operating system.
TIP
For best results, use a USB 2.0 compliant cable.
22 Using the Document Camera 99-00864-20 D0
Page 31

CAUTION
Do not connect or disconnect the USB cable when the document camera is
turned on.
To transfer image data from an SD Memory Card to a computer
1. Set up the document camera (see page 7).
2. Change the USB Mode setting to Mass Storage in the document camera’s on-screen
display menu. For more information on changing settings in the on-screen display menu ,
see page 9.
CAUTION
You must change the USB Mode setting to Mass Storage before
connecting the document camera to the computer using the USB cable.
3. Press the Power button on the document camera control panel for three seconds to
turn off the document camera.
4. Connect the USB cable to the document camera’s rear panel and the computer.
5. Press the Power button on the document camera control panel to turn on the
document camera.
6. Insert the SD memory card (see page 19).
7. Using your computer, browse to the My Computer/Removable Disk/DCIM/100SMART
folder. You can view and save the images from the SD memory card using any software
that displays JPEG files.
NOTES
– You’re unable to delete, lock, unlock or format data on the SD memory card using the
computer.
– You’re unable to save, delete, lock, unlock or format data using the on-screen display
menu when the document camera’s USB Mode setting is Mass Storage.
– You’re unable to record image data with the correct date and time.
8. After you finish transferring image data to the computer, reset the document camera’s
standard configuration as follows:
a. Press the Power button on the document camera control pa nel for three seconds to
turn off the document camera.
b. Disconnect the USB cable from the rear panel.
c. Press the Power button on the document camera control panel to turn on the
document camera.
d. Change the USB Mode setting to Application in the on-screen display menu.
99-00864-20 D0 Using the Document Camera 23
Page 32

Changing the Image Selection
You can use the document camera with a projector or television display to show the camera
image, the video signal from a connected compu ter or an image from a n SD memory card. You
can switch between these images without disco nn ec tin g an d re co nn e ctin g th e cab le s.
To display the Camera mode
Press the Camera button on the document camera control panel.
To display the video signal from a connected computer
1. Press the PC button on the document camera control panel.
NOTE: You’re unable to switch to the video signal from a connected computer if the DIP
switch is set to VIDEO (see page 7).
2. If you’ve connected the document camera to a laptop computer with external output
selection functionality, set the laptop’s output mode to External.
To display the image from an SD memory card
1. If the projector or television display shows the on-screen display menu, press the Menu
button on the document camera control panel to close the menu.
2. Press the SD Mode button on the document camera control panel.
Using Image Mate Software
You can also use Image Mate software to view and present document and object images with
the document camera and your computer.
To install Image Mate software
1. Visit the document camera page of the SMART support website:
www2.smarttech.com/st/en-US/Support/DocumentCamera/280.
2. Click Image Mate Software, and then follow the on-screen instructions to complete the
download and installation.
To display images in Image Mate software
1. Set up the document camera and connect it to your computer (see page7).
2. Start Image Mate software.
3. Press the play button on the Image Mate software toolbar to display the camera image.
The Live Monitor window appears.
4. Press the Stop button on the toolbar to freeze the image in the Live Monitor window.
5. To change the image magnification, press the Zoom In or Zoom Out buttons on
the toolbar.
6. To switch to full screen mode, press the Full Screen button on the toolbar.
7. To capture the image to a new window, press the Still Capture button on the toolbar.
8. To use the drawing tools in the Draw window, press the Draw button on the toolbar.
24 Using the Document Camera 99-00864-20 D0
Page 33

Changing the Focus, Brightness and Graphics Mode
You can manually adjust the focus, change the brightness mode and change the graphics
mode if your document camera is connected to a television display or projector using the
on-screen display menu.
Adjusting the Focus
Y o u can press the AF button on the camera head to automatically focus the camera. However,
you may need to focus the camera manually if you want the camera to focus on any of the
following objects:
• a low contrast object
• an object with a repetitive pattern, such as stripes
• an object that glitters or reflects strong light
• an object with a bright background or excessive contrast
• a very da rk obje ct
• multiple objects that are positioned in a variety of distances from the camera
• moving objects
• a different part of a 3-D object
To manually adjust the focus
1. Press the Menu button on the document camera control panel.
The on-screen display menu appears. For more information on changing settings in the
on-screen display menu, see page 9.
2. Select Focus.
3. Select the up and down arrow buttons on the document camera control p anel to adjust the
focus.
4. After you finish adjusting the focus, press the Menu button on the document camera
control panel to close the on-screen display menu.
Adjusting the Brightness
By default, the brightness of the image changes automatically depending upon the object. If
you want to prevent the document camera from automatically changing the brightness of the
image, you can set the brightness mode to Manual.
NOTE: You can press the brightness buttons on the document camera control panel to
adjust image brightness in both modes.
To change the brightness mode
If you want the document camera to automatically adjust the brig htness of image s, change the
Brightness setting to Auto in the document camera on-screen display menu.
OR
If you want to manually adjust the brightness of images, change the Brightness setting to
Manual in the document camera on-screen display menu.
99-00864-20 D0 Changing the Focus, Brightness and Graphics Mode 25
Page 34

For more information on changing settings in the on-screen display menu, see page 9.
NOTE: You can also change the brightness mode from Manual to Auto by pressing both
brightness buttons on the document camera control panel at the same time.
TIP
If an object is exposed to bright light, you can reduce the brightness of the
image by closing curtains or moving the light source.
Changing the Graphics Mode
You can change the document camera settings to improve the quality of some documents. For
example, you can sharpen the image of black characters against a white background, or
enhance the quality of color drawings or photos.
NOTES
• To customize the advanced graphics settings such as edge effects, change the Mode
setting in the on-screen display menu to Graphics.
• If you change the Microscope setting to Set, the document camera automatically changes
the Mode setting in the on-screen display menu to Graphics.
• If you connect the document camera to a DLP projector, change the Mode setting in the
on-screen display menu to Graphics.
To change the graphics mode
If you want to sharpen the image of black characters against a white background, change the
Mode setting to Text 3 in the document camera on-screen display menu.
OR
If you want to enhance the quality of color drawings or photos, change the Mode setting to
Graphics in the document camera on-screen display menu.
OR
If you want to reset to the default graphics mode, change the Mode setting to Text 1 in the
document camera on-screen display menu.
For more information on changing settings in the on-screen display menu, see page 9.
26 Changing the Focus, Brightness and Graphics Mode 99-00864-20 D0
Page 35

Troubleshooting the Document Camera
Issue Solution
No image displays or
appears.
No image displays after you
restart your computer.
The image is out of focus. • Press the AF button to sharpen the image.
• Turn off the document camera (see page 11). Securely
connect all cables and connect the camera’s AC ad apter to
a power outlet. Wait for several seconds, and then press
the Power button on the d ocument camera control p anel
to turn it on.
• Adjust the zoom dial. The camera may be magnified and is
displaying a blank section of the document.
• Ensure that the Output DIP switches on the rear panel are
set to the proper image output (RGB or Video on the left,
and NTSC or PAL on the right).
• If you’re using the included USB connector, set the left
Output DIP switch to RGB.
• If the document camera is connected to a USB hub and you
restart your computer, turn off the power on the document
camera, wait for several seconds, and then press the
Power button on the document camera control panel to
turn it on again.
• Use the manual focus option in SMART Notebook (see
page 13).
• Move the document or object further away from the
camera lens.
The image is scrambled or
black and white.
The image is too dark.
The image is broken apart by
lines.
The image doesn’t move. • Select Menu > Pause > Off to turn off the camera’s pause
• Ensure the right DIP switch is set to NTSC if you’re using an
NTSC display, or that it’s set to PAL if you’re using a
PAL display.
• Press the brightness buttons on the document
camera control panel to adjust the brightness.
• If the document or object isn’t well lit, turn on the
illumination lamp.
• Adjust the distance between the camera lens and the
document or object.
• Adjust your projector’s settings so that the lines disappear.
Refer to your projector’s documentation for more info.
feature in the on-screen display menu.
99-00864-20 D0 Troubleshooting the Document Camera 27
Page 36

28 Troubleshooting the Document Camera 99-00864-20 D0
Page 37

Regulatory Compliance
Waste Electrical and Electronic Equipment Regulations
Waste Electrical and Electronic Equipment regulations apply to all electrical and electronic
equipment sold within the European Union.
When you dispose of any electrical or electronic equipment, including SMART products, we
strongly encourage you to contact your local WEEE recycling agency for recycling and
disposal advice.
Your SMART product required the extraction and use of natural resources for its production. It
may contain hazardous substances. By disposing of electrical and electronic equipment
appropriately, you lower the impact of these substances upon health and the environment and
reduce the pressure on natural resources. Recycling agencies can reuse or recycle most of
the materials from your product.
Please think about how you intend to dispose of any product that has a WEEE symbol or
accompanying WEEE guidelines.
If you need more information on the collection, reuse and recycling of electrical and electronic
equipment, please contact your local WEEE recycling agency.
Alternatively, contact your local reseller or SMART Technologies for information on the
environmental performance of our products.
Restriction of Certain Hazardous Substances (RoHS) Directives
SMART Technologies supports global efforts to ensure that electronic equipment is
manufactured, sold and disposed of in a safe and environmentally friendly manner.
This product meets the requirements of the European Union's Restriction of Certain
Hazardous Substances (RoHS) Directive 2002/95/EC, as well as the People's Republic of
China's Control of Pollution Caused by Electronic Information Products (China RoHS).
Subsequently, this product also complies with other, less stringent directives that have arisen
in various geographical areas, and that incorporate the Euro pean Union's RoHS d irective as a
basis.
For more information, refer to your local regulations or visi t www.smarttech.com
.
99-00864-20 D0 Regulatory Compliance 29
Page 38

Customer Support
Online Support
Visit www.smarttech.com/support to view and download user’s guides, “how-to” and
troubleshooting articles, software and mo re.
Training
Visit www.smarttech.com/trainingcenter for training materials and information about our
training services.
Contacting SMART Technical Support
SMART Technical Support welcomes your call. However, if you experience difficulty with your
SMART product, you may want to contact your local reseller first. Your local reseller may be
able to resolve the issue without delay.
All SMART products include online, telephone, fax and e-mail support:
Online: www.smarttech.com/contactsupport
Telephone:+1.403.228.5940 or
Toll Free 1.866.518.6791 (U.S./Canada)
(Monday to Friday, 5 a.m. – 6 p.m. Mountain Time)
Fax: +1.403.806.1256
E-mail: support@smarttech.com
General Inquiries
Address:SMART Technologies
1207 – 11 Ave SW, Suite 300
Calgary, AB T3C 0M5
CANADA
Switchboard:+1.403.245.0333 or
Toll Free 1.888.42.SMART (U.S./Canada)
Fax:+1.403.228.2500
E-mail:info@smarttech.com
Warranty
Product warranty is governed by the terms and conditions of SMART’s “Limited Equipment
Warranty” that shipped with the SMART product at the time of purchase.
Registration
To help us serve you, register online at www.smarttech.com/registration.
99-00864-20 D0 Customer Support 30
Page 39

Page 40

www.smarttech.com/support
www.smarttech.com/contactsupport
Support +1.403.228.5940
Toll Free 1.866.518.6791 (U.S./Canada)
99-00864-20 REV D0
 Loading...