

Page 1
y
Smartswitch Toilet Controller
Model: STS-220
The unique Deluxe Programmable Toilet Controller by SmartSwitch was designed for all electric
marine toilets with remote, fresh or salt water flushing supply via an inlet pump or water solenoid
valve. The stylish control panel provides fully automatic programmed flushing when the
Flush touch pad is pressed. It also provides independent operation of the inlet or discharge
pumps for maintenance or line clearance when the manual touch pads are used. In-built
troubleshooting features and toilet pump protection are standard.
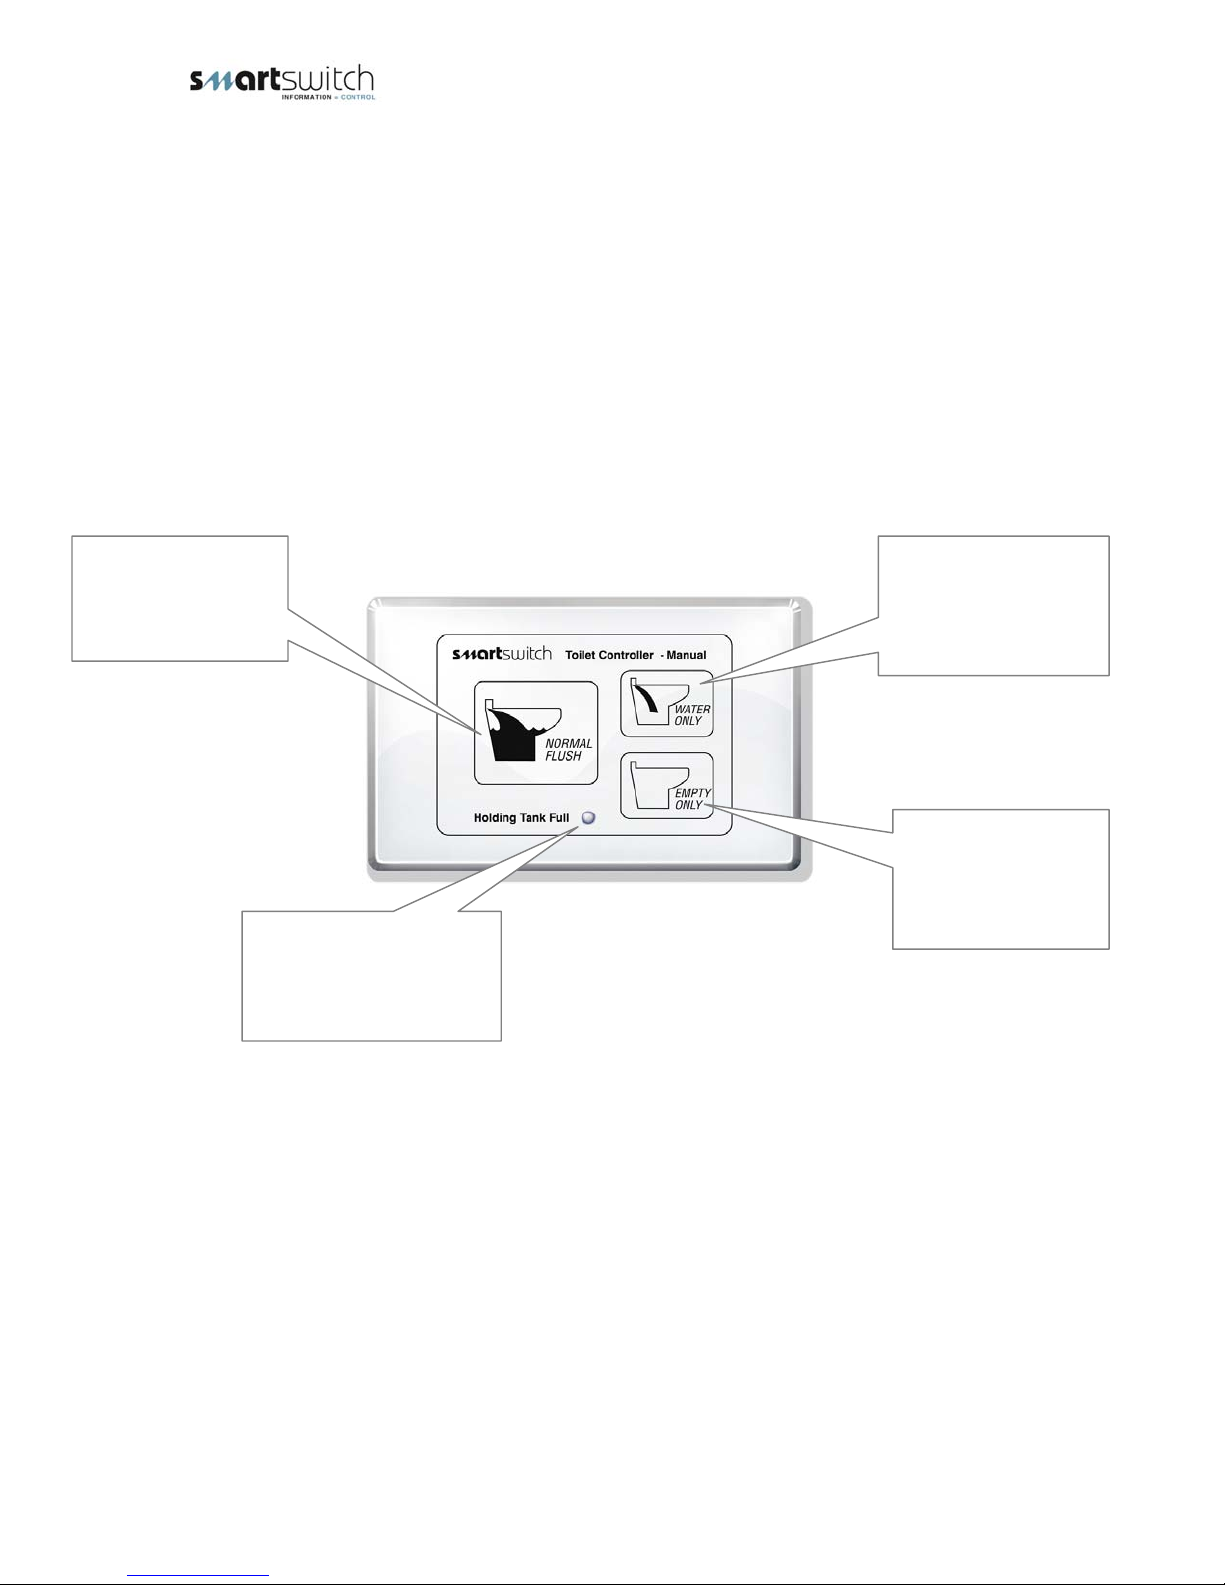
When pressed the
system will activate
a complete flush
cycle automatically.
This Product has been Factory Preset to operate effectively without
Should you wish to alter these settings please follow proceeding
If the tank system is
connected, this light will
turn on when the Holding
Tank is full and disable
an
further flush cycles.
making any further adjustments.
Water will be added
while the button is
held down.
(Max 20 seconds)
The extraction motor
will run while the
button is held down.
(Max 20 seconds)
instructions.
1
Page 2

Programming
This product has three Model Modes of operations:
Model Mode 1 = Standard Mode
Model Mode 2 = Tecma Silence (Series)
Model Mode 3 = Tecma Prestige (Series)
This product has been factory default set to Model Mode 2 (see page 3)
Factory Default: T1 = 20 seconds Model Mode = Tecma Silence (Series)
Please Note: If you have a Tecma Silent (Series) Toilet System ALWAYS choose Model Mode 2.
Should you wish to change these settings then proceed as below.
Advisory Warning: 1.5 litres per flush is the recommended minimum flush setting for discharge
lines of less than 6 feet. Dilution is the secret to efficient waste transfer, through pipes and must
be considered when programming your controller. Increase your flush volume appropriately if the
discharge line is greater than 6 feet in length.
Note – Variations in controllers may substitute the following buttons: Flush = Normal
Flush, Fill = Water Only, Empty = Empty Only.
Programmable Time Options (Actuate to ± 0.1%)
Timer T1 & T2 (Water Valve/Pump) & (Extraction Motor) from 1 to 20 seconds.
Timer T3 (Water Valve/Pump) is programmable from 0 to 20 seconds.
Programming for Standard Model Mode 1
Step 1 – Placing the unit in program mode:
After wiring and applying power, hold the Fill & Empty buttons down together for 3 seconds. The
Holding Tank Full LED will give three quick flashes indicating you have entered program mode.
You may now release both buttons.
Once in program mode you can now program one of the following three times: T1 = Water
Valve/Inlet Pump, T2 = Discharge Pump or T3 = Water Valve/Inlet Pump. Step 1 will need to be
repeated for each of these delay times.
Setting T1 Water Valve/Inlet Pump Time:
After placing the unit in program mode, as in Step 1 above, press the Flush button
times required for the Water Valve/Inlet Pump time (one press = 1 second, two = 2 sec’s, etc).
The Tank LED will flash once indicating a valid key press. Note: If the button is pressed 21 times
it will start back at 1 second.
Once this is done press the Empty button to store this value. The unit will flash three times
indicating the time has been set and you have left program mode.
Setting T2 Discharge Pump Time:
After placing the unit in program mode, as in Step 1 above, press the Empty button
times required for the Discharge Pump time (one press = 1 second, two = 2 sec’s, etc). The Tank
LED will flash once indicating a valid key press. Note: If the button is pressed 21 times it will start
back at 1 second.
Once this is done press the Flush button to store this value. The unit will flash three times
indicating the time has been set and you have left program mode.
the number of
the number of
2
Page 3

Setting T3 Water Valve/Inlet Pump Time:
After placing the unit in program mode, as in Step 1 above, press the Fill button
times required for the Water Valve/Inlet Pump time (one press = 0 sec’s, two = 1 second, three =
2 sec’s, etc). The Tank LED will flash once indicating a valid key press. Note: If the button is
pressed 21 times it will start back at 0 seconds.
Once this is done press the Flush button to store this value. The unit will flash three times
indicating the time has been set and you have left program mode.
the number of
Programming for Tecma Silence (Series) Model Mode 2
Step 1 – Placing the unit in program mode:
After wiring and applying power, hold the Fill & Empty buttons down together for 3 seconds. The
Holding Tank Full LED will give three quick flashes indicating you have entered program mode.
You may now release both buttons.
Once in program mode you can now program one of the following two times: T1 = Water Inlet /
Discharge Pump or T3 = Water Valve/Inlet Pump. Step 1 will need to be repeated for each of
these delay times.
Tecma mode differs as the water inlet and pump discharge times work together:
The pump discharge time will be half (1/2) of the T1 = Water Inlet time (see timing chart page 4)
therefore ONLY T1 & T3 need to be programmed.
Setting T1: Water Inlet / Discharge Pump Time:
After placing the unit in program mode, as in Step 1 above, press the Flush button
times required for the Water Inlet / Discharge Pump time (one press =1 second, two = 2 sec’s,
etc). The Tank LED will flash once indicating a valid key press. Note: If the button is pressed 21
times it will start back at 1 second.
Once this is done press the Empty button to store this value. The unit will flash three times
indicating the time has been set and you have left program mode.
Setting T3: Water Valve/Inlet Pump Time:
After placing the unit in program mode, as in Step 1 above, press the Fill button
times required for the Water Valve/Inlet Pump time (one press = 0 sec’s, two = 1 second, three =
2 sec’s, etc). The Tank LED will flash once indicating a valid key press. Note: If the button is
pressed 21 times it will start back at 0 seconds.
Once this is done press the Flush button to store this value. The unit will flash three times
indicating the time has been set and you have left program mode.
the number of
the number of
Programming for Tecma Prestige (Series) Model Mode 3
There is no programming required for this mode as the times are fixed (see timing chart page 4).
3
Page 4

Model Timing Chart
This device has three different timing sequences, any one may be selected.
(Factory default is Model Mode 2 = Tecma Silence)
Mode 1: Standard Model Mode 1
Start T1 Water Inlet Off T2 Discharge Motor Off T3 Water Inlet
Programmable
- 20 sec’s
from 1
2 sec’s 2 sec’s
Model Mode 2: Tecma Silence (Series) - Factory Default
Tecma Single Button Emulation Mode:
Start T1 Water Inlet All Off All Off
Programmable
from1 - 20 sec’s
Extraction/Motor
Model Mode 3: Tecma Prestige (Series) - Fixed time = 20 seconds
T1 Water Inlet
Programmable
from 1
- 20 sec’s
10 sec’s
Ext/Motor
4 sec’s½ of T1
Programmable
from 0 - 20 sec’s
2 sec’s
Water Inlet
Programmable
from 0 - 20 sec’s
Start
14 sec’s 18 sec’s 20 sec’s
Extraction/Motor
4
Page 5

Programming the Device for Model Mode or Disable Features
Place the unit in Model Mode / Disable Features Program Mode:
Hold the Fill & Empty buttons down together for 3 seconds. The Holding Tank Full LED will give
three flashes indicating you have entered program mode. While still holding down these two
buttons, press the Flush button
model mode / disable features Program Mode, release both buttons.
Model Mode Select:
Press the Flush button, the Holding Tank Full LED will give four flashes indicating you have
entered model mode program mode.
You may now select which model mode: Press the Flush button
(model mode 2), the Empty button for Standard Mode (model mode 1) or the Fill button for
Tecma Prestige (Series) (model mode 3). The Tank LED will give three flashes indicating you
have finished model program mode.
Disable Features:
You can disable or enable two features:
1/ The Manual buttons. If disabled the only button that will work is the Flush button. The Fill and
Empty buttons will be disabled.
2/ Tank Full. If enabled and the tank is FULL the LED will be turn on and NO buttons will
work. If disabled and the Tank is FULL the LED will be on and ALL buttons will still work.
3/ Deactivation of the Fill button after use. If this feature is enabled then after the Fill button has
been pushed and released it will be deactivated. The Empty button will need to be pressed for at
least 1 second to reactivate the Fill button. This feature can be disabled or enabled see page 5.
Place the unit in Model / Disable Features Program Mode as above (top of page).
Push the EMPTY button
entered disable feature mode.
You may now select which feature to disable.
1/ Push the FLUSH button
2/ Push the FILL button
3/ Push the EMPTY button
The Tank LED will give three flashes indicating you have finished model program mode.
Repeat the step to re enable these features.
NOTE: The factory default setting is on for both of these features.
, the holding tank full LED will give three flashes indicating you have
to disable or enable the Manual buttons.
. The Tank LED will give six flashes indicating you have entered
for Tecma Silence (Series)
disable or enable the Tank Full feature.
to disable or enable the Fill button deactivation feature.
SEE PAGE 6 FOR PROGRAMMING FLOW CHART
5
Page 6

Programming Flow Chart
Hold the Fill & Empty
buttons down together for 3
(LED will give three flashes)
seconds
While still holding down
these two buttons, press the
Flush button
(LED will give six flashes)
Push Flush
Tecma Silence Series
Push FLUSH
For Model.
(LED will give
four flashes)
Push Empty
For Disable.
(LED will give
three flashes)
Push Empty
Standard Mode
Push Fill
Tecma Prestige Series
Push Fill
Disable Fill & Empty
Push Flush
Tank Full Disable
LED will
give three
flashes and
leave
program
mode
Operating Instructions:
Flush:
Pressing the Flush button will run the auto cycle (see page 3 for details).
Fill:
While this button is held down the water valve/inlet pump will activate (Maximum 20 seconds per
press). After activation this button will be disabled. The Empty button will need to be pressed for
at least 1 second to reactivate this button. This feature can be disabled or enabled see page 5.
Empty:
While this button is held down the discharge pump will activate (Maximum 20 seconds per press).
Holding Tank Full: (Optional)
If the vessel is fitted with a Holding Tank Full Sensor Switch, it can be wired to the controller as
per diagram FIG 1 – page 6. If this sensor is on, due to a full tank, it will disable the controller
until the tank has been emptied. If this feature is not required leave the Float Switch Input
unconnected.
6
Page 7

p
g
Electrical Specifications:
Supply Voltage = 12-30 Volts DC (Auto-sensing)
Quiescent Current = .015 Amps
Input = EMI Protected
Max Motor Output = 44 Amps
Max Valve Output = 44 Amps
Max EST Output = 12 Amps
Protection = Reverse Polarity, Over Voltage, Over Temperature, Short Circuit.
Connections
Tank Full Float Switch
Battery Negative
GND
FIG 1
Water Inlet Pum
Dischar
e Pump -
/Valve -
EST + (Not used)
Water Inlet Pump/Valve +
Discharge Pump +
Battery Positive
Toilet Control
7
Page 8

Fitting Instructions
This device should be fuse protected and mounted in a dry area as close to the Toilet as is
practical. DO NOT cover the ventilation slot on the top of this device.
If the keyboard is mounted in an area where it may experience moisture or wetting, please
ensure that a bead of silicon is placed around the keyboard to waterproof it.
“ Warning ”
Fitting Face Panel:
Drill a small hole, approx 8mm, through the wall for the cable. Align panel, ensuring level and fasten with
screws supplied. Remove the protective film from the clip on surround panel and clean with a soft cloth.
Clip in place.
13mm
Toilet Control
84mm
115mm
72mm
Toilet Control
8
Page 9

All technologies, design and Intellectual property is owned by
Smart Switch Technologies Ltd
Phone 0064-4-293-4201 Fax 0064-4-293-4201
Email: info@smartswitch.co.nz
Po Box 272, Waikanae. NZ
Web: www.smartswitch.co.nz
9
 Loading...