

Page 1
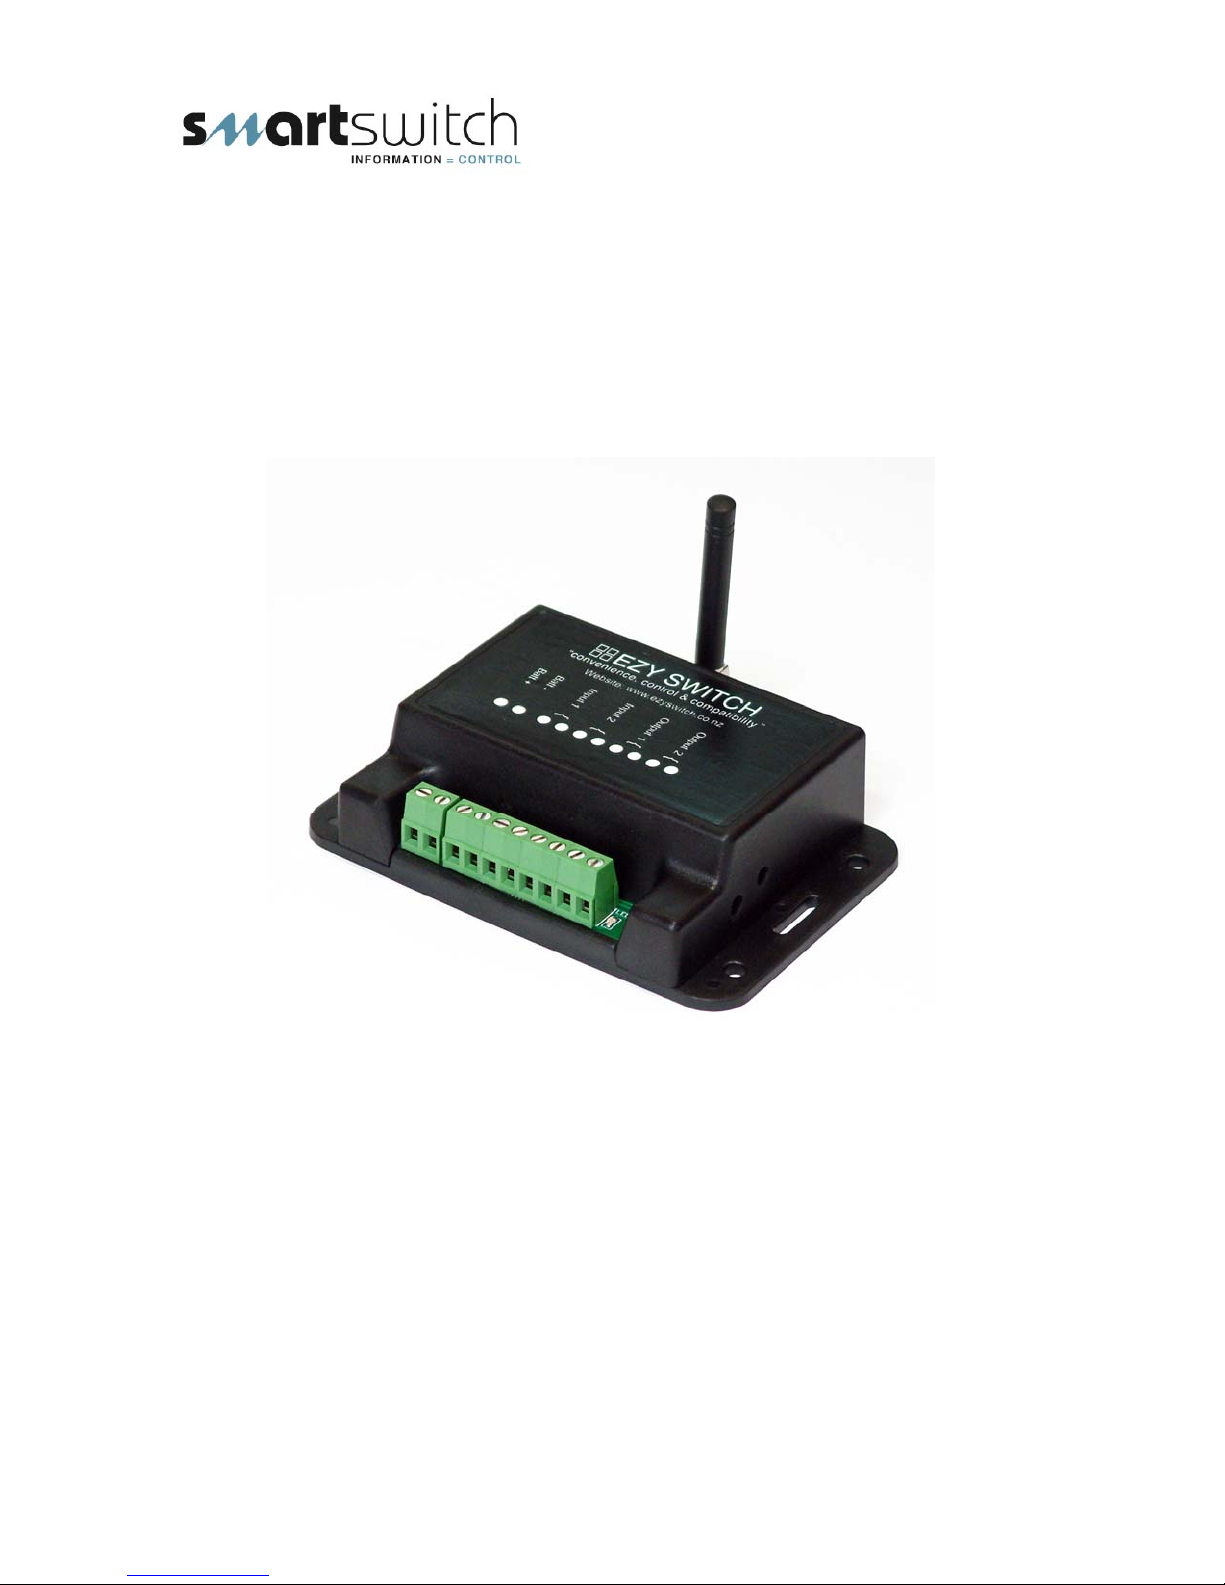
SMART SWITCH
SMS-2
System Monitor
Installation Manual
Page 2

Table of Contents
Features 3
System / Connections 4
Outputs 5
Inputs 6
COMMANDS
Getting Started – Setting Up Initial Owner 7
Adding a Master 8
Removing a Master 8
Adding an Administrator 8
Removing the Administrator 9
Get a list of all the Masters 9
Turn programmed numbers lookup on or off 9
Text all programmed numbers on or off 9
Turn All Texts OFF and Disable Inputs 10
Turn All Texts ON and Enable Inputs 10
Testing 10
Get a List of the Inputs 10
Get a List of the Outputs 10
Naming Inputs/Outputs and Changing Names 11
Change the Input Delays 11
Change Input to Normally Open or Normally Closed 12
Set Input as a latched Input 12
Set Input as a non-latched Input 12
Reset latched Input 12
Link an Input to an Output 13
Get linked information 13
Setup Input Tick off 13
Turn an Output ON or OFF 14
Turn an Output ON for a set time 14
Invert Output 14
Make an Output Pulse On and Off 15
Clear Output Pulse (Set to non-pulsed) 15
Turn Output response On / Off 16
Save Output Status 16
Set Battery Alarm trigger voltage 16
Link Battery Alarm to Output 17
Check Battery Supply Voltage 17
Latching / Non-latching battery alarm 17
Reset Latched Battery Alarm 17
Alive text 18
Get Firmware Version 19
Resetting Unit 19
Get Signal Strength 19
Reset Unit to Factory Defaults 19
Warranty 20
Appendix One
Table of User Selected Input and Output Names 21
Detailed Explanation Of Input Delays 21
Trouble Shooting Guide 22
Appendix Two
SMS-2 Application Notes (Shore Power) 23
SMS-2 Application Notes
SMS-2 Application Notes
SMS-8 Application Notes
(Intruder Alarm) 24
(Intruder Alarm) 25
(Air Conditioner / Heating) 26
2
Page 3

Smart Switch SMS-2 Installation & Operation Manual
Features - Model SMS-2
• Receive text messages on your cell phone alerting you to potential problems
anywhere in the world
• Send commands to control lights, pumps, appliances, air conditioning, etc.
via text message from your cell phone
• Connects to most GSM networks world-wide
• Module= Duel Band 900/1800MHz
• Up to 5 cell phones may be designated as “masters” to send commands and
receive alert text messages
• All set-up and changes made via text (no need for a computer)
• Control up to two (2) devices using text message commands
• Monitor up to two (2) devices that use switched contacts (switching Inputs
which use contacts that open or close upon activation such as a float switch):
o Programmable Input delays (max 99 minutes)
o Programmable for Latching or Non-Latching Inputs
o Programmable for Normally Open or Normally Closed Inputs
o Programmable for Normally Open or Normally Closed Outputs
• Inputs and Outputs names are user programmable via text command – up to
20 characters
• Link any Input to any Output (Example: Link intruder sensor or smoke
detector [input] to light or alarm horn [output])
• Monitors battery supply voltage and sends alarm message if low battery is
detected at below the programmed alarm setting
• On-demand updates via text message to interrogate status of:
o Current battery voltage
o Status of all Inputs
o Status of all Outputs
o List of all designated “masters”
• Compact Size for wall or horizontal surface mounting:
o 117mm x 78mm x 30mm
Monitor:
• Shore power disconnect
• Pumps running
• High water alarms
• Security & alarms
• Entry alerts
• Smoke alarms
• And much, much more
Control:
• Battery charger
• Fridge/Freezer
• Air Conditioning/Heating
• Lighting
• Hot water systems
• Irrigation systems
• Or any other device
3
Page 4
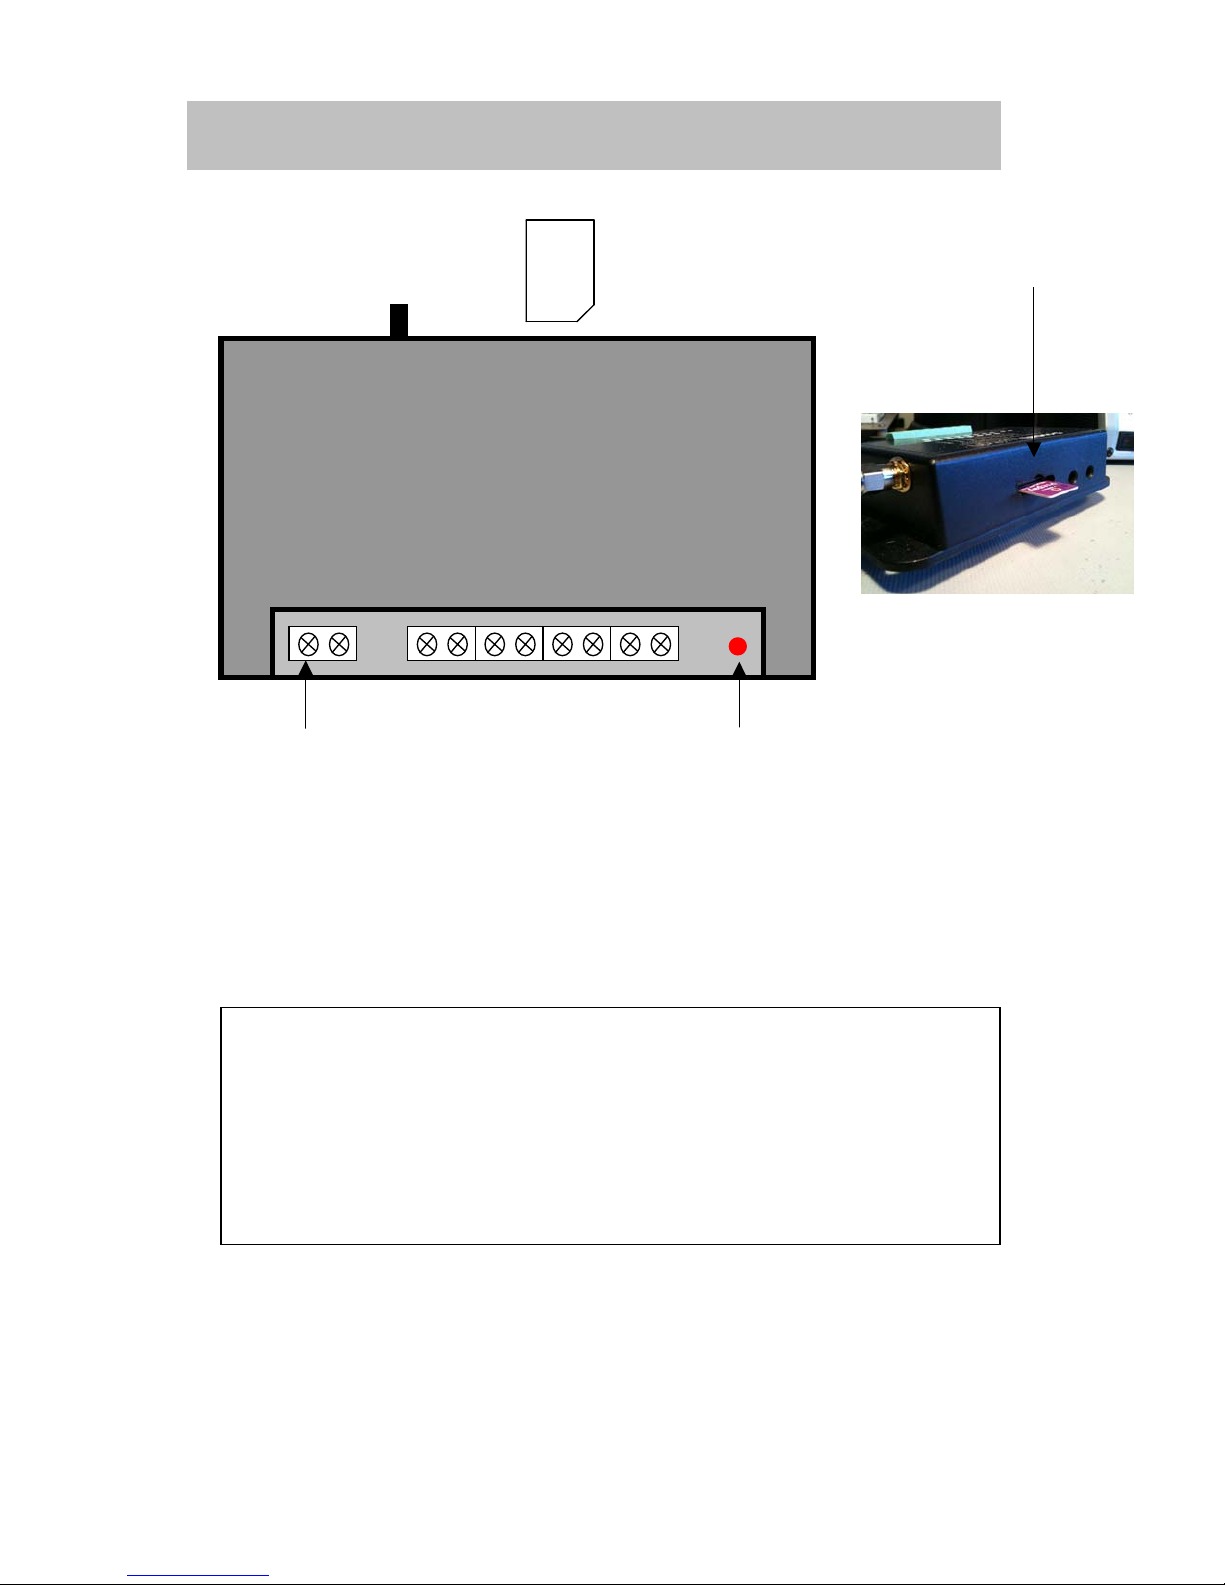
Smart Switch SMS-2 Installation & Operation Manual
System
Terminal 1
Signal LED:
If the LED flashes once every 1 second, this indicates the cellular network cannot be
found (out of GSM coverage range). Remedy = Re-locate the device or use a longer
aerial or signal booster.
If the LED flashes once every 3 seconds, this indicates the cellular network has been
found (all ok).
Terminal 1 = Batt +
Terminal 2 = Batt -
Terminal 3 = Input 1 Terminal 7 = Ouput 1 ( N/O )
Terminal 4 = Input 1 Terminal 8 = Output 1 ( Com )
Terminal 5 = Input 2 Terminal 9 = Output 2 ( N/O )
Terminal 6 = Input 2 Terminal 10 = Output 1 ( Com )
Electrical Specifications:
Supply Voltage
Quiescent Current
Data Retention
Outputs
Max Input voltage
SIM Card
Ezy Switch Ltd
SMS-2 Terminal Electrical Specifications
12 to 30 Volts DC @ 800mA
20 Milli-amps
10 years (without power)
Relay = 3 A resistive @ 125VAC
30vdc
Signal LED
SIM Card
4
Page 5
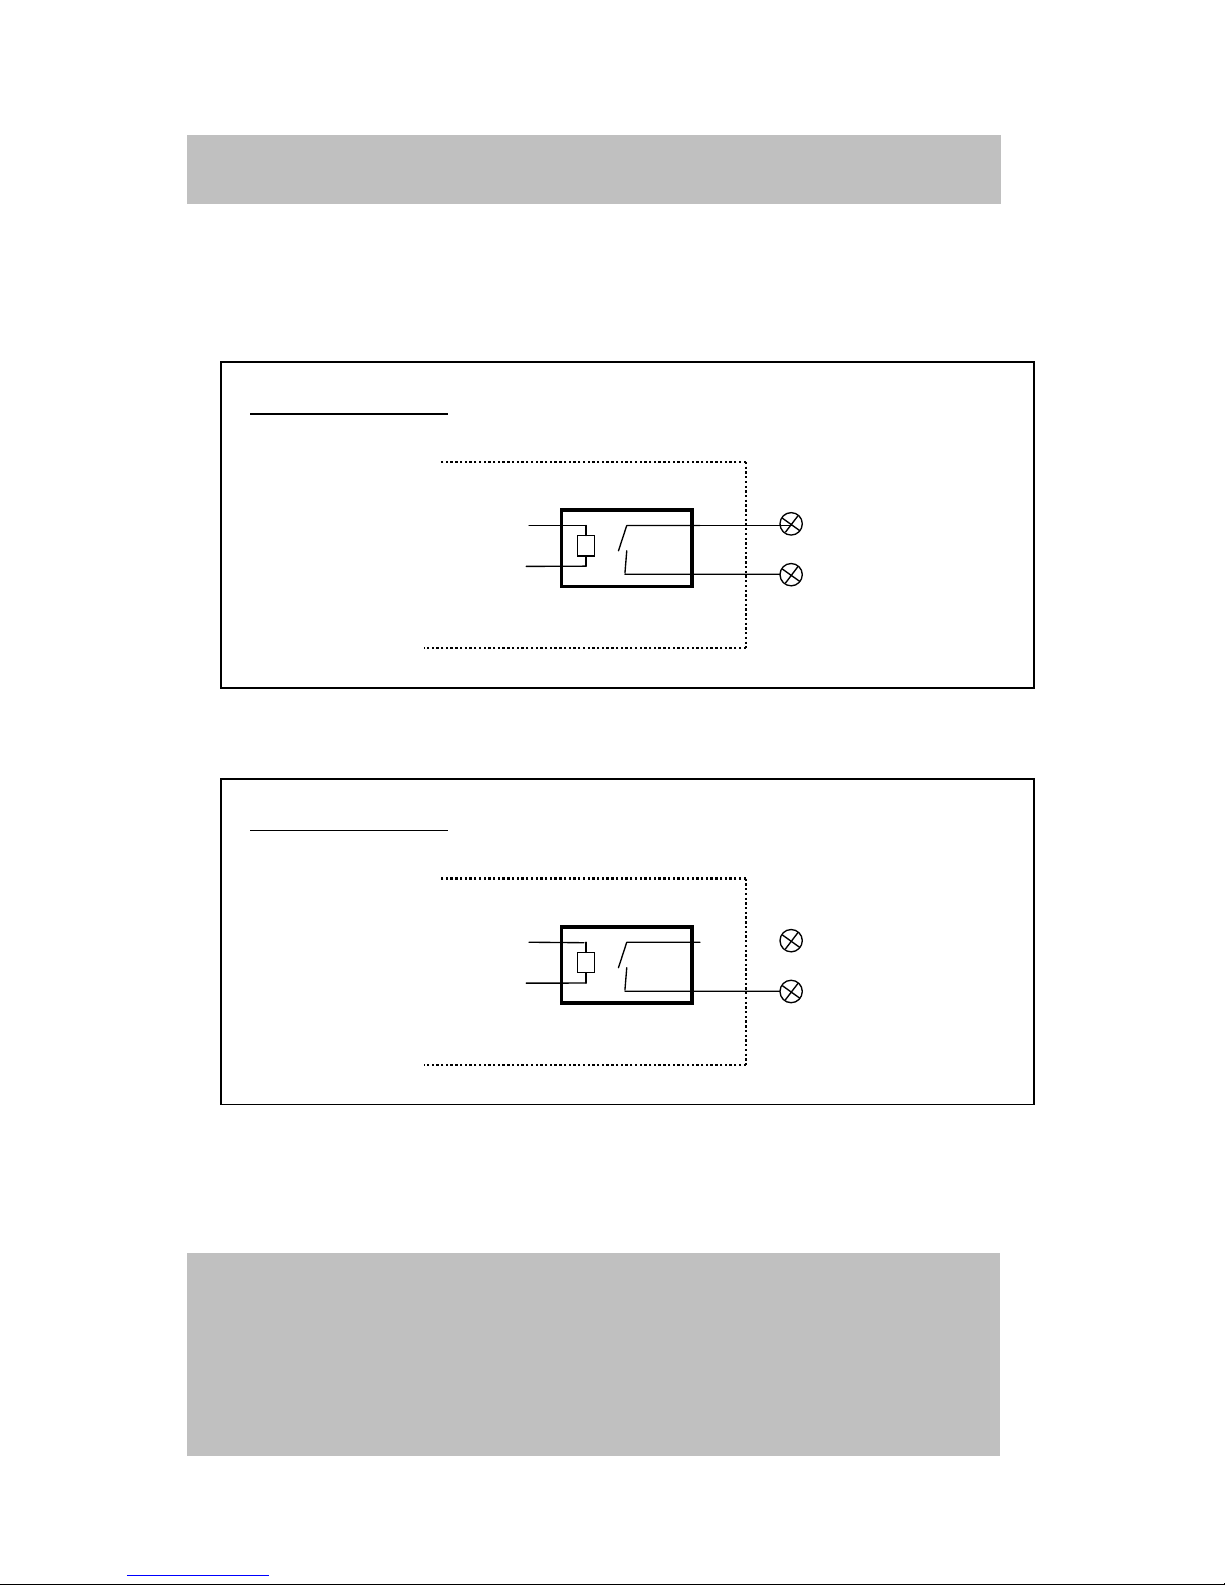
Smart Switch SMS-2 Installation & Operation Manual
g
Outputs
The SMS-2 has two (2) Outputs. The Outputs are Relays rated at 3 A resistive @ 125VAC
Relay 1 Connection
Relay 2 Connection
Internal Relay
Internal Relay
Relay
Terminals
7-8
Relay
Terminals
9-10
A registered electrician must be used when connectin
to the 120/240v main supply voltage.
!! Important Note !!
5
Page 6
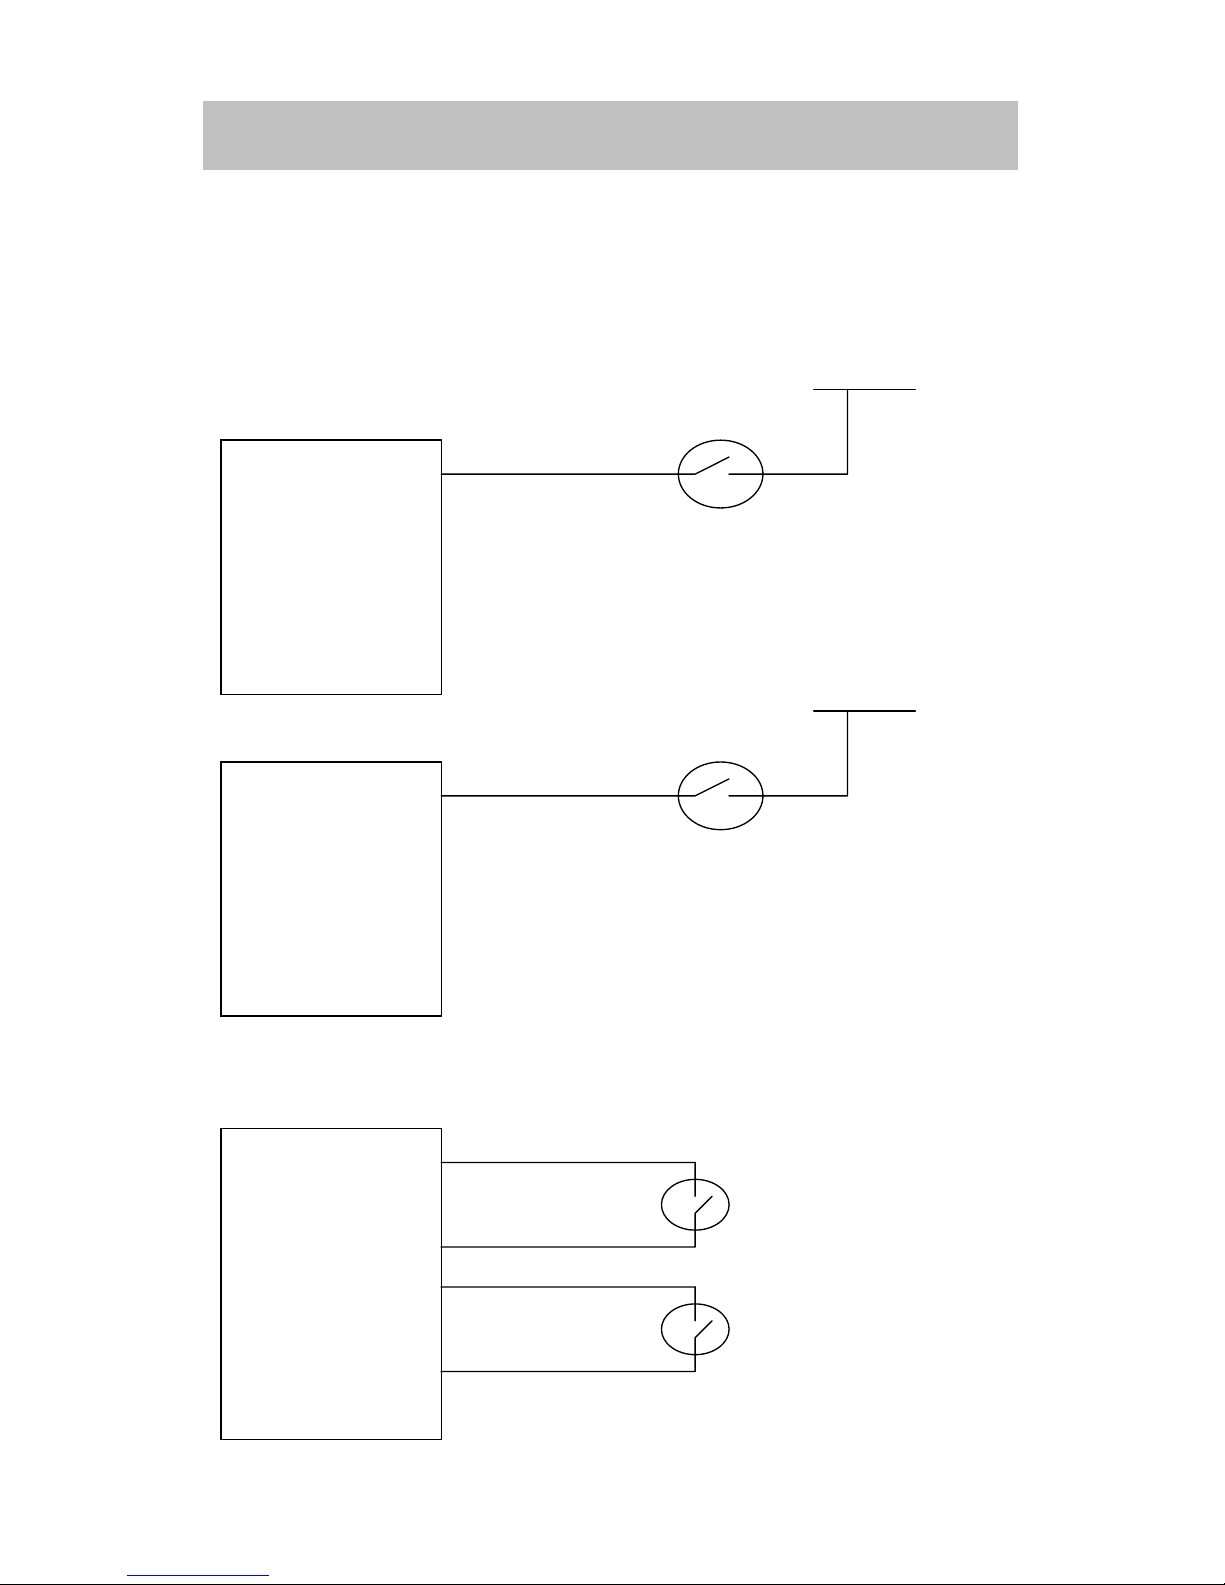
Smart Switch SMS-2 Installation & Operation Manual
Inputs
The SMS-2 has two (2) Inputs and can be connected as per Fig 1a /Fig1b or Fig 2
Fig 1a
SMS-2
Input 1
Terminal 4
Switch
+10 - 30vdc
Fig 1b
SMS-2
Input 2
Terminal 6
Fig 2
Terminal 3
Terminal 4
Terminal 5
Terminal 6
SMS-2
Switch
+10 - 30vdc
Switch / Input1
Switch / Input2
6
Page 7

SMART Switch SMS-2 Installation & Operation Manual
!! IMPORTANT !!
Setting up system for the first time:
Please ensure the SIM card does NOT have a PIN number or is locked has been
ACTIVATED with the network provider, insert into SIM slot on the back (see
page 4) and power the unit up.
When the unit is first powered ON a mobile (cell phone) number must be set for
initial programming. This phone number is called the “Initial Owner”.
You must wait for the LED to be slowing flashing (EVERY 3 seconds) before
sending any commands. Please wait a few minutes, as the unit will set autoband and other details for the country.
IMPORTANT:
For all text commands, spelling
Setting up the first user
Command:
Note:
When the Initial user setup has been successful the system responds with:
“ Your number has just been added to the user list”
Note:
user page 8) and then remove his number (Remove user page 8).
Set user
the unit will pick up the users number from the incoming text.
The initial user could be the installer who would set the system up, add other users (Add
Country Code:
?? Is the country code and XXXXXXXX is the mobile number without the preceding 0.
Examples:
New Zealand
= 64 (+64 and the number without the preceding 0)
If the users number is 0211893070 then Command = add user +64211893070
Australia
= 61 (+61 and the number without the preceding 0)
If the users number is 0412882900 then Command = add user +61412882900
Singapore
=0065 (+65 and the number without the preceding 0)
If the users number is 0412882900 then Command = add user +65412882900
USA & Canada
= 001 (+1 and the Area Code & Number)
If the users number is 412-555-1234 then Command = add user +14125551234
If a user sends a text message to the system, which is not an exact match with the
commands, the system responds with:
Sorry either that device does not exist or the message format is not understood, please
check the spelling and try again
If anyone other than a programmed user sends a text message to the system, the
system responds with:
Sorry you are not permitted to access this device
and spaces must be strictly followed.
!! NOTE !!
7
Page 8

Smart Switch SMS-2 Installation & Operation Manual
Commands
Adding a User
Command:
If the master is already in the list, the system responds with:
Sorry +??XXXXXXXX is already active and cannot be added twice, please check
the number and try again
If the number does not fit the checks, to confirm it is a valid number (all digits must be
numbers excluding the leading +), the system responds with:
+??XXXXXXXX does not appear to be a valid number, please check that there
are no letters or symbols in the number and try again
If the number does not lead with a +, the system responds with:
??XXXXXXXX does not appear to have the country code in international format
(e.g. +??...) please check this and try again
However if everything is fine, the system responds with:
The user number +??XXXXXXXX has been added to the user list
(
Add user +??XXXXXXXX (see
Setting up the first user page 7 must be done first)
Note:
Country Code page 7)
Removing a User
Command:
If you try to remove the only master, the system responds with:
If the number sent is not currently on the list, the system responds with:
If everything is ok, the system responds with:
Remove user +??XXXXXXXX
Cannot delete the only master; if you would like to change masters add the new
one before removing the old
+??XXXXXXXX is not currently on the masters list so cannot be removed,
please check the number and try again
The user number +??XXXXXXXX has been removed from the user list
(see
Country Code page 7)
Adding a Administrator
Command:
The system responds with:
If the admin has already been set, the system responds with:
If an administrator number is set then this is the only number the system will accept
commands from. Other user will be sent texts but CAN NOT send any commands.
Add admin +??XXXXXXXX (see
The number +??XXXXXXXXXXX has been set as the system administrator
The administrator number +??XXXXXXXXXXX has already been set
Country Code page 7)
8
Page 9

Smart Switch SMS-2 Installation & Operation Manual
Removing a Administrator
Command:
The system responds with:
Note: this completely removes the administrator from the user list, it does NOT move the user down
a security level to normal “user” unless the administrator is the only number in the system in which
case it will move the user from administrator to user.
The system responds with:
Get a list of all the Masters
Command:
The system responds with:
User list is: +??XXXXXXXX +??XXXXXXXX … (up to 5 numbers inc owner)
If there are too many numbers to display in one txt, a second txt will be sent showing
the last two numbers
First text followed by:
Turn programmed numbers lookup on or off
Command:
If User lookup is On the SMS-2 will only respond to numbers that have been programmed into
the unit using the Master Add command as per above.
If User lookup is
The system responds with:
OR
PLEASE NOTE:
Text all programmed numbers on or off
Command:
If Text all is On the SMS-2 will text all user that have been programmed into the unit with the
reply to the command.
If Text all is
The system responds with:
OR
PLEASE NOTE:
to users that have been programmed into the unit.
Remove admin
The administrator number and feature has been removed
This number has been changed from administrator to a user
User list
+??XXXXXXXX +??XXXXXXXX +??XXXXXXXX …
User lookup on (or) off (System default = On)
the SMS-2 will respond to any number that sends the correct command.
Off
The user lookup list feature has been turned on and the unit will only accept
commands from programmed users
The user lookup list feature has been turned off and the unit will only accept
commands from any users
Input changes will only be sent to users that have been programmed into the unit.
Text all on (or) off (System default = On)
the SMS-2 will only text the number that initiated the command with the reply.
Off
All users in the list will now receive notification texts ( On )
Only the number sending the text command will receive notification text ( Off )
This command does not affect the inputs all Input changes will only be sent
9
Page 10

Smart Switch SMS-2 Installation & Operation Manual
Turn all Input Text’s OFF
With alerts turned off the device will NOT text every time any Input changes but the Inputs are
still active so you can send a “Input status” query at any time.
Command:
The system responds with:
be disabled even after the unit is reset or rebooted)
OR
Command:
The system responds with:
If an input is triggered no alert text will be sent but if the input has a link to an output that
output will activate.
Alerts off
Alerts off exc links (
Alerts have been disabled
only available in ver 1.2 or higher)
note
Alerts have been disabled but linked outputs will still work
(this is saved to memory and will still
Turn all Input Text’s ON
Command:
The system responds with:
Alerts on
Alerts have been enabled
Testing
Command:
The system responds with: Battery is currently ??.? volts, signal strength is ?? % , run test
now. The unit will now test the inputs and outputs and waits for the inputs to be triggered.
When input1 is turned on output1 will turn on, when input1 is turned off output1 will turn off
When input2 is turned on output2 will turn on, when input2 is turned off output2 will turn off
Test finished
test
Get a list of the Inputs
Command:
Where ?? is either On or Off
If an Input is a latching input and on:
If an Input is a latching input and off:
Input status
Currently,
Currently the latching Input
Currently the latching Input
INPUT NAME
is ??,
INPUT NAME
INPUT NAME
INPUT NAME
is ??
is on and latched
is of
Get a list of the Outputs
Command:
Output status
The system responds with:
Currently,
Output Name
Where ?? is either On of Off
Output Name
is ??,
is ??
10
Page 11

Smart Switch SMS-2 Installation & Operation Manual
Naming Inputs and Outputs and Changing Names:
Command for initial Naming or changing name of Input or Output:
Note: The system default names are:
Inputs:
Outputs:
The name can contain a dash ( – ) but NOT a space. eg. “Pond-pump” is OK
Command:
Change
(Example: Change input1 to Alarm)
(Example: Change output1 to Pump)
This command is used to change Inputs and Outputs to a new name. Names can be words
up to a total length of 20 characters, please
spaces. Once the name has been changed, the particular Input or Output is always referred
to by the
respond using the new name.
names.
If the device you are trying to rename is not currently in the list, the system responds with:
Sorry either that device does not exist or the message format is not understood, please
check the spelling and try again
If the new name chosen does not fulfill the requirements of a name, the system responds
with:
Sorry that name is not allowed, please check that it is between 1 and 20 characters
long
If everything is ok, the system responds with:
Or
The output name has been changed to YYYYYYYYYY
Input1, Input2
Output1, Output2
Current Input or Output Name
new name
The input name has been changed to YYYYYYYYYY
to
New Input or Output Name
the name can contain a dash ( – ) but NOT
note
(e.g. Alarm). For commands or status interrogation and the SMS-2 will
Use table on page 20 to record your new Input and Output
Change the Input Delay
(You can have a delay when an Input turns either On or Off )
Command:
(Example: Change input1 on delay to 10 min)
Command:
(Example: Change input1 off delay to 10 min)
( XX can be between 1 and 99 seconds or 1 to 99 minutes )
The system responds with:
The
If XX is not between 1 and 99 or no value is entered, the system responds with:
Because no value was set the
Change
Change
INPUT NAME
INPUT NAME
INPUT NAME
(On or OFF) delay has been set to XX (sec or min)
(see page 20 for detailed explanation)
on delay to XX sec or min
off delay to XX sec or min
INPUT NAME
(On or OFF) delay has been set to 30 secs
11
Page 12

Smart Switch SMS-2 Installation & Operation Manual
Change Input to Normally Open or Normally Closed
Command:
This command is used to define if the switch wired to the Input is normally open or normally
closed. The Input defaults are set for a normally open switch (which is active closed). That is,
the Input becomes active when the switch is closed.
Active closed means: the Input switch is normally open and goes closed to activate Input.
Active open means: the Input switch is normally closed and goes open to activate Input
The system responds with:
OR if you try to set it for its current setting, the system responds with:
Make
INPUT NAME
INPUT NAME
INPUT NAME
will now activate when the input (either opens or closes)
is all ready set for (either open or closed) and does not need changing
active open (or) closed
.
Set an Input as a latched Input
Make
Command:
This sets the Input to a latched Input and the system responds with:
The Input
INPUT NAME
INPUT NAME
latching (Example: Make alarm latching)
is now a latching input
Set an Input as a Non-latched Input
Make
Command:
(Example: Make alarm non-latching)
This sets the Input to a NON latched Input and the system responds with:
INPUT NAME
nonlatching
The Input
INPUT NAME
is now a nonlatching input
Reset a latched Input
Command:
The system responds with:
If the Input is not latched, the system responds with:
Reset
INPUT NAME
INPUT NAME
(used to return Input to “non-activated” state)
INPUT NAME
is no longer in a latched state and will begin to be monitored again
latch is not currently set so does not need clearing
(Example: Reset alarm)
12
Page 13

Smart Switch SMS-2 Installation & Operation Manual
Link an Input to an Output
Link
Command:
(Example: Link alarm to siren)
The system responds with:
INPUT NAME
to
OUTPUT NAME
INPUT NAME
The
To clear a link
Command:
has been linked to
Clear
INPUT NAME
The system responds with:
OUTPUT NAME
link (Example: Clear alarm link)
The link between
Function:
Output will also turn on. Full control of the Output is still available.
If a link is setup between an Input and an Output and the Input is turned ON, the
Get Linked infomation
Command:
The system responds with:
Which inputs are linked to which outputs
if there are no links the response is
Currently Input1 is not linked to an output
Currently Input2 is not linked to an output
Link status
INPUT NAME
OUTPUT NAME
and
has been cleared
Input Tick Off Feature.
The inputs can have a Tick-Off feature, if this feature is turned on and an input is on
the unit will send a reminder text every 10 minutes until the text command “Tick
INPUT NAME off is sent. (max number of texts=20)
To turn the feature on:
Command:
If everything is fine, the system responds with:
To turn the feature off:
Command:
If everything is fine, the system responds with:
Make
The input tickoff feature has been turned on
Make
The input tickoff feature has been turned off
INPUT NAME
INPUT NAME
tickoff on
tickoff off
13
Page 14

Turn an Output ON or OFF
Command:
If everything is fine, the system responds with:
This command is used to turn on/off Outputs. If the item named is not an Output or the
command is not spelt correctly the system responds with:
OUTPUT NAME
Sorry either that output does not exist or the options ON or OFF has not been used
Turn an Output ON for XX mins or hrs or days
Command:
If everything is fine, the system responds with:
XX can be between 1 to 99 either minutes or hours or days (max time 99 days)
If no time is specified then the output will be turned on until the “Turn output Off “ command is
sent
The Output on time XX can also be programmed so when ever the “Turn output On
command is sent the output will turn on for the programmed time
Command:
The
The
was set
Sorry you can only set mins, hrs or days please check the spelling and try again
OUTPUT NAME
If everything is fine, the system responds with:
OUTPUT NAME
If no value is set the system will respond with:
OUTPUT NAME
If the text mins or hrs or days does not follow the XX (time) the system will respond with:
Smart Switch SMS-2 Installation & Operation Manual
Turn
OUTPUT NAME
Turn
OUTPUT NAME
Set
OUTPUT NAME
on time has been set to XX (mins or hrs or days)
has been turned on and will stay on because no time-out value
has been turned off (or) on
has been turned on for XX (mins or hrs or days)
on (or) off
on for XX (either mins or hrs or days)
on time to XX (mins or hrs or days)
(Example: Turn Generator on)
Change Output to Normally On or Normally Off
Command:
This command is used to define if the output relay is normally open or normally closed.
System default is normally open.
The system responds with:
Make
The OUTPUT NAME
OUTPUT NAME
is now inverted
inverted
To non-invert the output:
Command:
The system responds with:
Make
OUTPUT NAME
noninverted
OUTPUT NAME
The
is now noninverted
14
Page 15

Smart Switch SMS-2 Installation & Operation Manual
Make an Output pulse On and Off
Command:
This sets the output pulse time, XX can be between 1 and 99 seconds
When the Output ON command is sent as follows:
Turn
The Output will turn On for the programmed pulse time and then turn Off, the system
responds with:
OUTPUT NAME
If you try and set an Input as a pulse Output, the system responds with:
If the Output is already a pulsed Output the system responds with:
OUTPUT NAME
If the Output is initially off and everything goes correct, the system responds with:
Make
OUTPUT NAME
Sorry pulses only apply to outputs, please check the name and try again
OUTPUT NAME
On
has been pulsed on and off
is already a pulsed output so does not need changing
pulse XX secs
OUTPUT NAME
If the pulse time has not been set as per above the defalt time is 3 seconds and the system
responds with:
is now a pulsing output
OUTPUT NAME
If the Output was initially On when the Output was set, the system responds with:
is now a pulsing output with a defalt pulse time of 3 seconds
OUTPUT NAME
is now a pulsing output and has been turned off in preparation for use
If the Output is linked to an Input, when the Input is triggered the system sends:
INPUT NAME
linked output
Clear Output pulse (make output non pulsing)
OUTPUT NAME
has been pulsed on then off
Command:
If you try to clear a pulsed Output when it is not set, the system responds with:
OUTPUT NAME
If you try and clear a pulse on an Input, the system responds with:
Otherwise if its all ok, the system responds with:
Clear OUTPUT NAME pulse
is not currently a pulsed output so does not need changing
Sorry pulse only apply to outputs, please check the name and try again
OUTPUT NAME
is no longer a pulsing output
15
Page 16

Smart Switch SMS-2 Installation & Operation Manual
Turn Output response On / Off
This command is used to turn the output response text On or Off.
If the output response is turned off then a response text is not sent when outputs are turned
on or off System default is ON (send response).
To turn the feature on:
Command:
The system responds with:
To turn the feature off:
Command:
The system responds with:
Turn respond on
Turn respond off
This feature has been enabled, response text will be sent
This feature has been disabled, response text will not be sent
Save Output Status
This command is used to define if the output state is saved to memory and restored to it state
after a power recycle. E.g. if an output was On when the power was turned off then when the
power is restored the output will turn back on. Note this does not apply if an output was turned
on for a specified time. System default is not saved.
Command:
The system responds with:
The output condition will be saved and restored if the power is reset
To turn the feature off:
Command:
The system responds with:
The output condition will not saved
Note: If you want this for both outputs then the command needs to be sent for both outputs
Make
Make
OUTPUT NAME
OUTPUT NAME
save
nonsave
Set Battery Alarm Trigger Voltage
Command:
Where XX.X can be between 8 and 30 volts
The system responds with:
The low voltage alarm has been set to XX.X volts and the alarm has been reset
This system monitors the battery by calculating the average value of the supplied voltage over
the previous 1 minute period. Once this average has been detected to be below the set value
for the programmed time it sends a text message to inform all masters. The inclusion of the
running average helps protect the system from detecting inaccurate readings during periods
of increased load.
If no value (XX.X) is set the system responds with:
Because no value was specified the voltage alarm has been set to 11.5 volts and the
alarm has been reset
If the value (XX.X) is outside the settings the system responds with:
Because the value is out of range the voltage alarm has been set to 11.5 volts and
the alarm has been reset
Change battery alarm to XX.X
16
Page 17

Smart Switch SMS-2 Installation & Operation Manual
Link the Battery Alarm to an Output
Command:
The system responds with:
The battery alarm has successfully been linked to
been reset
To clear or remove the link
Command:
Link battery alarm to
Clear battery link
OUTPUT NAME
OUTPUT NAME
and the alarm has
The system responds with:
The battery alarm Output link has been removed
Function:
Alarm turns ON, the linked Output will also turn on. Full control of the Output is still available
(see 14-15).
If a link is setup between the Battery Alarm and an Output then when the Battery
Check the Battery Supply Voltage
Command:
The system responds with: (where battery is the name for the supply voltage)
Voltage status
Battery is currently XX.X volts
Set the battery alarm as a latched or non-latched alarm
If the battery alarm is set to latching then once the battery alarm has been triggered the
Reset Battery Alarm
latching the battery alarm will reset once the battery voltage has increased by .5 volts.
The system default is non latching:
Command:
System responds with:
Command:
System responds with:
Make battery alarm latching
Make battery alarm non-latching
command needs to be set to reset the latched alarm. If it is set to non-
The battery alarm is now latching
The battery alarm is now non-latching
Reset a latched Battery Alarm
Command:
This command is used to clear the Low Battery Voltage alarm, after it has alerted the owner
that the voltage has dropped below the set level.
The system responds with:
The battery alarm has been cleared and will begin to be monitored again
If the alarm is linked to an output the system responds with:
The battery alarm has been cleared and will begin to be monitored again, the linked output
has also been turned off
If the alarm is not currently set, the system responds with:
The battery alarm is not currently active and does not need to be cleared
Reset battery alarm
(if set to latching alarm)
17
Page 18

Smart Switch SMS-2 Installation & Operation Manual
Alive text feature.
This unit has an alive text feature which will send out a alive text as often as it has been
programmed for.
To turn the feature on:
Command: Turn alive text on every xx yy (where xx=1 to 99, yy = hrs or days)
This sets how often the alive text is sent out, XX can be between 1 and 99
Example:
Every 2 days the Alive text will be sent out
If everything is fine, the system responds with:
This feature has been set, the following text will be sent every xx yy ( yy = hrs or days)
Alive text, battery is currently xx.x volts, signal strength xx %
The default setting will send the Alive text to
To turn the feature off:
Command: Turn alive text off
If everything is fine, the system responds with:
This feature has been disable
Turn alive text on every 2 days
(only available in ver 1.2 or latter)
users, to mask users see Masking Alive texts
All
Masking Alive texts.
This feature allows you to mask the Alive text so only the programmed users will receive the
Alive text and not all users. The default setting is all users will receive the alive text but once
this command has been sent only the programmed numbers will receive the text.
To set mask:
Command: Add +??XXXXXXXXXX to alive text
This will set the mask and only the number as per above will receive the alive text, repeat this
for all users that require the alive text.
If everything is fine, the system responds with:
The number has been added to the alive text list
(only available in ver 1.6 or latter)
(example +6442934211)
18
Page 19

Smart Switch SMS-2 Installation & Operation Manual
Get Firmware Version
Command:
The system responds with:
Ver
SMS-2 Ver X.X
Get Signal Strenth
Command:
The system responds with:
Sig
Currently the signal strength is XX %"
Resetting the Unit
Command:
The system responds with:
Reboot
Module is not resetting
Reset Unit to Factory Defaults
-------------------------------------------------
WARNING
-------------------------------------------------------
This command restores the unit to factory defaults therefore all settings will be lost
Command:
Factory Reset
The unit responds with:
The unit has been restored to factory settings and all memory has been cleared
19
Page 20

Smart Switch SMS-2 Installation & Operation Manual
CONDITIONS OF WARRANTY
Penguin Electronics Ltd (the manufacturer) warrants that all of its products are free of
defects. Any apparent fault will be rectified free of charge by Penguin Electronics Ltd for a
period of 12 months from purchase date, provided that:
All costs of installation, cartage, freight, travelling expenses and insurance are paid by
the customer
The liability of Penguin Electronics Ltd under these Conditions Of Warranty is limited to
any defective components or workmanship directly attributed to the manufacture of this
product
The manufacturer’s liability under this warranty is limited to the replacement of
defective parts (or at our option, replace) without charge where determined by the
manufacturer
Where a replacement unit is provided the manufacturer is entitled to and will retain the
replaced product as its property
The equipment has been installed correctly and is used in accordance with the
instructions issued with the product
In no event will Penguin Electronics Ltd or its agents accept any liability for any
direct, indirect or consequential losses or damages whatsoever or howsoever
arising from the use of the product.
Where conditions or warranties are implied or other rights are given in respect of these
Conditions of Warranty under the Trade Practices Act or any other laws they are, to the
extent permitted by such laws, excluded. Where such conditions, warranties or rights are
not able to be excluded, Penguin Electronics Ltd liability for any breach of any such
condition or warranty shall, to the extent permitted by such laws, be limited to the repair or
replacement of the equipment. These conditions may only be varied with the written
approval of the directors of Penguin Electronics Ltd.
20
Page 21

Smart Switch SMS-2 Installation & Operation Manual
Appendix One: Record Your Names for all Inputs and Outputs
Active
Input Default
Name
1
input1
[Name] (Up to 20 characters )
Latched
Yes No
Linked
to
Open
or
Closed
2
input2
Output
1
2
output1
output2
Detailed explanation of Input delays:
On Delay:
This delay is used when the input turns ON:
Example : If input1 has an ON delay of 10mins, when Input1 turns ON the unit will wait 10
minutes then send the following text message “
If the input turns off before the programmed time delay expires the input is reset and the time
starts back at zero.
If the input is linked to an output it will also state the linked output has also been turned on
Off Delay:
This delay is used when the input turns OFF:
Example : If input1 has an OFF delay of 10mins, when Input1 turns OFF the unit will wait 10
minutes then send the following text message “
If the input turns off before the programmed time delay expires the input is reset and the time
starts back at zero.
If the input is linked to an output it will also state the linked output has also been turned on
Input Name
Input Name
has been turned on”
has been turned off”
21
Page 22

Smart Switch SMS-2 Installation & Operation Manual
Trouble Shooting Guide
PROBLEM CAUSE POSSIBLE SOLUTION
LED not flashing No power Check power supply
LED fast flashes
(every 1 second)
and never slow
flashes (every 3
seconds)
LED slow flashes
(every 3 seconds)
But no texts are sent
or received
Cannot find the GSM network 1. Replace aerial with high gain
aerial
2. Move unit to different location
3.
SIM card not installed
4.
SIM has a pin number (remove)
5. SIM is locked (remove lock)
The unit can find the GSM network
(hence the slow flashes) but the signal
strength is to low
1. Replace aerial with high gain
aerial
2. Move unit to different location
3. SIM card NOT registered with
the network provider
4. No credit on the SIM card
22
Page 23

Smart Switch SMS-2 Installation & Operation Manual
p
A
A
A
Appendix Two: SMS-2 Application Notes
Simple Shore Power Monitoring
n inexpensive and effective means to monitor your vessel’s shore power connection is to purchase a
12v DC power supply as typically used to power cordless phones or video games - the type normally
available at retailers and electronics suppliers. This unit is plugged into a conveniently located 120/240v
C outlet on-board your vessel and wired as shown in the diagram below (fig. 1). Name this Input Shore
Power using the Command on page 10. If shore power is lost, the SMS-2 will send a text message to all
“Masters” saying “Shore Power has turned off”. To avoid any nuisance text message’s caused by a
tripped breaker, or someone temporarily using your power outlet, you should set the
Input (a 15 minute delay is appropriate for most situations). To set the delay, simply send a text
command “Change Shore Power off delay to 15 min” as shown on page 11.
SMS-2
Figure 1
Input 1 Terminal 4
or
Input 2 Terminal 6
+
-
Gnd
120/230 VAC to 12 VDC
adapter plugged into vessel AC
outlet and connected as shown
rovides simple and
inexpensive means to monitor
shore power connection
delay for this
OFF
Fixed Wiring Shore Power Monitoring (requires a registered electrician)
SMS-2
Input 1 or 2
Relay
N/O AC
C
Figure 2
A registered electrician must be used when connecting to the mains
supply voltage.
! Important Note !
23
Page 24

Smart Switch SMS-2 Installation & Operation Manual
Intruder Alarm Systems
The following configurations define possible solutions for intruder alarms. Like all
other alerts provided by the SMS-2, these should be disabled prior to you entering
the premises. This is easily accomplished by issuing the text command:
when leaving the premise, simply issue the text command:
Alerts on
Alerts off
Connecting to a PIR motion sensor
SMS-2
+
Power to PIR
PIR Sensor
-
+
Input 1 or 2
Output
Commands
Send command text: Change input? to Sensor
Send command text: Make Sensor latching
Send command text: Make Sensor active open (most PIR are normally closed and go open
when activated)
When the unit detects movement you will receive the following text message:
“The input Sensor has been turned on and is now latched”
When the alarm has been triggered you can reset it by sending the txt:
If you want to connect a siren and/or flashing light to output1 then:
Send command text: Link Sensor to output1
Send command text: Change output1 to Siren
When the unit detects movement you will receive a text message and the siren and/or flashing
light will turn On.
“The input Sensor has been turned on and is now latched. Linked output Siren has also been
turned on”
When the alarm has been triggered you can reset it by sending the txt:
or the siren can be turned off by sending the command: Turn siren off
Note: The command: Reset sensor will still need to be sent to reset the system even though the
siren has been turned off (to unlatch the sensor Input).
Reset Sensor
Reset Sensor
24
Page 25

Smart Switch SMS-2 Installation & Operation Manual
Door and Window Alarms
Alarms sensors for doors and windows generally consist of magnetically held
switches. The contacts are normally-closed (NC). If a door/window is opened the
circuit is opened generating an alarm. An alarm is also generated if the wire is cut
between the sensor and the monitoring system opening the circuit. This prevents an
intruder from defeating the alarm system by merely cutting a wire. The wiring
diagram for the window/door switches is similar to the motion detector and the same
basic commands are used to set up the motion detector.
SMS-2
Input 1 or 2
Send command text: Change input? to Door Sensor
Send command text: Make Door Sensor latching
Send command text: Make Door Sensor active open (sensors are normally closed and go open
when activated)
When the unit detects movement you will receive the following text message:
“The input Door Sensor has been turned on and is now latched”
When the alarm has been triggered you can reset it by sending the txt:
If you want to connect a siren and/or flashing light to output1 then:
Send command text: Link Door Sensor to output1
Send command text: Change output1 to Siren
When the unit detects an intruder you will receive a text message and the siren and/or flashing
light will turn On.
“The input Door Sensor has been turned on and is now latched. Linked output Siren has also
been turned on”
When the alarm has been triggered you can reset it by sending the txt:
or the siren can be turned off by sending the command: Turn Siren off
Reset Door Sensor
Reset Door Sensor
Note: The command: Reset Door Sensor will still need to be sent to reset the system even
though the siren has been turned off.
25
Page 26

Smart Switch SMS-4 Installation & Operation Manual
Air Conditioners / Heating
Different brands of Air-Con’s use different means of remotely turning On and Off.
Type1:
If the brand requires that the Output to be turned On and left On then you can use
either Output 1 or 4.
eg. Turning the output relay On will start the Air-Con and turning the relay Off will
stop the Air-Con.
1. Change the Output name as per page 12:
Naming Inputs and Outputs and Changing Names
4. Turn output On as per page 15:
Turn an Output ON or OFF
4. Turn output Off as per page 15:
Turn an Output ON or OFF
Type4:
If the brand requires that the Output be pulsed On and Off to turn the Air-Con On and
pulsed On and Off to be turned Off. The SMS-8 has a special command for this type.
1. Connect the Air-Con to Output1
2. To turn On send : Air On (Output1 will pulse On and Off trigging the Air-Con On)
3. To turn Off send: Air off (Output1 will pulse On and Off trigging the Air-Con Off)
Type4: Heating
If the brand requires that the Output be pulsed On and Off to turn the Heating On and
pulsed On and Off to be turned Off. The SMS-8 has a special command for this type.
4. Connect the Heating Input trigger to Output1
5. To turn On send : Heating On (Output1 will pulse On and Off trigging the Heating)
6. To turn Off send: Heating off (Output1 will pulse On and Off trigging the Heating
Please Note: This special command only works with Output1
Page 27

All technologies, design and Intellectual property is owned by
New Zealand
Version 2.1
Penguin Electronics Ltd
27
 Loading...