

Page 1
Pivot Top Mount Hot Tub
Cover Lift
INSTRUCTIONS
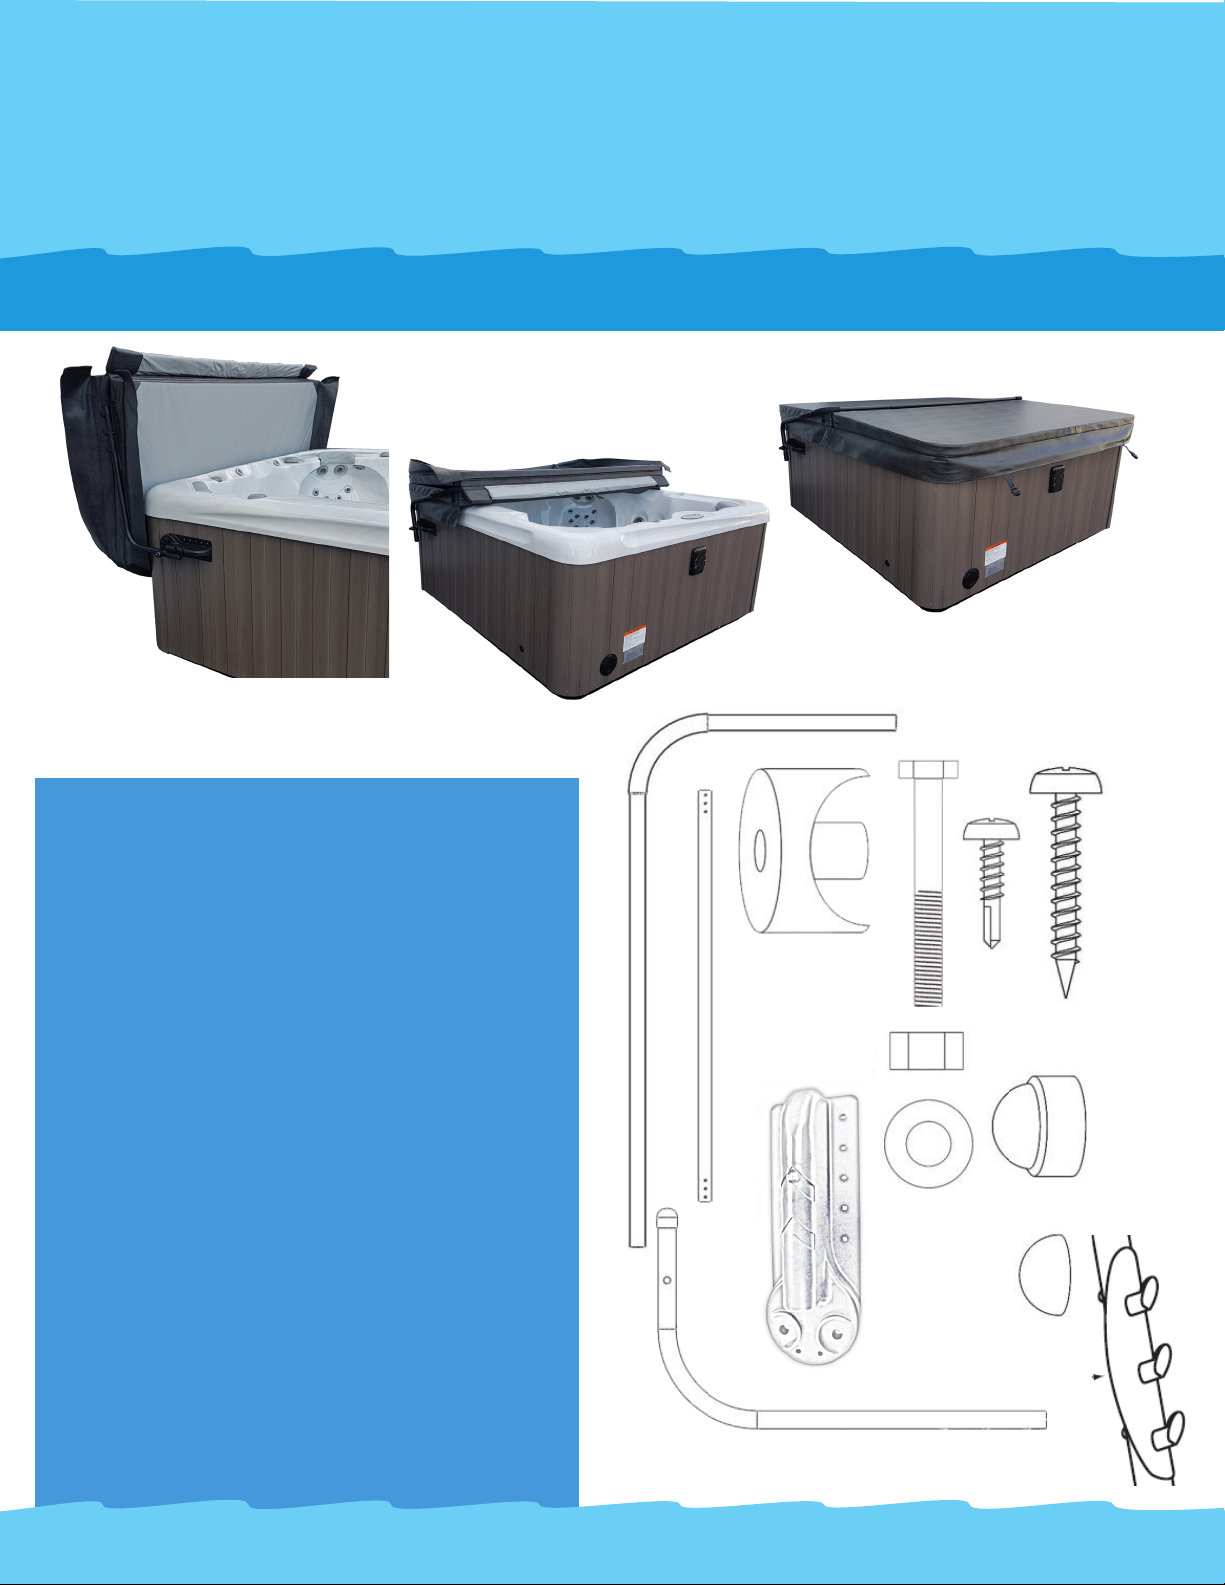
PARTS LIST
DESCRIPTION QTY
A. Pivot Arm 2
B. Cover Support Arm 2
C. Center Coupler 1
D. Bushing 4
E. Mounting Bracket 2
F. 3/8” x 3” Hex Cap Bolt 2
G. 3/8” Lock Nut 2
H. 3/8” Flat Washer 4
I. Towel Holder 1
J. #10 x 5/8” Self Tapping Screws 14
K. #10 x 1” Mounting Screws 20
L. Large Black Dome Caps 2
M. Small Black Dome Caps 38
7/16” Plug (Pre-Installed) 2
B.
C.
E.
D.
G.
F.
K.
J.
L.
H.
M.
#10 x 1 3/4” Mounting Screw 4
Foam Grip (Pre-Installed) 2
Pivot Arm Cap (Pre-Installed) 2
Tools Needed: Power/Cordless Drill with
phillips bit and a tape measure.
A.
I.
Page 2
Installation Instructions
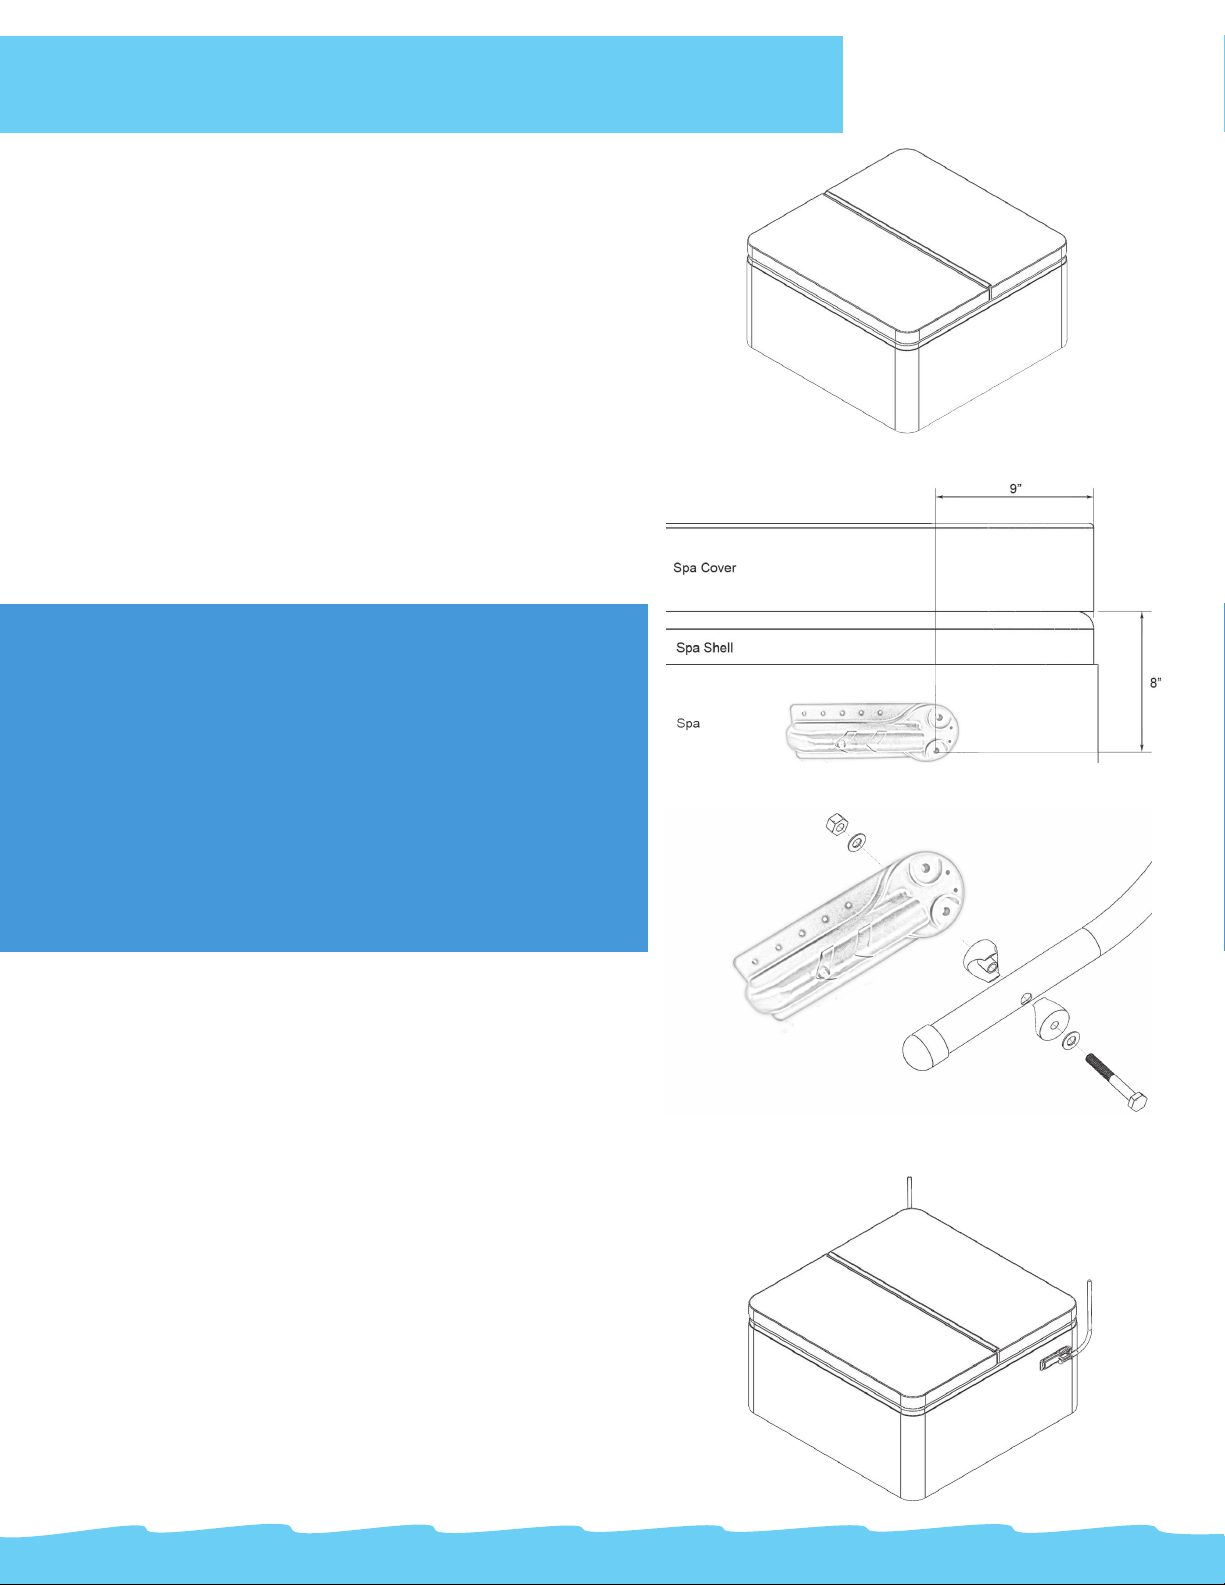
Position the spa cover (in the closed position)
on the spa, making sure that all four corners
are properly positioned and square on the spa.
1
2
If you want 75% of the spa cover standing above spa
surface in the open position, place the Mounting
Brackets (G) 8” (20cm) down from the top of the spa
shell and approximately 9” (23cm) clearance behind
the spa will be needed.
See Figure 1.
Before attaching the right & left Mounting
Brackets (G) to the appropriate side of the
spa, place the brackets where you will want
them positioned on the spa and mark the holes
with a marker. (SEE PRO TIP)
CAUTION: To prevent splitting a wood cabinet,
pre-drill holes with a 1/16” drill bit
PRO TIP
Figure 1
Figure 2
If you want 50% of the spa cover standing above spa
surface in the open position, place the Mounting
Brackets 12” (30cm) down from the top of the spa
shell, approximately 15” (38cm) clearance behind the
spa will be needed.
Attach the Mounting Brackets (E) to the left
and right sides of the spa with the #10 x 1”
Mounting Screws. See Figure 2.
3
Connect the Pivot Arm (A) and two Bushings
(D) to the Mounting Brackets (E), using one
3/8” x 3“ Hex Cap Bolt (F), two 3/8” Flat
4
Washers (H), and one 3/8” Nylon Locknut
(G), as shown in Figure 3.
Note: If necessary, slide a 3/8” Wrench behind
the Mounting Bracket (E) to tighten the 3/8”
Nylon Locknut (G).
Figure 3
Figure 4
5
Repeat Step 4 for the other side of the spa.
After installing the Pivot Arms (A), tilt them
into the upright position. See Figure 4.
Page 3
6
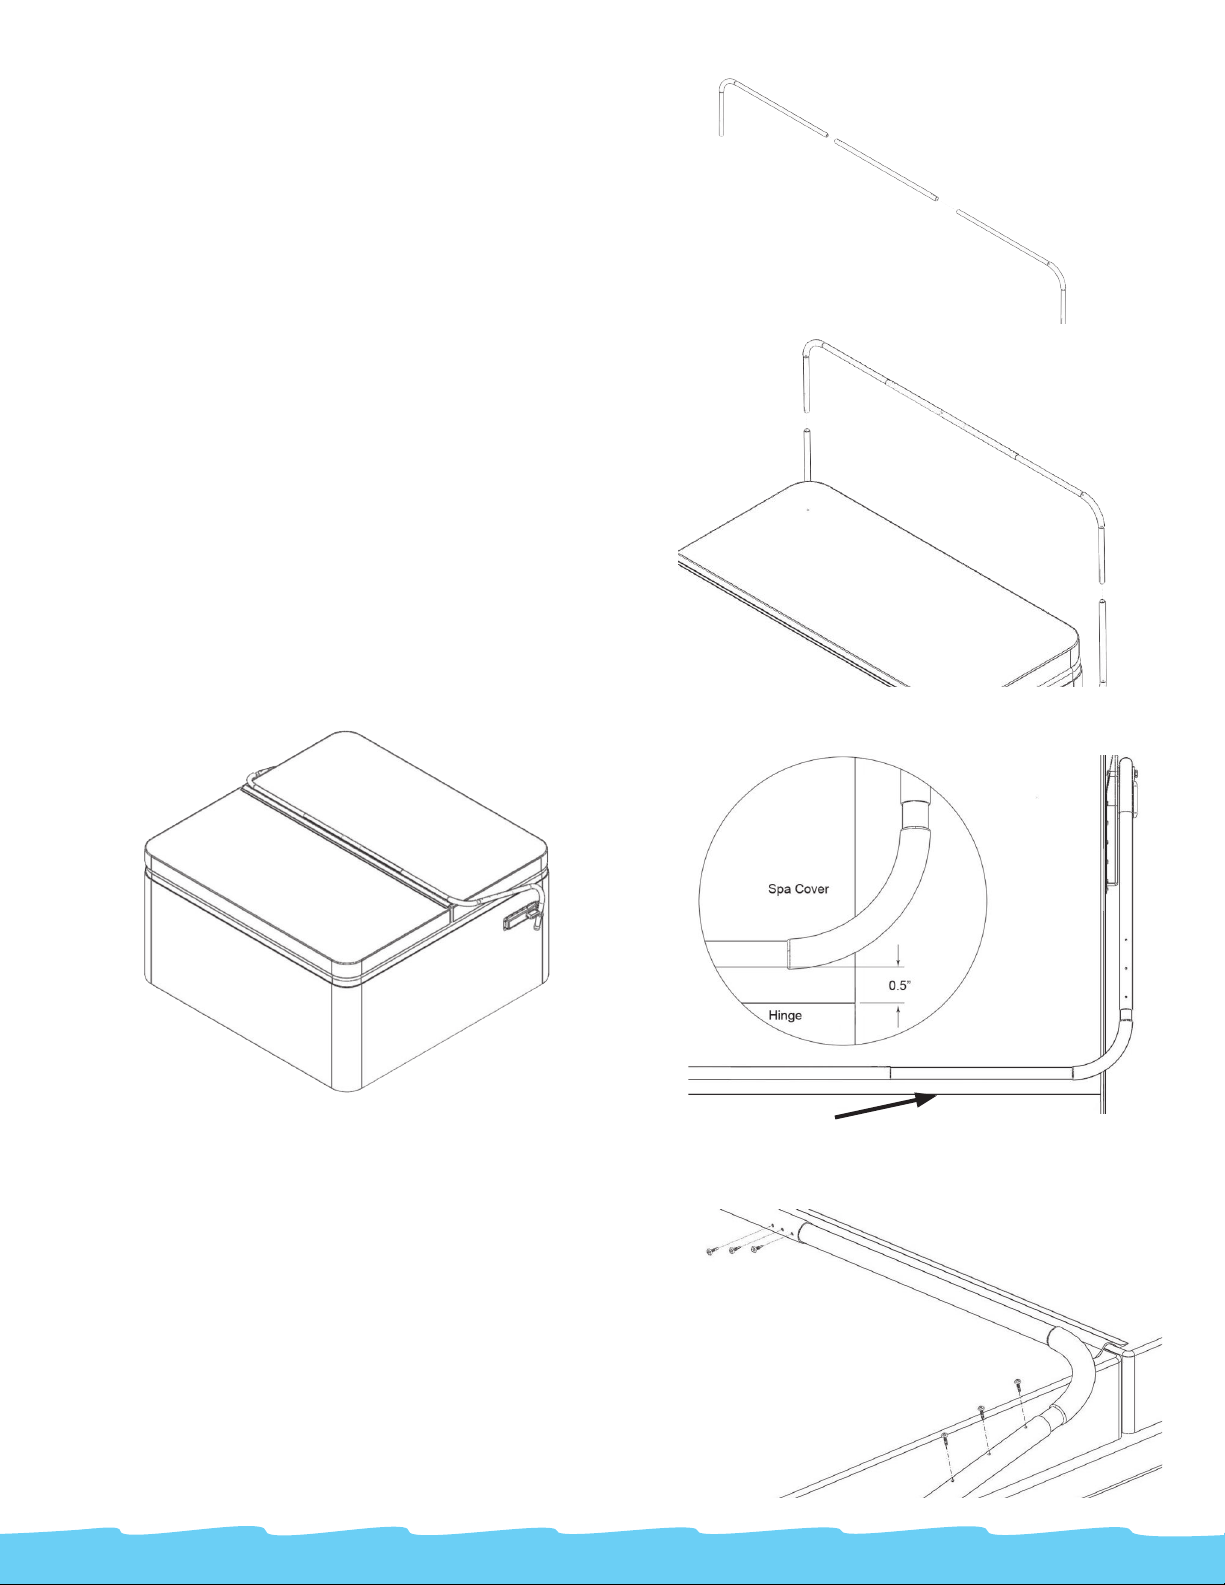
Insert the long arms of the Support Arms
Figure 5
(B) into the ends of the Center Coupler (C)
as shown in Figure 5.
Note: For narrow covers, flip the Support
Arms (B) and insert the short side of the
Support Arm (B) into the Center Coupler
(C).
7
8
Insert the short arms of the Support Arms
(B) into the Pivot Arms (A). See Figure 6.
Lay the Lifter on the spa cover, see Figure
7A. Adjust the Center Coupler Assembly
and the Support Arms (B) so that the
Center Coupler Assembly is lying parallel
to the spa cover hinge approximately 1/2”
away. See Figure 7B.
Figure 7A Figure 7B
Figure 6
9
Cover Hinge
Figure 8
Using the #10 x 5/8“ Self Tapping Screws
(J) to fasten the Support Arms (B) to the
Pivot Arms (A) and the Center Coupler
(C). See Figure 8.
Note: Be sure to rotate the Center Couplers
so that the inserted screws are horizontal,
with the heads facing the back of the spa,
where the cover will be stowed.
Page 4
10
11
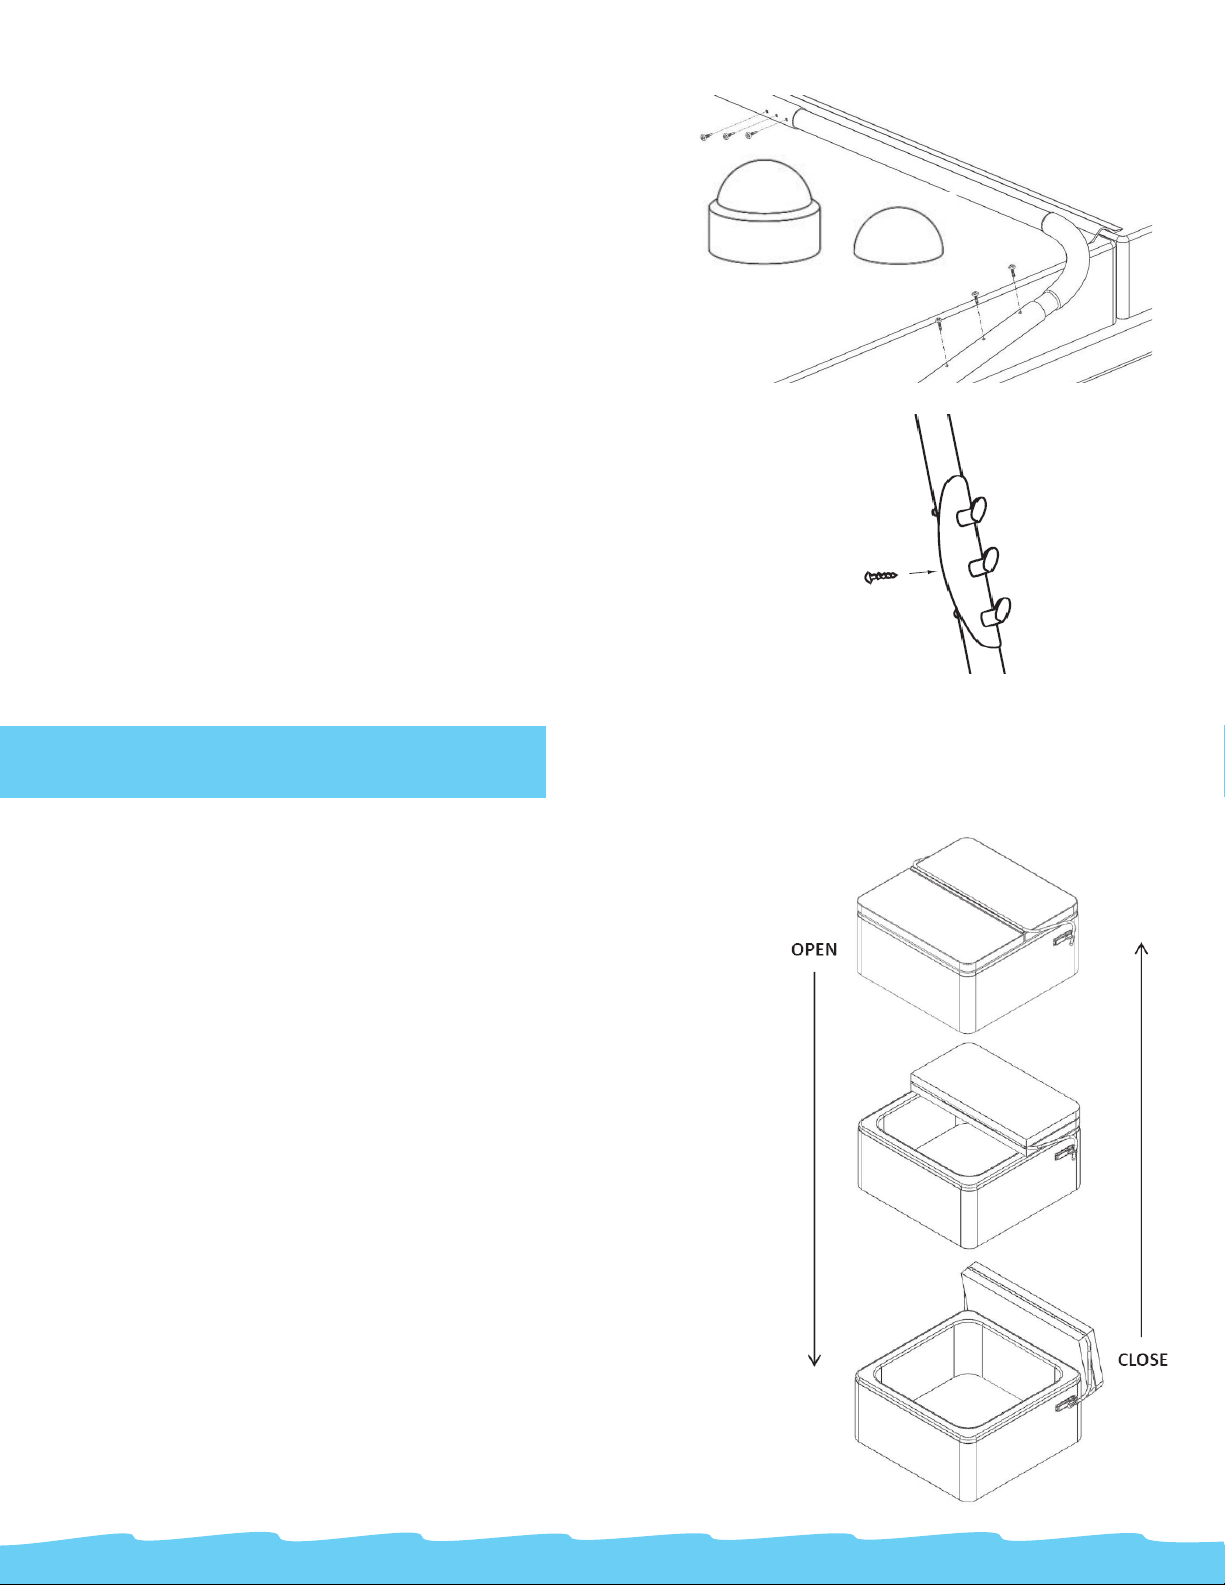
Press the decorative Large Black Dome Caps
(L) over the heads of the 3/8” x 3” Hex Cap
Bolts. Then press the decorative Small Black
Dome Caps (M) over the heads of all exposed
#10 screws (J and K). You may need a small
amount of glue/epoxy depending on the climate. See Figure 9.
Attach the provided 3-Hook Towel Holder (I)
on the preferred side of your cover lift by simply
snapping it into place and inserting the middle
Self-Tapping Screw (L). See Figure 10.
Large Dome
Screw Cap
Figure 9
Small Dome
Screw Cap
Figure 10
How to Use
How to OPEN your spa cover
1. Fold spa cover onto itself.
2. Lift the Lifter and spa cover to upright position by lifting at
the Foam Grip on the Support Arm (B), while supporting
the middle of the cover with the other hand. The Pivot Arm
will stop when it contacts the Mounting Bracket (E).
How to CLOSE your spa cover
1. With the spa cover in the upright position, hold the Foam
Grip on the Support Arm (B), and slowly guide the cover
and Lifter onto the spa shell. NEVER allow the spa cover to
fall onto the spa shell unassisted, as it can cause damage
to your Lifter, spa, and/or spa cover!
2. Unfold the spa cover off itself and engage the spa cover
locks if available.
CAUTION: DO NOT USE THE COVER LIFT IN HIGH WIND
CONDITIONS. DOING SO COULD CAUSE THE COVER
TO FALL. DAMAGE TO THE SPA/COVER/COVER LIFT,
OR INJURY TO THE OCCUPANTS MAY OCCUR. NEVER
LEAVE AN UNCOVERED HOT TUB OR SPA UNATTENDED.
 Loading...