

Smart Sensor AR924+ Instruction Manual
Version:SZ924+-1-00
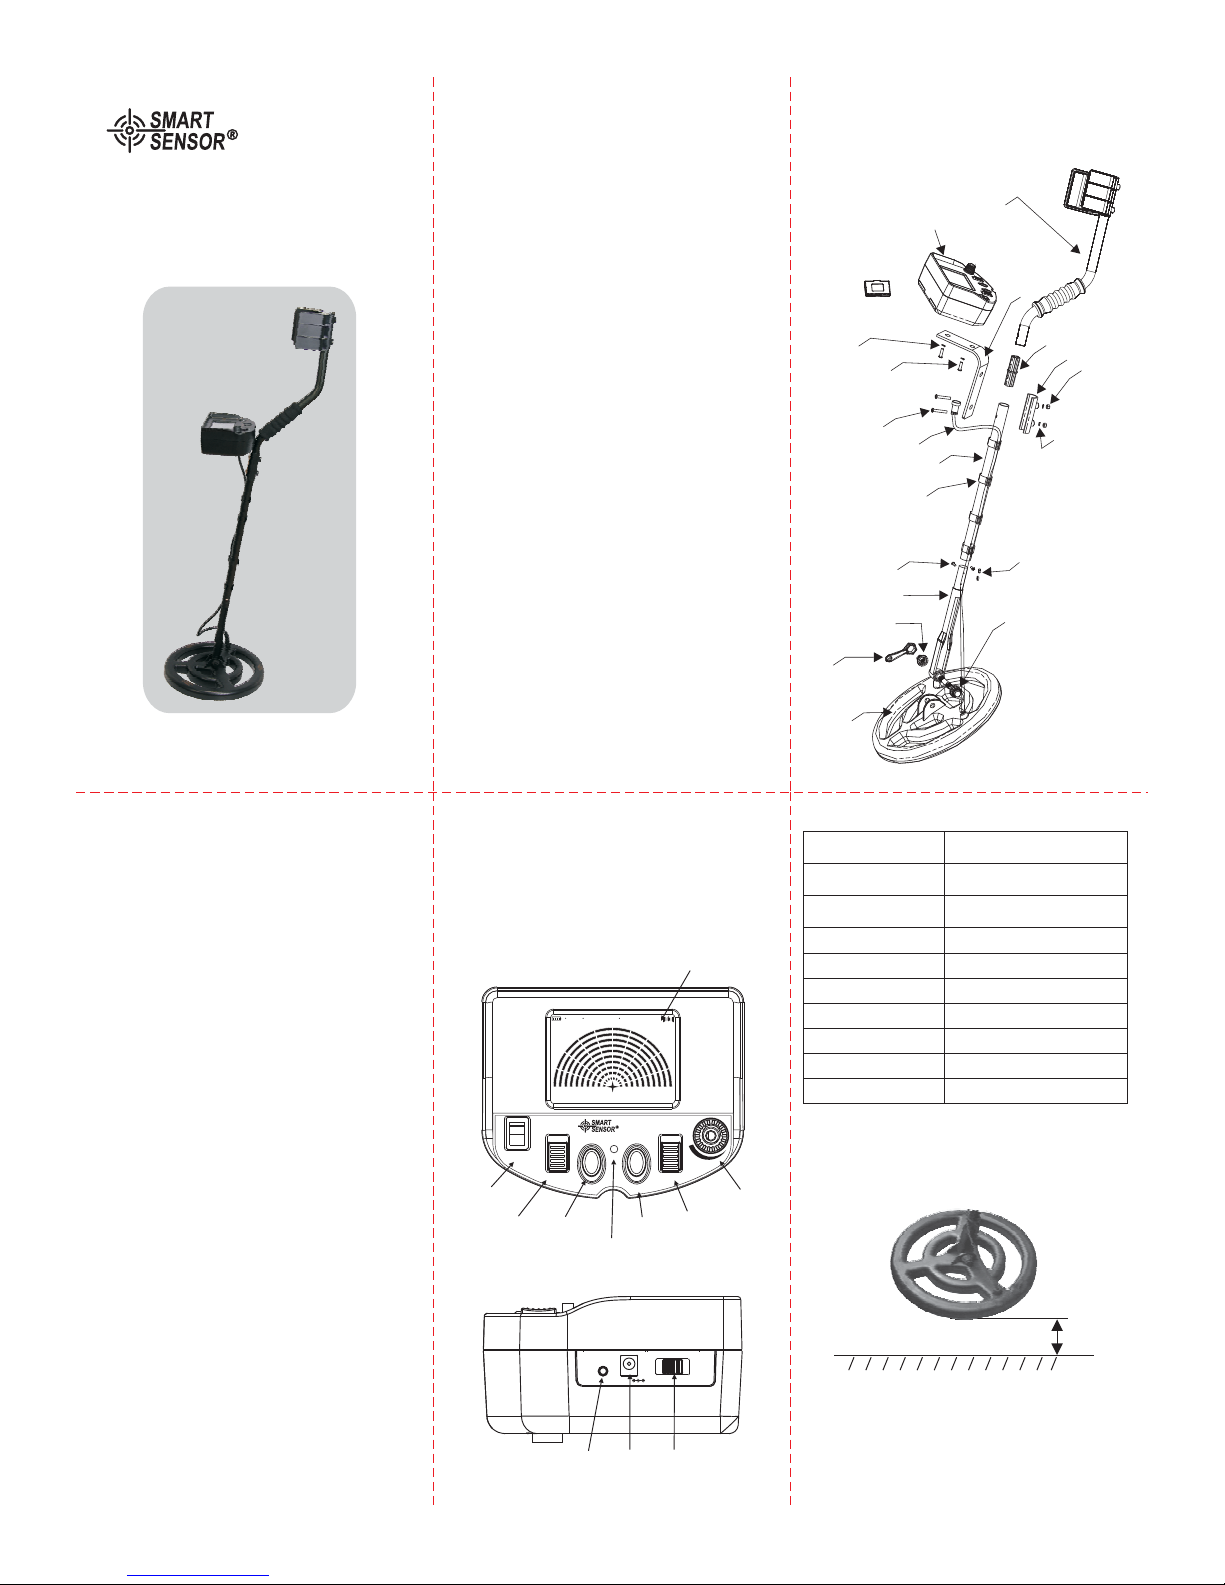
3. Parts and assembly diagram
3.1 Parts
While purchasing, check the package
contents carefully:
<01>Upper stem*1PCS
<02>Main panel*1PCS
<03>3.7 V li-battery*1PCS
<04>Washer(M5.0)*4PCS
<05>Screw B (M5.0*14PM)*2PCS
<06>Screw A(M5.0*33PM)*2PCS
<07>Lead wire*1PCS
<08>Extension Aluminum tube*1PCS
<09>Clip*3PCS
<10>Main panel metal bracket*1PCS
<11>Conection bracket*1PCS
<12>Nut bracket*1PCS
<13> *2PCS
<14>Nylon bolt
<15>Nylon screw
<16>Connecting rod *1PCS
<17>Plastic screw
<18>Plastic bolt*1PCS
<19>Plastic wrench*1PCS
<20>Searh coil*1pcs
If any parts miss before purchase, please
consult your dealer.
()Nut M5.0
1.Introduction
Thank you for choosing Smart Sensor Metal
Detector. This unit adopt latest electronic technology
provide with ground balance function which can
eliminate the effect caused by Mineralization
reaction besides the metal type mode can identify
that the detected subject is ferrous or non-ferrous
metal, enhance the effectively detect depth &
accuracy. It is easy to operate with big probing
depth accuracy appointed high resolution
features. In order to take full advantage &
functions of metal detection, please
read carefully before using this manual.
1.1 Application
Except for the military purpose, This unit
also suitable for following fields:
Police quick searching
Metal object detection in material, fuel,
food stuff
Metal object detection on mail, baggage
Hunting buried pipe, cable
Relic & Mineral hunting
Cache treasure & mineral hunting
1.2 Mineralization reaction
The kinds of the minerals which consist of soil
make unit send signal. When using old type
metal detector, the signal changed with distance
between sensor and floor, if use sensor scan the
rough floor, the signal change a lot. on the complex
soil place, the signal caused by soil is much bigger
than metal, this phenomenon named
ineralization reaction
“
”,
”.
、、
can
M“
6.1 Ground balance calibration:
There are two calibration methods.
6.1. 1.Auto calibration:
The auto calibration is just to turn the unit on.
When Calibrate by this method, Fan-shaped
stripe , calibration , and star shape will
on LCD.display
2.Assembly diagram
10-15cm
6. Operations
The operation is same as Sapper detect
landmine, when detect, keep 10-15cm from the
floor and canning in the horizontal level to avoid
lowering the actual detect depth.
figure 4
5. Specification
Max.
Detection depth
1.5m (50CMx50CMx1.2CM
aluminium board )
Detection mode
Ground balance/
discrimination
Signal frequency
7.1KHz
Power supply
3.7V(lithium battery)
charge voltage
DC 5V
Low battery indication
√
√
rechargeable battery
Product net weight
Product size
1.77 kg
30x30x123.5 cm
Detectable indication
Audio( 75dB) and
light indication
≥
Metal Detector
Instruction Manual
Model: AR924
+
16 Connectingrod
14
Nylon bolt
08 ExtensionAluminum tube
12 Nutbracket
11 Connection bracket
02 Mainpanel
20 Searchcoil
19 Platicwrench
18 Plasticbolt
09 Clip
17 Plasticscrew
13 Nut
06 ScrewA
05 ScrewB
10 Metalbracket
01 Upperstem
07 Leakwire
04 Washer
04 Washer
03 3.7V
li-battery
15 Nylonscrew
4.
①
②
③
④
Features
Torch light switch
Calibration button
Power OFF/ON
Backlight
METAL
FERROUSMETAL NONFERROUSMETAL
SENSITIVITY
Metaltype
Normalscan
Calibration
LightON
LightOFF
Backlight
PowerOFF/ON
AR924
+
UndergroundMetal Detector
Adjust
Charger
I
0
⑤
⑦
①
⑥
⑧
②
③④
DC5V IN
Low Med High
Voiceadjust
Earphone
⑩⑩
11
⑨
⑤
⑥
⑦
⑧
⑨
Normal scan and metal type mode selection
Sensitivity adjustment button
LCD
Earphone jack
Charging port
Voice adjustment switch
Charging indication
⑩
⑩
⑩
11
6.1.2.Manual calibration
Manual calibraion have following two methods:
a.On the status of ground balance, press
“ calibration ” key, release it quickly (not exceed
2 seconds). It is equal to auto calibration.
b. On the status of ground balance, press
“calibration” key(exceed 2 seconds), Fan-shaped
strip will displayed on LCD. This method is always
used while detecting. It is easy to operate,and will
enhance the accuracy.
6.2. Eliminate Mineralization reaction
There are two method to eliminate
mineralization reaction: auto and manual.
6.2.1 When adopts auto elimination,
Before power on,turn the ADJ knob left, then, turn
on the unit, after ground balanced, approach the
sensor to the floor, about 10-15cm from it. If the
fan-shaped bars icon is increasing or more than
6 bars, repeat the adjustment as above method,
the auto adjustment will be finished until there are
only 2 or 4 bars on LCD when take up and down
the sensor.
6.2.2 When adopts manual elimination,
Hold the “calbration” key for more than 2 seconds
and turn “ adjustment”button left slightly at same
time, release “calibration”key untill ground
balance completed, approach the sensor coil
about 10-15cm from floor for testing. If the fanshaped bars increasing or more than 6 bars, it
should be repeat the adjustment untill reaching
same effect as auto elimination. Then, the
mineralization reaction largely eliminated.
6.2.3 Note: before manual calibration, press
“ calibration ” key, release it when ground balanced.
6.3 Identify / Reject Metal
According to specific conditions, adjust ADJ knob
to eliminate unwanted metal target. For example,
when you hunting in an area with many buried metal
nails, it is easy to occur improper detection reading.
In such case, pre-set a metal nail on the ground,
hold the search coil scan above the nail, if the
detector responds as fan-shaped bars icon
increasing with sound alarms, just keep pressing
CALIBRATION button more than 2 seconds and
turning ADJ knob to the left slightly at the same
time. Then try to sweep the snail again after ground
balance, the adjustment will be completed until there
is only 2 or 4 fan-shaped bars displayed. Sometimes,
it need to take many adjustments on ADJ knob to
reach the best result, also take secular time to
accumulate preferable detection experience.
Identify / Reject metal operation similar with
Mineralize elimination. We recommend you take
time to explore with fund experience for proficient
operation and successfully hunting.
6.4 Metal Detection
There are Metal Scan & Metal Type modes available
during the metal detection.
6.4.1. Metal Scan:
This mode with the technology to eliminate
Mineralization Reaction and preferable sensitivity.
Whenever indoor/outdoor we recommend to choose
this mode, after a target is found, choose Metal Type
mode to discriminate ferrous and nonferrous metal.
Detector will produce audio signal and illuminate
with cursor on LCD when metal is detected.
Operation as below:
a. Turn on the power, power light on,slide switch to
Normal Scan, then turn on the sensitivity key to the
maximum, and keep the search coil 70-80cm from
floor.
b. Bar graphs will keep scanning from left to right
for 2 times on LCD, when the bar graphs gradually
fade out only remain the left bar graphs indicated
auto balance completed, LCD display “sensitivity”
with star icon.
c. Keep holding the search coil sweep along the
floor. When a target being detected, the metal
detector will produce audio sounds and increasing
bar grahps on LCD as well as spread to the right.
When LCD display 10 bar graphs with “METAL
TYPE” icon means metal detected.Once buried
target is indicated by a high tone response,
continue sweeping the coil over the target in a
narrowing side-to-side pattern to enhance the
accuracy.
d. In the hunting process of Metal Scan mode,
merely need to adjust ADJ knob.mostly just
eliminate mineralization & identify / reject metal
operations requires turning ADJ knob.
6.4.2. Metal type
This mode is designed to discriminated ferrous
metal and nonferrous metal. According to LCD
indicator to select desired / (reject unwanted)
metals. As metal type modes without ground
balance function, can not eliminate mineralization
interfere, make sure to moving the coil slowly at a
constant height.
Operations as below:
a. Slide switch to Metal Type.
b. Power on and after auto calibration ,slowly
sweep the coil above the metal being located,
the detector gives out audio sound with increasing
bar graphs. If the LCD display “nonferrous metal”
means the target is nonferrous metal; if display
“ferrous metal” means the target is ferrous metal.
Thus, you can distinguish the metal target by LCD
display. Also detect back and forth around the
place of metal located is needed. Eliminate the
effect maximum caused by soil structure or any
other elements to enhance the accuracy of the
detection. (note: Ferrous: containing, pertaining
to or made of iron; Non ferrous therefore does not,
eg: copper, aluminum, gold and so on)
Cautions:
a. If the target is a ferrous metal board, a special
phenomenon will happen: Whenthe coil approach
the wage of the target, the detector will response
as located a ferrous metal; when the coil right
above the centre of the target, the detector will
response as located a non-ferrous metal.
b. While in the operation process, when the coil
being disconnected with the main panel, the
detector will give out alarm sounds “BI BI” with bar
graphs blinking on LCD and no star icon display,
please check up the connection of lead wire.
c. Please use Normal scan to detect the target,
then switch to Metal type to discriminate ferrous/
non ferrous metal. Use higher sensitivity levels
(turns the ADJ knob at clockwise) before turn on
the unit for detecting.
d. Whatever use normal scan or metal type mode,
when there is 6 or more than 6 bar graphs icon on
LCD, please adopt manual ground balance
adjustment mentioned above. You should adopt
manual ground balance the detector regularly, keep
it eliminate interference by electromagnetic or
mineralize soil promptly. At the course of hunting,
eliminate Mineralization reaction & identify / reject
metal operation also aid you for desirable search
results.
e. Metal detector produce their own
electromagnetic fields, so if detecting with friends,
keep each metal detectors at least 10 meter apart.
f. Many household appliances and facility emit
electromagnetic energy, which can interfere the
detector, this detector is not adapt to indoor use.
7. Light
7.1 When the light is needed, just slide the switch to
ON position.
7.2 In dark environment, press“ backlight ” key to
activate, and press again, backlight off.
8. When LCD display icon “ ”, please replace
the batteries to ensure excellent sensitivity and
precise detection.
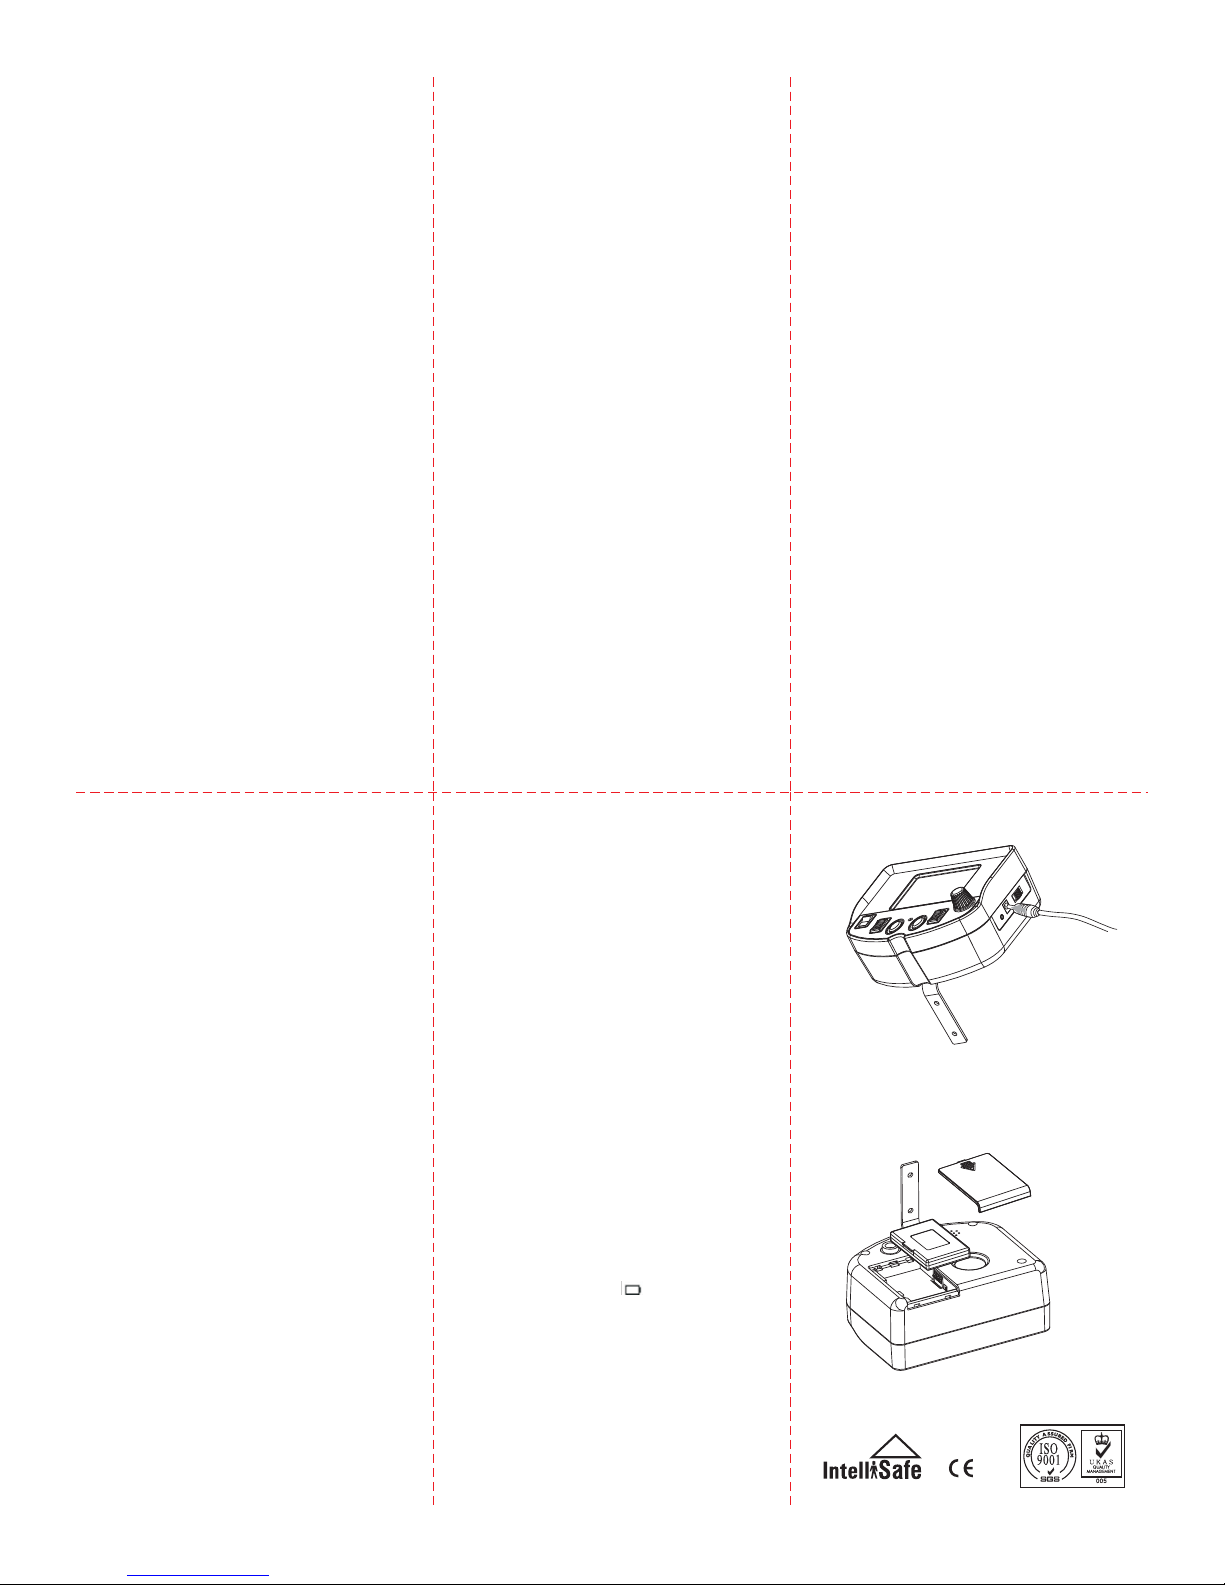
9 Charging
9.1 Connect adapter to 110V-240V AV power, plug
the DC charger into charging hole.See figure 5:
9.2 When charging, the power light is red.
9.3 The green power light means the power is full.
9.4 When charging, red power light keeping blinking
means battery over-temperature protection.
figure 5
figure 6
10. Battery installation
Open battery compartment cover, and insert into
3.7V*1 li-battery into compartment, then close the
compartment door. See figure 6 :
the battery is wrong if blinking for a long time.
 Loading...