

Smartrol Technology ZX G12 User Manual

Smart Security System
USER’S GUIDE
10:35:42
2019-06-05 Wednesday
2
1
5
4
6
7
8
9
3
0

CONTENTS
1 DO THIS FIRST
1 Things to be Noted Before Getting Started
1 What You Need
2 IN THE BOX
3 MEET YOUR ALARM SYSTEM
3 How the Alarm System Works
4 Getting to Know Your System
4 Smart Hub
9 Remote Tag
10 RFID Tag
10 Door/Window Sensor
11 PIR Motion Detector
13 PLACEMENT/INSTALLATION
13 Where to Place/Install Smart Hub
13 Where to Place Door/Window Sensor
14 How to Install PIR Motion Detector
15 GETTING STARTED
15
15
15
16 Exit/Entry Delay
16 How to Record a Voice Message by Panel
17 How to Pair a Remote Tag by Panel
17 How to Pair a Wireless Sensor by Panel
18 How to Pair a RFID Tag by Panel
18 How to Pair a Wireless Siren by Panel
18 How to Pair a Alarm Wireless Switch by Panel
19 APP
19 Download App
20 USING SMART SECURITY SYSTEM
20 The Security Levels
21 How to Arm or Disarm
22 Make a Call on Panel
22 Smart Hub Features
22 RESET TO FACTORY SETTINGS
23 SPECIFICATIONS
24 FCC WARNING

1
DO THIS FIRST.
Things to be Noted Before Getting Started
The followings are for hub cellular + Wi-Fi model only.
You should select a 2.4GHz Wi-Fi network. The hub does not support the 5GHz Wi-Fi. Select the
5GHz band instead of the 2.4GHz band is the most common mistake when setting up the hub for
the first time.
Your Wi-Fi password must not contain space or other special characters.
Place your hub as close as possible to your router when setting up.
A slow network speed will also affect the performance of your hub. It is recommended to have an
upload speed of at least 2Mbps or faster.
Make sure that the AP isolation setting in your router is disabled.
2
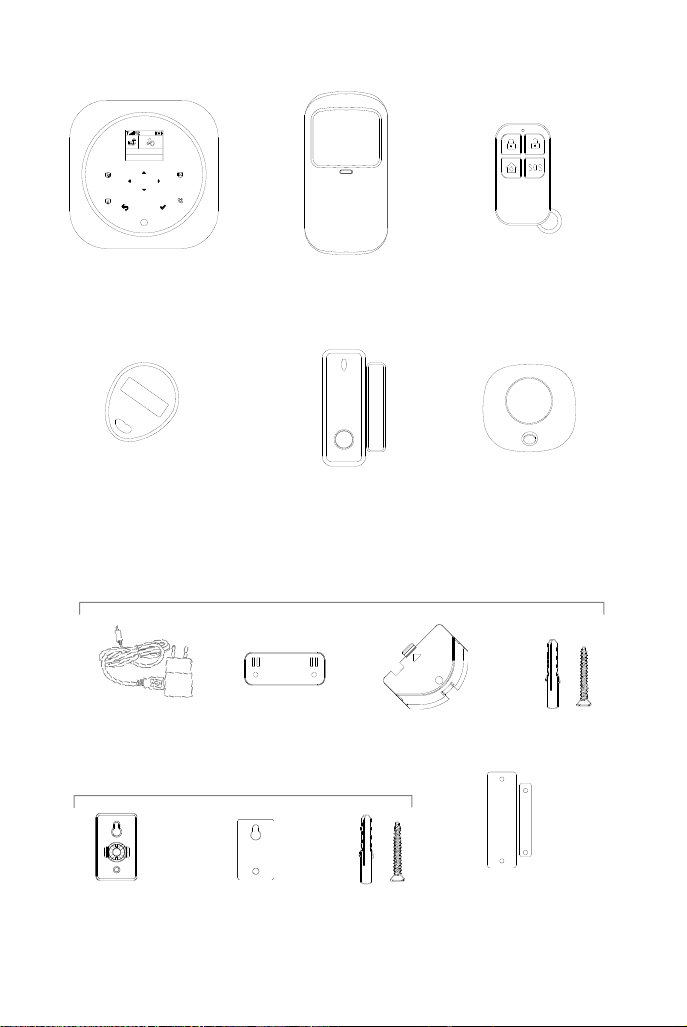
IN THE BOX.
Smart Hub (Panel)
Alarm, display and
keypad.
RFID Tags x2 (Optional)
Key fob to quickly arm
and disarm your home.
Remote Tag x2
Wireless key to quickly
away-arm, home-arm and
disarm your home, and to
trigger an emergency
alarm.
PIR Motion Detector x1
Senses when someone
walks nearby.
Door/Window Sensor
x1(x2 optional)
Senses when a door or
window is opened.
Power Adapter
For Smart Hub installation
Screws x2
Screws x2
Extra Adhesive
Mounting Strips
For door/window installation
PIR Motion
Detector Bracket
For PIR Motion Detector installation
Hub Bracket
Wireless Siren (Optional)
Sounds when the alarm
goes off.
Bottom Cover
Extra Adhesive
Mounting Strips
10:35:42
2019-06-05 Wednesday
2
1
5
4
6
7
8
9
3
0
3
MEET YOUR ALARM SYSTEM.
How the Alarm System Works
The hub internal siren
sounds at 85dB on-site
The hub sends a push
notification and text message
to your phone when a sensor
is triggered if you enable the
notification function located
in your app settings.
The hub receives the
command and enters
“Armed” mode.
Arm the system by the
remote, RFID tag, the
ARM button of hub
touchscreen or the APP.
When an optional
external wireless siren
has been placed there
will be a signal to be sent
to the siren.
When a Door/Window
Sensor detects a
door/window is being
opened, the sensor sends
a signal to the panel letting
the hub know that there
has been an intrusion.
The APP lets you know
what’s happening at home,
anywhere, any time.
10:35:42
2019-06-05 Wednesday
2
1
5
4
6
7
8
9
3
0
10:35:42
2019-06-05 Wednesday
2
1
5
4
6
7
8
9
3
0

4
Tamper switch
The tamper switch (lever
underneath the bracket)
will trigger an alarm
notification if an attempt
is made to remove the
hub from its installed
location. And the alarm
sounds.
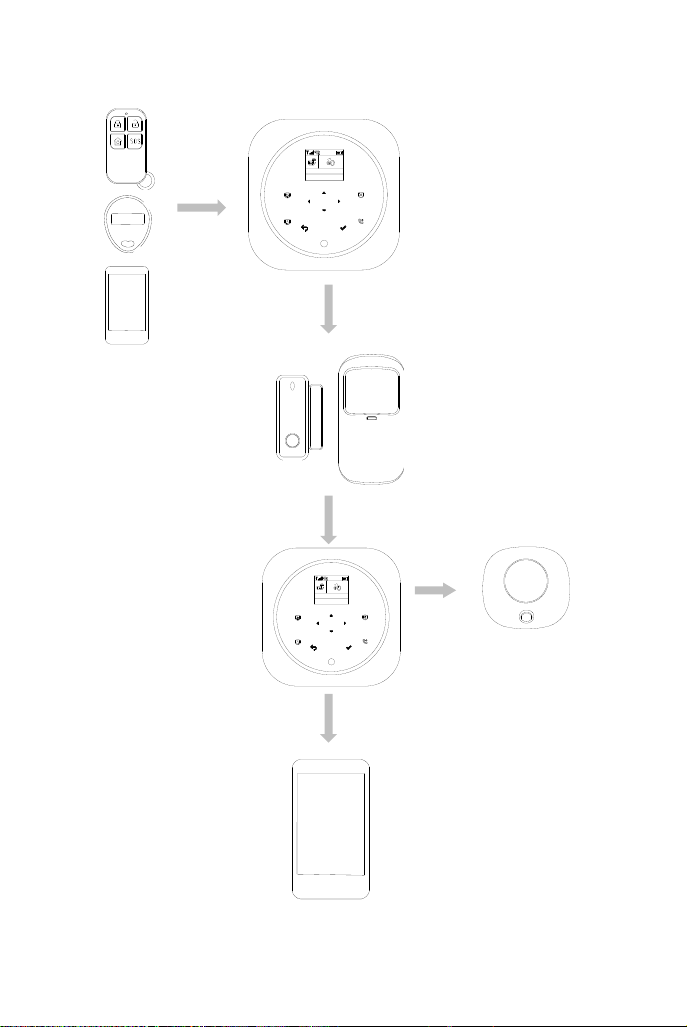
Getting to Know Your System
All sensors are wirelessly connected to the hub. In the event of alarm activation, for
example, when a sensor is triggered, a push notification will be sent and an alarm call
will be made automatically to all registered users.
The system can be controlled on-site by the remote tag supplied, or remotely from
anywhere with our free dedicated mobile application.
The system can connect with up to 100 wireless sensors, 10 remote tags and 10 RFID
tags.
Smart Hub
Alarm, display, keypad and the brains of the system
Overview
RFID tag reader zone
Tap RFID tag here to
arm and disarm.
Power port (Micro USB)
Plug in the power cable here.
Speaker
For voice prompt
and the alarm.
Backup battery ON/OFF
Push to ON to turn on the
built-in backup battery.
Keypad
ARM, ARM STAY,
DISARM and DIAL
buttons. Keypad for
entering passcode,
setting, and more.
Display Window
Display system status, time, the alarm’s
information, menus, and more.
Status indicator
Indicates the ARM/DISARM/ARM STAY/ALARM status.
10:35:42
2019-06-05 Wednesday
2
1
5
4
6
7
8
9
3
0
5
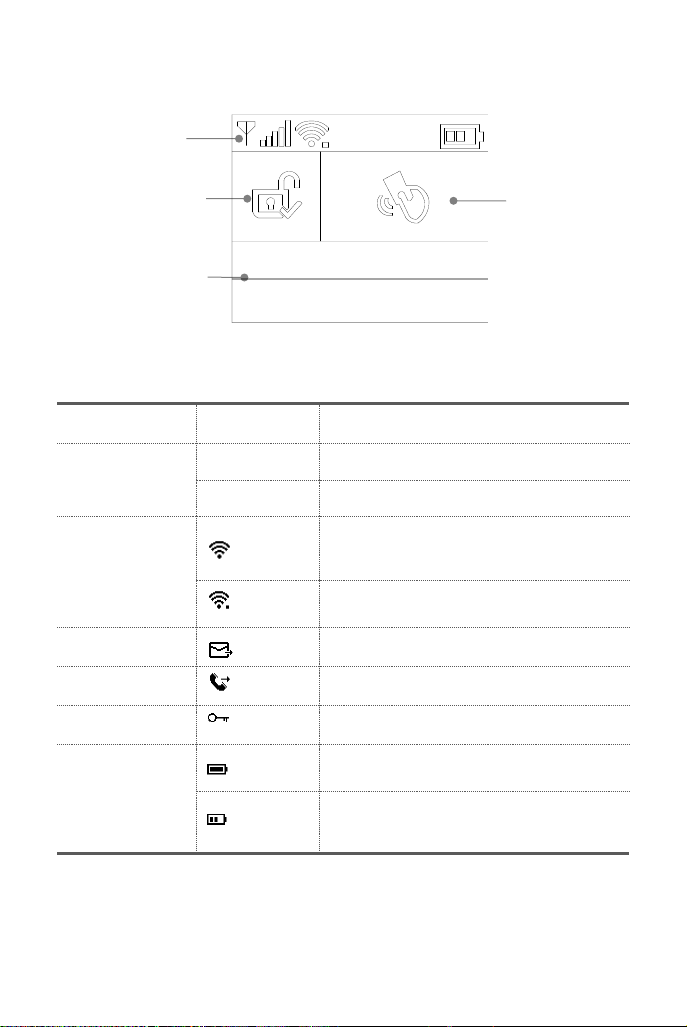
Home screen
Your home screen may look different if you use another version of hub.
Status bar
The icons in the status bar at the top of the screen shows information about the hub.
What you see
What it means
Wi-Fi network
(Cellular+Wi-Fi model)
Shows that the system is connected to a Wi-Fi
source and the signal strength when it is shown in
white. More bars means stronger connection.
Shows that the hub has a Wi-Fi Internet
connection when dot is shown.
SMS Text message sending
Call
Calling
Lock keypad
The keypad is locked
Power
AC powered, and the progress bars shows in case
of charging.
Shows the battery level when the system has lost
AC power. The icon is red when the backup
battery power is low.
Top status bar
Arm/Disarm status
Bottom status area
for countdown bar,
alarm information
and clock.
RFID read zone
10:35:42
2019-06-05 Wednesday
6
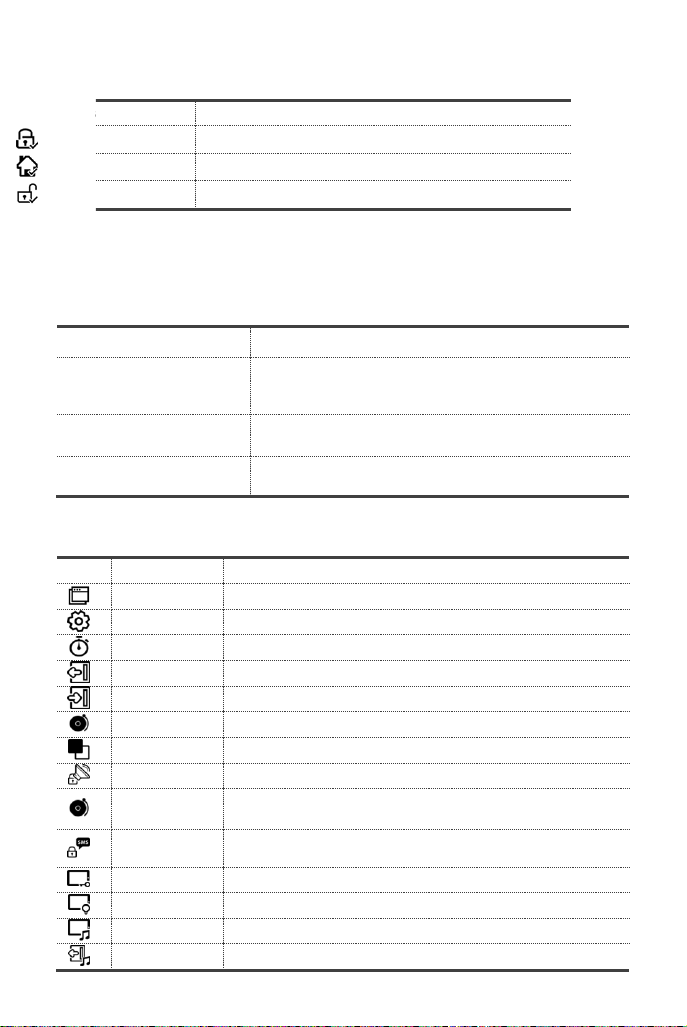
Arm/Disarm status
Here’s the Arm/Home Arm/Disarm status of system.
Alarm information
Display what happened in case of alarm.
Countdown bar
Clock is shown without countdown process.
Quick view of menu features
Your icons may look different if you use another version of hub.
What it means
System is AWAY ARMED.
System is HOME ARMED.
System is DISARMED.
What you see
What happens and what you should do
Please exit
You now have xx seconds to leave home before the Exit
Delay expires. When Exit Delay is completed, the alarm
system is armed.
Please disarm
You must disarm the system before Entry Delay expires, or an
alarm will go off.
Synchronizing
You must active the wireless transmitter before the paring
delay expires.
Icon
Item
What you can do with it
Menu
Settings
Delay
Exit Delay
Adjusting Exit Delay
(1)
(0~65535 seconds, default: 40)
Entry Delay
Adjusting Entry Delay
(1)
(0~65535 seconds, default: 30)
Siren Duration
Adjusting Siren Duration(0~65535 minutes, default: 3)
Switch
Turn on/off features
Arm Beep
Turning arm and disarm beep
(2)
on or off(default:on)
Siren
Turning alarm continuous siren on or off when an alarm occurs.
(default:on)
Arm SMS
Turning SMS notification on or off when the system arms or
disarms (default:off).
Keypad Lock
Turning touchscreen lock
(3)
on or off(default:off)
Backlight
Turning touchscreen backlight
(4)
on or off(default:off)
Keypad Tone
Turning operation chime on or off(default:on)
Delay Tick
Turning exit and entry chime on or off(default:on)
 Loading...