

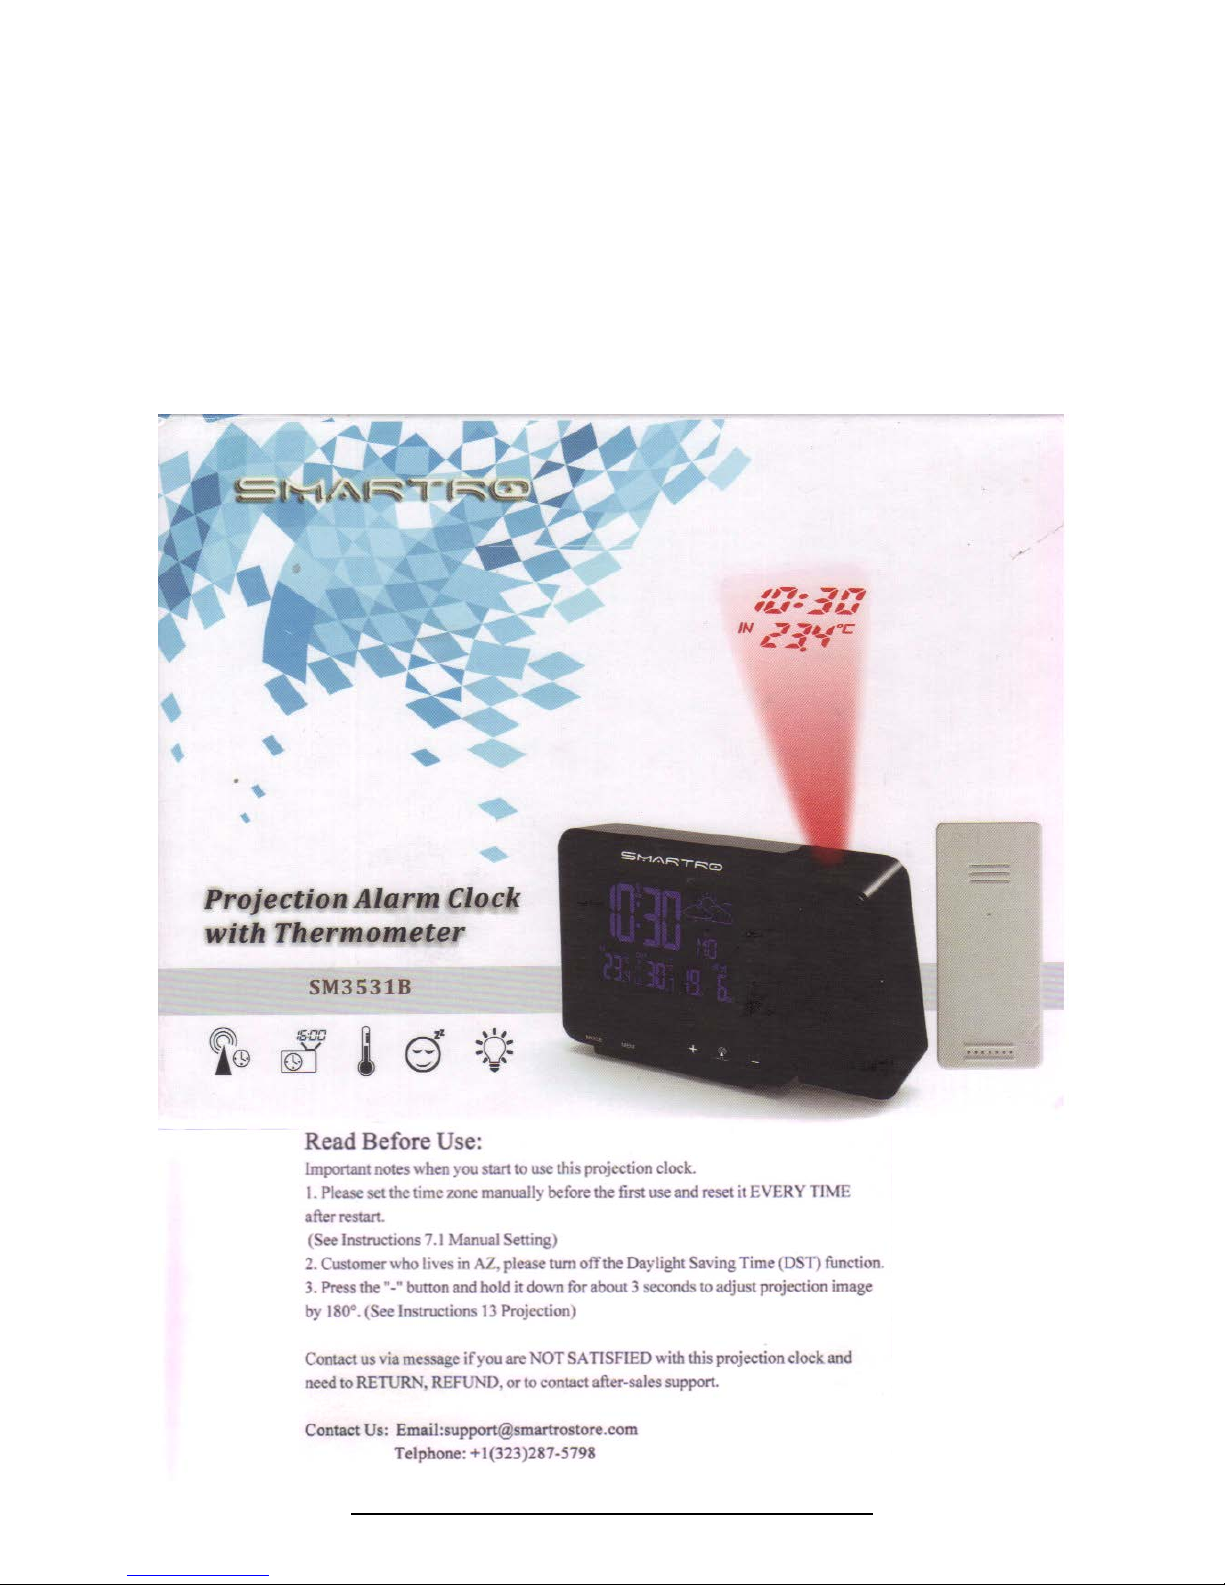
Instruction Manual
for Smartro
Projection Alarm Clock with Thermometer
SM3531B
http://metricpioneer.com/free-download/

Page 1
Instruction
Manual
Thanks
for
choosing
this
device
from
Smartro.
1. Befor•
You
Start
UsinK
It
Make
sure
{O
read
the
instruction
manual
carefully.
This infonoatioo will help you
10
fiuni.liarizt
yourself
\\'itb
your
new
device,
to
learn
all
of
its
functions,
and
to
get ad,ice
in
lhe
e\'ent
offBulL5.
Following
the
instructions
will
prevent
damage
to
your
device
and
IO~'li
of
your
susrutory
righis
n11sing
froni
de["'"" lluc to inooncct use.
We
shall not
be
liable
for
any damag• occurring as a resull
of
non
-following
of
the$e
~truClions.
Likewise, we
take
no
re-,pon~bilily fot
any
incomx:.t
readings
l:llld
for
any
consequ~
which may result
from
them.
Plo:a,e
Lake
particuL'IT
note
of
the safety advice!
Plea~e
keep
thi~
instruct
i()n
manual
ror
future
reference
.
2. Scope
of
Delivery
Radio-controlled
projection
weru.her
suuioo
Wm:1<»
Ri:mocc
Sensor
lnsmxtioa anmnl
p.,..
..
adaplor
J.
fldd
of
Optr•tlo11
•nd All lb• BentfitJ
of
Your
!\e"
De,i
..
at•
Gian«
Projection
of
the time and temperature onto a wall or coiling
(d1g11al)
Two
ahums
wilh
Snuozr:
function
Weather
forecasting
function
Radio--cootroUcd
nmc
function
CaJrndar
(Lp
ID
the
Year
or:im
I
lndoo<~-9.9"C-50"C(J>,-
J::<F
Ouldu<a
iUl.ij..<latwc:
~
- 71r-C(-40"f -IS8°Fl
'C
"f
seiect:!bl,
\\-rrclcss Remote Sensor
Wall
Mounting or
lable
Stand
433.92MHz
RF
transmitting frequency
60-meter
traMrni.ss-ion
ra.nge
in
an
upc:n
area
Battery: LR03 AAA
DC
Power:
DC
5V
12A
USB cin,ger func,.,,,
~-
For
YMC
Safety
Thn
pro=
~
"'c'cs;.dy
clmdcd
for the field
of
applicatima
~;,,,J
.._....,.,.. It sboukl
oa.fy
be
used
as
dcscri:..."00
~
~
~,K1ioos
Loaroboro.ed repaus.
~«
"'-¥CS
u,
the
proc!u:t
""?
;;,<otal
=!dd.
~
Camion? Risk
or
electJ • s '
Page 2
The
device
and
the
mains
adapter
must
not
come
int0
contact
with
water
or
moisture.
Only
&uiLublc
for
operation
in
diy
intcri.OI5
Do
not
u.se
the
unit
1f
the
housing
or
the
mail'l$-adaple:r
is
damagr:d.
Keep the unit
out
of
reach
of
pc,sons
(inclnding
children)
who
cannot full}
wee
iate lhe
pot"!)riaJ
risks
of
handling elecrricaJ eqwprn<nL
Pull the plug out
of
the socket immediately
if
any
liwk
occurs
or
lf
the
unit
is
not used for a
long
period
of
time.
Only
use the supplied mains adapter.
Do no, pull the plug out
of
the socket
by
iLs
lead.
Route
the
main:S
le.ad
so
dun
it
doe-s
not
come
into
contact
\\ith
sharp-orlgtu
or
ho1
objectS
.
&,
Caution!
Risk
of
injury!
Keep
this device
and
the battcric, out
of
the reach
of
children.
Batteries
mu."1
not
he
,hort-circwte~
laken apart, recharged
or
dtrown into a fire. Risk
of
C.'q>losion!
6aneries
contain
harmful
acids.
Low
batteries
~hould
be
changed
as
soon
as
possible-
to
prevem damar,e caused by leaking.
Never
use a combination
of
old
and
new
batt,-rics
together
or
u:;c
dillcr.-nt type, ofbatlcrics.
Wear
chenucal-resistam
procecu,·e
gloves
and
safety
gla..~ses
when
handling
leaking
bancrics.
&,
Important information on product
safecy!
Do DOlpb<e
~
pro<L,t
"'"""'"""""
1<mpe,2n..-es.
,-.bra.."cma<
;.bods..
s
..
fllBdioti
~
---
1~
.,_
Olz'
r
•
.
:O;
30
...
B1,..,.
w.
r.,
___
J_
:°5EJ
' '
_
,.
-
--·
·-··1 ·-·····
-- .
--'=-=
•-
~
----
·~--
~ ~
'
·-
- •tJ!.C,,-
.
.,
....
,-···
-·.i.::--·'---
:.
..
~
.
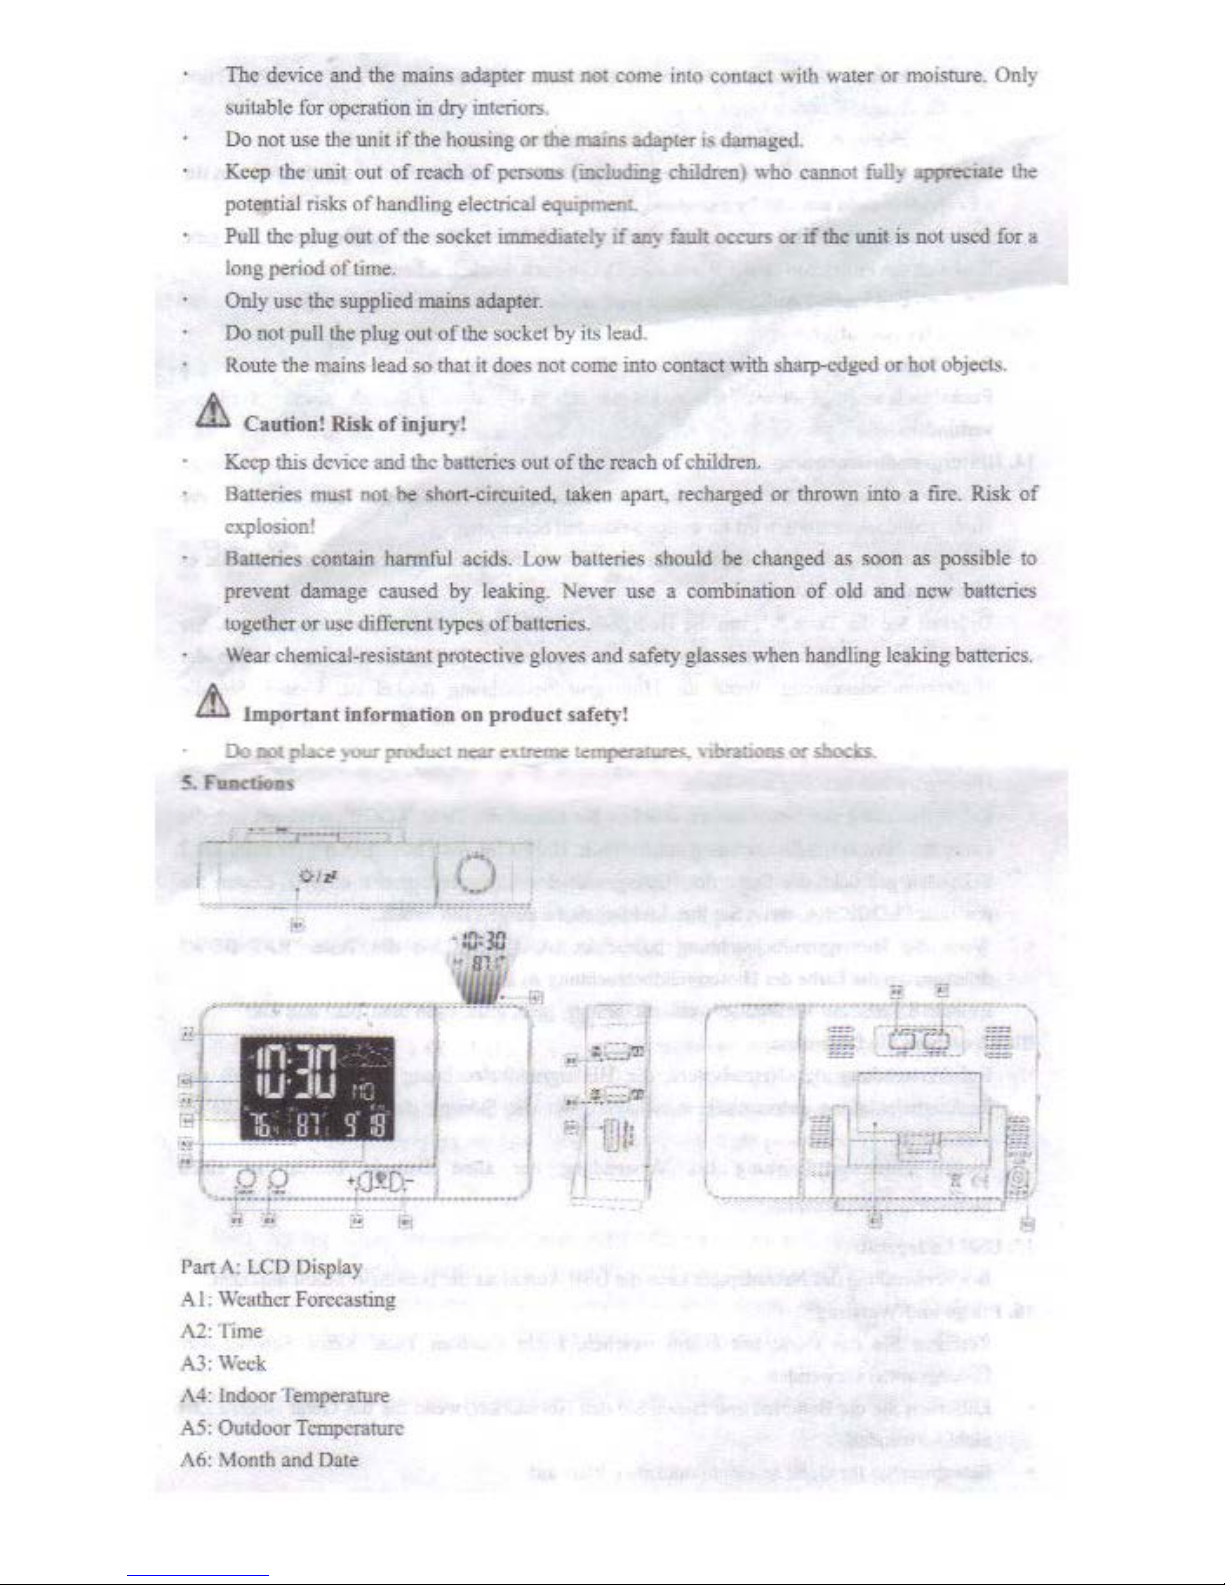
Pan
A: LCD Display
Al: Weather Forecasting
A2:
Time
A3:
Weck
J\4: Indoor Temperarure
AS:
Outdoor
Tcmpcrat11re
A6: Month and
D,ue
..
-~.;;;Pl
,;
I f!li
u
I
~==
=
·=
=

Page 3
A7:
Proje<:lion
D.i;"J)lay:
Time and lndoor/OutduorTcmperarure
P
an
B: Button and Power
B 1 :
•U
/
z'
" Touch button
B2: "
).1(:)DE""
buuon
83
: "M!:.M" buuon
B4: ··~·· button
RS
: .. _
.,.
button
B6: "'LOOP" button
B7
: "RAil\'BOW" button
l!X
: Al
arm I on1offswitch
B9: Alarm 2 on/off switch
13
10: USB
c
ha,g<,"T
output socket
Bl
l: Bane,y compartment
B
12; Power supply socket
Pan
C:
Wudcss
R.emore
Sensor
Cl:
Banay
compartment
6. Initial Op<_ration:
•
•
fi
r -
-,
I
Open the barteiy compamnent of weather
station
and
insen
t,vo
new 1.
SV
AAA
batteri
es,
Ensure
that
the
battery polarines
[·-·and"
-'1
an,
rorrec1.
When>""
ansen
lhe
ba!lenes.
all
11,,:
sy1!1bol<
°"
!ht
U:D
d;spbywill
hylt
np
for 3
seconds.
You
will hear 1 -'beep - sou!ld.
The
"e.nba
Slarion
mm
lD
dr:1cct
mdoar
~
Open
the
~
cnmpanmec
.t
of \\-ueks&
R""'°"
S<osor ond ,nsen .,.....
"'
" u·v
AAA
banenes.
Eru;ure
lhaLlhd,.,UCI) polarities [ ·- "
aoo
--J
an:
correcL
The weather
station
\\;U
now stan
ro
make
a:
coonecaon
to
me
Remote
Sensor.
displa
_yod
b_y
a
Dashing
rcccptfon
RF
antcnn•
•>-mbol
m
lb<>
"OUT" display
an:a
on !he receiver.
lllis
ope.ration
tales
about 3 minutes.
Afic..T
the
receiver
b..'iS
made a connection to
Oic
rcmolc
&..'IlSOr
,
il
will enter
the
radio-comroUed
time
receive
mode
..
6.1
Radio-controlled
time reception
Chaoge
the
baueric1>,
or
restart
the
d~vicc.
Aller 7
minutes,
the
weather
station aummaricaJ
Jy
starts the W'.VVB signal search. The radio
mast
symbol starts to flash.
At 1 :00
/2:00 /
3:00
am.
the
weather
51.alfon
autoID8tically
carries
oul
the
sy11chroni;1ation
pr
ocedure
with
the
\\'WVl-3
signal to
correct
any
deviations
to
the
e.,act
rime.
If
this
synchronization attempt
is
un,ucccssful (the radio mast symbol di""PI"'""
from
Lhe
display),
then
the
nex:l
reception
takes
place
the
ne.xt
hour
and
so
on
u
ntil the
reception
is
successful.
This procedure
is
automatically repeated
up
to a total
of
5 times.
lf
the
rc<:eption
is
not
successful,
ohen
!he
nen
attempt will
talce
place !he next day
at
01
:00
am.
To start manual
ViWVB
signal reception,
press and hold
both·~· and
"·'
button at the
sume

Page 4
time
for a few
seconds.
If
no
si,gnals
arc
received
wilhin
7
minutes.
the search
of
WWVH
signal stop,. (The radio
most
;ymbol disappear,s.) The next rec,:ption
rakes
place the next
hour.
During radio-<:onttolled time
rr..-c,:ption.
to siop searching
WWV-8
signal, press and hold the
"
-"
hurutn
for
more
dwi 2
second'ii.
Please
take note
oftbe
foUowing:
A
~bing
radio
roast
symbol
indicates
thac
the
WWV8
signal
reception
starts.
A continuously
displa}'lld
radio mast symbol indicates that the
WWVB
signal is received
succcssfo ll
y.
The
recommended
distance
to
any
interfering. sources
Jike
computer
monitors
or
TV
sets
is
at
least 2.5 mctets.
Th~
~el\
·(d signal b
naturaUy
weakeoed
in
rooms
with
concrete
walls
{cellars,
basements
)
and
in
offices. ln
$UCh
e
xtreme
circumstances,
place
the
device close
to~
window
.
During the RC reception mode, only
the"
-" bullon works while the other buttons have no
funcLion.
If you want the other buttons to function again, press and bold
the"
-"
buttoJl
for
more
than 2
sc<.'Ollds
to
quit the RC reception
mode.
7. Op<ratlon
7.1
Manual
Setting
Press
"MODE" butlon once,
you
can switch the symbol
of
calendar
to
the symbol
or
Alann I
'Alarm
2.
Press
and
hold the "MODE'"
oonon
for more than 1 seconds. the Year
dispby
SWtS
to
flash.
Prtss "~" ..
_..
buuoa
IOadJ\$
)ar
l're;s
-
\fODF
b>.mon
IOCODtirm
me
srning.
Toe Month display S1lUtS to
Dash.
Pres,"+"
"-" buuon
to
adju.<t
month.
Press "
MODE
"
b
utlOn
t0
con
Hnn
the
setting_.
·11
,e Uate display
staru
to flash. Press"+" I "-"
bu<Wn
10 adjust date. Press .. MOOE
·•
button
to
confirm the Stttiag.
The symbol
of
Momb and Date suuts 10 flash. Press "+" / "-" button
to
choose between
Montb!Dak: and D•tc/Montb. Press
"MODE" button
to
confirm the setting.
The
Tirne
Zone
display
starts
to
flash.
Press
·'
+"
/ "-"
button
lo
set
the
correct time
zone.
(PST:-08, MST:-07. CST:-06
ond
EST:--05)
Press
"MO
DI!:
"
to
confirm the setting.
The DST display staru; to flasb. l'ress
·<+··
t"
-" button to
tum
on/ offtbe DST function. Press
-~JODE
" to confirm the scuing.
The
syml)QI
of l21i
or
24H'
swts
to
flash. Press "
+"
/ "-" button
to
choose
1211
or 2411
system. Press
"J\
IODE
.. to
wnfinn
the seumg.
The
Hour
diSplay
starts
to
flash.
Pre.«
"+" . .. •••
button to adjnst hour. Press "J\10D.E" to
confinn the setting.
The Minute
disp
lay sians
to
flash.
Pres.,
.. ..,. ,
-.-
button
to
adjust minute.
Press
"i\10D.E"
hunon
ro
confirm
the
setting.
The symbol
of
l<mperawre unit &tanS
to
flash. Press "+" /
... ··
button
to
choose the
temperarure unit (°C r•F). Press
";I
f ODE" button
to
confum the sctting.
The
symbol
of
wcalhor
f<>n;c0>t
Pllll<m
staru
10
llash. Press
··
+·· / .. _ ..
bUtton
to select the
current weather panem. Press "MOOE ..
1<>confum
the setting and end the >etting procedure.
Plnse
take
note
of
the following:

Page 5
The wwlhcr station will •uLomatically
quit
lhc setting mode
if
no button is pressed wilhin
20
seconds.
American
TJJDC
Zone,,'$
EST: Eastern Stllldard
Tim
e (-5)
CST
CCIItral
Standaro
T,mc (-6)
MS'f:
Moumain
Stat\<IW
Ti,pe (-7)
PST: Pacific
Slllndord
T11nc
(-8)
Time
zone
must
be
chosen
correctly
according
10
the
area
of
\\ea:cher
station.
Or tbe lime
wi.U
be:
incorrect
v.
hen
the
signal
is received.
When Daylight S.w,ng Time
(DSni>
notJJill)l""""1<:d
in
the
an:a.
tumo!Ilhc DST function.
8.Alarm
8.1
ManualSe
tUng
uf
theA!acm
1·
•res.<
and bold -~LEM"
burton
fur
more
Illar, 2 seconds, and
Che
bOIJT
di>i>l•Y
of
Alaan l
stans
co
flash.
.Press
,._
,..
....
-
buuDn
m SC'I die
.hour.
Press
w!\
t£i\P"
button
to
confirm
che
~ning.
The
minutt
displa1
of
lhe Alarm I
mns
io
faslL
Pres.s
--·,"-"button
m
set
the minute.
Pr=
-,1
E
,r
buUQil
"'
cunfum
the
S<'tlll!J!.
The
boor
dispby
of
the
.\brm 2 scaru
10
il35h.
Press-
,- J
•--
bmmo
m
sei
the hoot.
Pre,;;;
~[E)r
buaom
"'roofum
the
scmng
1112'
nunme
display
of
the
Al3rm
:!
=
IO
112sh.
P,e;s
"-"
"-"
buaon
ll)
set
I.he
mmute-
Prcss
"'ME..1\r
button to confirm the setnng and end the setting
procedure.
Pica.so rake note or
tb<
following:
Th~
weather
station
will
automatically
SY.itches
from
setting
mode
to
normal
mode
if
no
button IS pressed wilhin
20
seconds.
8.2
AC'th-,t.tt,
'Inactivate
tht
Alarm function
\\
11<:u
tbc switch
of
aJ-mn I or
ahum
2 is
m<m:d
to the
"OS-
position. !he symbol
of
""!I"
or
·~ "I'!'""" oo the LCD dispby.
The
alarm function
'"ill
be
activ.ued.
When
the
swi1cb
of
alarm 1
or
alarm!
is
moved
10
the "OFF'
position_
the
symbol
of-:t'
or
··
-:1-
· disappears. Th< alarm functi,,o will be dcllctivatcd-
8.3 Turn off the Alarm
Press any button except lhc
·-¢-/
zZ"
to
turn
off
the
alann_
lt
is
not
nccUSIU,
io
r=,'atc
the
alaan. lt
will
m1cliva1~
I.be
alarm
function
:.iutomatically.
If
it
is
not
~topped
manually.
the
alarm
11i
ll
automa11ca1Jy
rum
off after~ mm!!!ti !lid
will
Ill!
reactivated
at
the
.same
time.
Please take note
of
the following:
11te alanu
will
keep rinyng
for
2 minutes
if
you do
not
deacu,-ate n by pressing any
bcnon
ln
Ibis case
the
ahum will
be
repeated automatically after 24
hours_
The ring
of
the
alarm
is:
a
rising
crescendo
l()f
voice,
which
changes
4
ti~
in
lOl3:I
during
the
past 2 minutes.
8.4 Snooic Func~on
You
COD ••1i••tc lhc
snooz.c:
function by touching the •tJ, I
zZ-
button. The alarm will ring
ag:ai n in 5 minutes.
9. Wireless Transmission:

Page 6
When
cli-e
weather
station
recei\'.es
signals
from
the
Wireless
Remote
Sensor
Micces:sfully.
outdoor
tcmpc-n1turc
(''
Out
")
is displayed
on
the weather static,.
The
weather
stario,
can
connect
up
10
lhree. WireJ~ss
Remore
Sensors.
When
dle
weather
station
connects
to
multiple
Sensors,
the
Wucle:ss
Remote
Sensor
cannot
choose
the
same
channel
ai
the
same
lirne. (The Win:les. Remote
S=rba>
3 ;i:lcctable olulnnels: channel l,
channel
2,
and charnel 3.)
Press the
"+" buuon w switch from the <li>l'lay
of
channel 1 outdoor
tc:mpcratun:
to the
display
of
channel ! outdoor temperarure.
lf
lhe
weat.ber
&t:atioo
fails
to
receive
wirckss
transmission
from
Remote
Sensor
("
...
·"'
is
displayed on the
LCD),
press and hold "+"
buttOD
for
mort:
than 2 seconds
tO
roceive
transmission
manually.
The
outdoor
temperature
v,ill
show
an
animation
of
the
RF
antenna
symbol. the weathe: station will
tty
again to n:ccivc the wirclcsl signal
of
the Remote
8<:nsor.
Please tllke note or the ronowlng:
When the
Wireless
Remote Sensor is set up a differem ehaonei the outdoor temperature
("OUr'}
will
swilcli
tO
the same channel with
R10mote
Sensor.
lf
there is
no
signal
transmission
on the channel,"-" will be displayed
on
the
LCD.
Wbc-a
the
\V'IrClcss
Remote Sensor bas no channel selection Jimction. the
8<:=r
ddilulls to
cbannel
I.
10. Temp•rarure
10.1
The Display
of
the Temper•ture »nd Temperxture Trend
The
current
indoor tcmpcrarurc and the tcmpcranm: m,nd (indoor) are shown nn the LCD
dispby
.
!..1'.a-
-•
~~
""'Cw~
R~
~
J,LE..Lc.sfidi)..
the"'"''
L n u:mpr:raturc
and
lhc
"'"J>Crat""'
""1ld (ouuloor)
i:anbc
,Jt<>wn
w
th1'
LCP
diSplay.
You
may
see the following symbols:
~
The
remperarure
ls
rising.
--+
The
temperarure
remains
constant.
-.._
The
temp<mture
is tailing.
10.2
M.uimum/Minlmum
temperature
To
cbao
2c
the
data
of
indoor/outdoor
maximum.
minimum
temperarurc.
press
the
"MEM"'
button.
Press
the «MEM"
button
once to.show
the
maximumtcng>craturc
values.
Press
the
.. M
EM-
butt.on
twice
LO
show
the
,'Omimur.1.1
tempenUure
values.
Press
the:
..
:ME..W
bunon
three
rimes
to
rctum
to
the
current
tcmperarure
Jevels.
To
rese1
the
maximum
and
minimum
temperature,
press
aud
hold
the
.. _ ..
button_
for
m.or'e
lhao
2 seconds.
Pleil$<>
lllke note
or
the (oDowing:
If the tempcrarurc
reading
is below the set poinr, the LL.L will
be
displayed.
If the tempel'lllurc
n:auing
i,
above lhc set
poinl.
the HH.H will be displayed.
10.3
Outdoor
Temperature ~·rost Alarm
Wbeo
the outdoor temperature is between -1°C - +3°C
(+30
°1'
- -37"F), the frost
aJarm
function will be acrivatcd and the symbol
of
•f,• will
be
flashing.
11.
Low
b•t1ery
ff
in the
"IN''
column. the LCD display shows the symbol
cf
..
riEJ-.
, plca;c replace the

Page 7
baueiy
of
<he
weather
..st.ation
as
.soon
as
possible.
If
in the "OUT'' column, the LCD display shows the symbol
of
..
j._ '",
please replace the
b•llcry
of
Win:lcss Remote
S<:nsor
as soon
as
possible.
12. Tile Weather Fo:reeast
The
weather
station
calculates
the
weather
forecast
for
the
next
12
hours
based
on
the
barum¢tric pm;sun: trend.
The
weather
forecast
of
the
weather
station
can~t
compare
to
d,u
of
professionaJ
weather
se,,.;cc:s
suppon<:d
by satellites and high pcifonnancc computers.
It
provides an approximate
indication
of
current
deveJopcneots.
Please
take
the
weather
forecast
from
your
local
weather
forecasting
service
into
account
a.Ci
well
as
the woalher foreca,;1
of
the weather station. If there are d;....-n:pmcics,
pie=
use the
former
a~
authoricuive.
U.2
The
Symbols of'Weatber Forecast:
-
_-
..
. '
- .
-~
sunny
I -•·
..
,ghdy
cloody
doudy
rainy
U.3
Ile
..
eatbor
sutioa
eaa
d.bpby
<the
barometric pressuct trend.
You
may
see the following symbols:
...,,.1111"
The
barometric
pressure
will
rise.
The
baromc:tnc
pres:,:un:
will
remain
coostu.oL
~
The barometric
pn,1,>1,n,
"ill
fall.
IJ.l'rojtttiolll
heavy rainy
snowy
Wb<,o
usmg
thc:
bauocy
Qf
the:
..
C8lh.:rSl8t¥E IOUtb -0-
zZ
·,
the:
projecu-Oo
will
tum
OD
for
a
few
s,,coods.
When using the power
ad~
the ptojectioo
v.iD
alv.'l!ys
light up.
Press the•-• bvtton and bold itd.,...,
forabolll
3 S«Onds to adjm1 projectio11jmAgt
bi
!80".
The
effcctiv,: distance
of
project,ou is
1-
3 meter...
Wbai
then; ,,s ao tight at nigh!. the
weather staiion can clearly di<pby
thie
oomans
of
the projecnon on me wall or ceiling.
Time and indoor
f outdoor tcmpc:ratun:
"ill
be displayed on thc
wiill
or
ociling.
Please take note
or
the
foDo..-lng:
When using the power adapter, during Radio-controlled recepoon, in order
to
P'"'""'
the
i111erJ.,-eoe
o
of
ekctric
W11ve.
the projection
di>1>lay
will
lUCll
olI
automatically.
14.
Backlight
When using the battery
of
the weather station, touch
~
I
zZ•
, the backhght
will
light
Ufl
for
a
few
seconds.
When using the power adapter, the
battery
will automatically disconnect the power supply.
and
the backlight will always light up
if
you don't
turn
it
off
manually.
Pre;;s
the"
-" button
to
adjust the brightness
of
the backlighL
You
cao
adjust the brighlncss for
4 times: 3 different brightness or rum
off
the backlighl
When
the
backlight is off, touch

Page 8
-{;};/~"
to
rum
on the
backlighc.
le
will
lighc
up
for a
few
seconds. Choose lhe brighllless
of
backligbl or tum off the backligln according to your personal preferences.
Wbcn
using !he power adapter,
pre,;s
"U)OP"
buuon
ooce..
!he
back.light
will
autom•cically
change the color. Pn:ss and bold the "
LOOP"
button
for
more !ban 2 seconds. the color
of
bacldighr will
be
changing
fu.~L
Release lbe "LOOP" buuon when
yoo
bav,:
selected your
favorite
colot
When the
b3cl<light
is on,
pms
the
"RAINBOW"
btctton
to change the color ofbacklight.
There are 8 colors selectable:
whire,
red,
orange, yellow, green,
eyao,
blue. and purple.
Pl•aso
uoke
note
of
the following:
When
using lhe power adapter, during Radio-controlled. in onlcr
to
prevent the interference
of
clccttic wave, the
back.light
wil l tum
off
automatically.
Since
the
p0w~
is
not
enough
when
using
the
old
battery)
there
v.ill
be
color
difference.
Please use the power adapter as far
as
possible.
1S.
USB
Charger
When
using the power adapter, the
USB
socket can
cllllrg_c
the bandhcld mobile devices.
16. Care and Maintenance
Clean your device with a soft
damp
cloth. Do
not
use soh'cnts or scouring agents.
Remove
rhe
batteries and pull out lhe plug
of
the socket if you do
noc
use the device
ror
a
long period
of
time.
Keep the
device
in
a dry
place.
17.Troublesbooting
P."'°"1::, •
~
EmaiB
dm:
*
OliiaYpom-L"Y
.is
correct.
Change
che
oamn<:5-
Problcm B:
~o
projection
Check the power
adapcer.
Problem C:
No
WWVB Reception
Change
tbt
location.
Remove
the
batteries
and
in~
chem
again.
Manual
clock setting
Problem
D:
incorrect
indication
Chango lhc batteries.
Jf
your
device fails
to
work
despite
these::.
measu
res. please
contact
the
seller
from
whOm
you
purchased
iL
18.
Waste Disposol
This product bas been manufactured using high-grade materials and componencs wbicb Clll1
be recycled and
11:u,;cd
.
Never dispose
of
empty batteries and rechargeable
bacl¢ries
in bo..,.,hold waste.
As a consum«,
you
arc
legally
required
to
take
them
to
your
retail
store
or
to
an
appropriate
collection site
depending
on
nationaJ
or
local
regulations
iD
order
to
prol«:l l.bc
environmcn1
.
The symbols for the heavy metals contained are: Cd=cadmium, Hg=mercwy,
Pb=lead
Please do not
di<J>Ose
of
this i.ns&rument
in household
WllSlo.
The user
is
obligated to take cod-of-life de,ices
to
a designated collection point
for
the
dispo.~al
of
electticaJ
ani.J
el<:(;tronic
equipment.
in
order
to
msurc
cnviroomenlally~nble
d,spa;al
 Loading...