

Page 1

RFID-1 P
Version
This manual contains information for programming the RFID-1 tag reader
security
www.smartrise.us | 8360 Rovana Circle, Suite 3, Sacramento, CA 95828 |
software included in software version 2 only (v2.32 or
ROGRAMMING
M
ANUAL
2.00
916.457.5129
above)
Page 2
GETTING STARTED
The Smartrise SRU controller provides a RFID-1 interface which allows the user to program security
tags for each car. Currently, the RFID-1 security feature is only available on a 3- board system
(MR/CT/COP boards) and in software version 2.32 and above.
Requirements
The following shows requirements for programming the RFID-1 tags:
1. Tag programming can only be done from the master board (COP).
2. Group – Only one master COP allowed per group. All other car COP’s are classified as slaves.
3. Simplex – The COP board must be a master.
Hardware
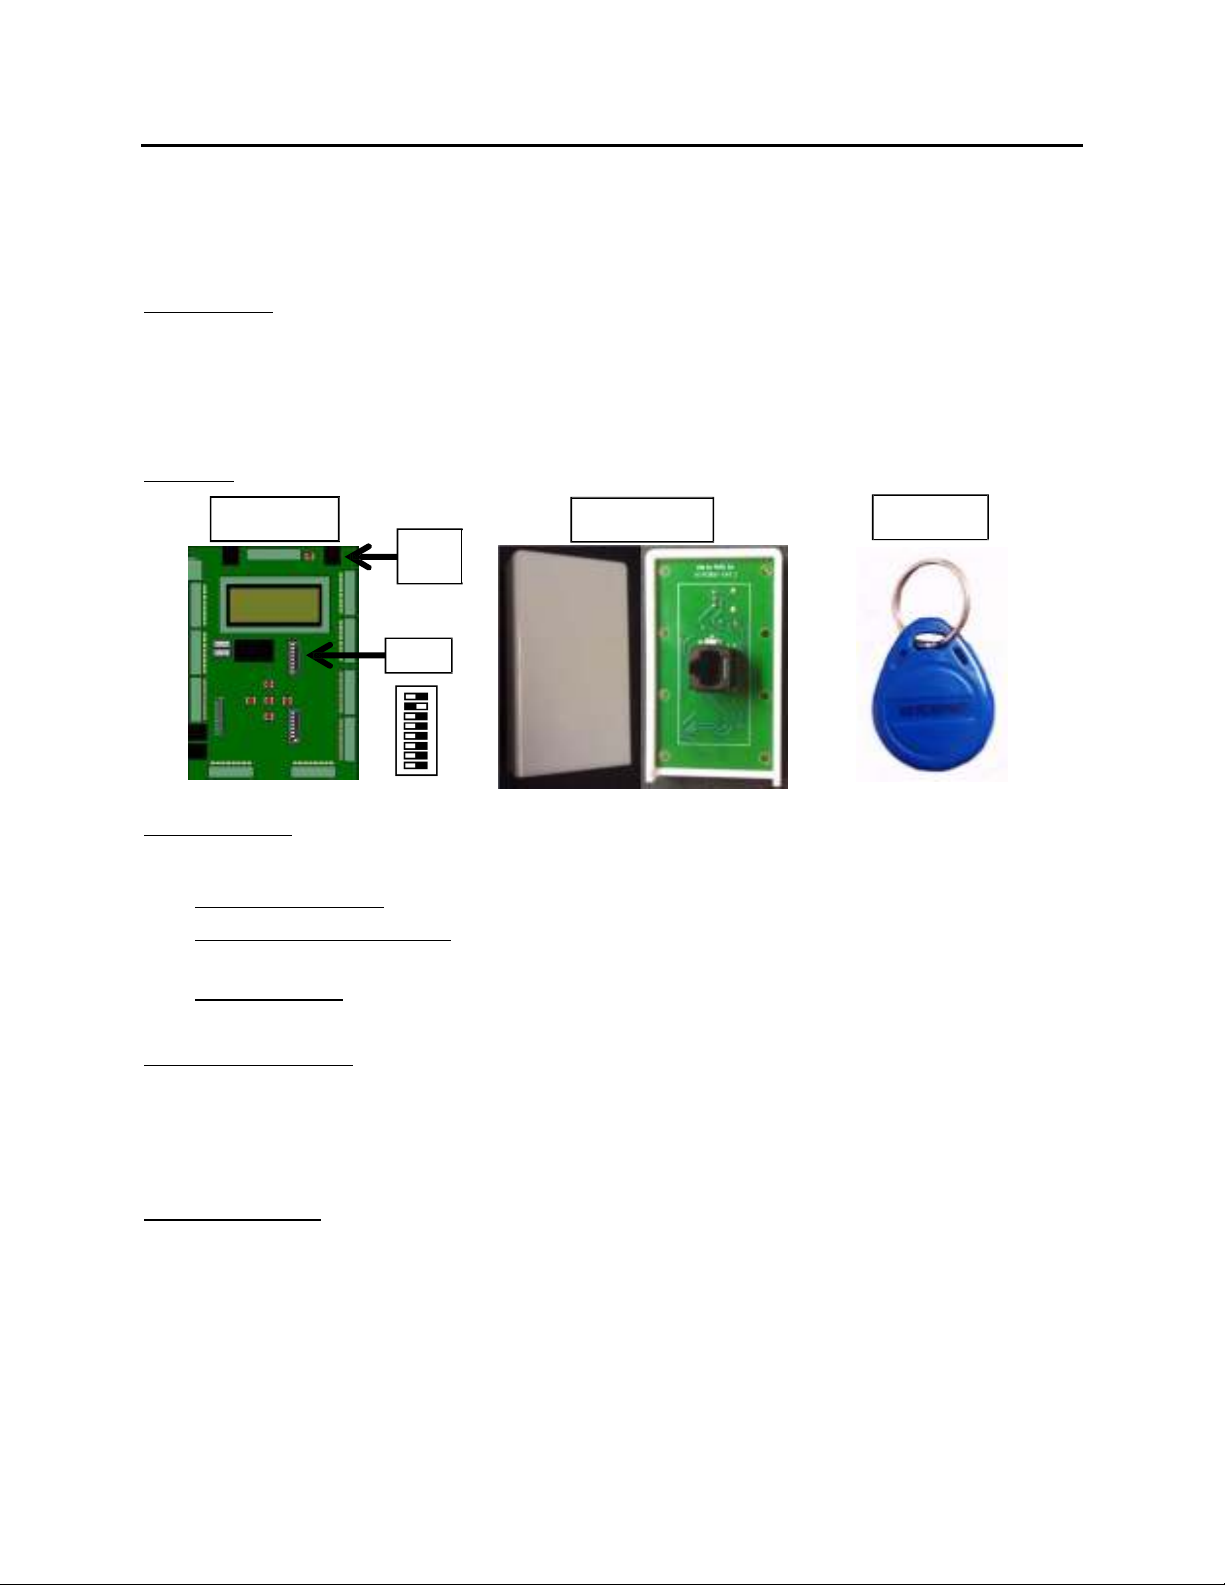
COP Board RFID-1 Reader
Drive
Port
RFID-1 Tag
Dip A
COP Board Dip A
The Dip Switch settings you will use on the COP board (Dip A) are as follows:
1. Operating the RFID-1 – Dip Switch #2 on. This is always on for the RFID-1 to operate.
2. Programming a Manager Tag – Dip Switches (#2 & #3) + swiping a Tag will program that tag as
the Manager Tag. This tag is needed for the programming of slave tags.
3. Deleting All Tags – Dip Switches (#2, #3 & #4) + swiping the Manager Tag will delete all tags.
This needs to be done to initialize the board for the first time.
125 KHZ RFID-1 Reader
The reader will plug into the Drive port on the COP board. In a Group system only one car COP board can
be a Master board for programming. All other car COP boards will be slave boards. The reader should be
installed so that the LED’s are visible when powered on and the plate
swiped across it.
accessible for scanning the tag when
125 KHZ RFID-1 Tag
A small keychain tag with a numerical ID printed on it. These tags can be programmed as the Master
Tag or as floor tags. The number printed on the tag is used by the software but is not needed for
individual programming. When the tags are programmed they are assigned a numerical value starting
at 000 (Master programmer tag), 001 (1
st
tag programmed), 002 (2nd tag programmed), etc. up to max
of 585 tags.
Page 3
PROGRAMMING THE READER
(REQUIRES ACCESS TO COP BOARD)
1
. Plug the reader into the COP Drive port using a standard CAT5 cable.
2. Turn on Dip Switch #2. [This will be left on when programming or using the RFID-1 reader].
3. Turn on Dip Switch #3 (#2 & #3 are now on) and swipe a tag across the reader. This will program
that tag as the Manager Tag which will be needed to program the User Tags.
4. Turn on Dip Switch #4 (#2, #3 & #4 are now on) and swipe the Manager Tag (programmed in step
#3). This will delete all tags that may be programmed in system, including the new Manager Tag
programmed in Step #3.
5. Turn off Dip Switch #4 and swipe a tag across the reader reprogramming it as the new
Manager Tag.
6. Turn off Dip Switch #3 (#2 is the only switch that will stay on). Now you’re ready to program the
User tags.
LED Patterns – Programming the Reader
Red / Green Blinking w/short
pause between blinking
Red / Green Blinking w/long
pause between blinking
Manager Tag programmed successfully
Delete all tags successful
PROGRAMMING THE USER TAGS
1.
With the solid red light on, swipe the Manager Tag across the face. You should have a solid
green light with a brief red flash showing the reader is in programming mode.
2. Swipe the un-programmed tag across the reader. The LED should be solid red with a brief green
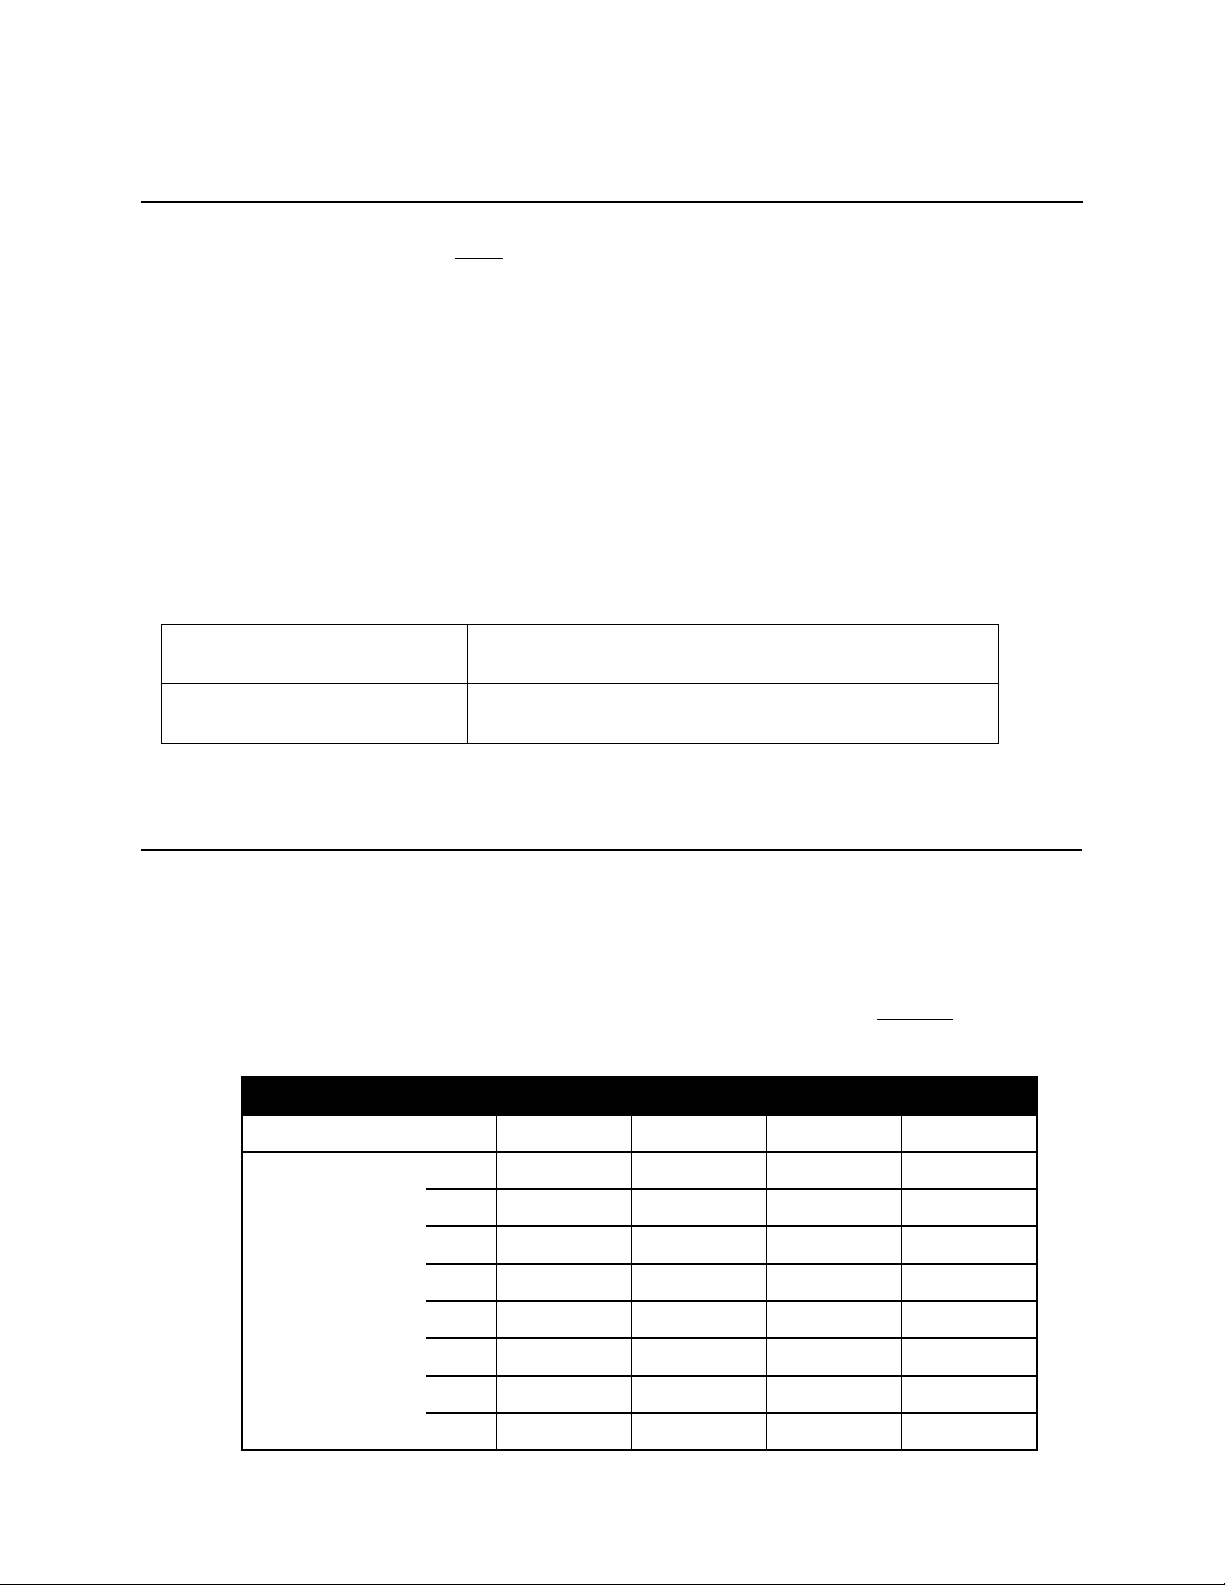
flash showing that the new tag is recognized. The Car Call Lamps (CCL) will display the tag ID (001
for 1st tag, 002 for second tag, etc.) in Binary. The following table shows an example of a 4-stop car
and the Car Call Lamps that correspond with the tag ID.
Tag Description ID# Floor 1 CCL Floor 2 CCL Floor 3 CCL Floor 4 CCL
Master Tag 0000
User Tags
0001
0002
0003
0004
0005
0006
0007
X
X
X
X
X
X
X
X
X
X
X
X
0008
X
Page 4

3. Press the DCB button. The reader should now go to “Waiting for floor permissions” with the red and
Allows
programmer
to
green LEDs flashing. Perform step “a” or “b” below.
a. Press the Car Call Button(s) for each floor that this tag will unlock when swiped
b. Pressing the DOB during this phase will toggle between giving permission to all or no floors.
4. Press the DCB button to save tag’s programming and reader goes back to Programming
Mode.
5. Repeat steps 2~3 for each tag to be programmed.
6. When finished programming, and while in Programming Mode, press the DOB to exit programming
mode. This will be done when the LED is solid green with a brief red flash. The LED should go to
solid red which means it is in normal operation mode waiting for a tag swipe.
LED Patterns – Programming RFID-1 Slave Tags
LED Pattern Description DOB DCB
Solid Green w/
brief Red flash
Solid Red w/ brief
Green flash
Red / Green
Blinking
DCB on floor permission: Save floor permissions and go back to beginning of programming mode
waiting for new tag.
1. The Door Open Button (DOB) and Door Close Button (DCB) handle several functions when
programming the RFID-1.
a. DOB
i. DOB in Programming Mode: Exit programming mode
ii. DOB when displaying tag ID or after manually entering ID: Deletes tag
iii. DOB when on floor permissions: Toggles between giving permission to ALL or
NONE floors
b. DCB
i. DCB in Programming Mode: Allows programmer to manually enter a tag ID (001,
002, etc. - see table on previous page)
ii. DCB when displaying tag ID: Advances to “waiting for Floor permissions”
iii. DCB when “waiting for floor permissions: Saves Permissions
Programming mode:
Waiting for new tag to
be swiped or tag ID to be
entered with CCBs
Verification Mode:
New tag recognized (CCL
displays tag ID)
Floor Permissions Mode:
Pressing single or
multiple CCB’s will
enable those floors.
Exits
programming
mode
Deletes tag
Toggles
between giving
permission to
ALL or NONE
floors
manually enter a tag ID
(for modification or
deletion only)
Advances to “waiting for
floor permissions” mode
Saves permissions
Page 5

USING THE RFID-1 USER TAGS
LED Patterns – Operation
Solid Red Normal – Waiting for tag swipe
Solid Green Tag recognized – Unlocking floors programmed for tag
Red Blinking Unrecognized tag
To operate the elevator with RFID-1 tags:
1. Reader displays solid Red LED
2. User swipes the tag across the reader.
a. Reader displays solid Green LED – Push the floor Car Call Button (CCB) that ID tag has access
General Information
Up to 585 tags are supported. Upon power up the master broadcasts tag #1, then #2, #3, etc… Any slave
COPs on the network will save the new broadcasted tag if it is different than its own local copy.
Worst case update time for a slave (subsequent car COP boards) can be 15-20 minutes after programming
with 2 or more cars if all 585 tags are programmed.
to.
b. Reader shows blinking Red LED – tag is not recognized. Contact elevator
administrator for assistance.
Page 6

User Precaution
This equipment has been tested and found to comply with the limits for a Class A digital device, pursuant
to part 15 of the FCC Rules. These limits are designed to provide reasonable protection against harmful
interference when the equipment is operated in a commercial environment. This equipment generates,
uses, and can radiate radio frequency energy and, if not installed and used in accordance with the
instruction manual, may cause harmful interference to radio communications. Operation of this
equipment in a residential area is likely to cause harmful interference in which case the user will be
required to correct the interference at his own expense. Changes or modifications not expressly approved
by Smartrise Engineering, Inc. could void the user's authority to operate the equipment.
Compliance Statement for Canada (English)
This device complies with Industry Canada license-exempt RSS standard(s). Operation is subject to the
following two conditions: (1) this device may not cause interference, and (2) this device must accept any
interference, including interference that may cause undesired operation of the device.
Déclaration de conformité pour le Canada (français)
Le présent appareil est conforme aux CNR d'Industrie Canada applicables aux appareils radio exempts de
licence. L'exploitation est autorisée aux deux conditions suivantes : (1) l'appareil ne doit pas produire de
brouillage, et (2) l'utilisateur de l'appareil doit accepter tout brouillage radioélectrique subi, même si le
brouillage est susceptible d'en compromettre le fonctionnement.
Sales and Service Information
To obtain information about Smartrise products and technical support, please reference the following
information.
Smartrise Engineering
8360 Rovana Circle Drive
Sacramento California 95828
Phone: 916-457-5129
Fax: 916-457-4948
www.smarise.us
 Loading...