


SMARTRIGGER USERS GUIDE
Version 1.8
2/10/2010
Users Guide
Smartrigger Electronic Percussion Products

SMARTRIGGER USERS GUIDE
Version 1.4
2/10/2010
Table of Contents
Table of Contents ....................................................................................................................... 2
Introduction................................................................................................................................. 3
Smartrigger Cymbal Features .................................................................................................... 4
Setup .......................................................................................................................................... 5
Quick Setup ............................................................................................................................ 5
Connecting the Cable ............................................................................................................. 5
Proper Cymbal Mounting ........................................................................................................ 6
Mounting the Hi Hat Cymbals ................................................................................................. 7
Using a Fixed Hi Hat Arm.................................................................................................... 7
Using a Standard Hi Hat Stand ........................................................................................... 7
Hi Hat Clutch Mounting ....................................................................................................... 8
Installing the Hi Hat Cable................................................................................................... 8
Triggering the Dual-Zone Crash and Hi Hat Cymbals ............................................................ 9
Triggering the Dual-Zone Ride.............................................................................................. 10
Triggering the Triple-Zone Ride ............................................................................................ 11
Setting Your Trigger Inputs ................................................................................................... 12
Roland Drum Module Settings .............................................................................................. 13
Settings for the Roland TD-20 and Roland TD-12 ............................................................ 13
Settings for the Roland TD-10........................................................................................... 14
Settings for the Roland TD-9............................................................................................. 15
Settings for the Roland TD-8............................................................................................. 16
Settings for the Roland TD-6/6V ....................................................................................... 17
Settings for the Roland TD-3............................................................................................. 18
Settings for the Roland TMC-6.......................................................................................... 19
Yamaha Drum Modules..................................................................................................... 20
Alesis Drum Modules ........................................................................................................ 20
Ddrum Modules ................................................................................................................. 20
Pearl REDbox.................................................................................................................... 20
Care and Feeding of your Smartrigger Cymbals ...................................................................... 21
Transporting Your Cymbals .................................................................................................. 21
Cleaning your cymbals.......................................................................................................... 21
Cleaning the Top Surface.................................................................................................. 21
Cleaning the Bottom Surface ............................................................................................ 21
Warranty Information ................................................................................................................ 22

SMARTRIGGER USERS GUIDE
Version 1.4
2/10/2010
Introduction
Thank you for purchasing Smartrigger Electronic Cymbals – the biggest advance in electronic
drumming since MIDI! Smartrigger cymbals were designed to meet the needs of today’s
electronic drummer, providing the ultimate electronic cymbal triggering, aesthetics, and
playability available anywhere, at any price.
This user’s guide provides simple instructions for getting your new Smartrigger Cymbals
integrated into your electronic drum setup.

SMARTRIGGER USERS GUIDE
Version 1.4
2/10/2010
Smartrigger Cymbal Features
Smartrigger Electronic Cymbals feature many improvements over previous electronic cymbals
including:
Authentic Playability is accomplished by using real brass alloy metal cymbals. This
means that your sticks respond to the playing surface the exact same way as they do
when using real acoustic cymbals.
Acoustic Dampening – our special patent pending dampening layer provides several
important features:
o Vibration dampening to reduce the actual sound of the cymbal by more than
90%.
o Waveform reduction reduces the secondary cymbal vibrations eliminating double
triggering.
o Shock buffering from the trigger housing.
Authentic Aesthetics means that your cymbals look like cymbals not pieces of
recycled black rubber tires. The vibration dampening layer on the bottom of the cymbal
is clear! This allows the bottom of the cymbal to look just like a real acoustic cymbal
when mounted on a stand. You audience will never know you are using electronic
cymbals!
Natural Swinging Motion means that your cymbals respond and swing naturally when
struck, allowing you to concentrate on your playing while reducing the negative effects
on the human body which come from hitting stationary objects that have no “give”. The
cymbals absorbs the impact, not your body.
New Dual Piezo Designs - Several of the Smartrigger Cymbals provide a new patent
pending “ring” piezo sensor centrally located under the bell of the cymbal. Mounting
directly under the bell, at the center, allows even edge to edge triggering and authentic
bell playing on a single cymbal surface.
Easier Choke – a wider 180 degree choke switch provides easier crash cymbal choking
on half of the cymbal’s surface.
NEW! Built-in Y Adapter – Add more cymbals without upgrading your module! 2010
model two zone Smartrigger cymbals provide a built-in Y adapter in the trigger housing.
Connect one jack to your module and another jack to another cymbal. The same sound
will be available on both cymbals.
SMARTRIGGER USERS GUIDE
Version 1.4
2/10/2010
Setup
Electronic cymbals produce no sound themselves and require the use of external sound
modules in order to be used as musical instruments. Smartrigger Electronic Cymbals are
compatible with many drum modules on the market including those manufactured by Roland,
Yamaha, Alesis, and Ddrum and can also be used to trigger sounds on any MIDI instrument
using a “Trigger to MIDI” interface such as the Roland TMC-6 or Alesis Trigger IO.
Quick Setup
1. Insert the “right angle” plug into the trigger housing on the underside of the cymbal.
2. Place the cymbal onto a cymbal stand.
3. Connect the other end of the cable to your drum module.
4. Set the trigger type specified for your cymbal and module.
5. Adjust the trigger settings to suit your needs.
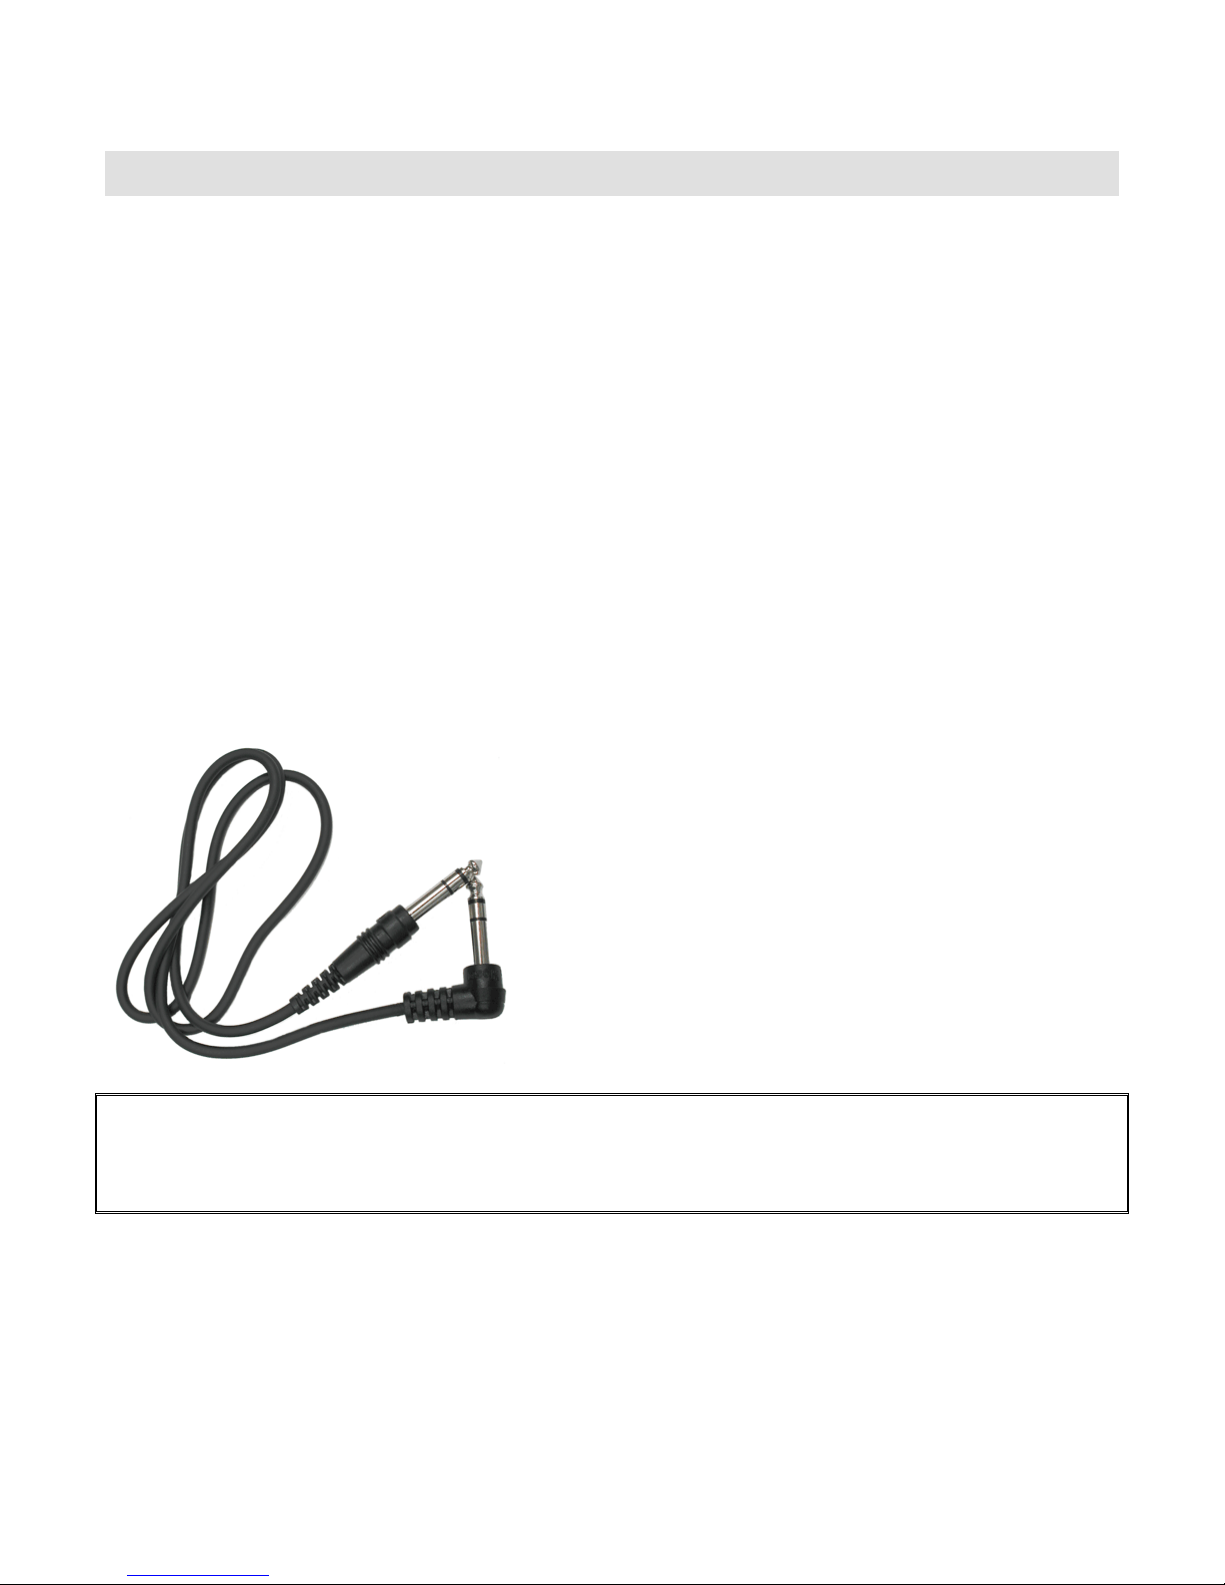
Connecting the Cable
You will need a stereo 1/4” male to male cable for each cymbal. One end of the cable should
have a “right angle” plug and the other has a straight plug. The “right angle” end should be
connected to one of the two jacks in the trigger housing on the bottom of the Smartrigger
Cymbal and the straight end should be connected to the trigger input on your module.
You can tell a “stereo” cable from a “mono” cable by the number of black rings on the plug. A
stereo cable will have 2 black rings and a mono cable will have only one. Typically, a dualzone or dual-piezo cymbal will require a stereo cable. A single zone cymbal can use a stereo
or mono cable.

SMARTRIGGER USERS GUIDE
Version 1.4
2/10/2010
Proper Cymbal Mounting
Smartrigger cymbals are designed to be mounted on any standard cymbal stand or mounting
arm.
Most stock cymbal stands come with a 6mm or 8m threaded mounting rod, a series of washers
and a wing-nut. You Smartrigger cymbal should be mounted between the two felt washers that
come with almost all cymbals stands. If you need additional cymbal hardware, any drum shop
or music store will have these in stock as they are considered replacement accessories and
should be replaced when they are worn out.
Gibraltar cymbal arms are very good for acoustic and Smartrigger electronic cymbals as they
come standard with a nice ‘T’ shaped black plastic cymbal sleeve. Alternatively, you can
always use Aquarian Cymbal Springs or other mounting systems with a standard 1/2” bore.

SMARTRIGGER USERS GUIDE
Version 1.4
2/10/2010
Note that you CAN NOT use a cymbal sleeve with the Ride cymbal as it already has a built-in
sleeve. Make sure to use felt washers on the top and bottom of the ride.
Mounting the Hi Hat Cymbals
The Smartrigger hi hat cymbals offer the best of both worlds and are designed to be mounted
on a fixed hi hat arm or standard hi hat stand. Your choice of mounting will depend on what
type of hi hat controller you are using and how much hardware you want to lug around. The
Smartrigger hi hat is only the trigger. The controller is responsible for the changing of
sound between open and closed.
Using a Fixed Hi Hat Arm
If you are using a typical hi hat controller pedal such as the Roland FD-7 or FD-8, you’ll want to
mount your Smartrigger hi hats on a fixed hi hat arm. These are manufactured by most drum
hardware companies and are available from your favorite drum shop. This is the most popular
mounting method if you are using a Roland drum modules.
Fixed Hi Hat Arm w/ Roland FD-7 Pedal
Standard Hi Hat stand w/ Visu-Lite RHC-100
Using a Standard Hi Hat Stand
Advanced users can mount your Smartrigger hi hats onto a standard hi hat stand only if you
are using the appropriate controller (like the Pintech HHC RYC Hi Hat Controller, or Hart
Epedal II). These controllers attach to your stand’s pedal and provide the electronics to create
the variable positions between the open and closed hi hat sounds.
Note that these controllers do not provide the foot pressure feature that the Roland VH-12 Hi
Hat system provides when using a Roland TD-20 module.
SMARTRIGGER USERS GUIDE
Version 1.4
2/10/2010
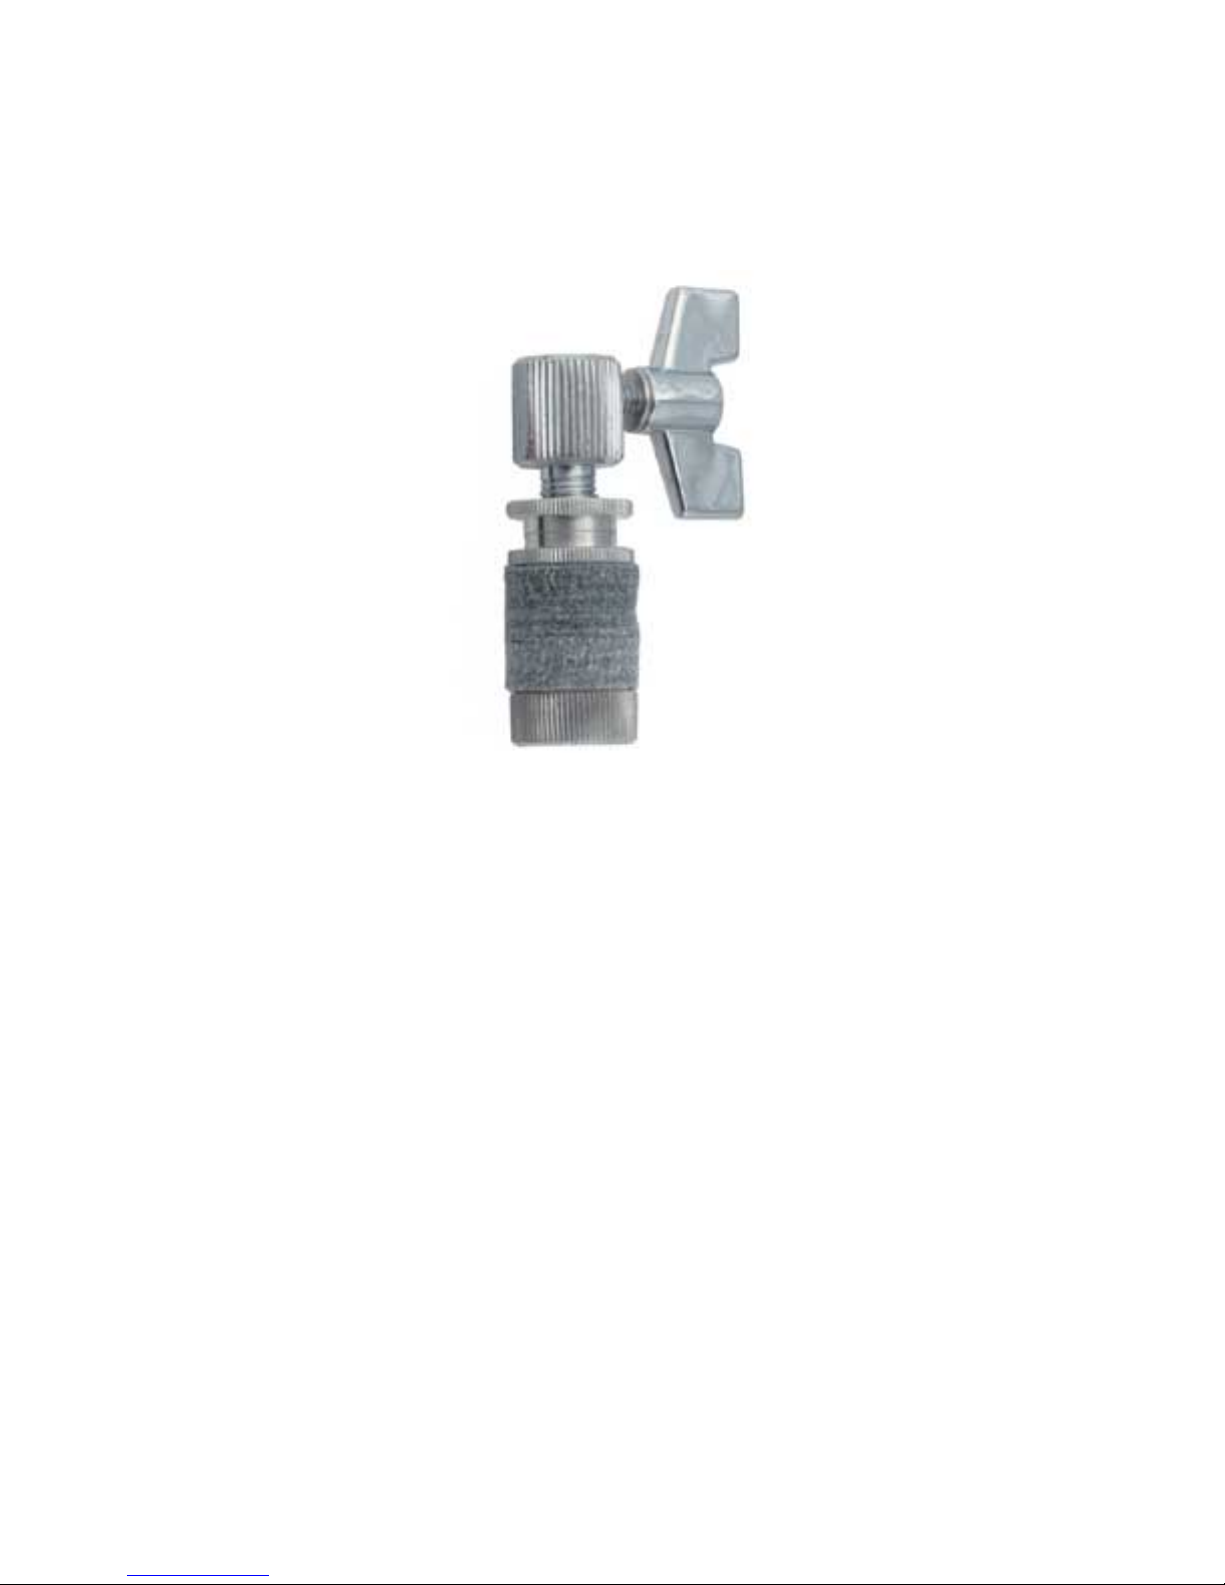
Hi Hat Clutch Mounting
Regardless of which type of hi hat stand you choose, you will mount the top hi hat cymbal onto
your hi hat clutch. Almost all hi hat arms and stands come with a clutch. You can use any
clutch you like including a “drop clutch”.
Clutch with Standard Felt Washers
Installing the Hi Hat Cable
A stereo cable with one straight ends and one right angle end should be used for the hi hat
connection to your drum module. Follow these steps to install the hi hat cable:
1. Place the hi hat bottom cymbal on your hi hat stand or hi hat arm.
2. Install your hi hat top cymbal and clutch.
3. Connect one end of the cable to the hi hat input on your module.
4. Pass the cable through one of the holes in the bottom hi hat cymbal.
5. Plug the other end into to one of the two jacks in the trigger housing of the top
cymbal. The jack on the trigger housing should leave enough clearance for the cable
to pass by the hi hat’s mounting rod.
6. Carefully place the top hi hat with installed clutch onto your hi hat stand.
SMARTRIGGER USERS GUIDE
Version 1.4
2/10/2010
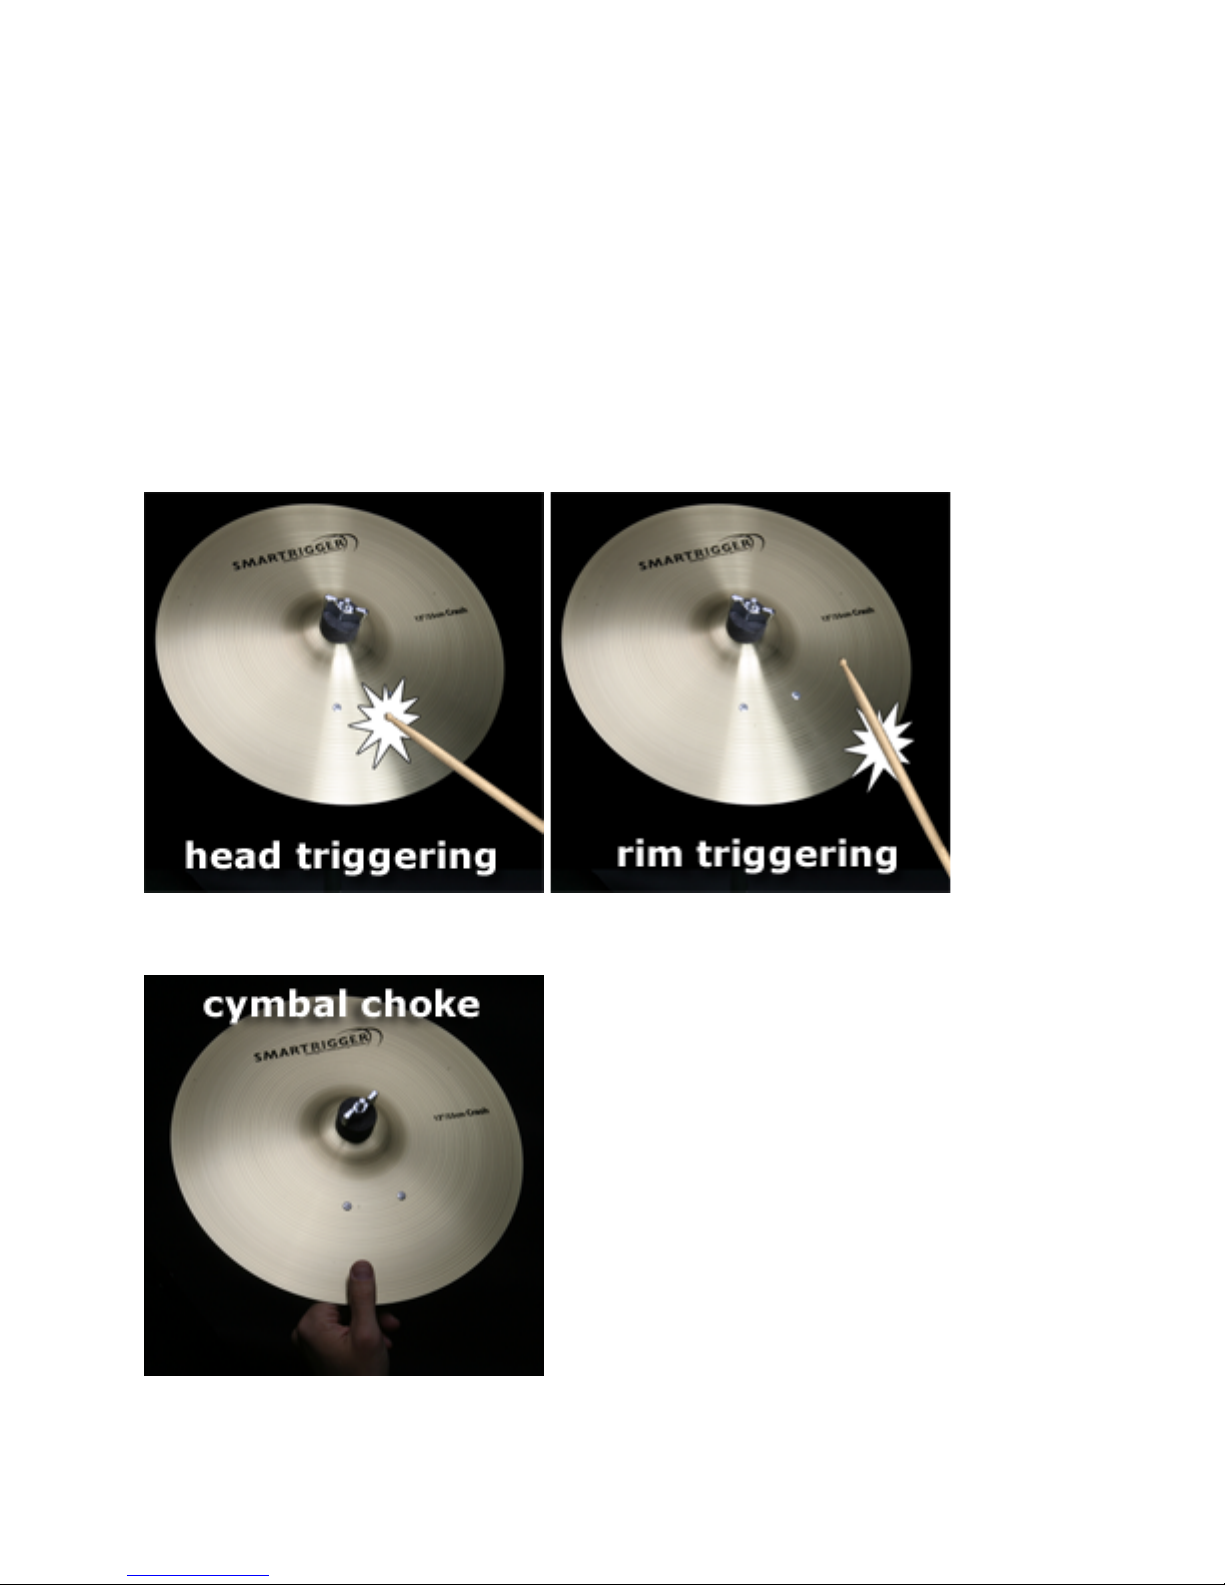
Triggering the Dual-Zone Crash and Hi Hat Cymbals
The Smartrigger crash and hi hat cymbals use what is commonly called a “Head/Rim” or
“Piezo/Rim-switch” type of triggering system. This means that the first “zone” or sound can be
triggered by activating the piezo trigger (which is mounted inside the small black housing
underneath the cymbal) and the second “zone” or sound can be triggered by activating the
piezo trigger and the rim-switch at the same time. The “rim-switch” is the 180 degree gold
colored band under the cymbal. This is also the “choke” switch that causes a ringing cymbal
sound to be “choked” off or stopped, by striking the cymbal then grabbing the choke switch.
To trigger the Head sound, strike the cymbal’s surface with the tip of the stick.
To trigger the Rim sound, strike the cymbal’s edge with a glancing blow
To choke the crash cymbal sound, strike the cymbal then grab the edge of the cymbal.
SMARTRIGGER USERS GUIDE
Version 1.4
2/10/2010
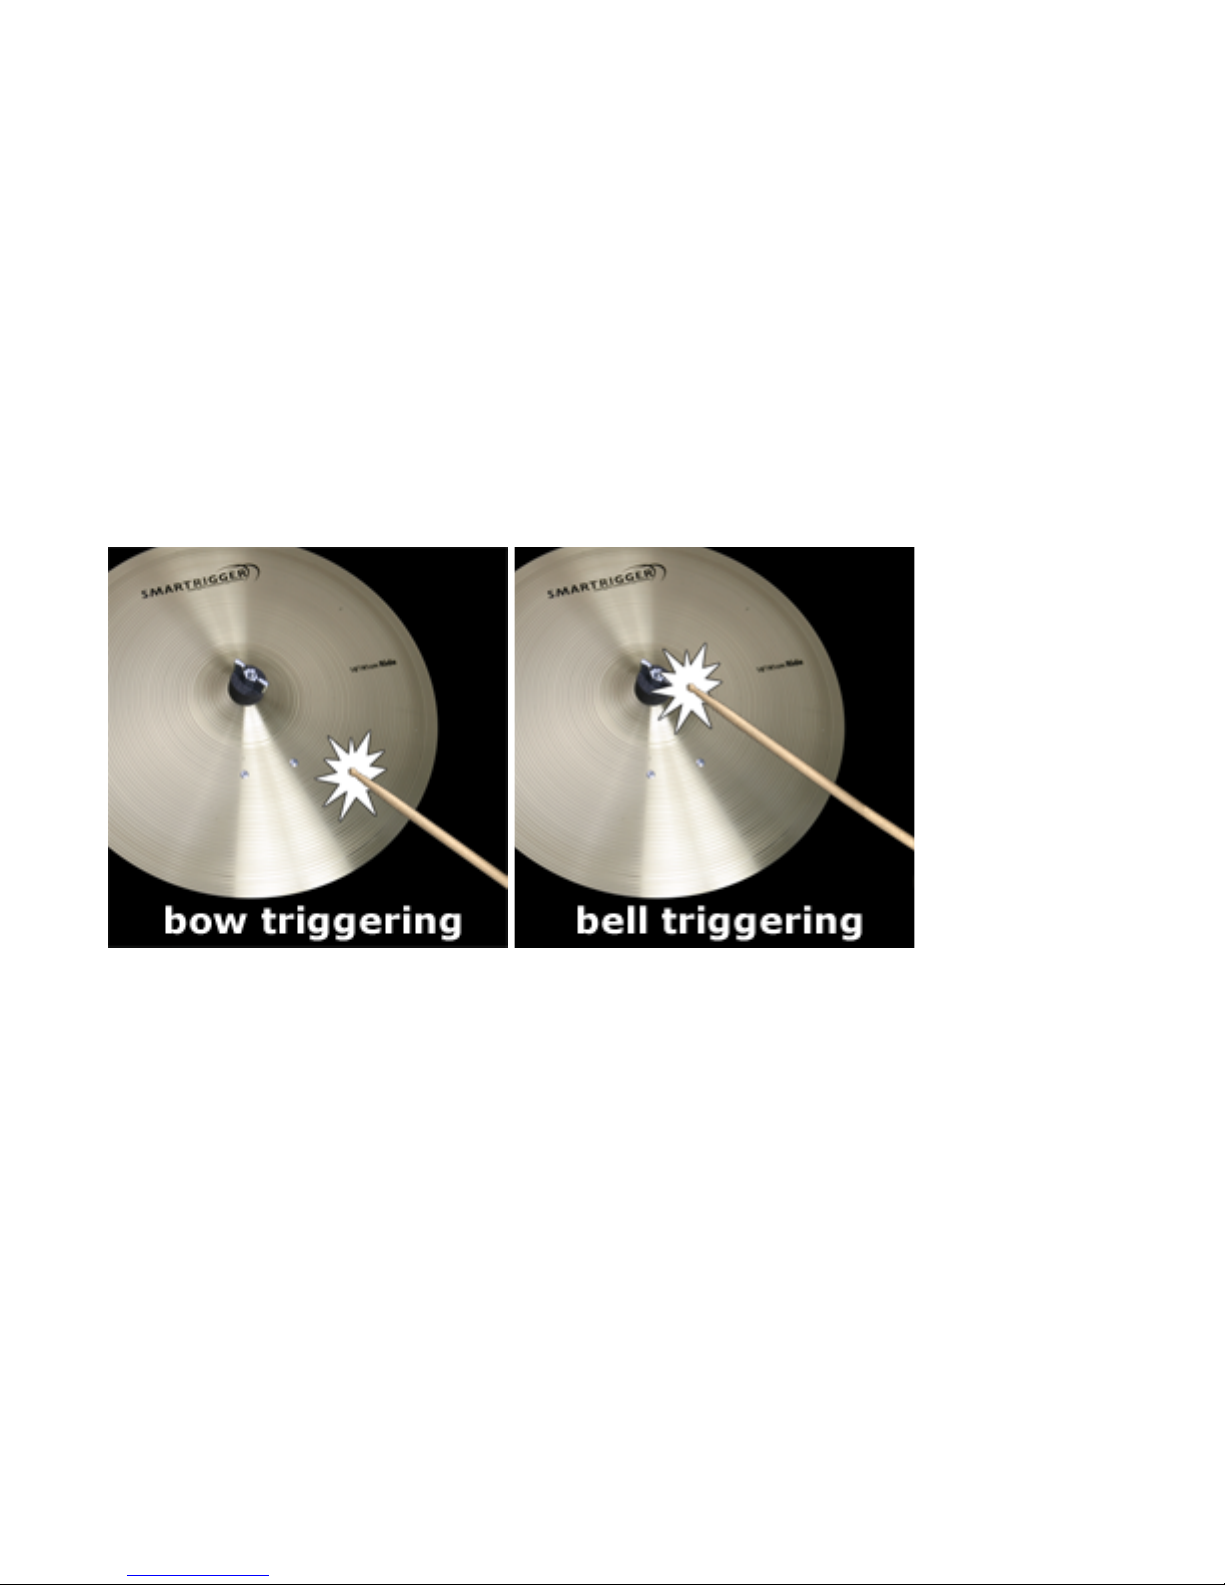
Triggering the Dual-Zone Ride
The Smartrigger ride cymbals use a dual-piezo design where the main piezo is mounted under
the bow of the cymbal in the trigger housing and a second piezo is mounted directly under the
bell of the cymbal. The main piezo is triggered when you play o the bow of the cymbal while
the second piezo is triggered when you play the bell of the cymbal.
Smartrigger’s patent-pending design allows you to play the ride cymbal just as you would play
an acoustic cymbal. Light bell strokes are now possible by playing the bell of the cymbal with
the tip of your stick. You no longer have to “whack” the bell of the cymbal to reproduce a bell
sound from your drum module.
Because the ride cymbal uses a dual-piezo design, you will have to use a dual-piezo input on
your drum module or split the two piezo triggers into two single inputs using an optional Y
adapter. Settings and specifics for each module are provided below.

SMARTRIGGER USERS GUIDE
Version 1.4
2/10/2010
Triggering the Triple-Zone Ride
The new Smartrigger three zone ride cymbal is the most amazingly realistic electronic cymbal
ever made! It features the same bell and bow triggers as the dual zone ride, but has an
additional edge sensor mounted on the underside of the front 180 degrees of the cymbal. This
sensor works similarly to our crash sensor in that it allows the 16” ride to be choked and
provides an additional zone for an edge ride sound. This edge ride sound is what makes it so
playable. You can get a crash-ride effect our of your ride cymbal when you strike the edge, just
like on a real ride!

SMARTRIGGER USERS GUIDE
Version 1.4
2/10/2010
Setting Your Trigger Inputs
The following information is only a starting point for setting your module to use Smartrigger
Cymbals. There are many factors that will affect the triggering and sensitivity of your module’s
inputs including:
Playing style
Type of drum sticks
Cymbal mounting (stands vs. racks)
Types of drums used and their sizes
Module features
How hard you play
Start with the recommended trigger input settings and then adjust your module’s trigger input
parameters to best match your needs.

SMARTRIGGER USERS GUIDE
Version 1.4
2/10/2010
Roland Drum Module Settings
Roland produces some of the most popular drum modules on the market and offers several
different models. We have included the default settings for some of the most recent Roland
modules here. If you have a Roland module which is not listed here, experiment with the
trigger input settings and let us know what works best for you and we’ll included it in the next
version of the manual.
Settings for the Roland TD-20 and Roland TD-12
Type
Sens
Thold
Curve
Rim
Gain
Scan
ReTrg
Can.
Mask
Xtalk
Mount
Splash
CY6
8-10
2
Linear
1.0
2.0 6 10
40
Cym
Crash
CY14C
8-10
2
Linear
0.8
1.6 6 10
40
Cym
China
CY14C
8-10
2
Linear
0.8
1.6 6 10
40
Cym
Ride
Bow
CY6
8-10
2
Linear
1.0
2.0 6 10
30
Cym
Ride
Bell
CY8
12-14
0
Linear
1.1
2.0 6 10
30
Cym
Hi Hat
CY-12H
8-10
2
Linear
1.0
2.0 6 10
40
Cym
Notes for using the Smartrigger CY-16RC3 Triple Zone Crash/Ride Cymbal:
Turn OFF 3 Way triggering
Connect one stereo cable from the bow trigger jack to the RIDE input on your module.
Connect the other stereo cable from the bell trigger jack to the EDGE input on your
module.
IMPORTANT!!! Make sure you have the two inputs set to trigger the appropriate sounds
for each kit
o Ride Input HEAD = Ride Bow Sound
o Ride Input RIM = Ride Edge Sound
o Edge Input HEAD = Ride Bell Sound
o Edge Input RIM = Ride Edge Sound (Same as Ride RIM input)
Notes for using the Smartrigger CY-16R2 Dual Zone Ride Cymbal:
Turn OFF 3 Way triggering on the Ride input and use the optional Y cable on the
module end of the ride’s stereo cable.

SMARTRIGGER USERS GUIDE
Version 1.4
2/10/2010
Optional Ride Y Cable splits stereo cable into 2 mono inputs
Plug the black TIP plug into the RIDE input and the orange RING plug into the EDGE
input. This places the bow ride sound on the Ride input and the bell ride sound on the
Edge input. Make sure you have a ride bow sound assigned to the HEAD of the Ride
input and a bell sound assigned to the HEAD of the Edge input.
Alternatively, you can use one of the AUX inputs for the ride without the Y cable. The
AUX inputs are dual-piezo inputs like the toms and snare and allow for dual piezo
stereo triggers like the Smartrigger CY-16R. This frees up inputs 10 and 11 (Ride and
Edge) for two additional cymbals. Make sure to select PD-120 for the input type on the
AUX input as this will allow the bell and bow sounds to be triggered, then select a ride
bow instrument and assign it to the HEAD of the AUX input and a ride bell instrument
and assign it to the RIM of the AUX input. Make sure you have a ride bow sound
assigned to the HEAD and a bell sound assigned to the RIM of the AUX input.
Settings for the Roland TD-10
Type
Sens
Thold
Curve
Scan
ReTrg
Can.
Mask
Xtalk
Splash
PD7
3
2
Linear
0.3 3 12
30
Crash
PD7
3
2
Linear
0.3 3 12
30
China
PD7
3
2
Linear
0.3 3 12
30
Ride Bow
PD7
5
2
Linear
0.3 3 12
40
Ride Bell
PD7
2
1
Linear
0.3 3 12
30
Hi Hat
PD-7
3
2
Linear
0.3 3 12
30
Notes for using the Smartrigger CY-16RC3 Triple Zone Crash/Ride Cymbal:
Connect one stereo cable from the bow trigger jack to the RIDE input on your module.
Connect the other stereo cable from the bell trigger jack to the AUX 1 input on your
module.
IMPORTANT!!! Make sure you have two inputs set to trigger the appropriate sounds for
each kit
o Ride Input HEAD = Ride Bow Sound
o Ride Input RIM = Ride Edge Sound

SMARTRIGGER USERS GUIDE
Version 1.4
2/10/2010
o Aux Input HEAD = Ride Bell Sound
o Aux Input RIM = Ride Edge Sound (Same as #10 RIM)
Notes for using the Smartrigger CY-16R Dual Zone Ride Cymbal:
Use the optional Y cable on the module end of the ride’s stereo cable. Plug the black
TIP plug into the RIDE input and the orange RING plug into the AUX 1 input.
Settings for the Roland TD-9
Type
Sens
Thold
Curve
Rim
Gain
Scan
ReTrg
Can.
Mask
Xtalk
Mount
Splash
CY8
8-10
2
Linear
1.0
2.0 6 10
40
Cym
Crash
CY14C
8-10
2
Linear
0.8
1.6 6 10
40
Cym
China
CY14C
8-10
2
Linear
0.8
1.6 6 10
40
Cym
Ride
Bow
CY8
8-10
2
Linear
1.0
2.0 8 10
40
Cym
Ride
Bell
CY8
12-14
0
Linear
1.1
2.0 8 10
40
Cym
Hi Hat
CY-12H
8-10
2
Linear
1.0
2.0 6 10
40
Cym
Notes for using the Smartrigger CY-16RC3 Triple Zone Crash/Ride Cymbal:
Connect the cable marked RIDE to the cymbal’s bow trigger jack (left jack looking at the
bottom).
Connect a separate stereo cable (not one in the cable harness) from the bell trigger jack
to the AUX input on the side of your TD-9 module.
IMPORTANT!!! Make sure you have the two inputs set to trigger the appropriate sounds
for each kit
o Ride Input HEAD = Ride Bow Sound
o Ride Input RIM = Ride Edge Sound
o AUX Input HEAD = Ride Bell Sound
o AUX Input RIM = Ride Edge Sound (Same as Ride RIM input)
Notes for using the Smartrigger CY-16R Dual Zone Ride Cymbal:
Plug a cable into the RIDE input. A Ride sound should be assigned to the HEAD trigger
and a Bell sound should be assigned to RIM trigger.
Use the CY8 Trigger Type and increase the RIM GAIN to 5.0 and adjust from there.

SMARTRIGGER USERS GUIDE
Version 1.4
2/10/2010
Settings for the Roland TD-8
Type
Sens
Thold
Curve
Scan
ReTrg
Can.
Mask
Xtalk
Splash
CY1
10
4
Linear
2.5 8 8
40
Crash
CY1
10
5
Linear
2.5 8 8
40
China
CY1
10
4
Linear
2.5 8 8
40
Ride Bow
CY1
10
4
Linear
2.5 8 8
60
Ride Bell
CY1
12
2
Linear
2.5 8 8
50
Hi Hat
CY1
10
2
Linear
2.5 8 8
40
Notes for using the Smartrigger CY-16RC3 Triple Zone Crash/Ride Cymbal:
Connect one stereo cable from the bow trigger jack to the RIDE input on your module.
Connect the other stereo cable from the bell trigger jack to the another input on your
module.
IMPORTANT!!! Make sure you have the two inputs set to trigger the appropriate sounds
for each kit
o Ride Input HEAD = Ride Bow Sound
o Ride Input RIM = Ride Edge Sound
o Other Input HEAD = Ride Bell Sound
o Other Input RIM = Ride Edge Sound (Same as Ride RIM input)
Notes for using the Smartrigger CY-16R Dual Zone Ride Cymbal:
Do not use a Y cable. Plug a stereo cable into the AUX 11/12 input. A Ride sound
should be assigned to input #11 and a Bell sound should be assigned to input #12.
Alternatively, you can use one input for the Ride and use an Xride instrument. This
setting will allow louder hits to trigger the bell sound and softer hits to trigger the bell
sound.
You can also use a Y cable (such as the Hosa YPP-117) to access input #2, splitting
the Kick to 1 and assign the bell instrument to input #2.
Hosa YPP-117 Y Cable

SMARTRIGGER USERS GUIDE
Version 1.4
2/10/2010
Settings for the Roland TD-6/6V
Type
Sens
Thold
Curve
Scan
ReTrg
Can.
Mask
Xtalk
Splash
CY-6
10
2
Linear
2.5 6 8
40
Crash
CY-6
10
2
Linear
2.5 6 8
40
China
CY-6
10
2
Linear
2.5 6 8
40
Ride Bow
CY-6
8
2
Linear
2.5 6 8
40
Ride Bell
CY-6
12
0
Linear
2.5 6 8
40
Hi Hat
CY-6
10
2
Linear
2.5 6 8
40
Notes for using the Smartrigger CY-16RC3 Triple Zone Crash/Ride Cymbal:
Connect one stereo cable from the bow trigger jack to the RIDE input on your module.
Connect the other stereo cable from the bell trigger jack to the AUX input on your
module.
IMPORTANT!!! Make sure you have the two inputs set to trigger the appropriate sounds
for each kit
o Ride Input HEAD = Ride Bow Sound
o Ride Input RIM = Ride Edge Sound
o AUX Input HEAD = Ride Bell Sound
o AUX Input RIM = Ride Edge Sound (Same as Ride RIM input)
Notes for using the Smartrigger CY-16R Dual Zone Ride Cymbal:
Use the optional Y cable on the module end of the ride’s stereo cable. Plug the black
TIP plug into the Ride input and the orange RING plug into any other available input.

SMARTRIGGER USERS GUIDE
Version 1.4
2/10/2010
Settings for the Roland TD-3
Type
Sens
Thold
Curve
Scan
ReTrg
Can.
Mask
Xtalk
Splash
CY-6
10
2
Linear
2.5 6 8
40
Crash
CY-6
10
2
Linear
2.5 6 8
40
China
CY-6
10
2
Linear
2.5 6 8
40
Ride Bow
CY-6
8
2
Linear
2.5 6 8
40
Ride Bell
CY-6
12
0
Linear
2.5 6 8
40
Hi Hat
CY-6
10
2
Linear
2.5 6 8
40
Notes for using the Smartrigger CY-16RC3 Triple Zone Crash/Ride Cymbal:
Connect one stereo cable from the bow trigger jack to the RIDE input on your module.
Connect the other stereo cable from the bell trigger jack to any other available input on
your module.
IMPORTANT!!! Make sure you have the two inputs set to trigger the appropriate sounds
for each kit
o Ride Input HEAD = Ride Bow Sound
o Ride Input RIM = Ride Edge Sound
o Other Input HEAD = Ride Bell Sound
o Other Input RIM = Ride Edge Sound (Same as Ride RIM input)
Notes for using the Smartrigger CY-16R Dual Zone Ride Cymbal:
Use the optional Y cable on the module end of the ride’s stereo cable. Plug the black
TIP plug into the Ride input and the orange RING plug into any other available input.

SMARTRIGGER USERS GUIDE
Version 1.4
2/10/2010
Settings for the Roland TMC-6
Type
Sens
Thold
Curve
Scan
ReTrg
Can.
Mask
Xtalk
Splash
CY
10 4 Lnr
2.5 8 8
40
Crash
CY
10 4 Lnr
2.5 8 8
40
China
CY
10 4 Lnr
2.5 8 8
40
Ride Bow
CY
8 4 Lnr
2.5 8 8
40
Ride Bell
CY
12 0 Lnr
2.5 8 8
40
Hi Hat
CY
10 4 Lnr
2.5 8 8
40
Notes for using the Smartrigger CY-16RC3 Triple Zone Crash/Ride Cymbal:
Connect one stereo cable from the bow trigger jack to the RIDE input on your module.
Connect the other stereo cable from the bell trigger jack to any other available input on
your module.
IMPORTANT!!! Make sure you have the two inputs set to trigger the appropriate sounds
for each kit
o Ride Input HEAD = Ride Bow Sound
o Ride Input RIM = Ride Edge Sound
o Other Input HEAD = Ride Bell Sound
o Other Input RIM = Ride Edge Sound (Same as Ride RIM input)
Notes for using the Smartrigger CY-16R Dual Zone Ride Cymbal:
Use the optional Y cable on the module end of the ride’s stereo cable. Plug the black
TIP plug into the any input (other than #2) and the orange RING plug into any other
input (other than #2).
Alternately, you can use input #2 only which is a stereo input (the only one on the TMC-
6) without the Y cable. Use the following settings if you connect the Ride to input #2.
NOTE: You MUST set the pad type to P12 in order to achieve the Bow and Rim sounds,
you will have to adjust the Head and Rim settings independently.
Type
Sens
Thold
Curve
Scan
ReTrg
Can.
Mask
Xtalk
Ride
(Head)
8 4 Lnr
2.5 8 8
40
Ride
(Rim)
P12
12 0 Lnr
2.5 8 8
40

SMARTRIGGER USERS GUIDE
Version 1.4
2/10/2010
Yamaha Drum Modules
Yamaha also offers a few very popular drum modules in the DTX line of electronic drums such
as the DTXtreme IIS and the DTXpress III. Our splash, crash, china, and hi hat are supported
when using the PCY-80 trigger input setting. Our ride cymbals will work but are not supported
at this time.
Alesis Drum Modules
Alesis offers exceptional value and very popular drum modules including the DM10, DMPro,
DM5, and DM4.
Ddrum Modules
Ddrum users are quite reluctant to use any other module and prefer the popular Ddrum4 model
above all others. Ddrum modules are not officially supported, but may work with Smartrigger
Cymbals using mono inputs. Email us if you have one of these modules and want to report
your trigger settings.
Note: The Ddrum cymbal inputs are not compatible with the choke-able or dual-zone cymbals.
You will only get one zone from all Smartrigger Cymbals.
Pearl REDbox
The Pearl REDBox module is also compatible with all Smartrigger cymbals. Consult the
REDBox module manual for more details.

SMARTRIGGER USERS GUIDE
Version 1.4
2/10/2010
Care and Feeding of your Smartrigger Cymbals
Smartrigger cymbals are designed to the highest standards and should provide you with a
lifetime of reliable service. As with any piece of electronic equipment, you should take care
when transporting and cleaning your cymbals.
Transporting Your Cymbals
You should transport your cymbals in protected and padded cases. We recommend using
standard cymbal bags like the one pictured here. The use of hard plastic cymbal-safe type of
cases isn’t recommended because you can’t clamp down more than a few Smartrigger
cymbals before you run out of room.
Recommended
Not Recommended
The trigger housings on the undersides of the cymbals are made from a very strong and
lightweight ABS plastic and are very durable, however care should be taken so that you do not
stack too much weight on the cymbals. Because of this trigger housing, you will not be able to
stack these cymbals as flat and neat as you could stack the same number of acoustic cymbals.
Cleaning your cymbals
Cleaning the Top Surface
The top playing surface of your Smartrigger cymbals is made from a real brass-alloy cymbal,
therefore you should use a damp wet cloth or a non-abrasive cymbal cleaner or cymbal polish
on the top surface only, to remove stick marks or other debris. DO NOT USE CYMBAL
CLEANER ON THE BOTTOM SURFACE.
Cleaning the Bottom Surface
The bottom surface is covered with the special plastic dampening material and should not be
cleaned with cymbal cleaner or cymbal polish. Instead wet damp cloth with water and clean the
surface or in extreme cases, use a specialty plastics cleaner like the kind available for cleaning
the isinglass on a boat. See http://www.hardlineproducts.com/plexus.html for an example of
Plexus™ Plastic Cleaner.

SMARTRIGGER USERS GUIDE
Version 1.4
2/10/2010
Warranty Information
Smartrigger warrants its products against defects in material and workmanship for a period of
one year from the date of the initial consumer purchase. Should any item fail during this period,
Smartrigger will repair or replace defective items free of charge. All returns MUST include the
original sales receipt/packing slip and are subject to a 25% restocking fee. Please email us for
a return authorization number BEFORE returning any products. This warranty is subject to
change without notice and is non-transferable. Normal wear and tear is not covered under this
warranty. Shipping charges are non-refundable. Unauthorized repairs or modifications to the
Smartrigger products may void the warranty.
Smartrigger LLC
www.smartrigger.com
email: info@smartrigger.com
 Loading...