

Page 1

NITRO ROBOTIC POOL CLEANER OPERATION MANUAL
Congratulations on your purchase of the most technologically advanced automatic pool
vacuum available today. The Nitro is easy to use and will make maintaining your pool
affordable and effortless. Following these simple directions will insure that the Nitro will
quickly and efficiently clean your pool today and for many years to come.
INSTALLATION
• Place the power supply in an area that will allow the cleaner to cover all areas of the pool.
• Be sure to only plug the power supply into a GFI (ground fault interrupter) or ELI (earth leak interrupter) protected electrical outlet.
• Look at the power supply and check that the power supply switch is in the off position.
• Plug the power supply into the protected outlet.
• Plug in the connector from the cleaner into the power supply. The connector is keyed so that it will only plug into the power supply one way.
Make sure that the plug is pushed all the way onto the power supply. Slide the connector lock (strain relief) onto the connector and turn
the connector lock clockwise until it is snug.
DO NOT RUN THE CLEANER OUT OF THE WATER.
OPERATING THE CLEANER OUT OF THE WATER WILL DAMAGE THE MOTORS AND VOID THE WARRANTY
• Place the cleaner into the pool and if needed rock the cleaner side to side to release any trapped air. The cleaner will sink to the bottom of the pool.
• Put enough of the blue cord into the water to assure that the cleaner can easily reach all areas of the pool.
• Turn the switch on the power supply to the on position.
• The cleaner will begin its cleaning program.
• The cleaner will automatically shut itself down after two hours.
• If a second cleaning is required or the unit is accidentally shut off, you should wait one minute before switching the unit on again.
IMPORTANT NOTE: During normal operation, the cleaner will appear to shut off for a few seconds, raise the
front wheels off the pool bottom and move either left or right or turn for an undetermined amount of time. This is
normal and has been preprogrammed into the unit to assure the quickest and most efficient cleaning of your pool.
Page 2

32
REMOVING THE CLEANER FROM THE POOL
• Slowlypull the blue cord to get the cleaner to the pool surface and near
the edge of the pool. DONOT PULL THECLEANER OUT OF THE POOL BY
THE CORD.
• Reachdown and grasp the handle of the cleaner and remove it from the
pool as shown below.
FIGURE 1: Grasping Handle
FIGURE 2: Lift from Pool by Handle
• Cleanfilter bag.
• Storethe cleaner on the optional
caddy,if available.
• Looselycoil the cable for storage.
The unit should be stored in an area that
will afford some protection from the
elements to insure that it retains its finish
.
CLEANING THE FILTER BAG (Filter Bag Should Be Cleaned After Every Use.)
• Turncleaner upside down andplace on ground so the bottom lid is exposed.
• Turnred locking pegs (by wheel area) to the unlocked position as shown in Fig 3. Next
press the two red locking clips near the roller brush in
towards the center of the unit. Liftthe bottom lidout.
AB
A: Press the red tabs inward as shown
and lift lid off cleaner
B: Turnlevers inward as indicated by
arrows imprinted on lid
FIGURE 3
• Holdthe bottom lid as shown in Fig 4 and pull the tab marked“PULL TO REMOVE BAG”
FIGURE 4
• Turnfilter bag inside outand hose off all debris as shown in Fig 5. Ifvery dirty it may
be washed in your washing machine, inside out, with cold water, mild detergent, and
by itself.
FIGURE 5
• Hoseall debris off the bottom lid being sure to get all dirt out ofthe fine filters on the
intake doors as shown in Fig 6.
FIGURE 6
• Toreattach the filter to thebottom lid, turn the filter bag right-side-out. Startat the
back where the filter bag says “PUSH” and insert the filterbead into the channel, so
that the tabs are holding the bag in near thelabel with the word “PUSH”, as shown in
Fig 7.
FIGURE 7
• Pressthe filter bead down all the way around the perimeter making sure that itis
completely seated and behind all the tabs as shown in Fig7a.
FIGURE 7A
• Pickup the bottom lid and turn it over so the bag hangs belowit. Place the bottom lid
back into the cleaner being careful to feed the filter baginto the body of the cleaner.
MAKE SURE ALL FILTERMATERIALIS INSIDE THE CLEANER OTHERWISE
THE LID WILL NOT CLOSE AND LATCH PROPERLY.
FIGURE 7B
• Pressthe rear section of the bottom lid
into the cleaner while pushing the
locking clips towards the edge of the
cleaner until an audible click
is heard as shown in Fig 7c.
FIGURE 7C
CLICK
• Oncethe bottom lid is properly seated,
turn the red locking clips in the opposite
direction of the arrows embossed on the
bottom lid until it locks between the two
raised locks.
CABLE MAINTENANCE
In the course of using your Nitro, the cord maybegin to coil. Excessive coiling
can lead to improper cleaning coverage of your pool.
• Touncoil the cord, itis best that the cable is wet.
• Placethe cleaner on the ground as shown below.
• Besure to use a clear area that will allow the cord to stretch outin a straight line.
• Pullthe cable so it is off the ground
• Usingyour fingers, roll the cable in the opposite direction that it is coiled in.
• Whenstraight, wrap cable for storage as shown below.
STORING THE CABLE
• Looselyloop the cable as shown below.
Hold the cord close to the cleaner.
Make a roughly two foot loop with
the cord as shown.
When making loop, roll the cable
slightly in a counter clockwise
manner to maintain form. DONOT
WRAP THE CORD TIGHTLY AROUND
OBJECTS.
When cable is properly wrapped
place it on the optional caddy.
If you do not have a caddy, store the
unit in a protected location where it
will not be damaged by the
elements.
WINTER STORAGE
If temperatures will regularly be below 45 degrees Fahrenheit or 5 degreesCelsius, the
cleaner and power supply should be stored indoors.
Page 3
54
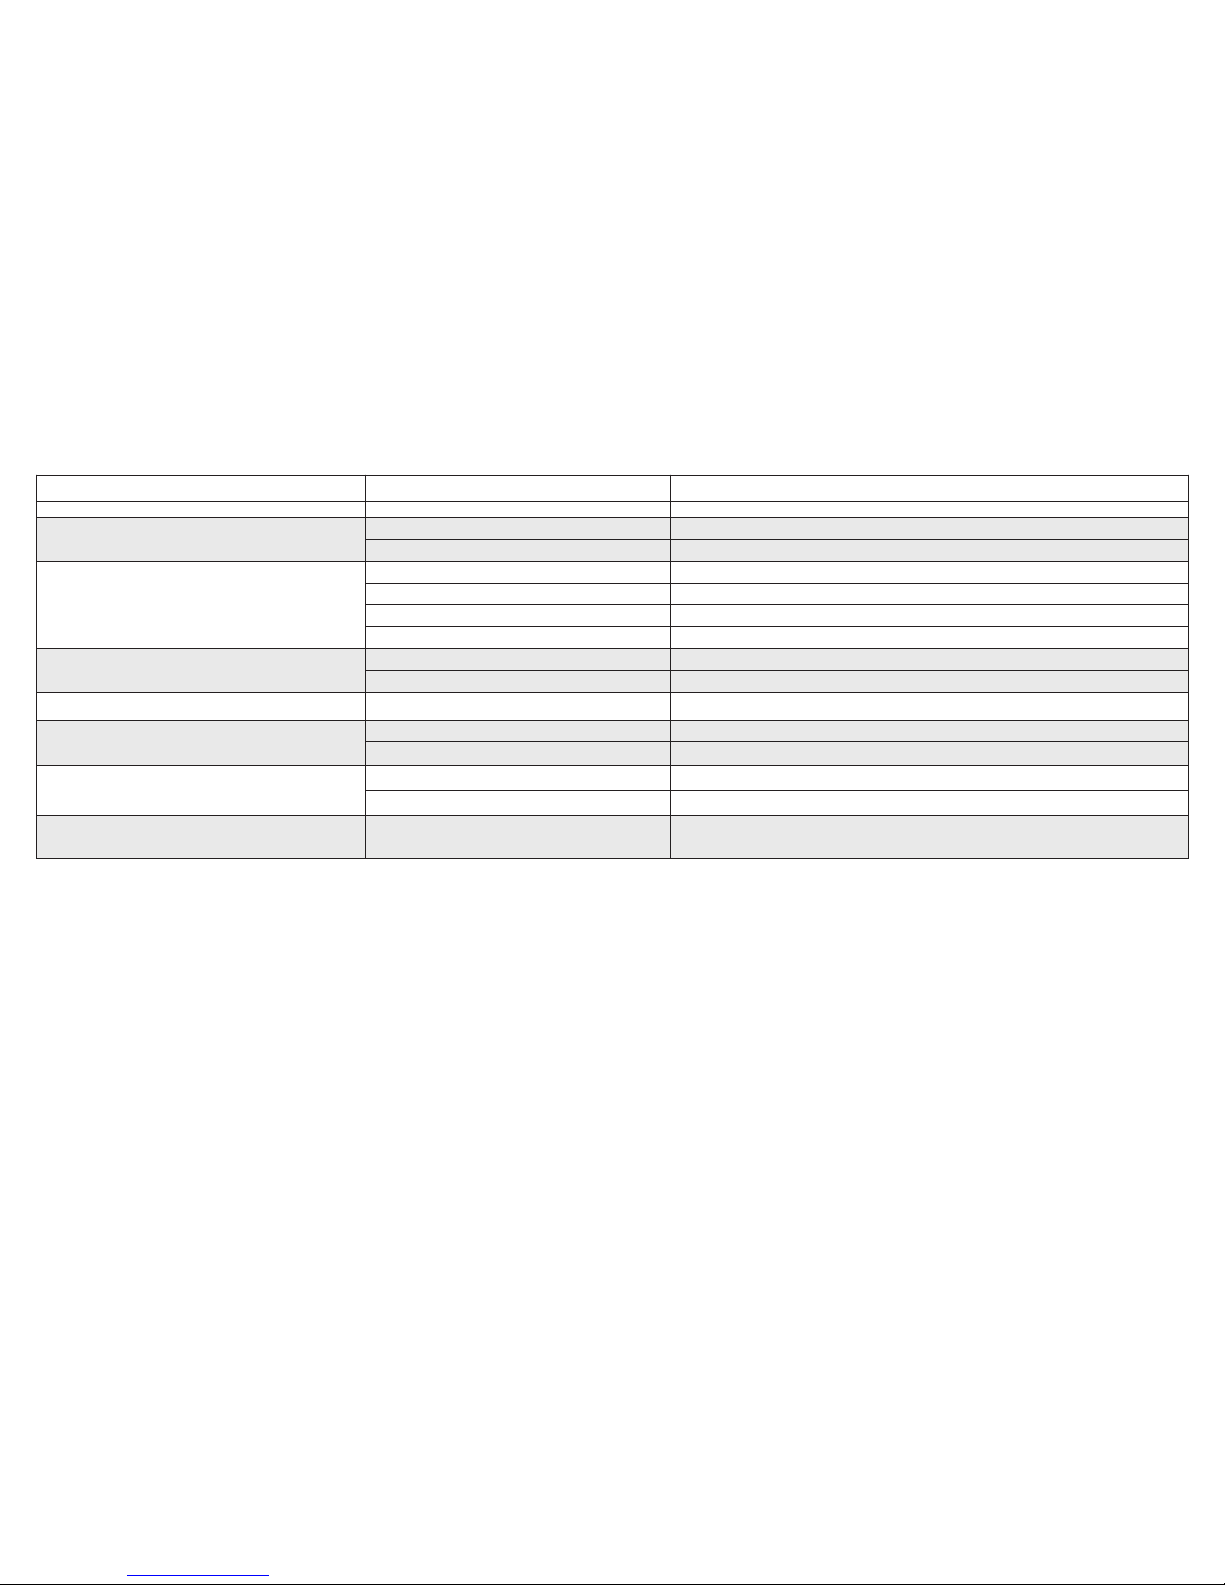
SYMPTOM POSSIBLE REASONS SOLUTIONS
UNIT GOING BACK AND FORTH ONLY A FEW FEET ATA TIME
Drive motor has water in it Replace Drive motor
Debris stuck in drive wheel Removedebris
UNIT NOT FUNCTIONING
Outlet not putting out proper voltage Check outlet voltage
Transformer not operating Check transformer output
Cord Defective Check Cord Voltage; Replace cord if needed
Outlet not putting out proper voltage Check outlet voltage
TRANSFORMER LIGHT OFF
Transformer may be operating but the light is not on. Test the unit with the transformer
Transformer not operating Check outlet voltage
UNIT MOVES BUT IT IS NOT PICKING UP DEBRIS
Pump motor malfunction, broken or jammed impeller Change pump motor,or replace or free impeller
UNIT IS CLIMBING OUT OF POOL
The pool does not have 2 feet of vertical slope for Incline sensor Replace Filter Bag with new 8 hole bag
Incline sensor is defective Remove Pump motor and shake. If the unit continues to climb in spite of freed incline sensor, Replace pump motor
UNIT MISSES AREAS OF POOL
Size of Pool is too big for unit Make sure the pool is less than 40 feet. If it is, reposition the power supply and rerun the unit.
Cord is tangled Straighten cord before and after each use.
UNIT HOVERING ON BOTTOM OF POOL
Filter bag clogged
Pump motor malfunction
Clean Filter Bag
Check Pump Motor
TROUBLE-SHOOTING GUIDE
Please visit www.smartpool.com for repair instructions.
Page 4

76
Mod el N C32
1-Y EAR L I M I T E D W A R R A N T Y
This product has been manufactured, tested and inspected in accordance with carefully
specified engineering requirements. It is warranted to be free from defects in materials
and workmanship under normal use and service, subject to qualifications, conditions and
limitations described below.
SmartPool 1 Year Limited Warranty:
One year full warranty, 6 months on Drive Motor and Pump Motor. This warranty applies
only while using this product in the United States and Canada.
This warranty extends to the first consumer/purchaser for a period of 12 months from the
original date of purchase.
This warranty covers only normal and reasonable use. Any damage, defects, malfunctions
or other failures arising from its use without the original transformer or any use which does
not comply with the instructions in this manual, including failure of the purchaser to
provide reasonable and necessary maintenance, will void this warranty.
The warranty obligations of SmartPool shall be limited to repair or replacement of the
product or any defective component, at the discretion of SmartPool. The repair or
replacement may include the use of refurbished components and/or units. SmartPool will
not be liable or responsible under any circumstances or in any amount for any
consequential or incidental damages, for any injury or damages to persons or property
using or used in connection with this product, or for loss of profits or other costs or
expenses of any kind or character.
This warranty does not include replacements of the filter bag, bottoms lid, and brushes.
THERE ARE NO OTHER WARRANTIES OR REPRESENTATIONS, EITHER
EXPRESSED OR IMPLIED, WHETHER OF MERCHANTABILITY, FITNESS FOR A
PARTICULAR PURPOSE, OR OTHER, MADE BY SMARTPOOL OTHER THAN THOSE
SPECIFICALLY SET FORTH IN THIS WARRANTY. NO PERSON, FIRM, OR
CORPORATION IS AUTHORIZED TO MAKE ANY REPRESENTATIONS OR INCUR ANY
OBLIGATIONS IN THE NAME F OR ON BEHALF OF SMARTPOOL, EXCEPT AS
STATEDHEREIN. THE REMEDIES SET FORTH IN THIS WARRANTY ARE
EXPRESSLY UNDERSTOOD TO BE THE EXCLUSIVE REMEDIES AVAILABLE TO THE
PURCHASER, AND THIS WARRANTY CONTAINS THE FULL AND COMPLETE
AGREEMENT BETWEEN SMARTPOOL AND THE PURCHASER. THIS WARRANTY
SETS FORTH THE ONLYOBLIGATIONS OF SMARTPOOL WITH REGARDS TO THIS
PRODUCT,AND THERE ARE NO WARRANTIES WHICH EXTEND BEYOND THE
DESCRIPTION ON THE FACE HEREOF.
This warranty gives you specific legal rights and you may also have other rights which
vary from state to state.
To obtain warranty service, call SmartPool Customer Support Specialist
at (732) 730-9880, Monday – Friday, 9:00 a.m. – 5:00 p.m. EST.
CAUTION:
Some vinyl liners are more susceptible to surface wear and pattern removal than others,
caused by objects such as brushes, toys, floats, chlorine dispensers, and automatic pool
cleaners coming into contact with the vinyl surface. Such patterns can be easily
scratched or abraded merely by rubbing the surface with a brush. Pattern ink can also
rub off when they come into contact with objects in the pool. SmartPool is not responsible
for, nor does this limited warranty cover pattern removal, abrasion, and markings on or
damage to any kind of vinyl liner.
Mode d'emploi du nettoyeur automatique pour piscines Nitro
Félicitations pour votre achat de l'aspirateur de piscine automatique le plus perfectionné du marché sur le
plan technique. Le Nitro est facile à utiliser et vous permetde nettoyer votre piscine à moindre coût et
sans efforts. Ensuivant ce mode d'emploi simple, vous pourrez nettoyer votre piscine rapidement et de
façon efficace à l'aide du Nitro dès aujourd'hui et pour de nombreuses années à venir.
Installation
• Placez le bloc d'alimentation électrique dans une zone permettant à la personne utilisant l'aspirateur d'accéder à l'intégralité de la piscine.
• Assurez-vous de brancher le bloc d'alimentation dans une prise de courant de sécurité uniquement, comme un disjoncteur de fuite à la terre (GFI)
ou un relais de mise à la terre (ELI).
• Observez le bloc d'alimentation pour vous assurer que l'interrupteur est en position « off ».
• Branchez le bloc d'alimentation dans la prise protégée.
• Branchez le connecteurdu nettoyeur dans le bloc d'alimentation. Le connecteur est claveté et pourra donc être branchéau bloc d'alimentation
d'une seule façon. Assurez-vousque la prise est correctement enfoncée dans le bloc d'alimentation. Faitesglisser la serrure du connecteur
(collier de serrage) sur le connecteur et tournez-la dans le sens des aiguilles d'une montre jusqu'à ce qu'elle soit serrée.
NE FAITES PAS FONCTIONNER LE NETTOYEUR HORS DE L'EAU.
FAIRE FONCTIONNER LE NETTOYEUR HORS DE L'EAU ABÎME LES MOTEURS ET ANNULE LA GARANTIE
• Placez le nettoyeurdans la piscine et, en cas de besoin, balancez-le d'un côtéà l'autre pour libérer l'air pouvant être emprisonné à l'intérieur. Le
nettoyeur s'enfoncera jusqu'au fond de la piscine.
• Laissez glisser une longueur suffisante du cordon bleu dans l'eau pour vous assurer que le nettoyeur atteint facilement toute la surface de la piscine.
• Tournez l'interrupteur du bloc d'alimentation sur la position « on ».
• Le nettoyeur commencealors son programme de nettoyage.
• Il s'éteint automatiquementau bout de deux heures.
• Si un deuxième nettoyage s'avère nécessaire, ou si l'appareil s'est malencontreusement éteint, vous devez attendre une minute avant de rallumer l'unité.
REMARQUE IMPORTANTE:
Dans des conditionsnormales de fonctionnement, le nettoyeur semble s'éteindre pendant quelques secondes, soulève ses roulettes
avant du fond de la piscine et se déplace soit vers la gauche, soit vers la droite, ou bien il tourne sur lui-même pendant un certain
temps. Cette procédure normale a été programmée pour garantir le nettoyage le plus rapide et le plus efficace de votre piscine.
Page 5

98
Retirer le nettoyeur de la piscine
• Tirezlentement surle cordon bleu pour approcher le nettoyeur de la surface et du
rebord de la piscine. NE SORTEZ PAS LE NETTOYEUR DE LA PISCINE EN LE TIRANT PAR LE
CORDON.
• Penchez-vouset saisissez la poignée du nettoyeur pour le sortir de la piscine tel
qu'indiqué ci-dessous.
Image 1 SAISIRLA POIGNÉE
Image 2 LESORTIR DE LA PISCINE PAR
LA POIGNÉE
• Nettoyezle sac à filtre.
• Rangezle nettoyeur sur le chariot
disponible en option, le cas échéant.
• Enroulezle cordon et accrochez-le
sur le chariot.
L'appareil doit être conservé dans un
endroit l'abritant des intempéries afin de
protéger son revêtement.
Nettoyage du sac à filtre
• Retournezle nettoyeur et posez-le sur le sol, couvercle inférieur vers le haut.
• Tournezles goupilles de verrouillagerouges (prèsdes roulettes) en position de
déverrouillage, tel qu'indiqué sur l'image 3. Appuyezensuite sur lesdeux pinces de
verrouillage rouges près de la brosse roulante en les poussant versle centre de
l'appareil. Soulevez le couvercle inférieur.
AB
A: Appuyez sur les languettes tel qu’indiqué et
soulevez le couvercle du nettoyeur
B: Tournezles boutons vers l’intérieur dans le
sens des flèches situées sur le couvercle
Image 3
• Tenezle couvercle inférieur tel qu'indiquésur l'image 4 et tirez la languette sur laquelle
est écrit « TIRER POUR ENLEVER LE SAC ».
Image 4
• Retournez le sac à filtre et nettoyez les débris à l'aide d'unjet d'eau tel qu'indiqué à l'image 5.
Si le sac est très sale, vous pouvez le laverseul à la machine, à l'envers, à l'eau froide et avec
un détergent doux.
IMAGE 5
• Nettoyeztous les débris du couvercle inférieur pour vous assurer de retirer toute la
saleté des filtres du déversoir, tel qu'indiqué à l'image 6.
IMAGE 6
• Pourrattacher le filtre au couvercle inférieur,retournez le sac à filtre. Commencez par
l'arrière à l'endroit où est inscrit « POUSSEZ » (push) surle sac à filtre et insérez le bord
du filtre dans la rainure de façon à ce queles languettes maintiennent le sac au niveau
de l'inscription « POUSSEZ », tel qu'indiqué à l'image 7.
IMAGE 7
• Appuyez sur l'ensemble du rebord du filtre pour vous assurer qu'il est bienenfoncé et
qu'il se trouve sous les languettes, tel qu'indiqué à l'image 7a.
IMAGE 7A
• Saisissez le couvercle inférieur, puis retournez-le de façon à ce que le sac pende sous celui-ci.
Remettez le couvercle inférieur sur le nettoyeur en prenant garde à insérerle sac à filtre
dans le nettoyeur.
ASSUREZ-VOUS QUE LE FILTREEST À L'INTÉRIEUR DU
NETTOYEUR SINON LE COUVERCLE NE FERMERA PAS ET NE SE
VERROUILLERA PAS.
IMAGE 7B
• Appuyezsur la partie arrière du
couvercle inférieur tout en poussant les
pinces de verrouillage vers l'extérieur du
nettoyeur jusqu'à ce que vous entendiez
un clic, tel qu'indiqué à l'image 7c.
IMAGE 7C
CLIC
• Unefois que le couvercle inférieur est
correctement installé, tournez les pinces de
verrouillage rouges dans le sens inverse de
celui des flèches apparaissant sur le
couvercle jusqu'à ce que celui-ci s'enclenche
entre les deux verrous soulevés.
Entretien du cordon
Pendant l'utilisation du Nitro, il se peut que le cordon commenceà s'enrouler.Des torsades
excessives peuvent faire en sorte que l'aspirateur ne nettoie pas toutela surface de la
piscine.
• Pourdérouler le cordon, il est préférable qu'il soit humide.
• Posezle nettoyeur sur le sol tel qu'indiqué ci-dessous.
• Assurez-vousde le poser dans un endroit dégagé où vous pourrez étendre le cordon sur
toute sa longueur.
• Tirezsur lecordon de façon à ce qu'il ne touche pas le sol.
• Àla main, tournez le cordon dans le sens opposé.
• Unefois que le cordon est tendu, enroulez-le pour le ranger, tel qu'indiqué ci-dessous.
Tournez le cordon
avec les mains pour
le tendre
Le sac à filtre doit être nettoyé après chaque utilisation.
Rangement du cordon
• Enroulezle cordon de façon lâche tel qu'indiqué ci-dessous.
• Enroulez le cordon de façon lâche
tel qu’indiqué ci-dessous. Tenez le
cordon à proximité du nettoyeur.
Formez une boucle d’environ deux
pieds avec le cordon, tel qu’indiqué.
Au moment de former la boucle,
enroulez le cordon légèrement dans
le sens contraire des aiguilles d’une
montre pour maintenir sa forme. NE
SERREZ PAS LE CORDON AUTOUR
D’OBJETS.
Une fois que le cordon est
correctement enroulé, accrochez-le
sur le chariot disponible en option.
Si vous n’avez pas de chariot, rangez
l’appareil dans un endroit protégé,
où il sera à l’abri des intempéries.
Stockage pour l'hiver
Si les températures tombent régulièrement en dessous de 5 degrés Celsius(45 degrés
Fahrenheit), le nettoyeur et le bloc d'alimentation doivent être rangés à l'intérieur.
Page 6

1110
SYMPTÔME RAISONS POSSIBLES SOLUTIONS
L’APPAREIL AVANCE ET RECULE SANS CESSE DE QUELQUES PIEDS SEULEMENT
Il y a de l’eau dans le moteur d’entraînement Remplacez le moteur d’entraînement
Des débris sont piégés dans la roue motrice Enlevez les débris
L’APPAREIL NE FONCTIONNE PAS
La tension de la prise d’alimentation n’est pas correcte e Vérifiez la tension de la prise
Le transformateur ne fonctionne pas Vérifiez la sortie du transformateur
Le cordon est défectueux Vérifiez la tension du cordon et remplacez le cordon au besoin
La tension de la prise d’alimentation n’est pas correcte Vérifiez la tension de la prise
LE VOYANT DU TRANSFORMATEUR EST ÉTEINT
Le transformateur fonctionne peut-être, mais le voyant est éteint Essayez l’appareil avec le transformateur
Le transformateur ne fonctionne pas Vérifiez la tension de la prise
L’APPAREIL SE DÉPLACE MAIS IL NE RAMASSE PAS LES DÉBRIS
Défaillance du moteur d’aspiration, impulseur cassé ou bloqué Changez le moteur d’aspiration, ou remplacez ou dégagez l’impulseur
L’APPAREIL GRIMPE HORS DE LA PISCINE
La piscine ne possède pas une pente de 2 pieds pour le capteur
d’inclinaison
Remplacez le sac à filtre par un nouveau sac à 8 orifices
Le capteur d’inclinaison est défectueux Retirez le moteur d’aspiration et secouez-le. Si l’appareil continue de grimper même après le déblocage du capteur
d’inclinaison, remplacez le moteur d’aspiration
L’APPAREIL OMET CERTAINESSECTIONS DE LA PISCINE
La piscine est trop grande pour l’appareil Assurez-vous que la piscine mesure moins de 40 pieds. Si c’est le cas, déplacez l’alimentation électrique et remettez
l’appareil en marche.
Le cordon est entortillé Détortillez le cordon avant et après chaque utilisation.
L’APPAREIL FLOTTE AU-DESSUS DU FOND DE LA PISCINE
Le sac à filtre est obstrué Nettoyez le sac à filtre
Défaillance du moteur d’aspiration Vérifiez le moteur d’aspiration
GUIDE DE DÉPANNAGE
Veuillez consulter www.smartpool.com pour obtenir des instructions pour les réparations.
Page 7

NC32
GARANTIE LIMITÉE DE 12 MOIS
Ce produit a été fabriqué, testé et vérifié conformément aux exigences techniques particulières. Il est
garanti contre les défauts matériels et les vices de fabrication dans des conditions normales
d'utilisation, et il est soumis aux conditions et aux limitations décrites ci-dessous.
Garantie limitée de dʼun an de SmartPool :
Garantie complète d'un an et garantie de 6 mois sur le moteur d'entraînement et sur le moteur
d'aspiration. La présente garantie s'applique uniquement à l'utilisation du produit au Canada et aux
États-Unis.
La garantie est offerte au premier acheteur ou consommateur pendant une durée de 12 mois suivant
la date initiale de l'achat.
La garantie porte uniquement sur l'utilisation normale et raisonnable. Tout dégât, défaut, mauvais
fonctionnement ou toute autre défaillance résultant de l'utilisation de l'unité sans le transformateur
d'origine ou de toute utilisation non conforme aux instructions contenues dans le présent guide,
notamment le défaut d'entretien raisonnable et nécessaire par l'acheteur, annulent la présente
garantie.
Les obligations de la garantie de SmartPool sont limitées à la réparation ou au remplacement du
produit ou de tout composant défectueux, au gré de SmartPool. La réparation ou le remplacement de
pièces peut inclure le recours aux composants et aux appareils remis à neuf. En aucun cas ou pour
quelque montant que ce soit, SmartPool ne sera tenu responsable de dommages indirects ou
accidentels, de préjudices ou de blessures survenus à des personnes utilisant lʼappareil, ou à des
biens utilisés en rapport avec celui-ci, ou encore dʼaucune perte de profit ou coûts et dépenses de
quelque type ou nature que ce soit.
La présente garantie ne porte pas sur le remplacement du sac à filtre, du couvercle inférieur ou des
brosses.
SMARTPOOL N'A CONCÉDÉ AUCUNE AUTRE GARANTIE ET N'A FORMULÉ AUCUNE
DÉCLARATION EXPRESSE OU IMPLICITE CONCERNANT LA QUALITÉ MARCHANDE,
LʼADAPTATION À UN USAGE PARTICULIER OU AUTRE, EN DEHORS DES DISPOSITIONS
EXPRESSÉMENT INDIQUÉES DANS LA PRÉSENTE GARANTIE. AUCUNE PERSONNE,
PERSONNE MORALE OU ENTREPRISE NʼEST AUTORISÉE À FAIRE DES OBSERVATIONS OU À
CONTRACTER DES OBLIGATIONS AU NOM DE SMARTPOOL, À LʼEXCEPTION DES
DISPOSITIONS MENTIONNÉES AUX PRÉSENTES. LES PROCÉDURES DE RECOURS
MENTIONNÉES DANS LA PRÉSENTE GARANTIE SONT EXPRESSÉMENT COMPRISES COMME
ÉTANT DES PROCÉDURES DE RECOURS DISPONIBLES POUR LE PROPRIÉTAIRE DE
LʼAPPAREIL, ET CETTE GARANTIE CONSTITUE LʼACCORD INTÉGRAL ET EXHAUSTIF ENTRE
SMARTPOOL ET LE PROPRIÉTAIRE DE LʼAPPAREIL. LA PRÉSENTE GARANTIE ÉTABLIT LES
SEULES OBLIGATIONS DE SMARTPOOL RELATIVES À LʼAPPAREIL; IL NʼEXISTE AUCUNE
AUTRE GARANTIE SʼÉTENDANT AU-DELÀ DE LA DESCRIPTION FAITE AUX PRÉSENTES.
La présente garantie vous octroie des droits reconnus par la loi, et il se peut que vous ayez d'autres
droits variant d'un État à l'autre, ou d'une province à l'autre.
Pour obtenir un service au titre de la garantie, appelez un représentant technique (Customer Support
Specialist) de SmartPool au (732) 730-9880, du lundi au vendredi de 9 h à 17 h HNE.
ATTENTION :
Certains liners de vinyle sont davantage sujets à la dégradation superficielle ou à lʼusure des motifs
dues à des objets comme les brosses, les flotteurs, les jouets, les distributeurs de chlore et les
aspirateurs de piscine automatiques lorsque ceux-ci entrent en contact avec les surfaces de vinyle.
De tels motifs peuvent être sérieusement égratignés ou abrasés, rien quʼen frottant la surface à la
brosse. Lʼencre des motifs peut également sʼestomper en cas de contact avec des objets dans la
piscine. SmartPool nʼest pas responsable de lʼusure des motifs, de lʼabrasion, des marques ou de
tout autre dommage de quelque sorte que ce soit survenant aux liners de vinyle, pas plus que la
présente garantie limitée ne couvre les dommages cités.
www.smartpool.com
 Loading...