

Page 1
CL02
INSTRUCTION MANUAL
Table of Contents
Warnings . . . . . . . . . . . . . . . . . . . . . . . . . . . . . . . . . . . . . . . . . . . . . . . . . . . . . . . . .2
Installation . . . . . . . . . . . . . . . . . . . . . . . . . . . . . . . . . . . . . . . . . . . . . . . . . . . . . . . .3
Water Chemistry . . . . . . . . . . . . . . . . . . . . . . . . . . . . . . . . . . . . . . . . . . . . . . . . . . .3
Salt Instructions . . . . . . . . . . . . . . . . . . . . . . . . . . . . . . . . . . . . . . . . . . . . . . . . . . .4
Stabilizer . . . . . . . . . . . . . . . . . . . . . . . . . . . . . . . . . . . . . . . . . . . . . . . . . . . . . . . . .6
Startup . . . . . . . . . . . . . . . . . . . . . . . . . . . . . . . . . . . . . . . . . . . . . . . . . . . . . . . . . . .6
Maintenance . . . . . . . . . . . . . . . . . . . . . . . . . . . . . . . . . . . . . . . . . . . . . . . . . . . . . .6
Winterizing . . . . . . . . . . . . . . . . . . . . . . . . . . . . . . . . . . . . . . . . . . . . . . . . . . . . . . . .7
Troubleshooting . . . . . . . . . . . . . . . . . . . . . . . . . . . . . . . . . . . . . . . . . . . . . . . . . . . .8
Warranty . . . . . . . . . . . . . . . . . . . . . . . . . . . . . . . . . . . . . . . . . . . . . . . . . . . . . . . . .8
www.smartpool.com
ChlorEase Manual Version 2.21
Page 2
!
!!!
!!!
!
!
!
!
IMPORTANT SAFETY INSTRUCTIONS
!
!
!
!
!
!
READ AND FOLLOW ALL INSTRUCTIONS
WARNING: To reduce the risk of injury, do not permit children to use this product unless they are
closely supervised at all times
WARNING: If ambient air temperature exceeds 115° F., protect the transformer from direct
sunlight with a well ventilated cover.
WARNING: The sole purpose of this product is for use as a salt water chlorinator as described in this
manual; any modification or other use will void the warranty.
WARNING: Do not allow children to use, touch, or play near or around the units’ power pack.
WARNING: Plug only into 110 V receptacles protected by a ground fault circuit interrupter.
WARNING: Do not connect unit to AC power until installation has been completed.
WARNING: Do not use if unit is damaged in any way.
WARNING: Unit must be completely submerged in water or warranty is void.
Minimum Water
Level
WARNING: DO NOT USE EXTENSION CORDS - DEATH OR INJURY CAN RESULT.
WARNING: Make sure ChlorEase is unplugged from its power supply before opening the unit or
performing any other maintenance.
WARNING: To protect risk of electrical shock, do not put the transformer in water or other liquid.
WARNING: To avoid damage to the transformer and cord, never carry the transformer by the cord or
pull on the cord to disconnect from an outlet. Instead, disconnect by pulling the plug, itself,
from the outlet. Do not pull cord around sharp corners or edges.
WARNING: Do not operate with a damaged cord or transformer.
WARNING: This unit is not compatible with soft-sided aboveground pools.
CAUTION: Disconnect transformer from outlet when not in use.
CAUTION: It is recommended to check your ChlorEase cell BI-WEEKLY for calcium build up (see page 6).
CAUTION: If ChlorEase is not working as it should or has been dropped or damaged in any way,
contact SmartPool, Inc., Inc. Customer Service before using at 1-732-730-9880.
SAVE THESE INSTRUCTIONS
ChlorEase Manual Version 2.2
2
Page 3
Introduction
ChlorEase is an automated chlorine generation system that has been specifically designed to operate in the aboveground or storable pool environment. The system requires a
low concentration of salt (sodium chloride) in the pool water. The LED display indicates that the unit is operating properly, when the water contains low salt, the cell is not
submerged in water, and when the cell is calcified, it also has a built-in timer. The salt levels are generally below the taste level for most people, but have the effect of softening
the water so it feels silkier and leaves hair and skin feeling much smoother than with other chlorine chemical products.
The ChlorEase unit sanitizes the water by converting the sodium chloride (salt) in your pool to chlorine ions by electrolysis. The chlorine ions generated form hypochlorous
acid, killing bacteria and algae in the pool that are then removed mechanically by the pool filter. The chlorine then reconstitutes itself as sodium chloride and begins the process
from the beginning, in a virtually unending cycle, resulting in rarely having to add sanitizer to your pool again. The only way that salt is lost from the pool is through
backwashing, splash out or drainage. Thus, salt replenishment is needed only periodically.
ChlorEase has been designed to introduce sanitizer between 1-23 hours a day 7 days a week to keep your pool sparkling clear. It has been designed to work on a wide variety of
pools with minimal installation.
Installation
1) First insure that chemical levels of the pool are correct based on the chart in Table 1
(see below). NOTE: Add chlorine if necessary to achieve a 1 – 3 ppm level prior to
operation of unit. Refer to table 2 on page 4.
2)
Locate an area of the pool that will allow for convenient access to a reliable steady
supply of electricity with a GFCI socket. The unit must be plugged into a GFCI
receptacle. DO NOT PLUG IN YET. Some models have an on off switch.
3) Install the ChlorEase unit in a reasonably close proximity to the filter return fitting
to maximize circulation of the chlorine being produced.
4) Remove screws and caps securing the top ledge of the pool in the desired area.
5) Gently lift one end of the ledge and slide the ChlorEase unit onto the pool wall. For
best results position the ChlorEase unit in the middle of
the top ledge.
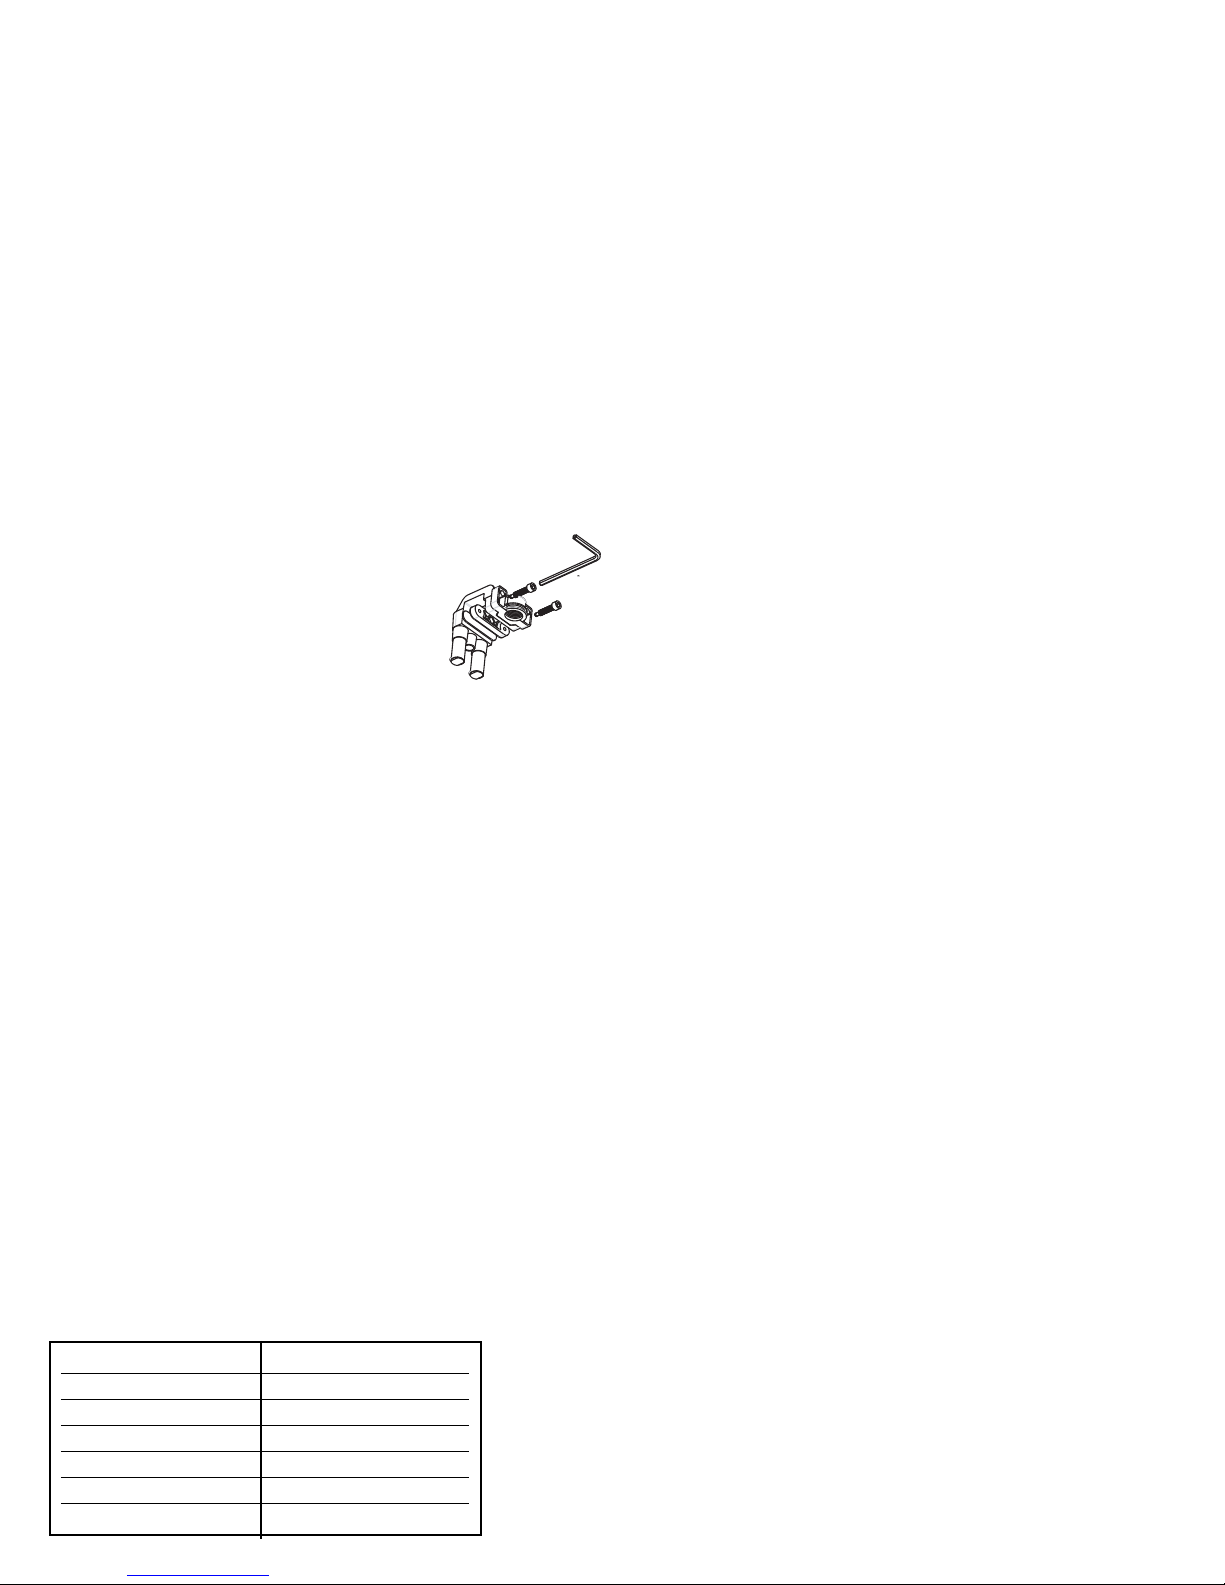
6) Turn screws on back of mounting bracket in to secure the
unit against the top of the pool wall using the allen
wrench provided. It is recommended that your
aboveground pool be grounded for safety. Consult your
local electrician for details.
7) Replace the top rail and all hardware.
8) Plug ChlorEase in to the 120vac GFCI socket. Some models have an on off switch.
9) Place the transformer in the protected area at least 3 feet from the pool. You will
see bubbles rising from the submerged cell. Initially a soft milky cloud may appear
around the ChlorEase unit. This
will stop after a few days of use.
This is normal and a good indicator
that the unit is working properly.
10) Screw the LED display to a secure
surface.
The LED display will default to
A)
the number 23. This indicates
that the unit is set to run for 23
hours. Leave the unit on its
default setting of 23 hours over
the next few days. Closely check
and review the chlorine levels in
the pool. If chlorine levels begin to rise, refer to the sanitizer level adjustment
section of the manual. To adjust the amount of hours, press and hold the up
button for 3 seconds or until the display begins to flash. Once the display begins
to flash, remove your finger from the up button. While the display flashes (within
4 seconds) press either the up or down button release and repeat to change the settings.
The highest setting is 23 and the lowest is 0 which will turn the unit off. Turning the
unit up to the 23 hours will result in the unit running for 23 hours and resting for one
hour of each day.
B. The display will show a numeric efficiency number between 4.0 and 6.0. This
number will continue to read out on the display and is normal.
C. The LED display will illuminate Green, Yellow or Red, or not at all.
i. Green indicates that the unit is operating properly. (pH MUST BE
BETWEEN 7.0 – 7.4).
ii. Yellow indicates that you are approaching an issue that there is low salt,
calcification on the cell, and if the ChlorEase unit is not submerged in water.
iii. Red indicates that there is low salt, calcification on the cell, and if the
ChlorEase unit is not submerged in water.
iv. No lights indicate that there is high salt, which will cause damage to all
components of the ChlorEase unit and will turn the unit off. FAILURE TO
MAINTAIN OPTIMUM WATER CHEMISTRY AND CLEANING OF
YOUR CELL WILL VOID YOUR WARRANTY.
11) If your system powers off for any reason or your display does not show a reading,
disconnect the unit from the power source and reconnect it. Then hold down the
reset button for 3 seconds until the number 23 displays on the LED. If the number
23 does not display or your LED does not show any readings, contact SmartPool,
Inc. Customer Service at 1-732-730-9880.
SANITIZER LEVEL ADJUSTMENT
The CL02 unit is designed to operate in many types and sizes of pools. The sanitizer
output is controlled by using the built in timer to limit the amount of sanitizer
generated. If your chlorine levels begin to rise, you will need to lower the amount of
hours the unit is set to run. To adjust the amount of hours, press and hold the up button
for 3 seconds or until the display begins to flash. Once the display begins to flash,
remove your finger from the up button. While the display flashes (within 4 seconds)
press either the up or down button release and repeat to change the settings. The
highest setting is 23 and the lowest is 0 which will turn the unit off. Turning the unit up
to the 23 hours will result in the unit running for 23 hours and resting for one hour of
each day. The setting for each pool will vary due to gallons in the pool and bather load.
It may take a week or so to find the proper settings for your particular pool. WARNING:
DO NOT OPERATE THE CHLORINATOR IF THE SALT LEVEL
PPM RO ABOVE 3,700 PPM. FAILURE TO MAINTAIN PROPER SALT AND
CHEMISTRY LEVELS WILL VOID THE WARRANTY.
IS BELOW 3,200
Water Chemistry
The ChlorEase system will automate the introduction of sanitizer in your pool, but it is very important that you check and regularly maintain the chemical make up of your
pool water and calcification on the cell. Table 1 shows the recommended levels to be maintained in your pool.
It is essential to maintain these levels to maximize the life of your product. Test your water weekly or bring a sample to your local pool store so they may assist you in
maintaining proper pool chemistry based on the chart in Table 1.
Be sure to inform the pool professional testing your water that you are using a ChlorEase Saltwater system. Cyanuric acid or conditioner takes a few days to totally dissolve and
level off. Please monitor closely for the first few days of operation (see Table 4). Cyanuric acid stabilizes the presence of chlorine in your pool water and is essential for proper
Table 1
Optimum Water Chemistry
ITEM RECOMMENDED LEVEL
(ppm= parts per million)
Salt 3200 to 3700 ppm
Free Chlorine 1.0 to 3.0 ppm
pH 7.0 to 7.4
Total Alkalinity 80 to 100 ppm
Calcium Hardness 100 to 200 ppm
Cyanuric Acid 60 to 80 ppm
Metals 0 ppm
disinfection. FAILURE TO MAINTAIN OPTIMUM WATER CHEMISTRY BASED ON THE CHART
IN TABLE 1 WILL VOID YOUR WARRANTY.
NOTE: It may be necessary to unplug your ChlorEase Chlorine Generator if over–chlorination occurs. If this occurs, unplug the
transformer form the GFCI receptacle (For models that have an on off switch. Turn power off; then unplug transformer from the GFCI
receptacle and test the levels of free chlorine in the water daily until a desired range of 1.0 – 3.0 PPM of free available chlorine is
achieved - See Table 2). Once the desired level is reached, plug the transformer back into the GFCI receptacle and turn power to the on
position where applicable. If there is not enough chlorine in the water or you cannot keep a chlorine reading in your pool (high chlorine
demand), refer to Table 2.1 to determine how much shock should be added to your pool to increase the free available chlorine (FAC)
level in the water. Contact SmartPool, Inc., Inc. at 1-732-730-9880 for additional help should this fail to correct the problem. ALL
METALS: COPPER, IRON, MANGANESE, ZINC, ETC. MUST BE REMOVED FROM THE WATER PRIOR TO USE. USE A SEQUESTERING AGENT TO
BIND ALL CALCIUM SHOULD YOUR WATER CONTAIN GREATER THAN 200 PPM OF CALCIUM.
CL02 Manual Version 2.23
Page 4
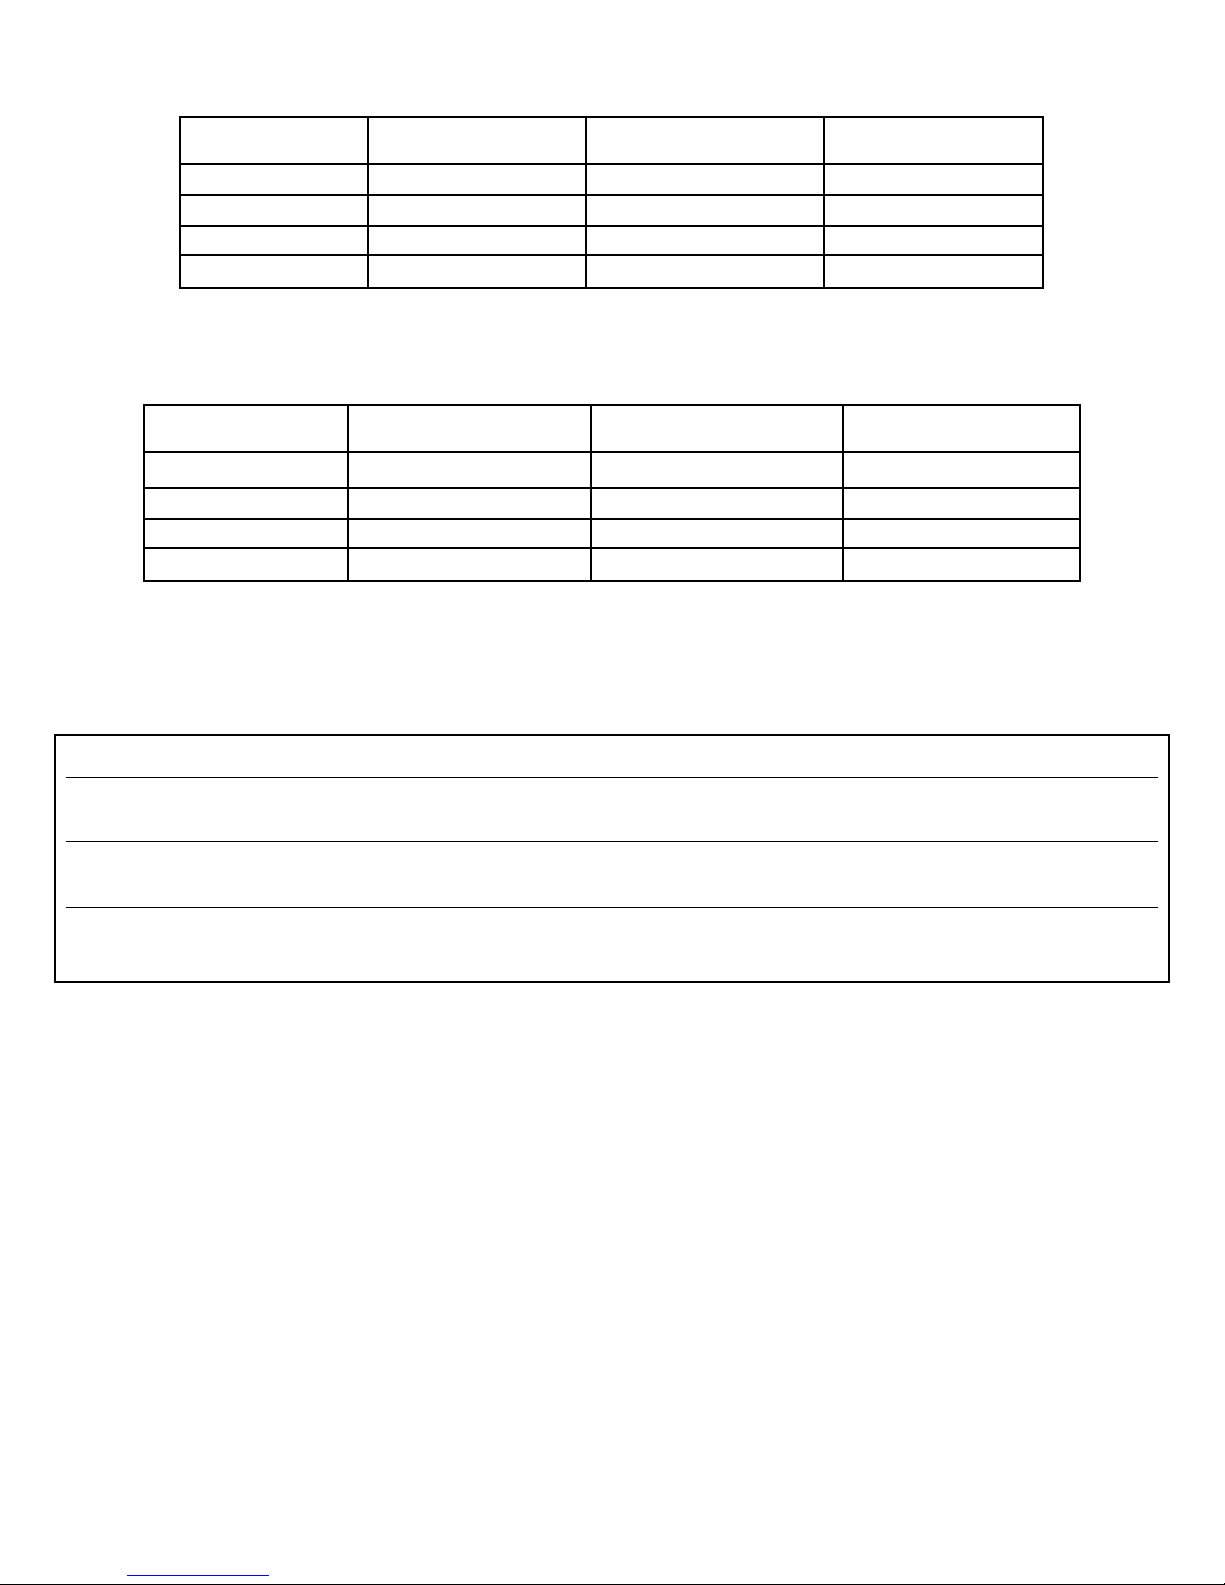
Table 2
Increasing Free Available Chlorine (FAC) Residual
Type of Chlorine
Liquid Chlorine 12% 5.3 oz. 10.6 oz. 15.9 oz.
Lithium Hypo 35% 1 oz. 3.8 oz. 5.7 oz.
Sodium Dichlor 56% 1.9 oz. 2.38 oz. 4.28 oz.
Trichloro 90% .75 oz. 1.5 oz. 2.25 oz.
The table above should be used to maintain a FAC residual. Please refer to Table 2-1 if you have ZERO FAC residual.
Amount to add for
1 ppm in 5,000 gallons
Amount to add for
1 ppm in 10,000 gallons
Amount to add for
1 ppm in 15,000 gallons
Table 2.1
Achieving Breakpoint or Superchlorination
Type of Chlorine
Liquid Chlorine 12% .5 gallons 1 gallon 1.5 gallons
Lithium Hypo 35% 1 lb. 3 oz. 2 lb. 6 oz. 3 lb. 9 oz.
Sodium Dichlor 56% 12 oz. 1 lb. 8 oz. 2 lbs. 4 oz.
Trichloro 90% 7.5 oz. 15 oz. 1 lb 6.5 oz.
Amount to add for
10 ppm in 5,000 gallons
Amount to add for
10 ppm in 10,000 gallons
Amount to add for
10 ppm in 15,000 gallons
Salt Level
Refer to table 3 to determine how much salt should be added to your pool for proper performance. Use the equation below to determine
the gallons or liters of water in your pool. Note: Always test for salt levels PRIOR to adding salt to the water.
How to Calculate Pool Size
Pool Type Gallons Liters
Rectangular Length (ft.) x Width (ft.) x Length (m) x Width (m) x
Average Depth (ft.) x 7.5 Average Depth (m) x 1000
Round Diameter (ft.) x Diameter (ft.) x Diameter (m) x Diameter (m) x
Average Depth (ft.) x 5.9 Average Depth (m) x 785
Oval Length(ft.) x Width(ft.) x Length (m) x Width (m) x
Average Depth (ft.) x 6.7 Average Depth (m) x 840
The optimum salt level is between 3200 and 3700 ppm. The salt level can easily be checked using test strips commonly sold at your local
pool store. If the salt level is low, use Table 3 to determine how much salt must be added to achieve the desired level.
Using Table 3, first locate on the top row the gallonage of your pool. Then look in the first column marked current salt level and find your
current salt level. Follow that row over to where it intersects with our pool gallon column. The number in that box shows the number of
pounds of salt you must add in order to achieve the ideal salinity. Remember that the only way that your pool will lose salt is if:
• You backwash your filter • Splash out • Overfill the pool • Drain the pool
Type of Salt to Use
It is imperative that you use only sodium chloride (NaCL) that is 99% pure. This is commonly available at most reputable pool stores or
home centers in a variety of sizes. Do NOT use rock salt, salt with more than 1% yellow prussiate of soda, salt with more than 1% anti
caking additives. DO NOT USE IODIZED SALT.
Adding Salt
Turn pool filter on and add salt directly to the pool. Use a brush to dissolve and disperse salt throughout pool. A pool vacuum or robotic
pool cleaner will serve the same purposes. Run the pump for the next 24 hours using the main drain for suction. If no main drain is
available, use the pool vacuum. Do not add salt through your skimmer; add directly into pool and brush to dissolve.
Removing Salt
The only way to remove salt or lower salinity is to drain water off and fill with fresh water.
ChlorEase Manual Version 2.2
4
Page 5
Table 3
!
LBS OF SALT REQUIRED TO RAISE LEVELS 3000ppm
(KG) OF SALT REQUIRED TO RAISE LEVELS 3000ppm
Current 6,000 gal 8,000 Gal 10,000 Gal 12,000 Gal 14,000 Gal 16,000 Gal 18,000 Gal
Salt level (22,500 L) (30,000 L) (37,500 L) (45,000 L) (52,500 L) (60,000 L) (67,500 L)
0 200 256 335 400 465 535 600
(93) (115) (153) (181) (214) (242) (274)
200 190 243 318 380 442 508 570
(88) (109) (145) (172) (203) (230) (260)
400 180 230 301 360 419 481 540
(83) (103) (137) (163) (192) (218) (246)
600 170 227 284 340 396 454 510
(78) (97) (129) (154) (181) (206) (232)
800 160 213 267 320 373 427 480
(73) (97) (121) (145) (170) (194) (218)
1000 150 200 250 300 350 400 450
(69) (91) (114) (136) (159) (182) (205)
1200 140 187 233 280 327 373 420
(64) (85) (106) (127) (148) (170) (191)
1400 130 173 217 260 303 347 390
(59) (79) (98) (118) (138) (158) (177)
1600 120 160 200 240 280 320 360
(55) (72) (91) (109) (127) (145) (164)
1800 110 147 183 220 257 293 330
(51) (66) (83) (100) (117) (133) (150)
2000 100 133 167 200 233 267 300
(46) (60) (76) (91) (106) (121) (136)
2200 90 120 150 180 210 240 270
(41) (54) (68) (82) (95) (109) (123)
2400 80 107 133 160 187 213 240
(36) (48) (61) (73) (85) (97) (109)
2600 70 93 117 140 163 187 210
(32) (42) (53) (64) (74) (85) (95)
2800 60 80 100 120 140 160 180
(27) (36) (45) (55) (64) (73) (82)
3000 50 67 83 100 117 133 150
(23) (30) (38) (45) (53) (61) (68)
3200 40 53 67 80 93 107 120
(18) (24) (30) (36) (42) (48) (55)
3400 30 40 50 60 70 80 90
(14) (18) (23) (27) (32) (36) (41)
3600 20 27 33 40 47 53 60
(9) (12) (15) (18) (21) (24) (27)
3800 10 13 17 20 23 27 30
(4) (6) (8) (9) (11) (12) (14)
4000 0000000
4200 Dilute Dilute Dilute Dilute Dilute Dilute Dilute
WARNING: DO NOT OPERATE CHLORINATOR IF SALT LEVEL IS BELOW 3,000 ppm. FAILURE
TO MAINTAIN PROPER SALT LEVELS IN POOL WATER MAY VOID WARRANTY.
ChlorEase Manual Version 2.25
Page 6
Stabilizer (Cyanuric Acid)
!
When checking salt level, always check the level of Cyanuric acid as well since it is likely that they will decline together. Use Table 4 to determining how much
stabilizer must be added to raise levels to the optimum level of 80ppm. First find the column that represents the gallons of your pool. Then locate the row that
shows your current level of Cyanuric Acid. The box that intersects those two will tell you the lbs or (kg) needed to raise levels in your pool to 80ppm.
Remember that Cyanuric Acid or conditioner takes some time to dissolve so check levels for several days after adding, or before adding more.
Table 4
POUNDS AND (KG) OF STABILIZER (CYANURIC ACID) NEEDED TO RAISE LEVELS TO 80 PPM
Current 6,000 gal 8,000 Gal 10,000 Gal 12,000 Gal 14,000 Gal 16,000 Gal 18,000 Gal
Stabilizer (22,500 L) (30,000 L) (37,500 L) (45,000 L) (52,500 L) (60,000 L) (67,500 L)
0 ppm 4.0 5.3 6.7 8.0 9.4 10.7 12.0
(1.8) (2.4) (3.0) (3.6) (4.3) (4.9) (5.4)
10 ppm 3.5 4.7 5.8 7.0 8.2 9.4 10.5
(1.6) (2.1) (2.6) (3.2) (3.7) (4.3) (4.8)
20 ppm 3.0 4.0 5.0 6.0 7.0 8.0 9.0
(1.4) (1.8) (2.3) (2.7) (3.2) (3.6) (4.2)
30 ppm 2.5 3.3 4.2 5.0 5.9 6.7 7.5
(1.1) (1.5) (1.9) (2.3) (2.7) (3.0) (3.4)
40 ppm 2.0 2.7 3.3 4.0 4.7 5.4 6.0
(0.9) (1.2) (1.5) (1.8) (2.1) (2.4) (2.7)
50 ppm 1.5 2.0 2.5 3.0 3.5 4.0 4.5
(0.7) (0.9) (1.1) (1.4) (1.6) (1.8) (2.0)
60 ppm 1.0 1.3 1.7 2.0 2.4 2.7 3.0
(0.5) (0.6) (0.8) (0.91) (1.1) (1.2) (1.4)
70 ppm 0.5 0.7 0.8 1.0 1.2 1.4 1.5
(0.2) (0.3) (0.4) (0.45) (0.54) (0.64) (0.68)
80 ppm 0.0 0.0 0.0 0.0 0.0 0.0 0.0
Startup and Spring Opening
Check water chemistry and refer to Table 1 as a guide for optimum water chemistry for ChlorEase. Then add a saltwater-compatible chlorinating product initially to bring
chlorine level to 3 ppm (See Table 2.1). This is likely the only time you’ll need to add chlorine to your pool. This will charge the water with chlorine as the ChlorEase begins to
generate chlorine in the pool. ChlorEase will then maintain your chlorine level after the initial shock treatment. ALL METALS: COPPER, IRON, MANGANESE, ZINC, ETC.
MUST BE REMOVED FROM THE WATER PRIOR TO USE. USE A SEQUESTERING AGENT TO BIND ALL CALCIUM SHOULD YOUR WATER CONTAIN GREATER
THAN 200 PPM O F CALCIUM.
Maintenance of your ChlorEase System
Follow these simple steps to maintain the best results from your ChlorEase:
1. Make sure that your water chemistry is within the optimum range (see chart opposite):
Adding Salt
Begin by testing the salt levels of the pool using saline test strips available at your local pool store. The
salt level must be above 3200 ppm. If the salt level is low, refer to Table 3 for amount of salt to add.
It is recommended that you check your cell for calcium build up (white residue on cell) on a BI-WEEKLY
2.
basis. If calcium appears on the cell, follow the “cleaning the cell” instructions on the next page.
Cleaning the Cell DO NOT REMOVE THE MESH COVERING THE CELL!
INSIDE ELEMENT IS SHARP!
ITEM RECOMMENDED LEVEL
Optimum Water Chemistry
Salt 3200 to 3700 ppm
Free Chlorine 1.0 to 3.0 ppm
pH 7.0 to 7.4
Total Alkalinity 80 to 100 ppm
Calcium Hardness 100 to 200 ppm
Cyanuric Acid 60 to 80 ppm
Metals 0 ppm
Table 1
(ppm= parts per million)
If proper chlorine levels cannot be maintained, and if salt levels and pH readings are correct, the cell must be
cleaned. FIRST UNPLUG THE CHLOREASE UNIT FROM THE AC SOCKET. THE UNIT SHOULD
ONLY BE SERVICED AFTER IT HAS BEEN UNPLUGGED.
The water that you fill your pool with may contain high amounts of calcium. The time period to clean the ChlorEase
cell will vary. It is recommended that you clean your cell on a BI-WEEKLY basis.
For models with an on off switch, turn unit to the off position. UNPLUG THE CHLOREASE UNIT FROM
THE AC SOCKET. THE UNIT SHOULD ONLY BE SERVICED AFTER IT HAS BEEN UNPLUGGED.
Remove the ChlorEase housing from the pool by pushing in the retaining clips to unlock the housing from
the metal bracket, using the plastic tool provided. Remove the front cover from the housing by first
unscrewing the two plastic screws on the front using the plastic key provided, and then grasp the two side
clips to remove the front cover. Next, pull out the wire spool and unwind the excess cord allowing the
housing to be pulled over outside of pool. Visually inspect the metal elements inside the mesh covering of the
chlorinating cell. If heavy scale is present, the scale should be removed (see next section).
ChlorEase Manual Version 2.2
6
Retaining Clips
Side Clips
Font Cover
Plastic Screws
Housing
Page 7

Removing Scale from Elements
Unsnap chlorinating cell from housing. Fill a deep container such as a bucket with 1 part white vinegar to 2 parts water. Immerse the chlorinating cell
only (NOT the housing) and let it sit for 30 minutes. Hose off and inspect cell – do not scrape the white mesh or the cell.
All scale (cake-like white mineral buildup) should have dissolved. If scale remains, change cleaning solution and repeat process and proceed in 30 minute
intervals. DO NOT SCRAPE SCALE WITH ANY TYPE OF TOOLS OR BRUSHES AS IT WILL DAMAGE TITANIUM COATING AND VOID
WARRANTY. THE WARRANTY WILL BE VOIDED IF THE CELL HAS BEEN CLEANED TOO LONG OR IF IT HAS NOT BEEN CLEANED IN A
TIMELY MANNER. IF THE TITANIUM COATING IS REMOVED FROM THE CELL THE WARRANTY IS VOIDED.
To reinstall, rewind wire around spool neatly. Replace cell into housing. Replace locking pin and replace front Cover. Plug unit in GFCI outlet.
Winterizing
It is preferable to remove the entire ChlorEase system for winter. Simply reverse the installation procedure and store the system in a shed or garage.
ALWAYS CLEAN THE CELL BEFORE THE WINTER!
If you do not remove the entire system for winterization, the ChlorEase housing and cell must be removed from the pool. The unit will be damaged if left
in freezing water and should be removed following the instructions for cleaning the cell (above).
Use some twine or wire ties to attach the housing and cell securely to the cable that holds the cover onto the pool. Secure it in a way that the housing and
cell will not swing around in the wind and cause damage.
NOTE: FAILURE TO REMOVE CELL FROM WATER FOR WINTERIZATION WILL VOID THE WARRANTY
Pushing in retaining
clips with plastic tool
(provided)
Detaching housing
from bracket
Wire Spool
with Excess
Cord
Chlorinating
Cell
Chlorinating cell
removed from
housing
Regular Water testing
Test your pool water weekly just as you would with any chemical maintenance program for your pool. The production of chlorine by ChlorEase is
directly affected by how well water balance is maintained (pH, Total Alkalinity and Calcium Hardness). IF PROPER WATER BALANCE IS NOT
MAINTAINED, CORROSION AND/OR SCALING CAN OCCUR IN THE ENTIRE POOL ENVIRONMENT AND WILL VOID THE WARRANTY.
Troubleshooting
If bubbles are NOT rising from the submerged part of the unit, follow these troubleshooting tips:
Unplug the unit and verify that you have power at the socket. Use a voltmeter to determine that you have 115vac output from the socket. If a voltmeter is
not available, use a lamp or other appliance to verify that There is enough voltage being supplied to the socket. If there is no supply voltage, either repair
the socket or Plug the ChlorEase in elsewhere.
If the socket is active, call 1-732-730-9880 for service.
Green Light
Yellow Light
Red Light
No Light
LED Troubleshooting
• ChlorEase is working properly
• Approaching low salt. Refer to chart in Table 3 and adjust accordingly
• Some calcium is building up on the cell. Clean the cell as described in Maintenance of
your ChlorEase System section of this manual (page 8)..
• Salt is low. Refer to chart in Table 3 and adjust accordingly.
• There is a large amount of calcium build up on the cell. Clean the cell as described in
Maintenance of your ChlorEase System section of this manual (page 8).
• ChlorEase is out of water. Unplug and place back in water immediately.
• Salt is High and will shut unit off. Drain 10” of water and refill with fresh water. Test
and adjust salt and chlorine accordingly.
ChlorEase Manual Version 2.27
Page 8
LED DIGITAL TROUBLESHOOTING
SYMPTOM CAUSE DISPLAY READING SOLUTION
Display reads HI Salt Level is too high. Higher than 6 or HI • Add water to your pool to dilute and lower salt level.
Display reads LO Salt level is too low or the cell has
calcium built up on it.
Lower than 4 or LO • Add salt as shown in Table 3
• Clean the cell as described in Maintenance of your ChlorEase System section of this
manual (page 7).
No Display or LED There is a non working power source
or the unit is not working.
Display is blank. • Check your power source (GFI outlet) with a known working appliance and repair
outlet if necessary.
• If unit is not working, contact SmartPool, Inc., Inc. Customer Support at 732-730-
Chlorine levels are low Cyanuric Acid levels are low or unit
Between 4 and 6 • Raise sanitizer levels or raise sanitizer level adjustment control on
is set to low
Chlorine levels are high Unit is set too high Between 4 and 6 • Lower sanitizer level adjustment on control
TWO-YEAR LIMITED WARRANTY
ChlorEase
Two year limited warranty from date of original purchase for manufacturing defects under normal and reasonable use, and subject to the
maintenance requirements and installation guidelines set forth in the product instruction manual. This warranty covers full replacement of
the product for one year from the original purchase date of the product. 50% of the MSRP will be paid by the purchaser towards the
replacement of the product after one year from original purchase date until the end of the second year.
THIS WARRANTY IS SUBJECT TO THE TERMS, LIMITATIONS AND EXCLUSIONS DESCRIBED BELOW, AND THERE ARE NO OTHER WARRANTIES OR
REPRESENTATIONS, EITHER EXPRESS OR IMPLIED, WHETHER OF MERCHANTABILITY, FITNESS FOR A PARTICULAR PURPOSE, OR OTHER, MADE BY THE
MANUFACTURER, OTHER THAN THOSE SPECIFICALLY SET FORTH IN THIS WRITTEN WARRANTY
What is Covered:
What is not Covered: Any type of damage to the product due to improper installation, maintenance, or failure to provide necessary and reasonable maintenance; any damage or injury
caused by misuse and/or unreasonable use of the product; batteries (if applicable); damage due to or related to improper draining, winterizing, storage or Acts of God; SmartPool, Inc. will
not honor any claims for damage to any products in transit unless damage to the shipping container is noted at the time of delivery on the transfer company’s delivery bill.
THE WARRANTY OBLIGATIONS OF SMARTPOOL, INC. ARE LIMITED TO REPAIR OR REPLACEMENT OF THE PRODUCT OR OF ANY DEFECTIVE COMPONENT,
AT THE OPTION OF SMARTPOOL, INC.. UNDER NO CIRCUMSTANCES WILL SMARTPOOL, INC. BE LIABLE OR RESPONSIBLE FOR ANY CONSEQUENTIAL OR
INCIDENTAL DAMAGES, AND/OR CHARGES FOR LABOR. SMARTPOOL, INC. SHALL NOT BE LIABLE OR RESPONSIBLE UNDER ANY CIRCUMSTANCES OR
ANY AMOUNT FOR ANY CONSEQUENTIAL OR INCIDENTAL DAMAGES, OR FOR ANY INJURIES OR DAMAGES TO PERSON OR PROPERTY USING OR USED
IN CONNECTION WITH THE PRODUCT, OR FOR ANY OTHER LOSS OF PROFITS OR OTHER COSTS OR EXPENSES OF ANY KIND OR CHARACTER. IF
SMARTPOOL, INC. DETERMINES THAT EITHER REPAIR OR REPLACEMENT OF THE PRODUCT IS NECESSARY, SMARTPOOL, INC. MAY EITHER REPAIR THE
PRODUCT AT A NOMINAL CHARGE TO THE OWNER OR REPLACE THE PRODUCT AS PER THE REPLACEMENT COST SCHEDULE DESCRIBED ABOVE.
SMARTPOOL, INC. RESERVES THE RIGHT TO SUPPLY REFURBISHED PRODUCTS OR PARTS. THE OWNER BEARS THE SOLE RESPONSIBILITY FOR PRE-
PAID RETURN OF THE PRODUCT TO SMARTPOOL, INC., AND ALL REPAIRED OR REPLACED PRODUCTS WILL BE RETURNED AT THE OWNER’S EXPENSE.
SmartPool, Inc., Inc. (SmartPool, Inc.) warrants its electronic product to be free from defects in material and workmanship when leaving the factory.
9880.
NO PERSON, FIRM, OR CORPORATION IS AUTHORIZED TO MAKE REPRESENTATIONS OR INCUR ANY OBLIGATIONS IN THE NAME OF OR ON BEHALF OF
SMARTPOOL, INC., EXCEPT AS STATED HEREIN. THE REMEDIES SET FORTH IN THIS WARRANTY ARE EXPRESSLY UNDERSTOOD TO BE THE EXCLUSIVE
REMEDIES AVAILABLE TO THE OWNER, AND THIS WARRANTY CONTAINS THE FULL AND COMPLETE AGREEMENT BETWEEN SMARTPOOL, INC. AND THE
OWNER. THIS WARRANTY SETS FORTH THE ONLY OBLIGATIONS OF SMARTPOOL, INC., WITH REGARD TO THIS PRODUCT, AND THERE ARE NO
WARRANTIES WHICH EXTEND BEYOND THE DESCRIPTION ON THE FACE HEREOF.
The representations set forth herein are the only representations made by SmartPool, Inc., with respect to the product, and this warranty does not constitute either a
performance or satisfaction guarantee. It is the responsibility of the product owner to regularly test and check the product for proper function and safety.
This warranty gives the original owner specific legal rights. You may have other rights depending on where you live.
What you must do to file a claim
: Call 1-732-730-9880 to initiate a claim.
ChlorEase Manual Version 2.2
www.smartpool.com
8
 Loading...