

Page 1
H
T
E
P
E
R
F
E
C
T
M
r
e
M
k
a
i
n
i
P
a
i
z
z
MPM-1K
PLEASE READ THESE INSTRUCTIONS CAREFULLY
AND RETAIN FOR FUTURE REFERENCE.
Page 2
CONGRATULATIONS
READ ALL INSTRUCTIONS
You are now the proud new owner of a
SMART PLANET Mini Pizza Maker,
model no. MPM-1K
Before using it for the rst time, kindly take time to care-
fully read your instruction manual. Please observe all safety
precautions and follow operating procedures. After reading,
kindly store your instruction manual in a safe place for your
future reference. If you pass this appliance to a third party,
please include the operating instruction manual as well.
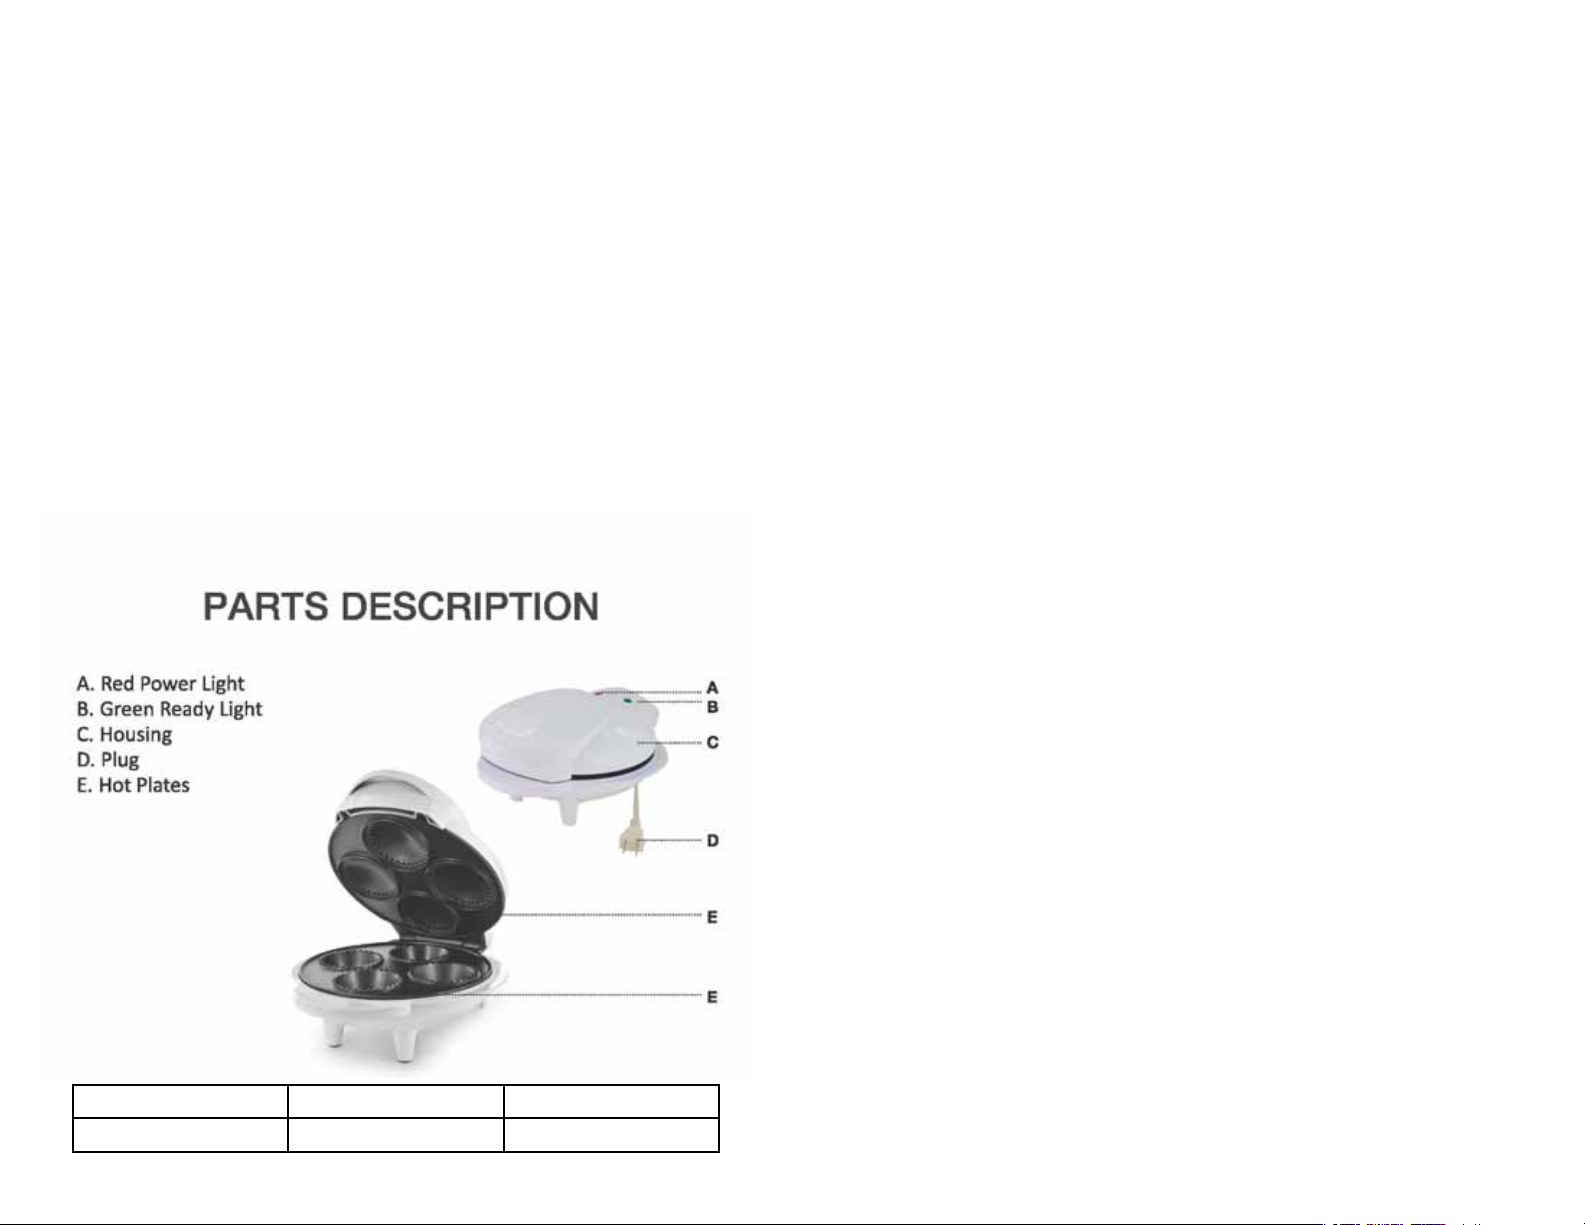
PARTS DESCRIPTION
A. Ready Light (Green)
B. Power Light (Red)
C. Housing
D. Drip Tray
E. Front Handle
F. Hot Plates
Electrical Specications
VOLTAGE FREQUENCY WATTAGE
120 V 60Hz 900 W
BEFORE USING THE
MINI PIZZA MAKER
APPLIANCE
ELECTRICITY PRECAUTIONS
• To protect against electric shock, do not immerse cord,
plugs, or other electric parts in water or other liquids.
• Do not operate any appliance with a damaged cord or plug.
• Do not use this appliance outdoors.
• After baking, unplug cord from electrical outlet.
• Do not leave the appliance plugged in when it is not
being used.
A
B
C
E
F
• Always unplug the appliance from electrical outlet and
allow to cool before cleaning.
• Once this unit is plugged into an electrical outlet it should
not be left unattended.
• A short power cord is provided with this appliance to
reduce the risk of entanglement or tripping. While we do not
recommend it, extension cords may be used if care is
exercised. If an extension cord is used, ensure that the
marked electrical rating of the extension cord is equal to or
greater than the appliance. If the plug is grounded, the
extension cord must be a grounded type-3 wire cord. To
avoid pulling, tripping or entanglement, position the extension cord so that it does not hang over the edge of the
counter, table or other area where it can be pulled on by
children or tripped over.
1 2
Page 3

IMPORTANT SAFEGUARDS
• For use only with 120V. 60HZ power source.
Use an electrical socket with a good ground connection.
• Never touch hot surfaces. Always use hot pads or
oven mitts while handling this appliance.
• To protect against re, electric shock and injury, do not
immerse the cord, plug or the appliance in water or any
other liquid.
• Close supervision is necessary when this appliance is
used by or near children.
• Before use, unwind the power cord completely and keep
the cord away from the hot parts of the appliance.
• Do not let the power cord hang over the edge of a table,
counter or touch hot surfaces.
• Do not place the appliance on or near hot gas or electric
burner, or in a heated oven.
• Do not operate the appliance if it has a damaged cord
and/or plug, if the appliance has malfunctioned, or has been
damaged in any manner. Contact the Smart Planet Service
Center for examination, repair or replacement.
Do not attempt to repair this appliance yourself.
• For interior household use only. Do not use this appliance
outdoors.
CAUTION
To prevent burns or other personal injuries
to children, read and follow all
instructions and warnings.
PRECAUTIONS
FOR USE AROUND CHILDREN
• Close supervision is necessary when this appliance
is used near children.
• Do not allow cord to hang over any edge where a
child can reach it. Arrange cord to avoid pulling,
tripping or entanglement.
• The use of accessories and/or attachments is not recommended and may result in re, electric shock or injury.
BEFORE INITIAL USE
• Always unplug the appliance from the electrical outlet
when not in use and before cleaning to avoid accidental
electrical shock. Allow it to cool before cleaning.
• While the appliance is hot, even if unplugged, there is a
danger of getting burned. Do not touch the appliance or
place it into storage while hot.
• Do not use this appliance other than for its intended use.
3 4
1. When using for the rst time, remove all packaging
materials and unwind the power cord from the appliance.
2. Open the unit by lifting the front handle with an oven mitt.
3. Clean the appliance with warm soapy water using a
damp cloth, then dry it. DO NOT immerse the whole unit in
water at anytime.
Page 4

4. Before using the appliance, make sure it is at least 4-6”
away from any obstacles.
OPERATING INSTRUCTIONS
5. There may be a slight smell and a small amount of
smoke the rst time the appliance is used. This is normal
and temporary. Make sure there is sufcient ventilation.
DO NOT put the Mini Pizza Maker into
the dishwasher. This will permanently damage the
product and will void the warranty.
CLEANING & CARE
• Always clean your appliance after each use to prevent
build up.
• Always disconnect the power plug from the wall outlet
before cleaning.
• Clean the unit only when it has completely cooled down.
• It is easiest to remove crumbs or leftovers with a
very soft brush.
• Roll out the dough into a 1/2 cm thick sheet. Cut dough
into circles using either a cookie cutter or the rim of a cup
and apply the toppings.
• Plug cord in 120 volt wall outlet.
• The appliance must be pre-heated before using.
• As soon as the appliance is ready, the green ready light
will turn on.
• You can now begin using the appliance.
• Open the appliance using the front handle with an oven
mitt.
• Brush or spray the molds with butter, margarine or cooking
oil.
• Carefully place the dough with topping on to each
individual mold.
• Be certain to wipe off any baked on oil residue. When the
non-stick cooking surfaces are thoroughly cleaned, the
releasing capabilities of the coating will be retained.
• Clean the housing surface and the outer surfaces of the
unit with a soft, damp cloth. If left over mixture is difcult to
remove, brush surface with a little oil. Allow to stand for ve
minutes then wipe with a damp cloth. Do not use abrasives
or metal scourers as they will scratch the non-stick surface
of the cooking plates.
• CAUTION: To avoid electric shock, DO NOT immerse the
appliance in water or other liquids.
• Do not place the unit in the dishwasher.
5 6
• Close the appliance and press the lid down for a few
seconds to evenly krimp the edge of the
• CAUTION: if there is too much dough/toppings applied the
appliance will be difcult to close. To remedy this, remove
some of the toppings. Never force this appliance to close
when over lled.
• After completion of the cooking process (approx. 8-12
minutes), carefully open the appliance and remove the mini
pizzas with the help of a at wooden, silicone or plastic
spatula. Never use a sharp or metal object (e.g. knives,
metal spatulas, etc.) as this will damage the non-stick
coating.
Page 5

• If mini pizzas do not lift out easily, cover and cook for an
additional 1-2 minutes.
• To cook more mini pizzas, re-brush or spray the cooking
surface with oil or cooking spray, close the appliance
again and wait until the heating surfaces have reheated
sufciently.
• The cooking process can be repeated as described
above.
• When done using the appliance, disconnect the electric
plug immediately. Keep the appliance open allowing
it to cool down before cleaning.
• Caution: The heating surfaces as well as the sides and
top of this appliance may get very hot. Avoid contact with
these hot areas by only using the handles and an oven mitt.
• The appliance must always be positioned horizontally on
a at surface during use.
R
E
P
E
H
T
M
i
n
i
F
E
C
T
r
e
k
P
i
z
a
M
a
z
Recipes
Pizza Dough
Ready-rolled dough, such as pizza dough, pie crust,
or phyllo dough is available in your supermarket freezer.
These kinds of dough give great results and are handy to
keep in your freezer. Allow sufcient time to defrost to room
temperature before use.
The dough sould be kept chilled then thawed when
needed. For best results, frozen pre-made frozen dough
should be used as soon as it is thawed. if left out for too
long, soft dough sheets are difcult to handle.
hanDmaDe Dough
HELPFUL HINTS
1 1/4 cups all-purpose our
1. There may be a slight smell and a small amount of
smoke the first time the appliance is used. This is normal
and temporary. Make sure there is sufficient ventilation.
2. Use smooth-edged plastic, wooden or rubber utensils. DO NOT use sharp-edged cooking tools such as
knives, forks, spoons etc. as the scratching will affect the
non-stick performance.
Please note that the Mini Pizza Maker cooks faster than
a traditional oven and therefore the cooking times will
need to be adjusted.
7 8
1 Tbs. sugar
1/4 tsp. salt
8 Tbs. (1 stick) cold unsalted butter, cut into 1/4-inch cubes
3 Tbs. very cold water
• Cut the Butter into small cubes
• In a large bowl, combine the butter, our, sugar and salt until the
butter is fully combined.
• Add water and thoroughly combine together.
• On a at surface, coat the surface with our to prevent the
dough from sticking.
• Immediately roll out the dough into a at sheet.
• Cut the dough into circles using a glass, cookie cutter, or a
knife.
• Apply the toppings and place into the Mini Pizza Maker.
Page 6

TraDiTional PePPeroni
BBQ ChiCken Pizza
Pizza
Toppings:
1/2 cup grated mozzarella
1/2 tsp oregano
12 medium sized slices of pepperoni
1/2 cup tomoto sauce
salt and pepper
Dough:
Please follow “Dough” instructions on page 8.
• Preheat the Mini Pizza Maker until the ready light turns on.
• Brush vegetable oil or cooking spray on cooking surfaces.
• Once the dough is made and cut into circles, place each circle
into an individual mold found on the appliance.
• After the dough has set into place, apply in this order, the
tomato sauce, mozzarella, pepperoni, and season with the
oregano and salt and pepper.
• Close the appliance and bake for 8-12 minutes.
Toppings:
1/2 cup grated mozzarella
12 small pcs of chicken breast
1/2 cup spicy bbq sauce
1Tbsp of fresh chopped Cilantro
1 Tbsp chopped red onion
Dough:
Please follow “Dough” instructions on page 8.
• Preheat the Mini Pizza Maker until the ready light turns on.
• Brush vegetable oil or cooking spray on cooking surfaces.
• Once the dough is made and cut into circles, place each circle
into an individual mold found on the appliance.
• After the dough has set into place, apply in this order, the
bbq sauce, red onions, cilantro, chicken breast, and lastly the
mozzarella cheese.
• Close the appliance and bake for 8-12 minutes.
9 10
Page 7

4 Cheese margariTa Pizza
hawaiian Pizza
Toppings:
1/4 cup grated mozzarella
1/4 cup crumbled feta cheese
1 tsp of parmesean
1/4 cup shredded fontina cheese
2 tsp of freshly chopped basil
1 Roma tomato sliced
1 tsp minced garlic
Dough:
Please follow “Dough” instructions on page 8.
• Preheat the Mini Pizza Maker until the ready light turns on.
• Brush vegetable oil or cooking spray on cooking surfaces.
• Once the dough is made and cut into circles, place each circle
into an individual mold found on the appliance.
• After the dough has set into place, apply in this order, the
4 cheeses, roma tomato slices (1 slice for each), garlic, and
lastly the fresh basil.
• Close the appliance and bake for 8-12 minutes.
Toppings:
1/2 cup shredded mozzarella cheese
1/2 cup tomato sauce
1 Tbsp shredded ham
1 Tbsp sliced pineapple
Dough:
Please follow “Dough” instructions on page 8.
• Preheat the Mini Pizza Maker until the ready light turns on.
• Brush vegetable oil or cooking spray on cooking surfaces.
• Once the dough is made and cut into circles, place each circle
into an individual mold found on the appliance.
• After the dough has set into place, apply in this order, the
tomato sauce, mozzarella cheese, pineapple, and lastly the
ham.
• Close the appliance and bake for 8-12 minutes.
11 12
Page 8
90 DAY LIMITED WARRANTY
Smart Planet warrants this appliance from failures in
its materials and workmanship for 90 days from the date of
original purchase provided the appliance is operated and
maintained in conformity with the instruction manual. Any
defective part of the appliance will be repaired or replaced
at Smart Planet’s discretion. Customers must provide proof
of purchase when submitting a warranty claim.
This warranty does not cover discoloration or any damage
to the non-stick surfaces of the appliance. This warranty is
null and void, as determined solely by Smart Planet, if the
appliance is damaged through accident, misuse, abuse,
negligence, scratching, shipping or if the appliance is altered in anyway.
If you think the appliance has failed or requires service within its warranty period, please email the Service Department
at [email protected] for further instructions. Please
include a description of the defect along with the date you
purchased the product and the original receipt with the
original purchase date. A receipt proving the original purchase date will be required for all warranty claims, hand
written receipts are not accepted. You may be instructed to
return the appliance for inspection and evaluation. Return
shipping costs are not refundable. Smart Planet is not responsible for returns lost in transit.
Check out some of our other great products.
Valid only in USA and Canada
www.smartplanethome.com
Copyright 2012 Smart Planet Canoga Park: CA 91304
Service Center: [email protected] copyright
v.20120215
13 14
www.smartplanethome.com
Page 9

15
 Loading...