

Page 1
cookie nation
Milk & Cookie Shot Maker
PLEASE READ THESE INSTRUCTIONS CAREFULLY
AND KEEP FOR FUTURE REFERENCE.
CNB-1SM
Page 2
CONGRATULATIONS
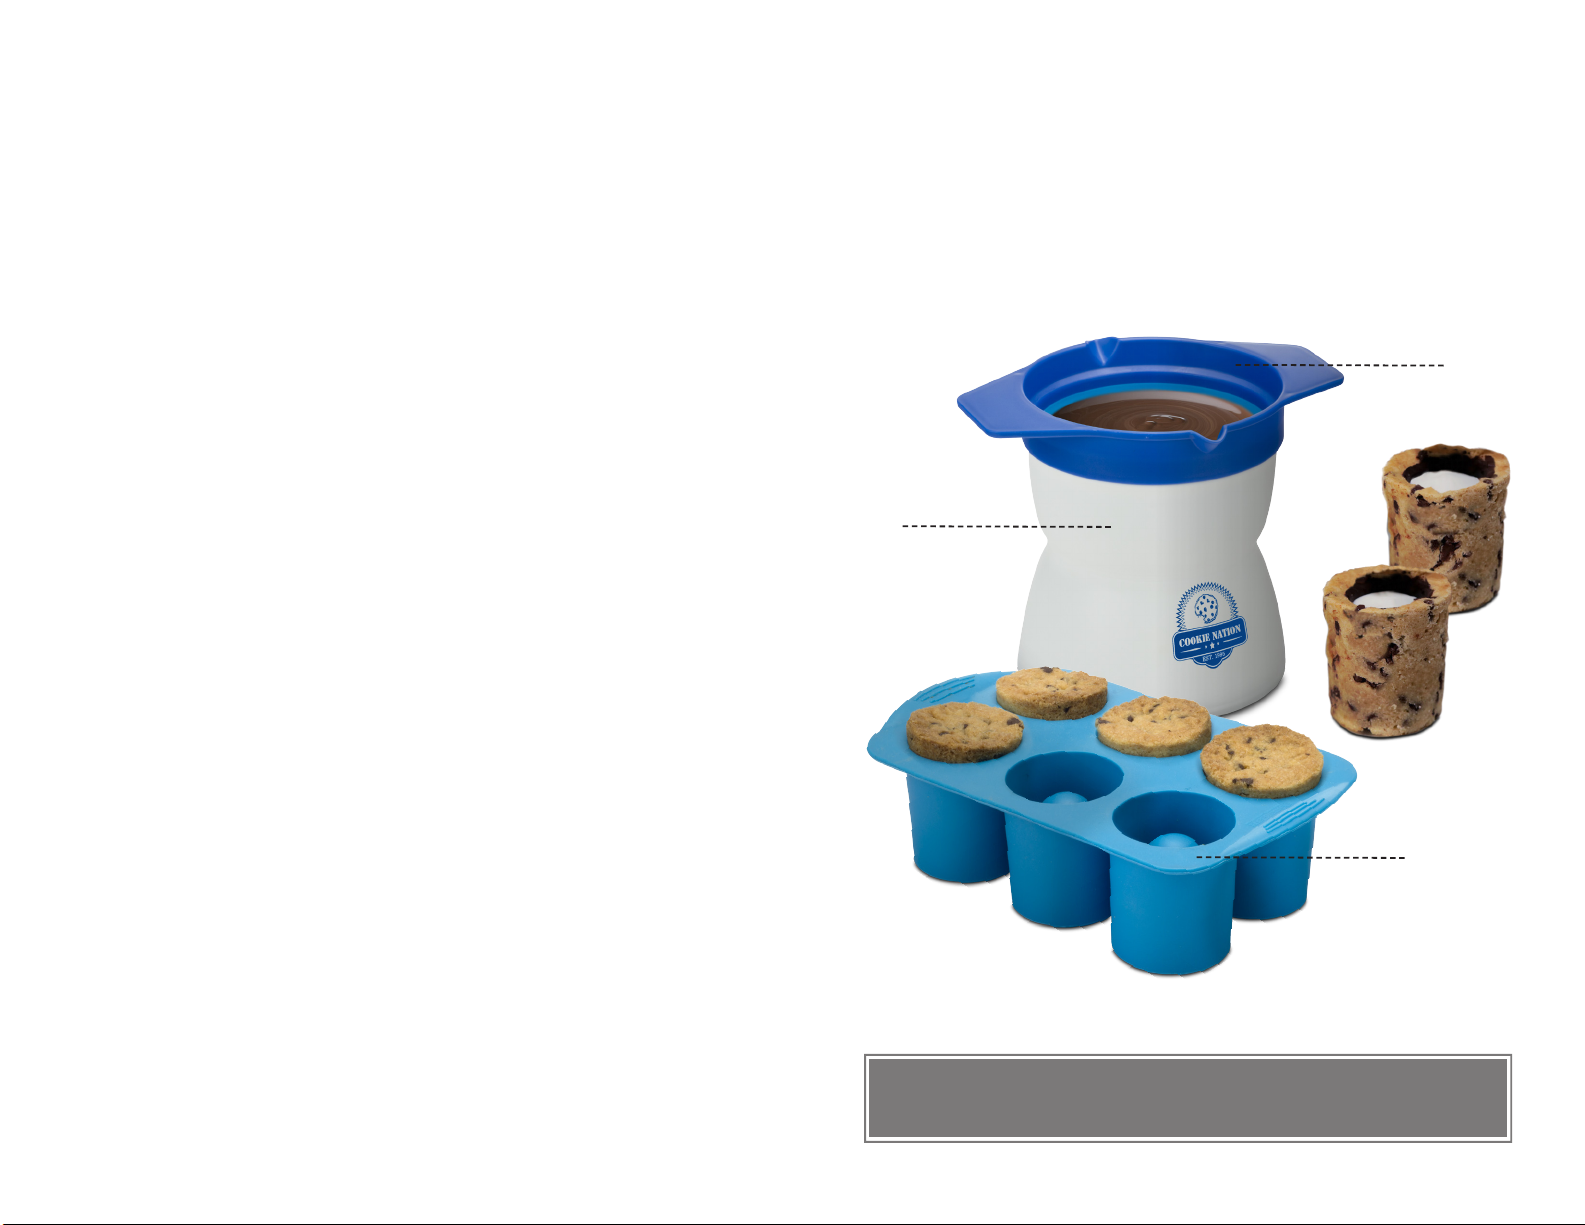
PARTS DESCRIPTION
You are now the proud new owner of a
Milk & Cookie Shot Maker
Item No. CNB-1SM
Before using your Milk & Cookie Shot Maker for the rst
time, kindly take time to carefully read the instruction manual.
Please read and observe all safety precautions and follow the
usage procedures. Please store your instruction manual in a
safe place for future reference. If you pass this appliance to a
third party, please include the instruction manual.
Save these instructions in a safe place for
future reference.
A. Removable Melting Bowl
B. Stand
C. Cookie Shot Mold
A.
B.
C.
PLEASE READ THESE INSTRUCTIONS CAREFULLY
AND KEEP FOR FUTURE REFERENCE.
1 2
Page 3

READ ALL INSTRUCTIONS BEFORE USING THE
MILK & COOKIE SHOT MAKER
HOW TO OPERATE
• Before rst use, wipe down Cookie Shot Mold, Stand and
Melting Bowl with a damp, non-abrasive cloth and dry thoroughly.
FOR HOUSEHOLD USE ONLY
CLEANING & MAINTENANCE
Please take care of your MILK & COOKIE SHOT MAKER by
following these simple instructions and precautions.
• Make sure the Cookie Shot Mold and Melting Bowl are
completely cool before cleaning.
• Follow the recipe for making the cookie dough and ll it in
the Cookie Shot Mold.
• Put the Cookie Shot Mold in the oven for 30 minutes at
350° F.
• Let the Cookie Shot Mold cool down completely before attempting to take the cookie shots out of the Cookie Shot Mold.
• Fit Melting Bowl on top of the Stand and add chocolate.
• Put the Melting Bowl with chocolate in the microwave for
45 sec or until chocolate melts.
• Take the Melting Bowl out of microwave and stir.
• Carefully take the cookie shots out of the Cookie Shot
Mold and coat the inside of the cookie shots with a layer of
melted chocolate.
• Let the chocolate cool until hardened.
• Add milk to the cookie shots and enjoy.
• Dispose of any remaining mixture by emptying it into a bag
or trash receptacle. It is not recommended that you pour the
leftover mixture down the sink.
• Hand wash mold, stand, and bowl in warm, soapy water
with a non-abrasive sponge.
• Dry all parts thoroughly with a soft, non-abrasive cloth.
• The Cookie Shot Mold and Melting Bowl may be washed
in the dishwasher on the top rack.
3 4
Page 4

Chocolate Chip Cookie Shots
Recipes
cookie nation
Important Notes:
The cookie shot glasses will not work correctly with
store brought pre-made cookie dough or even basic
chocolate chip recipes. So please use the recipe below.
This is a special recipe developed to work with this
device. It is a combo of a classic chocolate chip cookie
recipe and a classic shortbread cookie recipe. We
combined the two because they will keep the form of
the shot glass correctly.
This recipe calls for shortening (Crisco or the
equivalent) and not vegetable oil. That is important as
it will make the dough a bit more crumbly than most
cookie doughs and help the cookie glass keep its form.
This recipe calls for mini chocolate chips as opposed
to the normal sized chips. That is also important for the
structure of the cups.
The chocolate for the inside of the cookie glasses will
serve to seal the cookie so that milk can be added.
Ingredients
For the cookies:
1 cup shortening
1/3 cup granulated sugar
1/2 cup light-brown sugar
1 large egg yolk
2 teaspoons vanilla extract
2 cups all-purpose our, sifted
1/2 teaspoon salt
1 cup mini chocolate chips
For the cookie shots:
1 1/2 cups milk
1 1/2 teaspoons vanilla extract
5-6 oz chocolate
1 tbsp shortening
enough milk to ll the shot cups
See notes below for the chocolate for the inside of
the cup
Multiple types of chocolate can be used.
5 6
Page 5
Directions
1. Preheat oven to 350°F. You will not need to grease the silicone mold.
2. In a large bowl, cream together the shortening and brown
and granulated sugars. Add the egg yolk and vanilla extract,
and mix until completely incorporated. Gradually add the
our and salt, and mix until completely incorporated. Add
the mini chocolate chips, and mix together until evenly distributed. The dough should be a little crumbly at this point.
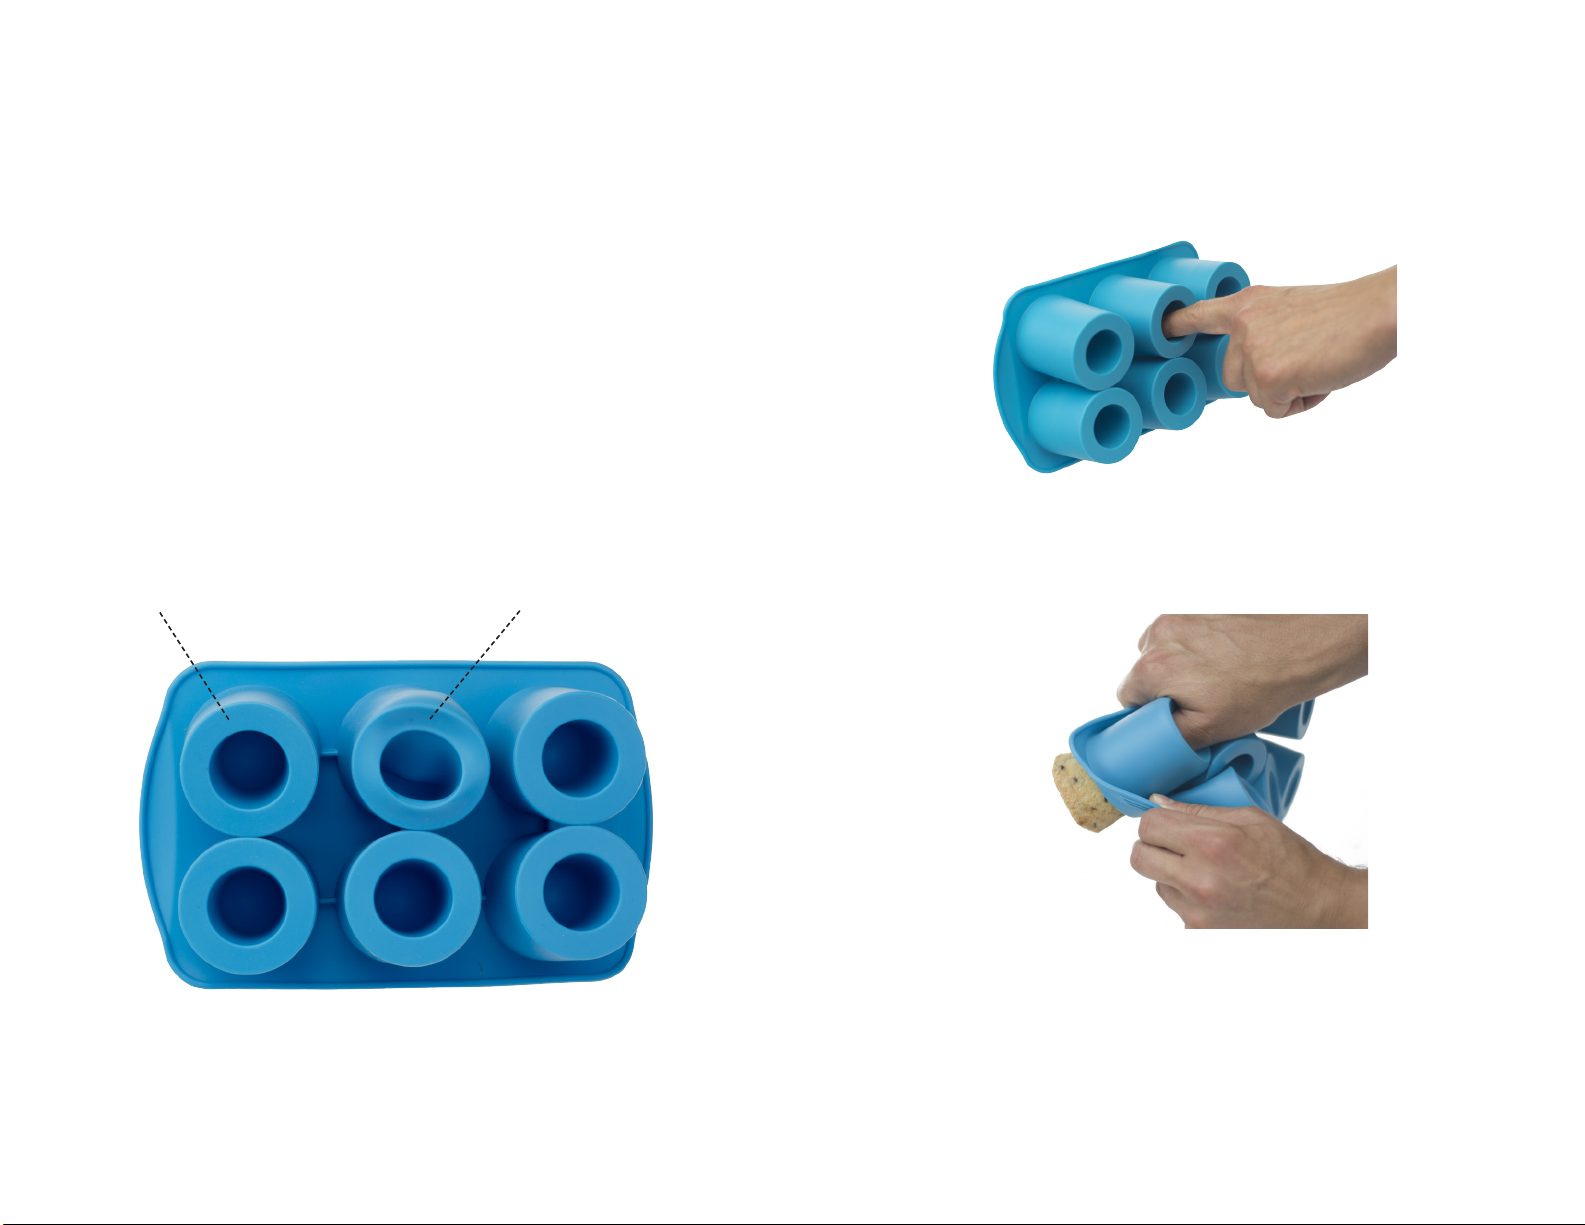
3. To form the dough into the cookie molds you need to carefully insert the dough a little quantity at a time and continually pack it in so there are no air pockets. Also try to
add enough dough so that it is slightly below the top line
because the dough will rise and you want a at bottom for
your cookie glass. Squeeze out any bulges that may have
deformed the silicone mold and reshape it to a nice cylinder
shape.
Correct form
Bulging
6. Remove from the oven, and let cool completely. Like the
special ingredients used, this step is unique to these cups
and unlike normal cookies. To test if the cookie is cool put
your ngers on the bottom inside of the mold (not the outside of it) and feel that is totally cool to the touch and not
warm at all.
7. To remove the cookies you want to keep the mold baking
side up and carefully remove the cookie by inserting ngers
into the bottom of the mold and pushing up slowly. Doing
this incorrectly will cause the cookie cups to crack.
8. Melt the chocolate for the inside of the shot glasses. (Please
see detailed explanation below).
9. Pour the melted chocolate into the well of each cookie. Let
4. Chill for 20 minutes before baking.
5. Baking time will vary with your oven and oven type (conventional oven vs convection oven.) So you will need some
experimentation. We suggest you start with about 30 min-
it sit for a minute, and then pour the excess chocolate back
into the pan. Chill cookie shots until the chocolate has set.
10. Mix together milk and vanilla extract, and serve inside each
cookie shot.
utes or until the cookies start to brown.
7 8
Page 6

Chocolate Melting
90 DAY LIMITED WARRANTY
For the inside chocolate barrier the easiest way to do it
is to get candy melts of any avor which are available at
most supermarkets. You can get a similar consistency
by melting together chocolate chips (or white chocolate
chips if you don’t want a chocolate avor) and shortening. 6 ounces of chocolate chips (or 5 ounces of white
chocolate chips) and 1 tablespoon of shortening should
be about right and you can double this recipe as needed.
You can also use chocolate bars like Hershey’s.
Melt the chocolate for the inside of the shot glasses.
Every microwave oven is different so it will take some
patience the very rst time to understand the time and
temperature you need to melt chocolate in your microwave oven. The key here is to go slow so you don’t burn
the chocolate.
Set your microwave to 50 percent power. Go for short
blocks of microwaving (30 to 45 second intervals) so that
you can check the progress more regularly and the chocolate will not be burnt. With each heating interval, stir
the chocolate with a spoon or plastic spatula to check
out the actual extent to which the chocolate has melted
(They won’t look melted, but that is okay, stir anyway).
Keep stirring and microwaving until it is a smooth consistency. Do not burn. If it is a bit clumpy simply add a
bit more shortening and melt.
Smart Planet warrants this appliance from failures in
its materials and workmanship for 90 days from the date of
original purchase provided the appliance is operated and
maintained in conformity with the instruction manual. Any
defective part of the appliance will be repaired or replaced
at Smart Planet’s discretion. Customers must provide proof
of purchase when submitting a warranty claim.
This warranty does not cover discoloration or any damage
to the, housing, graphics, and/or non-stick surfaces of the
appliance. This warranty is null and void, as determined
solely by Smart Planet, if the appliance is damaged through
accident, misuse, abuse, negligence, scratching, shipping
or if the appliance is altered in anyway.
If you think the appliance has failed or requires service within its warranty period, please email the Service Department
at [email protected] for further instructions. Please
include a description of the defect along with the date you
purchased the product and the original receipt with the
original purchase date. A receipt proving the original purchase date will be required for all warranty claims, hand
written receipts are not accepted. You may be instructed to
return the appliance for inspection and evaluation. Return
shipping costs are not refundable. Smart Planet is not responsible for returns lost in transit.
www.smartplanethome.com
Copyright 2015
Canoga Park: CA 91304
Service Center: [email protected]
v: I/2015
9 10
Page 7

11
 Loading...