

Page 1

Important Safety Precautions.......................2
What's Included..............................................3
Introduction....................................................4
Getting Started...............................................5
Copying Photos from a Memory Card.........6
Choosing an Album........................................7
Viewing Photos on a Memory Card..............7
Editing Albums...............................................8
SyncPix™ Settings..........................................9
Connect to a Macintosh...............................11
Connect a USB Flash Drive.........................11
Frequently Asked Questions........................12
Technical Specifications...............................14
Cleaning the LCD Screen............................15
Page 2

Important Safety Precautions
Always follow these basic safety precautions when using your digital
picture frame. This will reduce the risk of fire, electric shock, and
injury.
Warning: To reduce the risk of fire or shock hazard, do not expose
this product to rain or moisture.
Warning: To prevent the risk of electric shock, do not remove the
cover. There are no user-serviceable parts inside. Refer all servicing to
qualified personnel.
• The digital picture frame is for indoor use only.
• Unplug the digital picture frame before performing care and
maintenance.
• Do not block the ventilation holes on the back of the digital
picture frame at any time.
• Keep your digital picture frame out of direct sunlight and heat
sources.
• Protect the power cord. Route power cords so that they are
not likely to be walked on or pinched by items placed on or
against them. Pay particular attention to the point where the
cord attaches to the digital picture frame.
• Only use the AC adapter included with the digital picture frame.
Using any other power adapter will void your warranty.
• Unplug the power cord from the outlet when the unit
is not in use.
Page 3
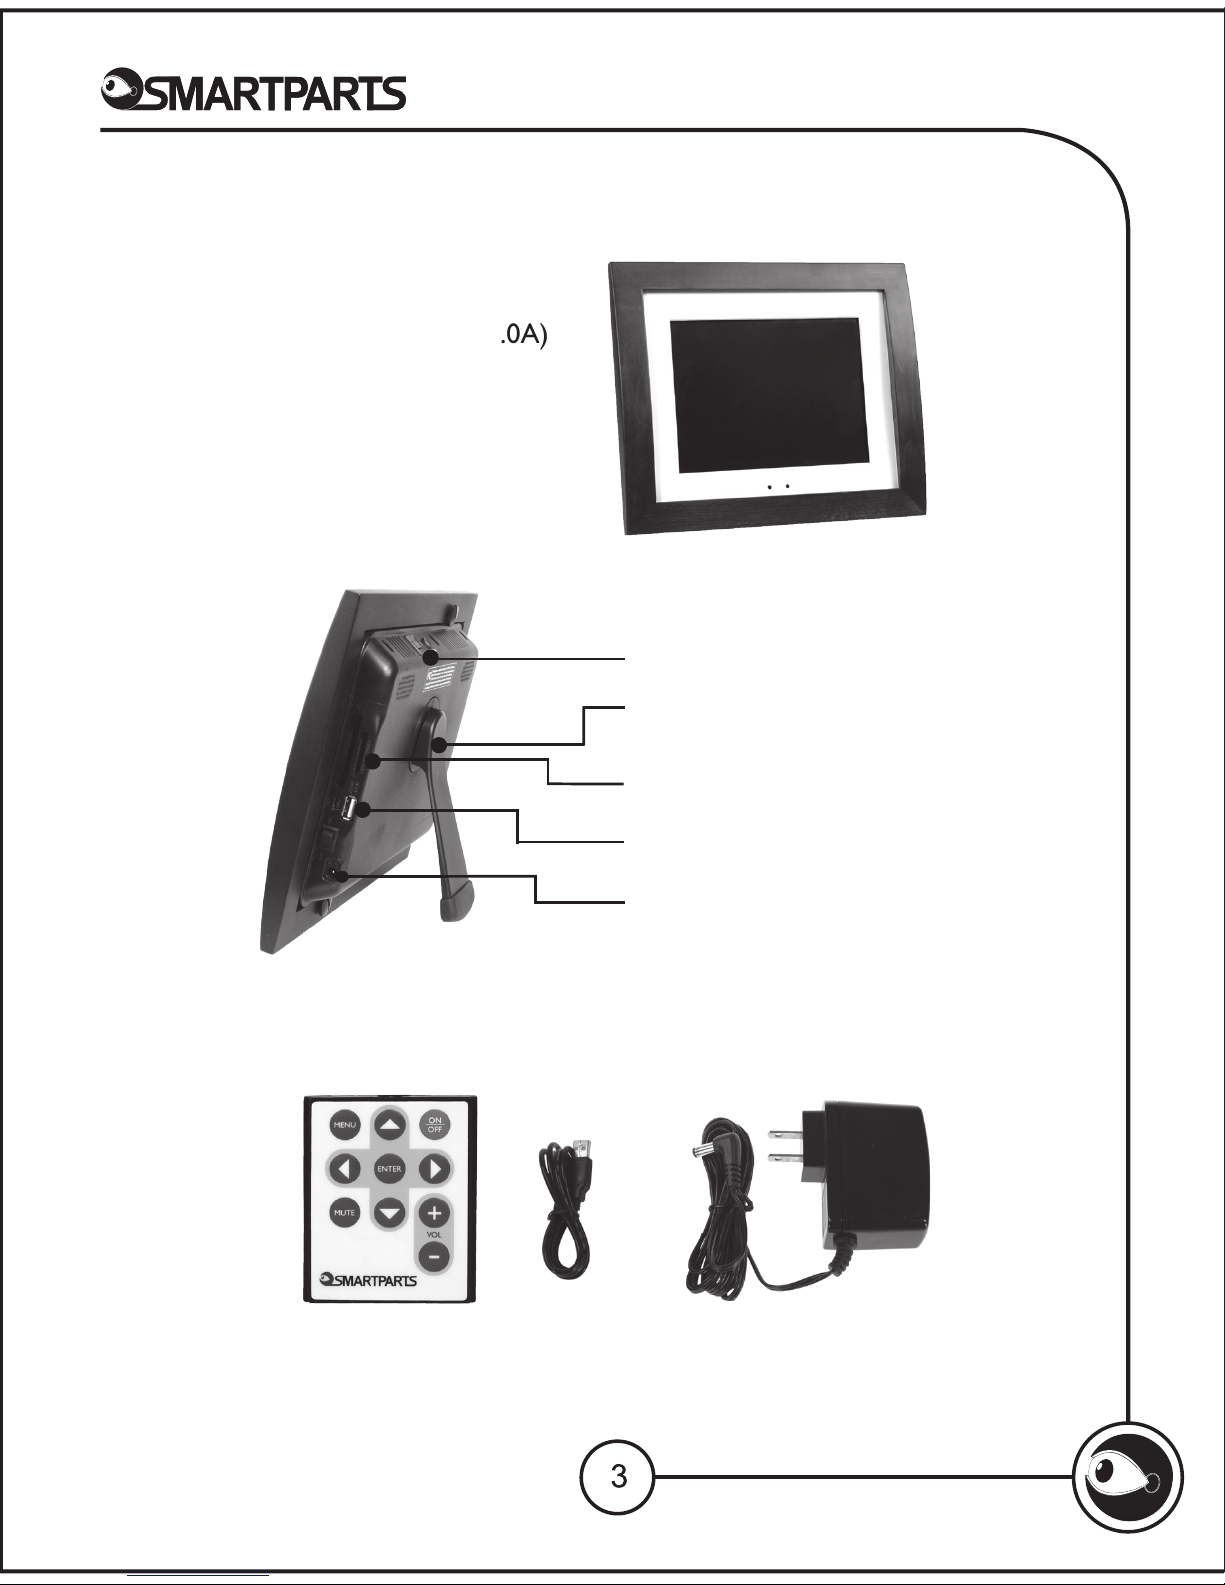
What's Included
Digital Picture Frame
AC Power Adapter (9V, 2.0A)
This User's Guide
Remote Control
USB Cable
Stand
5 Way button
Stand
Memory card slots
USB Ports
Power input jack
Page 4

Introduction
Congratulations on your new Smartparts SyncPix™ digital picture
frame! SyncPix™ frames include revolutionary technology that makes
transferring photos from a memory card to the frame virtually
effortless.
Your new picture frame does some amazing things.
It will automatically:
• Detect when a memory card is inserted.
• Determine if there are new photos on the memory card.
• Transfer copies of your photos to the frame’s built-in memory.
• Rotate your vertical photos so they are displayed the right way
on the screen.
• Store up to 3,000 photos on the frame’s memory.
• Put itself to sleep when no one is in the room.
In addition, your frame will let you sort your photos into albums and
arrange them in the order in which you want to view them. You can
customize your viewing experience in many other ways. To learn
more about your new digital picture frame’s features and take full
advantage of them, please take a few minutes to read this user manual.
Using the Control Buttons and Remote Control
All of the digital picture frame’s features can be accessed using either the
remote control or the buttons on the top of the frame. On-screen buttons are
selected using the Menu button on either the remote control or the frame.
Press the Menu button repeatedly to move between the buttons shown on the
screen. When the desired on-screen button is highlighted, press the OK button
on the top of the frame or the Enter button on the remote control to access that
menu function.Use the directional buttons surrounding the OK button to
navigate through items on the center of the screen - albums, images, settings.
4
Page 5
Getting Started
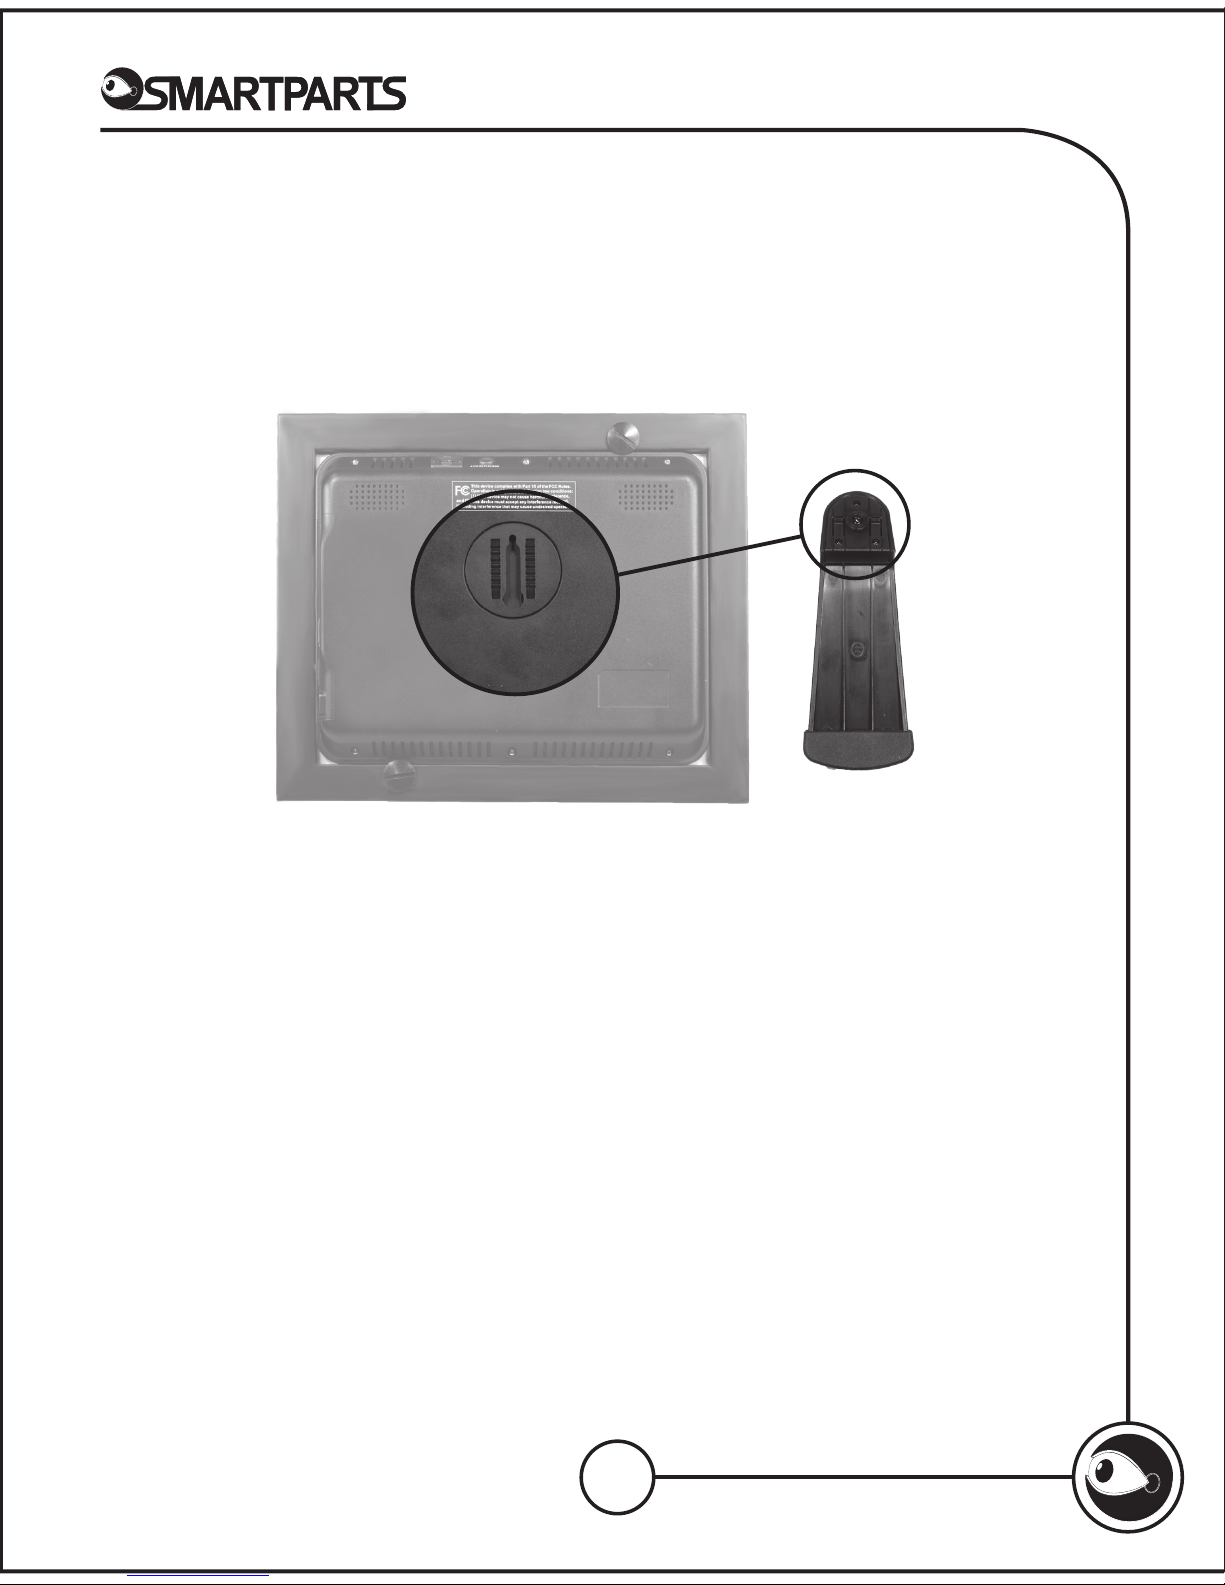
To begin using your SyncPix™ digital picture frame, start by connecting
the stand or hanging the frame on a wall.
The stand is connected by inserting the round knob at the top into the
opening on the back of the frame and sliding it upward. The display
angle of the frame can be adjusted by sliding the stand up or down. The
frame can be displayed vertically by rotating the stand 90 degrees
counter-clockwise.
The slot on the back of the frame can also be used to hang the unit on
a wall.
Connect the power adapter to the input jack on the right side of the
frame and plug the adapter into an active power outlet. Turn on the
power by pressing the switch just above the input jack.
After a few seconds, a slide show of pre-loaded photos will be displayed.
These photos can be deleted later.
5
Page 6
Copying Photos from a Memory Card
One of the key features of your SyncPix™ digital picture frame is the
ability to copy photos from a memory card to the frame’s built-in
memory automatically. This allows you to put your card back into your
camera and continue taking pictures while the digital frame displays
your photos.
To start the process, simply insert your memory card into the frame.
You will be prompted to "Copy" or "View." Select "Copy." The next
screen will allow you to select the photos you wish to copy.
To add all photos, use the Menu button to highlight the Add All button
on the screen and press Enter or OK.
To select photos, use the arrow buttons to highlight the photo you
want, and then press OK. When a photo has been selected, the border
will change from purple to green. Use the directional keys to select
additional images. When you are finished selecting, use the Menu button
to highlight the Add Selected button on the screen and press Enter or
OK.
Auto-Copy
The simplest way to add and view new photos on your frame is using the
auto-copy feature. Simply insert a memory card and wait 10 seconds after
the "Detected New Card" screen appears. All new images will be added to
the "General" folder automatically. Five seconds after the "Optimization
Complete!!!" message appears, the slideshow of the "General" folder will
automatically start.
How to Insert Your Memory Card
There are two memory card slots on the right side of the digital picture
frame. The smaller slot is for Secure Digital™, MultiMedia Card™,
Memory Stick™, Memory Stick Pro™, Memory Stick Duo™, Memory Stick
Pro Duo™ and xD Picture Cards. The larger slot will accept Compact
Flash cards. A card can be inserted in only one direction. It should fit
snugly when properly inserted. Do not force a card or you will risk damaging your digital picture frame and the card.
6
Page 7
IMPORTANT: The photos on the digital picture frame have a lower resolution than your originals. They should not be considered backup copies of
your originals. Do not delete your original photos from your memory card
until you have backed them up to another type of storage medium, such as
a computer hard drive.
Choosing an Album
If you would prefer to select a different album in which to store the
photos, press the Enter or OK button before the transfer begins. The
next screen will allow you to select individual photos to add, or give you
the option to add all of the photos.
To select photos, use the arrow buttons to highlight the photo you
want, and then press OK. When a photo has been selected, the border
will change from purple to green. When you are finished selecting, use
the Menu button to highlight the Add Selected button on the screen and
press Enter or OK.
The next screen allows you to choose the album in which you would
like to save your pictures. Use the arrow keys to “open” the album, and
then press OK to begin the transfer.
Viewing Photos on a Memory Card
To view photos on a memory card without copying them to the frame,
start by inserting the card into the appropriate card slot. When the
screen shows the message “SyncPix has detected a memory card,” press
the Menu button to highlight the View option, and then press Enter or
OK. All of the photos on the memory card will be displayed in a slide
show. To stop the slide show, press Menu.
Pausing and Stopping a Slideshow
At any time during a slide show you can pause the show briefly by pressing the Enter or OK button. The word “Paused” will appear in the upper
left corner of the screen. The slide show will resume after a few
seconds. To stop the slide show indefinitely, press the Enter or OK
button twice. The word “Stopped” will appear on the screen. To resume
the slide show, press Enter or OK again.
7
Page 8

Video Clips
Your SyncPix™ digital picture frame will play video clips from many
types of digital cameras. The videos will play during the slide show. No
special video mode is required. Best results are obtained with QVGA
resolution (320x240).
Adding Background Music to a Slideshow
Your SyncPix™ digital picture frame can play music in the background of
a slide show. To add music, simply copy one or more MP3 files onto the
frame’s internal memory. If the MP3 files are on a memory card, the
frame can transfer them to its internal memory just like photos.
Editing Albums
The albums screen is where you can change the order of your files or
delete them. Go to the albums screen by pressing Menu during the
slide show. Next, use the arrow buttons to highlight the album you
want to edit. Highlight the Edit button on the screen by pressing the
Menu button, and then press Enter or OK.
To move a photo, video or MP3 file, use the arrow buttons to
highlight the file. Press the Menu button until MOVE is highlighted and
then press Enter or OK. The border of the thumbnail image will change
to green. Now use the arrow buttons to move the file. When it is in
the proper position, press Enter or OK.
To delete a photo, video or MP3 file, use the arrow buttons to
highlight the file. Use the Menu button to highlight DELETE. Press Enter
or OK to delete the file.
Caution: The action of deleting a file cannot be undone.
To delete all files in an album, use the Menu button to highlight
DELETE ALL, and then press Enter or OK. A dialog box will appear,
asking you to confirm your decision. Use the arrow buttons to select
Yes or No, and then press Enter or OK.
To exit the Edit Mode, use the Menu button to highlight OK at the
bottom of the screen. Press Enter or OK.
8
Page 9

SyncPix™ Settings
From the albums screen, use the Menu button to highlight the Settings
icon, and then press OK. Use the up and down arrow buttons to navigate
to a setting, and the left and right buttons to change the setting. After
making any changes, you must select OK for the changes to take effect.
Select Back if you want to exit the screen without applying the changes.
Slideshow Speed
The speed of the slide show is the length of time that each photo is
displayed on the screen. The maximum is 30 minutes.
Number of Slideshow Images
This refers to the number of photos that will appear on the screen at one
time. The choices are 1,2,3,4, or Sequence. When Sequence is selected,
the number of images will vary – first one, then two, then three, then four.
Transition Effect
The way that photos transition from one to another during the slide
show can be selected here. The effects include:
Random
None
Inward
Outward
Gradual
Blocks
Down
Up
Left
Right
Slideshow Order
Here, you can choose between Ordered and Random. When Ordered is
selected, photos will be displayed in the slide show in the order in which
they appear in the album. When Random is selected, photos will be
displayed in no particular order.
Sleep Delay
This setting allows you to determine the length of time before the frame
will go into sleep mode after no motion is detected. When it is set to Off,
the frame will not enter sleep mode.When the frame enters sleep mode
the screen will turn off. The frame can be woken up by either
waving/walking in front of it or by pressing any button on the remote
control or keys on top of the frame.
9
Page 10

Volume
The volume of background music and video clips can be set between 0
and 15. Note that volume also can be adjusted with the use of the + and
– buttons on the remote control. However, if the remote control is not
available, the volume must be adjusted here.
Advanced Operations
In addition to the basic functions described previously, you can connect
the digital picture frame to your computer to copy files to the built-in
memory.
Using the SyncPix™ Desktop Tool
Download the latest SyncPix™ Desktop tool by connecting to
http://www.syncpix.com. The SyncPix™ Desktop Tool is free with the
purchase of any SyncPix™ digital picture frame. SyncPix™ Desktop Tool
is designed to help transfer images and other media from your desktop
to your digital picture frame via a USB cable. Using this tool is the best
way to transfer images from your computer to your frame.
Note: This program is not compatible with Macintosh computers.
Manually Transferring Files to a Windows Computer
To copy files between your computer and the digital picture frame,
perform the following steps:
1. Plug in and turn on the digital picture frame.
2. Connect the small end of the USB cable to the USB port on the
side of the digital picture frame.
3. Connect the larger end of the USB cable to a USB port on your
computer.
4. Open My Computer on your Desktop. A window showing all
drives connected to your computer opens.
5. The digital picture frame’s built-in memory is labeled SyncPix.
6. Double-click the SyncPix drive to display the folders and files on
the internal memory.
7. To copy files from the frame, simply select them and drag them to
the desired location on your computer.
8. To copy photos from your computer to the frame; first locate the
files on your computer. Most cameras and graphic programs store
photos in the Windows My Pictures folder. If you didn't move
them somewhere else, they are probably there.
9. Select the files you wish to copy, choose File > Copy, and then
move your cursor back to the open window for the frame.
10. Click in the window, and choose File > Paste.
10
Page 11

Note: Photos transferred manually with a USB cable will not be
optimized for use with the frame. We recommend copying photos and
other media to your frame by means of inserting a memory card into
the appropriate slot.
Folders
Your SyncPix™ digital picture frame’s internal memory has folders in
which pictures, music and video clips are stored. The folder names
correspond to the names of the albums. When copying files to the frame
manually, be sure to place them into the appropriate folder. CAUTION: Do
not change the folder names or add new folders. Do not alter the two files
named cstatus.dat and syncpix.ini.
Disconnect the Digital Picture Frame from the Computer
It is important not to just unplug the digital picture frame when you are
done transferring files. It can seriously damage the memory.
1. In Windows, look for the “Safely Remove Hardware” icon in the
system tray at the bottom right corner of the screen.
2. Click on the icon and select “Safely Remove USB Mass Storage
Device.”
3. Wait for the message “Safe to Remove Hardware” to appear before
disconnecting the USB cable.
Connect to a Macintosh
You can also copy files from your Macintosh computer to your digital
picture frame.
1. Use the included USB cable to connect your digital picture frame
to your Macintosh. The computer will recognize the digital picture
frame as an external storage device.
2. Drag and drop files between the two devices as you normally move
photo files.
3. To safely disconnect the digital picture frame from your Macintosh,
select the digital picture frame's icon on your desktop and press
Command-e to eject the disk. When the icon is no longer on the
desktop, it is safe to unplug the USB cable.
Connect a USB Flash Drive
Your digital picture frame will see a USB Flash Drive the same way it sees
memory cards.
11
Page 12

Frequently Asked Questions:
Q: What should I do if the digital picture frame does not respond to
the buttons on the remote control or on the frame?
A: If your digital picture frame seems unresponsive, please wait several
seconds to allow it to process your request. If it still does not
respond, turn the unit off and restart it.
Q: Why does the digital picture frame stop on a certain picture or
video file during the slide show?
A: The picture or video file might be corrupted or of a format that is
not supported by the digital picture frame. Supported file types
include .jpg, .mp3, and .avi. Try removing the file that is causing the
problem.
Q: Why were some vertical pictures not rotated when they were
copied to the frame’s internal memory?
A: SyncPix™ uses data that is encoded in digital picture files to know
which way the camera was oriented when the picture was taken.
Some model cameras may not have the capability of capturing this
data. Also, pictures that were edited on a computer may no longer
have this information intact. In this case, the photo should be
rotated with a computer program and resaved in its proper
orientation.
Q: How is the frame able to store thousands of pictures on its internal
memory?
A: High resolution pictures are required when making large photo-
graphic prints, but not when displaying pictures on an LCD screen.
SyncPix™ makes copies of your photos that are much smaller than
the originals. This allows you to fit many more picture files onto the
built-in memory than you might think possible.
12
Page 13

Q: Do I need a computer to copy music and videos to the
frame’s internal memory.
A: No. If the music and video files are stored on a memory card or
USB flash drive, SyncPix™ will copy them to the built-in memory
along with any photos. Unlike photos, music and video files are
not changed in any way.
Q: Can my SyncPix™ frame be upgraded when new firmware is
available?
A: Yes. All SyncPix™ frames are fully upgradeable. Visit
www.syncpix.com to download the latest firmware version.
Q: Why is the slideshow operating slowly? / Why are thumbnails
displayed slowly?
A: SyncPix™ optimizes pictures only when they are transferred with
a memory card. If you copied full-sized image using a USB connec
tion, SyncPix™ will operate significantly slower. We recommend
transferring images using a memory card and the built-in transfer
mechanism.
13
Page 14
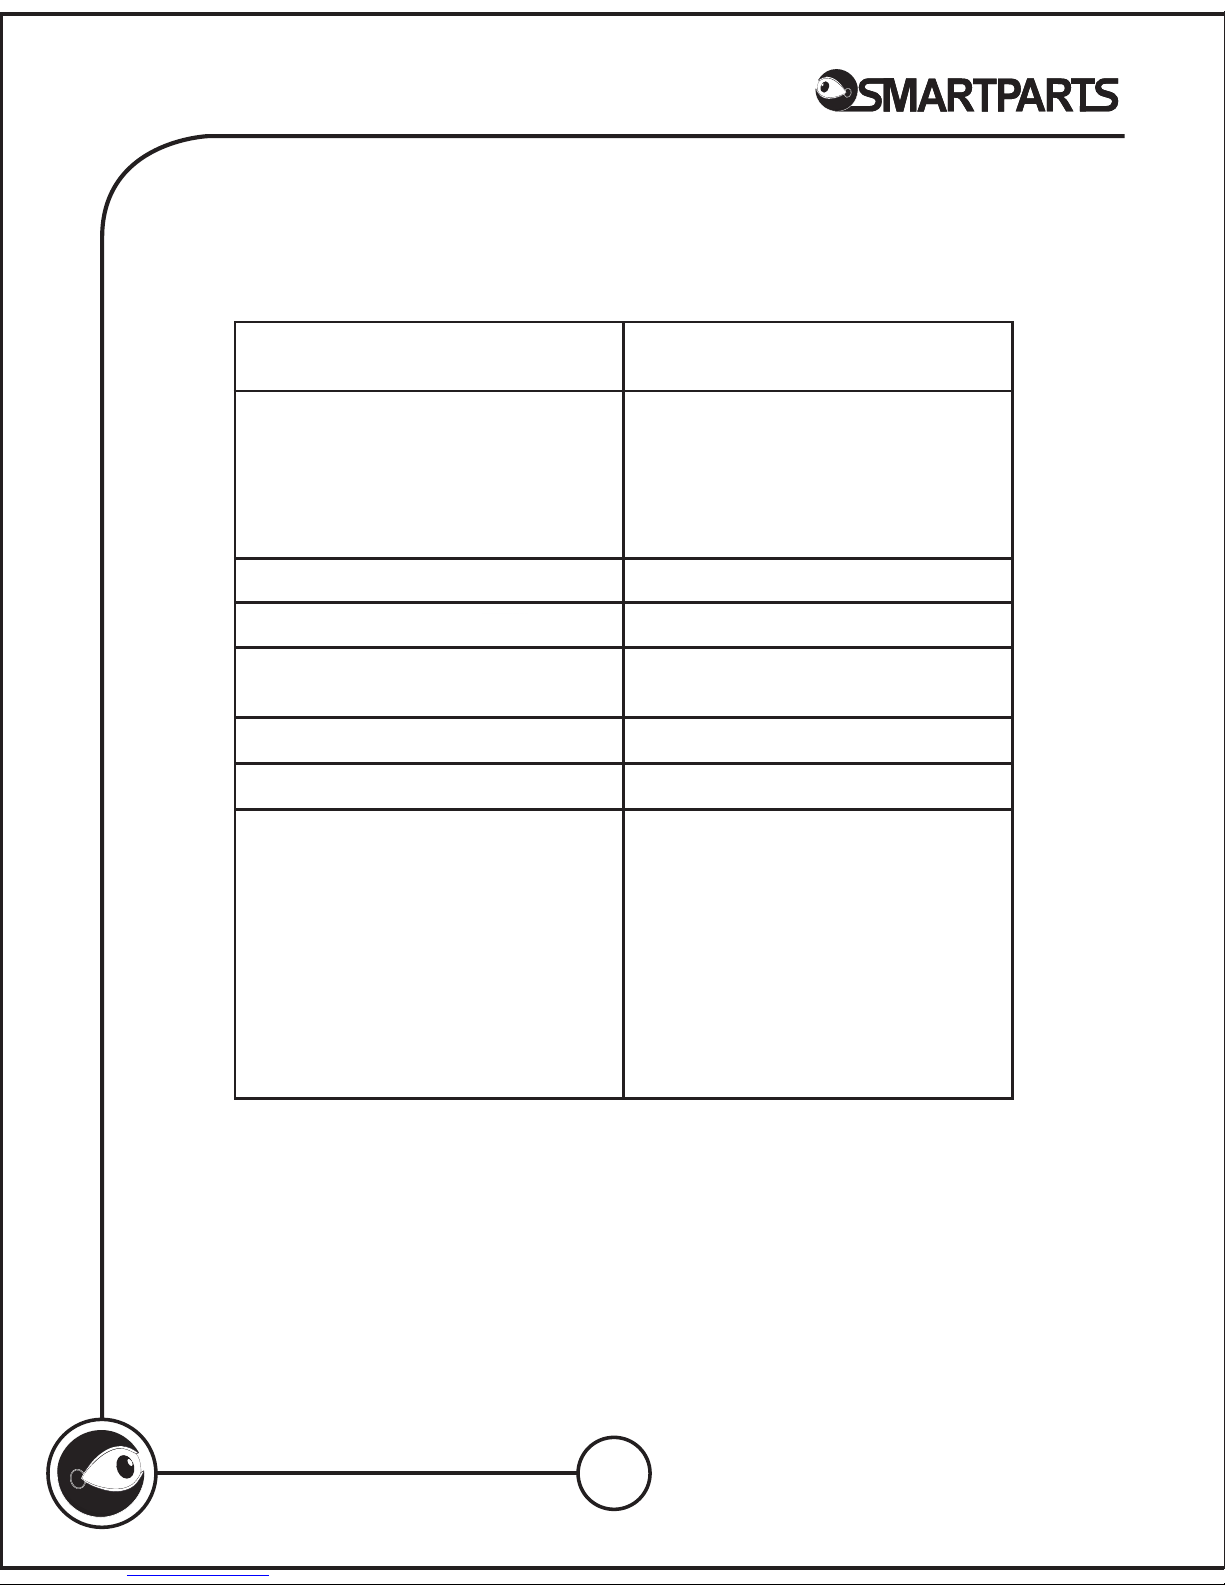
Technical Specifications
Product :
Input Formats:
File Format:
JPEG, AVI Motion JPEG, MPEG-1, MP3
Internal Memory:
256MB
USB Ports:
Mini-USB (for f ile transfer)
USB (for USB Flash Drives)
Power Input:
100V -240V AC, 50~60HZ
Power Output:
9V DC, 2.0 A
Features:
8” LCD Digital Picture Frame with
SyncPix™™ technology
Secure Digital™ , Multi Media Card™ ,
Compact Flash™ ,xD-Picture Card™ ,
Memory Stick™ ,Memory Stick PRO™,
Memory Stick Duo™, Memory
Stick PRO Duo™ and USB Flash Drives
Warranty
Smartparts, Inc. warrants its digital picture frames against manufacturing defects for a period of 90 days from date of purchase.
For technical support, please visit our web site at:
www.smartpartsproducts.com.
Automatic copying of photos, music and
video files
Auto-optimization of photos
Auto-rotation of vertical photos
Extendable/removable stand
Motion sensor for automatic on/off
Remote control
Variable speed slide show
Range of transition styles for slide show
14
Page 15

Cleaning the LCD Screen
Treat the screen gently. The screen is made of glass and can be
scratched or broken.
To clean fingerprints or dust from the LCD screen, we recommend
using a soft, non-abrasive cloth such as a camera lens cloth.
If you use a commercial LCD Cleaning Kit, do not apply the cleaning
liquid directly to the LCD screen. Clean the LCD screen with cleaning
cloth moistened with the liquid.
Cleaning the Digital Picture Frame
Clean the outer surface of the Digital Picture Frame (excluding the
screen) with a soft cloth dampened with water.
15
 Loading...