

Smart Openers ECO, Smart Lifter ECO Installation Manual
WARNING: IT IS VITAL FOR THE SAFETY OF ALL
PERSONS INSTALLING AND USING THIS OPENER TO
FOLLOW THE INSTALLATION INSTRUCTIONS AND
SAFETY WARNINGS. FAILURE TO COMPLY MAY RESULT
IN SERIOUS PERSONAL INJURY AND/OR PROPERTY
DAMAGE AND FAILURE OF THE OPENER SYSTEM.
Smart Lifter ECO
Sectional Door Opener
INSTALLATION MANUAL
-2-
Important Safety Warnings
The Smart Lifter ECO garage door opener described in
this manual is designed for the automation of residential
sectional overhead and tilt doors to a maximum size of
18m2 that are properly balanced and operating smoothly.
Any other use is considered improper and will void the
warranty.
WARNING:
You are carrying out operations on machine systems
classied in the automatic gates and doors category and
as such failure to comply with the relevant safety rules
may result in serious personal injury and/or property
damage. Reference to the safety rules can be found on
pages 2-4 of the owners manual and should be read and
understood prior to installation.
Only qualied personnel should install and service the
equipment. It is the responsibility of the installer to adhere
to all relevant safety standards.
The Smart Lifter ECO garage door opener is designed
and manufactured to meet all current Australian
standards and it is essential that the installer also installs
the equipment in accordance with all local and Australian
regulations.
Unqualied personnel or those who do not know the
occupational health and safety standards applicable
to the automatic gates and doors category must under
no circumstances carry out installations or implement
systems.
Persons who install or service the equipment without
observing all the applicable safety standards will be
held responsible for any damage, injury, cost, expense
or claim whatsoever suffered by any person as a result
whether directly or indirectly from failure to install the
system correctly and in accordance with the relevant
safety standards and installation manual.
For a more detailed list of the Safety Warnings and
Safety Issues associated with the installation and use
of a Smart Lifter ECO garage door opener refer to the
safety warnings in the OWNERS MANUAL.
Contents
The Smart Lifter ECO garage door opener requires a
240VAC 50Hz power input and has a 24V DC motor
and can provide remote control and automatic modes
for operation. When the door is in operation, movement
can be interrupted by activation of the safety inputs:
transmitter, wall button (if tted) and photo beams (if
tted).
Limits set open and close positions and braking during
the end of the travel cycle reducing speed and noise.
A 433.22MHz radio receiver is built into the circuit board
and the rolling code is memorised via the self-learning
technique. As an alternative to the built-in receiver the
opener will accept any of the range of stand alone radio
receivers. The opener has been designed to provide
maximum reliability, safety and exibility of use.
IMPORTANT:
Before commencing installation please read all of the
instructions carefully and make sure you are familiar
with the safety warnings included in this manual and
in the OWNERS MANUAL.
Description
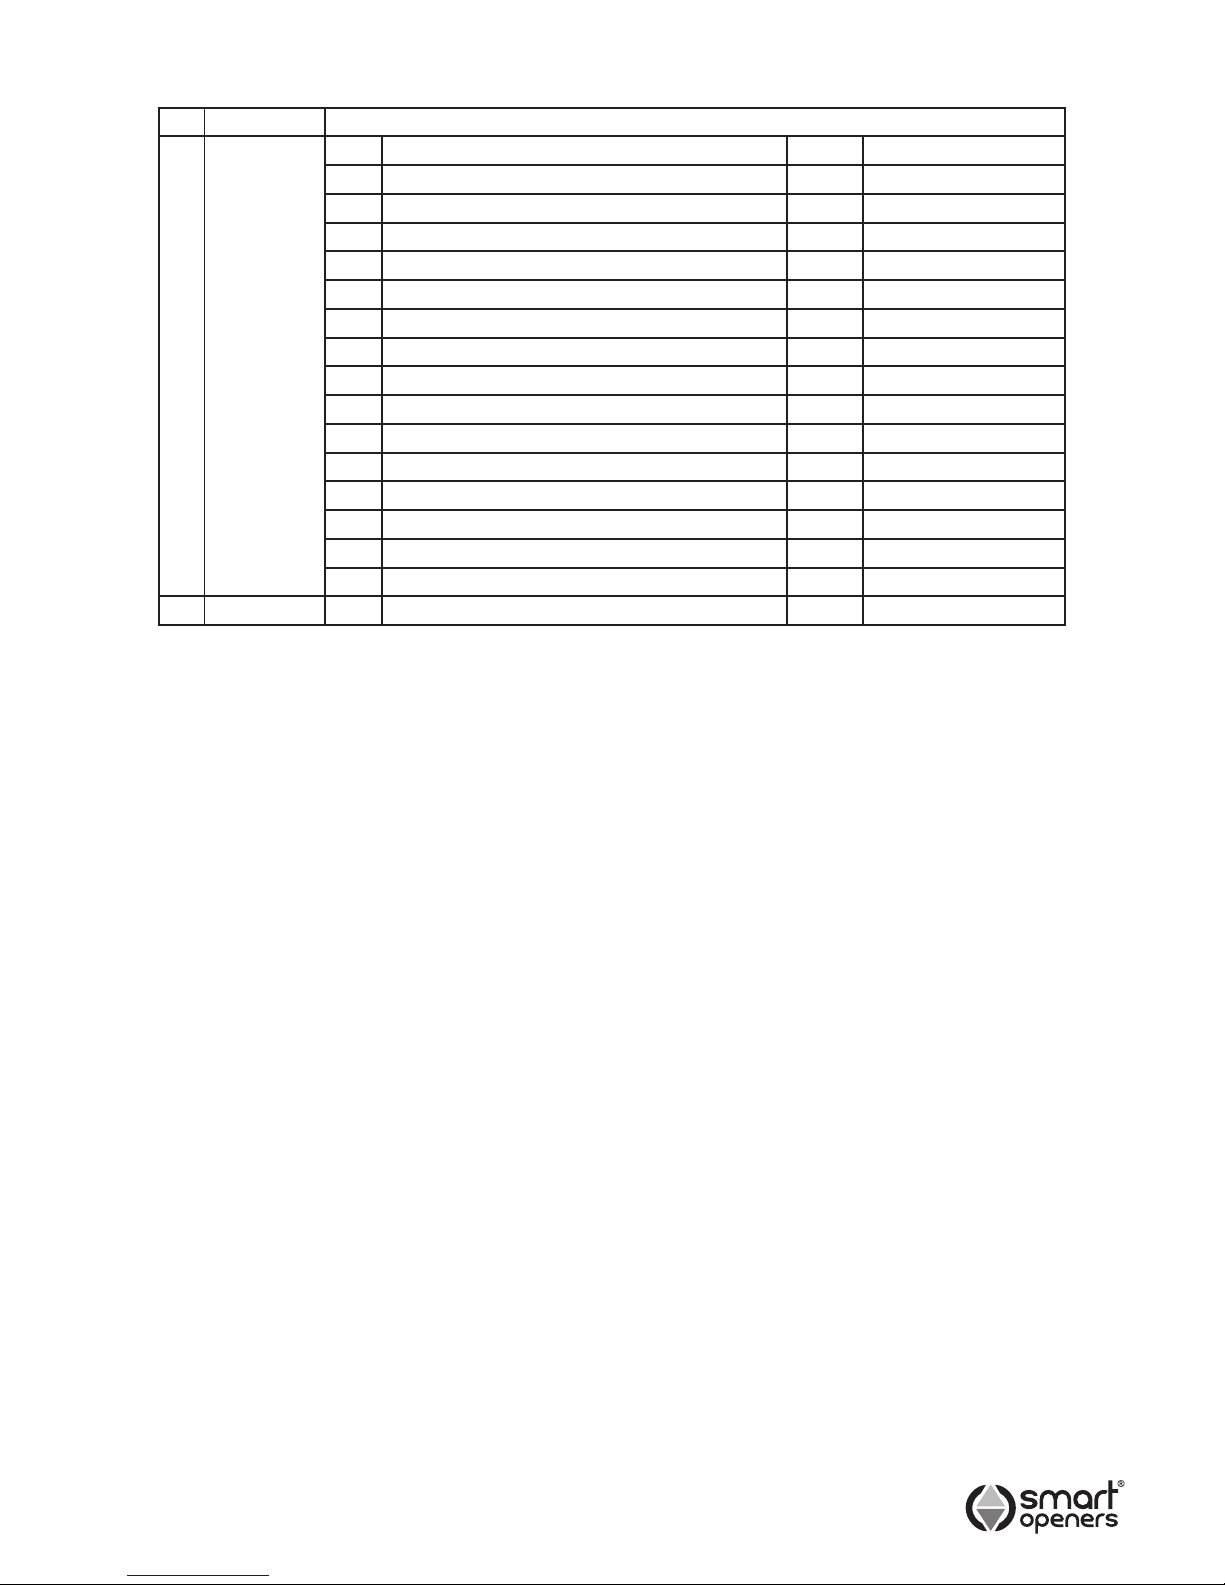
No Package Part
1 Motor No Description Qty Remark
1 Motor 1 Set
2 Transmitter 2 Pcs 4 Button
3 Remote Wall Switch 1 Pc 2 Button
4 Remote Wall Switch Bracket 1 Pc
5 Disengagement Cord 1 Pc
6 Bracket – Wall 1 Pc For Track
7 Bracket – Door 1 Pc For Hockey Stick
8 U-Bracket 2 Pcs For Track/Motor Assy
9 Hockey Stick 2 Pcs
10 Strapping 2 Pcs For Rail
11 Bolts/Nuts 1 Set
12 Installation Manual 1 Pc
13 Owners Manual 1 Pc
14 Quick Start Guide 1 Pc
15 Risk Of Entrapment Label 1 Pc
2 Rail 1 Extrusion With Chain 1 Set
© September 2011 Smart Openers Pty Ltd
-3-
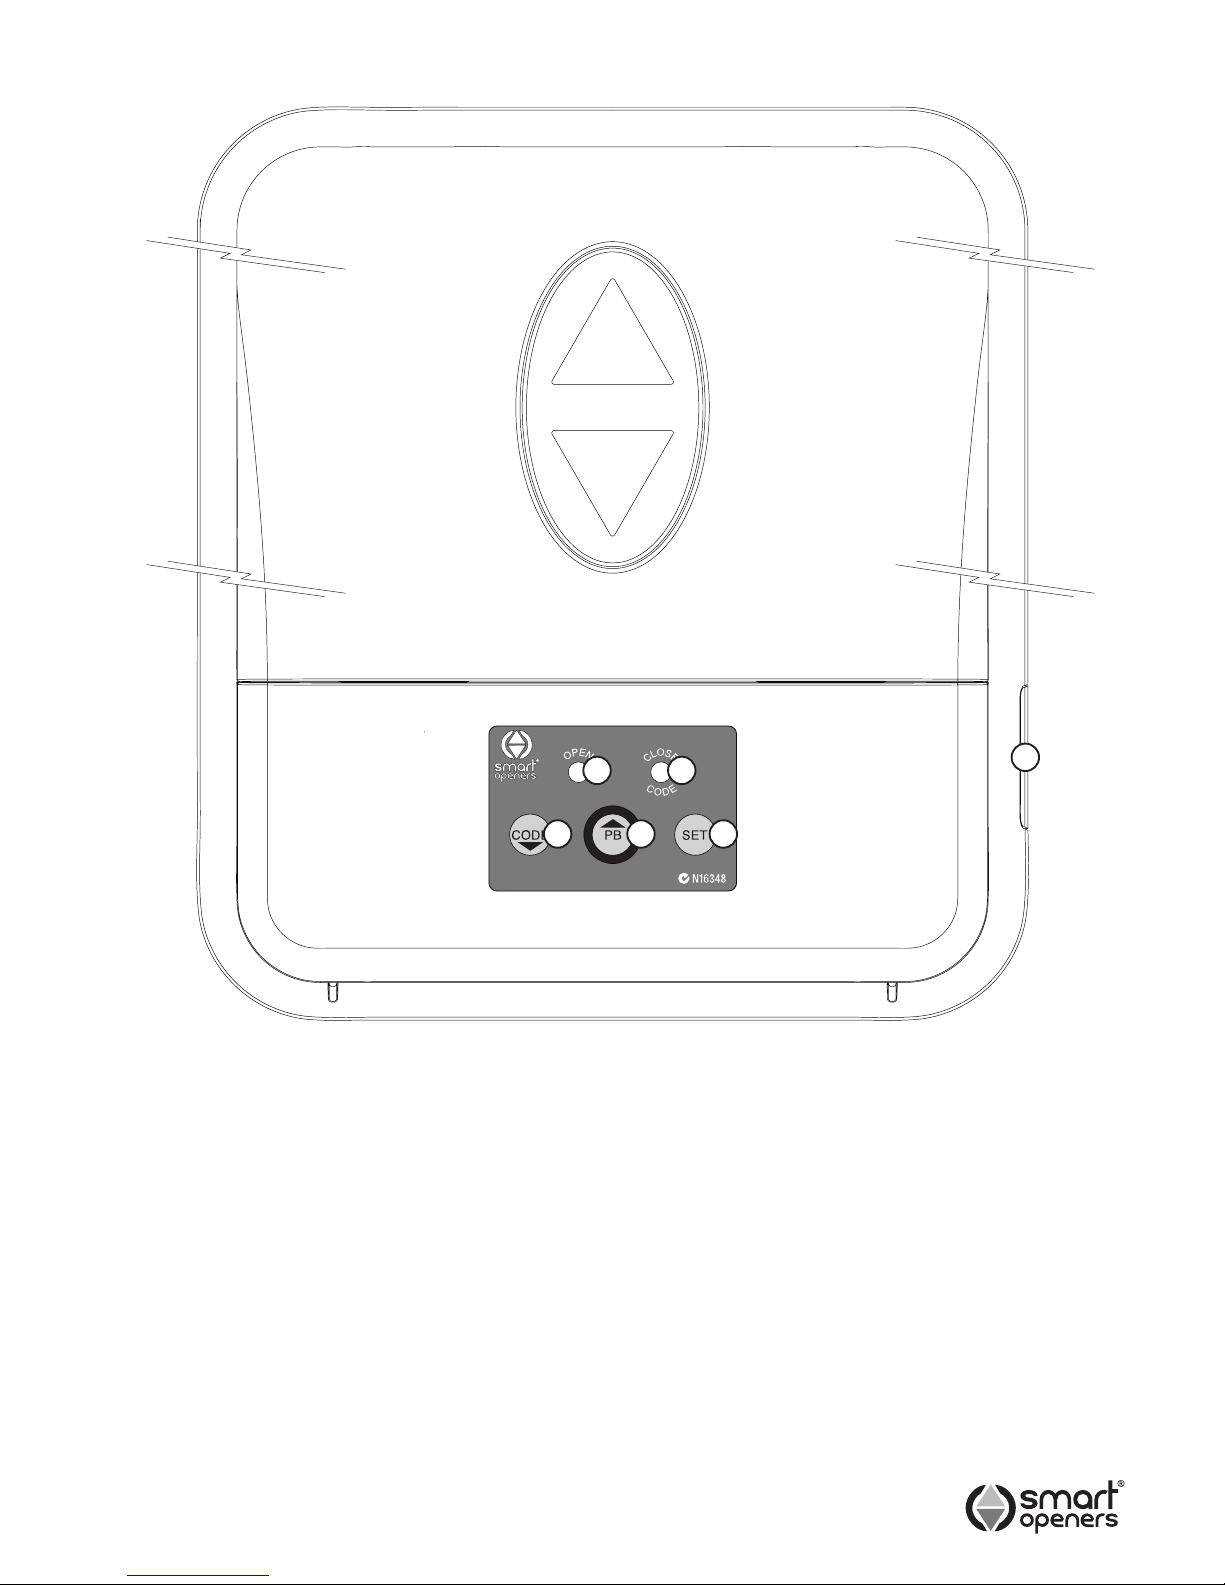
Operating Controls
1 CODE Button - used to store transmitter code.
2 PB (Push Button) - used to open/stop/close the door.
3 SET Button - used to set limits and save settings.
4 Yellow LED - Flashes during open cycle and indicates
photo beam mode during set up.
5 Red LED - Flashes during close cycle and indicates
force margin sensitivity during set up.
6 Input Terminal Block - used for connecting photo
electric safety beam or
external push button trigger.
1 2
4
3
5
6
© September 2011 Smart Openers Pty Ltd
+24V
PB
PE
+24V
GND
-4-
Before Installation
1 Read the instructions carefully.
2 Make sure the door structure is solid and suitable to
be motor driven.
3 Make sure that when the door is moving there are no
friction points.
4 The door must be properly balanced and must be
easily lowered and raised by hand.
5 A 240V, adequately protected 3-pin power outlet must
be near where the Smart Lifter ECO opener is going
to be installed.
Remember there are specic standards that have to
be strictly followed regarding the safety of electrical
installations for automatic gates and doors.
As well as the legal requirements and standards that
must be adhered to, please take note of the following
points to ensure maximum safety and reliability of your
installation.
6 Prior to installing check the surrounding environment.
Carefully evaluate any hazards there could be from
physical damage (transiting vehicles, parts of trees
falling etc.), possible contact with foreign bodies
(insects, leaves, etc.), ooding hazards or any others
exceptional events.
7 Check that the main voltage is the same as that given
on the rating plate and in this manual.
8 Check there is suitable electrical protection against
short circuits/power spikes and proper earthing on the
mains supply.
Remember the unit has mains voltage running through it
(electrocution hazard, re hazard).
9 Take care with the opener; parts may be subject to
damage if abused.
10 Make sure you have all the necessary installation
materials and that they are suitable for this kind of use.
11 Read all the instructions thoroughly and make sure
they are understood before attempting to install the
Smart Lifter ECO.
12 Before starting the installation, carefully analyse all the
risks relating to automating the door. Verify that the
door to be automated is in a sound condition and that
the mechanisms are in good working order; observe
the safety margins and minimum clearances.
13 Evaluate with particular care the safety devices to be
installed and where to install them; always install an
emergency stop device for interruption of power to the
opener if required.
14 Once the risks have been analysed, install the
Smart Lifter ECO opener and relative safety devices,
emergency stop and/or photo electric cells.
Important: For additional safety Smart Openers Pty Ltd
strongly recommends the tting of photo electric safety
beams on all installations.
15 When installing the Smart Lifter ECO opener, strictly
follow all the instructions given in the instruction
manual. If some points or procedures in this manual
are not very clear do not install the unit until all doubts
have been cleared up with our technical department.
© September 2011 Smart Openers Pty Ltd
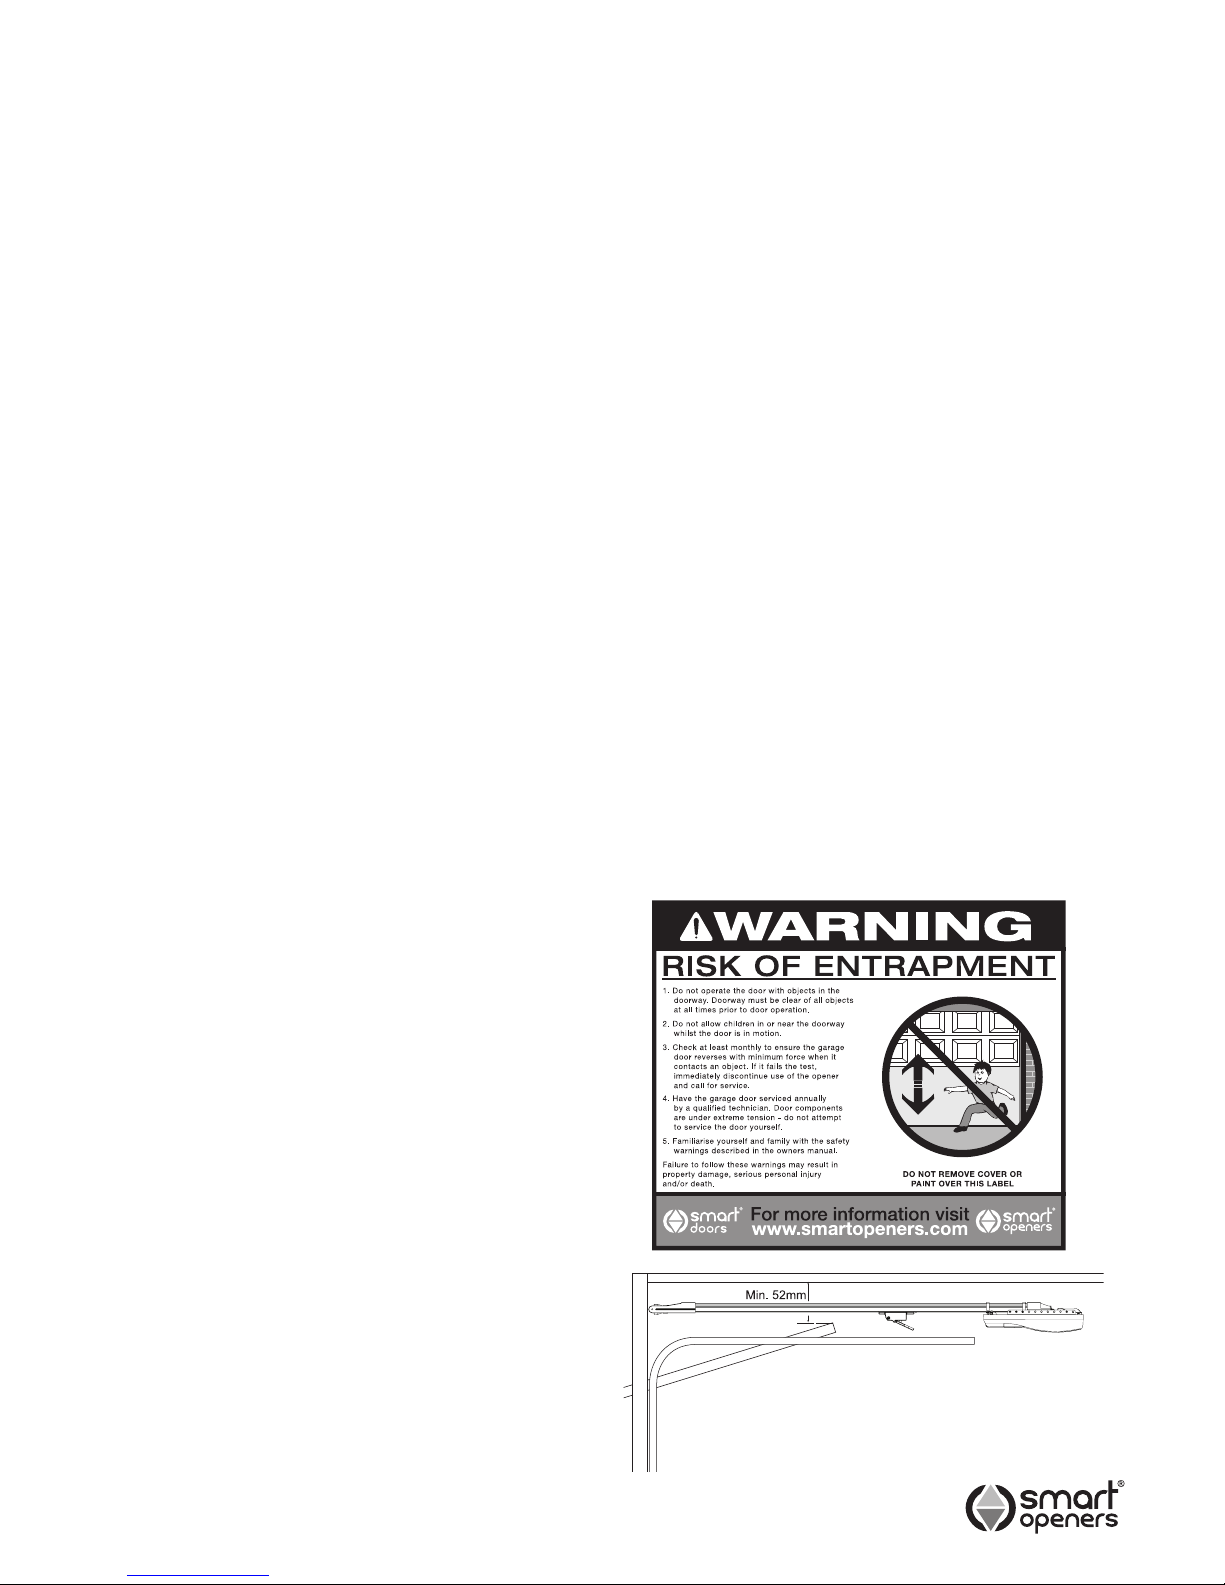
Risk Of Entrapment Label
1 The Risk of Entrapment Label must be attached to the
door in a suitable, prominent location so as to inform all
users of the dangers involved in owning and operating
an automated garage door. We provide this label for
everyone’s safety and it only takes seconds to install.
So as a responsible garage door installer please make
sure this is completed before leaving the job.
THE FITTING OF THIS LABEL IS MANDATORY.
2 Once set up is complete and the safety obstruction
margin test is carried out (see page 10), please
ensure that this warning and all safety warnings
described in the owners manual are explained to the
user to ensure that they are clearly understood and
followed.
Headroom Requirement
The Lifter ECO requires a minimum headroom of just
52mm (42mm for the rail plus an extra 10mm clearance)
between the top of the door’s highest point of travel and
the ceiling.
Fig. 1
 Loading...