

Page 1
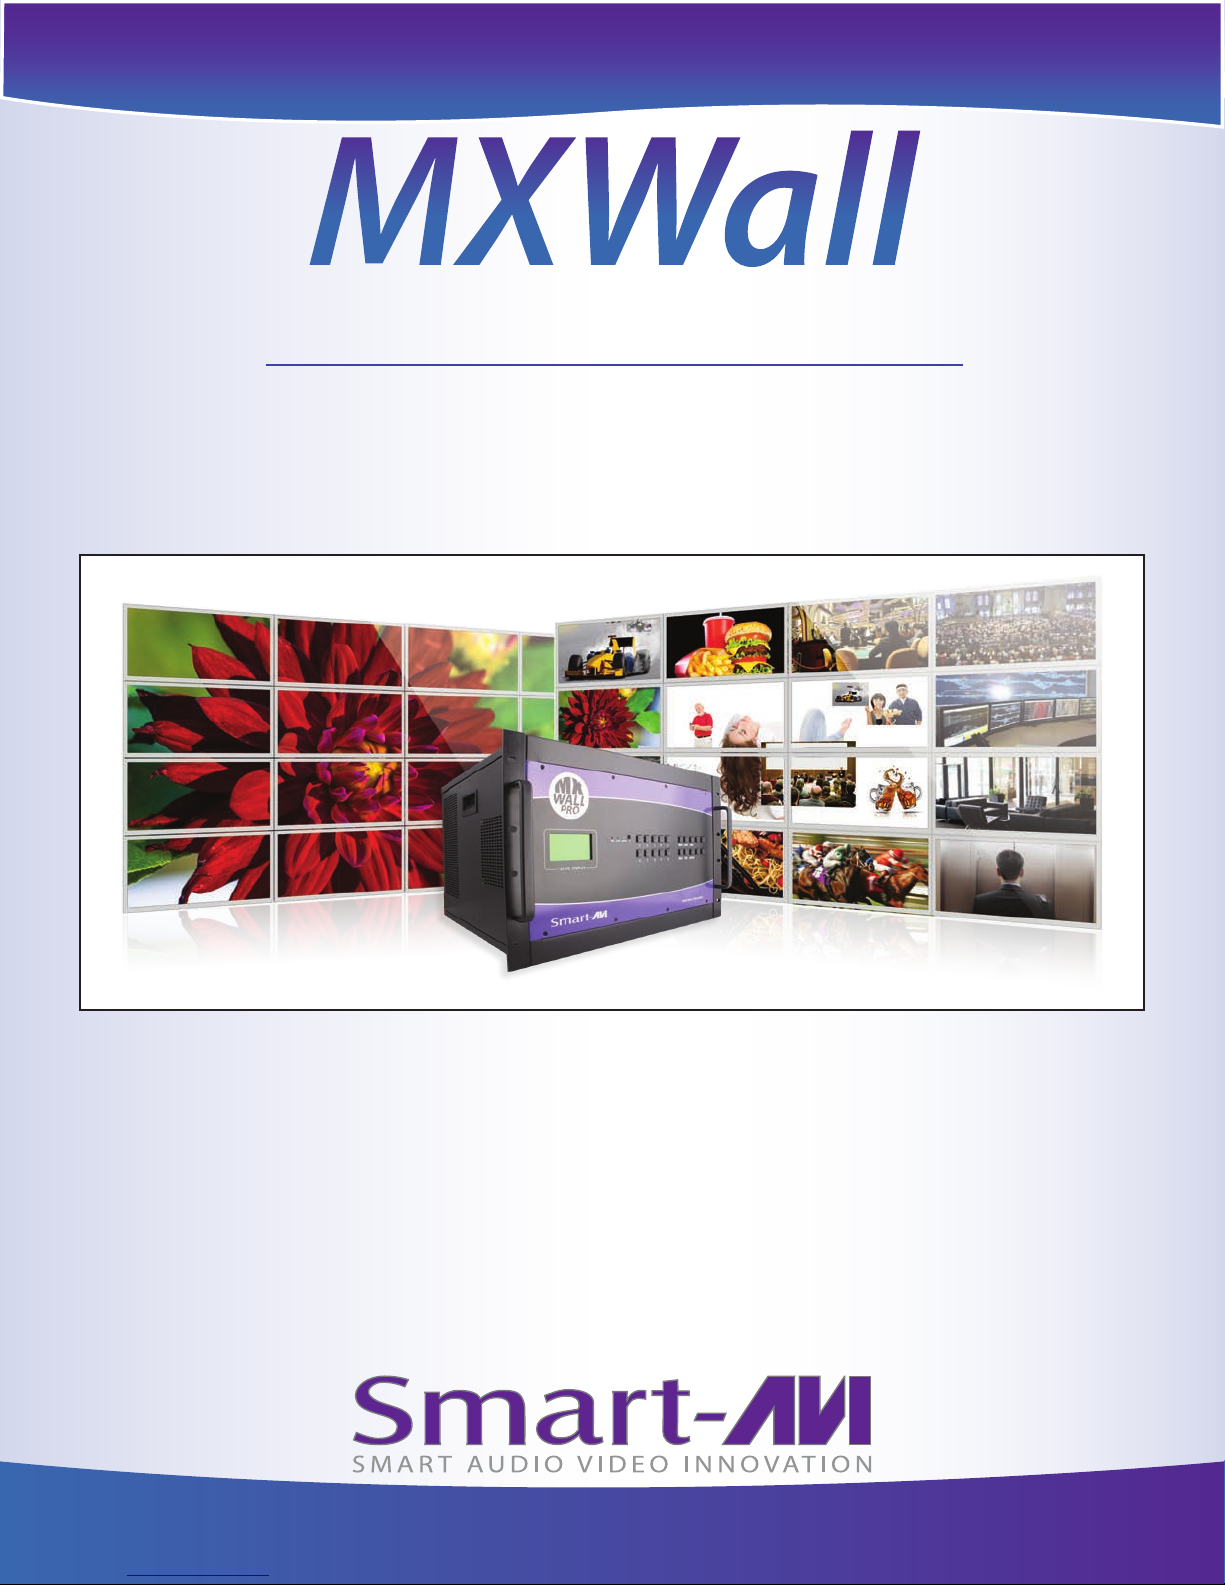
MXWall
Multi-Format Video Wall Processor
32x32 HD Video Wall Controller
HDMI, VGA, Composite, S-Video and Y/Pb/Pr Inputs
Integrated USB Media Player
Installation &
User Guide
Page 2
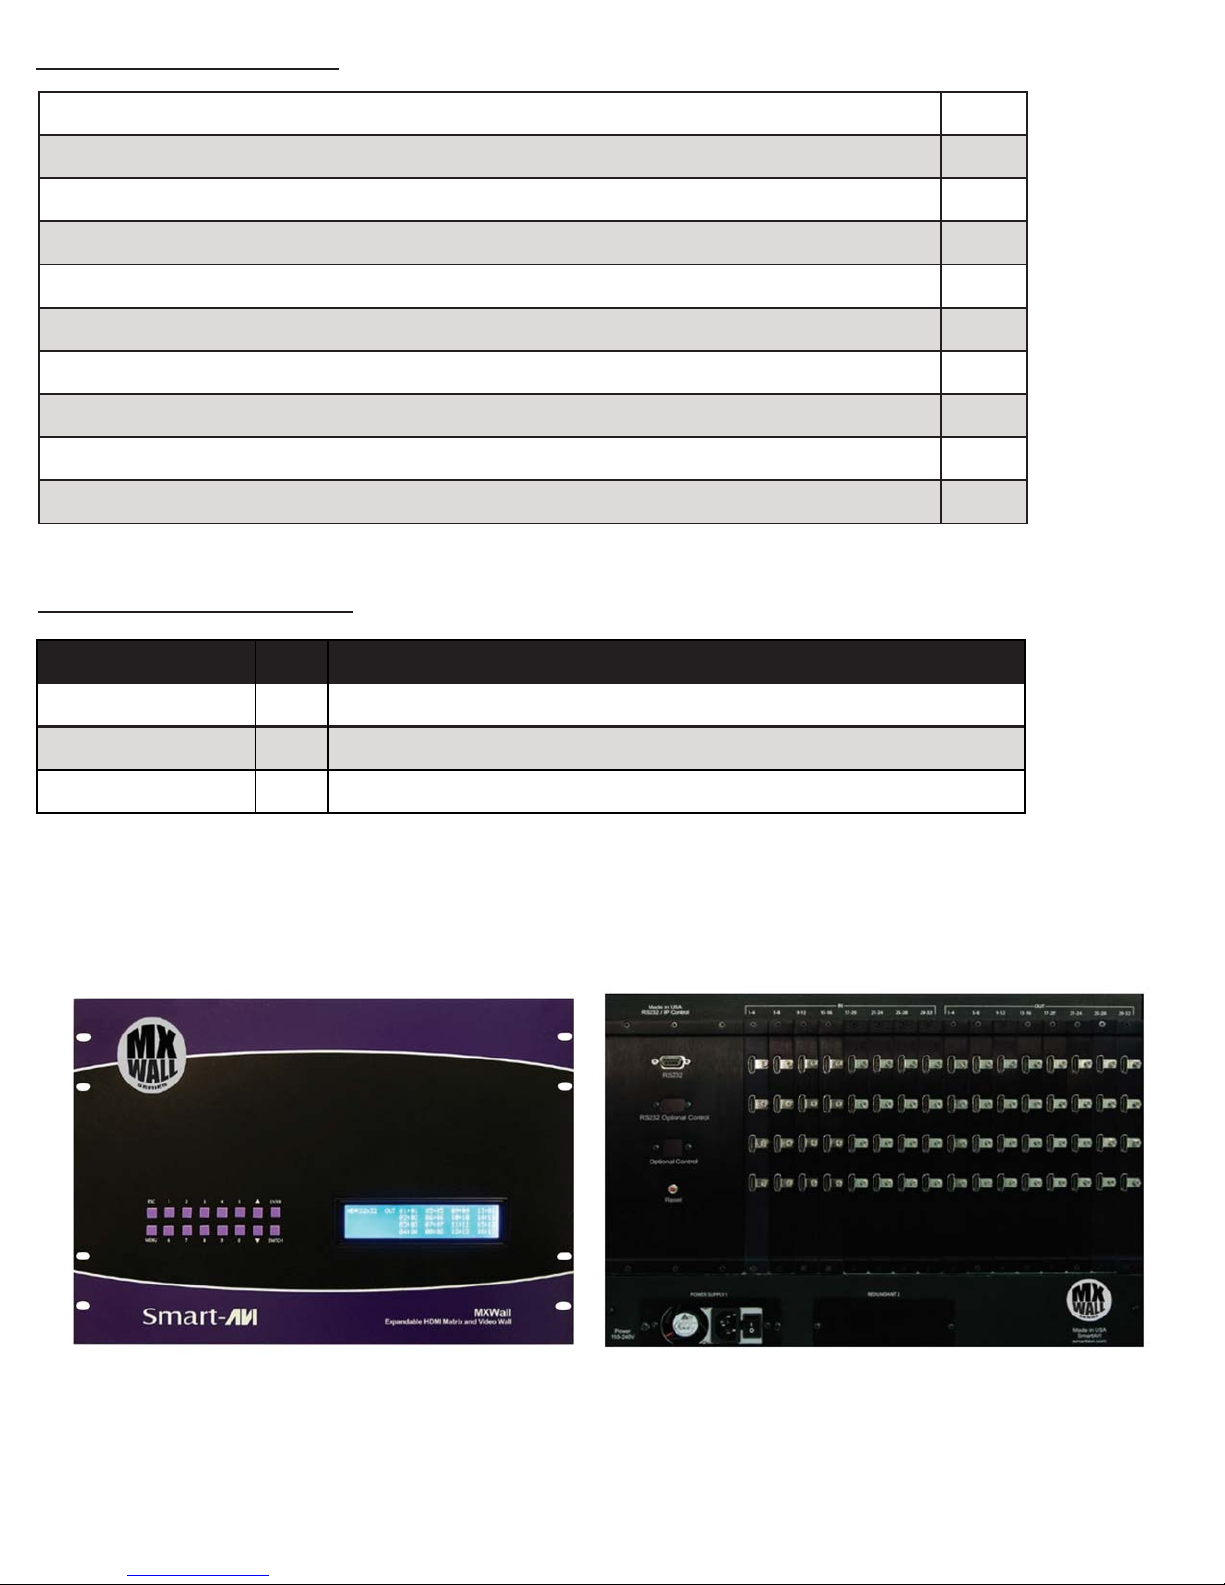
Table of Contents
TABLE OF CONTENTS / WHAT’S IN THE BOX 2
TECHNICAL SPECIFICATIONS 3
INTRODUCTION / FEATURES 4
APPLICATIONS 5
HARDWARE INSTALLATION / AVAILABLE CONFIGURATIONS 6
CONTROL USING THE FRONT PANEL 7
USING ON-SCREEN DISPLAY / IR REMOTE CONTROL / OSD USING FRONT PANEL 8
USING RS-232 CONTROL 9-11
FIRMWARE UPDATE 12
LIMITED WARRANTY STATEMENT 14
What’s in the Box?
PART NO. QTY DESCRIPTION
MXWALL-32x32-S 1 MXWall: 32x32 Video Wall Controller.
Power supply cord 1 (CCPWR06)
Manual 1 User Guide
2
Page 3
Technical Specications
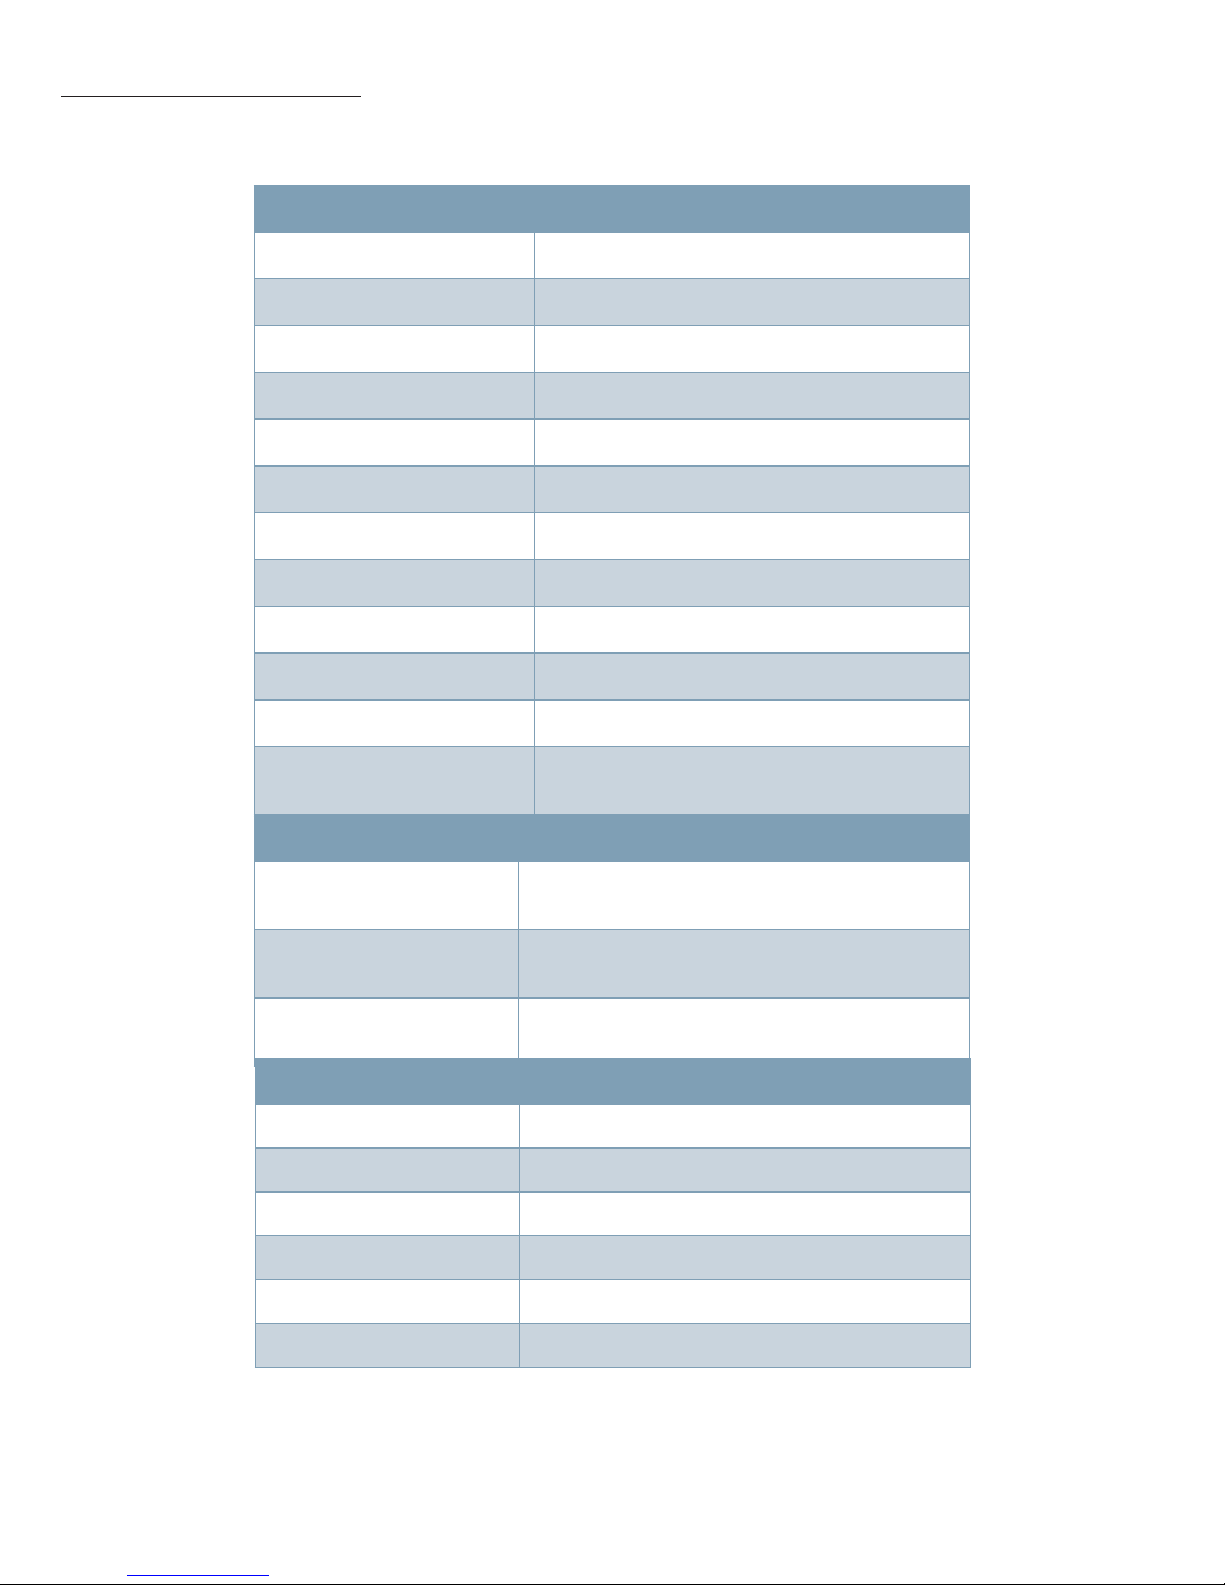
VIDEO
Video Amplier Bandwidth 3.2G
Input Video Signal Video (TMDS) 0.5~1.0Vpp
Input DDC Signal 5 volts
Compliances HDMI 1.4 and HDCP
Pixel Rates Clock frequency beyond 165Mpix/second
Format 4:4:4 and 4:2:2 data input formats
Resolution
Inp ut C ar d Fo rma t HDMI
Ou tp u t C a rd Fo r ma t DVI
Input Slots Up to 8 cards of 4 HDMI input each
Output Slots Up to 8 cards of 4 DVI output each
Video Type RGB/YCBCR : 24/30/36-bits,YCBCR:
480p, 720p, 1080i, 1080p
8/10/12/16/20/24-bits
CONTROLS
Front 2x8 keyboard with 4x40 LCD
RS-232 9600bps, Software ow DB9 Female
TCP/IP Webserver, Telnet
OTHER
Working Temperature 0°C~+55°C
Storage Humidity 10%~90%
Weight 30 lbs.
Dimensions
Power Supply
Consumption
17.125 in (W) x 12 in (H) x 12 in (D)
50/60Hz, 100~230 VAC
300W
3
Page 4

Introduction
Thank you for choosing SmartAVI’s MXWall for your ideal video wall solution. The MXWall
oers top-notch HD DVI output for six dierent type of signal inputs. Create striking 32x32
dynamic wall displays easily with simple signal-switching and exible connectivity. The
MXWall even features a fully-integrated USB media player, perfect for populating your
displays with enticing digital content.
Capable of expanding any one HD signal to four large-scale screens at 1080p (1920x1080
@ 60Hz), the MXWall showcases stunning picture quality and SmartAVI products’ signature
ease of use. In this guide, you will learn how to install and optimize your experience with
MXWall using basic steps. We will cover setting the hardware up, activating and connecting
your systems, and oer helpful tips on how to best use MXWall’s excellent selection of
picture modes to enhance your video wall.
Congratulations again on choosing MXWall and SmartAVI as your go-to video wall solution!
Features
• Four screen (32x32) multi-Layout, multi-format video wall controller
• Outputs: (32) DVI single-link
• Inputs: (32) HDMI
• Integrated USB Media Player (for digital video, imagery, audio) and port
• Internal EDID learning
• 1080p (1920x1080 @ 60Hz) HD resolution output
• No additional hardware or software required
• Supports TCP/IP, IR, and RS232 control
• HDCP and HDMI 1.4 compliant
• Easy to set-up
• Easy to use
4
Page 5
Computer Gaming Console
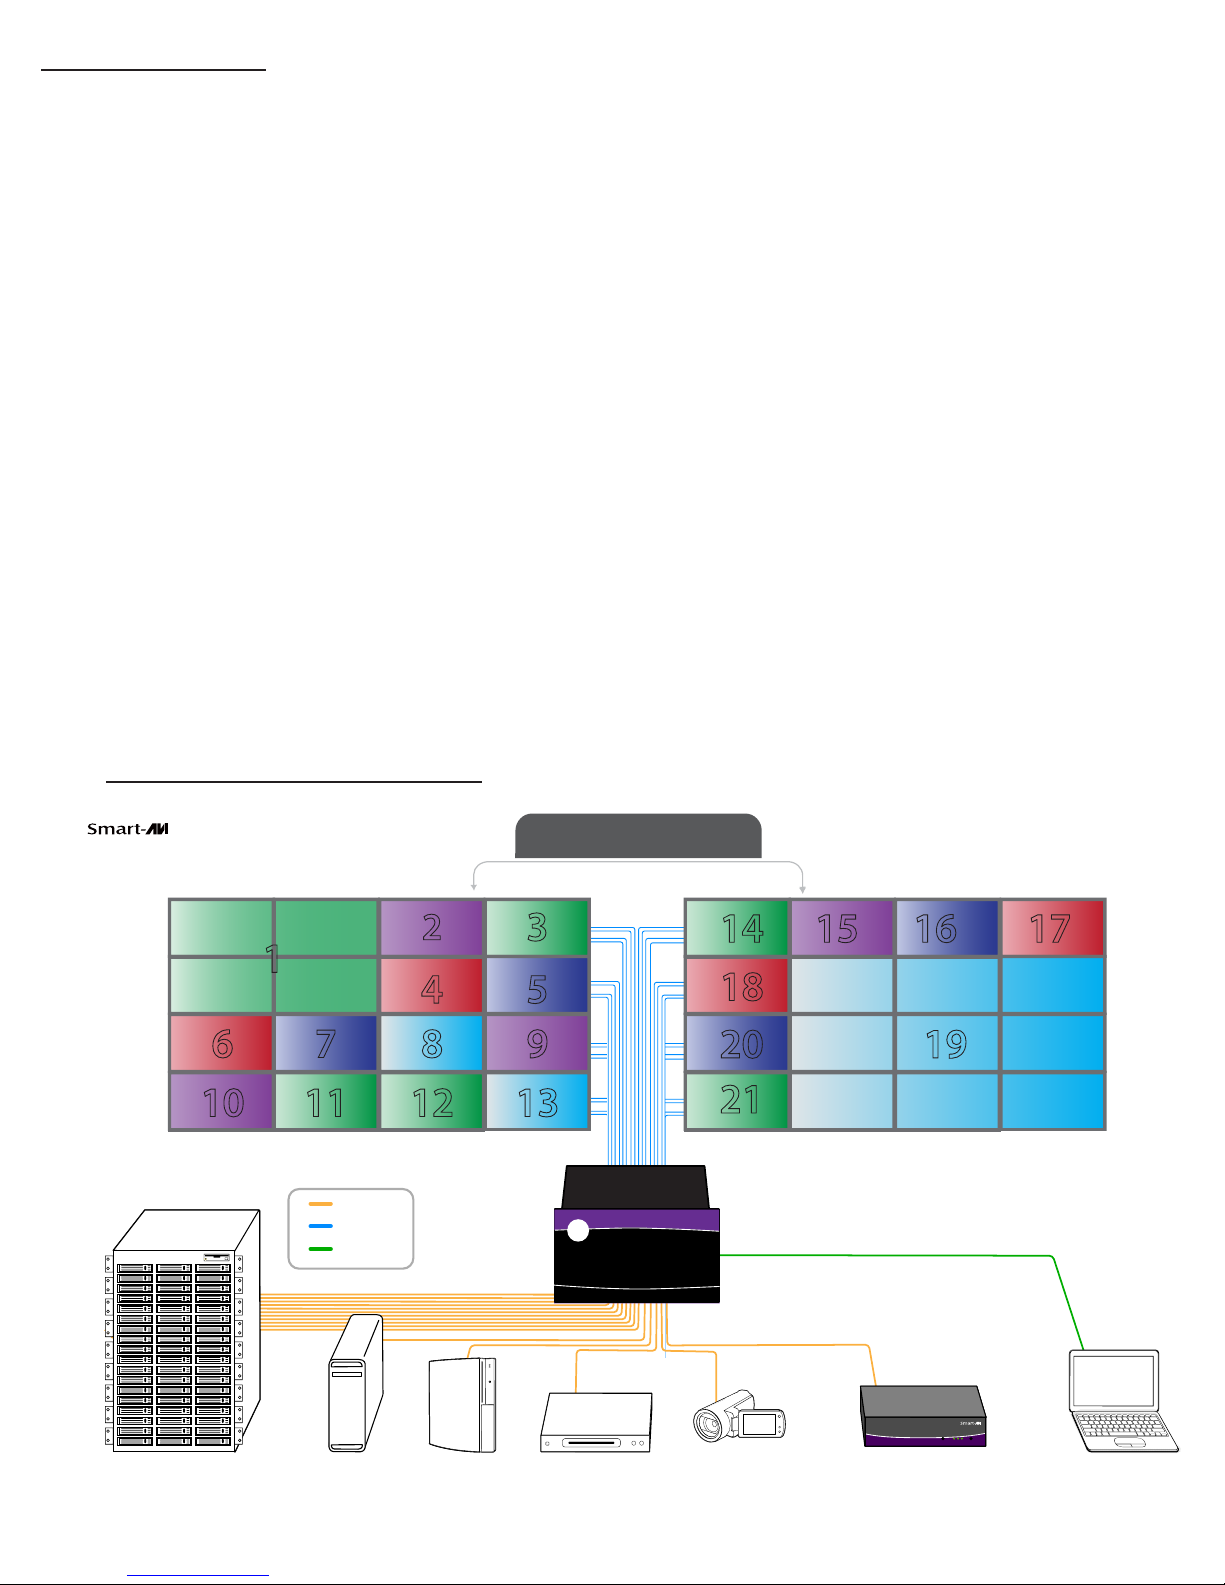
Applications
Rack Servers Blu-ray Player
Signage Player
RS-232
Video Camera
RS-232
HDMI Input
HDMI Output
MXWall-Pro
Up to 32 Screens
1
6 7
10 11
3
2
4 5
9
13
14 15 16 17
18
1920
21
12
8
• Corporate or Educational Presentations
• Airport Installations
• Wall Displays
• Digital Signage
• Dealer Rooms
• Control Rooms
• Shopping Centers
• Security
• Point-of-Sale
• Entertainment Venues
• Corporate Lobbies
• Restaurants
Operational Diagram
5
Page 6
Hardware Installation
1. Position MXWall conveniently and keep it unplugged.
2. Connect DVI output cables between the MXWall and your video wall screens
3. Connect any input to their corresponding signal source (Blu-Ray player, computer, etc)
4. Connect the IR receiver to the IR input jack at the back of the MXWall.
5. Optionally connect an RS-232 cable from PC to the RS-232 port of the unit for additional
control.
6. Optionally connect an Ethernet cable from web router to the MXWall for additional
control over the internet (TCP/IP)
7. Turn on the MXWall.
8. Wait for a few seconds for the unit to initialize.
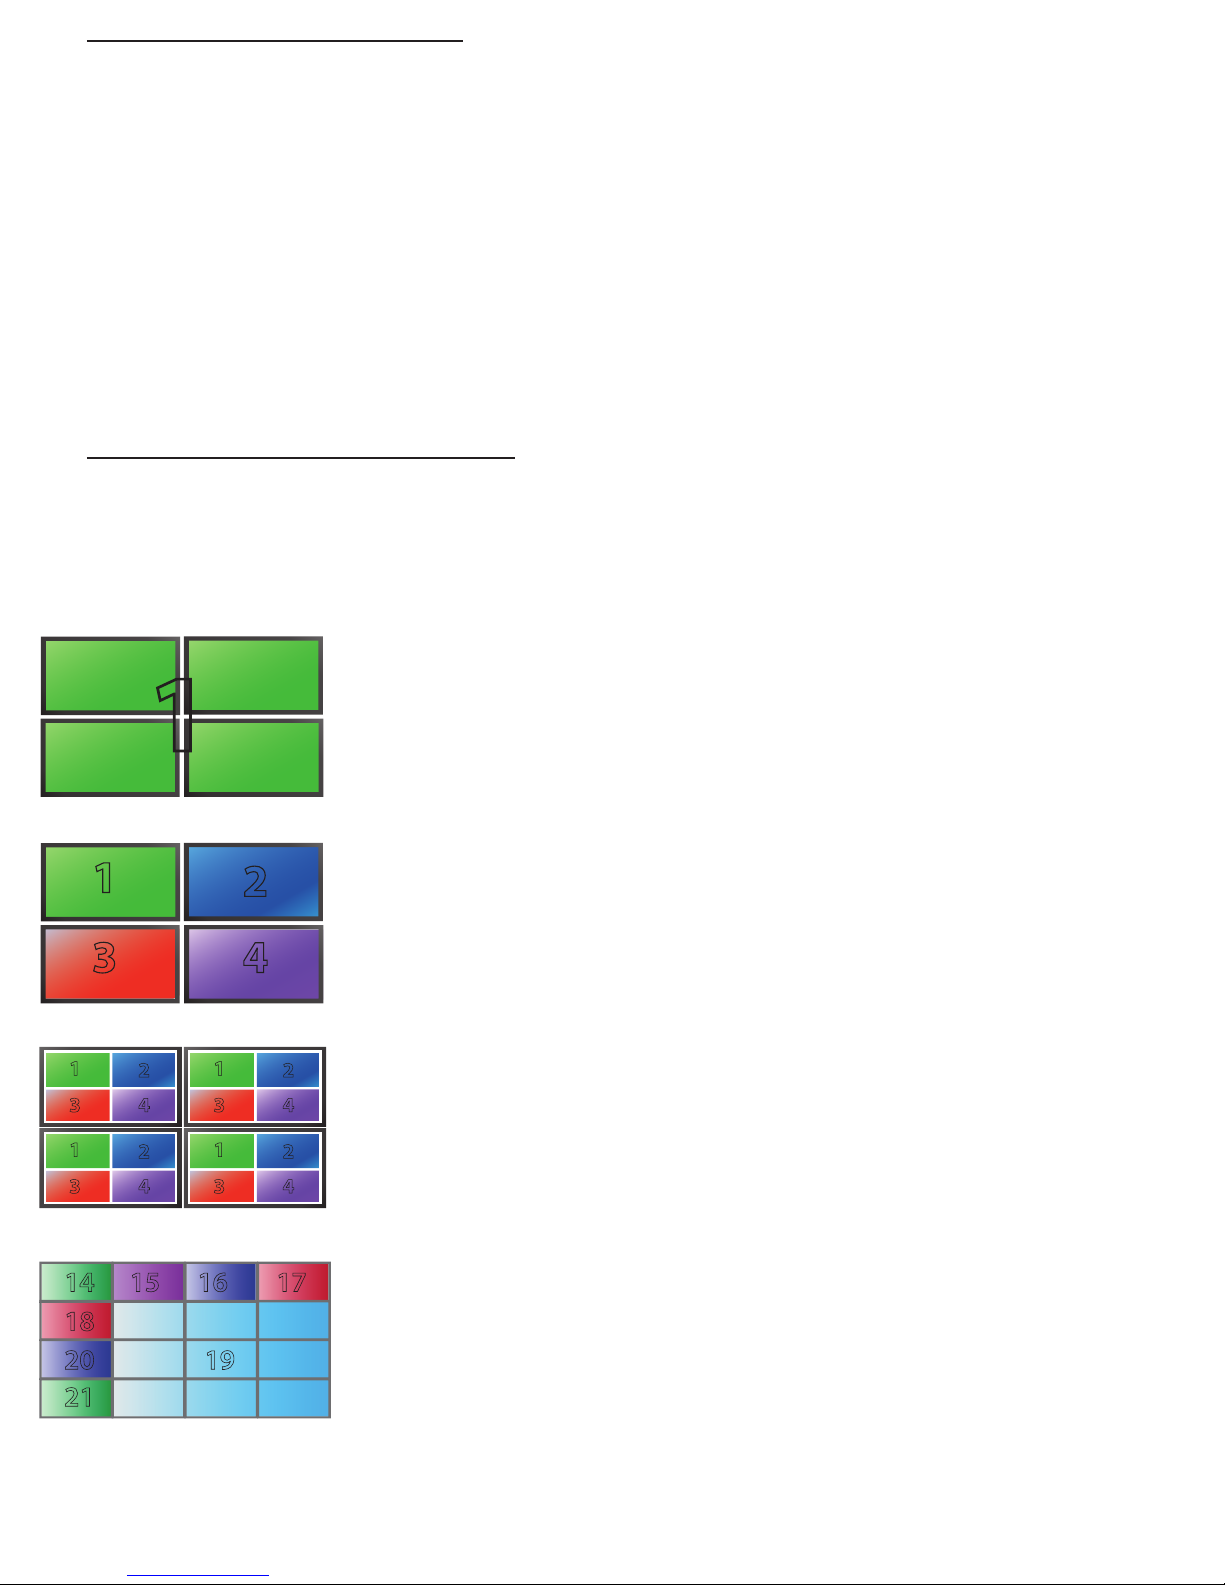
Available Congurations
There are four dierent congurations or modes that are easy to navigate through with the
MXWall. Switching between the display modes is simple. Front panel buttons, the IR remote
control, on-screen-display, RS-232, and TCP/IP can be used to switch between modes at will.
1
1
3 4
2
3
2
3
2
3 4
3 4
VIDEO WALL MODE: Users can project the input image across
four HD screens (32x32 conguration). With screen resolution
of 1920x1080, users can create a stunning 1080p resolution
video wall display.
INDIVIDUAL MODE: Users can route the input image to
each display individually, creating a simple and effective digital
signage display.
2
QUAD MODE: Split each individual screen into four
proportional sections, each displaying one of any 32 input
2
signals. Perfect for attractive and varied content.
14 5 6 17
18
1920
2
6
PIP MODE: Users can populate individual screens with multiple
signal sources. Add any of the 32 input signals to play alongside
others within a single display monitor for dynamic and intricate
visual presentations.
Page 7

Computer Gaming Console
Control Using the Front Panel
Front Panel Buttons
• For Menu, press the PIP and WIN buttons simultaneously.
• To switch to Video Wall mode, press the WALL button.
To switch to Individual mode, press the INDV button.
• To switch to Quad mode, press the QUAD button.
• To switch to PIP mode, press the PIP button.
• To switch to Windowed mode, press the WIN button.
Notes:
7
Page 8
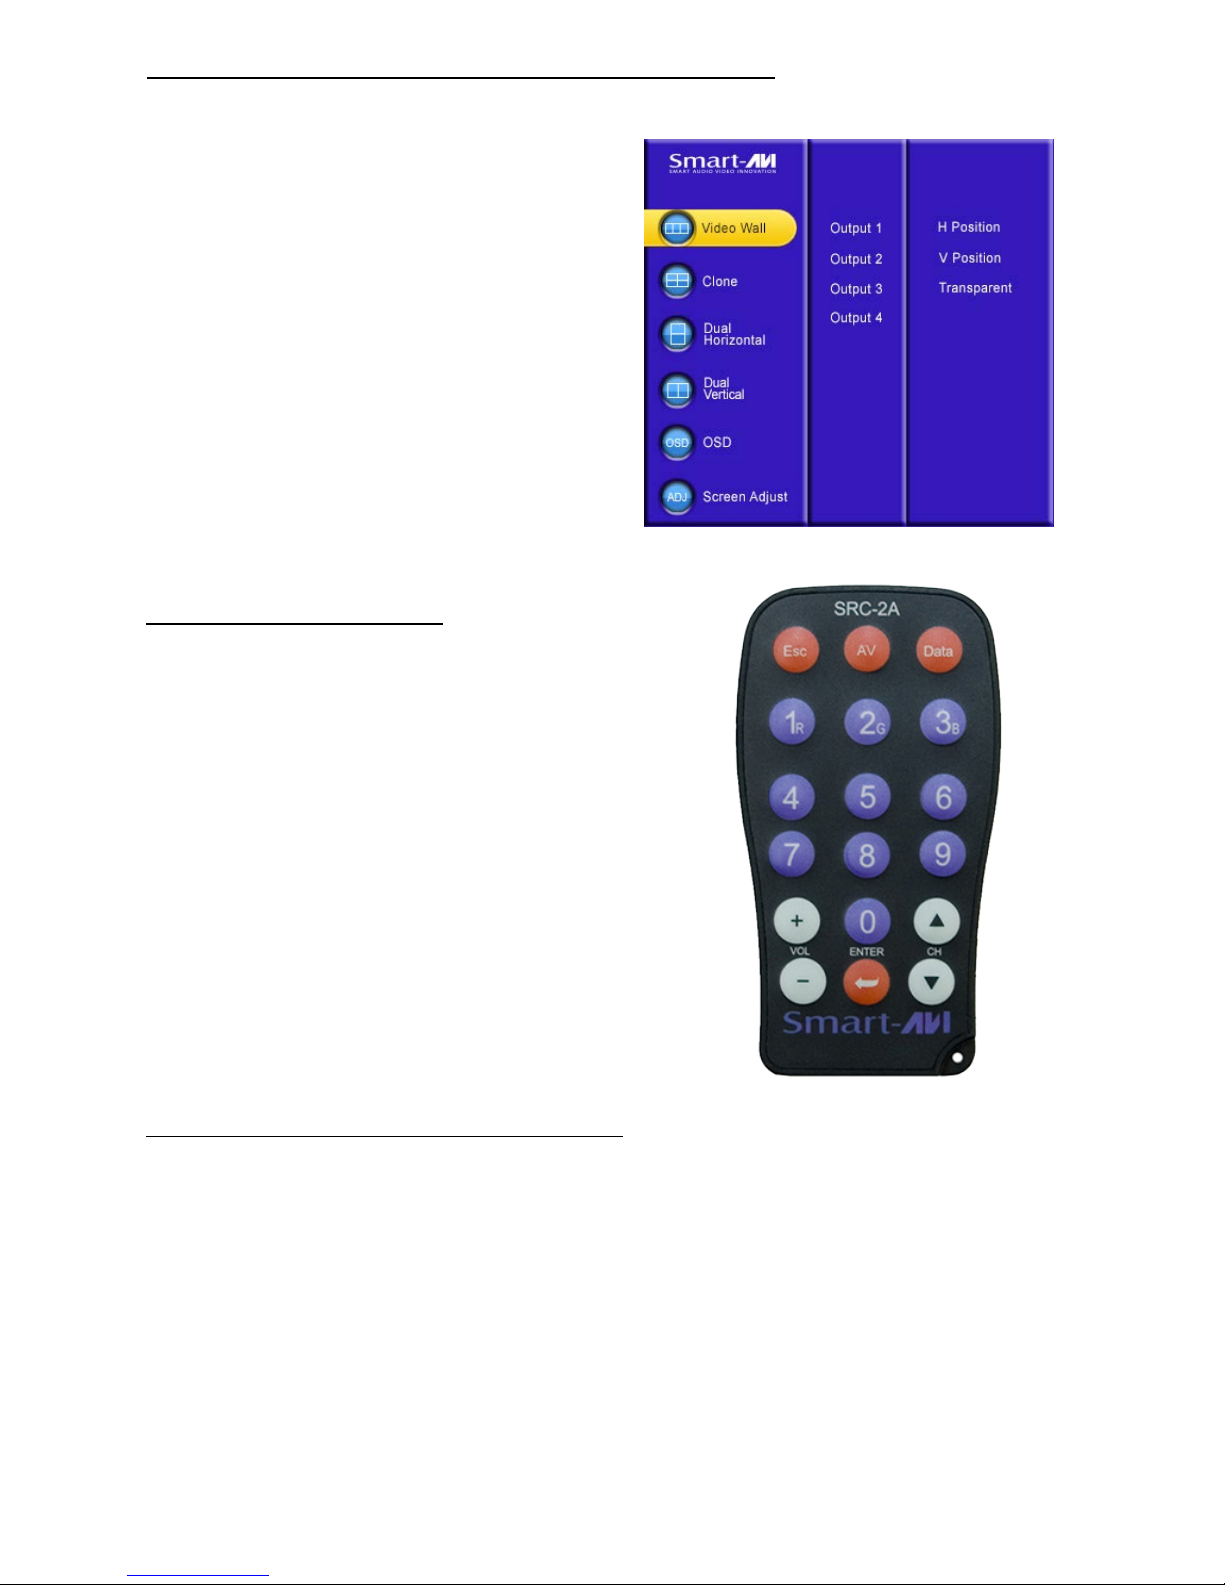
Control Using On Screen Display (OSD)
On Screen Display (OSD) gives users great
exibility and ease of use when looking to
manage their video wall. It can be operated
with the IR Remote Control and through the
Front Panel Buttons.
IR Remote Control
The MXWall will only respond to the remote
control unit provided in the box. Below is the
list of commands on how to control using the
remote control:
DATA: Activates the OSD
Ch. DOWN: Navigate down through the options
Ch. Up: Navigate up through the options
Vol. +: Select
Vol. -: Back
ENTER: Enter the command
ESC: Exit OSD
OSD Control with Front Panel
To change modes with the OSD simply navigate using the following buttons on the front panel:
1: Down
2: Up
3: Back
4: Select
FULL: Enter
Simply scroll to the mode desired with the up or down button, select the mode, select the
appropriate channel and enter.
8
Page 9
Using RS-232 Control
The MXWall may also be controlled via RS-232 commands. This feature requires an RS-232
card installed on your computer or a USB to RS-232 adapter. Below are instructions on how to
properly create an RS-232 connection between a PC the MXWall.
Establish a connection to MXWall:
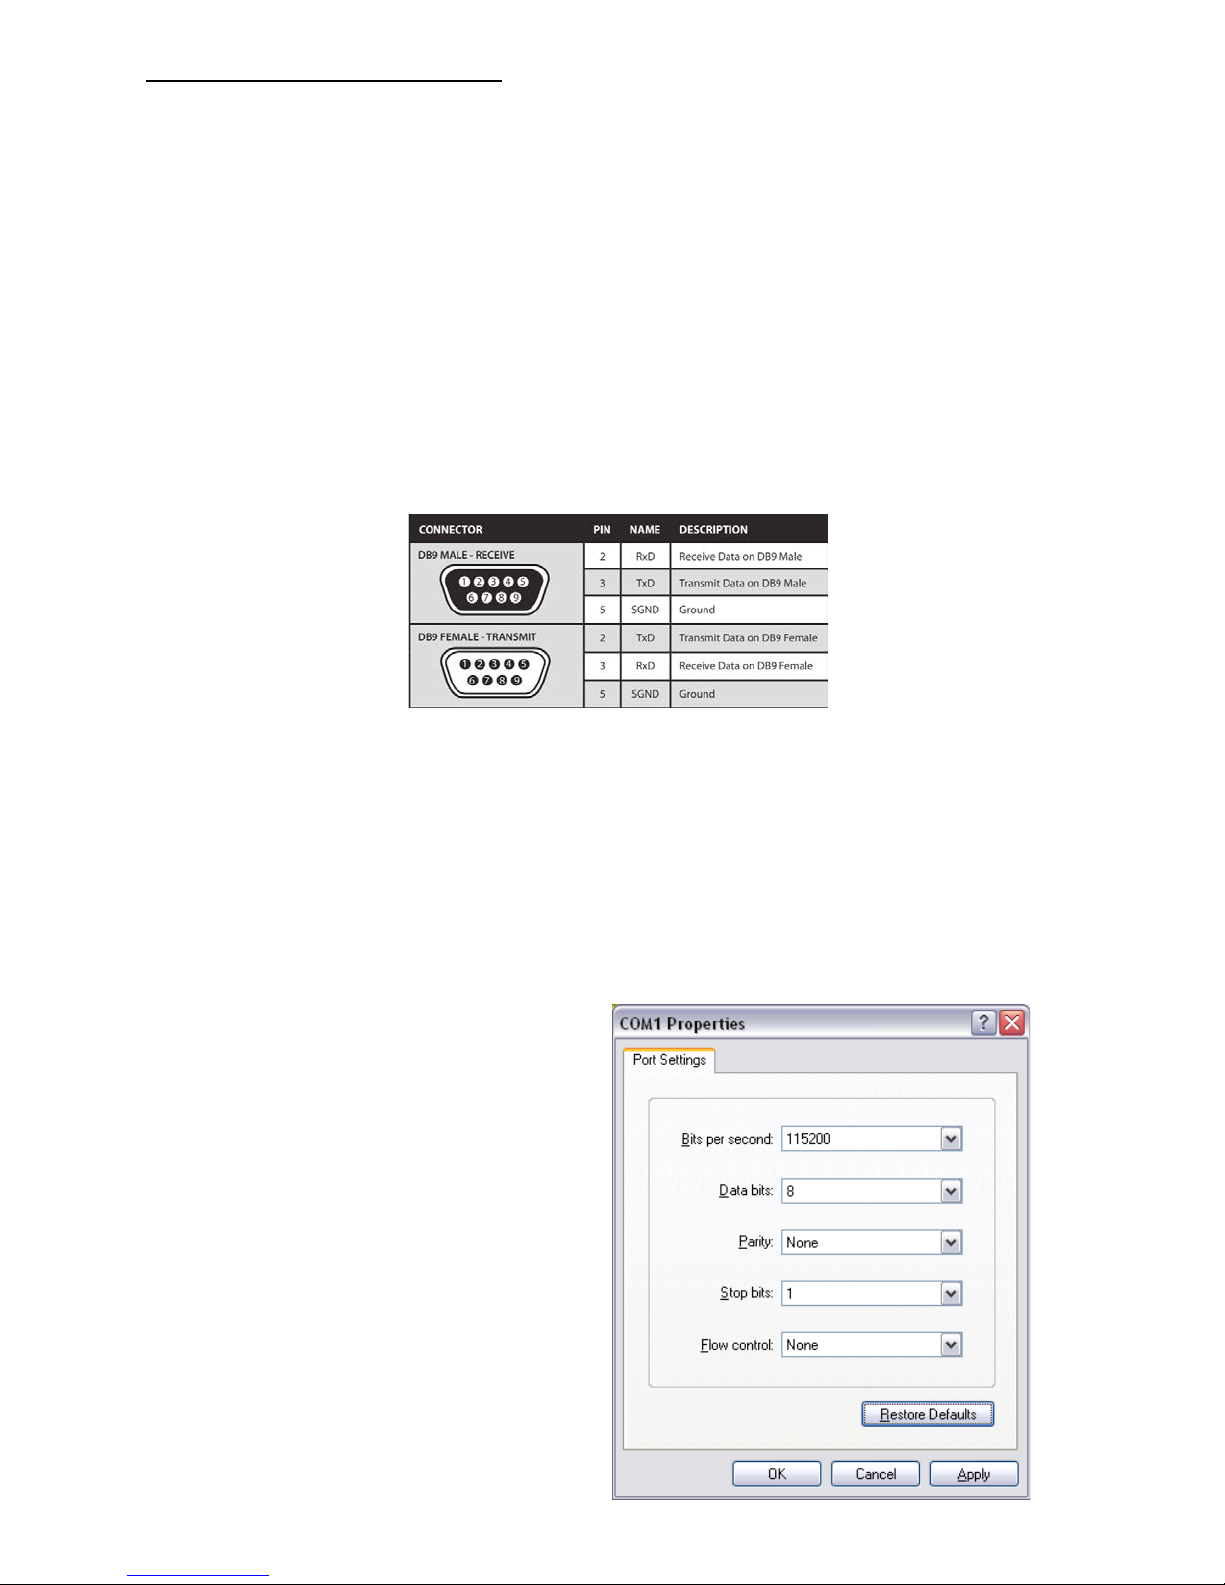
1. Connect a straight-through male-to-female RS-232 cable to the RS-232 connector on the PC.
2. Connect the other end of the cable to the RS-232 port of the MXWall.
3. Power on the device.
Setting up the Terminal Application:
1. Run HyperTerminal on the PC (or use the terminal client of your choice).
2. Select the correct COM Port on the PC.
3. Use the following settings to create a connection to the device:
115200, 8, N, 1.(see settings on right).
4. Be sure that Flow Control is None.
9
Page 10

Using RS-232 Control (continued)
There are two primary modes of operation for MXWall: Command Mode and CLI Mode. When
connecting to the MXWall via RS-232, it will start in Command Mode. CLI Mode is a more userfriendly way of operating the StretcherPro HD and includes instructional menus. The following
section details the use of the CLI Mode.
When you connect to the MXWall to a computer via an RS-232 connection, you will see the
following screen on startup:
******MXWall v.1.20.1*******
build date Mar 7 2014 10:53:44
…
…
MXWall Initialization complete
CLI Mode: To enter CLI Mode type “clion” followed by the <enter> key and you will see the
following prompt:
CLI enabled!
To display the MXWall help menu type “?” then <enter> key
Stretcher HD v.1.00.1 CLI command list
===================================================================
i List system information
f Full
dh Horizontal Dual
dv Vertical Dual
v VideoWall
o Output o [ 1-1080P60 | 2-720P | 3-1080P30 ]
rEDID Read EDID
wEDID < 1-ACER P241w | 2-Gateway FHX2300 | 3-local monitor>
reset Reset HDMV
losd load osd image
Frst Factory reset
? CLI command list
• Toseethestatusoftheinput,press“i”then<enter>key.
• ToreadtheEDIDforaninput,typein“rEDID”then<enter>.
• ToprogramanEDIDtotheinputs,typein“wEDIDN”then<enter>,where“N”istheEDIDmode.
Ex. “wEDID 3” is to learn the EDID of the local monitor
• TodoapowerresetontheMXWall,type“reset”followedby<enter>key.
10
Page 11
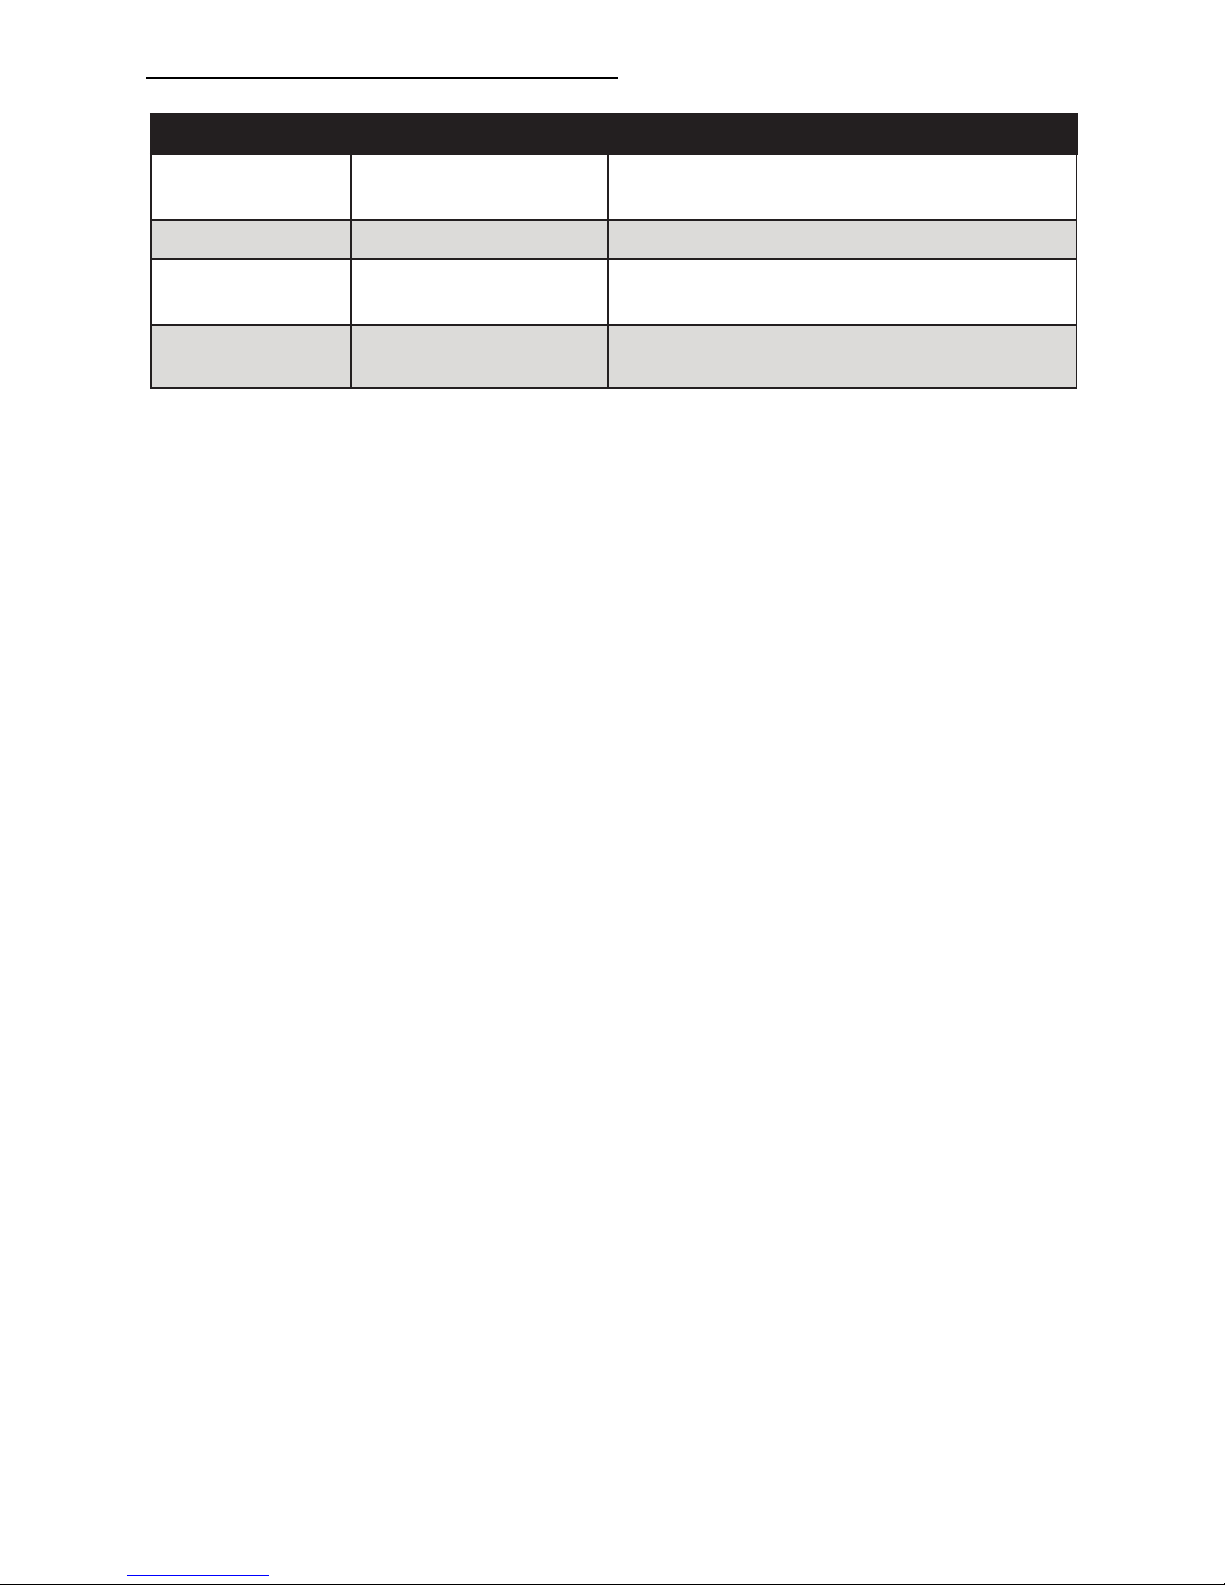
RS-232 Operation (continued)
MODE CONSOLE COMMAND DESCRIPTION & EXAMPLE
Video Wall Mode //V<CR> Stretch the input across four screens
(32x32).
Clone Mode //F<CR> Clone the input into the four screens
Dual Horizontal //DH<CR> Stretch the input over two horizontally ar-
ranged two times over
Dual Vertical //DV<CR>
Stretch the input over two vertically arranged two times over
<CR> is carriage return (0x0D). All commands sent from PC end with <CR> (or the <enter> key if
using HyperTerminal).
11
Page 12
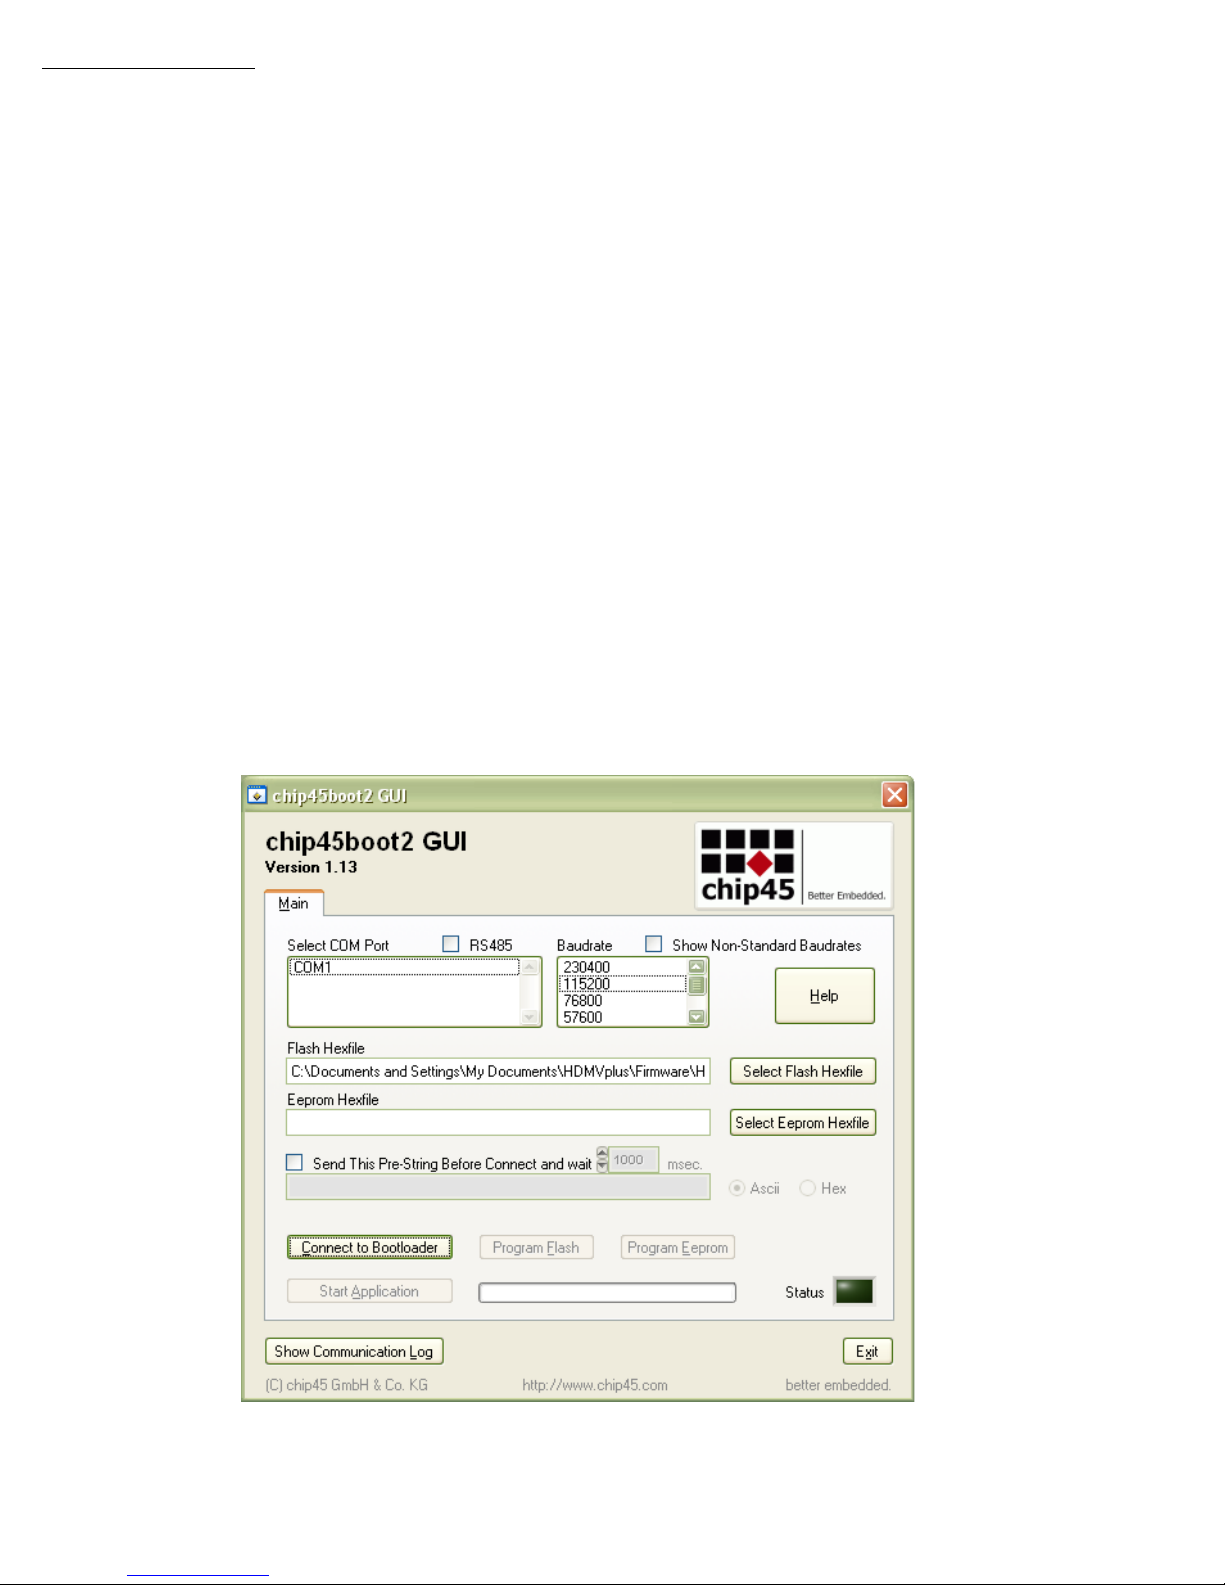
Firmware Update
The firmware of the MXWall can be upgraded by the end-user.
Below are instructions on how to upgrade the rmware of your MXWall:
1. Power OFF the MXWall.
2. Connect the RS-232 cable from computer to the RS-232 port of the MXWall.
3.
Download and install the chip45boot2 GUI.
4. Open the chip45boot2 GUI.
5. Click the Select Flash Hex le button and browse for the rmware le.
6. Power ON the MXWall, then click the Connect to Bootloader button on the
chip45boot2. The Status indicator on the lower right hand of the GUI should be green if the
connection is successful. If not successful, click the Connect to Bootloader button again.
7. Click Program Flash to upload the hex le. When nished uploading, the Status indicator
should say “Done”.
8. Click Exit and open PuTTY or HyperTerminal and verify if you have successfully loaded the
rmware.
12
 Loading...