


SML-5051W
User Manual
© 2019 SmartLabs Holding Ltd
Proprietary and Confidential

Thank you for Choosing us
The SML-5051W is a small-form and high-performance set-top box (STB) with 4K/UHD
video support and is able to deliver to your home the exciting world of cutting edge
interactive services.
This manual contains a descr ipt ion of all possible features an d opt ions of SML-5051W,
however your device may look slightly different from the one pictured in this document.
The packaging and configuration of your device, such as presence or absence of
certain connectors, are defined by the service provider.
Information about interactive television services available through the STB is given by
your service provider in a separate manual (not included).
Distribution Kit
• SML-5051W set-top box
• Power adapter 12 V, 1 A
• HDMI cable (optional)
• Ethernet cable (optional)
• Remote control (optional)
• Battery for remote control (1xCR2032, optional)
• User manual (English, optional)
Safety and Storage
Read this manual before using the STB and keep it for future reference. Please, heed
all warnings and follow the precautions and operating instructions.
• Do not open or repair the STB by yourself. Improper repair may result in
electrical shock or fire. In addition, the STB is removed from the warranty.
• Changes or modifications not expressly approved by the party responsible for
compliance could void the user’s authority to operate the equipment.
• Only use attachments/accessories specified by the manufacturer.
• The STB is intended for the indoors use only, with air temperature from 0°C to
35°C (from 32°F to 95°F) and 30-70% of relative humidity, non-condensing.
• Use only power supplies listed in the user instructions.
• Do not use the STB if the power cord is damaged.
• To reduce the risk of fire or electrical shock, do not expose the STB to dripping or
splashing and do not place any objects filled with liquids on or next to the STB.
• Do not expose the STB to any liquids, rain, steam, moisture or high humidity.
• Do not expose the STB to direct sun light.
• Do not place the STB near open fire or heating elements.
• Do not expose the STB to vibrations or shaking.
• Do not use the STB in dusty environments.
• If a storm is coming or if you are not going to use the STB for a long time, unplug
the power cord and disconnect the Ethernet cable. This will help to protect the
unit from lightning and power line surges.
• Batteries (battery pack or batteries installed) shall not be exposed to excessive
heat such as sunshine, fire or the like.
– 2 –
• Adapter shall be installed near the equipment and shall be easily accessible.
• The mains plug of adapter is used to disconnect device from power supply. The
mains plug of adapter shall remain readily operable.
• When using the STB with a plasma TV, do not put picture on pause for more
than 5 minutes, due to plasma TV scre en design it could lead to display damage.
The STB manufacturer is not responsible for any damage caused in such
manner.
• The software on your STB is updated automatically. Do not unplug the power
cord and do not disconnect the Ethernet cable while the software is updating.
The STB manufacturer is not liable for any consequences of incorrect software
update.
• The manufacturer does not guarantee the absence of interference with other
devices. To eliminate possible interference, increase the distance between the
STB and other equipment, or connect equipment using a different setup.
• In accordance with international safety requirements for radio equipment this
device should be installed and operated with a minimum distance of 20 cm (7.8
inches) between the device and the body .
• The device is going to be operated in 5150 to 5250 MHz frequency range. It is
restricted only to indoor use. This device may be operated in all member states
of the EU.
To prevent possible hearing damage, do not listen at high volume
levels for long periods.
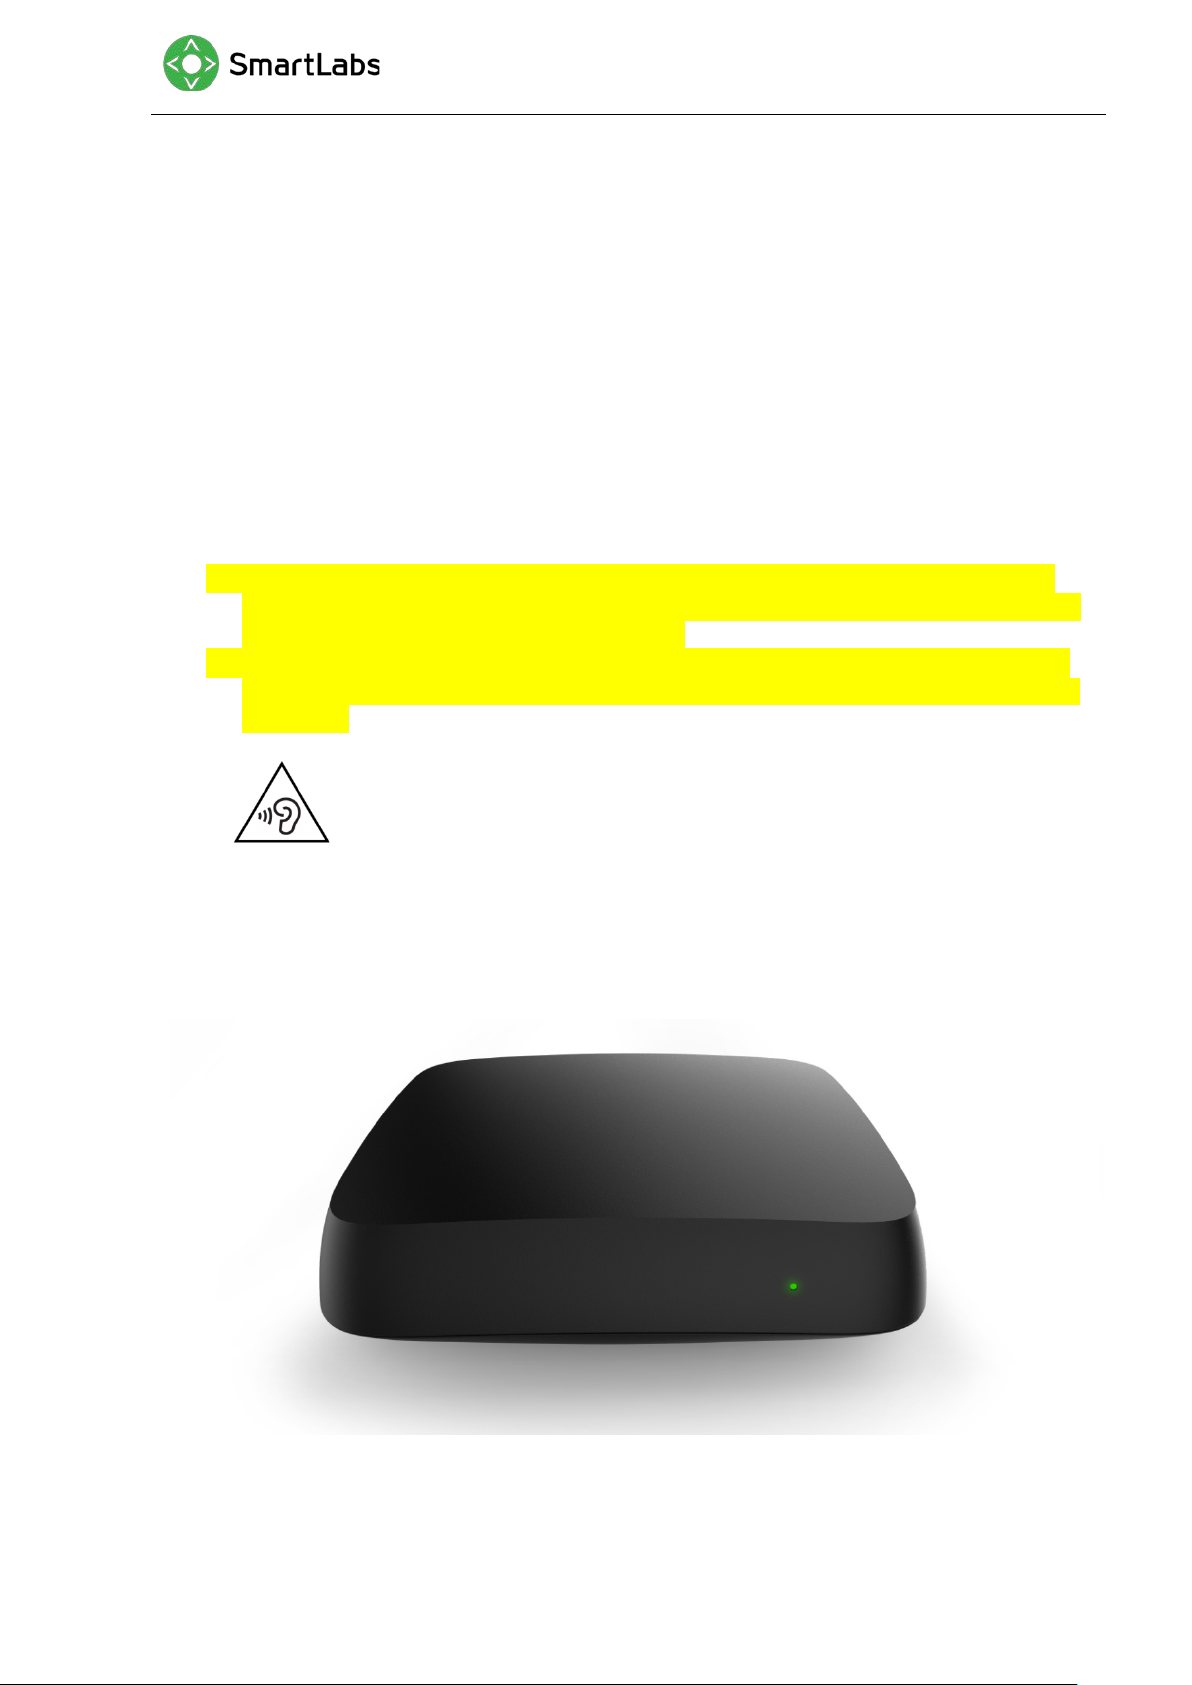
Indicators and Slots
Front Panel
– 3 –
Element Purpose
Power
indicator
IR receiver The internal IR receiver is accepting signals from the IR remote
Note: the device appearance may differ from that shown in the picture.
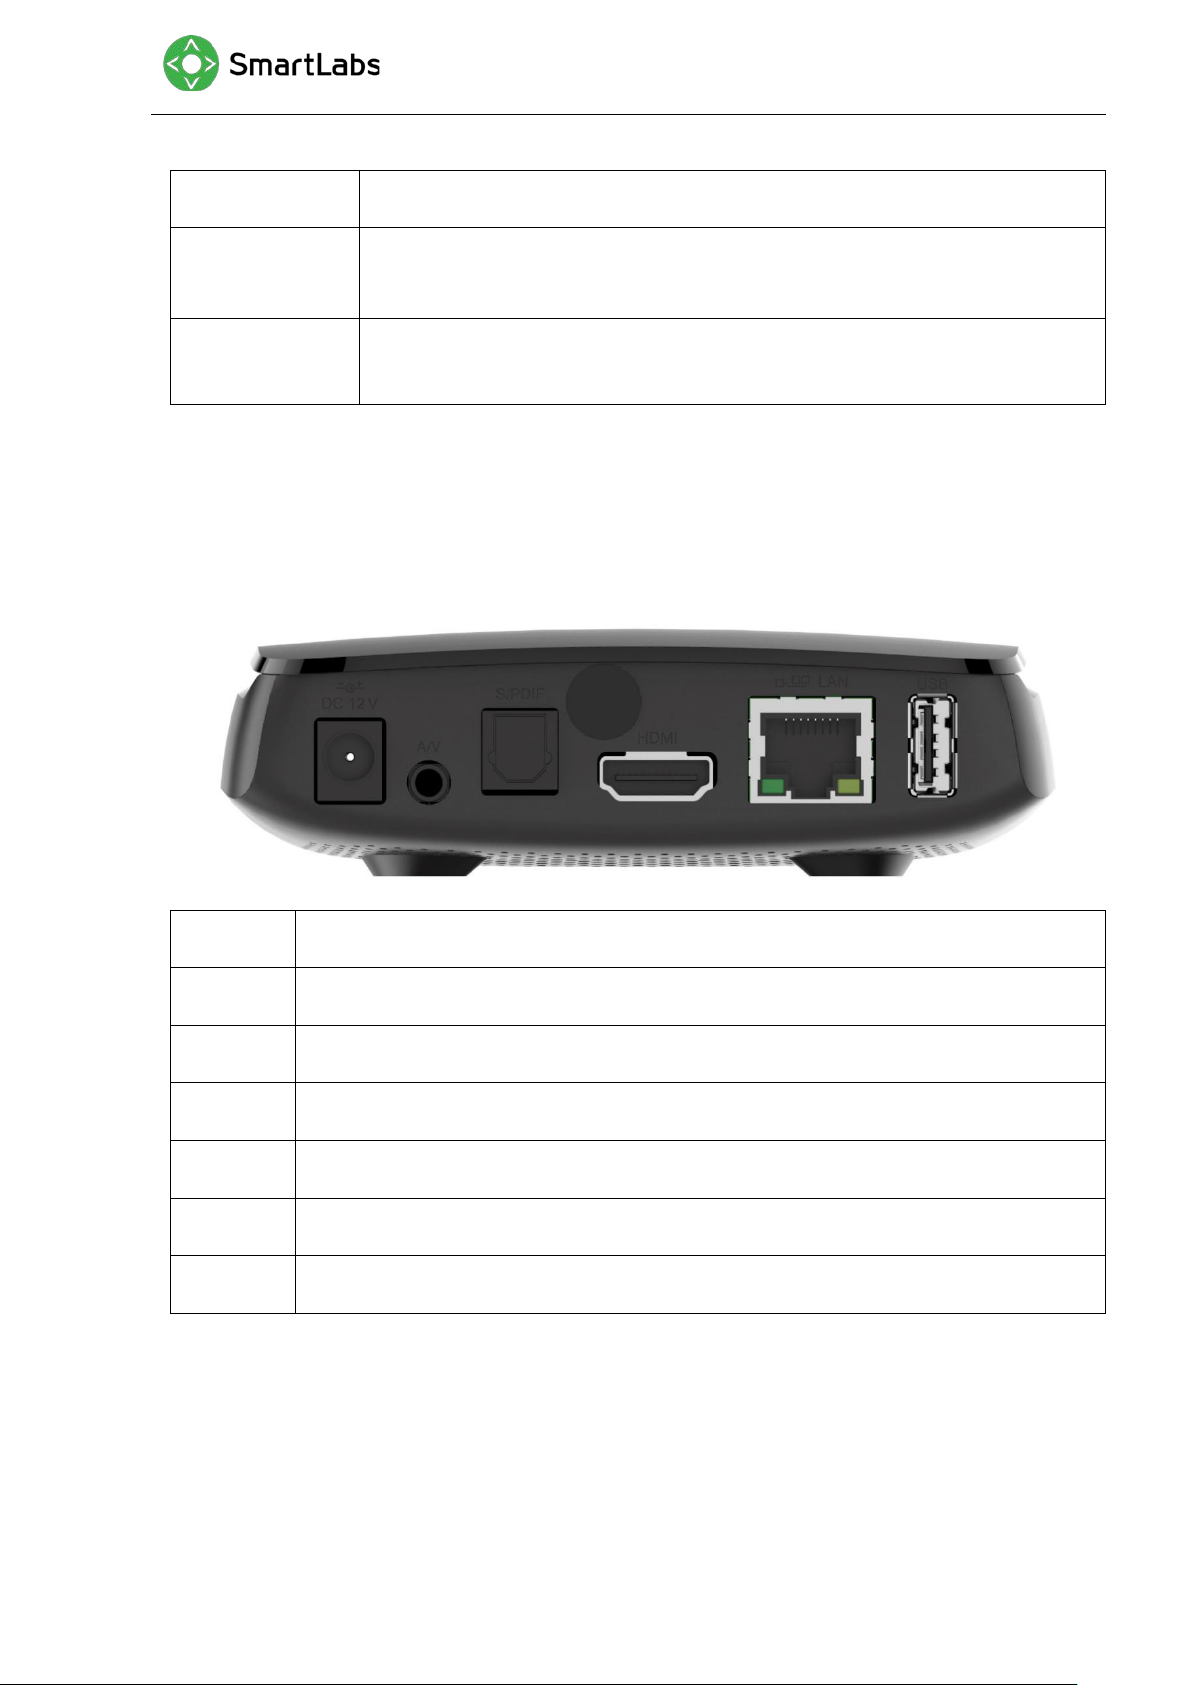
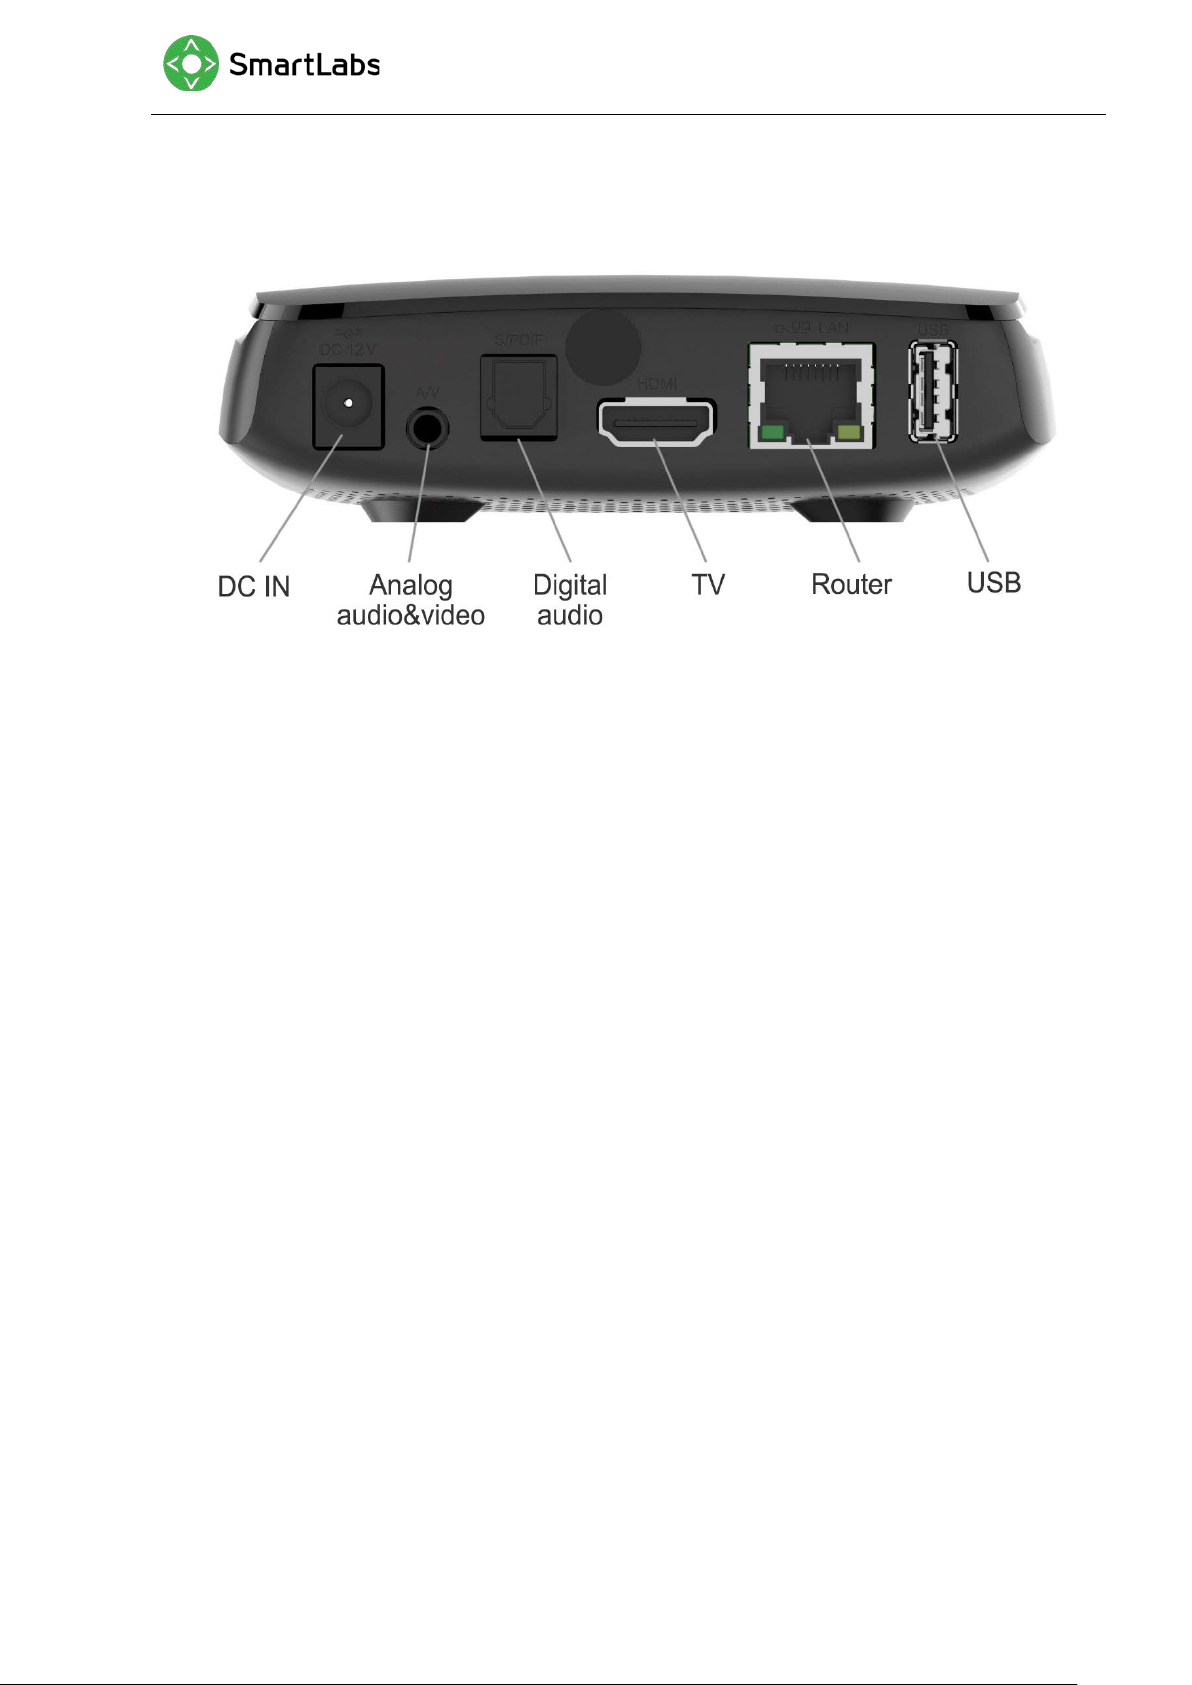
Back Panel
Green — STB is switched on and operates normally.
Red — STB is in stand-by mode.
control.
Element Purpose
DC 12V The port for a power adapter
A/V Composite video and ster eo audio
S/PDIF Optical digital audio interface (optional)
HDMI The audio/video interface for connecting with an HDMI-compl i ant de vice
LAN Ethernet port, 10/100 M bps
USB USB 2.0 port
Note: the device appearance may differ from that shown in the picture.
– 4 –
Connecting
Installation
1. Remove your STB from packaging and remove the protective tape.
2. Make sure that the place, where you are installing the STB, meets the following
requirements:
• Place STB on a flat surface.
• Do not place th e ST B o n sli ck sur fac es, wher e ther e is a ri sk of v ibrati on, fall or
other damages of STB.
• Do not mount the STB on soft surfaces, like a bed, carpet, etc. Such a surface
impedes access for air and normal ventilation of the STB and thereby causes
overheating and malfunc ti oni ng .
• Do not cover the STB.
• Do not shield the ventilation holes in the STB’s enclosure located at the top
panel of the STB.
• When mounting the S TB, mak e sure th at ther e are at least 10 c m of fre e space
at each side of the device. Do not place STB in closed cupboards and caves.
• Install and operate the STB with a minimum distance of 20 cm (7.8 inches)
between the device and the body.
• Do not place STB on surfaces, which can heat, for instance, on boosters.
• Do not place any things on the device.
• To avoid damage of th e power adapter’s cabl e, pl ace the cable so that i t i s not
pressed, pinched or mechanically affected in any way.
3. Make sure that the TV set and the STB are not connected to the power network.
Connect the TV set and the STB with the HDMI cable.
4. Connect the Ethernet cable to the S TB. If you a g oing to use the Wi-Fi connectio n skip
this step.
5. Connect the STB and the TV set to the power network.
– 5 –

Button
Purpose
Disable/Enable the sound. Controls TV or
Switching between watching TV/movie and last opened catalog
Connecting to Internet via Wi-Fi
1. Turn on the STB and wait for it to boot.
2. Go to the "Settings" menu on the home screen. Next, "System" → "Native system
settings" → "Network".
3. Select your wireless network in the list of available networks.
4. Type the password for the selected network using the on-screen keyboard (if
required).
5. If there are no networks available in the list, try running the scan again. To do this,
change the "Wi-Fi Off" setting to "Wi-Fi On".
6. If the problem persists, check the settings of your wireless access point (router) or
use a wired Ethernet connection.
Remote Control
LED
Switching the TV on and off*
Power. Switching the STB on and of
Choosing a signal source on TV*
STB*
Change volume. Controls TV or STB
Cancel/Go one level up
Move through menu items
Confirm the selection, pause, resume playback
Jump to the main menu
Search by content name, actors, t elevision ch annels and TV sh ows
page
– 6 –

Switch channels
* You can control TV after the RC setup
1. Use a tool to remove the battery cover:
2. Remove the old battery:
3. Insert a CR2032 battery, positive (+) side up.
4. Insert the cover and close the battery door.
With a screwdriver
opening movement.
Battery
Numeric keys
** RC appearance may differ from that shown in the picture.
Replacing the Battery
This remote is operated by a replaceable CR2032 battery. In accordance with IEC
60065:2014, the battery cover is held in the remote control case with considerable force
to prevent children from accessing the battery without adult supervision. Use a
screwdriver to open the cover. Be careful not to damage the battery cover or remote
control case.
To replace the battery:
on the slot, do the
polarity
ISO 7000-0434 (2004-01)
WARNING: Refer to the battery disposal and safety information before
replacing the battery.
Do not ingest the battery, chemical Burn Hazard.
Battery Information
– 7 –

The remote control is supplied with a coin/button cell battery. If the coin/button cell battery is
of used batteries according to the instruction in this manual.
swallowed, it can cause severe internal burns in just 2 hours and can lead to death.
Keep new and used batteries away from children. If the battery compartment does not close
securely, stop using the product and keep it away from children. If you think batteries might
have been swallowed or placed inside any part of the body, seek immediate medical
attention.
If fluid from the battery comes into contact with skin or clothing, immediately flush the affected
area with clear water.
CAUTION: There is a risk of explosion if the battery is replaced by an incorrect type. Dispose
Remote Control Setup
The universal remote control can simultaneously work with multiple devices.
To pair the IR rem ote con trol with a TV set, you need to pe rfor m simple c onfigu ring th at
will not take much of your time. The RC can be set up automatically as well as manually
using the TV manufacturer’s number or code.
You do not need to perform any special configuring to pair the RC with the TV. For more
information see the section RC Setup.
Automatic Setup
1. Turn your TV on.
2. Point the remote control at your TV. Press and hold the TV and OK buttons for 3
seconds. The LED on the remote control will flash twice and the remote control will
switch to setup mode. Release the TV and OK buttons.
3. Press and hold the CH- or CH+ button. The remote control will automatically send a
Power off code to the TV every 1.5 seconds. When the TV turns off, quickly release
the CH- or CH+ button and press OK to save the code. After that, the LED will blink
twice and the remote control will exit the setup mode.
Setting up Remote Control by Using Manufacturer Number
1. Turn your TV on.
2. Point the remote control at your TV. Press and hold for three seconds the TV button
and the button corresponding to the manufacturer’s number from the table below.
The LED on the remote control will flash twice and the remote control will switch to
the setup mode. Release the TV and OK buttons.
3. Press and hold the CH+ or CH- button. The remote control will automatically send a
Power off code to the TV every 1.5 seconds. When the TV turns o f f, qui ck l y release
the CH- or CH+ button and press OK to save the code. After that, the LED will blink
twice and the remote control will exit the setup mode.
– 8 –

4. You can change the search direction, using the buttons CH- and CH+.
5. Each time you start setting up, search begins with the first code in the table.
Table of Manufacturer Numbers and Codes
Manufacturer Number Code
Aiwa 0 1050 1141 1094
Akai 1 1086 1010 1018 1002 1001 1000 1059 1056
1053 1051 1049 1054 1031 1030 1023 1013
1008 1037 1071 1022 1064 1078 10 83 113 8
Hitachi 2 1104 1024 1034 1055 1162 1011 1005 1057
1105 1071 1093 1159 1122 1044 1022 1017
1163 1073 1027 1023 1002 1031 1006 1030
1008 1072
JVC 3 1046 1133 1037 1118 101 8 1004 10 45
LG 4 1091 1161 1008 1120 1002 1082 1000 1031
1053 1037 1006 1049 1054 1128 1123 1153
1186 1187 1188 1189 1190 1191 1192 1193
1194 1195 1196 1197 1198
Panasonic 5 1045 1113 1115 1012 1084 1002 1031 1030
1005 1180 1181 1182 1183 1184 1185
Philips 6 1031 1002 1095 1036 1017 1000 1202 1203
1204 1205 1206 1207 120 8 1209 12 10
Pioneer 7 1080 1092 1007 1048 1002 1031 1017 1006
1014 1025 1029
Samsung 8 1064 1151 1041 1008 1035 1004 1155 1112
1031 1079 1000 1002 1013 1165 1166 1167
1168 1169 1170 1171 1172 1173 1174 1175
1176 1177 1178 1179
Sony 9 1094 1134 1116 119 9 120 0 1201
A full table of manufacturer numbers and codes see on
http://bit.ly/2P6K8dV.
Setting up Remote Control by Using a Manufacturer Code
1. Turn your TV on.
– 9 –

2. Point the remote control at your TV. Press and hold the TV and OK buttons for 3
seconds. The LED on the remote control will flash twice and the remote control will
switch to the setup mode. Release the TV and OK buttons.
3. Enter the four-digit setup co de o f your TV mo del fro m the tabl e ab ove. The LED will
flash each time you enter a digit.
4. If you entered the code correctly, the LED will blink twice. Otherwise – once.
5. Check the buttons operation. If most of the buttons function correctly, the code is
correct. If necessary buttons do not work properly, select another code from the
table and repeat steps 2–5.
Note: If no button is pressed or a non-numeric button is pressed for 20 seconds in setup
mode, the remote control switches to standby mode.
Controlling Volume of STB or TV
Remote can be configured to control the volume of the TV or STB. To switch between
these two states , press an d hold the buttons P OWER and V + for thre e seconds. The LED
will blink twice and the remote will control the volume of the other device.
Changing STB Code
If using the remote control for STB results in any undesirable interference with your TV
(such as switching TV channels when you switch channels on STB), this means that the
codes used to control STB and TV overlap or are the same.
To eliminate this int erference, ch ange the code used by the remote contr ol for STB. Sinc e
there are two possible codes for STB, select the one that does not result in undesirable
interference with your TV.
To change the code, do the following steps:
1. Turn the STB on.
2. Press and hold POWER and OK buttons for three seconds. When the LED on
remote control lights up, release the buttons. The remote control will switch to the
setting mode. Release the TV and OK buttons.
3. By default, the STB uses the code 1256, you can change the code to 1255. Enter
the code 1255. The LED will flash each time you enter a digit.
4. If the code is entered correctly, the LED will flash twice. If the code is entered
incorrectly, the LED will flash once and the remote control will exit the setup mode.
Repeat steps 2–4.
5. Try pressing the remote control button that causes undesirable interference with
another device. If the conflict is resolved, the code has been selected correctly.
Resetting the Remote Control
To reset the remote control:
– 10 –

Problem
Possible reason
Solution
No picture
1. TV is not turned on
1. Turn on your TV
The screen
displays "No
1. STB is not connected
1. Connect STB to the mains
STB.
No sound
1. The sound is turned off
1. Increase the volume on TV by
remote control.
Remote control
1. Dead battery.
STB.
1. Replace the battery w i th a new
the remote control and STB.
STB turns off
1. Not enough power
1. Connect STB to power adapter
sides.
1. Press and hold TV and OK buttons for 3 seconds. The LED on the remote control
will flash twice and the remote control will switch to the setup mode. Release the TV
and OK buttons.
2. Enter the code 977. The LED will flash each time you enter a digit. After that, the
LED will blink four times, and the settings will be reset to default.
First Start
When you switch on the STB for the first time, make sure that the STB is connected to a
managed IPTV netw ork. The b ox w ill star t downloadi ng the lat est ver sion of t he softw are.
Updating may take a few minutes. Do not disconnect the STB from power supply and
from the Internet before the updating is complete. After finishing the STB will reboot
automatically.
Troubleshooting
signal"
is not working
periodically
to the mains supply.
2. STB is turned off.
3. TV is set to the wrong
input source.
on TV.
2. The sound is turned off
on STB.
2. The signal from remote
control does not reach
supply to STB.
2. Overheating.
supply.
2. Turn STB on by using its
remote control.
3. Use TV remote control to select
the video input connected to
using the TV remote control.
2. Increase the volume on STB by
using VOL+ button on STB
one.
2. Reduce the distance between
included in the supplied
package.
2. Ensure sufficient air flow to STB
— no less than 10 cm (4
inches) of clearance on all
If you need further support, please contact your Service Provider.
Cleaning
1. Unplug the STB before cleani ng .
2. Wipe the STB and remote control with a clean dry rag only.
3. Clean the ventilation holes in the STB’s enclosure on a regular basis.
– 11 –

4. You may remove stains from the STB’s surface with a slightly damp cloth.
5. Do not use chemical cleaner, car polish, dissolvent, aerosol, cleaning agents,
abrasive powders and materials for cleaning the STB and accessories.
Disposal
The STB must be disposed separately from household waste. When the STB reaches
its end of life, contact local authorities to learn about disposal and recycli ng options. The
correct disposal will help prevent potential negative impact on the environment and
human health.
STB remote control contains a battery. Dispose of the battery according to your local
environmental laws and guidelines.
WEEE Compliance Statement
This symbol on the product or on its packaging indicates that old electrical
appliances must n ot b e dis posed tog ether w ith the resi dual was te, but hav e
to be disposed o f sepa ratel y . The dis posal at the c ommu nal c ollec tin g point
via private persons i s for free. The owner of old appli ances is respon sible to
bring the applia nces to thes e col lecti ng points or t o si milar collec ti on poi nts.
With this little personal effort, you contribute to recycle valuable raw
materials and the treatment of toxic substances.
Specifications
Name: SML-5051W
Dimensions: 110 x 107 x 33 mm, 130g
Power supply:
• Input: AC 100-240V, 50/60Hz
• Output: DC 12V, 1.0A
Ports and interfaces:*
• Digital audio/video interface HDMI 2.0a
with HDCP 2.2 and HDR support
• CVBS video interface + analog stereo
audio interface (TRRS mini-jack)
• Ethernet port, 10/100 M bps
• Optical digital audio interface S/PDIF
(optional)
• USB 2.0 port
• Port for the power supply DC 12V
* The availability of some ports may vary
depending on service provider requirements.
– 12 –

Wi-Fi module:
Standard IEEE 802.11n\ac, MIMO 2x2
Operating frequency 2.4GHz band: 2400~2483.5 MHz
Antenna Gain not more than 3dBi
Max. transmitting power (EIRP) not more than 18 dBm
BT module:
Standard BT v4.2 + BLE
Operating frequency 2402–2480 MHz
Antenna Gain not more than 3dBi
5GHz band: 5150~5250 MHz & 57255850 MHz (depends on country)
Max. transmitting power (EIRP) not more than 8 dBm (BT class 1)
The device complies with RF specifications when the device used at 20cm from your
body.
When the device support wlan5G (5150–5250 Mhz), Manufacture will list the following
statement and country list (not EU country) on the user manual, and wlan5G only used
to indoor.
Max. resolution supported on HDMI: 4Kx2K@60
Supported CVBS standards: PAL, NTSC
Supported video and audio codecs: to get information about actually supported
codecs, please contact the service provider.
Extreme temperature: 0–40℃
Hardware version: 0x10010001
Software version: 98200.02
Licensing and Certification
Company and product names mentioned in this guide may be trademarks, registered
trademarks or serv ed marks of the a ppro pri ate r ig ht holders . HDM I and H DCP s tandar ds
– 13 –

are used in the device on the appropriate licenses given by its right holders. Smartlabs
Holding Ltd has the ap pr opr i ate li cens es to use these standards.
The terms HDMI and HDMI High-Definition Multimedia Interface, an d the HD MI Log o ar e
trademarks or registered trademarks of HDMI Licensing LLC in the United States and
other countries.
Smartlabs Holding Ltd is able to change, improve any product described in this guide
and also the guide itself without preliminary notice.
©Smartlabs Holding Ltd, 2019. No part of this document can be reprinted, republished
without a preliminary agreement with Smartlabs Holding Ltd.
EC Declaration of Conformity
This product can be used across EU member states.
The plug considered as disconnect device of
• Adapter 1. Manufacturer: ShenZhen Sunun Power Technology CO., LTD.
Model: SA12V-120100V. Input: AC 100–240V, 50/60Hz, 0.4A max. Output: DC
12V, 1A.
• Adapter 2. Manufacturer: ShenZhen Sunun Power Technology CO., LTD.
Model: SA12BH-120100V. Input: AC 100–240V, 50/60Hz, 0.4A. Output: DC 12V,
1A.
• Adapter 3. Manufacturer: Shenzhen TEK A Tec hn ol og y CO., LTD. Model:
TEKA012-1201000EU. Input: AC 100–240V, 50/60Hz, 0.35A max. Output: DC
12V, 1A.
• Adapter 4. Manufacturer: SHENZHEN RUIJING INDUSTRIAL CO., LTD. Model:
RJ-AS120100E106. Input: AC 100–240V, 50/60Hz, 0.5A. Output: D C 12V, 1A.
Hereby, Smartlabs Holding Ltd declares that the radio equipment type STB, model
SML-5051W is in compliance with Directive 2014/53/EU. The full text of the EU
declaration of conformity is available at the following internet address:
http://bit.ly/2JCmYwf.
– 14 –

FCC Compliance Statement
This device complies with part 15 of the FCC rules. Operation is subject to the following
two conditions: (1) This device may not cause harmful interference, and (2) this device
must accept any interference received, including interference that may cause undesired
operation.
Note that this equipment has been tested and found to comply with the limits for a Class
B digital device, pursuant to part 15 of the FCC Rules. These limits are designed to
provide reasonable protection against harmful interference in a residential installation.
This equipment generates, uses and can radiate radio frequency energy and, if not
installed and used in a ccordanc e wi th the inst ructions, may cause h arm ful inter ference to
radio communications. However, there is no guarantee that interference will not occur in
a particular installation. If this equipment does cause harmful interference to radio or
television reception, which can be determined by turning the equipment off and on, the
user is encouraged to try to correct the interference by one or more of the following
measures:
• Reorient or relocate the receiving antenna.
• Increase the separation between the equipment and receiver.
• Connect the equipment into an outlet on a circuit different from that to which the
receiver is connected.
• Consult the dealer or an experienced radio/TV technician for help.
FCC Radiation Exposure Statement:
• This equipment complies with FCC radiation exposure limits set forth for an
uncontrolled envir onm ent. This equipment should be installed and operated with
minimum distance 20cm between the radiator and your body. This transmitter
must not be co-located or operating in conjunction with any other antenna or
transmitter.
Innovation, Science and Economic Development (ISED) Canada Compliance Notice
This device complies with Innovation, Science and Economic Development Canada’s
license-exempt RSS(s). Operation is subject to the following two conditions:
1. This device may not cause interference.
2. This device must accept any interference, including interference that may cause
undesired operation o f the dev i c e.
Le présent appareil est conforme aux CNR d’Innovation, Sciences et Développement
économique Canada applicables aux appareils radio exempts de licence. L’exploitation
est autorisée aux deux conditions suivantes:
1. L’appareil ne doit pas produir e de br ouil l ag e;
2. L’appareil doit accepter tout brouillage radioélectrique subi, même si le brouillage
est susceptible d’en compromettre le fonctionnement.
– 15 –

This equipment complies with IC radiation exposure limits set forth for an uncontrolled
environment. This equipment should be installed and operated with minimum distance
20cm between the radiator and your body.
Cet équipement es t conform e aux li mites d'ex position aux rayonne ments IC ét ablies pour
un environnement non contrôlé. Cet équipement doit être installé et utilisé avec un
minimum de 20 cm de distance entre la source de rayonnement et votre corps.
Manufacture date
Manufacture date is specified in the serial number on the device bottom. 8-th digit to the
right is the year, 7-th and 6-th are the week:
Note: S/N and MACs are shown here for example only.
About the Manufacturers
Manufacturer: Smartlabs Holding Ltd
Manufacturer address: Nafpliou 15, Limassol, Cyprus, 3025
Contact information: info@smartlabs.tv
Manufacturing plant: Sichuan Changhong Network Technologies Co. LTD
Manufacturing plant address: 35, East Mianxing Road, High-Tech Park, Mianyang,
Sichuan, China
Warranty
The appliance warranty is provided through the service provider. The warranty period
and conditions are determined by the service provider. If maintenance or repair is
required please contact your service provider.
No part of this document shall be considered as warranty.
– 16 –
 Loading...