

Page 1
SML-272 SD
SML-282 HD Base
SML-292 HD Premium
User Guide
IPTV Set-Top Box
Page 2

Contents
CONTENTS.........................................................................................2
INTRODUCTION.................................................................................3
USING IPTV STB................................................................................7
TECHNICAL CHARACTERISTICS..................................................20
LICENSES AND CERTIFICATES.......................................................23
WARRANTY.......................................................................................25
2
Thank You for Choosing SmartLabs IPTV STB..............................3
Serial Number and MAC Address of STB.......................................3
Using This Guide............................................................................3
Usage Conditions...........................................................................3
Чистка............................................................................................5
Cleaning.........................................................................................5
Servicing.........................................................................................5
Packaging.......................................................................................7
Connecting to Devices....................................................................8
Indicators and Slots......................................................................10
Starting the IPTV STB..................................................................13
Using the Remote Control...........................................................13
Remote Control Buttons Specication..........................................16
Installation of the Hard Disk (HDD)..............................................18
Installation of the Flash Drive (USB Flash)..................................20
Licensing Agreement...................................................................23
Copyright Notice..........................................................................23
Standards and Certicates..........................................................24
Page 3

Introduction
Thank You for Choosing SmartLabs IPTV STB
Please read this user guide carefully before using the digital interactive television (IPTV) set-top box (STB).
This guide contains the information about the following models of IPTV STB:
SML-272 SD, SML-282 HD Base, SML-292 HD Premium.
Note that particular features of your device are optional. Your device may differ
from the device shown in pictures in this guide.
The guide provides the description of all possible functions and options of
SmartLabs IPTV STB.
The functions and slots available in your device and supplied accessories are
fully determined by the service provider.
Your service provider will also give you another user guide or manual with the
information on how to use the device to get access to IPTV services.
Serial Number and MAC Address of STB
Serial Number and MAC Address of STB are written at the bottom panel of
IPTV STB.
Using This Guide
Further in this guide the information, which is strongly recommended to be read, is
marked with the following icons:
Usage Conditions
1. Use your IPTV STB indoors only. The air temperature should be no higher
than 40° С and the relative humidity should be between 20-90% without
condensation.
3
Attention! Possible situations of incorrect usage of the device, which can
provoke damage of IPTB STB or other devices and accessories.
Note. Additional information on the device usage peculiarities.
Page 4

2. Use the IPTV STB only with the power adapter supplied with your device.
Make sure that the power supply standard approved in your country is
compatible with the power supply standard used in the power adapter (See
the Technical Specication section, Power Adapter). If the power adapter
is not compatible with the power supply standard used in your country,
contact the service provider.
3. Do not allow water or other liquids, rain or high humidity to affect the de-
vice to decrease the risk of re or current rush.
4. Do not put the device into water. Do not use the device in those places,
where the IPTV STB can contact with liquid or steam. If this occurs, immediately turn off the device and disconnect from the electricity network.
Contact the service provider on this accident.
5. Do not put the device into direct sun rays.
6. Do not place the device near the open re or heating radiators.
7. Do not allow vibration or shake the device.
8. Do not use the device in dusty rooms.
9. If lightning is expected, or you are not going to use IPTV STB for a long
time, disconnect the device from the wall outlet, unplug the Ethernet,
video, audio cables from it. This measure will help to protect IPTV STB
from damage due to lightning and power surges.
10. If you use IPTB STB with a plasma TV set, do not leave the picture on for
more than 5 minutes. Due to plasma’s constructive peculiarities a static
picture left for a long time can damage the display of the screen. The IPTV
STB manufacturer is not responsible for any harm caused by this reason.
11. IPTB STB can automatically update its software. Do not switch off the
device and disconnect it from Ethernet until the software update is complete. The IPTV STB manufacturer is not responsible for consequences of
incorrect software update in your device.
4
Page 5
Cleaning
• Turn off the device before cleaning.
• Wipe the device with a clean, dry rag only.
• Clean the ventilation holes in the device’s enclosure regularly.
• To remove stains from the device’s surface, it is possible to use a slightly
damp rag.
• Do not use chemical cleaner, car polish, dissolvent, aerosol, cleaning
agents, abrasive powders and materials for cleaning the device and accessories.
Servicing
1. Do not open the device. Unauthorized opening of the device deprives warranty. The manufacturer’s label is located at the bottom side of the device.
Breach of the label removes warranty from the device.
2. To repair the device, contact your service provider.
Device Installation
1. Remove IPTV STB from packaging.
2. Remove the protective lm from the glance top panel of the device.
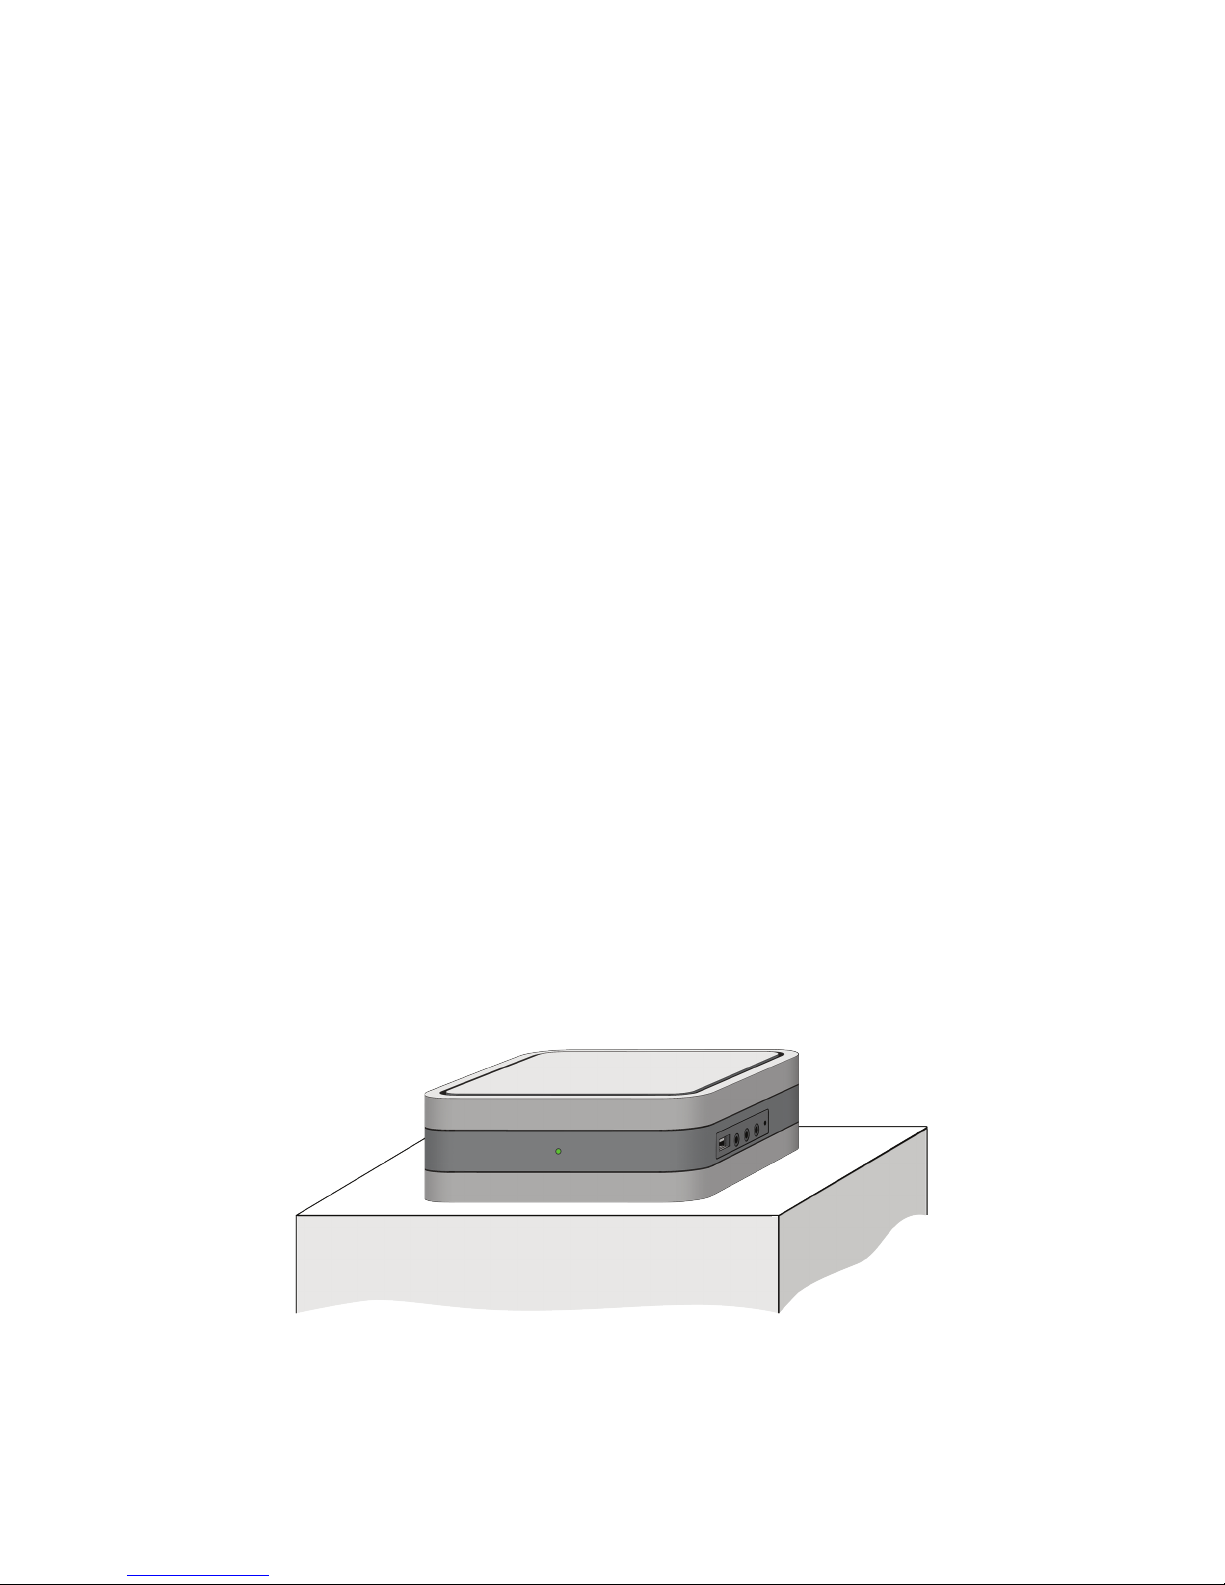
3. Choose one of the following positions:
Horizontal position (on table, holder, shelf)
5
Page 6
If your device is supplied with the RF remote control, you do not need to place
IPTV STB in the direct visibility range to control the device.
Keep the following conditions when installing the device:
1. Place IPTV STB on a at surface.
2. Do not place the device on slick surfaces, where there is a risk of vibration, fall or other damages of IPTV STB.
3. Do not mount the device on soft surfaces, like bed, carpet, etc. Because
it impedes access for air and normal ventilation of the device. This can
cause overheating or damage of the device.
4. Do not cover the device.
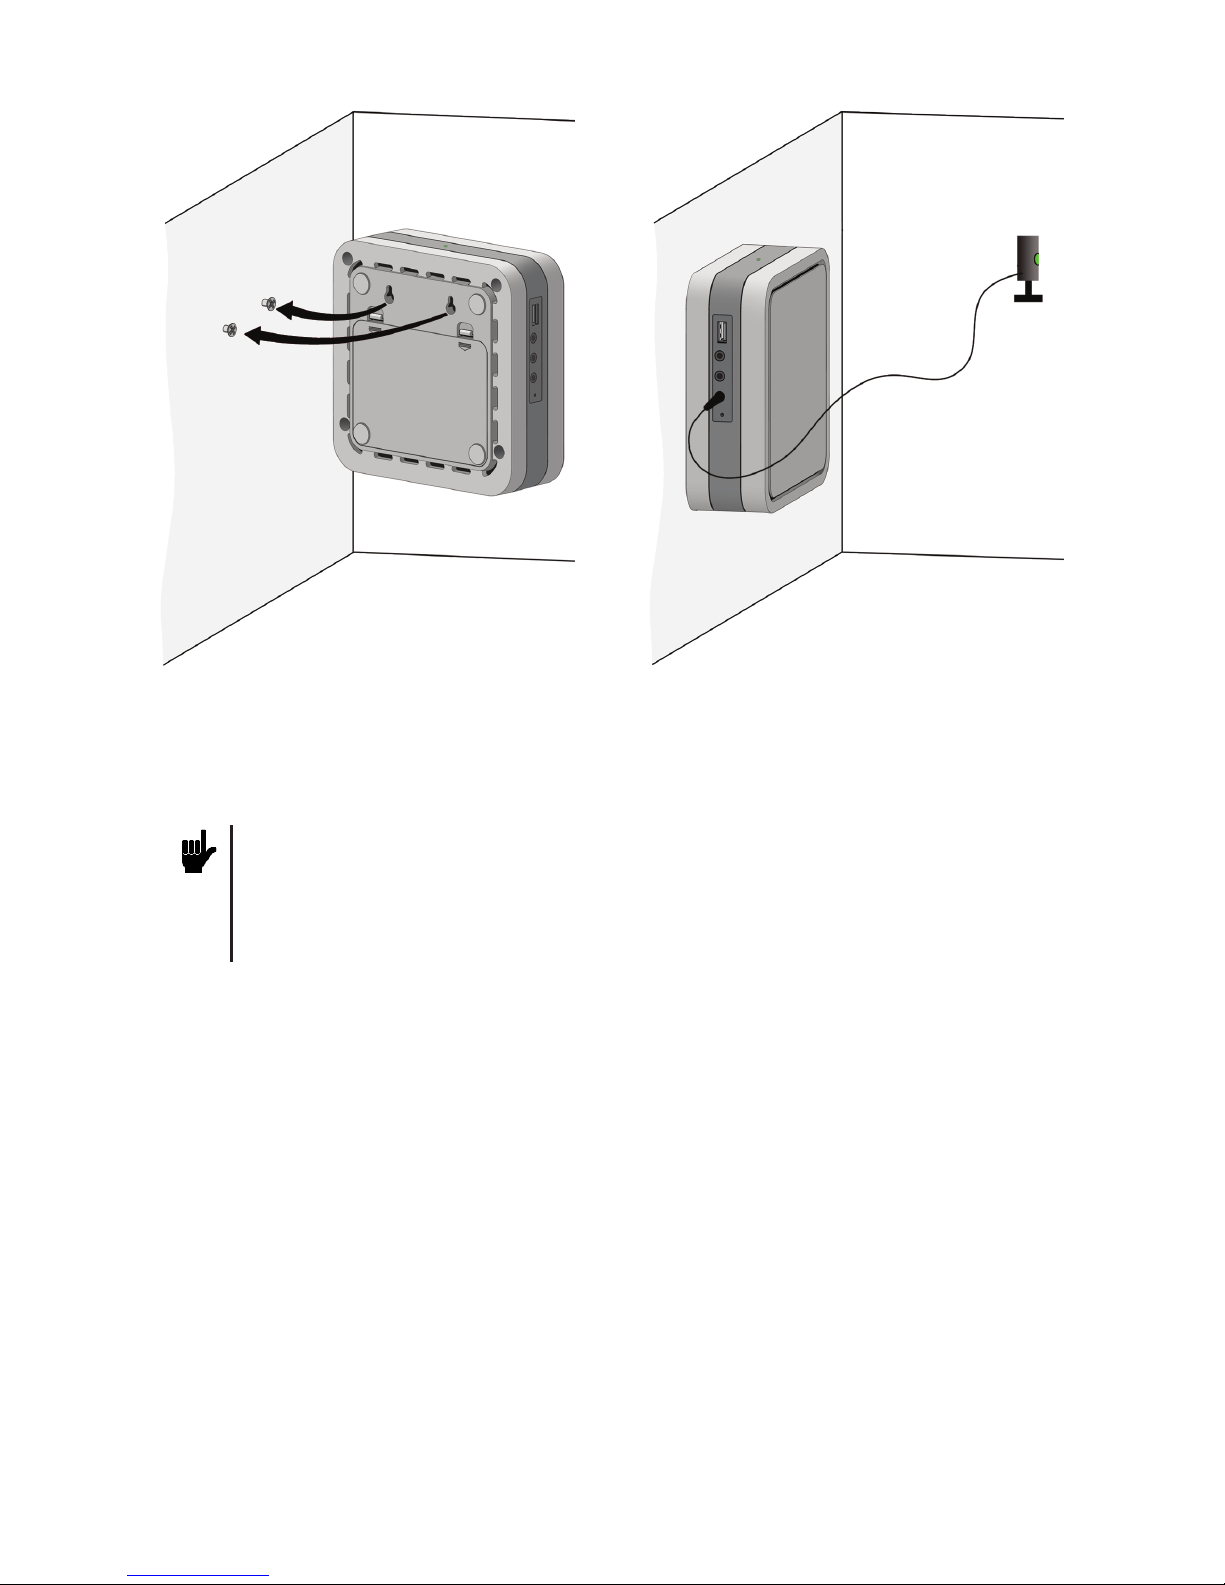
4. If your IPTV STB is equipped with an IR receiver, you should place the
device’s front side towards the user.
Note. To control the device placed out of the direct visibility range with the
IR remote control, use the external IR receiver (if the device has the appro-
priate slot). Connect the external IR remote control to IPTV STB and x the
external IR receiver in the direct visibility range of the device.
Remote
IR receiver
Vertical position (on the wall)
6
Page 7
5. Do not shield the ventilation holes in the device’s enclosure located at the
top panel of the device.
6. When mounting the device leave at least 10 cm of free space from each
panel of the device. Do not place IPTV STB in closed cupboards and
caves.
7. Do not place IPTB STB on surfaces, which can heat, for instance, on
boosters.
8. Do not place various things on the device.
9. To avoid damage of the power adapter’s cable, place the cable so that it is
not pressed, pinched or mechanically affected in another way.
Using IPTV STB
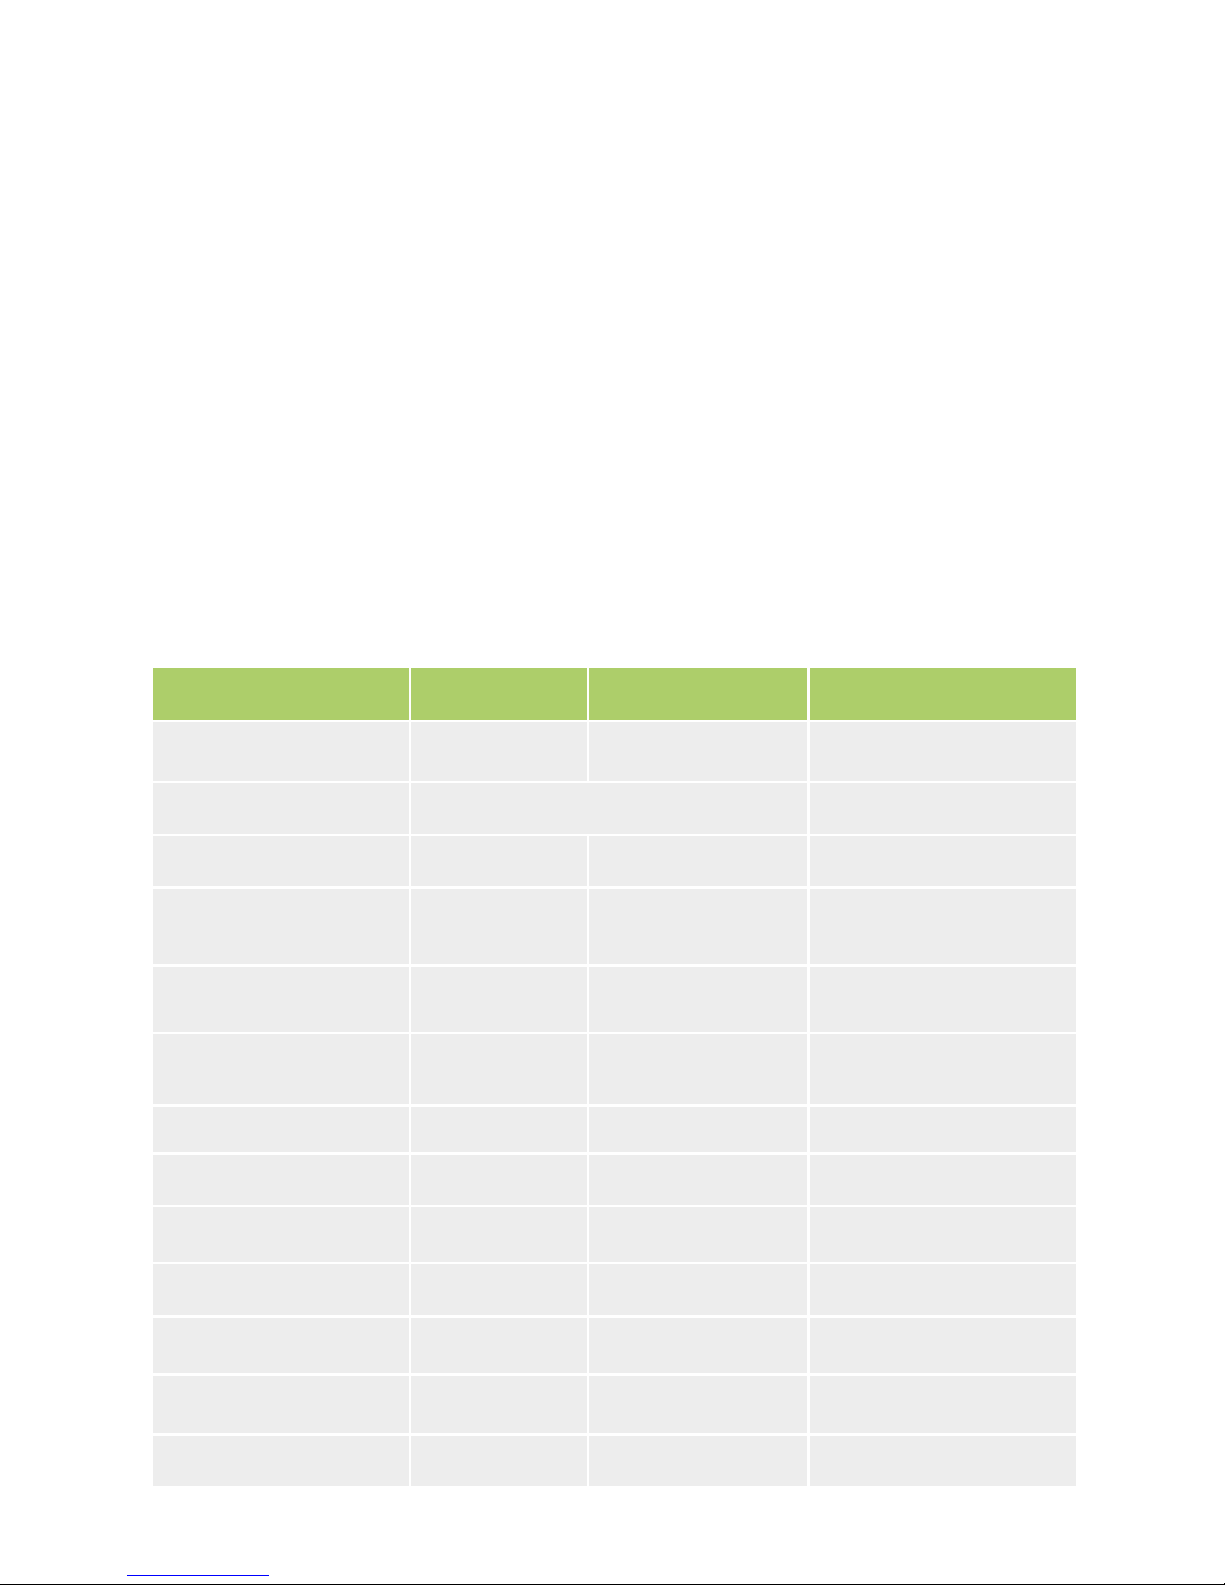
Packaging
Name SML-272 SD SML-282 HD Base SML-292 HD Premium
IPTV STB + + +
Power supply 12V 1.2A 12V 2.0A
Ethernet cable Optional Optional Optional
AV video cable
(3xRCA)
+ + +
YPbPr video cable
(3xRCA)
Optional Optional Optional
YPbPr + Audio cable
(5xRCA)
Optional Optional Optional
HDMI cable, 1.8 m - Optional +
Remote control IR or RF IR or RF IR or RF
ААА batteries, 2 pcs + + +
HDD connection kit - - +
User guide + + +
Warranty card + + +
Package + + +
7
Page 8
Connecting to Devices
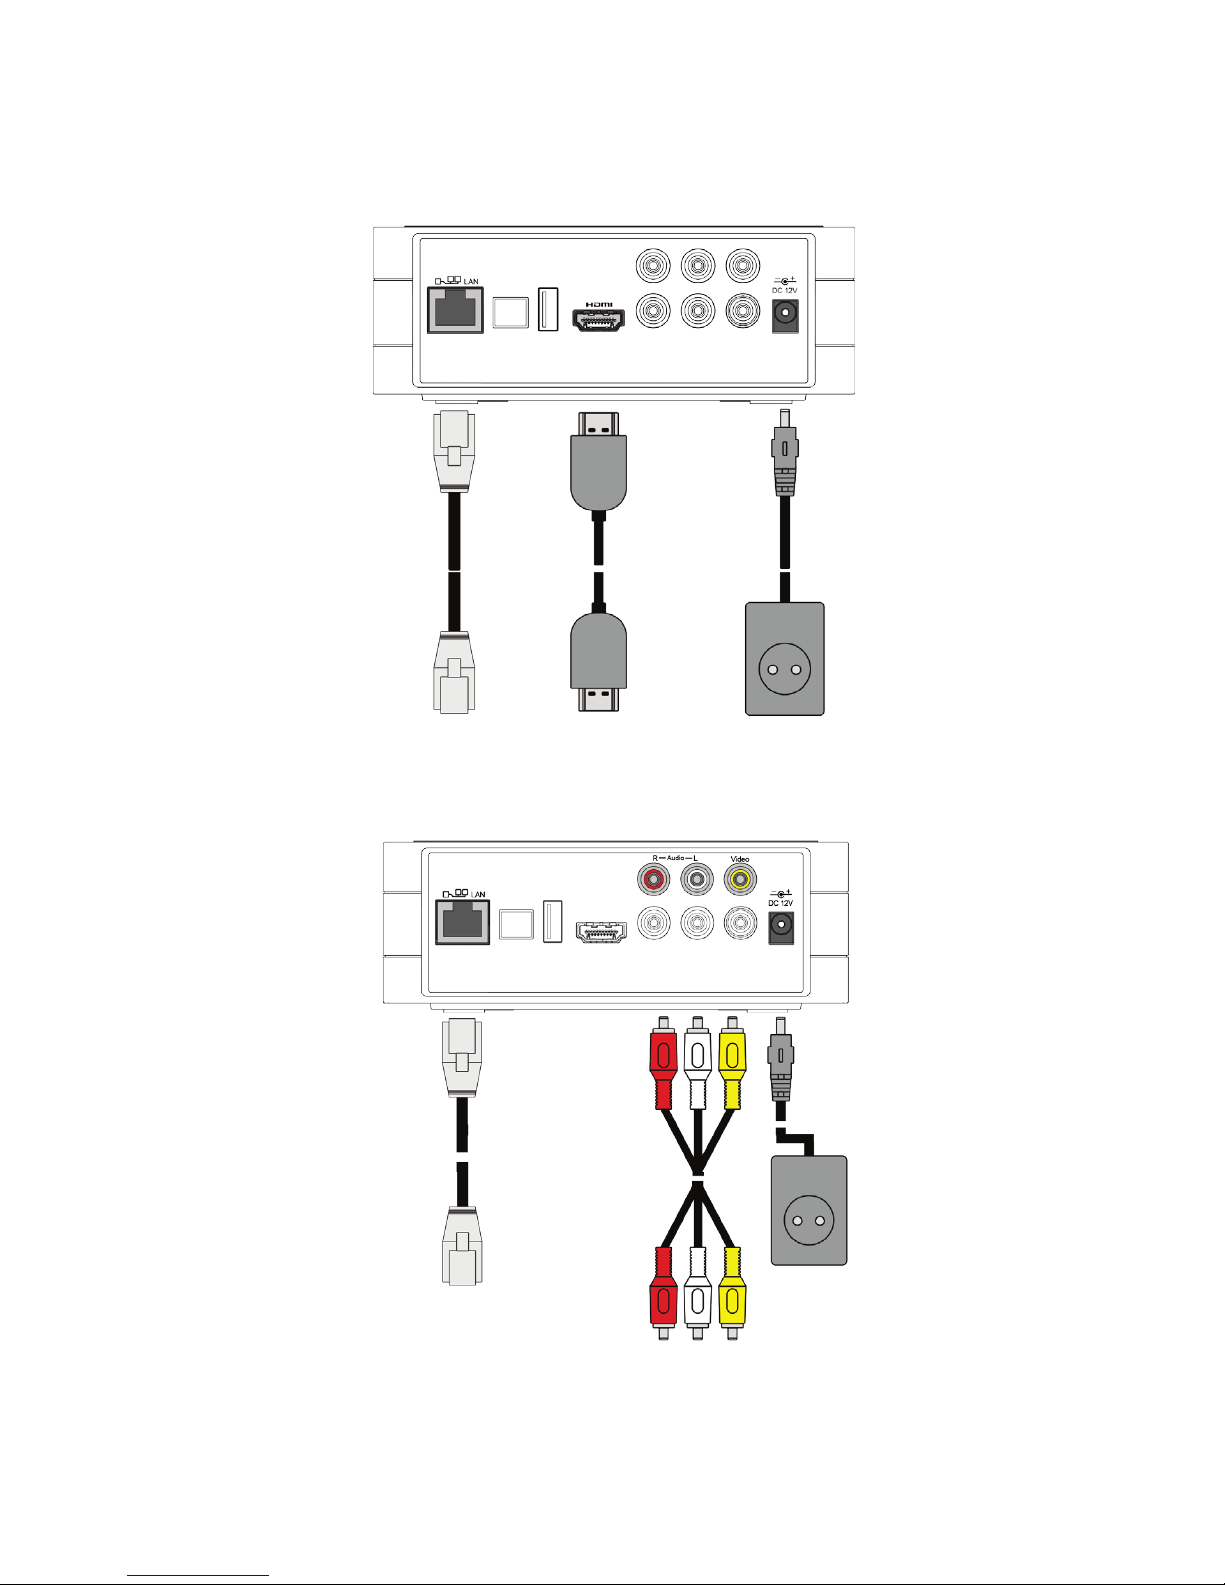
Connect your IPTV STB to a TV set, speakers (if any) and the Internet according to one of the following schemes:
The connection scheme via HDMI
The connection scheme via the composite video slot RCA
and stereo audio slot RCA
To an Internet
router
To an Internet router
Power supply
(220 V)
Power supply
(220 V)
To a TV set or audio
system
To a TV set or AV
receiver
To a TV set
8
Page 9

You can also connect additional devices to your IPTV STB:
• Microphone
• 2.5’’ SATA internal HDD – SML-292 HD premium only
• USB ash drive (USB Flash) or other USB device (web camera, external
HDD)
• External IR receiver
The connection scheme via the component video slot YPbPr
and audio slot RCA or S/PDIF
To an Internet router
Power supply
(220 V)
To an audio receiver or
audio system (if any)
To a TV set
To a TV set or
audio system
9
Note. If your device is provided with the RF remote control, it has no slot to
plug in an external IR remote control.
Note. The list of compatible microphones is available on the IPTV STB manufacturer’s web site: www.smartlabs.tv/iptvstb
Attention! Before using the RF remote control, you should connect it to the
IPTV STB, as it is described in the Connecting the RF Remote Control sec-
tion.
Page 10

Back Panel
Number Slot Purpose
1 LAN
Ethernet port 10/100 Mbit/s for the connection to a
network device (the service provider’s equipment or
Internet router).
2 S/PDIF
Optical audio output to audio receiver or speakers of
the PCM or Dolby Digital 5.1 digital audio format.
It is possible to switch the output mode from the
application’s menu, if your service provider provides
this feature.
3 USB USB 2.0 port for the connection to external devices.
4
HDMI (Нет в SML-
272 SD)
Audio+video output of high denition for the connection to a TV set or AV receiver.
5 R-Audio-L
Stereo audio output.
R - Right channel.
L - Left channel.
6 Video Composite video output.
7 Y, Pb, Pr Component video output.
8 DC 12V Power adapter slot.
Indicators and Slots
10
Page 11

Side Panel
Number Slot Purpose
1 USB USB 2.0 port for the connection to external devices.
2 и 3 Mini-jack 3.5 mm slot for the microphone connection.
4 Ext-IR (Optional)
Mini-jack 3.5 mm slot for the external IR receiver connection.
5 RESET
The button inside restores the default settings in the
device dened by the manufacturer.
Front Panel
11
Page 12

Number Slot Purpose
1 SATA HDD slot Internal HDD connection slot.
2 HDD cover
Bottom Panel
Number Elements Purpose
1 Power indicator
Green – IPTV STB is switched on and works
normally.
Red – IPTV STB is in the stand-by mode.
2 IR receiver’s window
The internal IR receiver’s window accepting
signals from the IR remote control (RC).
This window should be in the direct visibility
range from the IR RC, if an external IR receiver is not used.
If the device is supplied with the RF RC, it has
no internal IR receiver.
12
Page 13

Starting the IPTV STB
When you switch on IPTV STB for the rst time, the device will start downloading the latest version of software. During the update the special service
message and progress bar are displayed on the TV set’s screen. The software update process can take a few minutes. Do not disconnect the device
from power supply and Ethernet before the update is complete. After nishing the update procedure, IPTV STB will automatically reboot.
As a new software version appears, it will be automatically downloaded to
the device.
Using the Remote Control
Differences Between RF and IR Remote Controls
Your IPTV STB can be supplied with IR or RF remote control (RC).
Determine the Remote Control type by the picture (see Remote Control But-
tons Specication).
IR Remote Control is a common remote control, which requires an IR receiver
located in the direct visibility range from the device. Usually it is an internal IR
receiver having a special window to receive signals located at the front panel
of the device. If your IPTV STB has a slot for an external IR receiver, you can
x the receiver in a suitable place and aim the Remote Control to it to control
the device (see Connecting External IR Receiver for IR Remote Control).
RF Remote Control is a radio frequency remote control, which does not require the direct visibility range from the device. RF Remote Control works in a
range of 50 m of direct visibility and can also overcome small obstacles, thin
walls, etc., however in this case the action radius considerably decreases.
13
Page 14

Installation of Batteries to the Remote Control
Two batteries of the AAA type are used in IR and RF Remote Control. Put the
batteries into Remote Control like it is shown in the picture:
• Remove the cover from the batteries’ compartment.
• Insert batteries keeping the correct polarity.
• Close the batteries’ compartment cover.
When inserting or replacing batteries in Remote Control, keep the following
conditions:
1. Strictly keep the batteries’ polarity.
2. Do not use old and new batteries at the same time.
3. Do not try to charge batteries.
4. Insert both batteries of the same manufacturer and model.
Connecting the RF Remote Control
If your device is equipped with the RF Remote Control, you should connect it
to the IPTV STB, which you are going to control with the Remote Control. To
connect the RF Remote Control, do the following:
1. Insert the batteries into the Remote Control.
2. Put the Remote Control close to the IPTV STB no farther than at 20 cm
from the device.
3. Press the Favorites and >>| buttons simultaneously.
4. If the Remote Control’s led indicator lights up and lights permanently, the
Remote Control has been successfully connected to the IPTV STB and
the RF Remote Control is ready to use.
If the indicator blinks, repeat steps 2, 3, 4.
If the indicator does not light up, make sure that you have installed the
working batteries properly and repeat steps 2, 3, 4.
14
Page 15

Connecting External IR Receiver for Remote Control
If your device is supplied with the RF Remote Control, you do not need an external IR receiver.
If your device has a slot to plug in an external IR receiver, you can connect it
to IPTV STB and use this receiver in the direct visibility range instead of using
internal IR receiver of the device.
Both external and internal receivers accept signals from the same Remote
Control. When an external receiver is connected, it accepts signals from Remote
Control. In order to send commands to the internal receiver aiming the Remote
Control to the window on the front panel of the device, disconnect the external
receiver from IPTV STB.
External IR receiver is not included with the accessories. You can purchase it
separately.
Insert the external IR receiver into the slot located at the back panel of the device (see the back panel picture).
Place the signal receiving eye of the receiver in the direct visibility range from
the device (see Device Installation).
15
Page 16

16
Namber IR/RF Remote Control Button Purpose
1 (Turn on/stand-by)
Switches the IPTV STB on or turns the
device into the stand-by mode.
2
(Mute)
Disables/Enables sound.
3 Numeric buttons Enter numbers, letters, symbols.
4 Last ch. (Last channel)
At the time of watching TV channels
switches the translation to the previous
viewed channel.
At the time of watching a move rewinds
for a few seconds back.
Remote Control Buttons Specication
RF Remote Control IR Remote Control
Page 17

Namber IR/RF Remote Control Button Purpose
5 Search Opens the search window.
6 Home
Returns to the main menu from any position.
7 TV Opens the TV channels menu.
8 VoD Opens the video on demand menu.
9 Menu Opens the menu.
10
▼▲◄► (Arrow buttons)
OK
Move through menu items, select and
conrm options.
11 VOL ▲▼ (Volume +/-) Change volume.
12 CH ▲▼ (Channels +/-) Switch channels.
13 Colored buttons
The button functions are determined by
the service provider.
14 Video player buttons
Play
Stop
Pause
Fast forward
Rewind
Next frame
Previous frame
15 Favorites Opens the favorites menu.
16 Info Opens the information menu.
17 Settings Opens the settings menu.
18 Prole
Opens the application proles menu (if
supported by the service provider).
17
Page 18

18
Installation of the Hard Disk (HDD)
The SML-292 HD Premium model allows you to install an internal hard disk
into the device.
Hard disk is not included with the accessories. You can purchase the disk
separately.
HDD Requirements:
• Size 2.5’’
• Thickness 7, 9.5, 12 mm. To install 7 or 9.5 mm disk, use the appropriate
plastic handle shipped with the box
• SATA-300 connection slot and data transmission
• SATA COMBO connector type (SATA Data+SATA Power)
• Recommended rotation speed: 5400 rev/min
• Up to 1 TB volume
When choosing the HDD model for your IPTV STB you may use the recommended HDD model list from the device manufacturer, which is available on the
web site:
www.smartlabs.tv/iptvstbdfg
The IPTB STB’s manufacturer does not recommend you to use HDD with more
than 5400 rev/min speed, because IPTV STB’s enclosure will overheat. If you
install HDD with more than 5400 rev/min speed, HDD will work out of the esti-
mated recommended temperature mode, which can decrease both the device
and HDD’s life time.
Install the disk as it is shown in the picture:
Attention! Before you install/remove HDD, switch off the device and disconnect it from power supply.
7 mm
9.5 mm
Page 19

Remove the HDD cover by pressing 2
locks at the same time.
Take 2 screws and a handle from the HDD
connection kit. Fix screws as it is shown in
the picture.
Place the hard disk into the compartment.
Plug in the disk to the slot using the
handle as it is shown in the picture.
19
Switch off the device and disconnect it from the wall outlet. Turn
the device upside-down. To prevent scratching the glance surfaces, put it on a fabric laying.
Attention! To install 12 mm disk, carefully cut off the lug at the internal side of
the HDD cover. A plastic handle is not required in this case.
Page 20

20
Close the HDD cover so that both locks click.
To remove the internal HDD from the STB, perform the installation actions in
the reverse order.
For more information on how to use the hard disk connected to IPTV STB, see
the documentation obtained from your service provider.
Installation of the Flash Drive (USB Flash)
Flash drive is not included with the accessories. You can purchase it separately.
Connect a Flash drive to a USB slot located at the back or side panel of the
device (see panel pictures).
For more information on how to use a Flash drive in IPTV STB, see the documentation obtained from your service provider.
Technical Characteristics
Options SML-272 SD
SML-282 HD
Base
SML-292 HD
Premium
Basic parameters
HDD SATA 2.5” connection
possibility
Slot: SATA HDD
- - +
IR receiver
Protocol: RC5-RC7
Carrier frequency: 37.9 kHz
IR/RF IR/RF IR/RF
Page 21

Options SML-272 SD
SML-282 HD
Base
SML-292 HD
Premium
RF receiver
Frequency : RF433 MHz
IR/RF IR/RF IR/RF
Device dimensions (L*W*H), mm 150*150*55
Package dimensions (L*W*H), mm 290*230*80
Inputs and Outputs
USB 2.0 at the back panel
А type, 5V 500mA
+ + +
USB 2.0 at the side panel
А type, 5V 500mA
Optional Optional +
Ethernet (10BASE-T, 100BASETX)
Slot: RJ45
+ + +
Composite video output
CVBS
Slot:1xRCA
+ + +
Component video output YPbPr/
RGB
Slot: 3xRCA
Optional Optional Optional
Multimedia output HDMI 1.3a with
HDCP
Slot: HDMI
- + +
Stereo audio output
Slot: 2xRCA
+ + +
S/PDIF Optional + +
Microphone inputs, pcs
Slot: mini-jack 3.5 mm
Optional
(Up to 2)
Optional
(Up to 2)
+ (2)
21
Page 22

22
Supported video formats
MPEG-2 ISO/IEC 13818
MPEG-4 AVC H.264/H.263
Maximum supported denition
HDMI output – up to 1080p
YPbPr/RGB output – up to 1080i
CVBS output – up to 576i
Supported output video formats
for CVBS
PAL
SECAM
NTSC
Aspect ratio
4:3
16:9
Audio
Play modes
Analog output – Stereo
Digital output– Bypass, Stereo
Analog video formats Stereo
Digital audio formats MPEG (Layer 1,2,3), PCM, AC3 , AAC
Microphone types supported at
mini-jack 3.5 mm inputs
Dynamic microphones
Options SML-272 SD
SML-282 HD
Base
SML-292 HD
Premium
External IR receiver
Slot: mini-jack 3.5 mm
Optional Optional Optional
Video
Page 23

Licenses and Certicates
Licensing Agreement
By using the software in your IPTV STB, you agree to be bound by the terms
of this agreement. If you do not agree to be bound by the terms of the agreement, you must immediately cease all use of the device and return the device,
all accessories and documentation to your service provider.
Subject to terms of this agreement, SmartLabs LLC and your service provider
jointly grant you a non-exclusive, non-transferable license, without the right
of sub-license, to use all software included with the device or subsequently
provided to you, and all documentation solely for your noncommercial use and
solely in connection with your use of the device.
The device manufacturer does not provide any additional warranties regarding
software installation. The device manufacturer is not responsible for defects
and errors, which can be present in software, and the device compliance to
your functional requirements and needs.
The device manufacturer is not responsible for possible loss of prots, activity
cease, money, information loss or other kinds of losses, which can be caused
by using or the inability of using the installed software.
After the agreement is over, you must return the device, accessories and
documentation to your service provider.
Copyright Notice
Company and product names mentioned in this guide may be trademarks,
registered trademarks or served marks of the appropriate right holders.
HDMI, HDCP, Dolby AC-3 standards are used in the device on the appropriate licenses given by its right holders. SmartLabs LLC has the appropriate
licenses to use these standards.
No part of this guide, except the «Warranty» section, can be considered as
additional warranty commitment.
SmartLabs LLC is able to change, improve any product described in this
guide and also the guide itself without preliminary notice.
© SmartLabs LLC. No part of this document can be reprinted, republished
without a preliminary agreement with SmartLabs LLC.
23
Page 24

24
Standards and Certicates
The device manufacturer does not guarantee absence of clutters generated
by the device. To eliminate possible clutters, do the following:
1. Enlarge the distance between IPTV STB and other devices and equipment.
2. Connect the equipment using another scheme.
3. Consult with your service provider.
Conformity
IPTV STB is complied with TU 6582-001-83102005-2010
and has the appropriate ROHS certicate.
Electrical Safety
Device: SML-272 SD, SML-282 HD Base, SML-292 HD Premium
Electrical Safety Class: III
Page 25

3. Information on the manufacturer
Company: SmartLabs LLC
Address: 127521, Moscow, 72 Oktyabrskaya street, telephone: (495)645-44-56
Contact information: www.smartlabs.tv, support@smartlabs.tv
Assembling factory: Sichuan Changhong Network Technologies Co., LTD
Assembling factory’s address: 35 East Mianxing Road, High-Tech Park,
Mianyang, Sichuan, China
Warranty
1. Providing the warranty
A warranty for your IPTV STB is offered by your service provider.
The warranty period and conditions of service are determined by your ser-
vice provider.
In case your IPTV STB requires servicing, please contact your service pro-
vider directly.
2. Warranty card:
25
Page 26

 Loading...