

Page 1
y
Quick-Start Guide
MorningLincTM – INSTEON® Morning Industry
RF Doorknob/Deadbolt Controller
Model: 2458A1
Introduction
MorningLinc consists of a specially-wired ICON Appliance Module,
which will allow you to lock or unlock your Morning Industry RF
deadbolts and door locks (up to fifteen) with the press of a button
on an
Linked INSTEON Controller.
Installation
When installing MorningLinc, use an outlet or extension cord to keep the unit within five feet of the door lock fixture. Once
installation is complete, MorningLinc can be moved to another outlet (up to 30 feet away from the door lock fixture).
1) Be sure you have properly installed at least two Access Points or other dual-band products. Search for dual-band
INSTEON products at: http://www.smarthome.com/dualband
2) Plug MorningLinc into an unswitched wall outlet
The MorningLinc Status LED will turn on solid
3) Use a screwdriver to remove the cover plate from the door lock fixture. Then, tap its Set button (labeled “S”).
The door lock fixture will beep
4) Tap the Set button on MorningLinc
After a few seconds, the door lock fixture will double-beep
The MorningLinc Status LED will turn off
5) If you wish to control multiple door locks with MorningLinc, repeat steps 3 and 4 with each additional door lock fixture
6) Tap the Set button on MorningLinc to toggle the door lock fixture locked and unlocked
NOTE: The MorningLinc Status LED will follow the last INSTEON command it received. When the door is manually locked/unlocked
from the keypad or the lock itself, the LED will not change until it receives an INSTEON command (either from a Linked Controller or
the Set button on MorningLinc). It may take 3-5 seconds for the door lock fixture to respond to INSTEON commands.
Controlling MorningLinc from an INSTEON Controller
Individual commands can be Linked to the On and Off buttons on your Controller. For example, you can Link the door to lock
when you press the On button and unlock when you press the Off button on your Controller.
NOTE: LOCK and UNLOCK commands must each be Linked to a separate button. Commands cannot be toggled on one
button unless you are using a Controller that allows toggle mode (e.g., KeypadLinc
To Link to an On button:
1) Use the Set button to put your lock into the desired state (what action you would like the lock to perform when you press
the On button)
2) Set your Controller to Linking Mode. (For most Controllers, press & hold an On or Scene button for 10 seconds, or the Set
button for 3 seconds.)
You will have 4 minutes to complete the next step before Linking Mode automatically times out.
3) Press & hold the Set button on MorningLinc for 3 seconds
The MorningLinc Status LED will flash once, and then turn on solid if the door is locked or turn off if the door is
unlocked
4) Confirm that Linking was successful by locking/unlocking the door and pressing the On button you just Linked to
MorningLinc should respond appropriately
To Link to an Off button:
1) Use the Set button to put your lock into the desired state (what action you would like the lock to perform when you press
the Off button)
2) Set your Controller to Linking Mode. (For most Controllers, press & hold an On or Scene button for 10 seconds or the Set
button for 3 seconds.)
You will have 4 minutes to complete the steps 3 and 4 before Linking Mode automatically times out.
3) Double-tap the Set button on MorningLinc and wait for 3 seconds before next step
4) Press & hold the Set button on MorningLinc for 3 seconds
The MorningLinc Status LED will flash once, and then turn on if the door is locked or turn off if the door is unlocked
5) Confirm that Linking was successful by locking/unlocking the door and pressing the Off button you just Linked to
MorningLinc should respond appropriately
™
).
Complete Instructions, Troubleshooting, and Tech Support
Owner’s Manual: http://www.smarthome.com/manuals/2458a1.pdf
Tech. Support @ 1-800-SMARTHOME (800-762-7846)
Call:
Contact Us Online:
http://www.smarthome.com/contactus.html
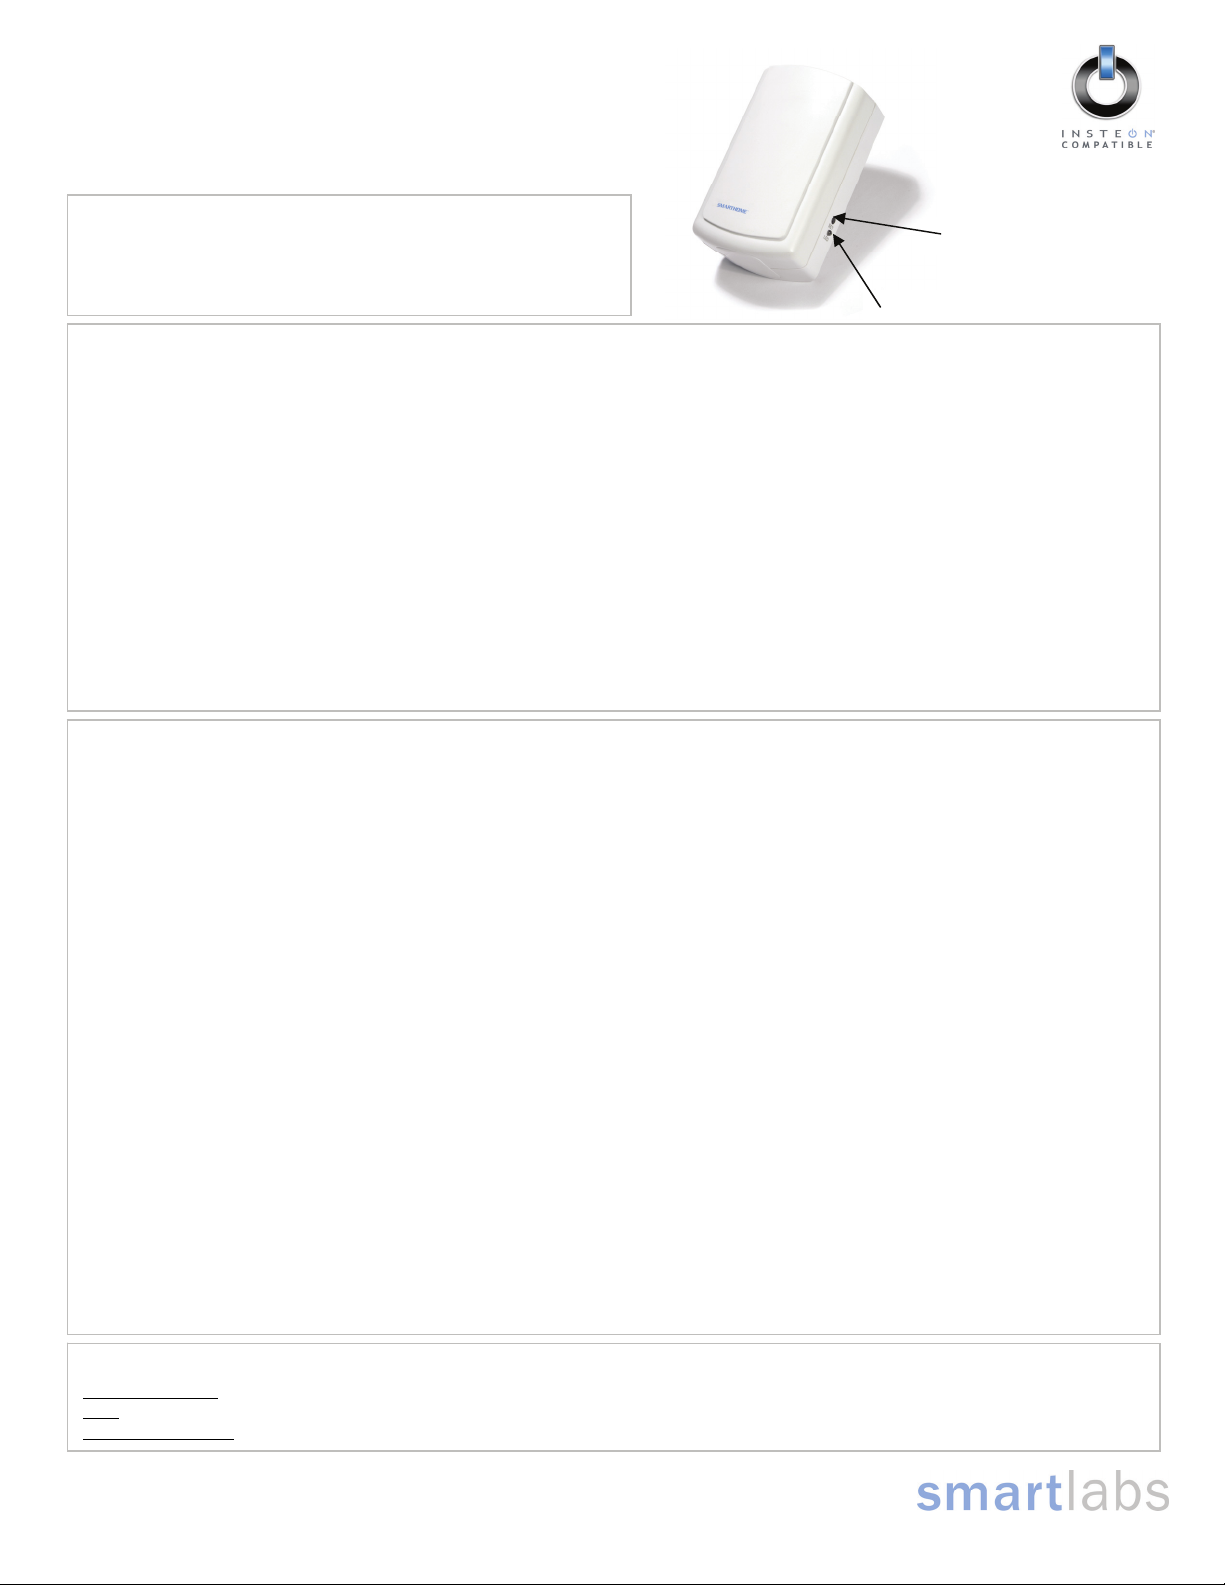
Set button
Status LED
Page 1 of 1
Rev. 09-20-2011
SmartLabs Limited Warranty – SmartLabs warr ants to original consumer of this product for a period of 2 years from date of purchase, this product will be
free from defects in material & workmanship & will pe rform in substantial conformity with its Owner 's Manual. Warranty shall not apply to defec ts caused by
misuse or neglect.
U.S. Patent No. 7,345,998, International patents pending © Copyright 201 0
SmartLabs, 16542 Millikan Ave., Irvin e, CA 92606, 800-762-7845
 Loading...