

Page 1
Quick-Start Guide
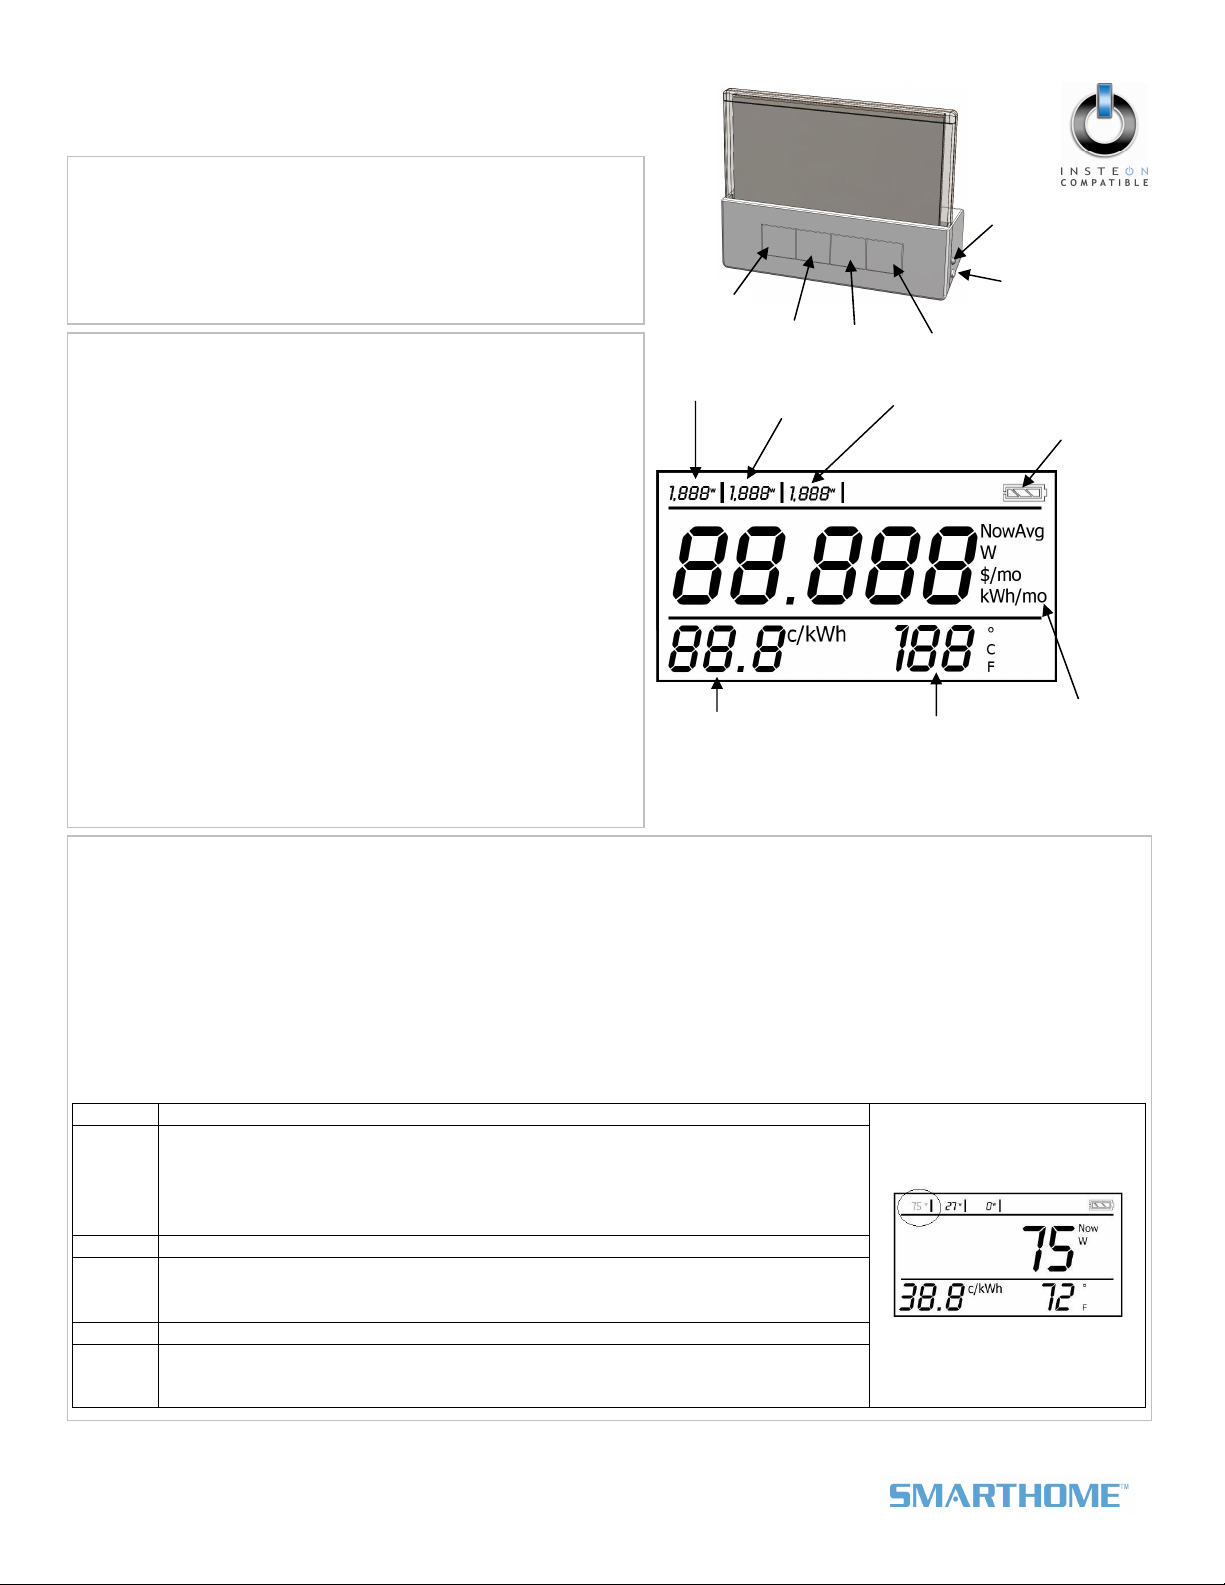
r
Mode
button
Cost
setting
Restart
button
Meter 2
1/2/3
button
Refresh
button
Meter 3
Temperature
setting
Status LED
Set button
Battery level
Display
options
Energy Display – INSTEON® In-Home Display
Model: 2448A2
Introduction
Energy Display reads power consumption information from devices
plugged into INSTEON devices and presents current power use,
average energy use per month, and average cost per month based
on your monthly billing rate.
NOTE: Energy Display requires an INSTEON meter device (e.g.,
™
iMete
Solo).
Installation
NOTE: Energy Display uses 2 AAA batteries and will provide approximately
one year of use per pair.
1) Energy Display requires at least one Access Point (#2443) or
dual-band INSTEON device for communication. For the best
INSTEON network performance, be sure you have properly
installed at least two dual-band INSTEON devices.
Search for dual-band INSTEON devices at:
www.smarthome.com/dualband
2) Remove the battery compartment from the rear of Energy
Display
3) Observe the polarity markings, install two AAA batteries, and
then replace the battery compartment door
Energy Display is now ready to use. See Linking Energy Display to
an INSTEON Device to begin receiving energy information about
your appliances.
The Energy Display screen should turn on and all LCD
segments should turn on
After a few seconds, Energy Display should beep and its
screen should be in Display Mode
Energy Display should attempt to gather data. While
gathering data, Energy Display should show a series of
hyphens along the top of the screen.
Meter 1
Using Energy Display
Data is retrieved when:
• Energy Display is first Linked to a meter device
• Refresh button is tapped while Energy Display is in Display Mode
• Any button is tapped in Standby Mode
Energy Display will exhibit power-related information for one minute after the last button press, and then enter Standby Mode to
prevent unnecessary traffic on the network and save battery energy. When in Standby Mode, no items will display on the screen
except the temperature settings. Tap any button to exit Standby Mode. When Energy Display exits Standby Mode, it will return to
the previous Display Mode.
Display Mode
NOTE: Circled text indicates blinking text on the Energy Display screen.
Button Action
Mode
Up N/A
1/2/3
Refresh Tap to read current information for all meter devices
Set
button
• Tap to cycle between display setting options
• Instantaneous Watts used (Now | W)
• Average cost per month (Avg | $/mo)
• Average energy used per month (Avg | kWh/mo)
• Press & hold for 3 seconds to enter Setup Mode
• Tap to cycle between each meter device to be displayed (Meter 1, 2, or 3)
• Press & hold for 10 seconds to reset the energy value for the currently displayed
meter device (for calculating average energy used and cost/month)
Press & hold for 3 seconds to Link a meter device to the current meter position on
Energy Display (Meter 1, 2, or 3). See Linking Energy Display to an INSTEON Meter
Device.
Page 1 of 3
Rev. 01-14-2011
Smarthome Limited Warranty – Smarthome warr ants to original consumer of this product for a per iod of 2 years from date of purchase, this product will b e
free from defects in material & workmanship & will pe rform in substantial conformity with its Owner 's Manual. Warranty shall not apply to defec ts caused by
misuse or neglect.
U.S. Patent No. 7,345,998, International patents pending © Copyright 201 1
Smarthome, 16542 Millikan Ave., Ir vine, CA 92606, 800-762-7845
Page 2
Quick-Start Guide INSTEON Energy Display
Linking Energy Display to an INSTEON Meter Device
1) Make sure the meter device is properly installed with the appliance you wish to monitor
2) Tap the 1/2/3 button until the desired meter position is blinking (Meter 1, 2, or 3)
3) Set Energy Display to Linking Mode* by pressing & holding the Refresh button until it beeps (3 seconds)
4) On the meter device, press & hold the Set button for 3 seconds
5) Confirm that Linking was successful by checking the Energy Display screen
The Energy Display Status LED should begin blinking green
Energy Display should beep and its Status LED should stop blinking and turn off
The Energy Display screen should display information for the meter device you just Linked to
Setup Modes
NOTE: Circled text indicates blinking text on the Energy Display screen.
To enter Setup Mode, press & hold the Mode button for 3 seconds.
To exit Setup Mode:
• Tap the Refresh button to accept the current value
• Wait for Energy Display to time out and automatically accept the current value (~1 minute)
• Tap the Mode button to accept the current value and move to the next Setup Mode
Once Energy Display exits a setup mode, it will return the screen to Display Mode.
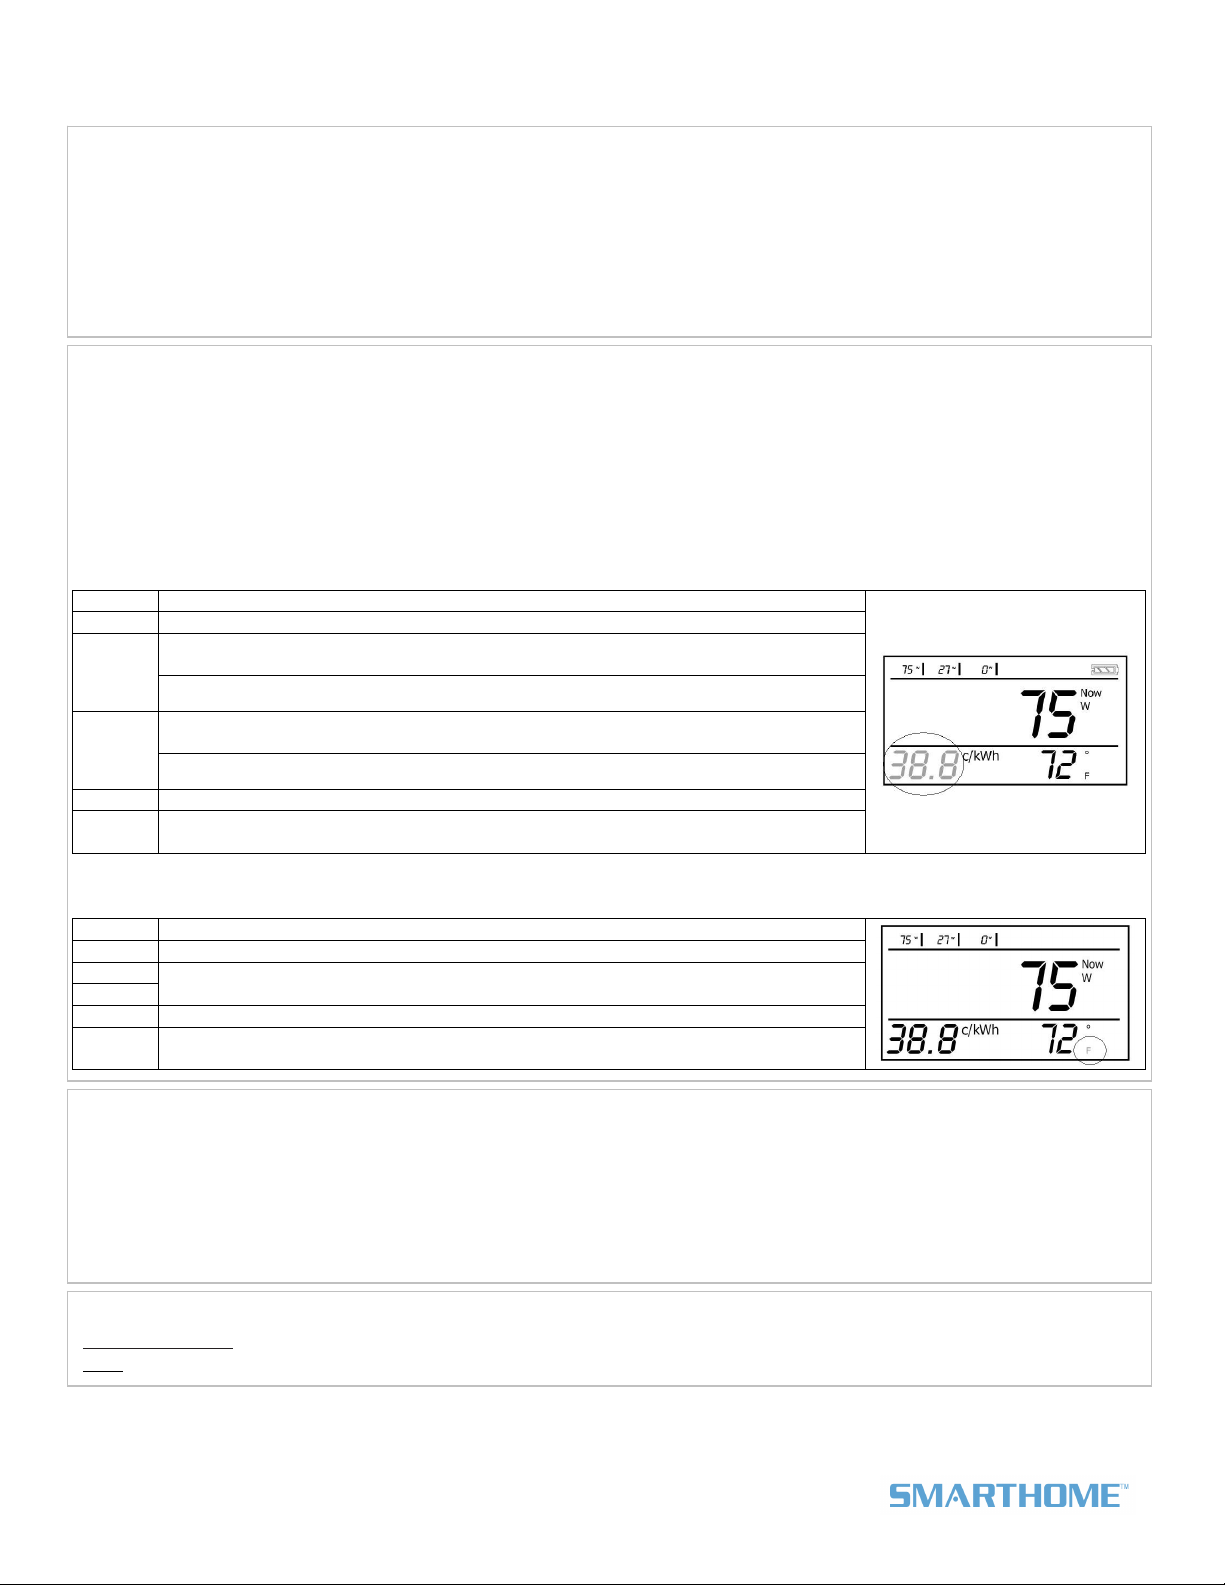
Cost Mode
Range is 0.1 to 999 cents/kWhr ($9.99/kWhr). Once the counter reaches 99.9¢, it will reset to 100¢. The default is 10.0¢.
Button Action
Mode Tap to cycle to the next setting mode (Temperature Format)
Tap to increase the cost by 0.1¢ until cost exceeds 99.9¢. If cost is 100¢ or greater,
Up
Down
OK Tap to accept current Cost setting and exit Setup Mode
Set
button
cost increases by 1¢.
Press & hold to continuously increase cost
Tap to decrease the cost by 0.1¢ if cost is between 0.1¢ and 99.9¢. If cost is 100¢ or
greater, decreases by 1¢.
Press & hold to continuously decrease cost
N/A
Temperature Format Mode
Range is 0 to 199 degrees. The default is Fahrenheit.
Button Action
Mode Tap to cycle to the next setting mode (Display Mode)
Up
Down
OK Tap to accept current Temperature Format setting and exit Setup Mode
Set
button
Tap to toggle the temperature display between Celsius and Fahrenheit
N/A
Calibrating the Temperature
1) Set Energy Display to Temperature Calibration Mode** by pressing & holding the Mode and Refresh buttons simultaneously
until the temperature setting begins blinking (3 seconds)
2) Use the Restart and 1/2/3 buttons to set the local temperature (based on a thermostat or other device)
3) When you reach the correct temperature, tap the Refresh button to accept the local temperature
• Tapping the Restart button will increase the temperature by one degree
• Tapping the 1/2/3 button will decrease the temperature by one degree
The temperature setting should no longer be blinking
Complete Instructions, Troubleshooting, and Tech Support
Owner’s Manual: www.smarthome.com/manuals/2448A2.pdf
Call:
INSTEON Gold Support Line at 800-762-7845
*Setup Modes will automatically time out after 4 minutes.
**Temperature Calibration Mode will automatically time out after 1 minute.
Page 2 of 3
Rev. 01-14-2011
Smarthome Limited Warranty – Smarthome warr ants to original consumer of this product for a per iod of 2 years from date of purchase, this product will b e
free from defects in material & workmanship & will pe rform in substantial conformity with its Owner 's Manual. Warranty shall not apply to defec ts caused by
misuse or neglect.
U.S. Patent No. 7,345,998, International patents pending © Copyright 201 1
Smarthome, 16542 Millikan Ave., Ir vine, CA 92606, 800-762-7845
Page 3

Quick-Start Guide INSTEON Energy Display
FCC & Industry Canada Compliance Statement
This device complies with FCC Rules Part 15. Operation is subject to two conditions:
(1) This device may not cause harmful interference, and
(2) This device must accept any interference that may be received or that may cause undesired operation. The digital
circuitry of this device has been tested and found to comply with the limits for a Class B digital device, pursuant to Part
15 of the FCC Rules. These limits are designed to provide reasonable protection against harmful interference in
residential installations. This equipment generates, uses and can radiate radio frequency energy and, if not installed
and used in accordance with the instructions, may cause harmful interference to radio and television reception.
However, there is no guarantee that interference will not occur in a particular installation. If this device does cause such
interference, which can be verified by turning the device off and on, the user is encouraged to eliminate the interference
by one or more of the following measures:
• Re-orient or re-locate the receiving antenna of the device experiencing the interference.
• Increase the distance between this device and the receiver.
• Connect the device to an AC outlet on a circuit different from the one that supplies power to the receiver.
• Consult the dealer or an experienced radio/TV technician.
WARNING! Changes or modifications to this device not expressly approved by the party responsible for compliance
could void the user's authority to operate the equipment.
This device complies with Industry Canada licence-exempt RSS standard(s). Operation is subject to the following two
conditions: (1) this device may not cause interference, and (2) this device must accept any interference, including
interference that may cause undesired operation of that device.
Le prsent appareil est conforme aux CNR d'Industrie Canada applicables aux appareils radio exempts de licence.
L'exploitation est autorise aux deux conditions suivantes : (1) l'appareil ne doit pas produire de brouillage, et (2)
l'utilisateur de l'appareil doit accepter tout brouillage radiolectrique subi, mme si le brouillage est susceptible d'en
compromettre le fonctionnement.
Page 3 of 3
Rev. 01-14-2011
Smarthome Limited Warranty – Smarthome warr ants to original consumer of this product for a per iod of 2 years from date of purchase, this product will b e
free from defects in material & workmanship & will pe rform in substantial conformity with its Owner 's Manual. Warranty shall not apply to defec ts caused by
misuse or neglect.
U.S. Patent No. 7,345,998, International patents pending © Copyright 201 1
Smarthome, 16542 Millikan Ave., Ir vine, CA 92606, 800-762-7845
 Loading...