

Page 1
INSTEON
RemoteLinc
INSTEON-compatible
Wireless Handheld Controller
For models:
#2440 RemoteLinc Handheld Controller
Page 2

INSTEON-compatible RemoteLinc User’s Guide
TABLE OF CONTENTS
ABOUT REMOTELINC................................................................................................................................. 3
What is INSTEON?.................................................................................................................................... 3
Key RemoteLinc Features.........................................................................................................................3
HOW TO INSTALL REMOTELINC .............................................................................................................. 4
RemoteLinc Installation ............................................................................................................................. 4
HOW TO SET UP REMOTELINC ................................................................................................................5
Linking RemoteLinc to an INSTEON Device.............................................................................................5
Unlinking One INSTEON Device from RemoteLinc ..................................................................................6
Creating an INSTEON Scene.................................................................................................................... 6
ADVANCED FEATURES OF REMOTELINC .............................................................................................. 7
Resetting One ON/OFF Button to Its Factory Default Settings ................................................................. 7
Resetting RemoteLinc to Its Factory Default Settings............................................................................... 7
Turning the Audio Beeper On and Off.......................................................................................................8
Turning the Status LED On and Off ..........................................................................................................8
Stuck Button Feature.................................................................................................................................8
SETUP SUMMARY....................................................................................................................................... 9
HOW TO USE REMOTELINC ....................................................................................................................10
Using RemoteLinc’s Buttons ................................................................................................................... 10
Using the ON and OFF Buttons ..............................................................................................................10
Using the ALL ON and ALL OFF Buttons................................................................................................11
Using the BRIGHT and DIM Buttons.......................................................................................................12
ABOUT INSTEON ......................................................................................................................................13
Understanding Why an INSTEON Network Is Reliable........................................................................... 13
Further Enhancing Reliability ..................................................................................................................13
Using SmartLab’s AccessPoint to Upgrade Your INSTEON Network ....................................................13
TROUBLESHOOTING................................................................................................................................14
SPECIFICATIONS ...................................................................................................................................... 16
RemoteLinc Specifications ...................................................................................................................... 16
FCC Compliance Statement.................................................................................................................... 17
Limited Warranty .....................................................................................................................................18
Page 3
INSTEON-compatible RemoteLinc User’s Guide
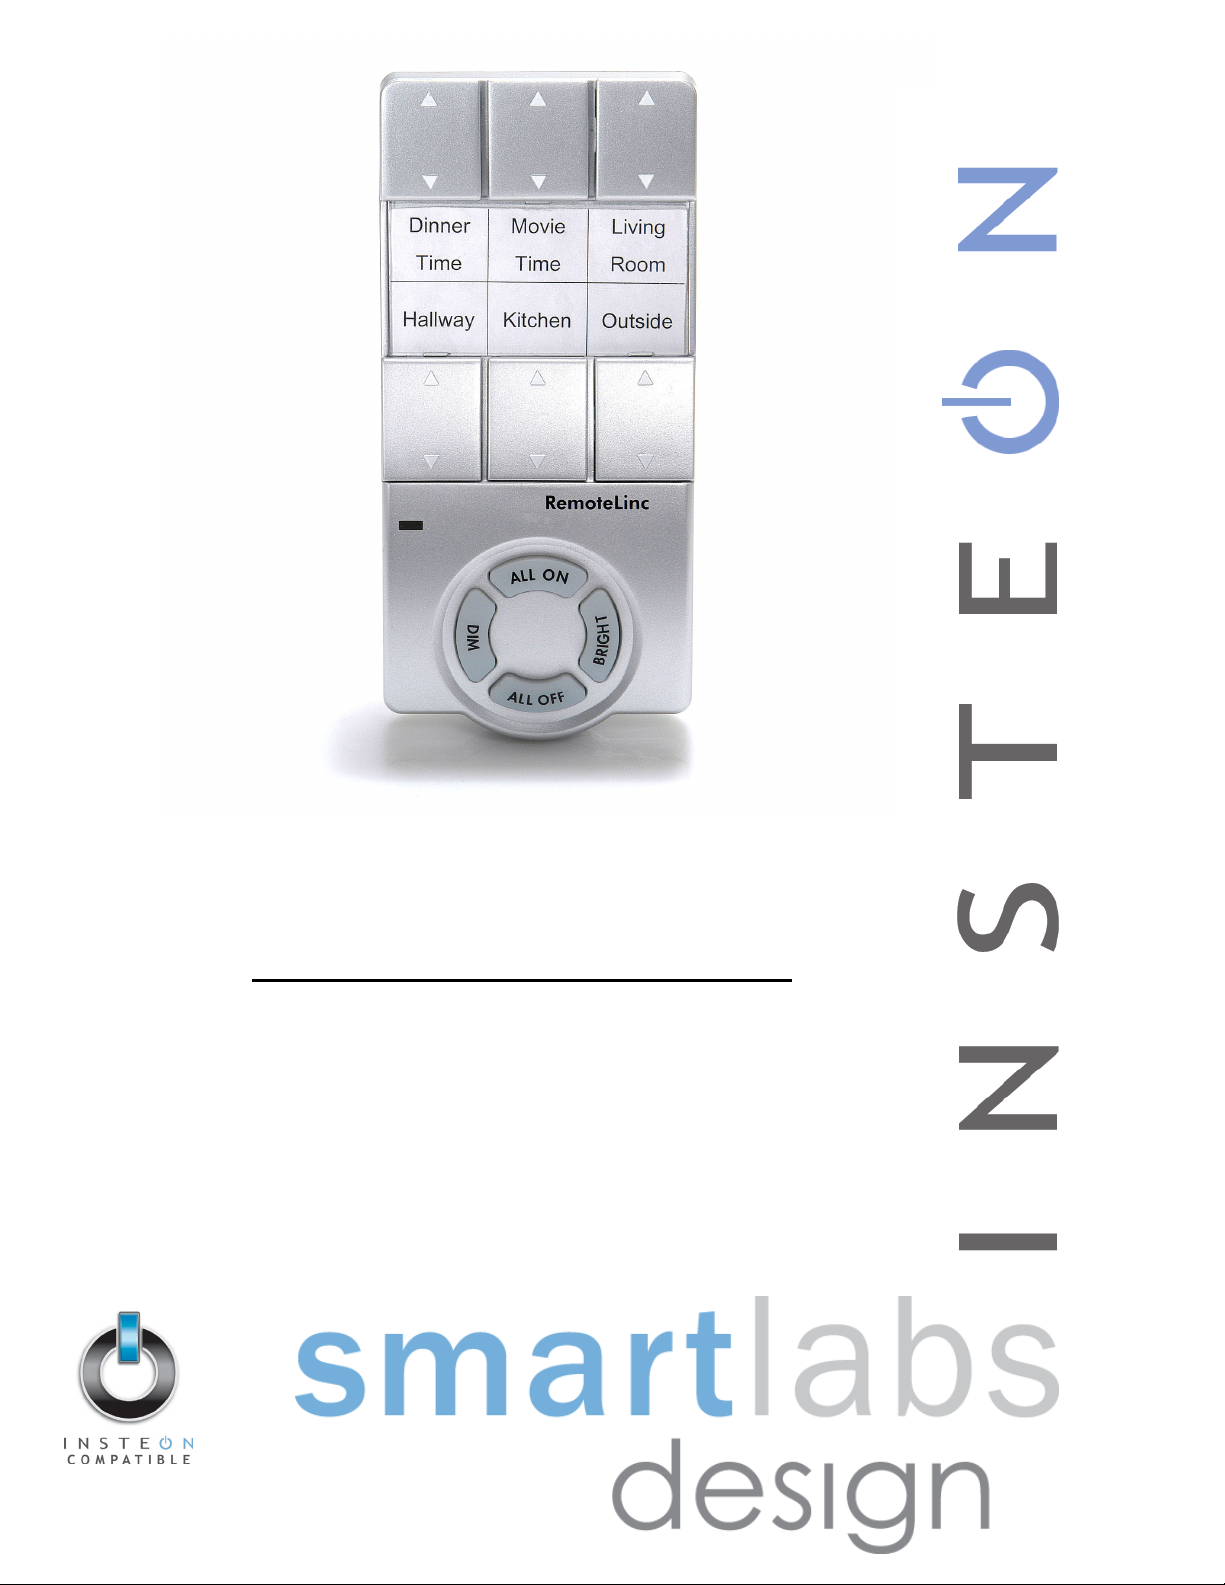
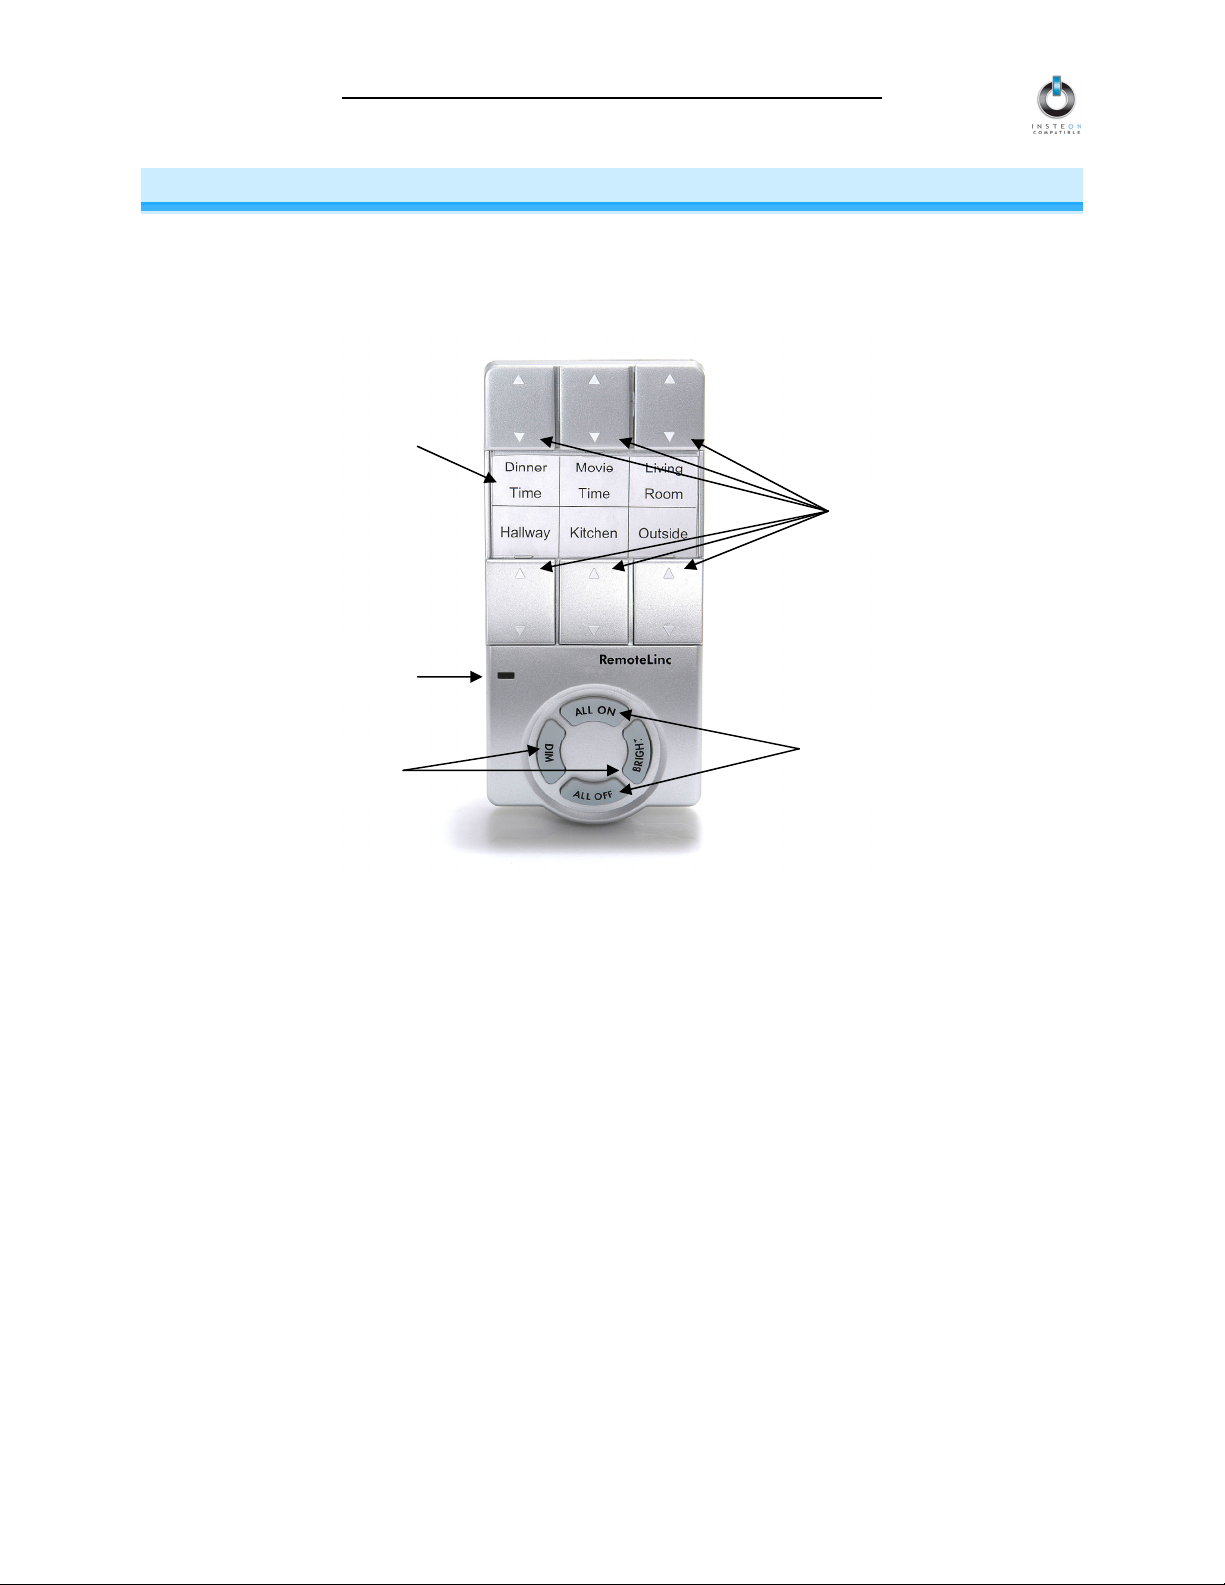
ABOUT REMOTELINC
Congratulations on purchasing the INSTEON™ RemoteLinc™ Handheld Controller. RemoteLinc allows
you to use the power of INSTEON to control your home with the convenience of a handheld wireless
controller.
Customizable Label Insert
Status LED
Dedicated
DIM/BRIGHT buttons
6 ON/OFF Buttons
Simultaneously control
all linked devices
What is INSTEON?
INSTEON is a simple, reliable, and affordable breakthrough in home control. Simple, because Plug-nTap™ setup is a breeze, and there are no wires to add – INSTEON uses existing powerline wiring as well
as radio-frequency for communication. And reliable, because every INSTEON device is a two-way
repeater. An INSTEON home grows in value with every INSTEON device you add, making life more
convenient, safe and fun.
Key RemoteLinc Features
• Six individual on/off buttons, plus dedicated DIM, BRIGHT, ALL ON and ALL OFF buttons.
• Setup is easy – install four AAA batteries (included), link RemoteLinc buttons to devices with simple
button taps, and you’re up and running.
• Shows command transmission activity with status LED
• Stores setup state in memory, even with batteries removed.
• Smart circuitry detects abnormally long button presses (like those ocurring when remote falls between
couch cushions) and puts RemoteLinc into sleep mode, preserving battery life.
• Warranted for two years
Page 3 of 18
Page 4

INSTEON-compatible RemoteLinc User’s Guide
HOW TO INSTALL REMOTELINC
Proper installation of at least two INSTEON™ AccessPoints (#2443) is required
prior to installing and using RemoteLinc.
RemoteLinc Installation
• Remove battery compartment door from rear of RemoteLinc. Observe polarity markings, and install
four AAA batteies accordingly. Replace battery compartment door.
• Use alkaline batteries, or high quality rechargeable batteries. A fully charged set of alkaline batteries
will provide approximately 1500-2000 functional button presses under normal circumstances.
Page 4 of 18
Page 5
INSTEON-compatible RemoteLinc User’s Guide
HOW TO SET UP REMOTELINC
Linking RemoteLinc to an INSTEON Device
To control an INSTEON Device using RemoteLinc, follow these steps to link RemoteLinc and the
INSTEON Device together. Refer to your INSTEON Device’s User’s Guide for detailed instructions on
how to properly install it and link it to RemoteLinc. The following will work for the most common
INSTEON Devices.
1. Choose the ON/OFF Button on RemoteLinc that you want to use for controlling your INSTEON
Device. There are 6 ON/OFF Button Pairs, labeled Channel 1 through Channel 6. You can link
multiple INSTEON Devices to a single ON/OFF Button.
2. Set RemoteLinc to Linking Mode by pressing and holding the ON side of the
button for 10 seconds until the Status LED begins blinking.
3. Select your INSTEON Device from the list below and follow the linking method for that Device. You
have about 4 minutes to perform this step before RemoteLinc’s Linking Mode times out automatically.
A. LampLinc™ V2 Dimmer – Press and hold the SET Button on the side of
LampLinc V2 Dimmer for 3 seconds, then release. To confirm linking,
LampLinc V2 Dimmer will blink its Status LED and also the light that it is
controlling.
B. ApplianceLinc™ V2 – Press and hold the SET Button on the side of
ApplianceLinc V2 for 3 seconds, then release. To confirm linking,
ApplianceLinc V2 will blink its Status LED.
C. SwitchLinc™ V2 Dimmer – Press and hold SwitchLinc V2 Dimmer’s Paddle
Top for 10 seconds, then release. To confirm linking, SwitchLinc V2 Dimmer
will blink the top LED in its LED Bar and also the light that it is wired to.
D. KeypadLinc™ V2 – Press and hold the ON Button at the top of KeypadLinc V2
for 10 seconds, then release. To confirm linking, KeypadLinc V2 will blink the
light that it is controlling.
E. Other INSTEON Devices – See the INSTEON Device’s User’s Guide.
4. When your INSTEON Device is successfully linked, RemoteLinc will beep, and its Status LED will
stop blinking.
5. Test that your INSTEON Device is working as expected by pressing the ON and OFF Buttons that
you linked to.
Page 5 of 18
Page 6

INSTEON-compatible RemoteLinc User’s Guide
Unlinking One INSTEON Device from RemoteLinc
If you are no longer going to use an INSTEON Device that has previously been linked to RemoteLinc, it is
very important that you unlink it, otherwise the INSTEON network will retry any commands intended for
the unused INSTEON Device, thus slowing down your system.
1. Using the ON/OFF Button that you already linked your INSTEON Device to, set RemoteLinc to
Unlinking Mode by pressing and holding the ON side of the button for 10 seconds until the Status
LED begins blinking, then release the button.
2. Immediately press the same ON button again for 10 seconds.
3. Follow the same method given above that you used to link your INSTEON Device to unlink it. On
most INSTEON Devices, you just push a SET Button for 3 seconds.
4. When your INSTEON device is successfully unlinked, RemoteLinc will beep, and its Status LED will
stop blinking
Creating an INSTEON Scene
INSTEON Scenes let you activate dramatic lighting moods with the press of just one button. INSTEON
Scenes are very easy to set up – just link more than one INSTEON Device to an ON/OFF Button on
RemoteLinc. Then, when you press either the ON or the OFF Button on RemoteLinc, all of the INSTEON
Devices linked in the scene will respond as a group. You can link multiple INSTEON Devices to multiple
of INSTEON Controllers.
To add an additional INSTEON Device to a scene controlled by an ON/OFF Button on RemoteLinc,
simply follow the same procedure as above in Linking RemoteLinc to an INSTEON Device. To remove
an INSTEON Device from a scene, see Unlinking One INSTEON Device from RemoteLinc.
TIP
You can avoid having to hold RemoteLinc’s ON Button down for 10 seconds for each INSTEON
Device in a scene by placing RemoteLinc in Scene Setup Mode, also called Multilink Mode.
1. Set the RemoteLinc to Scene Setup Mode for the ON/OFF Button Pair you want to use for
controlling the scene by pressing and holding the desired ON Button for 10 seconds, then tapping
the same ON Button again. RemoteLinc’s Status LED will blink.
2. Follow the linking method given above for the INSTEON Device you want to include in the scene.
On most INSTEON Devices, you just push a SET Button for 3 seconds. RemoteLinc will beep to
confirm linking, and its Status LED will continue to blink slowly.
3. On some INSTEON Devices, you may be able to set up additional features, such as On-Levels or
Fade Rates at this time.
4. Continue Steps 2 and 3 for any additional INSTEON Devices you want to link to the scene.
5. When you are finished linking INSTEON Devices to the desired ON/OFF Button, complete Scene
Setup by pressing the ON Button. RemoteLinc’s Status LED will stop blinking and remain
steadily on. You have about 4 minutes of inactivity before RemoteLinc’s Scene Setup Mode times
out automatically.
Page 6 of 18
Page 7

INSTEON-compatible RemoteLinc User’s Guide
ADVANCED FEATURES OF REMOTELINC
Resetting One ON/OFF Button to Its Factory Default Settings
If you want to remove all INSTEON links from a single ON/OFF Button Pair, or if you cannot unlink a
previously-linked INSTEON Device that has been lost or broken, follow this procedure.
1. Remove a single battery from RemoteLinc for at least 10 seconds.
2. While holding down the OFF side of the ON/OFF Button that you want to reset, reinsert the battery
into RemoteLinc (ensure battery is properly oriented). RemoteLinc will beep and its Status LED will
illuminate steadily. Wait 3 seconds after reinserting the battery, and then release the OFF button.
3. The ON/OFF Button will now have no INSTEON Devices linked to it.
NOTE
INSTEON Devices that have been previously linked to RemoteLinc will still respond to the ALL ON
and ALL OFF Buttons, and dimmable INSTEON Devices will still respond to holding down the ON or
OFF Buttons of the ON/OFF Button Pair that they were originally linked to, as well as the BRIGHT
and DIM Buttons. The reason is that the INSTEON Devices themselves have not been unlinked from
RemoteLinc. Follow the procedure Unlinking One INSTEON Device from RemoteLinc, above, to
unlink individual INSTEON Devices.
Resetting RemoteLinc to Its Factory Default Settings
The factory reset procedure can be used to clear the RemoteLinc’s memory and restore its factory default
settings. This procedure will clear the unit of all INSTEON Links.
1. Remove a single battery from RemoteLinc for at least 10 seconds.
2. While holding down the BRIGHT Button, reinsert the battery into
RemoteLinc (ensure battery is properly oriented). RemoteLinc will beep and
its Status LED will blink as you reinsert the battery, then its Status LED will
illuminate brightly.
3. After reinserting the battery, continue to hold down the BRIGHT Button for
10 seconds. RemoteLinc will beep continuously for a few seconds, then will
quickly beep twice.
4. Release the BRIGHT Button. The Status LED will turn off. RemoteLinc will now have no INSTEON
Devices linked to it.
NOTE
INSTEON Devices that have been previously linked to RemoteLinc will still respond to the ALL ON
and ALL OFF Buttons, and dimmable INSTEON Devices will still respond to holding down the ON or
OFF Buttons of the ON/OFF Button Pair that they were originally linked to, as well as the BRIGHT
and DIM Buttons. The reason is that the INSTEON Devices themselves have not been unlinked from
RemoteLinc. Follow the procedure Unlinking One INSTEON Device from RemoteLinc, above, to
unlink individual INSTEON Devices.
Page 7 of 18
Page 8

INSTEON-compatible RemoteLinc User’s Guide
Turning the Audio Beeper On and Off
This procedure toggles the sound OFF or ON. The factory default is ON.
1. Simultaneously press and hold the DIM and BRIGHT Buttons for 10 seconds. RemoteLinc will beep
once and its Status LED will begin blinking slowly.
2. Release the DIM and BRIGHT Buttons.
3. Press and release the BRIGHT Button. RemoteLinc will beep twice and its Status LED will illuminate
steadily. The audio beep is now disabled.
4. Repeat steps 1 through 3 to re-enable the audio beep function.
Turning the Status LED On and Off
This procedure toggles the white Status LED OFF or ON. The factory default is ON.
1. Simultaneously press and hold the DIM and BRIGHT Buttons for 10 seconds. RemoteLinc will beep
once and its Status LED will begin blinking slowly.
2. Release the DIM and BRIGHT Buttons.
3. Press and release the ALL OFF Button. RemoteLinc will beep twice and its Status LED will now be
disabled.
4. Repeat steps 1 through 3 to re-enable the Status LED.
Stuck Button Feature
If any button on RemoteLinc is depressed for longer than 60 seconds, the controller will enter sleep mode
until the button is released. This feature is provided to preserve battery life in situations like RemoteLinc
falling between sofa cushions.
Page 8 of 18
Page 9

INSTEON-compatible RemoteLinc User’s Guide
SETUP SUMMARY
The following table summarizes the setup options for RemoteLinc as described in the previous sections.
Linking
Enter Linking Mode Desired ON Button Hold 10 Seconds
Hold 10 Seconds
Release
Enter Unlinking Mode Desired On Button
Desired ON Button Hold 10 Seconds
Enter Multi-Link Mode
Same ON Button Tap
Exit Linking Mode Any ON or OFF Button Tap
Immediately press same On
button for another 10
seconds, then release.
Reset
Remove one battery, press
and hold button, reinsert
ON/OFF Button OFF Button
RemoteLinc BRIGHT
Toggle On/Off
BRIGHT + DIM Hold 10 Seconds
Beeper
BRIGHT Tap
BRIGHT + DIM Hold 10 Seconds
Status LED
ALL OFF Tap
battery, continue to press
button for 10 seconds, then
release.
Remove one battery, press
and hold button, reinsert
battery, continue to press
button for 10 seconds, then
release.
Page 9 of 18
Page 10

INSTEON-compatible RemoteLinc User’s Guide
HOW TO USE REMOTELINC
Using RemoteLinc’s Buttons
The following table gives an overview, and the sections thereafter give the details, on how to use
RemoteLinc’s buttons.
Button Applies To Tap Press and Hold
ON
OFF
ALL ON
ALL OFF
BRIGHT
DIM
Devices Linked to Button Ramp to On-Level Brighten
Devices Linked to Button Ramp to OFF Dim
Instant on up to On-
All Linked Devices
All Linked Devices Instant OFF Dim Until Released
Last Button Pushed Brighten a Little
Last Button Pushed Dim a Little Dim Until Released
Level
Brighten Until
Released
Brighten Until
Released
Using the ON and OFF Buttons
The ON and OFF Buttons have a dual purpose. If you tap them briefly, they turn INSTEON Devices
linked to them on or off. If you hold them down, the ON Button will brighten and the OFF Button will dim
any dimming modules linked to them. Holding down will not affect any non-dimmable (switchable)
modules. So, if you just want to turn things on or off, tap the appropriate button – don’t hold it down.
• To turn ON only those INSTEON Devices linked to an ON/OFF Button, tap the ON side of the Button.
RemoteLinc will beep and its Status LED will blink off twice. Dimmable modules will go to whatever
On-Level they were set up for, at whatever Fade Rate they were set up for. Switchable modules will
immediately go full on.
• To turn OFF only those INSTEON Devices linked to an ON/OFF Button, tap the OFF side of the
Button. RemoteLinc will beep and its Status LED will blink off twice. Dimmable modules will go full
off at whatever Fade Rate they were set up for. Switchable modules will immediately go full off.
• To brighten only those dimmable INSTEON Devices linked to an ON/OFF Button, press and hold
the ON side of the Button. RemoteLinc will beep and its Status LED will blink off once. Dimmable
modules will begin to brighten, unless they are already fully bright. Switchable modules will not be
affected. When you release the button, dimmable modules will stop going brighter and RemoteLinc’s
Status LED will blink off again.
• To dim only those dimmable INSTEON Devices linked to an ON/OFF Button, press and hold the
OFF side of the Button. RemoteLinc will beep and its Status LED will blink off once. Dimmable
modules will begin to dim, unless they are already fully off. Switchable modules will not be affected.
When you release the button, dimmable modules will stop dimming and RemoteLinc’s Status LED will
blink off again.
Page 10 of 18
Page 11

INSTEON-compatible RemoteLinc User’s Guide
Using the ALL ON and ALL OFF Buttons
The ALL ON and ALL OFF Buttons will turn on, turn off, brighten or dim all INSTEON Devices linked to
RemoteLinc, no matter which ON/OFF Button Pair they are linked to.
Choose carefully what you will be controlling with RemoteLinc, because all linked INSTEON Devices
will respond to the ALL ON and ALL OFF Buttons. Some INSTEON Devices can be set up so that
they will not respond to the ALL ON and ALL OFF Buttons (refer to the specific INSTEON module’s
documentation for instructions).
• To turn ON all INSTEON Devices linked to RemoteLinc, tap the ALL ON Button. RemoteLinc will
beep and its Status LED will blink off once. Dimmable modules will go to whatever On-Level they
were set up for. Switchable modules will immediately go full on.
• To turn OFF all INSTEON Devices linked to RemoteLinc, tap the ALL OFF Button. RemoteLinc will
beep and its Status LED will blink off once. All linked modules will instantly go off.
• To brighten all dimmable INSTEON Devices linked to any of RemoteLinc’s buttons, press and hold
the ALL ON button. RemoteLinc will beep and its Status LED will blink off once. Dimmable modules
will begin to brighten, unless they are already fully bright. Switchable modules will not be affected.
When you release the button, dimmable modules will stop brightening and RemoteLinc’s Status LED
will blink off again.
• To dim all dimmable INSTEON Devices linked to any of RemoteLinc’s buttons, press and hold the
ALL OFF button. RemoteLinc will beep and its Status LED will blink off once. Dimmable modules
will begin to dim, unless they are already fully off. Switchable modules will not be affected. When
you release the button, dimmable modules will stop dimming and RemoteLinc’s Status LED will blink
off again.
BE CAREFUL
Page 11 of 18
Page 12

INSTEON-compatible RemoteLinc User’s Guide
Using the BRIGHT and DIM Buttons
The BRIGHT and DIM Buttons will brighten or dim only those INSTEON
Devices linked to the last ON/OFF Button you used. Switchable modules will
not be affected. Pressing and holding the BRIGHT and DIM Buttons will adjust
the brightness continuously, while tapping the buttons will adjust the brightness
one of 32 steps for each tap.
• To continuously brighten only those INSTEON Devices linked to the last ON/OFF Button you used,
press and hold the BRIGHT Button. RemoteLinc will beep and its Status LED will blink off once.
Dimmable modules will begin to brighten, unless they are already fully bright. Switchable modules
will not be affected. When you release the button, dimmable modules will stop going brighter and
RemoteLinc’s Status LED will blink off again.
• To continuously dim only those INSTEON Devices linked to the last ON/OFF Button you used, press
and hold the DIM Button. RemoteLinc will beep and its Status LED will blink off once. Dimmable
modules will begin to dim, unless they are already fully off. Switchable modules will not be affected.
When you release the button, dimmable modules will stop dimming and RemoteLinc’s Status LED will
blink off again.
• To brighten by incremental steps only those INSTEON Devices linked to the last ON/OFF Button Pair
you used, tap the BRIGHT Button. RemoteLinc will beep and its Status LED will blink off once.
Dimmable modules will brighten 3 of 32 steps for each tap of the button, unless they are already fully
bright. Switchable modules will not be affected.
• To dim by incremental steps only those INSTEON Devices linked to the last ON/OFF Button you
used, tap the DIM Button. RemoteLinc will beep and its Status LED will blink off once. Dimmable
modules will dim 3 of 32 steps for each tap of the button, unless they are already fully off. Switchable
modules will not be affected.
Page 12 of 18
Page 13

INSTEON-compatible RemoteLinc User’s Guide
ABOUT INSTEON
Understanding Why an INSTEON Network Is Reliable
INSTEON messages travel throughout the home via Powerline Carrier (PLC) signals on the existing
house wiring, and also via wireless Radio Frequency (RF). As the messages make their way to
INSTEON devices being controlled, they are picked up and retransmitted by all other INSTEON devices
along the way. This method of communicating, called a mesh network, is very reliable because each
additional INSTEON device helps to support the overall network.
To further ensure reliability, every INSTEON device confirms that it has received a command. If an
INSTEON Controller does not receive this confirmation, it will automatically retransmit the command up to
five times.
Further Enhancing Reliability
As signals travel via the powerline or RF throughout the home, they naturally become
weaker the farther they travel. The best way to overcome signals getting weaker is to
increase the coverage of the mesh network by introducing more INSTEON devices.
It is possible that some audio-video products, computers, power strips or other electrical
equipment may attenuate INSTEON signals on the powerline. You can temporarily
unplug suspected devices to test whether the INSTEON signal improves. If it does, then
you can plug in filters available from Smarthome that will permanently fix the problem.
Using SmartLab’s AccessPoint to Upgrade Your INSTEON Network
AccessPoints are ideal for improving signal strength and network
coverage throughout your home. In addition, two AccessPoints provide
a wireless path for INSTEON signals to travel between the two separate
electrical circuits, called powerline phases, found in most homes.
Without a reliable method for coupling opposite powerline phases, some
parts of your home may receive INSTEON signals intermittently. With at
least one AccessPoint plugged into one of the powerline phases, and at
least one more plugged into the opposite powerline phase, INSTEON
powerline signals will be strong everywhere in your home.
Page 13 of 18
Page 14

INSTEON-compatible RemoteLinc User’s Guide
TROUBLESHOOTING
Problem Possible Cause Solution
The Status LED on my
RemoteLinc is not
turning on at all.
My RemoteLinc will not
go into Linking or
Unlinking Mode.
The Status LED is still
flashing after linking an
INSTEON device.
My RemoteLinc is not
controlling linked
INSTEON devices.
An INSTEON device is
not linking or responding
to RemoteLinc.
RemoteLinc is locked up.
My RemoteLinc’s Status
LED keeps blinking
whenever I press a
button, and it takes a
long time for my
INSTEON Devices to
respond.
My INSTEON Devices
don’t always respond to
my RemoteLinc.
The beeper on my
RemoteLinc doesn’t
work.
Batteries are missing or
depleted.
User previously disabled
Status LED
You didn’t hold the ON
Button down long enough.
You may be in Scene Setup
(multilink) mode.
The device may be on the
phase other than the node
communicating with
RemoteLinc.
RemoteLinc may be out of
wireless range
The INSTEON signal may be
too weak.
Fluctuating battery current
may have glitched it.
RemoteLinc may be waiting
for a response from a lost or
broken INSTEON Device.
The RemoteLinc may have
been reset without first
unlinking INSTEON Devices
from it.
The beeper may have been
turned off.
Install 4 fresh AAA bateries into RemoteLinc
See section Turning the Status LED On and Off for
instructions on re-enabling Status LED.
Hold the ON Button down for at least 10 seconds. To
enter Unlinking Mode, repeat the same process (a total
of two sequential presses of the ON button for 10
seconds each press). If the above doesn’t work, perform
a Factory Reset. (See Resetting RemoteLinc to Its
Factory Default Settings)
Tap the ON Button you are linking to in order to end
Scene Setup mode.
Make sure two AccessPoints are properly installed to
bridge the two powerline phases.
Try using RemoteLinc from another location, and install
additional AccessPoints in trouble locations
Add new INSTEON devices or move around existing
INSTEON devices. All INSTEON devices act as
INSTEON Network repeaters.
Make sure you are not experiencing interference with
older X10 BoosterLinc technology. Upgrade to
INSTEON BoosterLincs.
Remove batteries from RemoteLinc for 10 seconds and
reinstall.
Install a fresh set of batteries
If the above doesn’t work, perform a Factory Reset. (See
Resetting RemoteLinc to Its Factory Default Settings)
If the INSTEON Device is available, unlink it from
RemoteLinc by following the directions in the section
Unlinking One INSTEON Device from RemoteLinc.
If the INSTEON Device is not available or you are
unsure which INSTEON Device RemoteLinc is looking
for, unlink all INSTEON Devices from the ON/OFF
Button by following the directions in the section
Resetting One ON/OFF Button to Its Factory Default
Settings.
Reset RemoteLinc by following the directions in the
section Resetting RemoteLinc to Its Factory Default
Settings.
Re-link your INSTEON Devices to RemoteLinc.
Follow the directions in the section Turning the Audio
Beeper On and Off.
Page 14 of 18
Page 15

INSTEON-compatible RemoteLinc User’s Guide
Problem Possible Cause Solution
All of my INSTEON
Devices do not respond
to RemoteLinc’s ALL ON
or ALL OFF Buttons.
All of my INSTEON
Devices do not respond
to RemoteLinc’s BRIGHT
or DIM Buttons.
If you have tried these solutions, reviewed this User’s Guide, and still cannot resolve an issue you’re
having with RemoteLinc, please:
• Call: Tech. Support @ 1-800-SMARTHOME (800-762-7846)
The ALL ON and ALL OFF
Buttons only control
INSTEON devices already
linked to RemoteLinc.
The BRIGHT and DIM
Buttons only control
INSTEON devices linked to
the last ON/OFF Button you
pushed on RemoteLinc.
Link INSTEON Devices you want to respond to ALL ON
and ALL OFF to RemoteLinc.
Push the ON or OFF Button for the scene you want to
control, then use the BRIGHT and DIM Buttons.
• Contact Us Online: http://www.smarthome.com/contactus.html
.
Page 15 of 18
Page 16

INSTEON-compatible RemoteLinc User’s Guide
SPECIFICATIONS
RemoteLinc Specifications
General
Smarthome Product Number 2440, INSTEON RemoteLinc Handheld Controller
Warranty 2 years
Operation
ON/OFF Button Pairs 6 Channels
ALL ON/ALL OFF Buttons Control all INSTEON devices linked to Channels 1-6
BRIGHT/DIM Buttons Control INSTEON devices linked to last pressed Channel
Audio Alert Beeper, can be disabled
Status LED White, can be disabled
Setup Memory Non-volatile EEPROM
INSTEON Features
INSTEON Addresses 1 hard-coded out of 16,777,216 possible
INSTEON Links 417 out of 16,777,216 possible
INSTEON Messages Repeated No
Mechanical
Button Labels Printable using template
Operating Conditions Indoors, 32 to 122°F, up to 85% relative humidity
Dimensions 5.-3/8” H x 2-1/2” W x 1-1/8” D
Weight 0.35 lbs with batteries installed, 0.25 lbs without batteries
Electrical
Supply 4 AAA Alkaline Batteries (included). Also compatible with rechargeable batteries.
Battery Life Approximately 1500 – 2000 button presses
Certification FCC ID SBP2440
Page 16 of 18
Page 17

INSTEON-compatible RemoteLinc User’s Guide
FCC Compliance Statement
This device complies with FCC Rules Part 15. Operation is subject to two conditions: (1) This device
may not cause harmful interference, and (2) this device must accept any interference that may be
received or that may cause undesired operation. The digital circuitry of this device has been tested and
found to comply with the limits for a Class B digital device, pursuant to Part 15 of the FCC Rules. These
limits are designed to provide reasonable protection against harmful interference in residential
installations. This equipment generates, uses and can radiate radiofrequency energy and, if not installed
and used in accordance with the instructions, may cause harmful interference to radio and television
reception. However, there is no guarantee that interference will not occur in a particular installation.
WARNING! Changes or modifications to this unit not expressly approved by the party responsible for
compliance could void the user’s authority to operate the equipment.
Page 17 of 18
Page 18

INSTEON-compatible RemoteLinc User’s Guide
Limited Warranty
Seller warrants to the original consumer purchaser of this product that, for a period of two years from the
date of purchase, this product will be free from defects in material and workmanship and will perform in
substantial conformity to the description of the product in this User’s Guide. This warranty shall not apply
to defects or errors caused by misuse or neglect. If the product is found to be defective in material or
workmanship, or if the product does not perform as warranted above during the warranty period, Seller
will either repair it, replace it or refund the purchase price, at its option, upon receipt of the product at the
address below, postage prepaid, with proof of the date of purchase and an explanation of the defect or
error. The repair, replacement, or refund that is provided for above shall be the full extent of Seller’s
liability with respect to this product. For repair or replacement during the warranty period, call SmartLabs
customer service to receive an RA# (return authorization number), properly package the product (with the
RA# clearly printed on the outside of the package) and send the product, along with all other required
materials, to:
SmartLabs, Inc.
ATTN: Receiving Dept.
16542 Millikan Ave.
Irvine, CA 92606-5027
Limitations
The above warranty is in lieu of and seller disclaims all other warranties, whether oral or written, express
or implied, including and warranty or merchantability or fitness for a particular purpose. Any implied
warranty, including any warranty of merchantability or fitness for a particular purpose, which may not be
disclaimed or supplanted as provided above shall be limited to the one-year period of the express
warranty above. No other representation or claim of any nature by any person shall be binding upon
seller or modify the terms of the above warranty and disclaimer. In no event shall seller be liable for
special, incidental, consequential, or other damages resulting from the possession or use of this product,
including without limitation damage to property and, to the extent permitted by law, personal injury, even if
seller knew or should have known of the possibility of such damages. Some states do not allow
limitations on how long an implied warranty lasts and/or the exclusion or limitation of damages, in which
case the above limitations and/or exclusions may not apply to you. You may also have other legal rights
that may vary from state to state.
INSTEON, Plug-n-Tap, ControLinc, TesterLinc, SignaLinc, LampLinc, ToggleLinc, BoosterLinc, ApplianceLinc, KeypadLinc,
FilterLinc, ProbeLinc, SwitchLinc, TempLinc, IRLinc, TriggerLinc, I/O Linc, RemoteLinc, PowerLinc, ICON, In-LineLinc,
HouseLinc, SocketLinc, OutletLinc, TimerLinc, SmartLinc, Smarthome, SmartLabs, and SmarthomeLive are trademarks of
SmartLabs, Inc. INSTEON Technology Patent. U.S. Patent No. 7,345,998, International patents pending.
© Copyright 2009 SmartLabs, Inc., 16542 Millikan Ave., Irvine, CA 92606-5027,
1-800-SMARTHOME (800-762-7846), www.smarthome.com
Rev 06-17-2009
Page 18 of 18
 Loading...