

Page 1
INSTEON Hub
INSTEON Hub
Owner’s Manual
Owner’s Manual
Page 2

Contents
Getting Started
INSTEON Hub 4
Device Overview
Installation
Download the App
Create an Account
Optional Wall Mounting 5
INSTEON App
INSTEON App on iOS 7
INSTEON App on Android 11
INSTEON App on Windows 15
Hardware Reset
Network Reset 20
Factory Reset 21
Appendix
Specications 25
Troubleshooting 28
Certications and Warnings 29
Product Warranty 30
Page 3

Getting Started
Getting Started
Everything you need to quickly get up and running.
Everything you need to quickly get up and running.
3
Page 4
INSTEON Hub
X
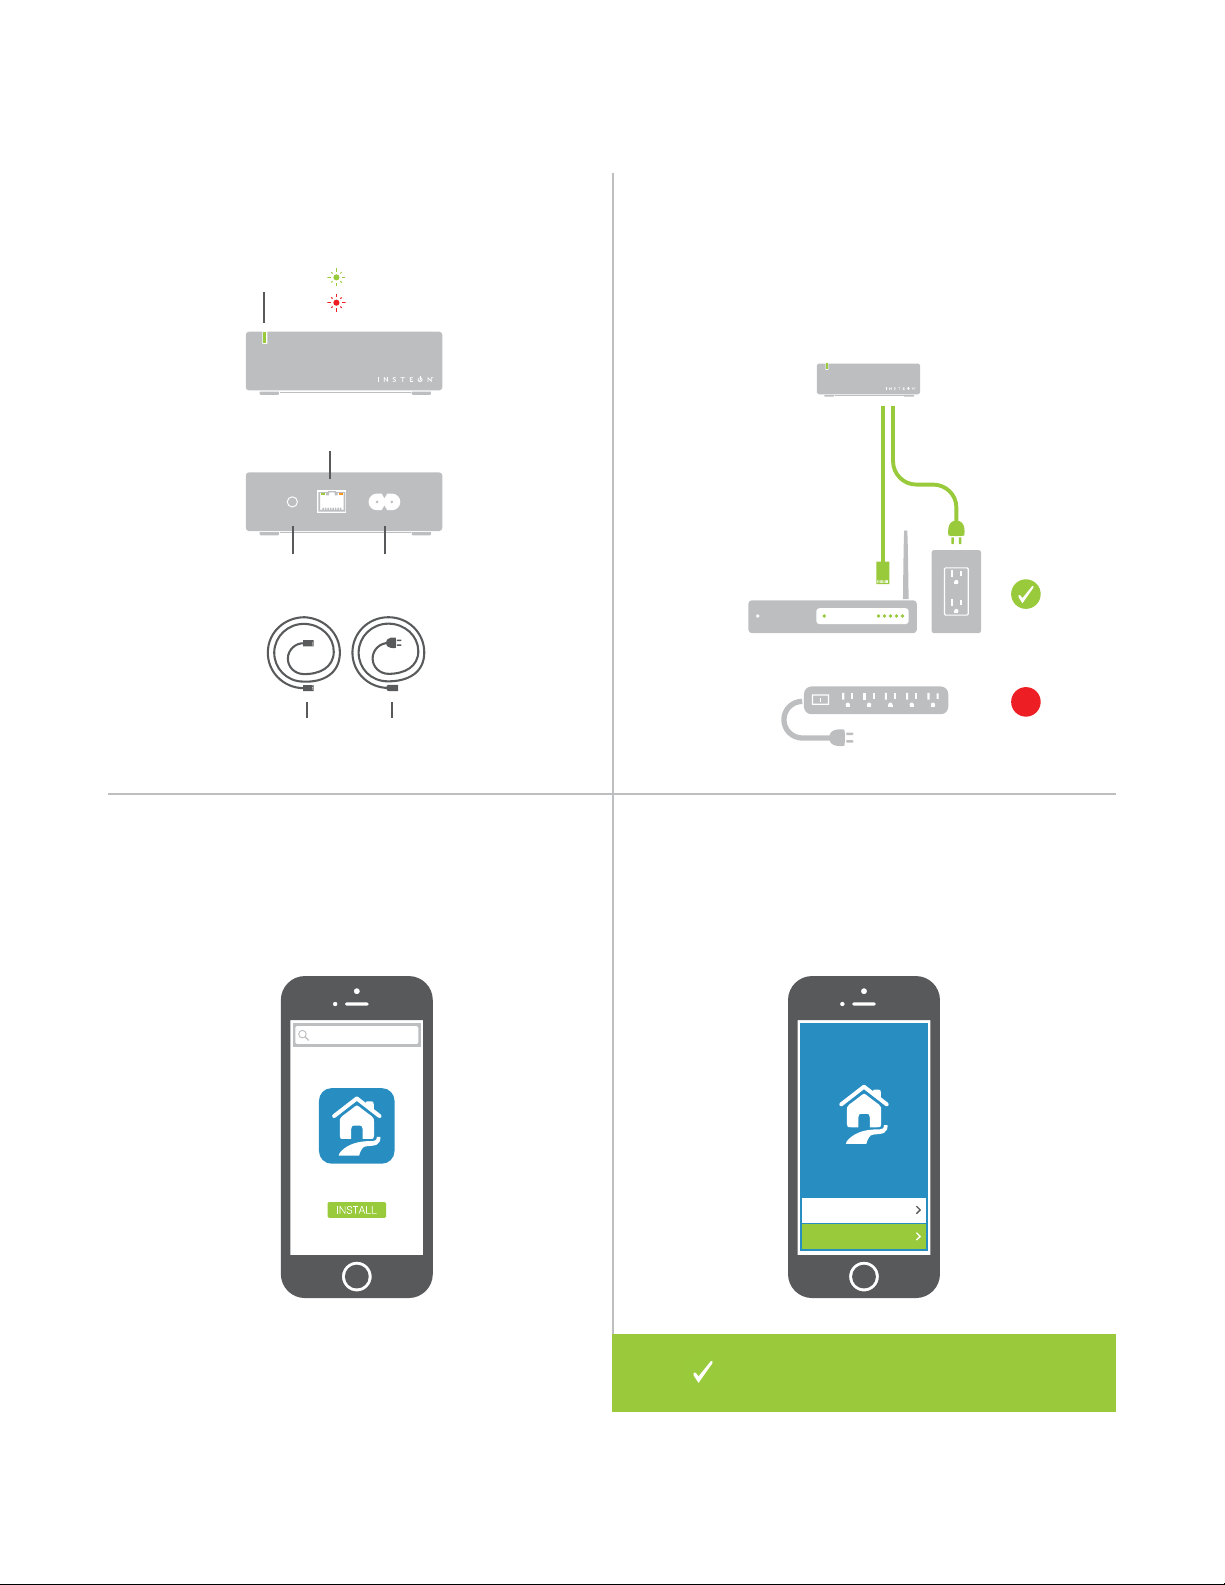
Device Overview
Status LED Linking/Idle
Unlinking
Ethernet Port
Factory Reset Power
Ethernet
Cable
Power
Cable
Installation
Connect your Hub to the internet and a power
outlet using the cables provided. Avoid switched
outlets or ltered power strips.
Download the App Create an Account
From your mobile device, download
and install INSTEON for Hub from your
device’s app store.
insteon for hub
INSTEON for Hub
Launch the App and follow the on-screen
instructions to create an account and setup
the INSTEON Hub.
INSTEON
Sign In
Create an Account
You’re done setting up your INSTEON
Hub; now start adding devices.
4
Page 5
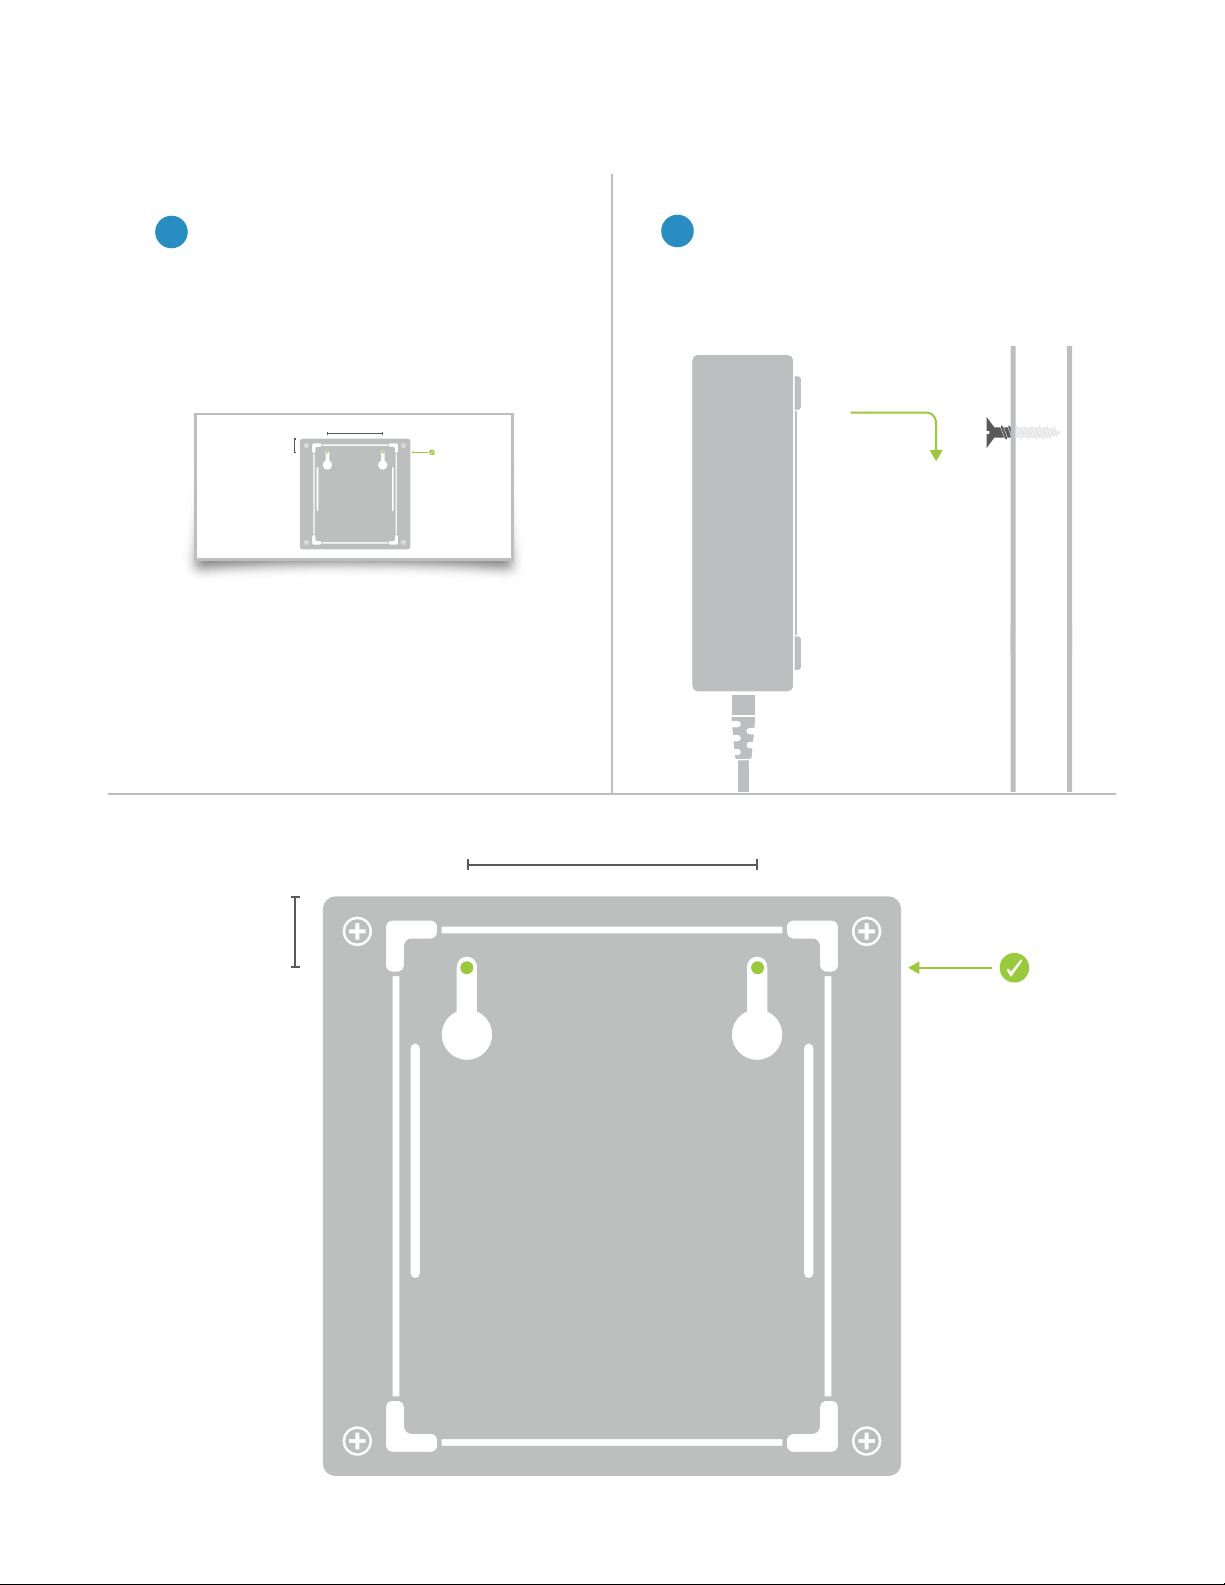
Optional Wall Mounting
Print out this page and use it as a
1
template to drill mounting holes.
2 1/32”
15/32”
12mm
52mm
Hang the Hub on two screws
2
by aligning the hanger slots and
sliding down.
15/32”
12mm
2 1/32”
52mm
5
Page 6
INSTEON App
INSTEON App
Use the INSTEON App to congure and control your INSTEON Hub.
Use the INSTEON App to congure and control your INSTEON Hub.
Everything from adding a device to controlling your thermostat is handled
Everything from adding a device to controlling your thermostat is handled
through your mobile device.
through your mobile device.
6
Page 7
INSTEON App on iOS
The INSTEON app on iOS uses a right-hand drawer to navigate between Check-In, Favorites, Rooms,
Scenes, Thermostats and Settings. You can also add and edit devices, rooms and scenes from the drawer.
Check-In Favorites
An at-a-glance overview of all of your
INSTEON sensors. Sensors are white
when closed and red when triggered.
A customizable screen where you can place
your most used devices, scenes and sensors.
7
Page 8

INSTEON App on iOS
Let’s you group devices into rooms for easier
navigation.
ScenesRooms
Automatically displays all of the scenes that
have been created.
Thermostat Settings
Displays your INSTEON Thermostat. For
homes with multiple thermostats, you can
congure the default from settings.
Your one-stop-shop for Hub and INSTEON
account settings and conguration. You can
also nd in-app help here.
8
Page 9
Controlling a Device
INSTEON App on iOS
Tap the arrows to adjust in 10%
increments
Adjust the brightness in 1%
increments
Turn a device on or o,
regardless of brightness
Monitoring a Sensor
Indicates that your sensor is OK
Indicates that your sensor has
been triggered
Indicates that the Hub has lost
contact with your sensor
9
Page 10

Controlling a Scene
INSTEON App on iOS
Tap to turn the scene on or o
Tap to edit the scene
Controlling a Camera
Use the arrows to pan and tilt
your camera
10
Page 11

INSTEON App on Android
The INSTEON app on Android uses tabs to navigate between Check-In, Favorites, Rooms, Scenes,
Thermostats and Settings. You can add and edit devices, rooms and scenes from the settings button.
Check-In Favorites
An at-a-glance overview of all of your
INSTEON sensors. Sensors are white
when closed and red when triggered.
A customizable screen where you can place
your most used devices, scenes and sensors.
11
Page 12
INSTEON App on Android
Let’s you group devices into rooms for easier
navigation.
ScenesRooms
Automatically displays all of the scenes that
have been created.
Thermostat Settings
Displays your INSTEON Thermostat. For
homes with multiple thermostats, you can
congure the default from settings.
Your one-stop-shop for Hub and INSTEON
account settings and conguration. You can
also nd in-app help here.
12
Page 13

INSTEON App INSTEON App on Android
Controlling a Device
Tap the arrows to adjust in 10%
increments
Adjust the brightness in 1%
increments
Turn a device on or o,
regardless of brightness
Monitoring a Sensor
Indicates that your sensor is OK
Indicates that your sensor has
been triggered
Indicates that the Hub has lost
contact with your sensor
13
Page 14

Controlling a Scene
INSTEON App on Android
Tap to turn the scene on or o
Tap to edit the scene
Controlling a Camera
Use the arrows to pan and tilt
your camera
14
Page 15

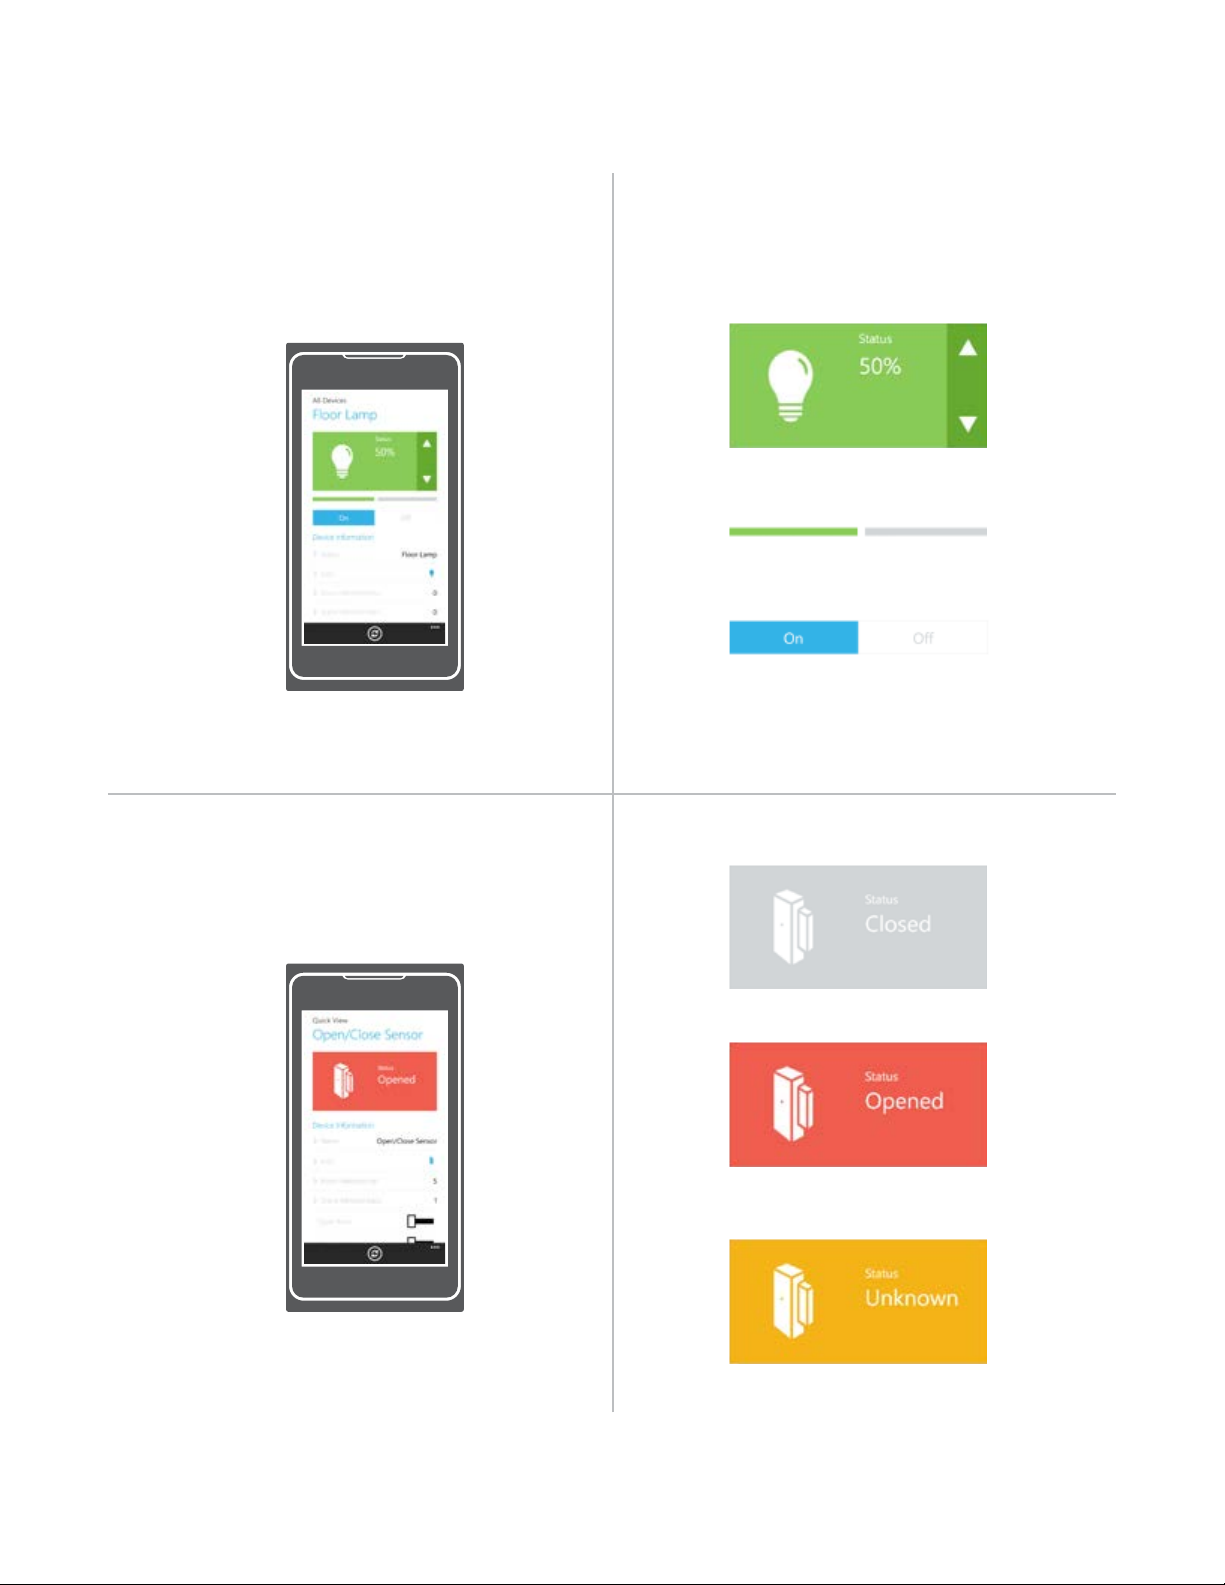
INSTEON App on Windows
The INSTEON app on Windows Phone uses a six-screen carousel to switch between Quick View, Favorites,
Rooms, Scenes, Thermostats and Settings.
Quick View Favorites
An at-a-glance overview of all of your
INSTEON sensors. Sensors are green
when closed and red when triggered.
A customizable screen where you can place
your most used devices, scenes and sensors.
15
Page 16

INSTEON App on Windows
Let’s you group devices into rooms. Also the
location for All Devices which displays every
device added to your house.
ScenesRooms
Automatically displays all of the scenes that
have been created.
Thermostats Settings
Displays your INSTEON Thermostat. For
homes with multiple thermostats, you can
congure the default from settings.
Your one-stop-shop for Hub and INSTEON
account settings and conguration. You can
also nd in-app help here.
16
Page 17
Controlling a Device
INSTEON App on Windows
Tap the arrows to adjust in 10%
increments
Adjust the brightness in 1%
increments
Turn a device on or o,
regardless of brightness
Monitoring a Sensor
Indicates that your sensor is OK
Indicates that your sensor has
been triggered
Indicates that the Hub has lost
contact with your sensor
17
Page 18
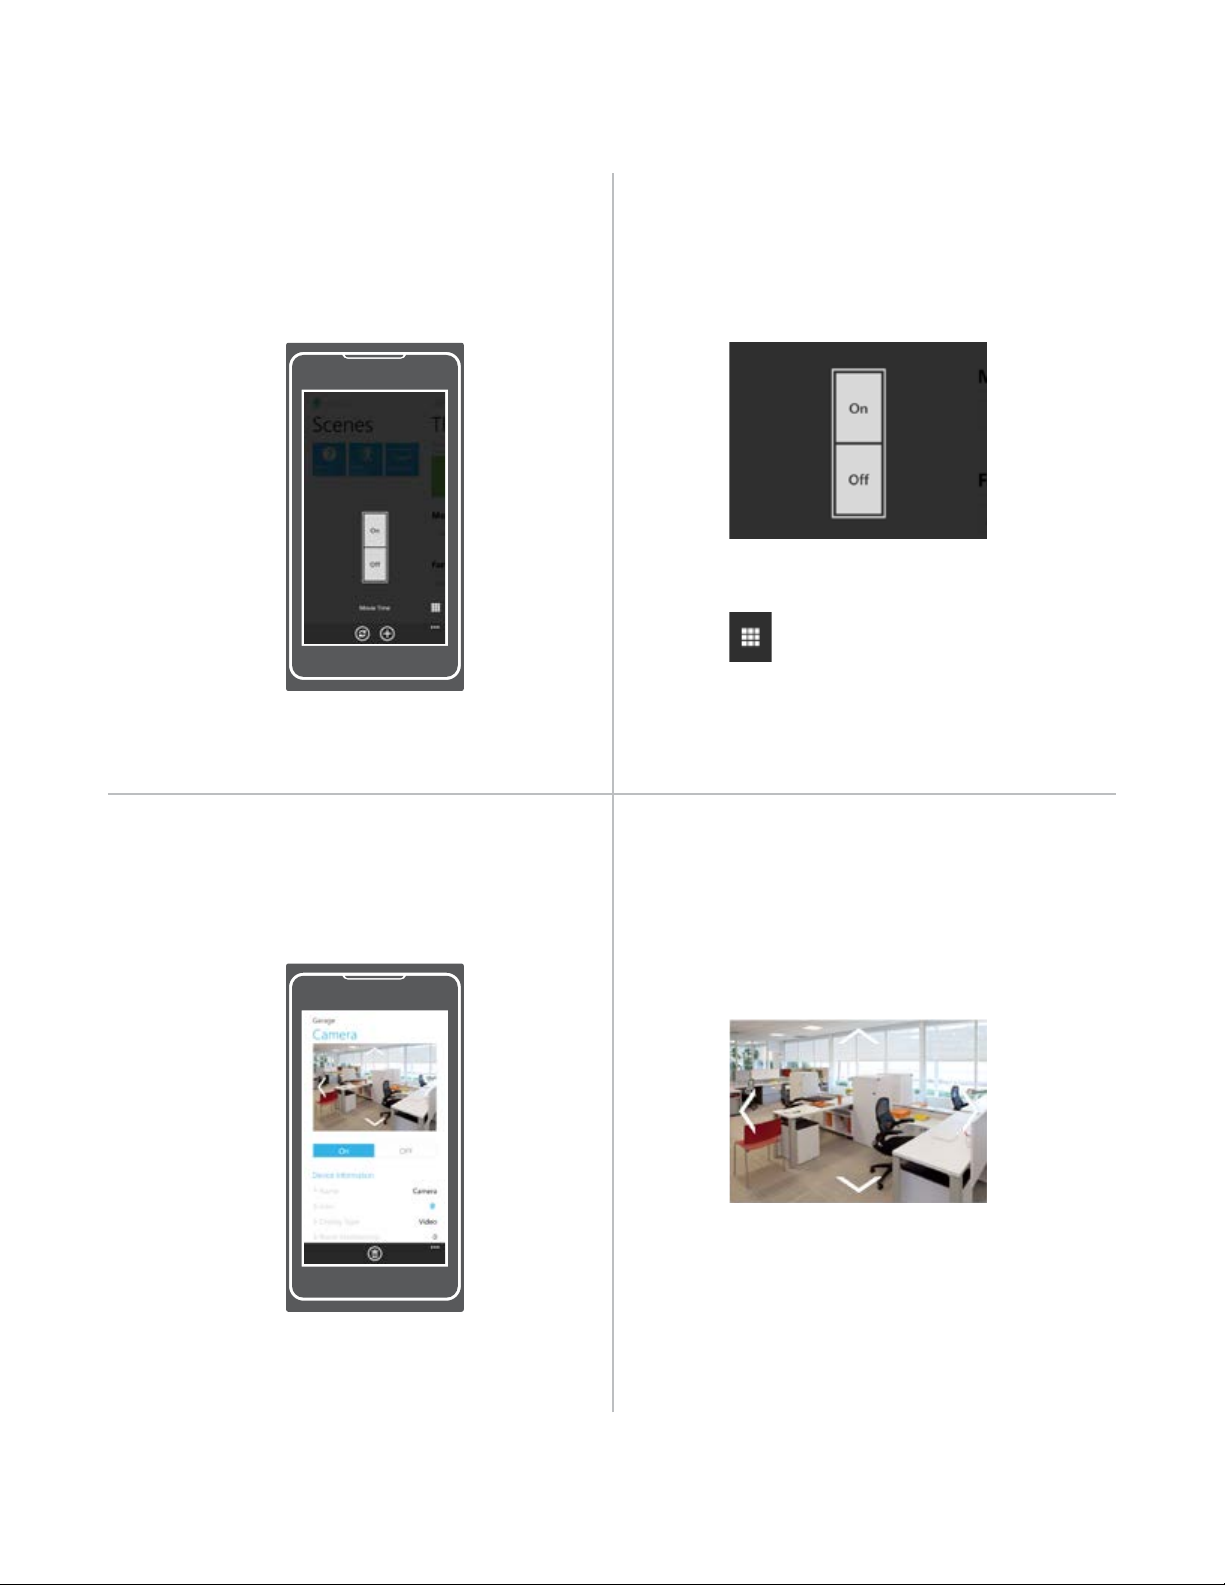
Controlling a Scene
INSTEON App on Windows
Tap to turn the scene on or o
Tap to edit the scene
Controlling a Camera
Use the arrows to pan and tilt
your camera
18
Page 19
Hardware Reset
Hardware Reset
A network reset will restore the default network conguration to the Hub.
A network reset will restore the default network conguration to the Hub.
A factory reset will erase all links stored in the device’s database as well as
A factory reset will erase all links stored in the device’s database as well as
any customized properties.
any customized properties.
19
Page 20

Network Reset
Slowly tap the set button ten
1
times. The Hub will double-beep.
10x
The ethernet port status LEDs will briey
2
turn o and then return to normal.
Your Hub has been restored to
default network settings.
20
Page 21

Factory Reset
Prior to performing a factory reset,
you must delete your user account
from INSTEON Connect.
Navigate to settings
From Settings, tap Account
21
Tap Delete Account. This cannot
3 4
be undone and will erase your
home from INSTEON Connect.
Disconnect power from the Hub
4
21
Page 22

Factory Reset
Press and hold the set button
5
while reconnecting power. The
Hub will emit a long beep.
LONG
When the long beep ends,
6
release the set button. The Hub
will double-beep.
Your Hub has been restored to
factory settings.
22
Page 23

Appendix
Appendix
Everything else you might need to know about your INSTEON product.
Everything else you might need to know about your INSTEON product.
23
Page 24

INSTEON Glossary
Controller The INSTEON transmitter
Responder The INSTEON receiver
Blinking LED turning on and o repeatedly
Dual-Band An INSTEON device that can send and receive both INSTEON powerline signals and
INSTEON radio frequency signals
Ramp Rate The speed at which the load fades on or o
On-Level The preset brightness level a device will return to when turned on
INSTEON A dual-band, mesh networking technology developed by Smarthome/INSTEON. The world’s
most reliable, expandable and simple home automation and control technology.
Link A one way association between a controller and responder
Linking A method for associating INSTEON controller buttons with groups of INSTEON responders
such that the responders instantly return to a memorized state when the button is pushed.
Links can be made manually with the set button or using software.
Unlinking The process by which an INSTEON device can remove stored links. Just as with linking,
unlinking is a one-way process and should be performed in both directions for devices that
are both controllers and responders of each other, as in a 3-way switch scenario.
Multi-Linking /
Unlinking
Factory Reset A process that erases all stored links and recongures the device to factory defaults.
Load The device that you are controlling (e.g. a light bulb, ceiling fan, etc.)
On/O A device that can control its connected load to turn on and o but cannot dim. Usually a
Retry A 2nd (or subsequent) attempt by a controller to send an INSTEON signal, usually after an
Scene Multiple devices respond to memorized states. For example, a dinner time scene turns
Set Button A button on an INSTEON device that is used for setting or changing its properties
Simulcast A method for increasing the reliability of message delivery in a network. When a node in
A special mode that allows more than one link to be either created or removed
simultaneously, without laborious set button presses. When in linking or unlinking mode, an
INSTEON device will continue to link to other devices until the set button is tapped or four
minutes have elapsed, whichever occurs rst.
relay-based device.
acknowledge is not received from the responder in the expected time-slot.
on the dining table light, dims the kitchen lights to 10%, backyard lights turn o and the
thermostat adjusts to 72º.
a network sends a message, every other node that hears the message retransmits it at
precisely the same time based on a global clock, provided that the message has not already
been retransmitted some maximum number of times. Message propagation is more robust
because each node adds its energy to the signal, much like voices in a choir. Simulcasting
is much simpler than message routing because there are no routing tables to maintain and
nodes can join the network without any installation procedure.
X10 A legacy powerline networking technology. Many INSTEON devices are backwards
compatible with X10 devices by setting a house and unit code.
24
Page 25

General
Specications
Available Colors White
Brand: INSTEON
FCC ID
Industry Canada
Manufacturer Product No.: 2245-222 US
2245-422 France
2245-432 Germany
2245-442 UK
2245-522 Australia/New Zealand
Patent No.: Protected under US and Foreign Patents (see www.insteon.com/
patents)
UPC: 813922XXXXXX US
813922XXXXXX France
813922XXXXXX Germany
813922XXXXXX UK
813922XXXXXX Australia/New Zealand
Warranty: 2 years, limited
Operation
Audio Alert Beeper, can be disabled through software
Local Control No
Setup Memory Non-volatile EEPROM
Status LED Red/Green LED
INSTEON Features
INSTEON Device Category 0x03
INSTEON Device Subcategory 0x33 North America
0x34 United Kingdom
0x35 Europe
0x36 Australia/New Zealand
INSTEON ID 1
INSTEON Links 417
INSTEON Messages Repeated Yes
INSTEON Minimum Receive Level 10 mV
INSTEON Minimum Transmit Level 3.2 Vpp into 5 Ohms
25
Page 26

INSTEON Powerline Device Yes
INSTEON Powerline Frequency 131.65 KHz
INSTEON RF Device Yes
Maximum Controlled Scenes 400
Maximum Scene Memberships 400
Multi-Link Support Yes
Multi-Unlink Support Yes
RF Beacon Yes
Radio Frequency 915 MHz US
869.85 MHz Europe
869.85 MHz UK
921.00 MHz Australia/New Zealand
Radio Frequency Range 150 feet
Scene Commands Supported as
Scene Commands Supported as
Responder
Software Congurable Yes
Mechanical
Beep on Button Press No
Dimensions 1.5” H x 3.75” W x 3.75” D
Enclosure Material UV stabilized plastic
On O
Controller
Fast-On Fast-O
Begin Brighten Begin Dim
End Brighten End Dim
None
Beeper Yes
38mm H x 95mm W x 95mm D
Mounting Tabletop
Operating Environment Indoors
Operating Humidity Range 0-90% relative humidity
26
Page 27

Operating Temperature Range 32º to 104º F
Set Button Yes
Storage Temperature Range -4º to 158º F
Weight 5.2 oz
Electrical
Power Consumption <0.75 Watts
Supply Voltage 120-277 Volts AC, 50/60 Hertz, single phase
Surge Resistance Surges over 1000 volts
Power Connector IEC C8
Certication FCC ID Part 15B & 15C
0º to 40º C
-20º to 70º C
IC RSS-210 Issue 8
Intertek ETL
CE
C-Tick
27
Page 28

Troubleshooting
Unable to create an INSTEON Connect account using your smartphone
There is most likely an internet connection issue between your mobile device and the INSTEON Hub
Try this:
• Make sure your internet connection is working by trying to browse a website on your mobile device
• Look for any typos in your email address that might prevent the account from creating; if you are missing
the “@” symbol or “.com,” add them. INSTEON connect requires a full, valid email address.
INSTEON App is unable to nd your INSTEON Hub
A number of factors can impact the initial setup but most of them are internet connection related.
Try this:
• Check all of the cables going into the Hub and make sure they are rmly seated. Trace the ethernet cable
from the Hub back to the router and make sure it is connected properly there, too.
• Look for signs of life from the INSTEON Hub. Even if not properly connected, you should see a blue LED
glow on the front of the Hub. If the LED doesn’t illuminate, check the power outlet. There should also be a
blinking green and orange light on the Hub’s ethernet port. If both ethernet LEDs are o, try a dierent port
on your router.
• For the initial connection, your mobile device must be connected to the WiFi network being generated by
the same router to which the Hub is connected. While some routers create a “guest” network, you most
often need to be connected to the main WiFi network being created by your router for the initial setup to
work correctly.
• You can check to see if the INSTEON Hub was able to properly “phone home” to INSTEON Connect. This
will at least tell you that the Hub is up and running, even if a network conguration problem is preventing
you from connecting to the Hub. On a computer, visit connect.insteon.com/getinfo.asp. Any detected
INSTEON Hubs will be displayed on this page.
28
Page 29

Certications and Warnings
Read and understand these instructions before installing and retain them for future reference.
This product is not designed or approved for use on powerlines other than 120-277VAC, 50Hz or 60Hz, single
phase. Attempting to use this product on unapproved powerlines may have hazardous consequences.
• Use only indoors or in outdoor rated box
• This product may feel warm during operation. The amount of heat generated is within approved limits and
poses no hazards. To minimize heat buildup, ensure the area surrounding this product is as clear of clutter
as possible.
• Each INSTEON product is assigned a unique INSTEON I.D., which is printed on the product’s label.
• Changes or modications to the hardware not expressly approved by INSTEON may void the user’s
authority to operate the equipment in a licensed manor.
• For pluggable equipment, the socket-outlet shall be installed near the equipment and shall be easily
accessible.
This device complies with FCC Rules and Industry Canada license-exempt RSS standard(s). Operation is
subject to the following two conditions: (1) this device may not cause harmful interference, and (2) this device
must accept any interference, including interference that may cause undesired operation of the device.
Le present appareil est conforme aux CNR d’Industrie Canada applicables aux appareils radio exempts
de licence. L’exploitation est autorise aux deux conditions suivantes: (1) l’appareil ne doit pas produire de
brouillage, et (2) l’utilisateur de l’appareil doit accepter tout brouillage radiolectrique subi, mme si le brouillage est
susceptible d’en compromettre le fonctionnement.
DECLARATION OF CONFORMITY
Hereby, INSTEON declares that this device is in compliance with the essential requirements and other relevant
provisions of the following Directives:
1) Electromagnetic Compatibility Directive 2004/108/EC
2) Hazardous Substance Directive 2005/95/EC
Technical data and copies of the original Declaration of Conformity are available and can be obtained from
INSTEON; 16542 Millikan Ave, Irvine, CA, USA.
29
Page 30

Product Warranty
Limited Warranty
Seller warrants to the original consumer purchaser of this product that, for a period of two years from the date
of purchase, this product will be free from defects in material and workmanship and will perform in substantial
conformity to the description of the product in this Owner’s Manual. This warranty shall not apply to defects or
errors caused by misuse or neglect. If the product is found to be defective in material or workmanship, or if the
product does not perform as warranted above during the warranty period, Seller will either repair it, replace it,
or refund the purchase price, at its option, upon receipt of the product at the address below, postage prepaid,
with proof of the date of purchase and an explanation of the defect or error. The repair, replacement, or refund
that is provided for above shall be the full extent of Seller’s liability with respect to this product. For repair or
replacement during the warranty period, call 866-243-8022 with the Model # and Revision # of the device to
receive an RMA# and send the product, along with all other required materials to:
INSTEON
ATTN: Receiving
16542 Millikan Ave.
Irvine, CA 92606-5027
Limitations
The above warranty is in lieu of and Seller disclaims all other warranties, whether oral or written, express or
implied, including any warranty or merchantability or tness for a particular purpose. Any implied warranty,
including any warranty of merchantability or tness for a particular purpose, which may not be disclaimed
or supplanted as provided above shall be limited to the two-year of the express warranty above. No other
representation or claim of any nature by any person shall be binding upon Seller or modify the terms of the
above warranty and disclaimer.
Home automation devices have the risk of failure to operate, incorrect operation, or electrical or mechanical
tampering. For optimal use, manually verify the device state. Any home automation device should be viewed as
a convenience, but not as a sole method for controlling your home.
In no event shall Seller be liable for special, incidental, consequential, or other damages resulting from
possession or use of this device, including without limitation damage to property and, to the extent permitted by
law, personal injury, even if Seller knew or should have known of the possibility of such damages. Some states
do not allow limitations on how long an implied warranty lasts and/or the exclusion or limitation of damages, in
which case the above limitations and/or exclusions may not apply to you. You may also have other legal rights
that may vary from state to state.
Protected under U.S. and foreign patents (see www.insteon.com/patents)
© 2014 INSTEON
Rev 07.01.14
30
 Loading...