


RFID Gun reader
for SmartCompact
User Manual
SmarTerminal Computers, Inc.
Ver 0.931, SEP 2007
Page 1 2/1/2008

Disclaimer
SmarTerminal and SmartCompact are registered trademarks of
Sammi Information Systems Co., Ltd.
All other brand names, product names, or trademarks belong to their respective
holders.
Head Quarters
Sammi Information Systems Co.,Ltd.
103-15, Galwor –dong, Yongsan-Gu, Seoul, Korea
Tel. 82 -2-790-5508 / Fax. 82-2-790-5509
Email. sales@sammicomputer.co.kr
Web. www.sammicomputer.co.kr
Us Office
SmartTerminal Computers, Inc.
5200 Orange Ave. Suite 212
Cypress, CA 90630
Tel. 1-714-761-5300 Fax. 1-562-252-8272
Email.
sales@smarterminal.com
Web. www.smarterminal.com
Page 2 2/1/2008

Table of Contents
Introduction....................................................................................................................................... 4
Chapter 1 Get to know more about RFID Gun reader................................................................... 5
1.1 Make sure you have everything ....................................................................................... 5
1.2 Appearance ........................................................................................................................ 6
1.2.1 Front side .................................................................................................................... 6
1.2.2 Rear side...................................................................................................................... 6
1.2.3 Top side ....................................................................................................................... 8
1.2.4 Bottom side................................................................................................................. 8
1.2.5 Left side....................................................................................................................... 8
1.2.6 Right side .................................................................................................................... 9
1.2.7 With Protective rubber cover .................................................................................... 9
Chapter 2 Power settings and connections ................................................................................ 10
2.1 Remove / Install batteries in RFID Gun reader.............................................................. 10
2.2 Battery charging using power adapter.......................................................................... 11
2.2.1 Charging with AC/DC adapter................................................................................. 11
2.2.2 Charging with Battery charger................................................................................12
Chapter 3 Setting up SmartCompact RFID Gun reader.............................................................. 13
3.1 How to set CAB Files in SmartCompact........................................................................ 13
3.2 How to connect SmartCompact to RFID Gun reader................................................... 16
3.3 How to remove SmartCompact from RFID Gun reader................................................ 17
Chapter 4 Using RFID Gun reader................................................................................................ 18
4.1 How to operate RFID Gun reader................................................................................... 18
4.1.1 How to install program files in SmartCompact...........................................................18
4.1.2 How to operate RFID Gun reader ................................................................................. 21
Appendix A...................................................................................................................................... 23
RFID Gun reader Specification Highlights............................................................................... 23
Appendix B......................................................................................................................................24
Version Table...............................................................................................................................24
Page 3 2/1/2008

Introduction
This quick reference guide allows you to use all the advanced features of SmartCompact effectively.
Please go through it once before using SmartCompact handheld termin al.
User's Information
Cautions
Modifications not expressly approved by the party responsible for compliance could void the user's
authority to operate the equipment.
FCC compliance Information
This device complies with part 15 of FCC Rules. Operation is subject to the following two conditions:
1. This device may not cause harmful interference, and 2. This device must accept any interference
received. Including interference that may cause undesired operation.
Information to User
This equipment has been tested and found to comply with the limits for a Class B digital device, Pursuant
to part 15 of the FCC Rules. These limits are designed to provide reasonable protection against harmful
interference in a residential installation. This equipment generates, uses and can radiate radio Frequency
energy and, if not installed and used in accordance with the instructions, may cause harmful interference
to radio communications. However, there is no guarantee that interference will not occur in a particular
installation. If this equipment does cause harmful interference to radio or television reception, which can
be determined by turning the equipment off and on, the user is encouraged to try to correct the interference
by one or more of the following measures:
- Reorient or relocate the receiving antenna.
- Increase the separation between the equipment and receiver- Connect the equipment into an outlet on a
circuit different from that to which the receiver is connected.
- Consult the dealer or an experienced radio/TV technician for help.
RF exposure statement
"To maintain compliance with FCC's RF exposure guidelines, this equipment should be installed and
operated with minimum distance 20cm between the radiator and your body. Use only the supplied antenna."
Page 4 2/1/2008

Chapter 1 Get to know more about RFID Gun reader
1.1 Make sure you have everything
9 RFID Gun reader main unit (UHF)
9 Standard battery pack (2200 mAH Li-ion)
Optional accessories
9 Spare battery pack (2200 mAH Li-ion)
9 3 pack battery charger – under development
9 AC/DC adapter
9 Protective rubber cover
Page 5 2/1/2008

1.2 Appearance
1.2.1 Front side
UHF antenna
Features and description
Features Function / Description
RFID Antenna RFID antenna is located in front side of Gun reader
1.2.2 Rear side
LED
Display
Gun handle
Power LED
Battery Capacity
Communication LED
RF Strength LED (1 ~ 5)
Rear panel features
Page 6 2/1/2008

Name Function
Power LED Shows green light for 5 seconds when user triggers the gun
Battery capacity LED Shows battery capacity status (see below table for details)
Communication LED When IrDA communication is successful between Gun reader and
SmartCompact, Communication LED shows green light (blinking)
as user triggers the gun.
RF Strength LED Shows RFID power level from 1~5
LED color change according to battery capacity
Name Function
0 ~ 30% charged : red
30 ~ 80% charged : blue
80 ~ 100% charged : green (fully charged)
Page 7 2/1/2008

1.2.3 Top side
Screws for attaching
1.2.4 Bottom side
2200mAH battery
1.2.5 Left side
to SmartCompact
Battery out switch
Page 8 2/1/2008

nd description
Features a
Features Function / Description
Battery out button To take out battery, user should push this button.
1.2.6 Right side
DC input jack
Features and description
Features Function / Description
DC input jack To charge RFID reader, user should connect AC/DC adapter
to this DC input jack.
1.2.7 With Protective rubber cover
Features and description
Features Fun
Protective rubber vibration, user can additionally
To protect from shock and
ction / Description
cover
Page 9 2/1/2008
cover SmartCompact and/or RFID Gun reader.
Chapter 2 Power settings and connections
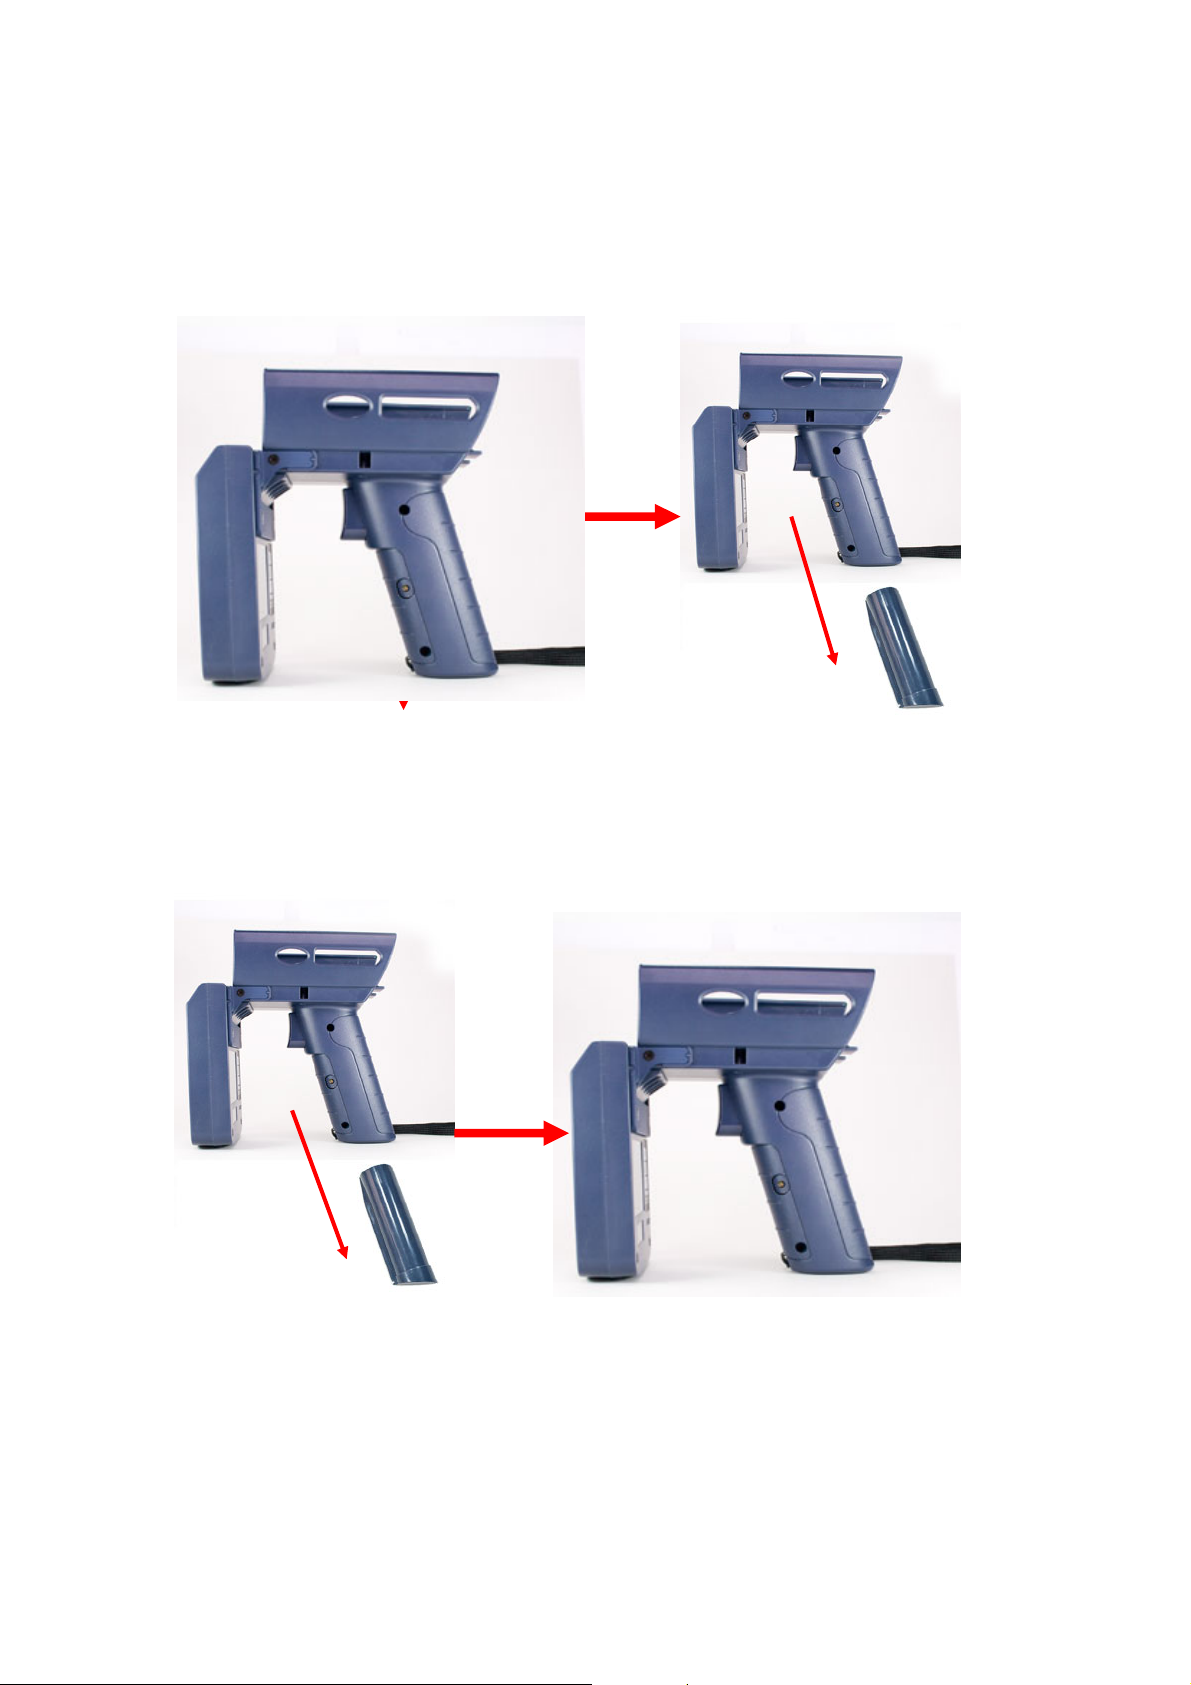
2.1 Remove / Install batteries in RFID Gun reader
ress the battery out button and remove battery in below direction:
P
battery out button
Push and secure the battery in the gun reader until hearing a click sound:
Page 10 2/1/2008

2
.2 Battery charging using power adapter
In the beginning, user must charge the battery at least for 4.5
read
er.
2.2.1 Charging with AC/DC adapter
hours to use the RFID Gun
Prepare AC/DC adapter (5V, 3A) and powe
compatible with that of SmartCompact.
r cable for RFID Gun reader . This AC/DC adapter is
Insert power cable to AC/DC adapter like below photo:
Open RFID Gun reader’s DC input jack cover and insert DC adapter output cable.
Page 11 2/1/2008

2
.2.2 Charging with Battery charger
To charge the battery pack, user can also use 3 pack Battery charger. Three batteries can be
cha
rged at the same time.
Und
er charging, the LED light is red and turns green after fully charged.
Page 12 2/1/2008

Chapter 3 Setting up SmartCompact RFID Gun reader
3.1 How to set CAB Files in SmartCompact
Connect USB Active sync cable bet ween your computer and SmartCompact.
When Active Sync progra m is opened, click Explore.
Page 13 2/1/2008

Click DiskOnChip folder.
Save necessary CAB file in the DiskOnChip folder.
Page 14 2/1/2008

Click DiskonChip/Cold Reset folder of SmartCompa ct.
Click corresponding Cab File. (ex : UHF_KOREA)
Page 15 2/1/2008

3 Gun reader
.2 How to connect SmartCompact to RFID
Insert SmartCompact to RFID Gun reader in below direction:
SmartCompact combined to RFID Gun reader:
Tighten the screws (2 pcs) firmly in order to hold the combination.
screws
Page 16 2/1/2008

3.3 How to remove SmartCompact from RFID Gun reader
Loosen the screws (2 pcs) in order to undo the combination.
screws
Remove SmartCompact from RFID Gun reader in below direction:
Page 17 2/1/2008

Chapter 4 Using RFID Gun reader
4.1 How to operate RFID Gun reader
To operate RFID Gun reader, user needs RFID Gun reader and SmartCompact (power on) with
program files installed.
4.1.1 How to install program files in SmartCompact
To install program files in SmartCompact, user can follow one of bel
1) Using Sync cable
To do this, user should have Microsoft ActiveSync program (v.4.2 or higher) installed in the
computer. Connect SmartCompact to the computer with USB or Serial Sync cable. (USB sync
cable is provided in SmartCompact standard package. Serial sync cable should be purchased
additionally)
ow three methods:
When Microsoft ActiveSync program is opened, click “Explore”
Page 18 2/1/2008

When Explore window is opened, copy and paste necessary program files from computer to
iskOnChip folder of SmartCompact (shown as Mobile Device).
D
Page 19 2/1/2008

2
) Using CF/SD cards
User can save necessary files to CF or SD card and insert
ns of CF/SD card slots below:
locatio
CF Card Slot
SD Card Slot
Copy the necessary files and paste them to DiskOnChip folder of SmartCompact.
it into SmartCompact. Check the
My Device DiskOnChip > Coldreset folder
Page 20 2/1/2008

4.1.2 How to operate RFID Gun reader
Slide SmartCompact to RFID Gun reader in below direction.
After combining SmartCompact and RFID Gun rea , click to open program CAB files to
stall. (ex : UHF_KOREA)
in
der
Page 21 2/1/2008

After program setting is done, target the RFID tag in front of antenna side and trigger the RFID
Gu
n reader.
TAG sample (ISO 18000 – 6C
EPC CLASS1 GEN 2)
UHF Gun reader can read in 0.5-1.5m distance and supports EPC C1G2, ISO18000-6B/C tags.
Page 22 2/1/2008

Appendix A
n reader Specification Highlights RFID Gu
RFID Gun reader(optional)
Radio frequency UHF (US: 902-928MHz)
Tag support UHF : EPC C1G2, ISO18000-6B/C
Output power: 0.5W(A type U HF)
Antenna type UHF: 80mm x 80mm
Page 23 2/1/2008

Appendix B
V
ersion Table
Ve ate: 09/03/2007
rsion: 0.93 Release D
V Release Date: 02/01/2008 ersion: 0.931
Page 24 2/1/2008
 Loading...