


Model 3705414
600W
Portable Worklight
with H-Stand Base
Back Cover
We’re here to help. For assistance before returning to your retailer, call 1 (888) 575-5272.
Hours: 9 a.m.-5 p.m., PST, Monday- Friday.
CAUTION:
Read and understand all Safety and Operating
instructions in this manual before attempting to
assemble or use this product.
!SNOITCURTSNI ESEHT EVAS
READ ALL INSTRUCTIONS!
Printed in China
Tools Required:
Crosshead or “Phillips”
screwdriver
(not included)
WARRANTY
THREE YEAR LIMITED WARRANTY
If this product (excluding bulbs) fails due to a defect in materials or
workmanship within three (3) years from the date of purchase, return
it along with the proof of date of purchase to place of purchase and it
will be replaced with the same or comparable model free of charge.
This warranty gives you specific legal rights and you may have other
rights that vary from state to state. This warranty is void if damage or
defect has resulted from accident, abuse, misuse or faulty repair.
IN NO EVENT WILL THE MANUFACTURER BE LIABLE FOR
ANY CONSEQUENTIAL, SPECIAL INCIDENTAL OR INDIRECT
DAMAGES OF ANY KIND ARISING OUT OF THE USE OR
MISUSE OF THIS PRODUCT. SOME STATES DO NOT ALLOW
THE EXCLUSION OR LIMITATION OF INCIDENTAL OR CONSEQUENTIAL DAMAGES SO THE ABOVE EXCLUSIONS OR
LIMITATIONS MAY NOT APPLY TO YOU.
For Warranty Service: Call 1 (888) 575-5272
Hours: 9 a.m.-5 p.m., PST, Monday- Friday.

Page 1 Page 2
SAVE THESE INSTRUCTIONS! SAVE THESE INSTRUCTIONS!
Fig. 1
IMPORTANT SAFETY INSTRUCTIONS
Understanding Hazard Signal Words:
WARNING indicates a potentially hazardous situation that, if not
avoided, could result in death or serious injury.
CAUTION indicates a potentially hazardous situation that, if not
avoided, may result in damage to the product.
READ ALL INSTRUCTIONS!
WARNING
: BE EXTREMELY CAREFUL WHEN USING THIS
DEVICE. Improper use of this work light can result in injury or death.
Follow all safeguards stated in this manual in addition to normal safety
precautions in working with electrical devices. DO NOT attempt to
service this device. When using outdoor portable work lights, always
follow basic safety precautions to reduce the risk of fire, electric shock
and personal injury.
WARNING: Failure to observe the following safety rules may
result in FIRE, ELECTRICAL SHOCK, INJURY or EXPOSURE TO
EXCESSIVE ULTRAVIOLET RADIATION.
1) Use only 3-wire UL listed outdoor extension cords that have
3-prong grounded plugs and grounded receptacles that accept the
work light’s plug.
2) Use only with a 16-gauge (AWG) extension cord of cord type SWA, SOW, SOW-A, STW, STW-A, STOW, STOW-A, SJW, SJW-A, SJOW,
SJOW-A, SJTW-A or SJTOW, SJTOW-A.
3) To avoid electrical shock, do not use near water or in areas where
water may accumulate. Keep work light at least 16 ft. from pools or
spas. Keep plugs dry. Use only Ground Fault Circuit Interrupter (GFCI)
protected receptacles when using this work light in wet or damp
locations. Receptacles are available with built-in GFCI protection and
are to be used for this measure of safety.
4) Always unplug work light and allow lamp head to cool before
replacing bulb.
• Estimated Assembly Time: 10 minutes
• Tools Required for Assembly:
# 2 Phillips screwdriver (not included)
PARTS LIST
U-shaped
bracket
D
B
A
F
E
G
C
Part Description Quantity
A Lamp head 1
B Floor H-stand 1
C Metal wire grill guard 1
D Tilt knob 2
E
Wing nuts connect lamp
head to H-stand
2
F Light bulb 300W 3
G Spare bulb holder 1
Page 3 Page 4
ASSEMBLY INSTRUCTIONS
WARNING: Risk of electrocution and severe burns.
DO NOT plug in the work light before completing assembly.
NEVER operate the light with the lens cover off and the
halogen lamp exposed.
CAUTION: DO NOT touch the bulb at any time.
Use a soft cloth. Oil from skin may damage bulb.
Your portable halogen work light requires some assembly.
Follow the following steps to complete the final assembly.
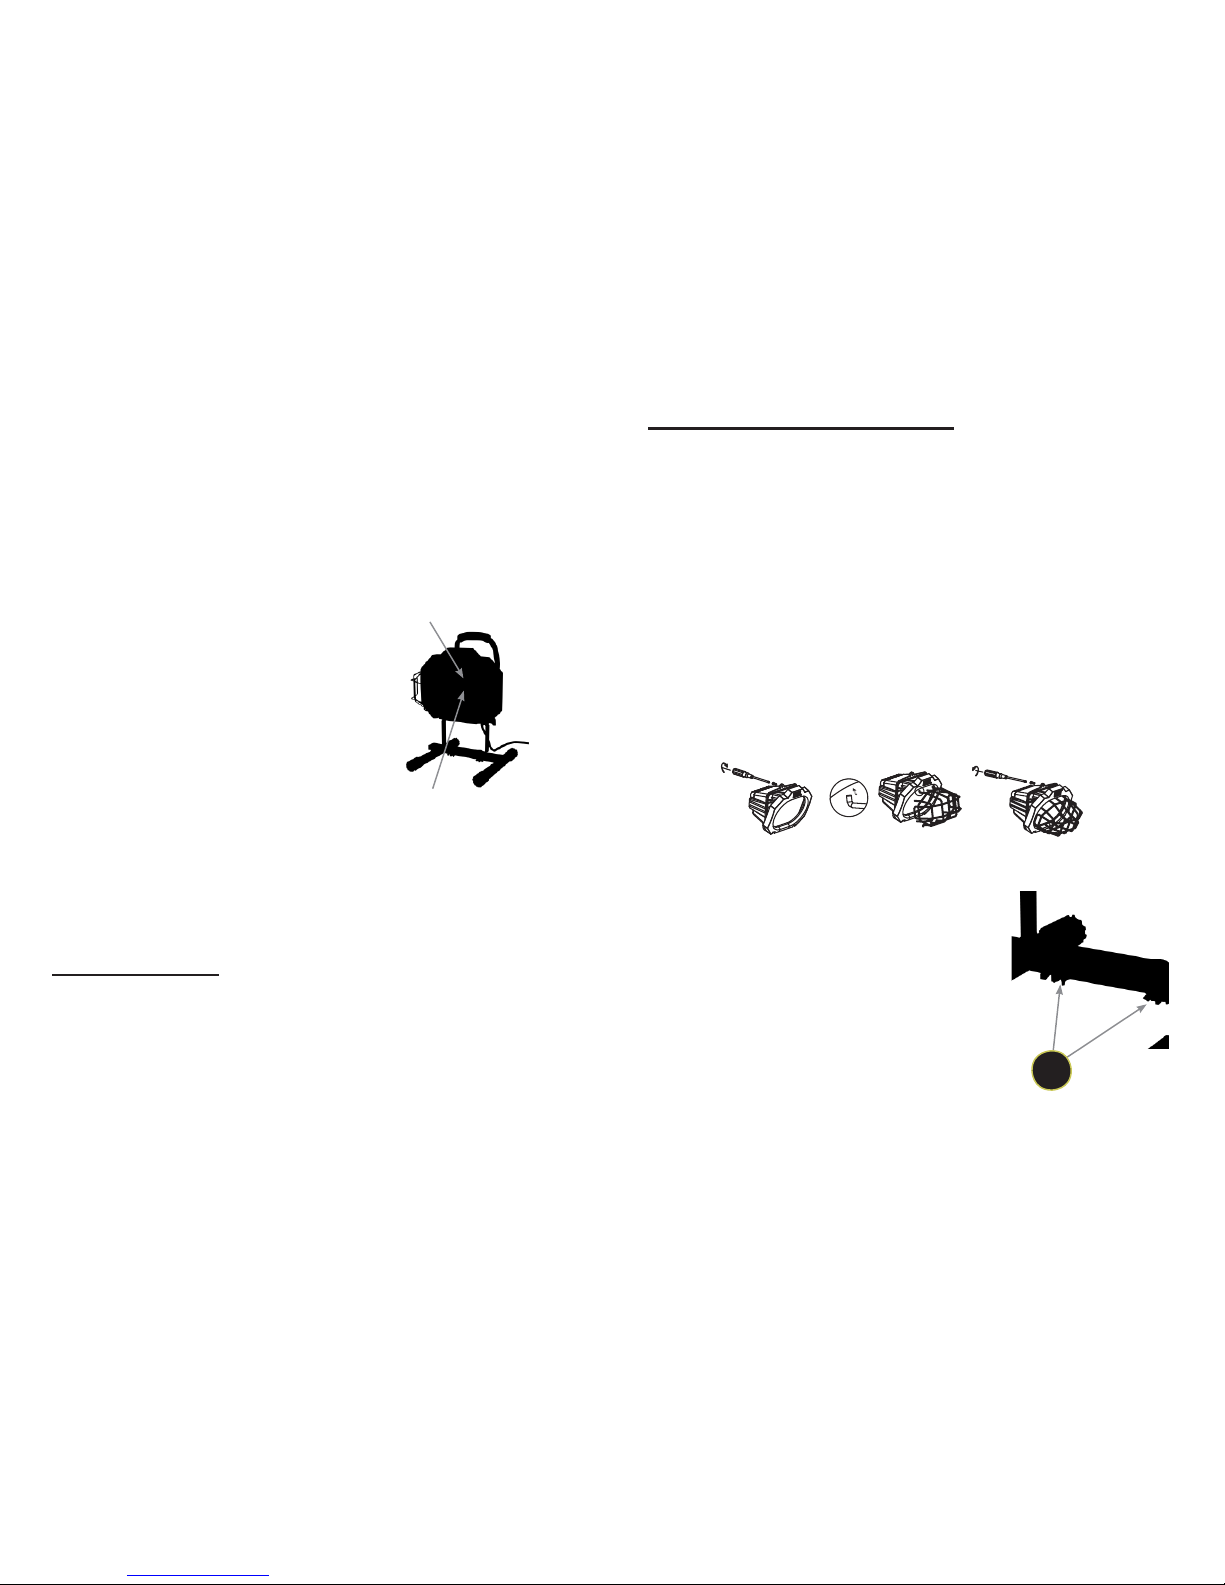
1) Attach wire grill guard
2) Attach lamp head to stand
The lamp head (A) comes with a U-shaped
bracket and is mounted to the portable stand
with two machine screws (E).
Place portable
stand(B) on a flat surface. Using the 2 wing nut
screws (E), secure the lamp head (A) to the
portable stand (B). See Fig. 4. Your new work
light will be ready for use after installation
of the bulb. See Bulb Installation and
Replacement instructions.
SAVE THESE INSTRUCTIONS! SAVE THESE INSTRUCTIONS!
5) The work light lamp head gets HOT very quickly. Only touch the
power plug or cushioned handle when turning the lamp heads ON or
OFF.
6) Do not touch the glass lens, wire lens guard or any metal part of
the lamp head when lamp is turned on to avoid burns.
7) If exposed skin feels warm while you are in the lighted area, move
the work light farther away. Do not remain in light if skin feels warm.
8) Do not look directly at the lighted lamps to avoid eye injuries.
9) Always keep the work light away from
any flammable surfaces or materials.
10) Use only with 300-Watt bulb or lower
wattage bulb in socket at top of lamp head.
Use only with 300-Watt bulb or lower
wattage bulb in socket at bottom of lamp
head. See Fig. 2.
11) Never touch the halogen lamp surface
with your bare hands. Unplug, and allow
lamp to completely cool before replacing
bulb.
12) Do not operate work light if it has a missing or damaged wire
guard, lamp containment barrier or lens cover. Contact customer
service for a replacement.
13) Read and follow all safety rules and operating instructions before
first use of this product.
PREPARATION
Before beginning assembly, remove all parts from carton. Compare
parts with parts list. If any part is missing or damaged, or you are
unsure how to proceed with assembly, do not attempt to assemble or
use the product. Call our customer service department for replacement
parts at 1 (888) 575-5272 between the hours of 9 a.m.-5 p.m., Monday
-
Friday PST.
300W bulb
Fig. 2
300W bulb
Fig. 4
E
(1) you must unscrew the frame in order to have an enough space to
insert the grill guard into the four corners around frame; See Fig.3(a)
(2) The grill guard must be inserted in between the face frame and
glass lens; See Fig.3(b)
(3) Screw the face frame back on to light housing and tighten it
gently. See Fig.3(c)
Fig.3(c)
Fig.3(b)
Fig.3(a)

Page 5 Page 6
HALOGEN LAMP INSTALLATION
WARNING: RISK OF SEVERE BURNS. LAMP HEAD AND BULB
ARE EXTREMELY HOT DURING AND IMMEDIATELY AFTER USE.
Touching lamp heads or bulbs with bare hands while work light is on
can cause severe burns. Turn off and unplug work light and allow it to
cool completely before attempting to change bulbs.
CAUTION: RISK OF DAMAGING BULB! NEVER TOUCH BULB
SURFACE WITH YOUR BARE HANDS!
The natural oil from your skin can leave a residue that could cause the
bulb to fail prematurely. If you accidentally touch the bulb with your
bare hands, wipe the bulb thoroughly with alcohol and soft cloth
or tissue before installing. ALWAYS USE A CLEAN CLOTH OR TISSUE
WHEN HANDLING THE BULB.
WARNING: RISK OF FIRE AND PERSONAL INJURY.
The lamp head on this work light is designed to operate safely with
two
300-watt bulb. To avoid damage to the work light, DO NOT USE A
BULB OVER
300-watts IN THIS WORK LIGHT.
Install halogen bulb into lamp head
The halogen bulb (F) is shipped in a protective box inside the lamp
head.
1) Remove the center screw at the top of the lamp head (A) and lower
the hinged frame with glass lens. Fig. 5 and Fig 6.
2) Remove bulb (F) from its box and wrapper, being careful not to
touch the bulb with your bare hands. Only use a clean cloth or tissue
to handle the bulb
3)
4) Insert the other ceramic end of the bulb into the other lamp holder
socket. Make sure that the bulb (F) makes secure contact at both lamp
holder sockets. When properly installed, the bulb can be rotated about
45° (1/8 of a turn) on its axis with very little or no resistance. Replace
the hinged front frame with glass lens. Then replace and tighten the
center screw. Repeat above steps for other lampholder.
HALOGEN LAMP REPLACEMENT
WARNING: Risk of severe burns. Bulb housing and bulbs are
extremely hot during and immediately following use. Touching
housing or bulb with bare hands while unit is lit can cause severe burns. Unplug light and allow it to cool completely before
attempting to change lamp.
To remove lamp:
1. Unplug and allow the light housing (A) and bulb (F) to cool.
2. Remove the center screw at the top of the light head (A) and lower
the hinged lens cover.
3. Using a cloth to safely grasp the burned out lamp (F), gently push
the lamp to the right. You will feel the lamp holder spring retract, freeing the other end of the lamp.
4. Lift and remove the bulb (F).
To replace lamp:
To install a new lamp, follow all instructions in the HALOGEN LAMP INSTALLATION section of this manual.
SAVE THESE INSTRUCTIONS! SAVE THESE INSTRUCTIONS!
Fig. 5 Fig. 6 Fig. 7
Hold the bulb (F) at its center with a clean cloth or tissue and
gently push one ceramic end of the bulb (F) into the bulb holder
to engage right side first. See Fig.7

Page 7 Page 8
WORKLIGHT OPERATION
Power supply cord and plug
Your portable halogen worklight comes with a 4-ft. power supply
cord with a 3-prong grounded plug. The maximum mounting distance
to receptacle is 4 feet when not used with an extension cord. DO NOT
attempt to plug the worklight into a non-grounded outlet or nongrounded extension cord.
• DO NOT remove the ground prong or otherwise try to alter the
plug. If the provided plug will not fit the outlet receptacle, have the
proper outlet receptacle installed by a qualified electrician. Improper
connection of the grounding conductor can result in electrical shock
and death.
• DO NOT abuse the power supply cord. Never carry the worklight by
the power supply cord or pull the cord to disconnect the plug from the
outlet receptacle. Keep cord away from heat, oil and sharp edges.
WARNING: Improper connection of the grounding conductor
can result in electrical shock and death.
• DO NOT abuse the power supply cord. Never carry the work light by
the power supply cord or pull the cord to disconnect the plug from the
outlet receptacle. Keep cord away from heat, oil and sharp edges.
Adjusting the light direction
1. Adjust the lamp head vertically by loosening the twist knob on
the side of the lamp head. Using the handle,
adjust the lamp head to desired position and
retighten knob. See Fig. 8.
WARNING: RISK OF PERSONAL INJURY.
To avoid being burned, always hold the
work light by its grip handle when making
adjustments.
Power Switch
• The lamp head has Two (2) ON–OFF style switches. See Fig. 9.
Always turn the lamp head OFF before unplugging the
worklight!
WARNING: RISK OF FIRE. DO
NOT aim the work light at flammable or
combustible surfaces.
Extension cords
The maximum extension cord length
recommended for this work light is 50 ft.
Use of extension cords longer than 50 ft.
can cause a voltage drop that can dim
the lights. Extension cords used with this
work light must have adequate American
Wire Gauge (AWG), or wire size, for safe,
efficient use. The smaller the gauge of the
wire, the greater the capacity of the wire
(e.g., 14-gauge wire has more capacity than 16-gauge wire). Use an
extension cord of minimum 16-gauge (AWG) 3-conductor or higher
capacity such as 14-gauge or 12-gauge for this work light. Always
make sure that the prongs on the plug of the extension cord are the
same number, size and shape as those on the work light plug. Always
be sure that the extension cord is in good electrical condition.
Spare bulb holder
Your worklight has a spare bulb holder. The spare bulb holder stores
one spare bulb. One spare bulb holder stores
an extra
300 watt lamp. See Fig. 10.
SAVE THESE INSTRUCTIONS! SAVE THESE INSTRUCTIONS!
Fig. 8
D
U-shaped
bracket
Fig. 10
G
Fig. 9

Page 9 Page 10
CARE AND MAINTENANCE
Your portable halogen work light requires very little care and
maintenance. Simply clean the lens, lamp head and lamp stand
regularly with a non-abrasive cleaner.
WARNING: Always make sure that work light is unplugged and
cooled down before attempting to clean it.
Storage
Always allow the work light to cool down completely before
storing. Store in a safe place, out of the reach of children.
TROUBLE SHOOTING
Use below chart for troubleshooting your worklight.
SAVE THESE INSTRUCTIONS! SAVE THESE INSTRUCTIONS!
PROBLEM POSSIBLE CAUSE CORRECTIVE ACTION
If the work
light will not
operate
There may be a poor
connection between
lamp holder and
bulb.
Bulb needs
replacement.
Try re-installing the bulb. Refer to Halogen Bulb
Installation section of this manual.
Remove bulb and check for a break in the
filament wire. Replace bulb if necessary. Refer
to Halogen Bulb Installation section of this
manual.
The work
light comes
on, but the
lights are
dimmed
Improper voltage or
power supply. The
work light will only
operate on standard
household 120V AC/
60 Hz power.
Use of an extension cord longer than 50 ft. can
reduce the voltage supplied to the light and can
cause dimming.
Use 16-gauge (AWG) extension cords with
a cord length of less than 50 ft. Have power
supply checked by a qualified electrician.
We’re here to help. For assistance before returning to your retailer, call 1 (888) 575-5272.
Hours: 9 a.m.-5 p.m., PST, Monday- Friday.
 Loading...