

Page 1
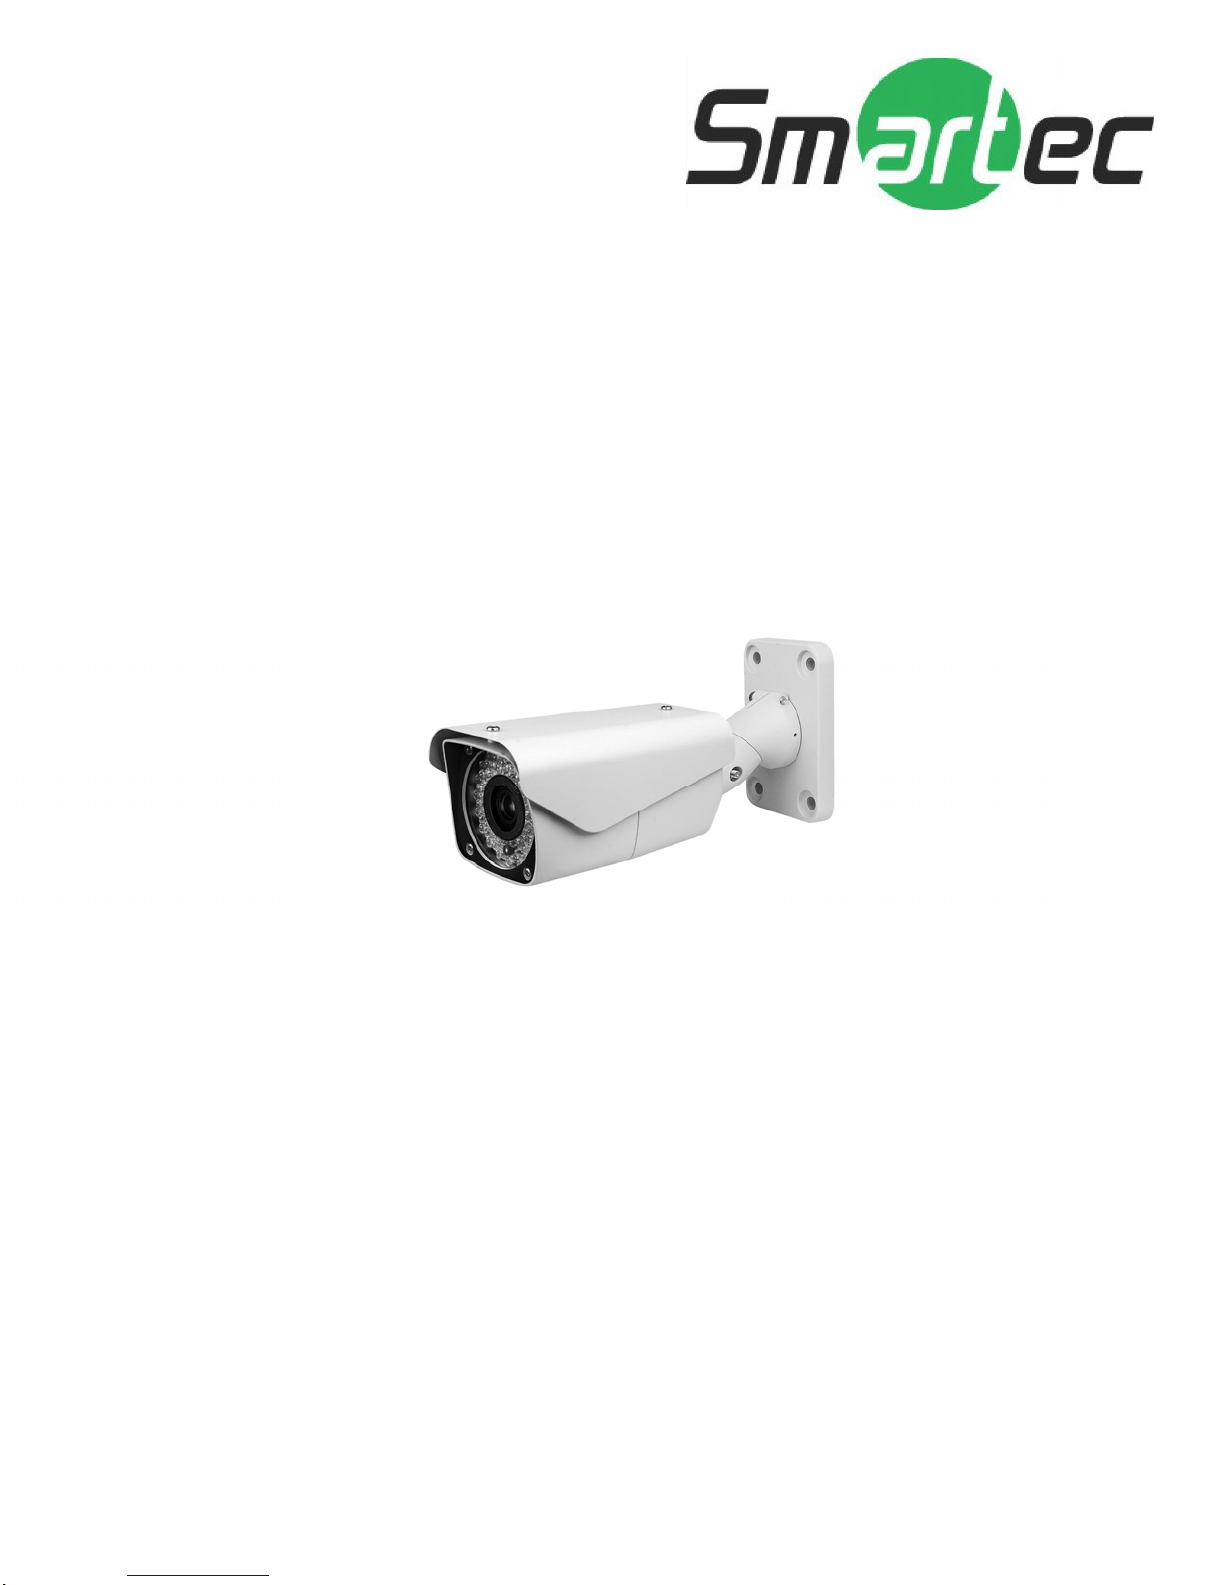
Smartec STC- 3670 Zoom D/N
Vandal-Proof IR LED Outdoor Camera
User Manual
www.smartec-security.eu
Page 2

TABLE OF CONTENTS
CONTENT VERIFICATION........................................................4
DISCLAIMER..................................................................5
WARNING AND CAUTION .........................................................6
FCC COMPLIANCE STATEMENT....................................................6
CE COMPLIANCE STATEMENT.....................................................7
IMPORTANT SAFEGUARDS........................................................7
INTRODUCTION................................................................8
FEATURES..................................................................9
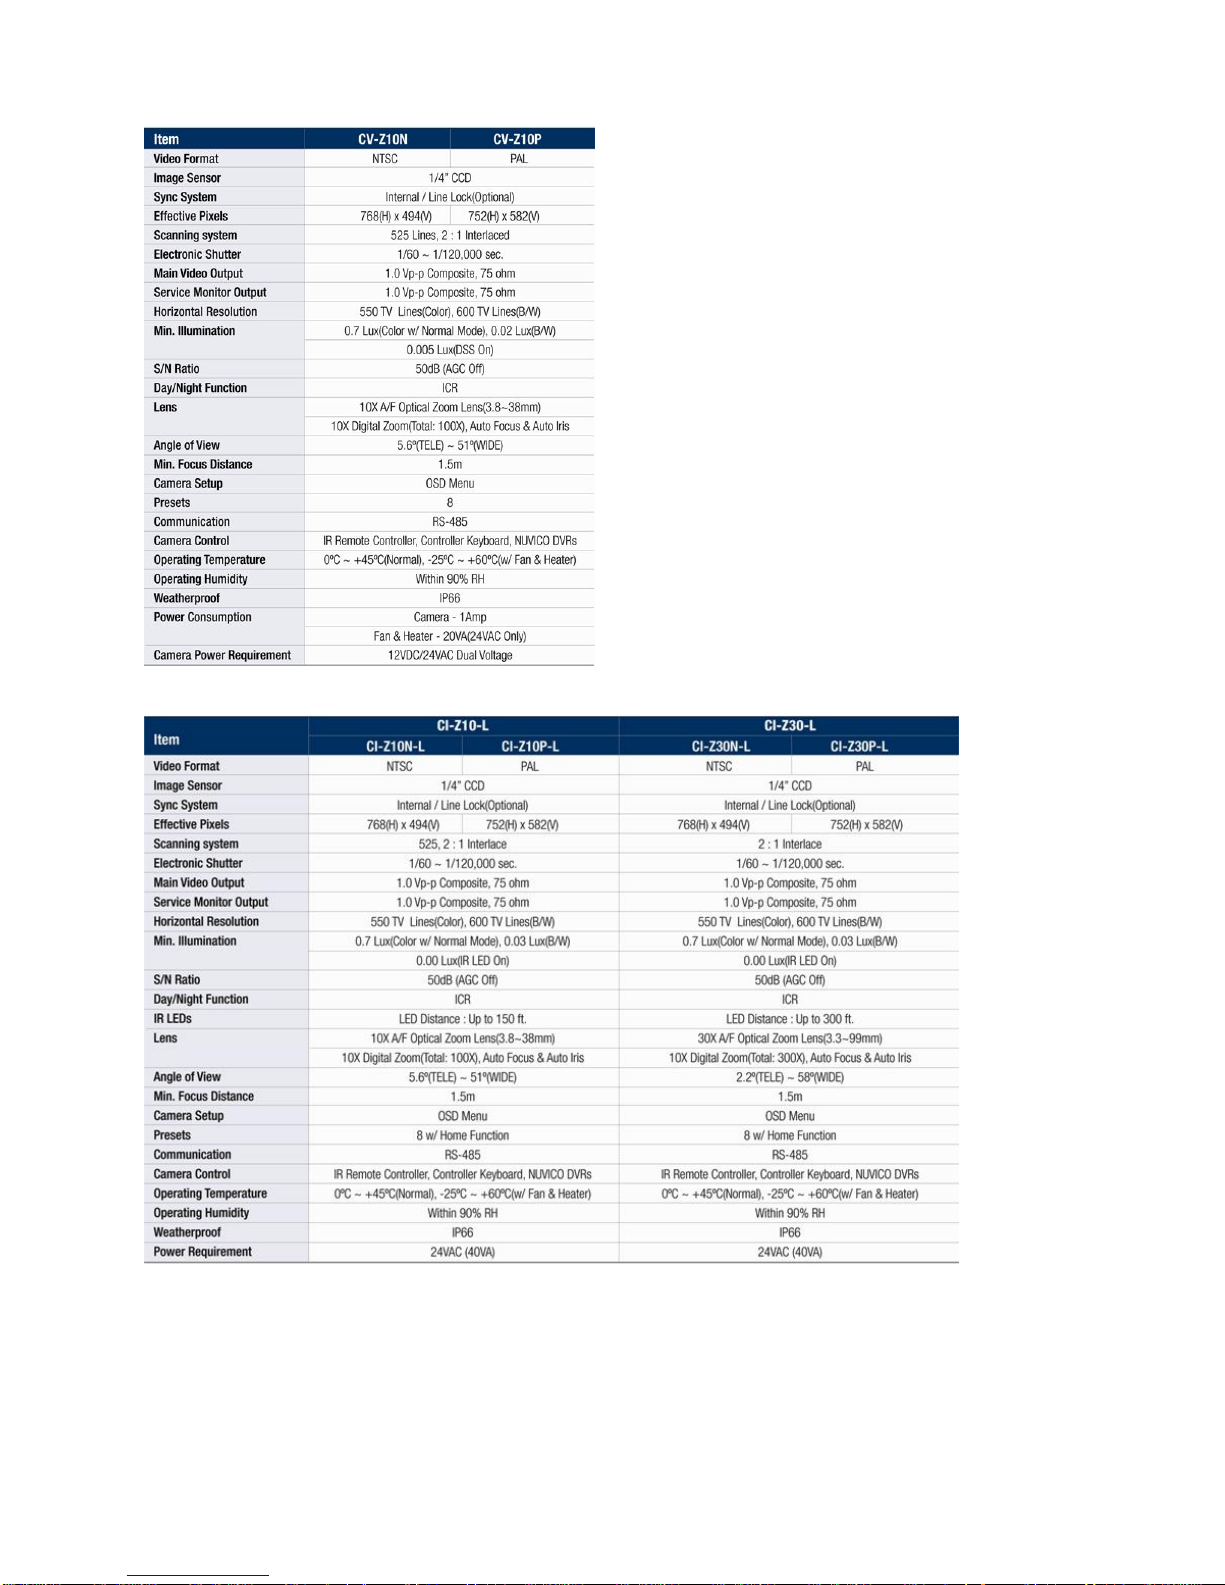
SPECIFICATION...............................................................9
CV–Z10 3 AXIS GIMBAL ADJUSTMENTS...........................................10
CI-Z10 & CI-Z30 3 AXIS BRACKET ADJUSTMENTS .................................11
WIRING DIAGRAM: GENERAL OVERVIEW ...........................................12
WIRING DIAGRAM: CONNECTING TO THE CONTROLLER (NVCK-3X) ...................14
WIRING DIAGRAM: CONNECTING TO THE DVR ....................................14
REMOTE CONTROLLER (SUPPLIED)...............................................15
REMOTE CONTROLLER INSTRUCTIONS ...........................................16
ADJUSTING THE LENS & SETUP MENU............................................17
VIA IR REMOTE CONTROL ....................................................17
U
VIA CONTROLLER (NVCK-3X).................................................17
VIA DVR..................................................................17
MENU CONFIG INSTRUCTIONS...................................................18
NAVIGATING THE MENU......................................................18
FOCUS....................................................................19
WHITE BALANCE CONTROL ....................................................20
EXPOSURE.................................................................21
SPECIAL..................................................................23
DISPLAY..................................................................26
FUNCTION.................................................................27
IR RADIATOR..............................................................30
Page 3

CONTENT VERIFICATION
Before installing the camera, please make sure that the following items are
included in the box:
CV-Z10:
1. Dome Camera
2. Remote Control
3. Instruction Manual
4. Mounting Hardware
CI-Z10 & 30–L:
1. Integrated Camera
2. Sunshield
3. Remote Control
4. Instruction Manual
5. Mounting Hardware
If any of these materials are missing, please contact the vendor or NUVICO
customer service department immediately.
Available Accessories
CV–FH Fan & Heater for CV-Z10
CA–JB Junction Box
CA–OM Outdoor Wall Mount for CV-z10
CA–PM Pendant Mount for CV-Z10
CA–SMC30 Service Monitor Cables
4
Page 4

DISCLAIMER
• While every effort has been made to ensure that the information contained
in this guide is accurate and complete, no liability can be accepted for
any errors or omissions.
• NUVICO reserves the right to change the specifications of the hardware and
software described herein at any time without prior notice.
• No part of this guide may be reproduced, transmitted, transcribed, stored
in a retrieval system, or translated into any language in any form, by any
means, without prior written permission of NUVICO.
• NUVICO makes no warranties for damages resulting from corrupted or lost
data due to a mistaken operation or malfunction of the cameras, peripheral
devices, or unapproved/unsupported devices.
5
Page 5
G
WARNING AND CAUTION
WARNIN
TO REDUCE THE RISK OF FIRE OR ELECTRIC SHOCK, DO NOT EXPOSE THIS PRODUCT TO RAIN
OR MOISTURE. DO NOT INSERT ANY METALLIC OBJECTS THROUGH THE VENTILATION GRILLS OR
OTHER OPENINGS ON THE EQUIPMENT.
CAUTION
EXPLANATI O N OF GRAP HICAL SYMBOLS
The ligh tning flash with ar rowh ead symb ol, with in a n equ ilate ral triangle, i s inte nded to
alert th e user to th e presence of uninsu lated "dange rous volt age" within the produc t's
enclosure that may be of sufficient magnitude to constitute a risk of electric shock to
persons.
The exclamation point within an equilateral triangle is intended to alert the user to the
presence of im por ta nt op er at ing an d m ai nte na nce (se r vici ng ) in s tru ctio n in t he literature
accompanying the product.
FCC COMPLIANCE STATEMENT
6
Page 6
FCC INFORMATION: THIS EQUIPMENT HAS BEEN TESTED AND
FOUND TO COMPLY WITH THE LIMITS FOR A CLASS A DIGITAL
DEVICE, PURSUANT TO PART 15 OF THE FCC RULES. THESE LIMITS
ARE DESIGNED TO PROVIDE REASONABLE PROTECTION AGAINST
HARMFUL INTERFERENCE WHEN THE EQUIPMENT IS OPERATED IN
A COMMERCIAL ENVIRONMENT. THIS EQUIPMENT GENERATES,
USES, AND CAN RADIATE RADIO FREQUENCY ENERGY AND IF NOT
INSTALLED AND USED IN ACCORDANCE WITH THE INSTRUCTION
MANUAL, MAY CAUSE HARMFUL INTERFERENCE TO RADIO
COMMUNICATIONS. OPERATION OF THIS EQUIPMENT IN A
RESIDENTIAL AREA IS LIKELY TO CAUSE HARMFUL INTERFERENCE
IN WHICH CASE THE USER WILL BE REQUIRED TO CORRECT THE
INTERFERENCE AT HIS OWN EXPENSE.
CAUTION: CHANGES OR MODIFICATIONS NOT EXPRESSLY
APPROVED BY THE PARTY RESPONSIBLE FOR COMPLIANCE COULD
VOID THE USER'S AUTHORITY TO OPERATE THE EQUIPMENT.
THIS CLASS A DIGITAL EQUIPMENT COMPLIES WITH CANADIAN
ICES-003.
CET APPAREIL NUMÉRIQUE DE LA CLASSE A EST CONFORME À LA
NORME NMB-003 DU CANADA.
CE COMPLIANCE STATEMENT
WARNING
THIS IS A CLASS A PRODUCT. IN A DOMESTIC ENVIRONMENT THIS
PRODUCT MAY CAUSE RADIO INTERFERENCE IN WHICH CASE THE
USER MAY BE REQUIRED TO TAKE ADEQUATE MEASURES.
IMPORTANT SAFEGUARDS
7
Page 7

• Read these instructions.
• Heed all warnings.
• Follow all instructions.
• Do not use this equipment near water.
• Clean only with dry cloth.
• Do not block any ventilation openings. Install in accordance with the
manufacturer's instructions.
• Do not install near any heat sources such as radiators, heat registers,
stoves, or other equipment (including amplifiers) that produce heat.
• Do not defeat the safety purpose of the polarized or grounding-type plug.
A polarized plug has two blades with one wider than the other. A
grounding type plug has two blades and a third grounding prong. The wide
blade or the third prong is provided for your safety. If the provided
plug does not fit into your outlet, consult an electrician for replacement
of the obsolete outlet.
• Protect the power cord from being walked on or pinched, particularly at
plugs, convenience receptacles, and the point where they exit from the
equipment.
• Only use attachments/accessories specified by the manufacturer.
• Unplug this equipment during lightning storms or when unused for long
periods of time.
• Refer all servicing to qualified service personnel. Servicing is required
when the equipment has been damaged in any way, such as power-supply cord
or plug is damaged, liquid has been spilled or objects have fallen into
the equipment, the equipment has been exposed to rain or moisture, does
not operate normally, or has been dropped.
• CAUTION - THESE SERVICING INSTRUCTIONS ARE FOR USE BY QUALIFIED SERVICE
PERSONNEL ONLY. TO REDUCE THE RISK OF ELECTRIC SHOCK DO NOT PERFORM ANY
SERVICING OTHER THAN THAT CONTAINED IN THE OPERATING INSTRUCTIONS UNLESS
YOU ARE QUALIFIED TO DO SO.
• Use Certified/Listed Class 2 power supply transformer only.
INTRODUCTION
8
Page 8

FEATURES
The Zoommatic Cameras feature high resolution 1/4” Interline Transfer CCD
Imager for enhanced lowlight sensitivity. User-friendly, on-screen pull-down
menus and short-cuts make it easy to setup and program functions.
• Super Resolution – 550 TV Lines (Color), 600 TV Lines(B/W)
• True Night Shot function with ICR Day/Night function
• Auto Focus & Auto Iris
• 0.7 Lux(Color w/ Normal Mode), 0.03 Lux(B/W), 0.00 Lux(IR LED On)
• OSD for Camera Setup
• 8 Presets
• Home Function
• RS-485 Communication
• IR Remote Controller (Supplied)
• 3-Axis Camera View Adjustments
• Weatherproof – IP66
• 24VAC
CV-Z10
• Built-in 10X (3.8~38mm) Optical Power Zoom.
• Fan & Heater (Optional)
CI-Z10 & 30 - L
• Built-in 10X (3.8~38mm) or 30X (3.3~99mm) Optical Power Zoom.
• 46 IR LEDs for 10X Optical Zoom and 78 IR LEDs for 30X Optical Zoom
• IR Adjustments: On/Off, & Brightness Level
• IR Distance: Up to 150 ft for the CI-Z10 and 300 ft for the CI-Z30.
• Fan & Heater (Built-in)
SPECIFICATION
9
Page 9
CV–Z10 3 AXIS GIMBAL ADJUSTMENTS
10
Page 10
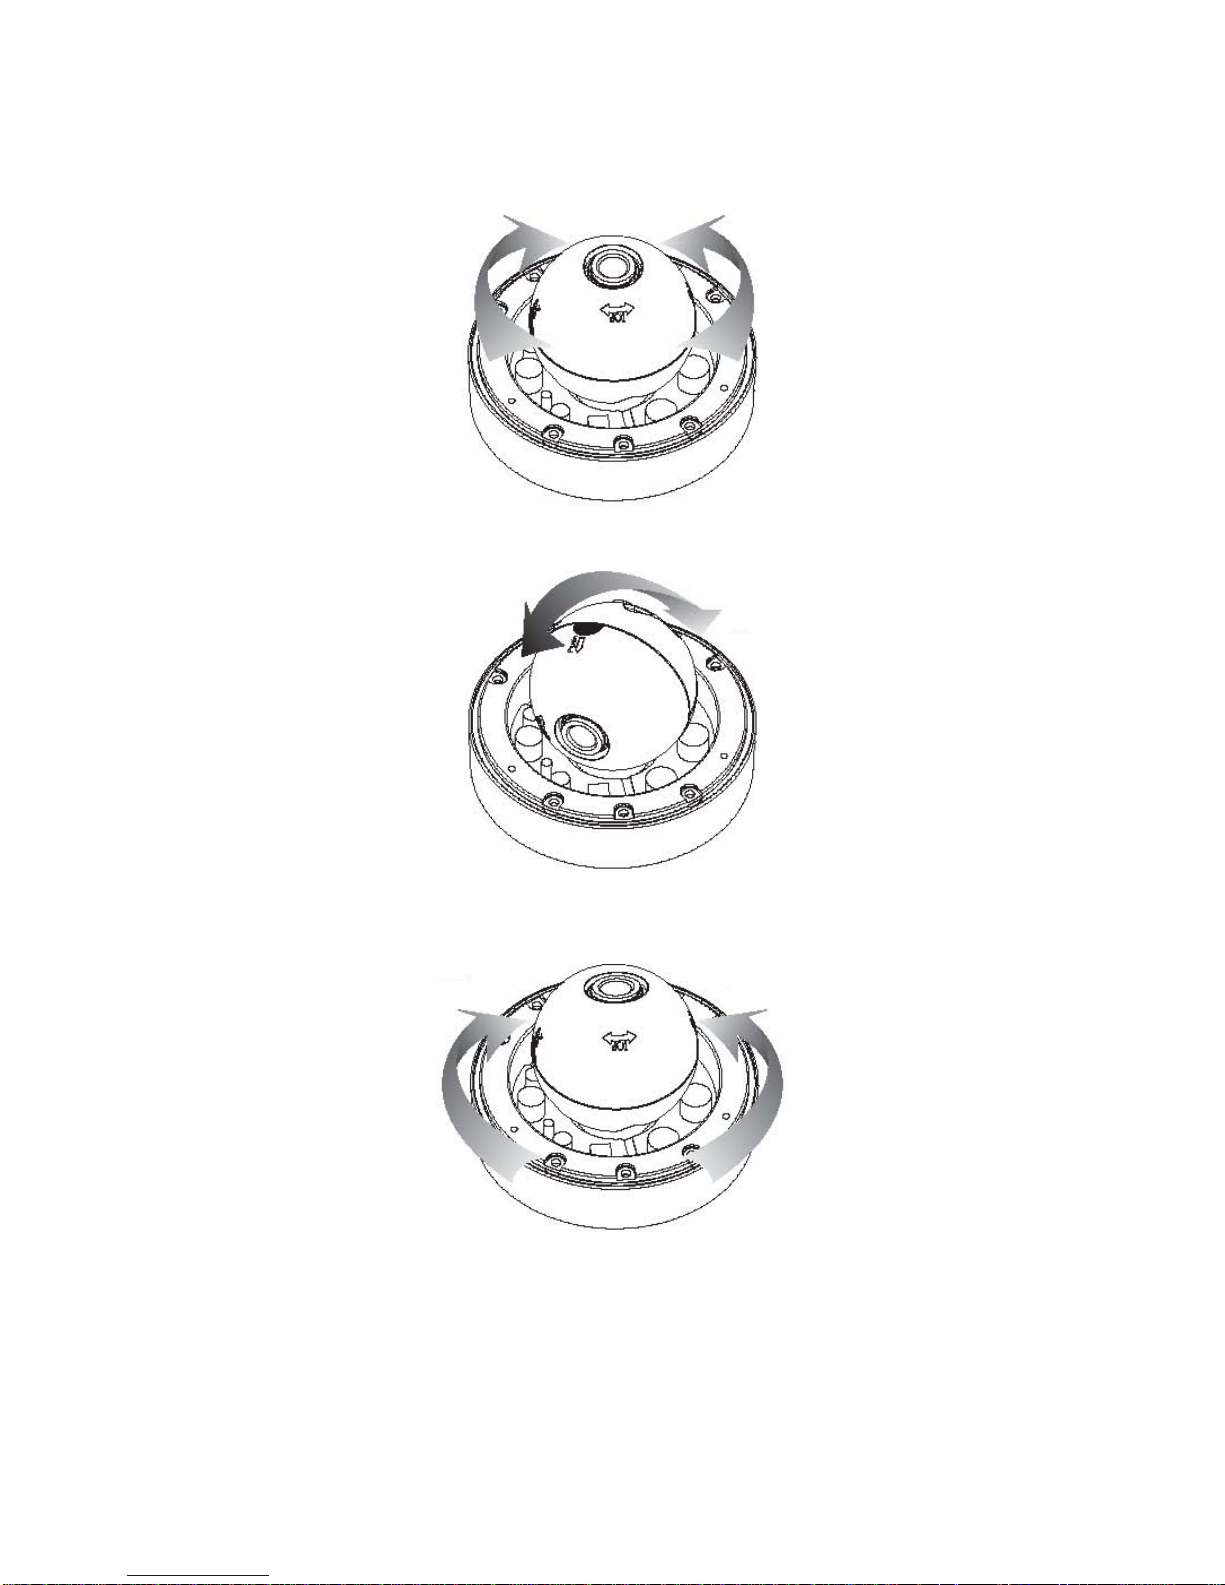
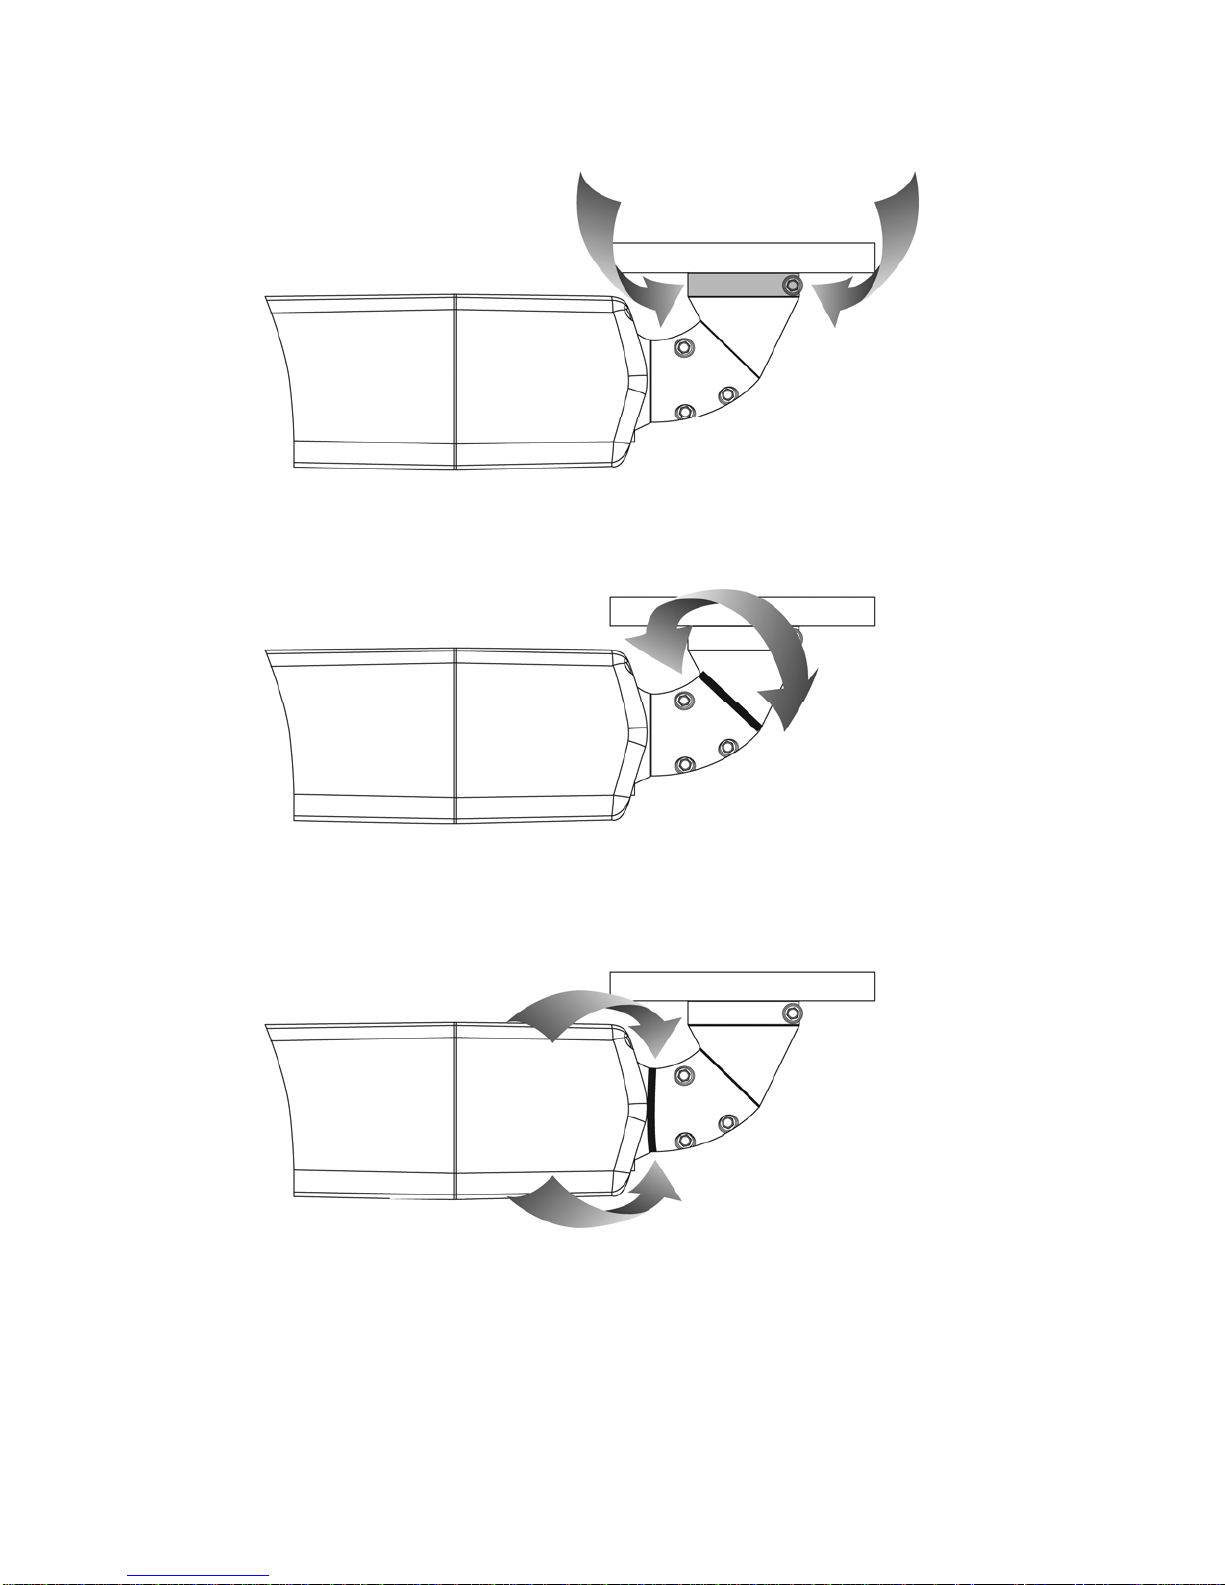
CI-Z10 & CI-Z30 3 AXIS BRACKET ADJUSTMENTS
11
Page 11
WIRING DIAGRAM: GENERAL OVERVIEW
12
Page 12
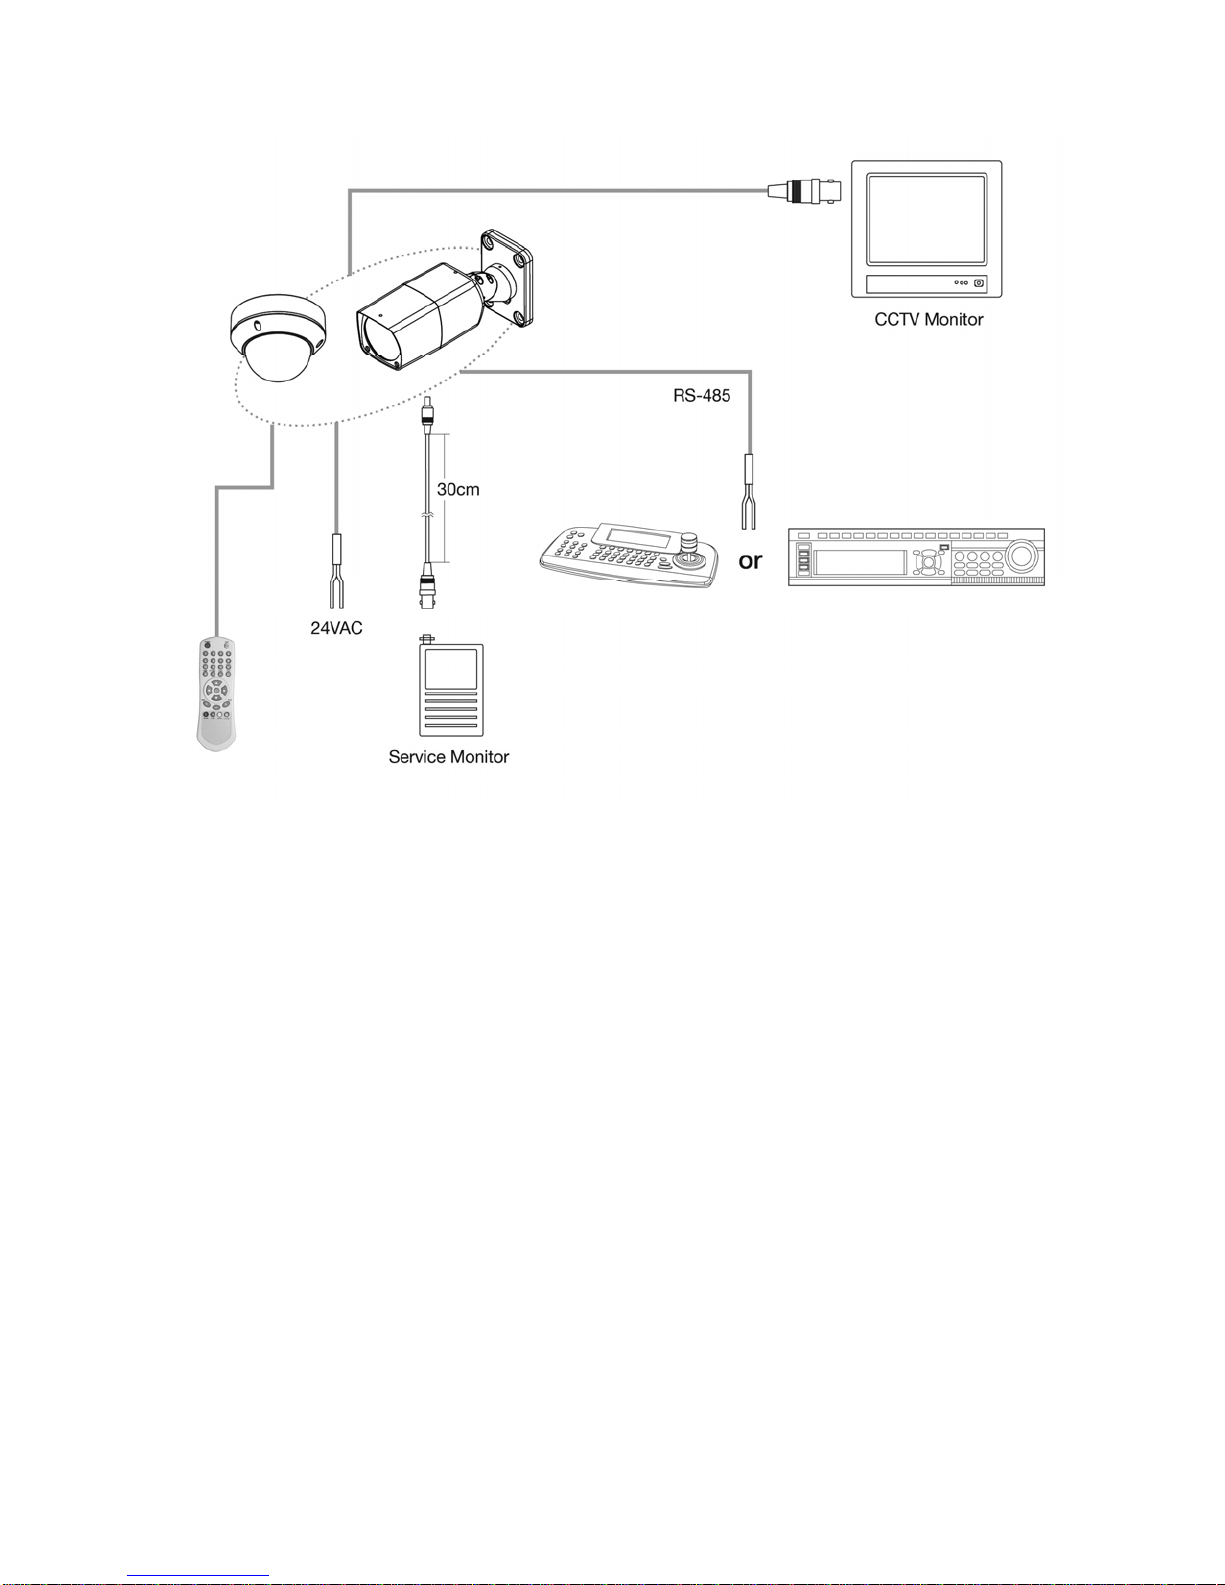
Use minimum of AC 24V / 40VA power source.
• Connect the VIDEO-OUT jack to the VIDEO-INPUT of the device.
• As the connecting method varies with the equipment, refer to the manual
supplied with the equipment.
• Always make sure that the camera’s power is off when connecting the cables.
• The camera is supplied with second video output on the camera housing. To
use this feature along with a service monitor, second monitor cable is
required.
Using a RS-485 communication, it will be able to control the ZOOM/FOCUS and
OSD menu from the controller (NVCK-3X) or through the DVR. RS-485 does not
allow star connection layout. It must be in a daisy-chain configuration. An
amplifier/repeater is required to extend over 1.2km in distance.
13
Page 13
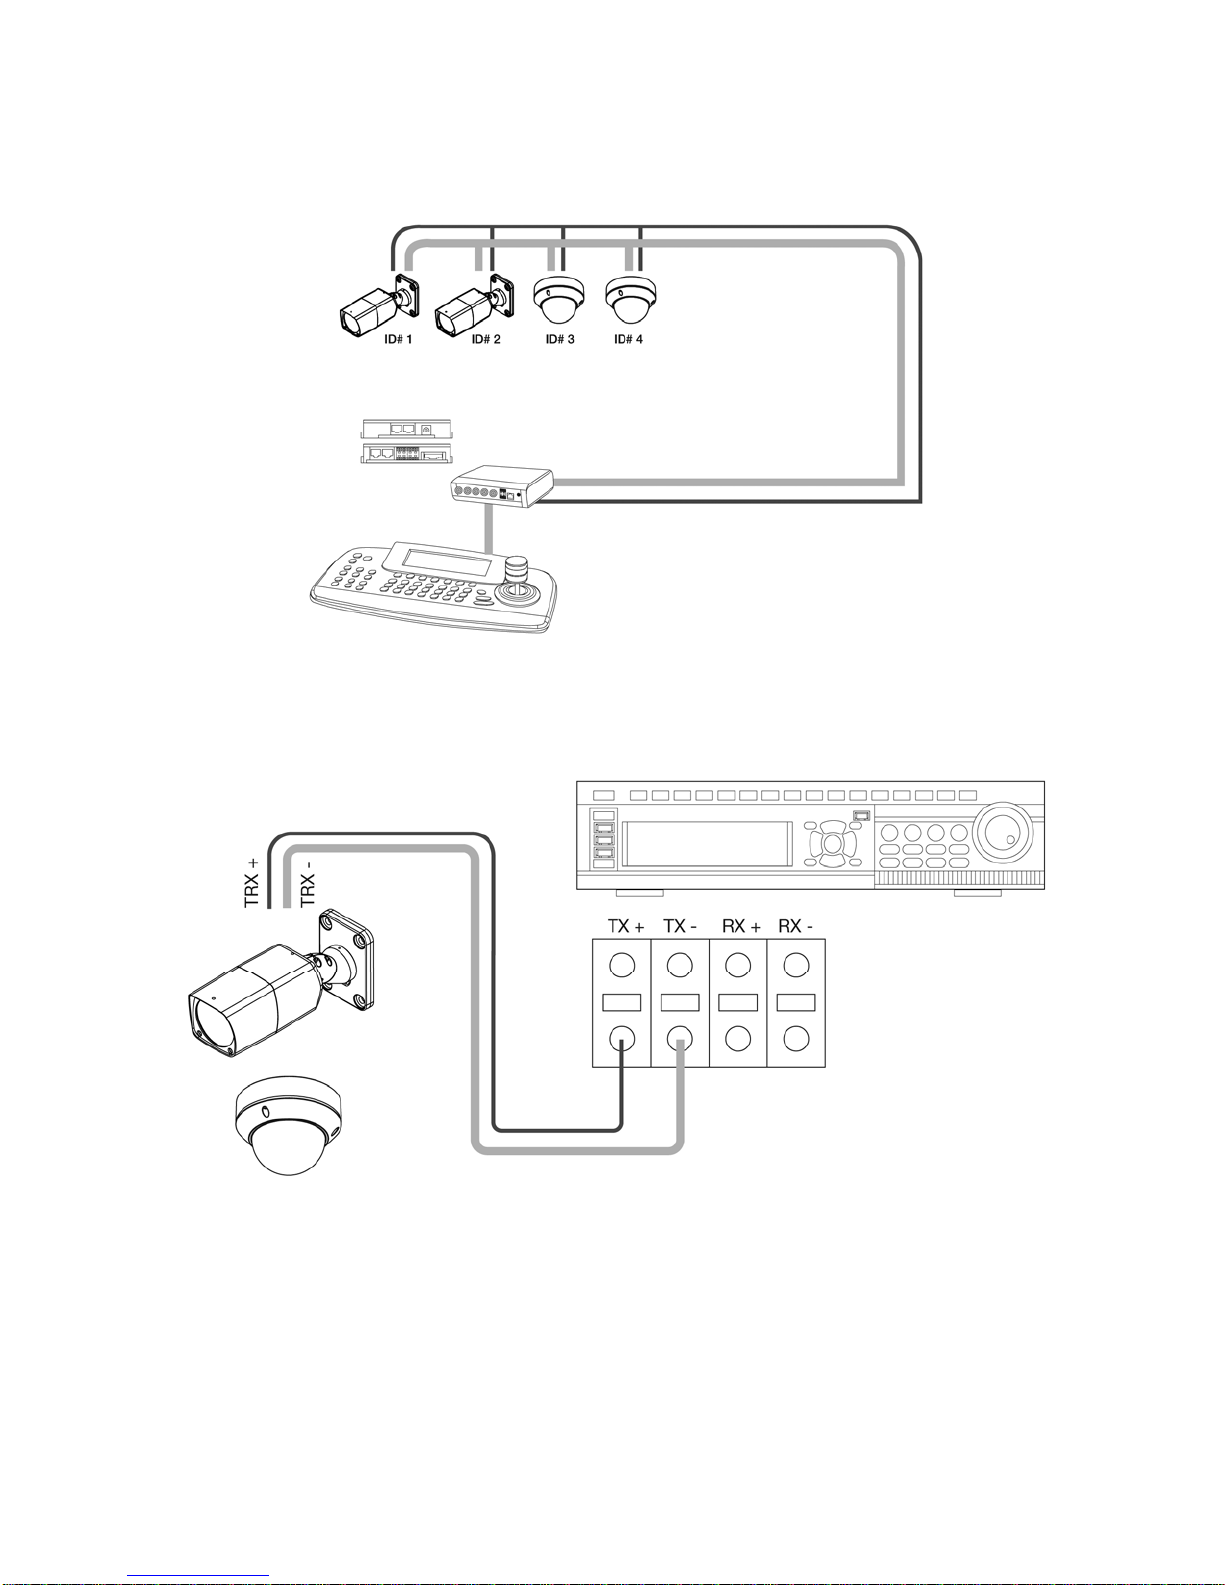
WIRING DIAGRAM: CONNECTING TO THE CONTROLLER
(NVCK-3X)
WIRING DIAGRAM: CONNECTING TO THE DVR
14
Page 14
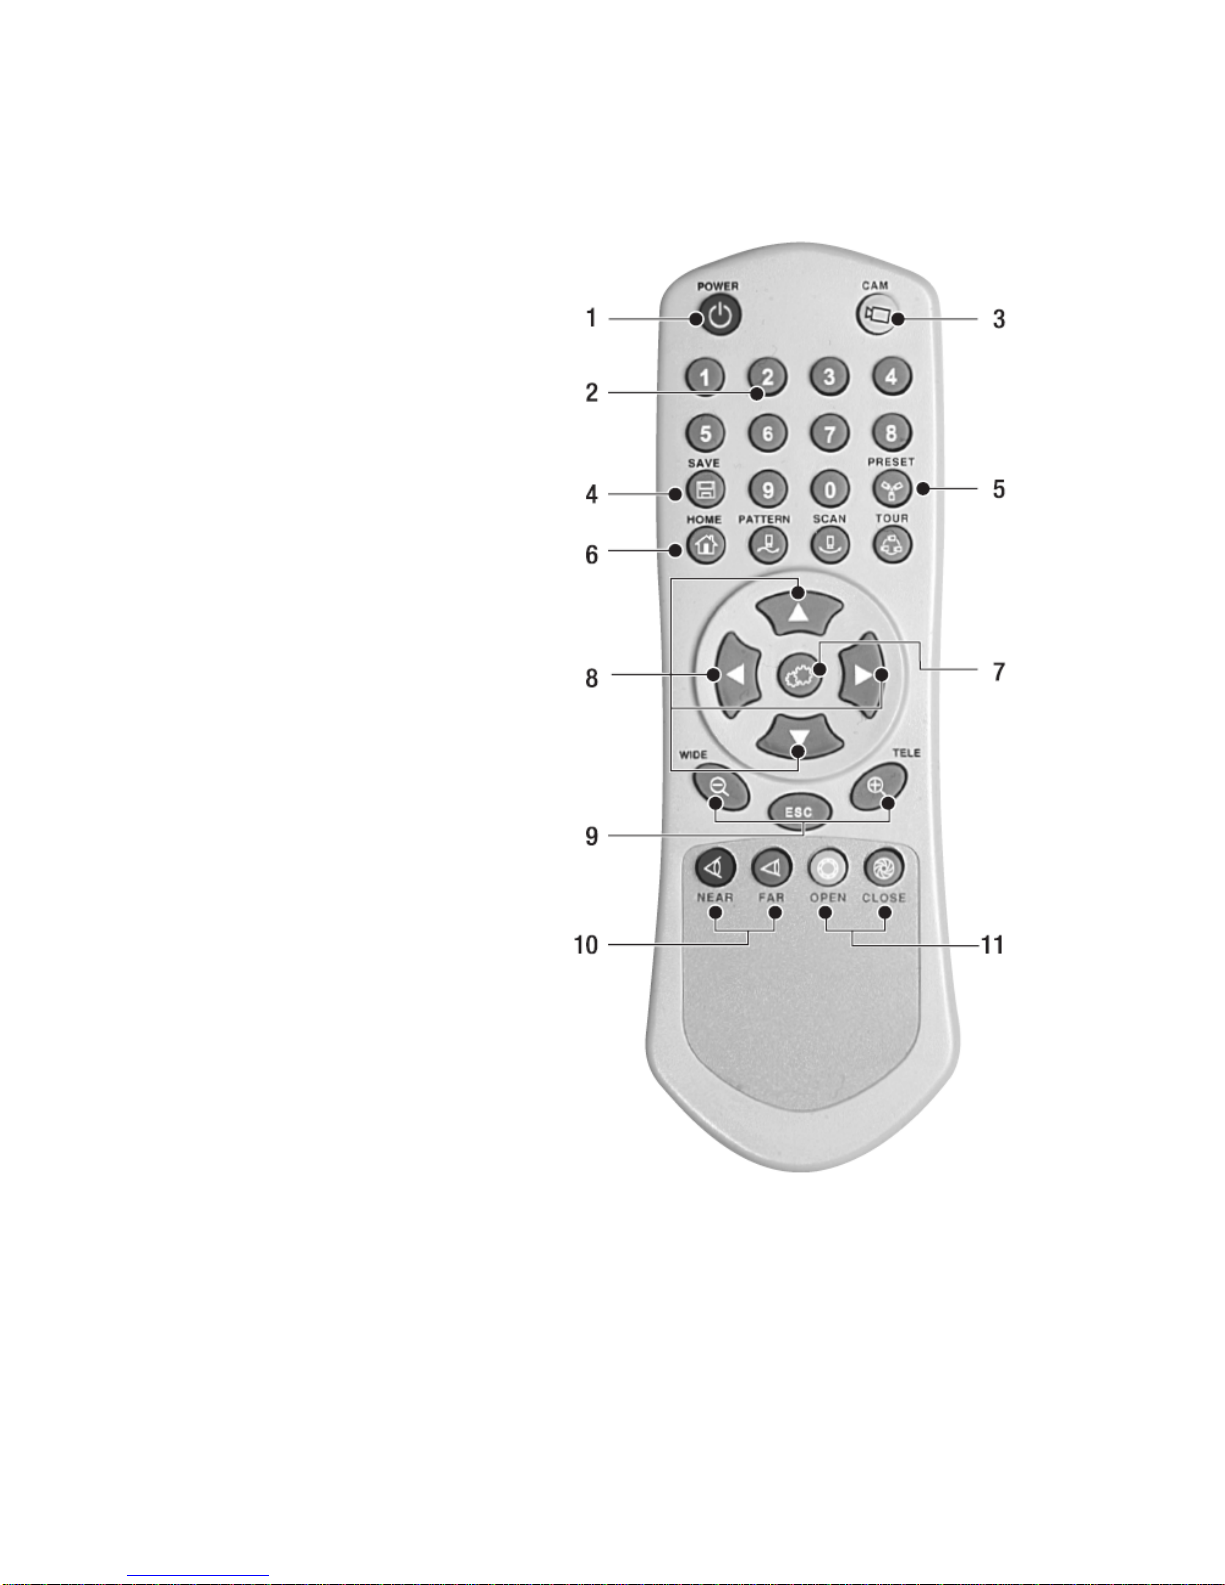
REMOTE CONTROLLER (SUPPLIED)
1. POWER
• Power on/off.
2. NUMBERS
• Numeric keypads (0~9),
3. CAM
• Change camera ID.
4. SAVE
• Saves preset position.
5. PRESET
• Recall preset.
6. HOME
• Recall Home function.
7. MENU
• OSD menu on.
8. DOWN / UP / LEFT / RIGHT
• Moves up/down in the menu.
• Moves left/right in the menu.
• Decreases/increases control.
9. ZOOM
• Zoom In / Out
10. FOCUS
• Controls Focus.
11. IRIS
• Controls Iris.
15
Page 15

REMOTE CONTROLLER INSTRUCTIONS
1. POWER – Not used
2. NUMBERS – Use Numbers when changing the ID of the remote controller. They
are also used to save or recall presets.
3. Camera Address (ID) - Use CAM button to change the ID of the remote
controller when controlling multiple cameras.
Example: To control CAM ID#2, Press 2 and CAM button in sequence.
4. WRITE PRESET - Saves preset position.
Example: To save Preset #1, Press 1 and WRITE in sequence.
5. PRESET - Recall preset.
Example: To recall Preset #1, Press 1 and PRESET in sequence.
6. HOME - Immediately calls Home function.
7. MENU – Recalls On Screen Display Menu.
8. DOWN / UP / LEFT / RIGHT
Moves up/down in the menu.
Moves left/right in the menu.
Decreases/increases control.
9. ZOOM - Zoom In / Out
10. FOCUS – Adjusts focus.
11. IRIS – Adjusts Iris.
16
Page 16
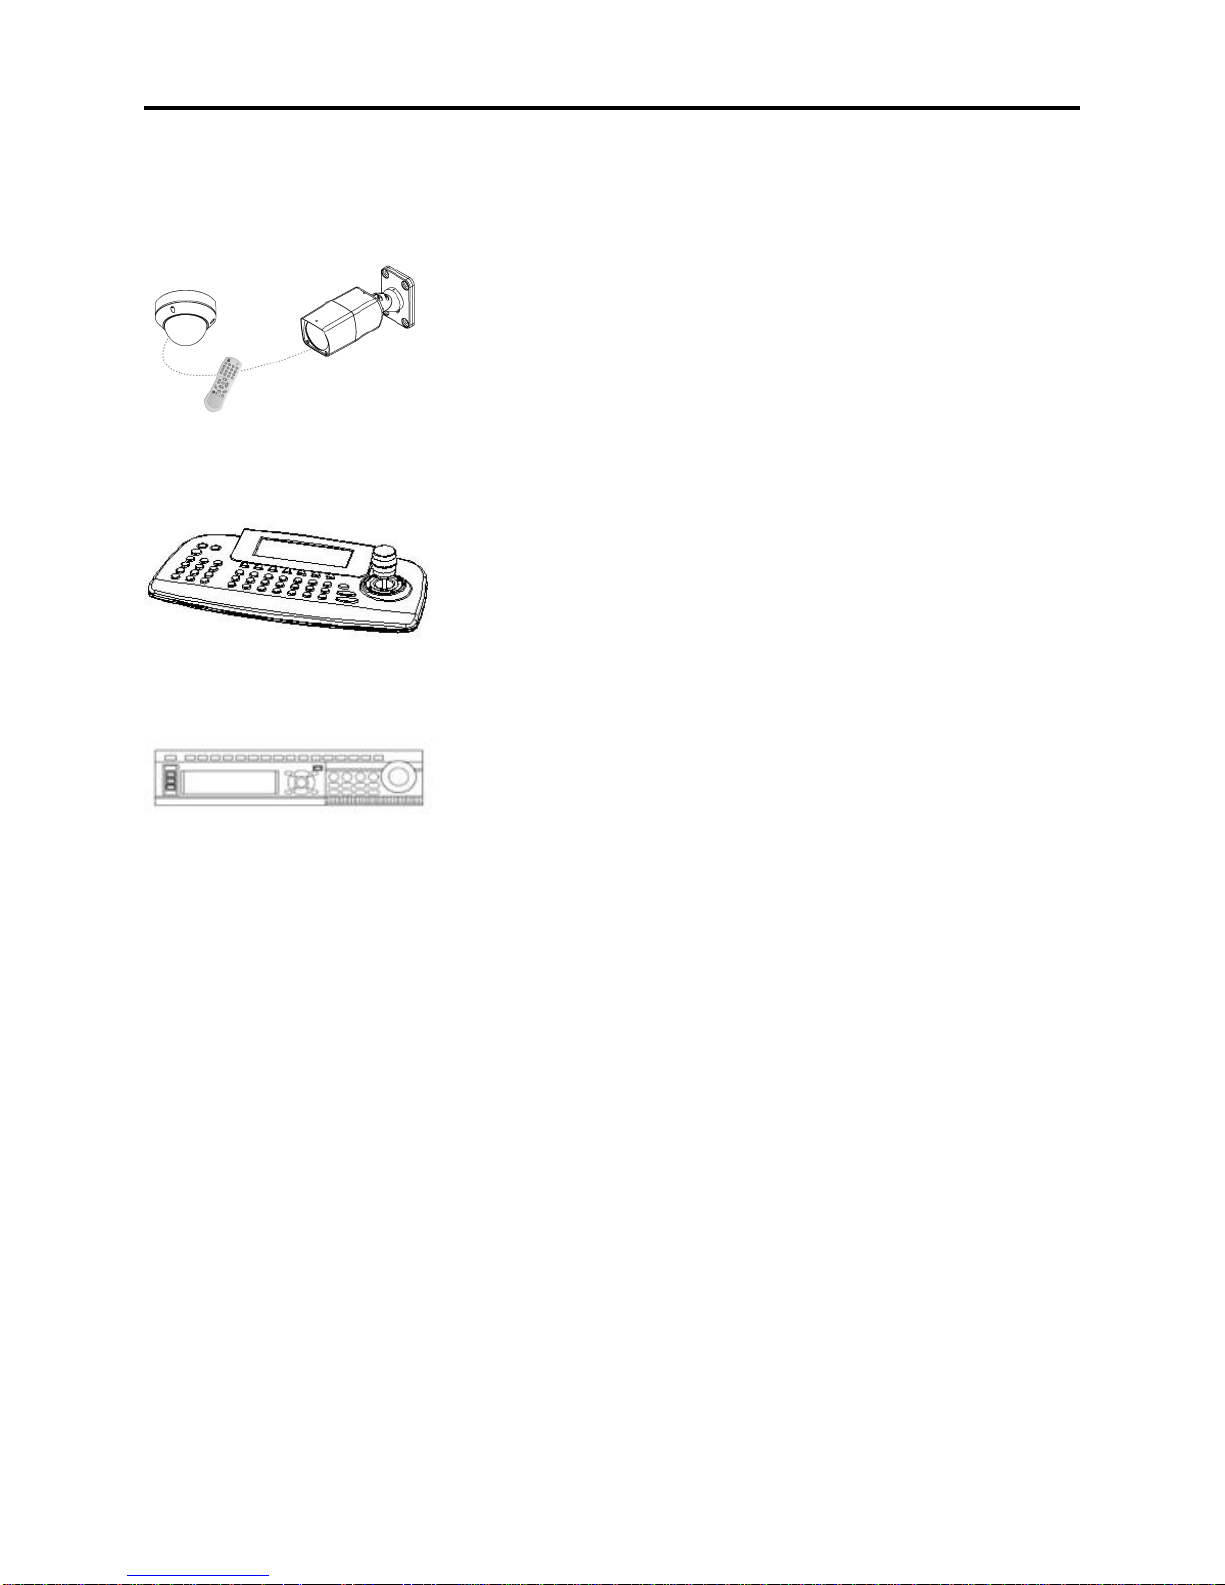
ADJUSTING THE LENS & SETUP MENU
VIA IR REMOTE CONTROL
Point the Remote Controller to the Camera to
control the zoom. You can also use the remote
controller to enter and make changes in the OSD
Setup Menu.
VIA CONTROLLER (NVCK-3X)
Use the controller to adjust the zoom by
twisting the joystick. You can also enter and
make changes in the OSD Setup Menu.
VIA DVR
Use the DVR’s PTZ menu to adjust the zoom using
the + and -. You can also enter and make
changes in the OSD Setup Menu.
NOTE: Make sure that the RS485 connection is connected to the Controller or
DVR.
17
Page 17
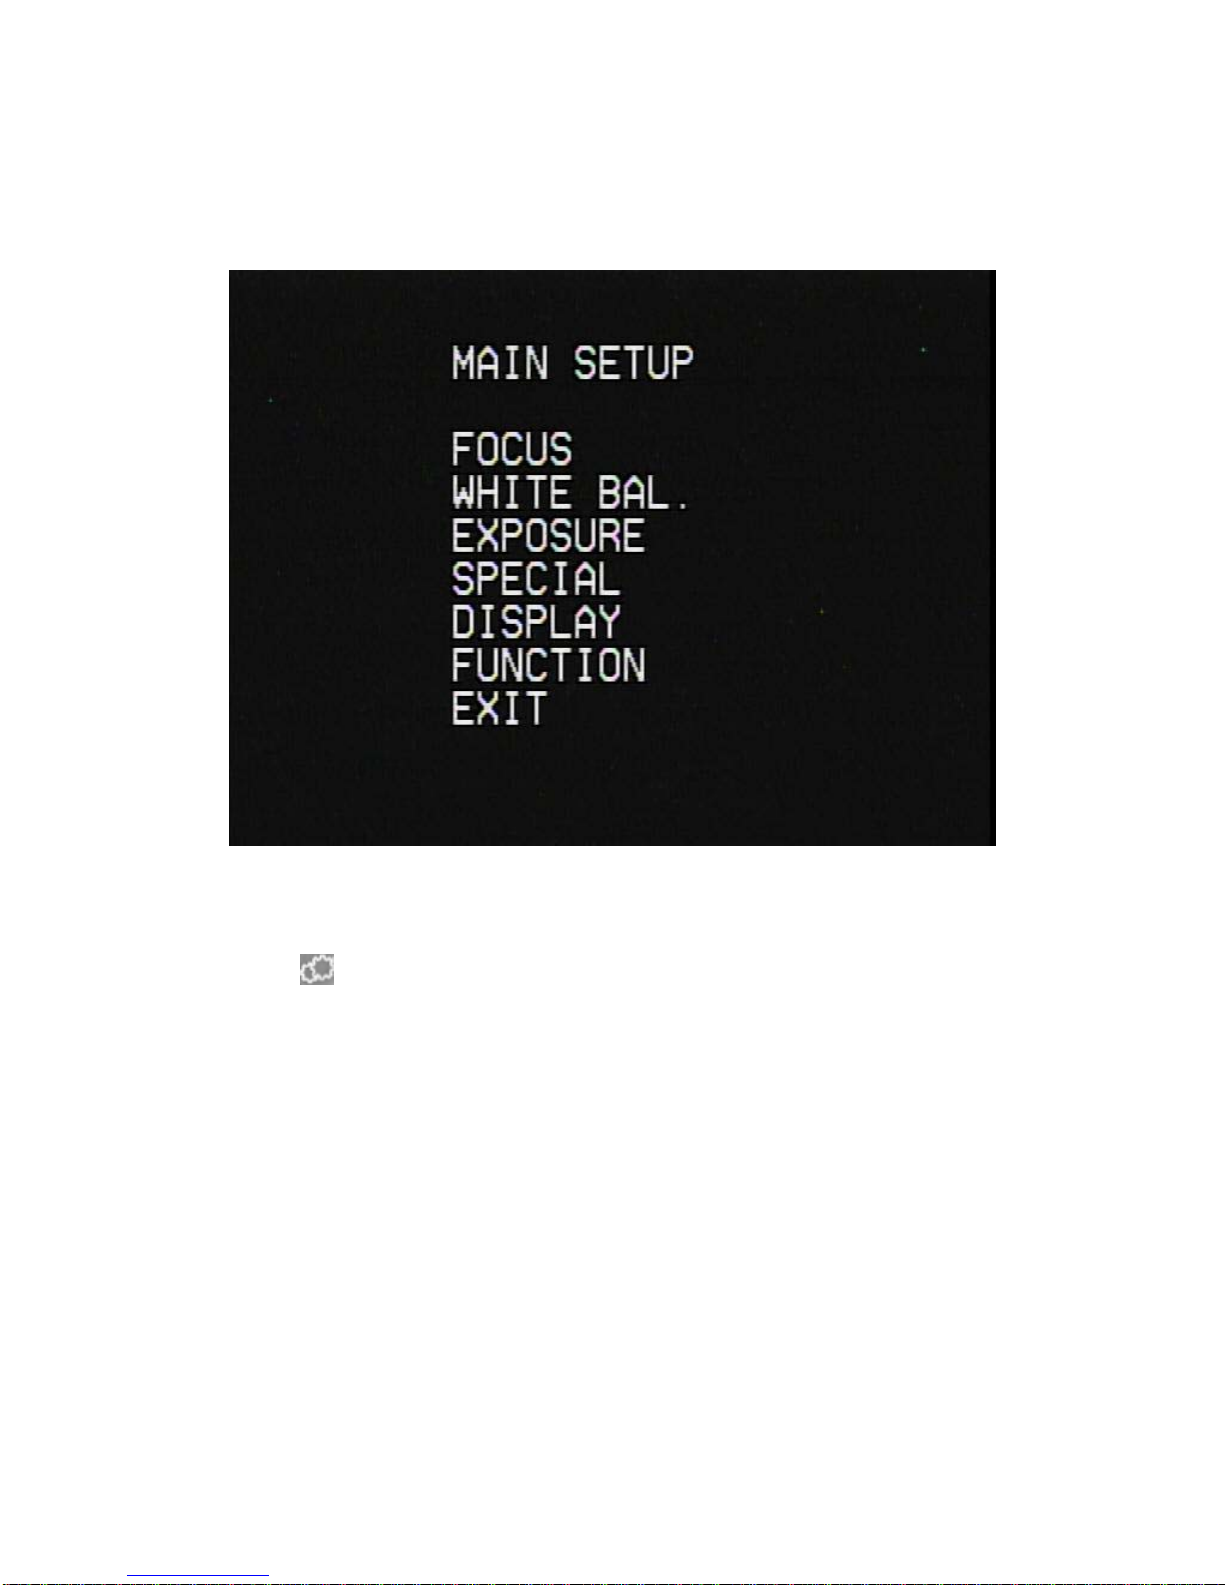
MENU CONFIG INSTRUCTIONS
MENU CONFIGURATION
NAVIGATING THE MENU
1. Press the MENU button to access the main setup mode.
• Main setup menu is displayed on the monitor screen.
2. Select the desired feature.
3. Pressing up and down of the directional buttons on the remote control, DVR,
or from the joystick moves the indicator to the desired feature.
4. Move the arrow indicator to the desired feature item.
5. Change the status of the selected feature by pressing → (Right) on the
Remote Control or Twist Right using the joystick.
6. When finished, move the arrow indicator to 'EXIT' and press Right on the
remote control or twist joystick to Right
18
Page 18
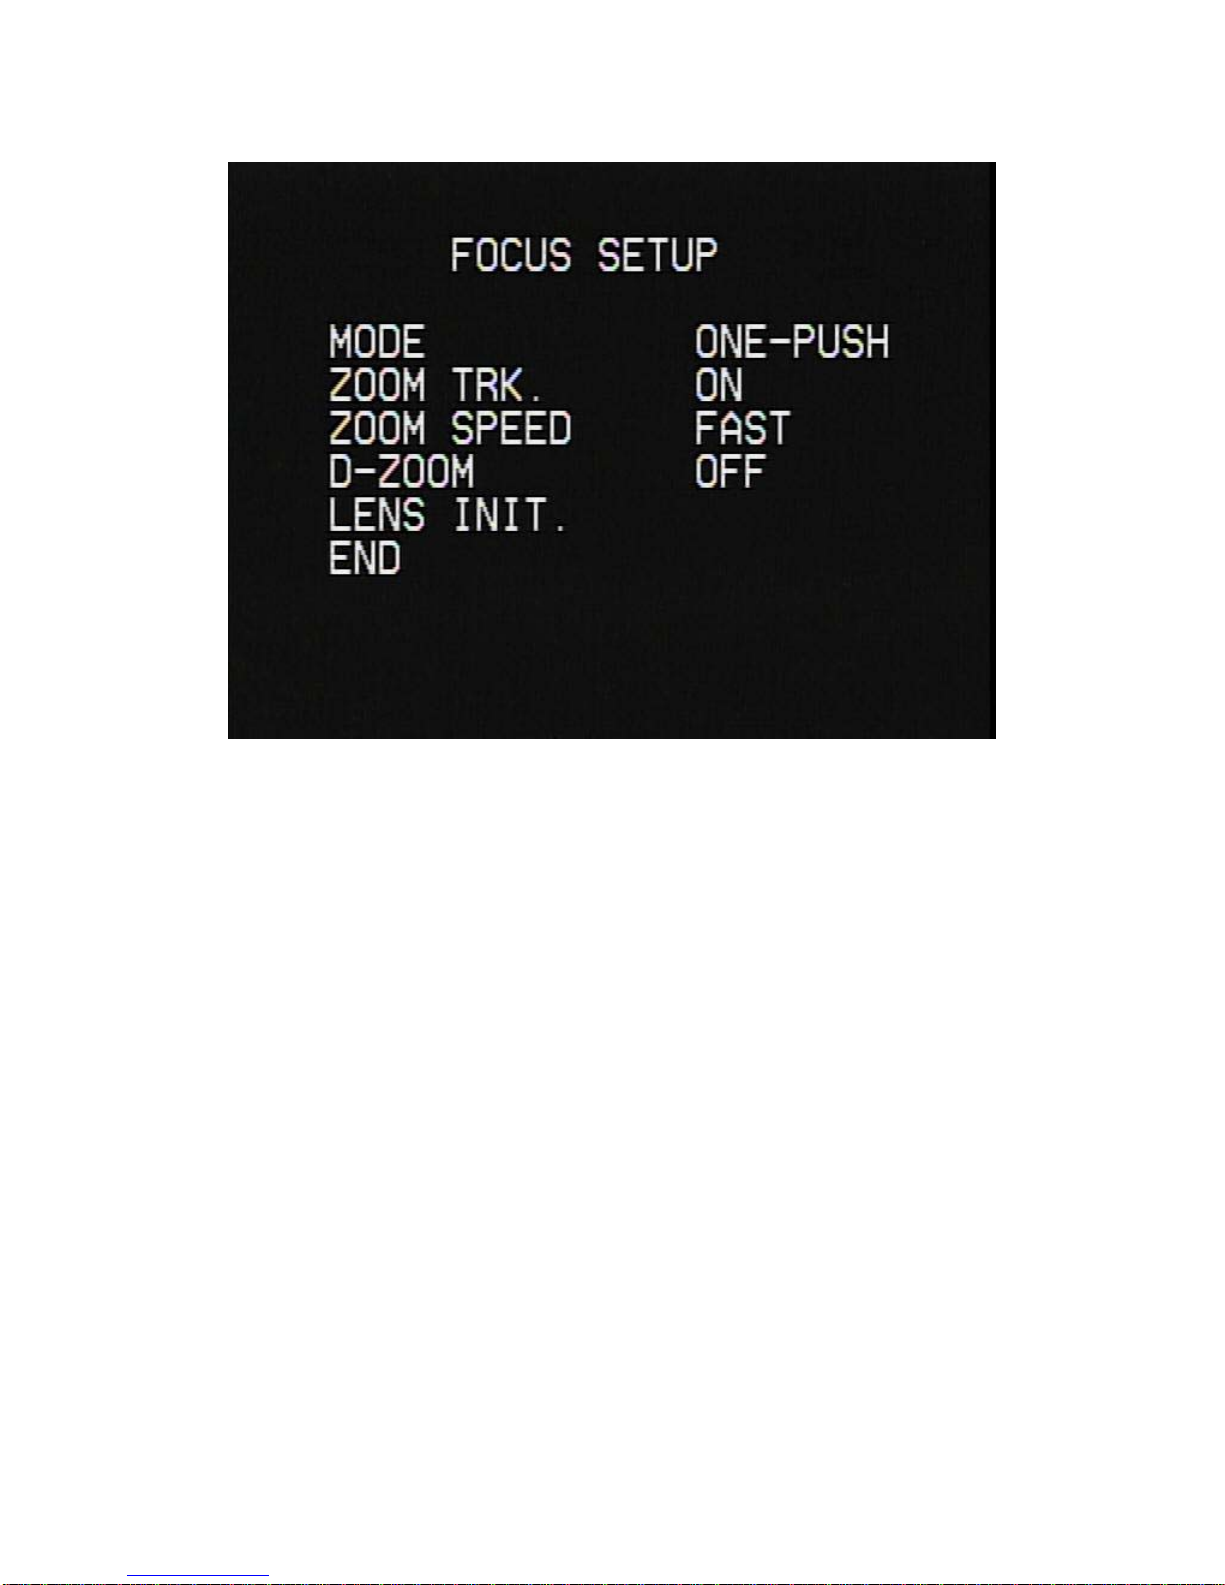
FOCUS
MODE: You can select the most suitable zoom mode.
• AUTO: Focus is automatically adjusted with moving zoom.
• ONE PUSH: Focus is automatically adjusted just once, after zoom
position is set.
• MANUAL: After the desired field of view is set, focus can be manually
adjusted.
ZOOM TRK: The focus is adjusted with the zoom while in operation.
ZOOM SPEED: Configure zoom speed using this feature.
• FAST: To move zoom fast.
• SLOW: To move zoom slowly.
D-ZOOM: Configure magnification limit from x2~x10 using this feature. When
this feature is set to ON, it will digitally magnify images after the optical
magnification has reached its limit.
LENS INIT: Use this feature to initialize the lens (1x, WIDE).
END: To revert to the main setup menu.
19
Page 19
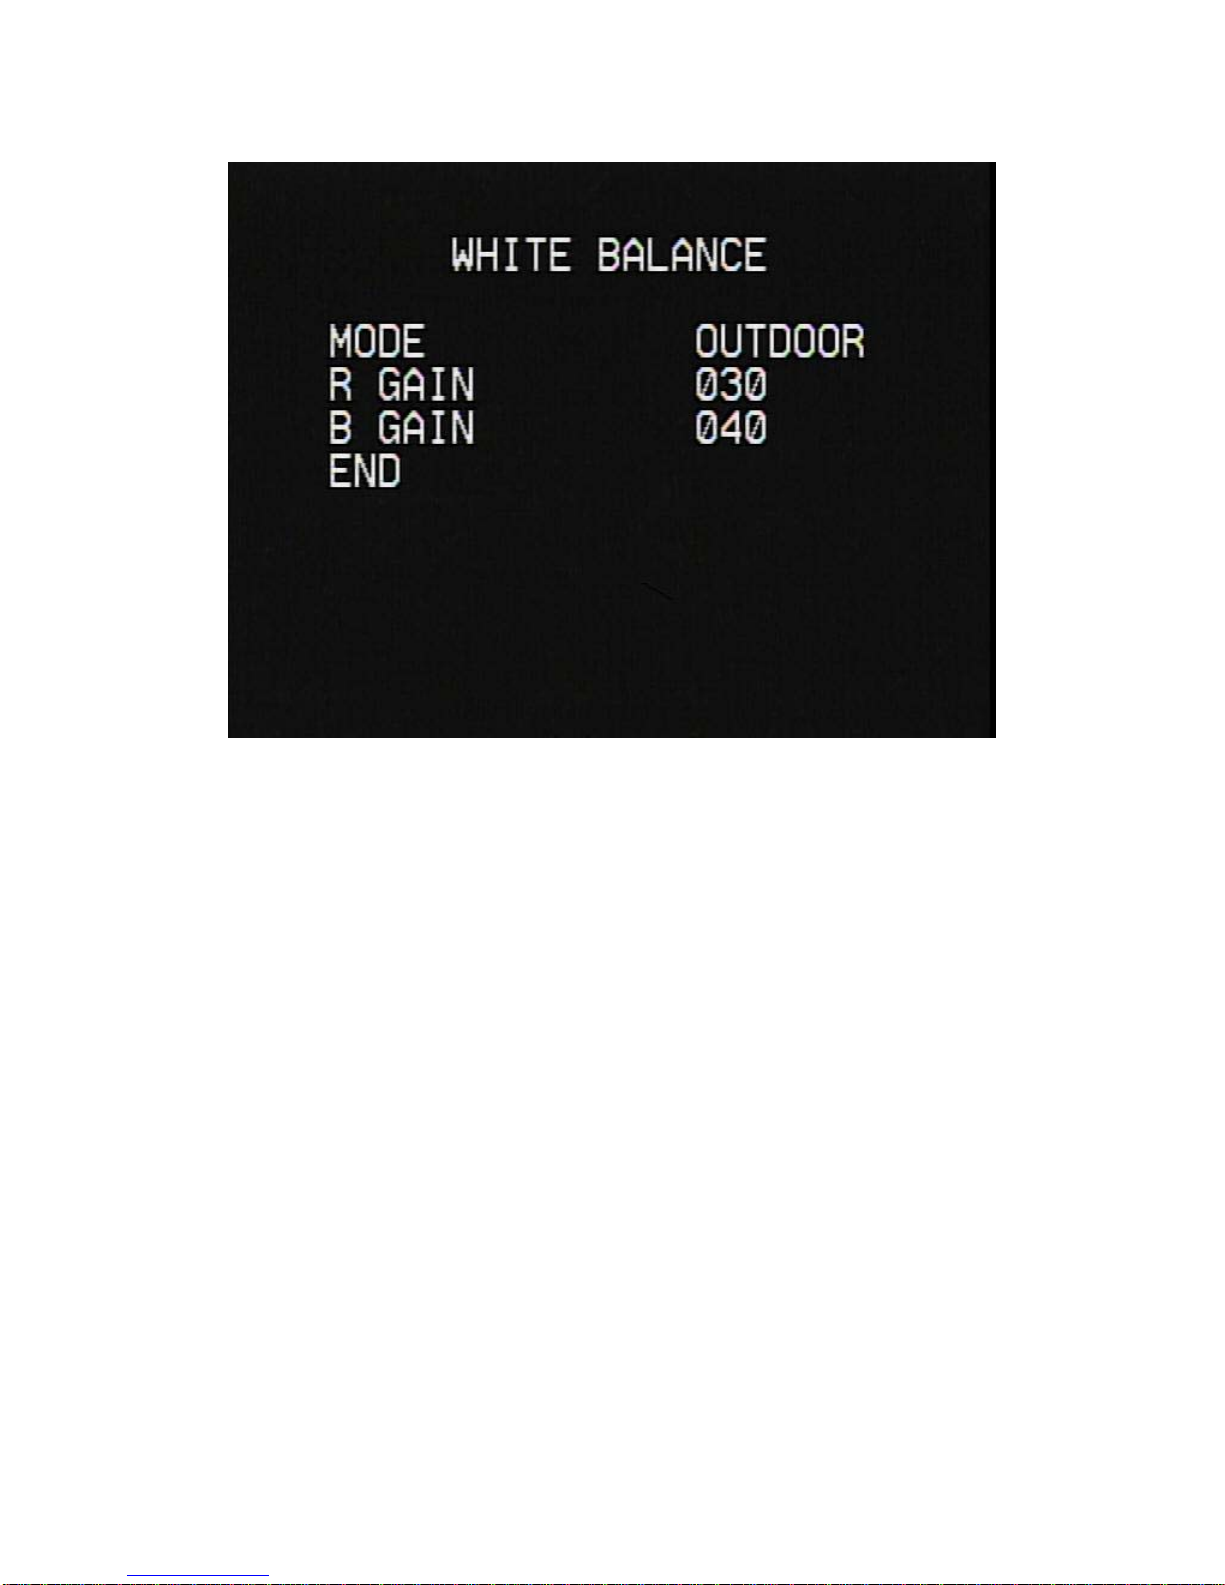
WHITE BALANCE CONTROL
MODE: The three white balance control modes are as follows:
• OUTDOOR: This mode can be used within the color temperature range
1800~10500°K (Ex: fluorescent light, outdoor, sodium vapor lamp or
inside tunnels)
• INDOOR: This mode can be used within the color temperature range
3000K~10500°K.
• AWC (Auto White Balance Control):
The white balance is automatically adjusted in a specific environment.
• MANUAL: To fine tune, select the Manual mode. You can increase or
decrease the red or blue factor while monitoring the difference on the
screen. Increase or decrease the value of red(R-Gain) and blue(B-Gain),
to achieve the best color while watching the changes in the picture.
20
Page 20
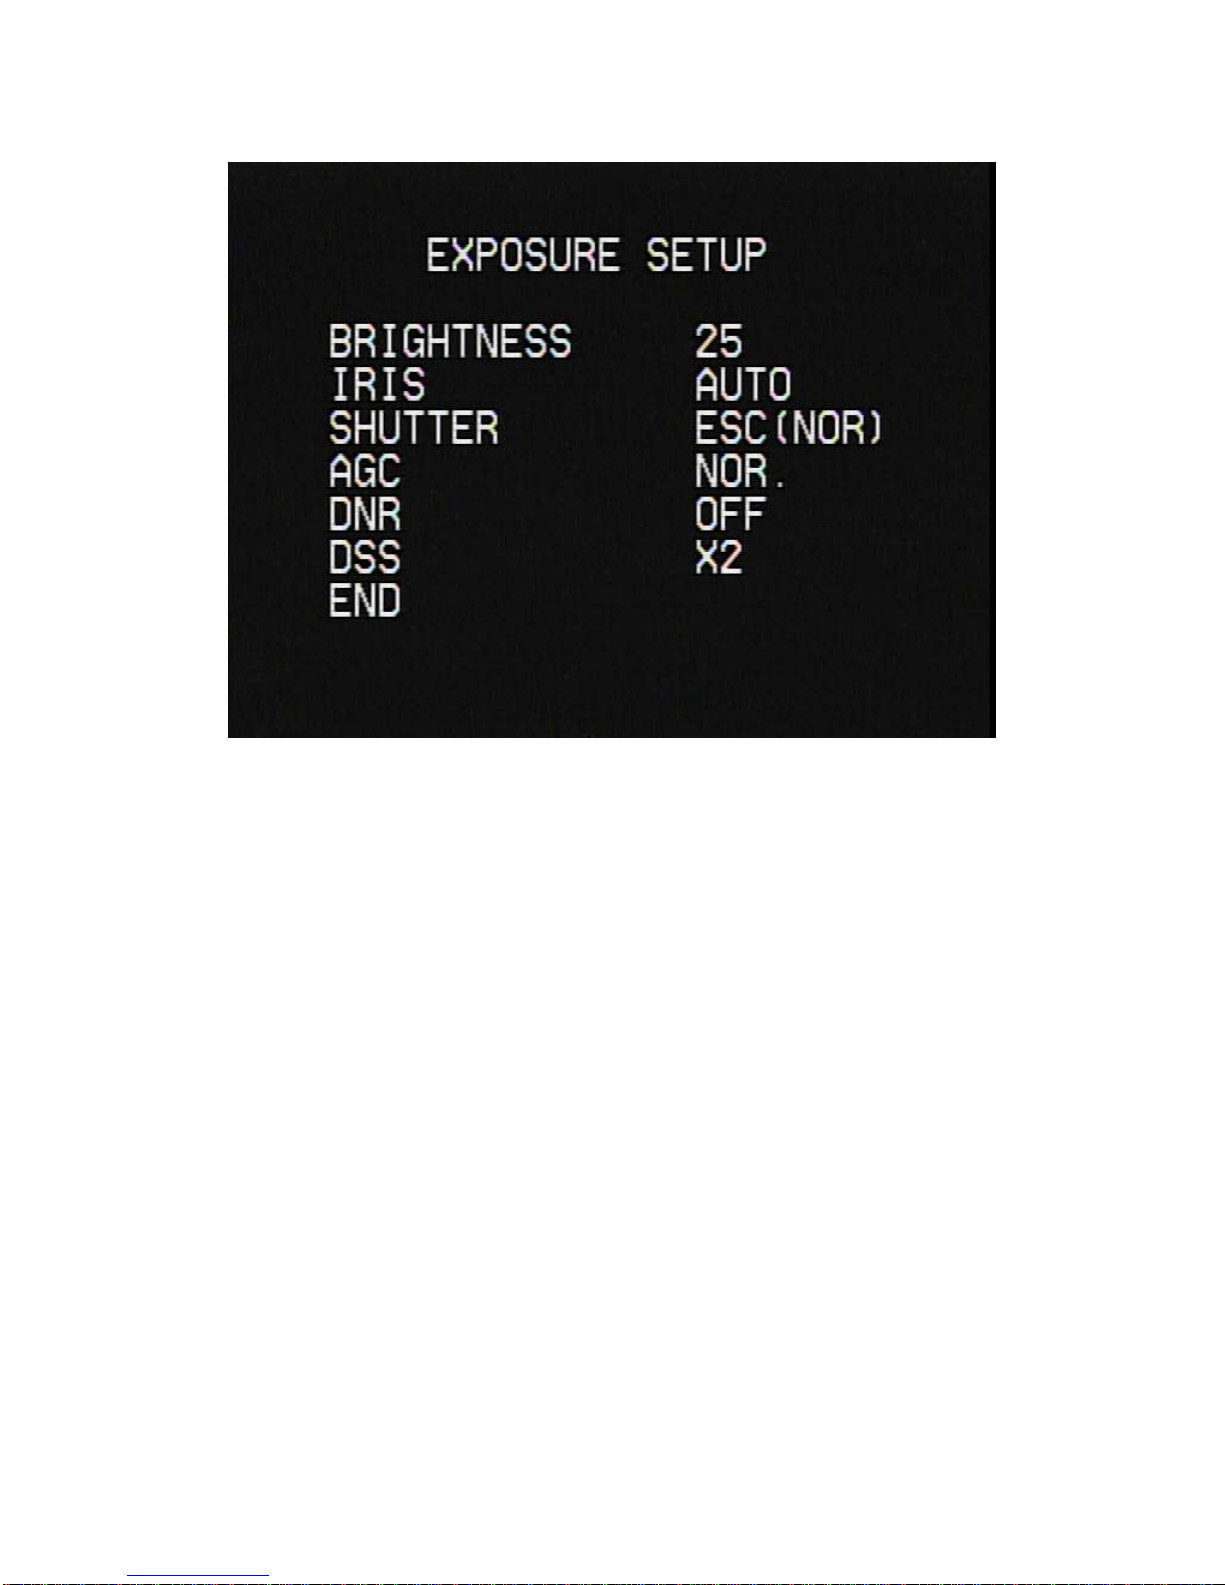
EXPOSURE
BRIGHTNESS: Use this feature to adjust image brightness. Position the
indicator over 'BRIGHTNESS'. Then increase or decrease brightness level using
the left or right directional buttons while verifying the changes on screen.
Select END once desired level is obtained.
IRIS: Set 'IRIS' to 'AUTO' or 'MANUAL'. Position the indicator over 'IRIS',
and then select the desired iris mode.
• AUTO: The iris of the lens is automatically adjusted.
• MANUAL: Manual iris configuration. Set 'IRIS' to 'MANUAL' using the
directional buttons. Then increase or decrease iris level while
verifying the changes on screen.
SHUTTER: Control image brightness by adjusting shutter speed.
21
Page 21

Position the indicator over 'SHUTTER'. Then select the desired shutter mode
(1/60, MANUAL, A.FLK).
• FLK. (NTSC: 1/100, PAL: 1/120): Flicker-free mode.
• ESC (NOR): Automatic shutter speed setting (optimal).
• 1/60(1/50): Fixed (1/60 or 1/50) shutter speed setting.
AGC (Auto Gain Control): Amplifies video signal under low Lux environment to
achieve brighter images. Position the indicator over 'AGC'. Set 'AGC' to the
desired mode.
• HIGH: Wide range gain value adjustment
• NORMAL: Normal range gain value adjustment.
• OFF: Disabled
DNR (Digital Noise Reduction): Reduces video noise under low Lux environment.
Position the indicator over 'DNR'. Set 'DNR' to the desired mode.
• LOW: Low noise reduction
• MIDDLE: Medium noise reduction
• HIGH: High noise reduction
• OFF: Disabled
DSS (Digital Slow Shutter): This feature ensures clear images at low Lux
environment. Position the indicator over 'DSS'. Set 'DSS’ to the desired mode.
• X2 - X64: Select this mode for use in night time or under low lighting
conditions.
• OFF: Disabled
22
Page 22
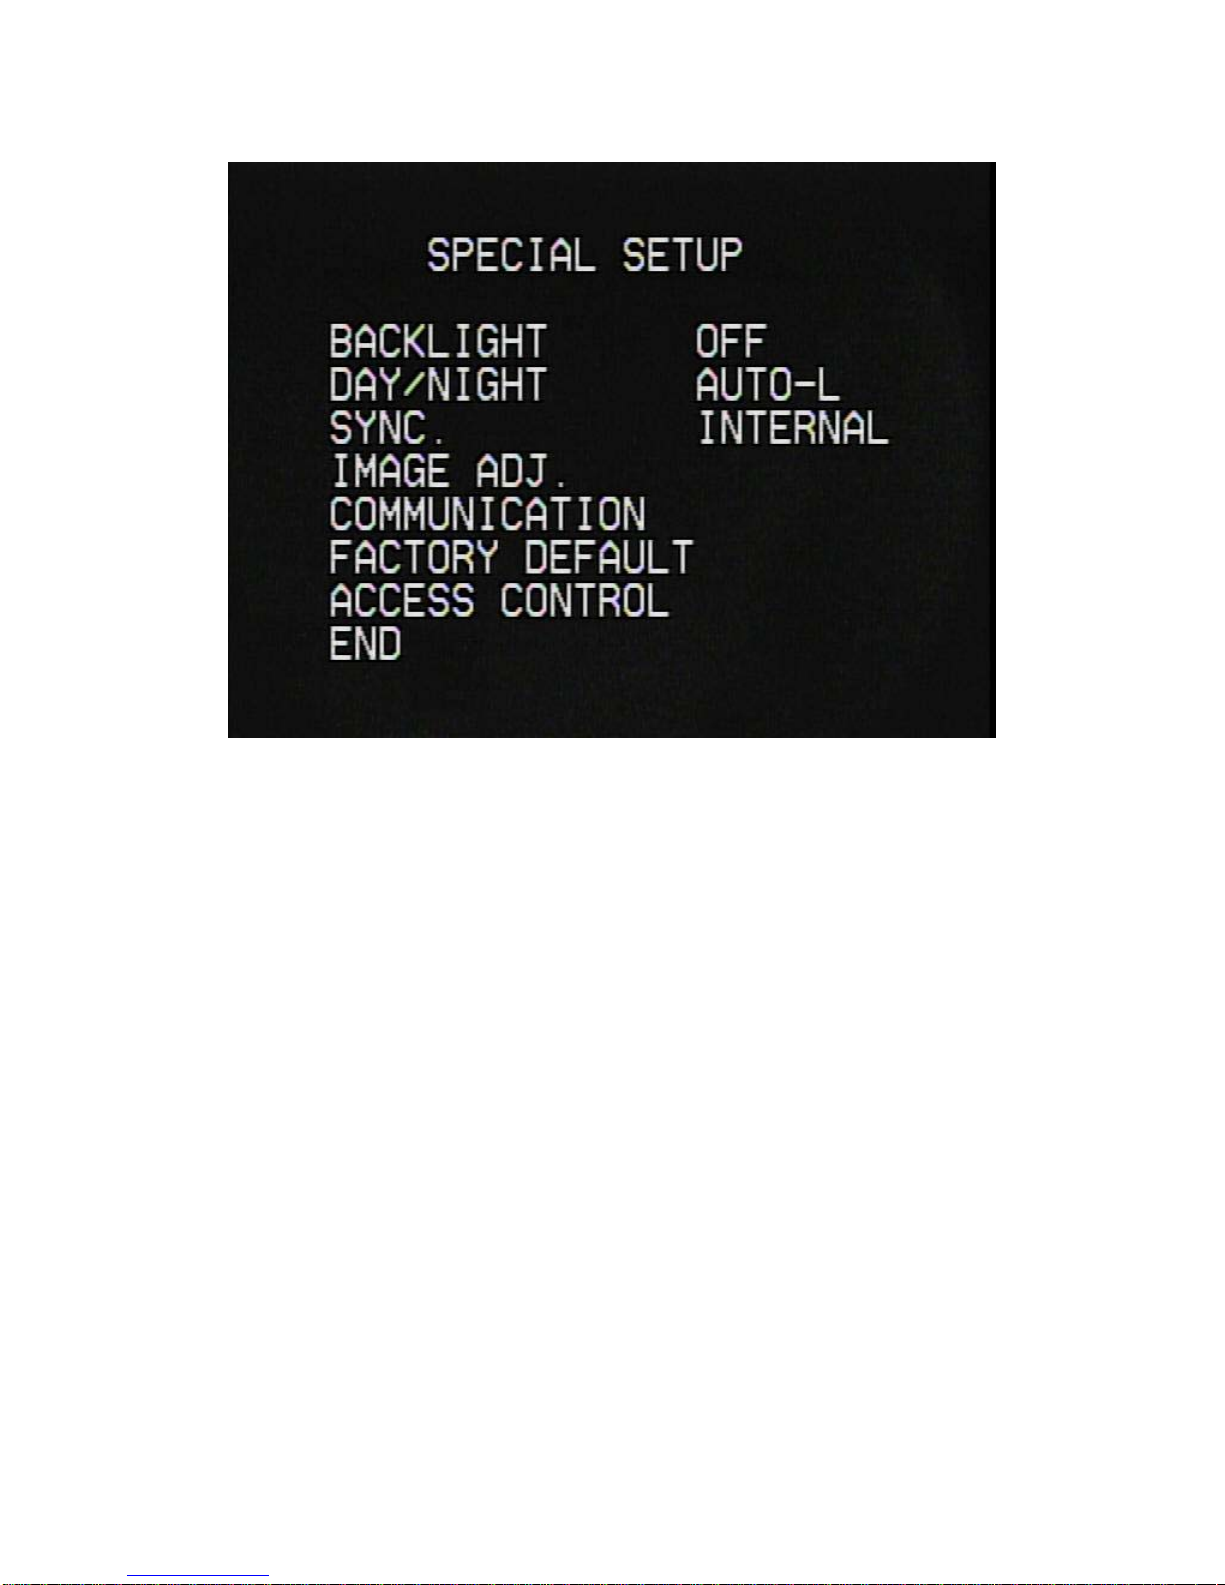
SPECIAL
BACKLIGHT: You can adjust the sensitivity of Backlight Compensation. Position
the indicator over to 'BACKLIGHT'. Set 'BACKLIGHT’ to the desired mode.
• HIGH
• MIDDLE
• LOW
• OFF
DAY/NIGHT: Select from COLOR, BW or AUTO modes.
• COLOR: Color mode.
• B/W: B/W mode.
• AUTO-L, M, H*: The camera automatically detects lighting conditions and
selects the mode accordingly. You can adjust the sensitivity for the IR
Cut Filter lighting conditions.
SYNC: Two synchronization modes are available INTERNAL and EXTERNAL LINE-LOCK.
23
Page 23
In LINE-LOCK mode, it synchronizes the camera’s video out signal to the
external SYNC signal.
• INT: Internal synchronization.
• LL*: External line-lock synchronization.
If you choose ‘LL’, you can adjust the desired phase.
You can adjust the desired phase from 0 to 359.
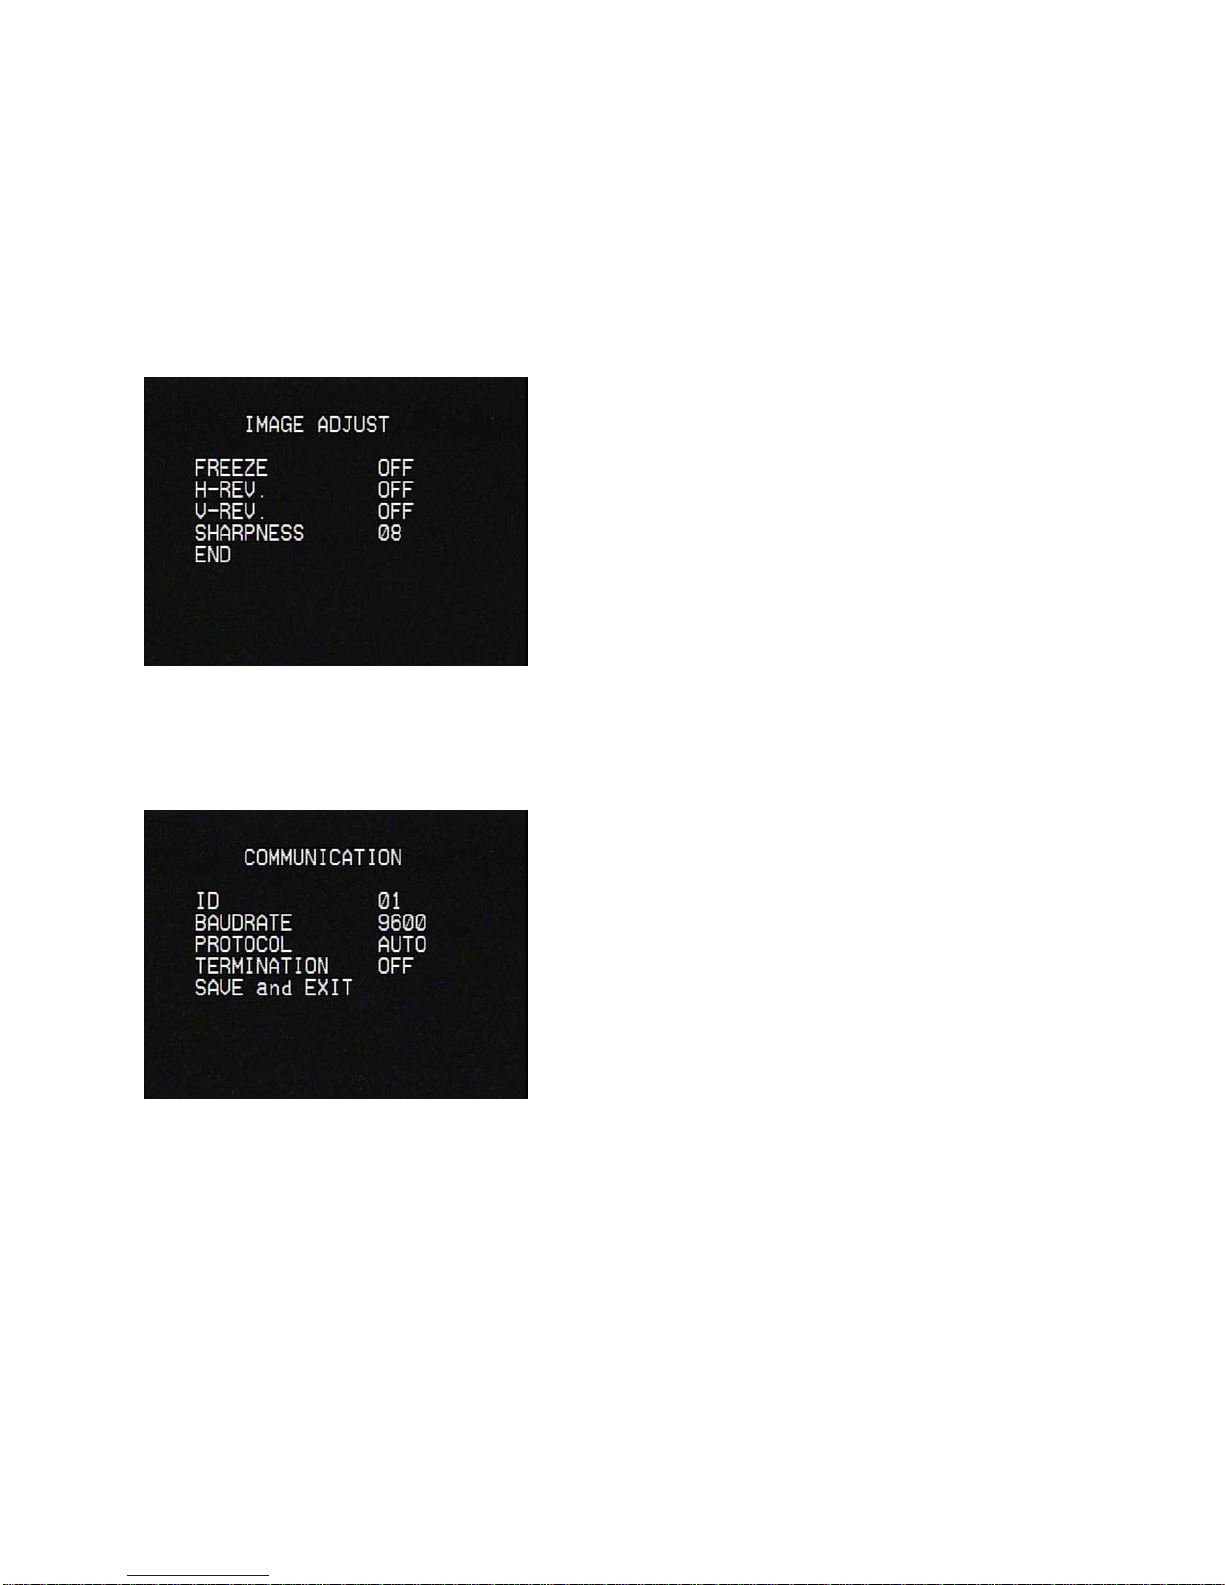
IMAGE ADJUST: Includes image quality or special function factors.
FREEZE: Use this feature to freeze an
image.
H-REV: Use this feature to horizontally
inverse the screen.
V-REV: Use this feature to vertically
inverse the screen.
SHARPNESS: Increasing this value
sharpens object edges. Too high of a
setting, however, produces noise and
may obscure the image.
COMMUNICATION: Use this feature to select communication protocol. Position
the indicator over 'COMMUNICATION'.
ID: Assign ID number to the camera. It
is available to set an ID from 1 to 99.
BAUDRATE: Configure baud rate from 2400,
4800, 9600, 19200, 38400bps.
PROTOCOL: Assign protocol to the camera.
It is available to set at AUTO, NUVICO,
Pelco-D, and Pelco-P.
TERMINATION: Every device that is
connected at the end of the
communication data line must be
terminated.
FACTORY DEFAULT: To reset your camera to factory default condition.
24
Page 24
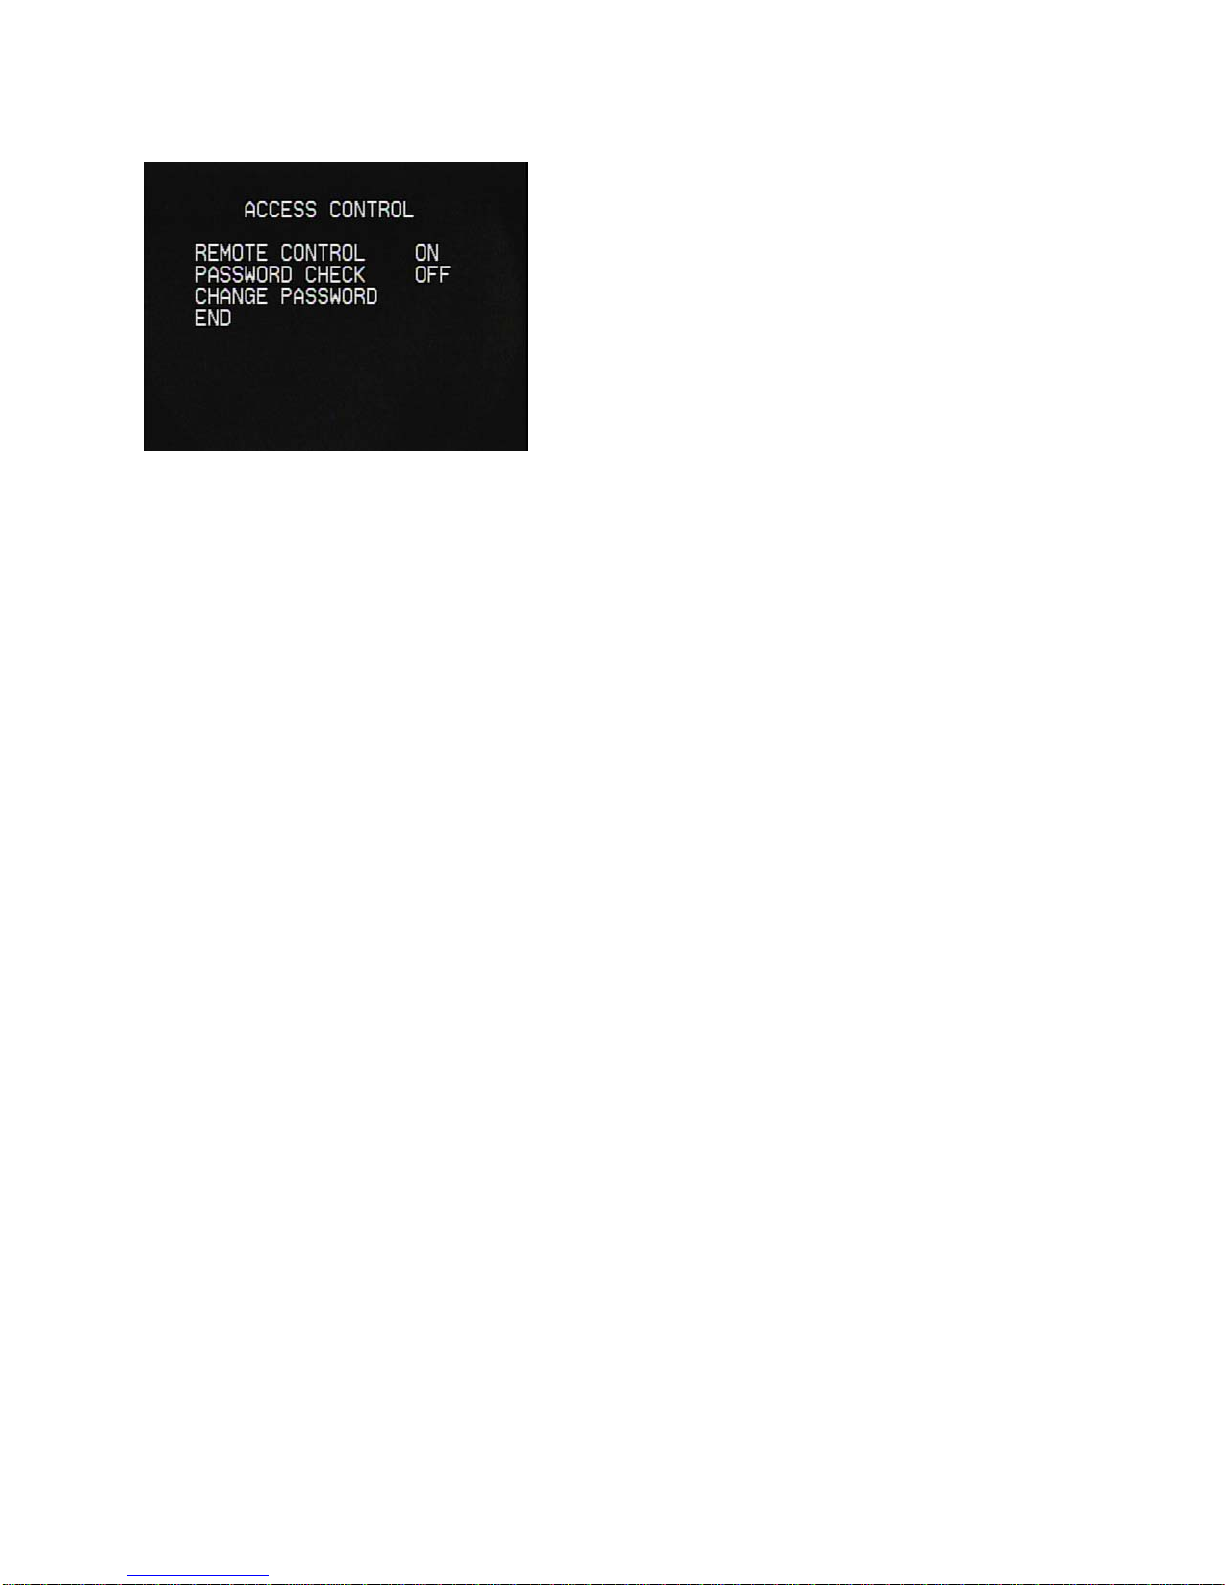
ACCESS CONTROL: Use this mode to limit access to the Remote Controller.
REMOTE CONTROL: The REMOTE CONTROL
feature is set to '‘ON'’, REMOTE
CONTROL free operating mode. But, if it
is set to “OFF”, it is REMOTE CONTROL
for limited operating mode.
PASSWORD CHECK: The PASSWORD CHECK
feature is set to “ON”, pressing MENU
to enter the main menu setup mode wi
display the password confirmation
screen. The factory default for the
password is
“9 PRESET 9 PRESET 9 PRESET 9 PRESET”.
CHANGE PASSWORD:
change password.
Use this feature to
ll
25
Page 25
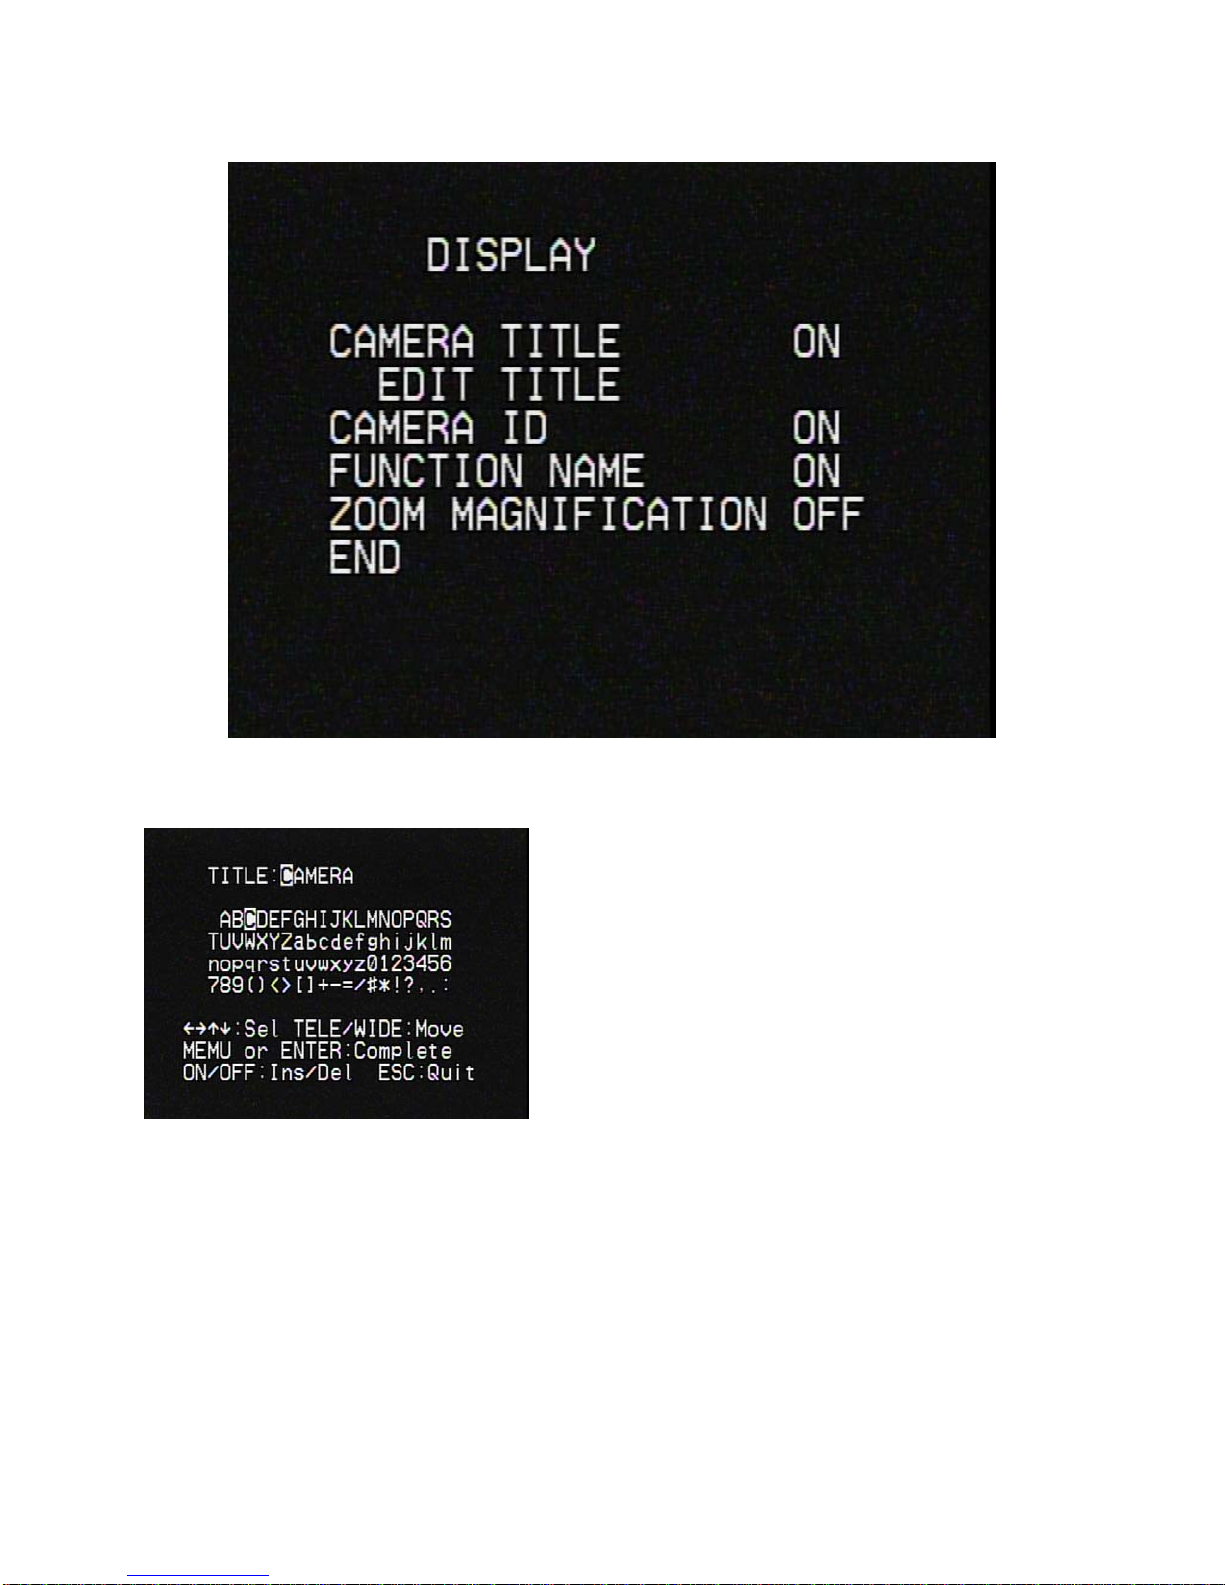
DISPLAY
CAMERA TITLE: Use this feature to designate a name for the camera, which will
display on the monitor screen.
EDIT TITLE: You can enter up to 15
characters.
CAMERA ID: Use this feature to designate an ID for the camera, which will
display on the monitor screen.
FUNCTION NAME: Use this feature to designate a preset for the camera, which
will display on the monitor screen.
ZOOM MAGNIFICATION: Use this feature to adjust zoom level for the camera,
which will display on the monitor screen.
26
Page 26
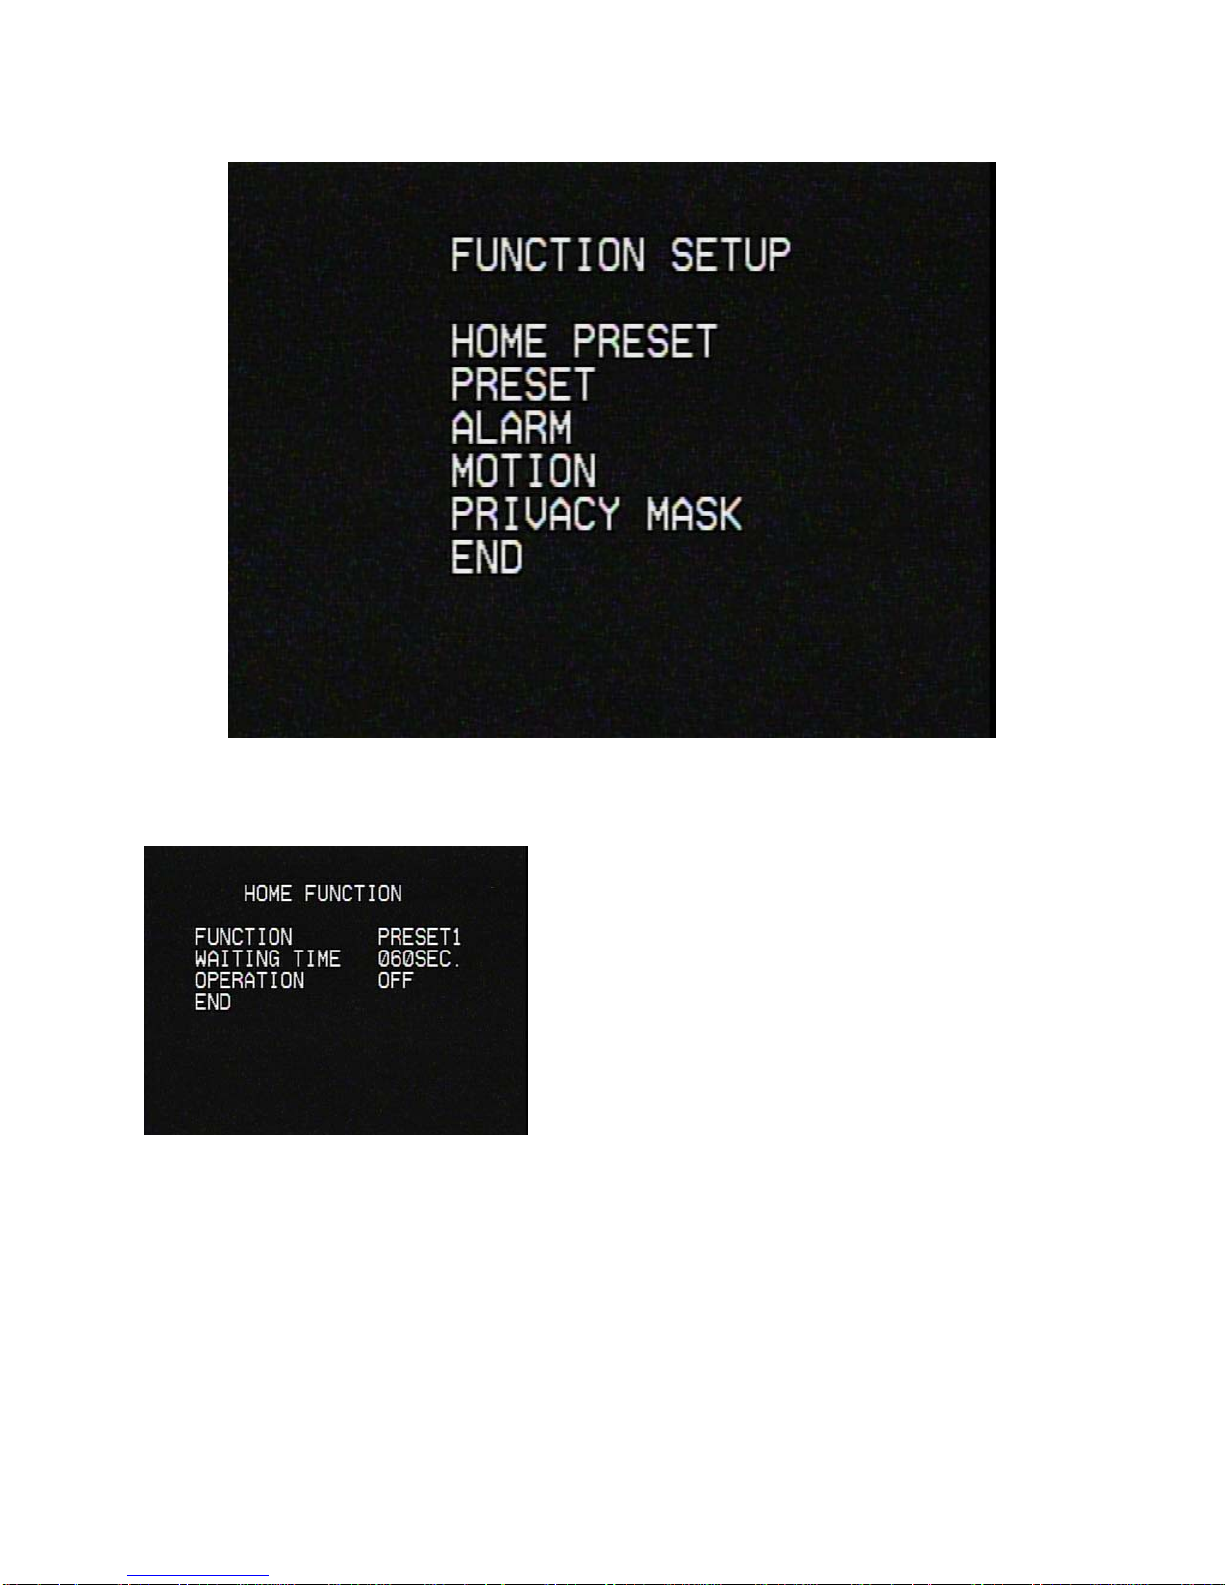
FUNCTION
HOME PRESET: The HOME function invokes predefined Preset function after the
remote controller or the controller has been idle for programmed time.
FUNCTION: Use this feature to designate
preset number for the home.
WAITING TIME: Use this feature to set
the dwell time before it goes into Home
Function.
OPERATION: Use this feature to
designate operation on/off for the home.
27
Page 27
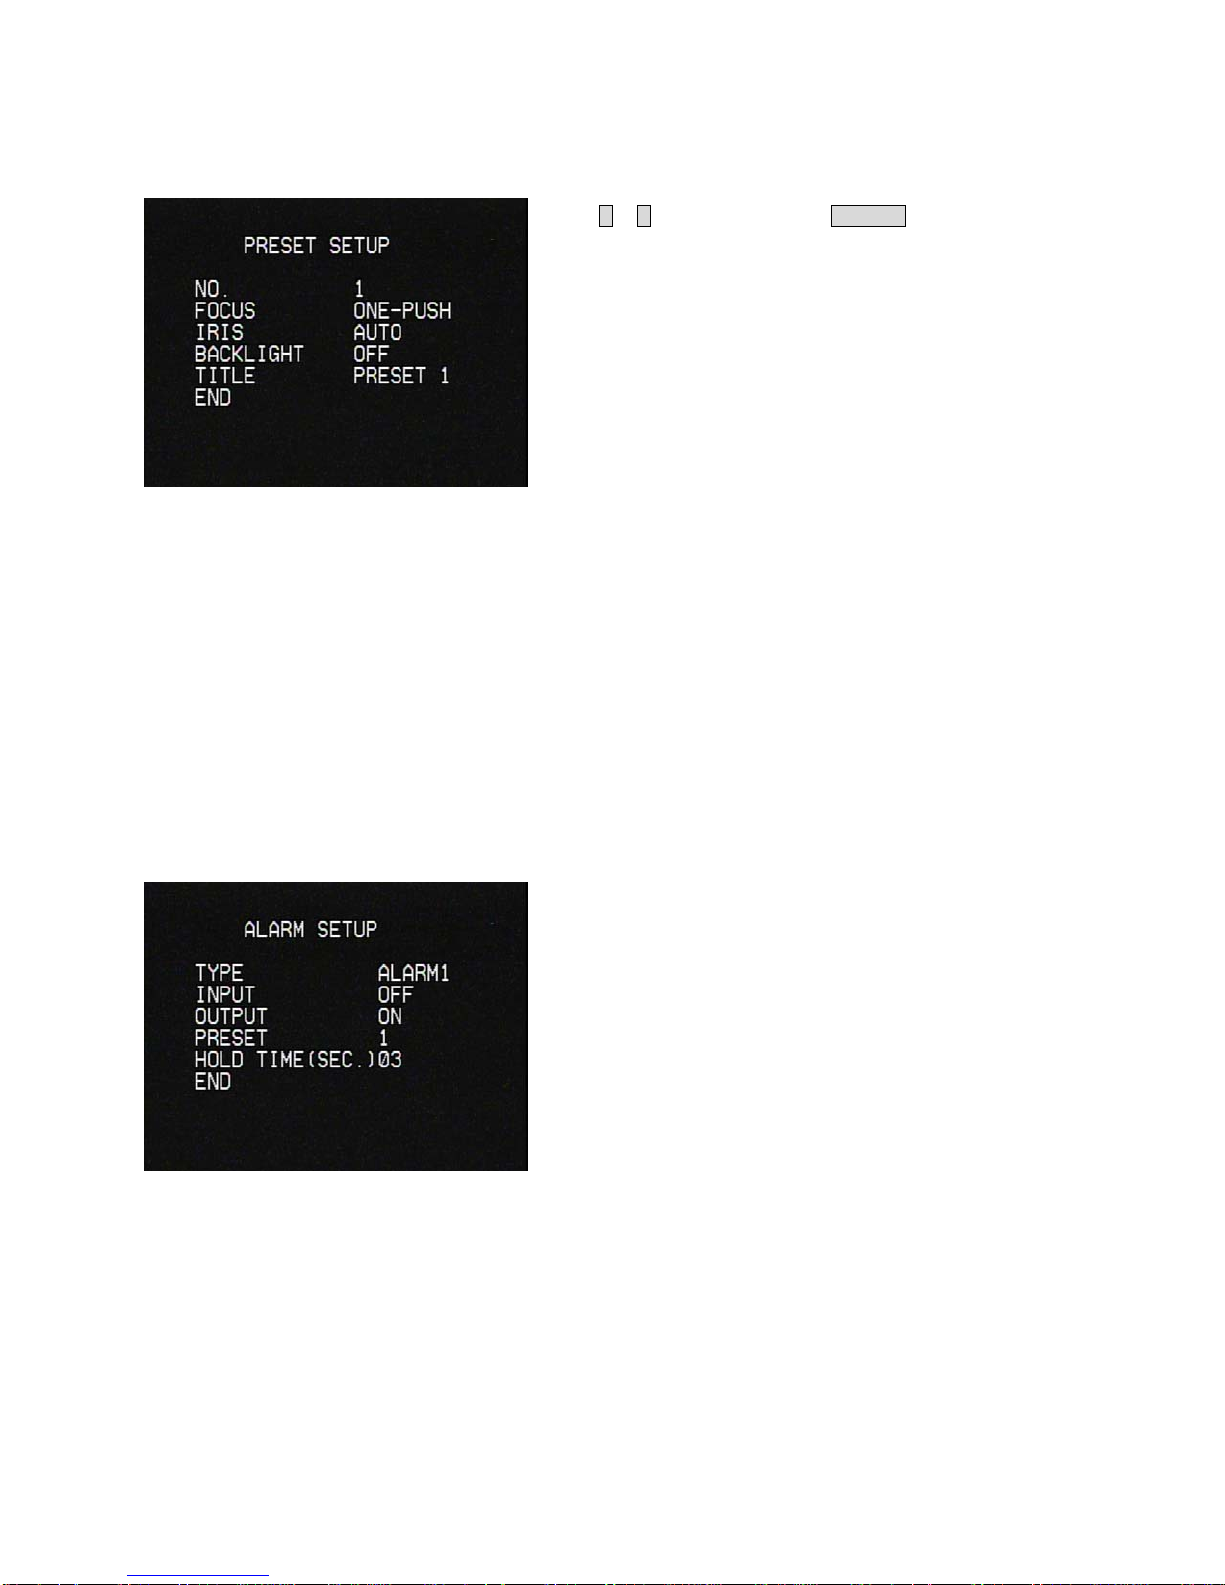
PRESET: Preset memorizes zoom, focus, iris and backlight, title settings.
Once programmed, pressing combination of
1 ~8 numbers and a PRESET button on
your remote control or the controller
automatically calls up the preset
position. Presets may be assigned to
alarm or motion actions.
NO.: Use this feature to designate
preset number for preset.
FOCUS: Use this feature to designate
focus mode (ONE-PUSH, MANUAL, AUTO) for
preset.
IRIS: Use this feature to designate
IRIS mode for preset.
BACKLIGHT: Use this feature to
designate backlight mode fo
TITLE: Use this feature to designate
preset name for preset.
ALARM: Magnetic, PIR or other external sensor devices can be used to signal
the camera reacting to an event.
TYPE: Use this feature to designate
alarm number for alarm input.
INPUT: Use this feature to designate
dry contact relays (OFF, N/O and N/C)
for alarm inp
OUTPUT: Use this feature to designate
relay output for alarm.
PRESET: Use this feature to designate
preset number for alarm output.
HOLD TIME: Use this feature to
designate dwell time of the alarm
ut.
r preset.
28
and/or relay output for a
larm output.
Page 28
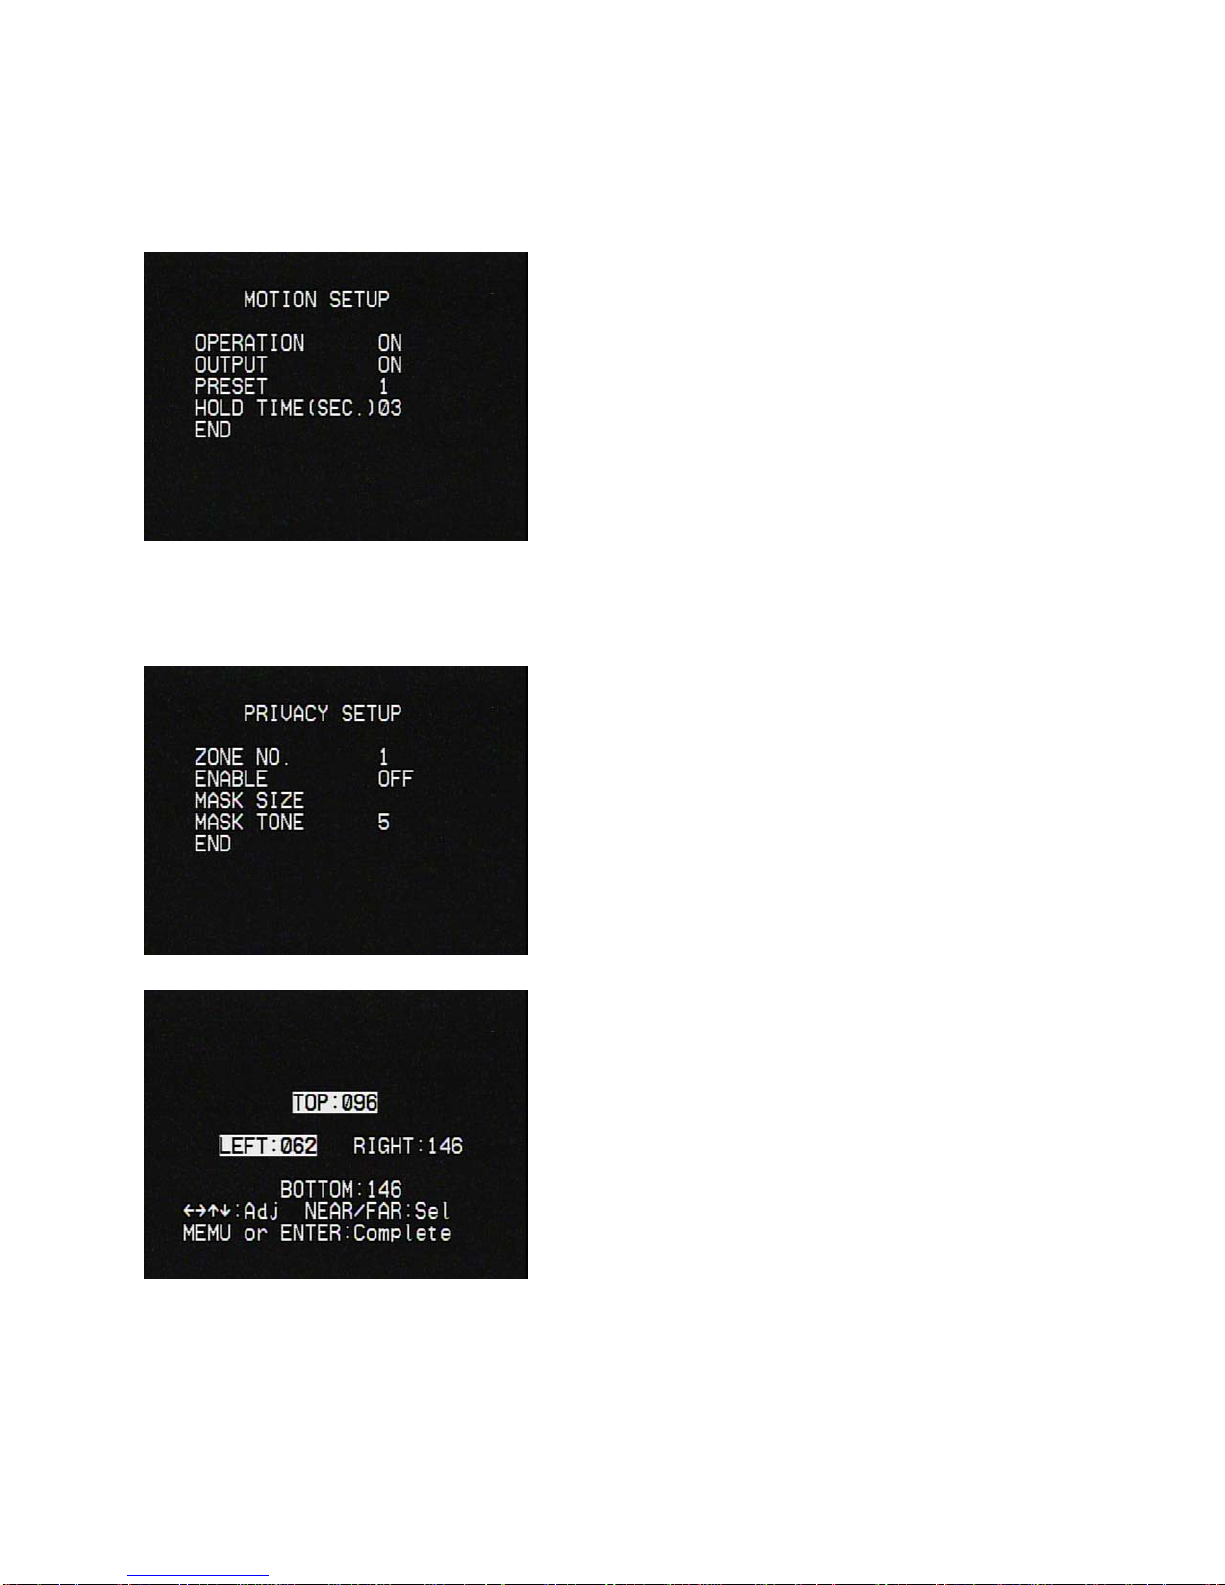
MOTION: This camera has a feature that allows you to observe movements of
objects on the screen, and the words ‘ALARM : M’ appear on the screen when
movement is detected.
OPERATION: Use this feature to
designate operation on/off fo
OUTPUT: Use this feature to designate
relay output mode for MOTION.
PRESET: Use this feature to designate
preset number for MOTION.
HOLD TIME: Use this feature to
designate dwell time of the motion
and/or r
PRIVACY MASK: Mask privacy area using this feature. The mask area
expand/contract upon the zoom position.
ZONE NO.: Use this feature to designate
zone number for mask privacy.
ENABLE: Use this feature to enable
on/off for mask privacy.
elay output.
r MOTION.
MASK SIZE: Use this feature to
designate mask size for mask privacy.
MASK TONE: Use this feature to
designate mask tone for mask privacy.
Configure mask tone from 0~9 using this
feature.
29
Page 29
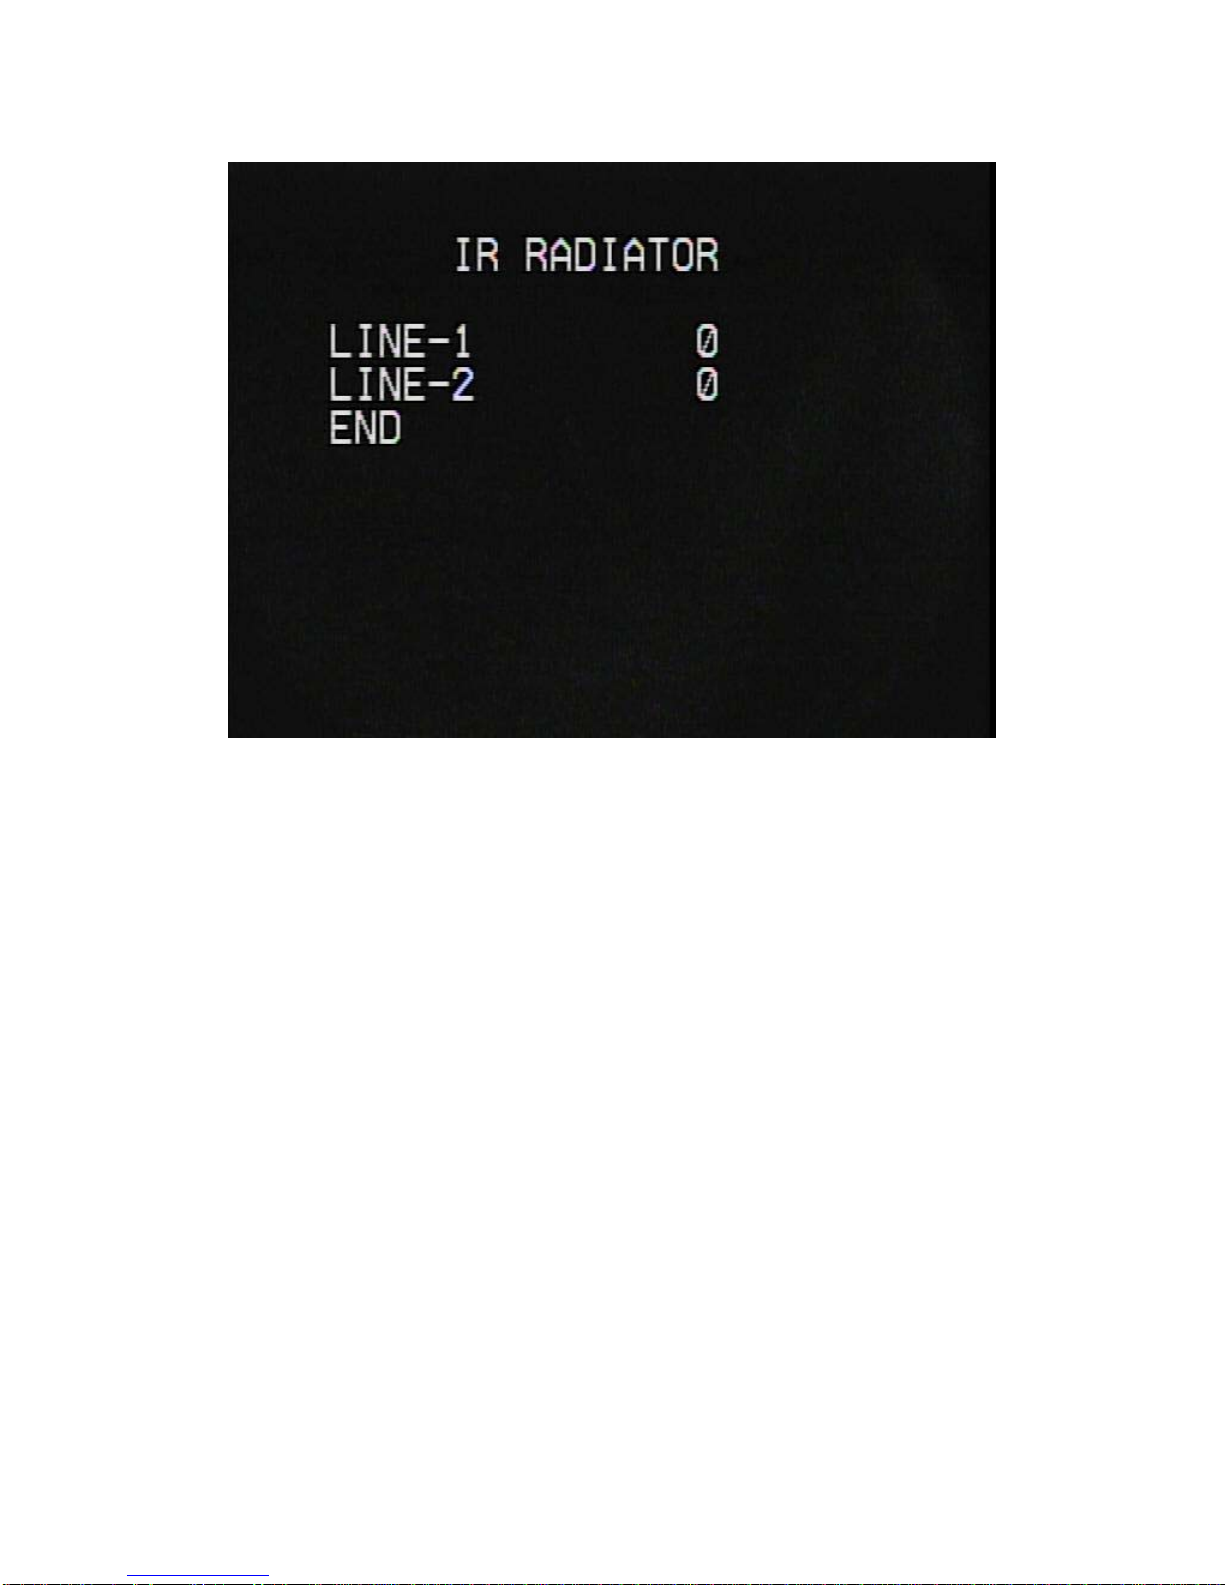
IR RADIATOR
Use this feature to adjust IR brightness. LINE-1 is the outer IR and LINE-2
is the inner IR. On the CI-Z30, there are LINE 1 ~ LINE 4. 0 means that IR
is turned off and 9 is the at IR’s brightest mode. Increase or decrease IR
level while verifying the changes on screen. Select END once desired level is
obtained.
30
 Loading...