


Page 1 of 21
©Smart-e(UK) Ltd. SDS-7000 User Manual
SDS-7000
Rack Mounted Full HD Presentation Switcher &
Scaler With Incorporated HDBaseT In/Out Link
USER MANUAL

Page 2 of 21
©Smart-e(UK) Ltd. SDS-7000 User Manual
Notice
The information contained in this document is subject to change without notice.
Smart-e makes no warranty of any kind with regard to the material, including but not
limited to implied warranties of merchantability and fitness for particular purpose.
Smart-e will not be liable for errors contained inside this manual, or for incidental or
consequential damage in connection with the furnishing, performance or use of this
material.
No part of this document may be photocopied, reproduced or translated into another
language without prior written consent from Smart-e (UK) Ltd.
Edition 1, August 2014
Copyright 2014 Smart-e (UK) Ltd.

Page 3 of 21
©Smart-e(UK) Ltd. SDS-7000 User Manual
Introducing The SDS Presentation Switch/Scaler
What’s in the box?
Thank you for purchasing the SDS Presentation Switch/Scaler. Your order should
arrive to you in a Smart-e branded matrix box, if any obvious damage is visible to the package
on arrival and the delivery has not been signed for as ‘damaged’ or ‘uninspected’ please
contact Smart-e as soon as possible. The below items should be included with your SDS
presentation switch/scaler:
1x SDS-7000 1U chassis
1x Mains Lead
Transmitter and/or Receiver if ordered
Power supplies and mains leads to accompany Transmitter and/or Receiver
Any ordered peripherals (HDMI cables, serial cables etc.)
If any of these items are not present or you believe any components which should have been
included are not please contact Smart-e ASAP on:
+44(0) 1306 628264

Page 4 of 21
©Smart-e(UK) Ltd. SDS-7000 User Manual
Introducing the SDS Presentation Switch/Scaler
What is the SDS Presentation Switch/Scaler?
The SDS presentation switch allows the input of 9 video inputs to be switched to 2
outputs. The Input video formats include: CVBS, (Y,Pb/Cb,Pr/Cr), VGA, HDMI and HDBaseT.
The two outputs are: HDMI and HDBaseT. Both outputs are controlled in parallel to allow the
output signal to be monitored locally whilst also being sent up to 100m along the HDBaseT
output via CAT5E/6 cable. The unit also incorporates 9 analogue 2-channel stereo audio
inputs and 1 audio balanced stereo audio amplifier output. The balanced audio output can be
used to output the output present on the HDMI and HDBaseT outputs or any of the 9
analogue inputs.
Why is the SDS Presentation Switch/Scaler necessary?
The SDS presentation switch removes a lot of the headaches that would usually be
encountered when trying to formulate a audio and video setup for a presentation
environment. The variety of input connectivity allows great flexibility for any user of the device
to connect their desired device to the unit without need for converters or specialist cables.
The analogue audio layer of the unit allows for connection to a powerful audio output, suitable
for large venues. The HDBaseT technology enables a remote input to be received from up to
100m away and the output can then be sent another 100m away to a projector or screen.
This means the unit can be located in a convenient central location whilst still having the
ability to retrieve content from and deliver it to the required locations with relatively
inexpensive and easy to install CAT5E/6 cabling.

Page 5 of 21
©Smart-e(UK) Ltd. SDS-7000 User Manual
Installation and Operation
Before beginning the installation process ensure that all video displays and audio outputs are
compatible with the specification of the SDS Presentation Switch/Scaler. The best
procedure, if not sure about how to do this, is to connect the source devices directly to the
output devices and ensure successful operation without any Smart-e equipment connected.
Once this has been verified the sources and outputs can be connected to the switch. Below is
a list of the accepted input/output formats, resolutions, frame rates and interconnects:
ANALOGUE CVBS/YPbPr
Gain
0dB
Bandwidth
150MHz @ -3dB
Format
NTSC,PAL,SECAM
Differential phase error
0.1°,3.58-4.43 MHz
Differential gain error
0.1%,3.58-4.43 MHz
Switching speed
200 ns(the maximum time)
Signal type
Composite video(CVBS), Component video(YPbPr/YCbCr)
Interface
RCA female joint(4PIN),1(CVBS),1(YPbPr/YCbCr)
Minimum / maximum level
Analog signal: -2V/+2V
Impedance
75 Ω
Return loss
<-30dB@5MHz
ANALOGUE VGA VIDEO
Gain
0 dB
Bandwidth
380 MHz
Signal type
VGA
Interface
15-pin HD female interface,2 VGA inputs
Signal strength
0.63V p-p to 0.9 V p-p
Impedance
75 Ω
Return loss
<-40dB@5MHz
DC compensation
Maximum ±5mV
Supported resolution
640x480@60Hz;800x600@60Hz;1024x768@60Hz;
1280x720@60Hz;1280x800@60Hz;1280x960@60Hz;
1280x1024@60Hz;1360x768@60Hz;1366x768@60Hz;
1400x1050@60Hz;1440x900@60Hz;1600x1200@60Hz;
1680x1050@60Hz;1920x1080@50Hz;1920x1080@60Hz;
1920x1200@60Hz

Page 6 of 21
©Smart-e(UK) Ltd. SDS-7000 User Manual
Installation and Operation
HDMI
Supported
protocols
HDMI1.3a,DVI1.0,HDCP1.3
Maximum pixel
clock
225MHz
Interface
bandwidth
6.75Gbps(RGB:2.25 Gbps/per lane)
Signal type
In HDMI 1.3a / DVI 1.0 specifications
HDMI / DVI-D all-digital T.M.D.S. signal
Interface
HDMI-A interface (Type A connector ),3 HDMI inputs,1HDMI output
Minimum /
maximum level
T.M.D.S.2.9V/3.3V
Impedance
100 Ω
Input EDID
Use the system default EDID,
( Supports EDID mapped to the input terminal)
The maximum DC
bias error
15mV
Recommended
maximum input
distance
The input distance is less than 25 meters;output less than 10
meters,in 1920x1080p@60(you’re recommended to use the
certified HDMI dedicated wire, such as the Molex TM wire.)
Supported
resolution
640x480@60Hz;800x600@60Hz;1024x768@60Hz;
1280x720@60Hz;1280x800@60Hz;1280x960@60Hz;
1280x1024@60Hz;1360x768@60Hz;1366x768@60Hz;
1400x1050@60Hz;1440x900@60Hz;1600x1200@60Hz;
1680x1050@60Hz;1920x1080@50Hz;1920x1080@60Hz;
1920x1200@60Hz
Display Port
Interface
20-pin DP interface, standard,1 DisplayPort input
Supported
protocols
DisplayPort 1.1
Maximum
transmission
delay
500us
Transmission
bandwidth
The maximum transmission bandwidth is 10.8Gb/S
Supported
resolution
640x480@60Hz;800x600@60Hz;1024x768@60Hz;
1280x720@60Hz;1280x800@60Hz;1280x960@60Hz;
1280x1024@60Hz;1360x768@60Hz;1366x768@60Hz;
1400x1050@60Hz;1440x900@60Hz;1600x1200@60Hz;
1680x1050@60Hz;1920x1080@50Hz;1920x1080@60Hz;
1920x1200@60Hz

Page 7 of 21
©Smart-e(UK) Ltd. SDS-7000 User Manual
Installation and Operation
HDBaseT
Interface
RJ-45 female interface;1 HDBaseT input,1 HDBaseT output
Supported
protocols
Conform to HDCP standard
Maximum pixel
clock
225MHz
Impedance
100Ω
Recommended
maximum input
distance
The maximum transmission distance is ≤100m
(use standard Cat5 enhanced or Cat6 cable)
Supported
resolution
640x480@60Hz;800x600@60Hz;1024x768@60Hz;
1280x720@60Hz;1280x800@60Hz;1280x960@60Hz;
1280x1024@60Hz;1360x768@60Hz;1366x768@60Hz;
1400x1050@60Hz;1440x900@60Hz;1600x1200@60Hz;
1680x1050@60Hz;1920x1080@50Hz;1920x1080@60Hz;
1920x1200@60Hz
AUDIO
Input/output interface
9x 3-pin phoenix joint/each has unbalanced
audio input,Balanced audio amplifier output of
1x 4-pin phoenix joint
Gain
0 dB
Frequency response
20 Hz~20 kHz,
THD + Noise
0.05%@1 kHz (with rated voltage)
Signal-to-Noise(S/N )
>80dB
Stereo separation
>80dB@1 kHz
Common-mode rejection ratio(CMRR)
>75dB@:20 Hz ~ 20 kHz
Signal type
stereo
Impedance
input:>10 kΩ(Unbalanced)
maximum input level
+19.5dBu,
Gain error
±0.1dB @ 20 Hz ~ 20 kHz

Page 8 of 21
©Smart-e(UK) Ltd. SDS-7000 User Manual
Installation and Operation
SETUP
Begin setup by connecting all input and output video and audio devices
If unit being controlled via Ethernet please ensure presentation switch connected to
network port before progressing any further
Apply power to unit via IEC mains inlet, the LCD panel on the front should be lit and
shortly after power being applied will display a message; ‘Loading….’
Once the screen displays a message (variations dependant on model):
SDS-7000
V1.0
The unit has completed its boot up sequence and is now ready to accept switch
commands and begin outputting video and audio
YPr/Cr
Pb/Cb CV
VGA 1 VGA 2
HDMI 1 HDMI 2 HDMI 3
DISPLAY PORT
HDBaseT
HDMI
HDBaseT
VIDEO OUPUTS
YPbPr
1
2 3 4
5
6
7 8 9
AMPLIFIER OUTPUT
+ - - +
R L
RS-232
ETHERNET
AC100-240V 50/60Hz
AUDIO INPUTS
VIDEO INPUTS
CONTROL
PC
MEDIA
SERVER
SATELLITE
RECEIVER
Blu-ray
Player
DVD
Player
AMPLIFIER
LOCAL
INPUTS
L
A
P
T
O
P
4K-TX900
L
C
D
T
E
L
E
V
I
S
I
O
N
PROJECTOR
4K-RX900
REMOTE
INPUT
KEY
- HDMI CABLE
- 3 RCA COMPONENT CABLE
- VGA CABLE
- 2 CHANNEL COAX
- CAT5E/6 CABLE
Page 9 of 21
©Smart-e(UK) Ltd. SDS-7000 User Manual
Installation and Operation
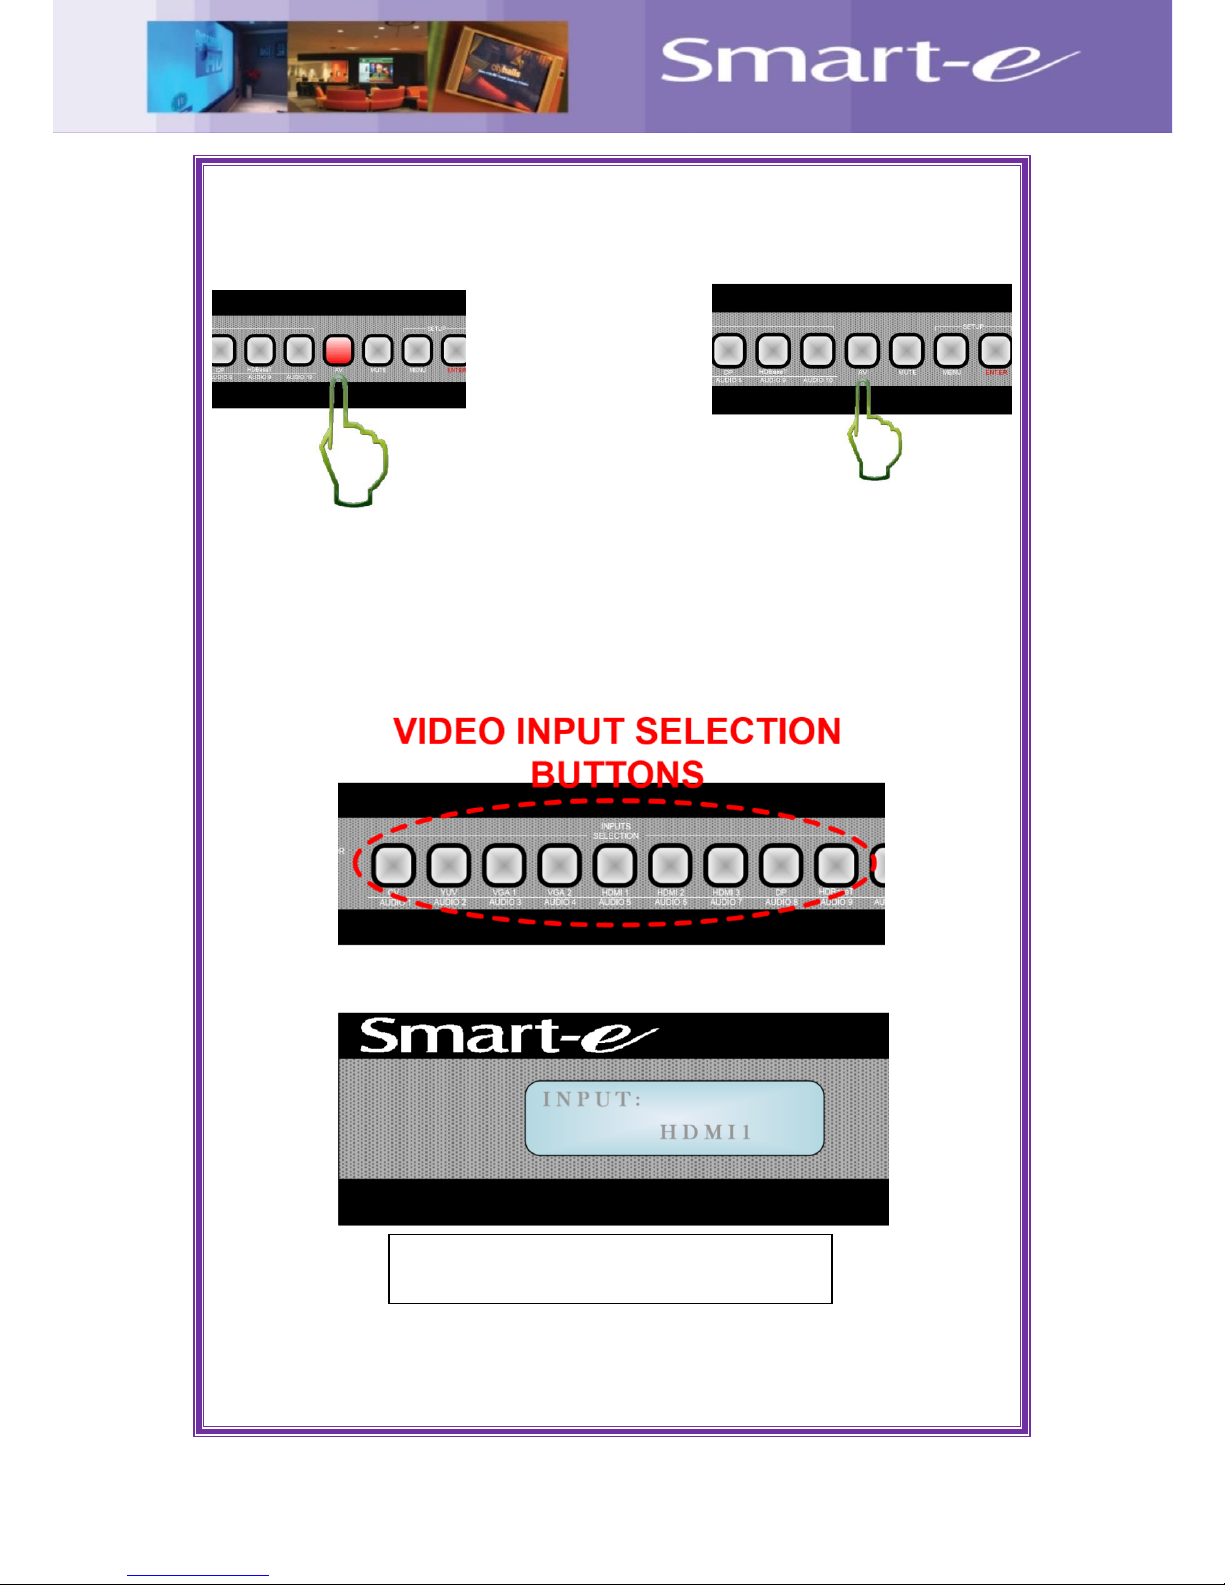
Control – Video Input Selection
Firstly ensure the unit is
in the correct mode for
switching, when the AV
button is lit the unit is
in audio switch mode,
when the AV button is not
lit the unit is in video
switch mode. To cycle
between the two, press
the AV button.
Now in video switch mode, with the AV button not lit, the unit will have lit red the currently
selected video input (by default this will be the CV input). To change input press and release
one of the other 8 video input buttons, the new input selected button will now be lit red, the
previously illuminated button will no longer be lit and the display will show the newly selected
input, when the screen updates the unit has successfully changed video input.
NOTE: The selected video input will be output on both the HDMI and HDBaseT outputs,
the outputs cannot be independently switched.
EXAMPLE OF SUCCESSFUL VIDEO CROSSPOINT
CHANGE ON LCD SCREEN

Page 10 of 21
©Smart-e(UK) Ltd. SDS-7000 User Manual
Installation and Operation
Control – Audio Input Selection
The audio switch function of the unit controls the audio output from the amplifier, balanced
audio output on the rear of the unit. Ensure the AV button is lit, this shows the unit is in audio
switch mode. The currently selected audio inputs corresponding button will be lit on the front
of the unit, this by default will be AUDIO 1. To change the input simply press and release the
desired inputs button. This button will then be eliminated red and the previously selected input
will no longer be lit. The LCD screen will also update, showing the newly selected audio input,
once this message is seen the audio crosspoint has been set and accepted.
NOTE: Audio Input 10 does not appear on the rear panel of the unit, this audio input,
when selected, allows the audio embedded via a HDMI or HDBaseT input, currently being
sent to the HDMI and HDBaseT output, to be sent to the amplifier output. So in a
auditorium environment for example when the output is being sent to a projector from a
HDMI input the audio being sent with the video can be passed directly to the installed
speakers of the room rather than having to be routed from the source as a separate
analogue audio input saving time, complexity and cabling.
EXAMPLE OF SUCCESSFUL AUDIO
CROSSPOINT CHANGE ON LCD SCREEN

Page 11 of 21
©Smart-e(UK) Ltd. SDS-7000 User Manual
Installation and Operation
Control – Audio Level Setting
The SDS presentation switch has the ability to alter the level of the audio on the amplifier
output.
To alter the output level simply turn the volume control switch, the audible output should
change and the LCD display will show the current output level in dB (decibels). To mute the
audio output simply press the MUTE button located on the front of the unit, the LCD display
will update to show the change, as shown below.

Page 12 of 21
©Smart-e(UK) Ltd. SDS-7000 User Manual
Installation and Operation
Configuration – Output Resolution Scaling
Your SDS presentation switch has the ability to scale the video output(s) to suit the screen
being used or compensate for quality of content being input to the system. The following is a
list of resolutions the system is able to scale content to. Please ensure the desired resolution
appears in this list and that the screen or projector being used is able to select that resolution.
In order to set the output resolution press the MENU button, if the
LCD screen was already lit the screen should now show ‘Output
Format’ if it wasn’t press the MENU button again to bring up this
option. Press the ENTER key and the LCD display should now show
the currently set output resolution. Scroll the parameter wheel in the
desired direction
Once the desired resolution is displayed on the LCD screen press
the ENTER button, the screen should then display the message;
‘SETTING OK’ and the new output resolution with the change taking
effect on the video output.
Width (pixels)
Height (pixels)
Rate (Hz)
640
480
60
800
600
60
1024
768
60
1280
720
60
1280
800
60
1280
960
60
1280
1024
60
1360
768
60
1366
768
60
1400
1050
60
1440
900
60
1600
1200
60
1680
1050
60
1920
1080
50
1920
1080
60
1920
1200
60
EXAMPLE OF SUCCESSFUL OUTPUT
RESOLUTION CHANGE ON LCD SCREEN

Page 13 of 21
©Smart-e(UK) Ltd. SDS-7000 User Manual
Installation and Operation
Configuration – Image Settings
The SDS presentation switch and scaler has the ability to alter the brightness and contrast of
the content being sent through the HDMI and HDBaseT outputs.
Firstly press the MENU button
Turn the Parameter wheel until ‘Image Settings’ is seen on the LCD display and press
ENTER
Turn the Parameter wheel until the desired setting is displayed, contrast or
brightness, and press ENTER
The LCD should now be displaying the current value of this setting
Turn the Parameter wheel until the desired value has been reached and press
ENTER
NOTE: The contrast and brightness will not update whilst the parameter wheel is turned,
the new setting will only take effect once the ENTER button has been pressed
You should now see the change has taken effect on the video output and a bar should
have appeared on the bottom of the screen showing the parameter which has been
altered with its new value
The LCD display will display the message, ‘SETTING OK’ showing the command has
been sent and accepted
EXAMPLE OF IMAGE SETTINGS
BAR SEEN ON VIDEO OUTPUT
EXAMPLE OF SUCCESSFUL IMAGE SETTINGS CHANGE ON LCD SCREEN

Page 14 of 21
©Smart-e(UK) Ltd. SDS-7000 User Manual
Installation and Operation
Configuration – EDID Setting
The SDS presentation switch reads the EDID of the screen connected to its HDMI output
when instructed to do so, it will then make this information available to the EDID compatible
sources present on the following inputs:
EDID Compatible Input
VGA 1
VGA 2
Display Port
HDMI 1
HDMI 2
HDMI 3
HDBaseT
NOTE: Please ensure all cables being used have the DDC pins connected, this will connect
the EDID of your compatible sources and screen to the matrix so it may be read and
distributed as necessary. Some sources will not output any video (especially HDMI
sources) without valid EDID information, so it is vitally important this is taken in to
consideration during setup.
Firstly press the MENU button
Turn the Parameter wheel until ‘System Settings’ is shown on the LCD display and
press ENTER
Turn the Parameter wheel until the LCD display shows:
Pressing ENTER when this is shown will set the EDID that will be sent to sources to
that currently present at the HDMI output
The display will update to say ‘SETTING OK’ and the EDID is now set
Now when looking at the video output settings of the sources (if available) the EDID
seen should be that of the screen attached, when setting the EDID, to the HDMI
output

Page 15 of 21
©Smart-e(UK) Ltd. SDS-7000 User Manual
Installation and Operation
Configuration – Serial Control
The SDS presentation switch has the ability to be controlled via 232 using the DSub 9-pin
socket on the rear of the unit.
The pin connections for 232 communications between the SDS and control device are
shown below (pin connections typical for most standard D9 Male – Female Cables).
The Protocol document for the SDS presentation switch can be found on the product page:
www.smart-e.co.uk/product-range/sds-7000
The Smart-e control application can be downloaded from the Smart-e website:
www.smart-e.co.uk/downloads/software
When a successful command has been received and processed via the 232 port the system
will update the lights and LCD on the front of the unit, this can confirm visually if content
cannot be seen from the location of the presentation switch that the command has been
successful.
Serial Protocol Settings
Baud Rate
115200
Data Bits
8
Stop Bits
1
Parity Bits
none
Control Device i.e. PC
D9 Plug
Pin 2 – RX
Pin 3 – TX
Pin 5 - GND
SDS switch/scaler
D9 Socket
Pin 2 – TX
Pin 3 – RX
Pin 5 - GND

Page 16 of 21
©Smart-e(UK) Ltd. SDS-7000 User Manual
Installation and Operation
Configuration – IP Control
A very useful feature of the SDS presentation switch is the ability to control the unit via
Ethernet. This means the unit can be controlled from a remote location, be that in the same
building as the unit itself or from anywhere in the world, simply by connecting the unit to an
accessible network.
NOTE: Ensure SDS presentation switch is attached to network via Ethernet port prior to
the unit being powered, the unit will only allocate an IP address on power up, attaching
unit to network after this will result in the control over IP functionality being unavailable.
The Protocol document for the SDS presentation switch can be found on the product page:
www.smart-e.co.uk/product-range/sds-7000
The Smart-e control application can be downloaded from the Smart-e website:
www.smart-e.co.uk/downloads/software
Ethernet Control Settings
IP Address
192.168.1.190
Port
6666

Page 17 of 21
©Smart-e(UK) Ltd. SDS-7000 User Manual
Installation and Operation
Structured Cabling Installation
The SDS presentation switch utilizes CAT5E/6 cabling for HDBaseT input and output and
also for network connectivity.
This is the desirable cable choice as many buildings have it pre-wired into its infrastructure,
as it is used widely for telecommunications and network connectivity. If cabling is not already
present the CAT5E/6 cabling is very cost effective to install. The category 5E and 6 cabling is
becoming the modern standard in the commercial environment as the added shielding to the
cables gives protection to transmitted signals from noise produced by all manner of devices
(lighting, PCs, air conditioning units etc..).
Below is an image showing the pinout of the CAT5E/6 cables to be used with the SDS
presentation switch:
STP CABLE INFORMATION
Connectors
Shielded RJ45
Capacitance
14pF/ft (46.2pF/m)
Conductor Gauge
24AWG
Impedance
100Ω ± 15Ω
Max Cable distance for HDBaseT
100m
Max Cable distance for Ethernet
100m
NOTE: Please be sure not to plug a cable connected to a network into either of the
HDBaseT ports on the unit, this could cause severe damage to the unit and void warranty
LINK SHIELDS

Page 18 of 21
©Smart-e(UK) Ltd. SDS-7000 User Manual
Transceiver Options
Receivers
There are a range of receivers available to accompany the SDS presentation switch which
have a range of abilities, giving you the option to pick the one most ideally suited to fit your
environment and budget.
4K-RX900
The 4K-RX900 has a HDBaseT input which can
accept a HDBaseT signal from up to 100 meters
away via CAT5E/6 cable. It has a single HDMI
output which as well as the video carries the
embedded HDMI audio. Presented in a compact
case with incorporated mounting lug solution for
ease of installation. For more information please
visit the product page:
http://www.smart-e.co.uk/product-range/4k-900

Page 19 of 21
©Smart-e(UK) Ltd. SDS-7000 User Manual
Transceiver Options
Transmitters
There are a range of transmitters ideally suited for use with the SDS presentation switch
offering a wide range of connectivity and solutions to suit purpose and budget.
SDS-TX911-WP
The SDS-TX911-WP is ideally suited to the type of
environment where the presentation switch is likely to be
located. Designed specifically to sit within a standard
double gang mains box making for a neat and convenient
installation. Boasting a RGBHV and HDMI input (switchable
via the SELECT button) output via a single HDBaseT
CAT5E/6 output. Handling resolutions of up to 1080p
sending them up to 100m along the CAT5E/6 cabling.
For more information please visit the product page:
http://www.smart-e.co.uk/product-range/sds-tx911-wp
4K-TX900
The 4K-TX900 has a single HDMI input and a single
HDBaseT output carried via CAT5E/6 cable up to
100 meters. Presented in a compact case with
incorporated mounting lug solution for ease of
installation. For more information please visit the
product page:
http://www.smart-e.co.uk/product-range/4k-900

Page 20 of 21
©Smart-e(UK) Ltd. SDS-7000 User Manual
Troubleshooting
Power
Firstly check the issue does not lie with the mains lead
Try cable in another IEC inlet device
Check the fuse in the cable to verify this has not blown
Video
Check all signal cables and swap if possible for known working ones
Connect sources directly to screens to ensure these are both ok and compatible
Check the resolutions are within the specification (scaled output may not be in list of
accepted resolutions for screen)
If on HDBaseT input or output check the CAT5E/6 cabling
Ensure the EDID is set correctly (please refer to relevant section of this manual)
Audio
Check all input and output wiring
Connect sources if possible directly to amplifier (or speakers) to hear output
Check the mute function of the SDS presentation switch is off
Adjust master volume rotary wheel to make sure level is audible
Control
Check all cabling and replace if possible
Ensure correct comm port / IP address is selected
Ask IT technician to ensure comm port is outputting data
Cycle power on unit to ensure IP address in obtained

Page 21 of 21
©Smart-e(UK) Ltd. SDS-7000 User Manual
Appendix
Limited Warranty Statement
A. Extent of limited warranty
1. Smart-e (UK) Ltd warrants to the end-user customers that Smart-e
product specified above will be free from defects in materials and
workmanship for the duration of 3 years, which duration begins on the
date of purchase by the customer. Customer is responsible for
maintaining proof of date of purchase.
2. Smart-e warranty covers only those defects which arise as a result of
normal use of the product, and do not apply to any:
a. Improper or inadequate maintenance or modifications
b. Operations outside product specifications
c. Mechanical abuse and exposure to severe conditions
3. If Smart-e receives during applicable warranty period notice of defect,
Smart-e will at its discretion replace or repair defective product . If
Smart-e is unable to replace or repair defective product covered by the
Smart-e warranty within reasonable period of time Smart-e shall refund
the cost of the product.
4. Smart-e shall have no obligation to repair, replace or refund unit until
customer returns defective product to Smart-e.
5. Any replacement product could be new or like new, provided that it has
functionality at least equal to that of the product being replaced.
6. Smart-e warranty is valid in any country where the covered product is
distributed by Smart-e.
B. Limitations of warranty
TO THE EXTENT ALLOWED BY LOCAL LAW, NEITHER SMART-E NOT ITS THIRD
PARTY SUPPLIERS MAKE ANY OTHER WARRANTY OR CONDITION OF ANY
KIND WHETHER EXPRESSED OR IMPLIED , WITH RESPECT TO THE SMART-E
PRODUCT , AND SPECIFICALLY DISCLAIM IMPLIED WARRANTIES OR
CONDITIONS OF MERCHANTABILITY, SATISFACTORY QUALITY , AND FITNESS
FOR A PARTICULAR PURPOSE
C. Limitations of liability
To the extent allowed by local law the remedies provided in this warranty
statement are the customers sole and exclusive remedies
TO THE EXTENT ALLOWED BY LOCAL LAW , EXCEPT FOR THE OBLIGATIONS
SPECIFICALLY SET FORTH IN THIS WARRANTY STATEMENT , IN NO EVENT
WILL SMART-E OR ITS THIRD PARTY SUPPLIERS BE LIABLE FOR DIRECT,
INDIRECT, SPECIAL, INCIDENTAL, OR CONSEQUENTIAL DAMAGES WHETHER
BASED ON CONTRACT , TORT OR ANY OTHER LEGAL THEORY AND WHETHER
ADVISED OF THE POSSIBILITY OF SUCH DAMAGES.
D. Local law
To the extent that this warranty statement is inconsistent with local law, this
warranty statement shall be considered modified to be consistent with such law
 Loading...