


HandiTheatre System Setup
Manual
Home model
SCREEN
1. Take out of the bag, Unroll, unfold
2. Inate by closing both valves on right side of the screen rst
3. Open the large valve on the left side of the screen and using your handheld blower inate the
screen to a standing position and close the big valve.
4. Unscrew the small valve that is onto of the large valve you just closed and using your handheld
blower proceed to inate the screen so that it is solid and the screen has stretched
5. Zip on screen surface and attach tethers to D-Rings - see set up guide provided for full details
and diagrams for set up, ination & deation.
6. Attach the tethers to the twist stakes
SPEAKERS
1. Place Subwoofer on the oor at the front and centre of your screen
2. Place the speakers on either side of your Subwoofer facing the audience
3. Connect the cable at the back of each speaker to the back of the Subwoofer
4. Connect the Subwoofer power cable to your power outlet (do not turn on)
5. Take the red & White RCA cable and connect it to the back of your Subwoofer
6. Take the other end of the red & White RCA cable and connect it to the Audio out on the projector
PROJECTOR AND DVD
1. Put the projector on a stand approx 4m – 5m away from the screen and approx 70cm high
2. Connect the projector to the power (do not turn on)
3. Connect one end of the HDMI cable to your projector and the other end into your DVD player
or source
4. Connect your Blu-ray to the power (do not turn on)
TURN EVERYTHING ON, POWER BOARDS, SPEAKERS, PROJECTOR AND DVD PLAYER/SOURCE
FOR MORE DETAILS VISIT
WWW.SMARTDIGITAL.COM.AU/SUPPORT
AND DOWNLOAD OUR FULL
HANDITHEATRE SET UP GUIDE
Quick Guide
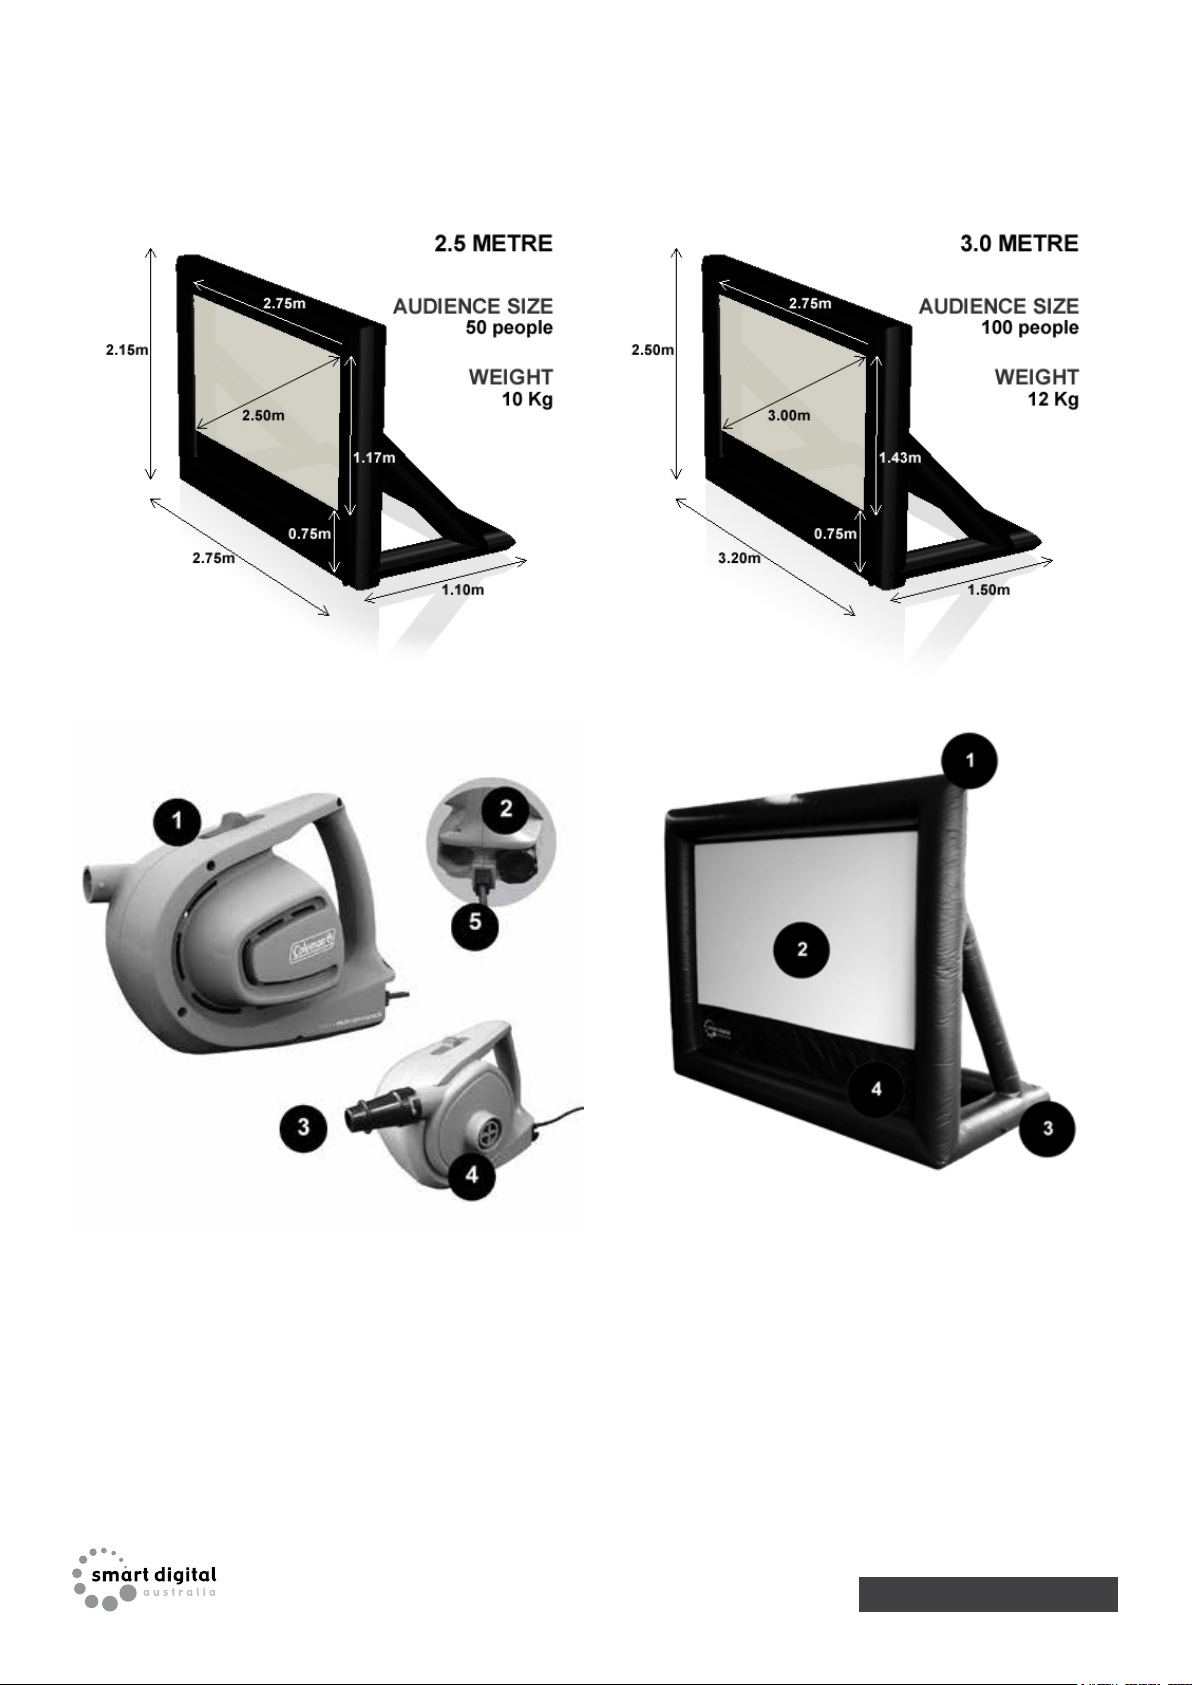
SCREEN REFERENCE
1. On / Off Switch
2. Nozzle Holder
3. Ination nozzle
4. Deation nozzle
5. Power cable
INFLATABLE SCREEN PARTSAIR BLOWER
1. Screen Frame
2. Screen Surface
3. Ination / Deation valve
4. Screen Skirt (On side tubes, each side)
Page 2

SCREEN SET UP
UNROLLING SCREEN
1. After deciding on set up location and whether
projection will be front or rear it is time to
unroll the screen. For outdoor application we
recommend using a tarp under the screen
secured down with tent pegs to help keep
screen clean. (NOTE: push tent pegs right
into ground so that it is not raised above
ground level – for screen and operator
safety).
2. Remove your HandiScreen from the dufe
bag provided and place the screen at the
FRONT LEFT of the set up location, remove
tie from around screen and unroll to the right
(example in diagram).
3. Once unrolled, unfold the screen once to
have it in its ‘ination ready’ position. The
screens white surface area is now sitting in
half on the rectangular base. You are now
ready to inate your screen.
LEFT
BACK
PLACE
SCREEN
HERE
FRONT
RIGHT
4. Ensure one ination / deation valve is
sealed completely. Have your handheld
blower ready for ination.
5. Open the other ination valve completely
so that the air from the blower goes straight
into the tubing, and not through the one way
valve. Ensure your blower has the correct
nozzle attached to t the valve. Hold blower
against the valve, turn the blower on.
6. Holding the blower to the valve the screen will
start to inate slowly (takes approximately 3
minutes). Once screen has inated enough
to stand up on its own, remove the blower
and seal the rst valve. Screen inates
as pictured below when inated from the
“ination ready position”
7. Place the blower back onto the second (top)
value and continue inating until screen
frame is rm. Turn off and remove blower,
fastening the nal valve cover.
Unroll to the right
Page 3

8. You must now have your stakes ready for
this step. From each corner of the bottom
of the frame there is a D-ring with a tether
attached. Find this D-ring / tether, and then
from each corner walk out 2 -3 LARGE
STEPS (approximately 2-3 metres) and
twist the stake into the ground and connect
that tether using the clip.
9. Attach all top tethers to stakes and adjust
tethers so they all have the correct tension.
FOLDING UP SCREEN
DEFLATION PACK UP OF SCREEN
1. Unclip tethers from stakes, and roll up neatly.
Place on screen
2. Undo the ination / deation values on each
side and allow deating.
3. To speed up deation, unseal only one
valve, remove the nozzle on the blower from
the ination nozzle at the front, and connect
to the deation nozzle on the side. Place the
blower nozzle onto the deation valve, and
turn the blower on.
4. Watch the screen deate!
1. Roll up tethers and tie in a loose know, and
lay gently onto screen tubing.
2. Fold screen in half (with white screen surface
front on the inside) by pushing the centre of
the front frame towards the back so that it
sits over the base frame. From the side it will
looks like an S shape.
3. Fold screen in half again lengthways.
4. Roll screen up tightly (with tethers tucked
inside) from the right side of the screen
toward the left (opposite to the way you
unrolled at the beginning).
5. Secure with double D ring strap provided.
6. Screen should then be placed back into the
wheeled dufe bag provided.
Page 4

GENERAL CARE
CARING FOR YOUR
SCREEN
1. The easiest way to care for your screen,
is to keep it clean and dry. Always set up
your screen on a tarpaulin to prevent it from
coming into contact with the ground, grass,
dirt or sand that may dirty your screen.
2. When deating your screen after use,
always pull the screen down so that screen
lays over the back tubing, before removing
the screen surface. This will prevent your
screen surface from hitting the ground and
collecting any dirt on the way down.
3. Ensure your screen is always dry when rolled
up and put away. Any moisture can result in
mould growing and can destroy your screen.
CLEANING
1. Cleaning the tube is best done with a soft
cloth and some methylated spirits. This
not only cleans your screen but dries very
quickly without leaving and streaks. This
method can also be used to spot clean the
screen surface as well.
2. Alternately leave your screen inated and
bring inside to dry off.
PATCHING
If your screen obtains a cut, hole or is pierced
by a sharp object it can be repaired. Simply get
out your repair kit to x your screen. Patching
the screen should be done when the screen is
deated.
1. Cut a piece of the PVC fabric so that it covers
the hole entirely, with approximately 2cm
around each side overhanging the gash.
2. Make sure that both the PVC patch and the
tubing where the hole is are clean
3. Use the glue supplied to glue around the
edge of the patch to create a seal over the
hole. Warning - Don’t use too much! The
glue can ooze out and make a mess of your
tubing.
2. If the screen surface become very dirty,
simply zip of the screen and hand wash in
warm soapy water. Do not wash the black
section of attached to the screen surface.
Then hang out to dry.
DRYING
1. If your screen gets wet from dew or rain
don’t stress! Simply shake off as much of the
water as possible and then pack away. Bring
out the following day when the weather is
better, set up and inate and the screen will
dry out usually within around 30minutes. If
the screen was very wet this may take a little
longer. Ensure all your tethers are also dry
as these can get mouldy as well.
Page 5

AUDIO & PROJECTOR SET UP
CONNECTING SPEAKERS
1. Place Subwoofer on the oor at the front and
centre of your screen
WHITE
RCA
RED
GREEN
3.5
3.5
BLACK
RCA
AUX
AUDIO INPUT
RIGHT SPEAKER
LEFT SPEAKER
POWER CORD
2. Place the speakers on either side of your
Subwoofer facing the audience
3. Connect the cable at the back of each
speaker to the back of the Subwoofer
4. Connect the Subwoofer power cable to your
power outlet (do not turn on)
5. Take the red & White RCA cable and connect
it to the back of your Subwoofer
6. Take the other end of the red & White RCA
cable and connect it to the Audio out on the
projector
7. Connect the projector power cable to your
power outlet (do not turn on)
Now you have successfully connected the
Audio to your Projector
Next you will connect your Source this is the
DVD player, game console or laptop PC you
want the speakers and projector to play.
1. HDMI IN
2. Audio Out (3.5mm jack)
3. HDMI OUT (source)
4. Speakers RCA
8. Connect the HDMI cable to the HDMI INPUT
located on the left hand side of your projector
9. Connect the other End of the HDMI to your
Source Out (usually at the back of the DVD
player etc)
10. Connect the power cable to your power
outlet
11. Turn on Power for ALL devices & press the
power buttons for the speakers, projector
and your source
12. Using the projector remote access the menu
and select HDMI Source the image will now
appear
13. The volume can be adjusted via your source
or projector volume as well as speakers as
required
Page 6
 Loading...