

Page 1
Smart Choice™
7/8" Gas Range Connector
Installation Kit
BEFORE BEGINNING INSTALLATION, READ
ALL MANUFACTURER’S INSTALLATION
INSTRUCTIONS THOROUGHLY
pn/ 5304501596
DANGER
FIRE AND ELECTROCUTION HAZARD
YOU DO NOT POSSESS THE NECCESSARY
This Kit Includes:
One 4' Long x 7/8" OD Gas Supply Line
Two 7/8" OD Flare x 3/4" MIP Fitting
One Tube of Thread Sealant
One Tube of Leak Detector Solution
1
Page 2
IMPORTANT SAFETY INSTRUCTIONS - GAS RANGE
• A child or adult can tip the range
and be killed.
•
installed to floor or wall.
•
range is moved to floor or wall.
place and engaged.
serious burns to children and adults.
Range
leveling leg
To check if the anti-tip bracket is installed properly, use
both arms and grasp the rear edge of range back.
Carefully attempt to tilt range forward. When properly
installed, the range should not tilt forward.
Refer to the anti-tip bracket installation instructions
supplied with your range for proper installation.
Anti-Tip
bracket
If the information in this manual is
not followed exactly, a fire or explosion may
result causing property damage, personal
injury or death.
FOR YOUR SAFETY:
— Do not store or use gasoline or other
flammable vapors and liquids in the
vicinity of this or any other appliance.
WHAT TO DO IF YOU SMELL GAS:
• Do not try to light any appliance.
• Do not touch any electrical switch; do not use
any phone in your building.
• Immediately call your gas supplier from a
neighbor’s phone. Follow the gas
supplier’s instructions.
• If you cannot reach your gas supplier, call the
fire department.
— Installation and service must be performed
by a qualified installer, service agency or the
gas supplier.
Refer to your serial plate for applicable agency certifications
our range is usually factory preset to
Important notes to the installer
• Read all instructions contained in these installation
instructions before installing range.
• Remove all packing material from the oven
compartments before connecting the gas and electrical supply
to the range.
•
•
Important notes to the consumer
• for
future reference.
•
Special instructions for appliances installed in the State of
Massachusetts:
This appliance can only be installed in the State of
Massachusetts by a Massachusetts licensed plumber or gas
fitter.
2
Page 3
IMPORTANT SAFETY INSTRUCTIONS - GAS RANGE
IMPORTANT SAFETY INSTRUCTIONS
• Range must conform with local codes or, in the absence of
local codes, with the National Fuel Gas Code ANSI Z223.1—
latest edition when installed in the United States.
• When installed in a manufactured (mobile) home,
installation must conform with the Manufactured Home
Construction and Safety Standard, Title 24 CFR, Part 3280
[formerly the Federal Standard for Mobile Home
Construction and Safety, Title 24, HUD (Part 280)] or,
when such standard is not applicable, the Standard for
Manufactured Home Installations, ANSI/NCSBCS A225.1,
or with local codes.
• As with any appliance using gas and generating heat, there
are certain safety precautions you should follow. You will
find them in the Use & Care Guide, read it carefully.
• Be sure your range is installed and grounded properly by a
qualified installer or service technician.
• This range must be electrically grounded in accordance
with local codes or, in their absence, with the National
Electrical Code ANSI/NFPA No .70—latest edition when
installed in the United States. See Grounding Instructions
on page 8.
• Before installing the range in an area covered with
linoleum or any other synthetic floor covering, make sure
the floor covering can withstand heat at least 90°F above
room temperature without shrinking, warping or
discoloring. Do not install the range over carpeting unless
you place an insulating pad or sheet of 1/4-inch thick
plywood between the range and carpeting.
• Make sure the wall coverings around the range can
withstand the heat generated by the range.
• Do not obstruct the flow of combustion air at the oven
vent nor around the base or beneath the lower front panel
of the range. Avoid touching the vent openings or nearby
surfaces as they may become hot while the oven is in
operation. This range requires fresh air for proper burner
combustion.
• Air curtain or other overhead range hoods, which operate
by blowing a downward air flow on to a range, shall not be
used in conjunction with gas ranges other than when the
hood and range have been designed, tested and listed by
an independent test laboratory for use in combination
with each other.
DO NOT MAKE ANY ATTEMPT TO
OPERATE THE ELECTRIC IGNITION OVEN DURING
AN ELECTRICAL POWER FAILURE. RESET ALL OVEN
CONTROLS TO “OFF” IN THE EVENT OF A POWER FAILURE.
The electric ignitor will automatically re-ignite the oven
burner when power resumes if the oven thermostat control
was left in the “ON” position. When an electrical power failure
occurs during use, the surface burners will continue to operate.
During a power outage, the surface burners can be lit with
a match. Hold a lighted match to the burner, then slowly
turn the knob to the LITE position.Use extreme caution
when lighting burners this way.
Never leave children alone or
unattended in the area where an appliance is in use. Teach
children the proper, safe use of all appliances. Never leave
the oven door open when the range is unattended.
drawers of this range can result in serious injuries and can
also cause damage to the range.
• Do not store items of interest to children in the cabinets
above the range. Children could be seriously burned
climbing on the range to reach items.
• To eliminate the need to reach over the surface burners,
cabinet storage space above the burners should be avoided.
• Adjust surface burner flame size so it does not extend
beyond the edge of the cooking utensil. Excessive flame
is hazardous.
• Do not use the oven as a storage space. This creates a
potentially hazardous situation.
• Never use your range for warming or heating the room.
Prolonged use of the range without adequate ventilation
can be dangerous.
• Do not store or use gasoline or other flammable vapors
and liquids near this or any other appliance. Explosions or
fires could result.
• Reset all controls to the “OFF” position after using a
programmable timing operation.
Stepping, leaning or sitting on the doors or
3
Page 4
GAS RANGE INSTALLATION REQUIRMENTS
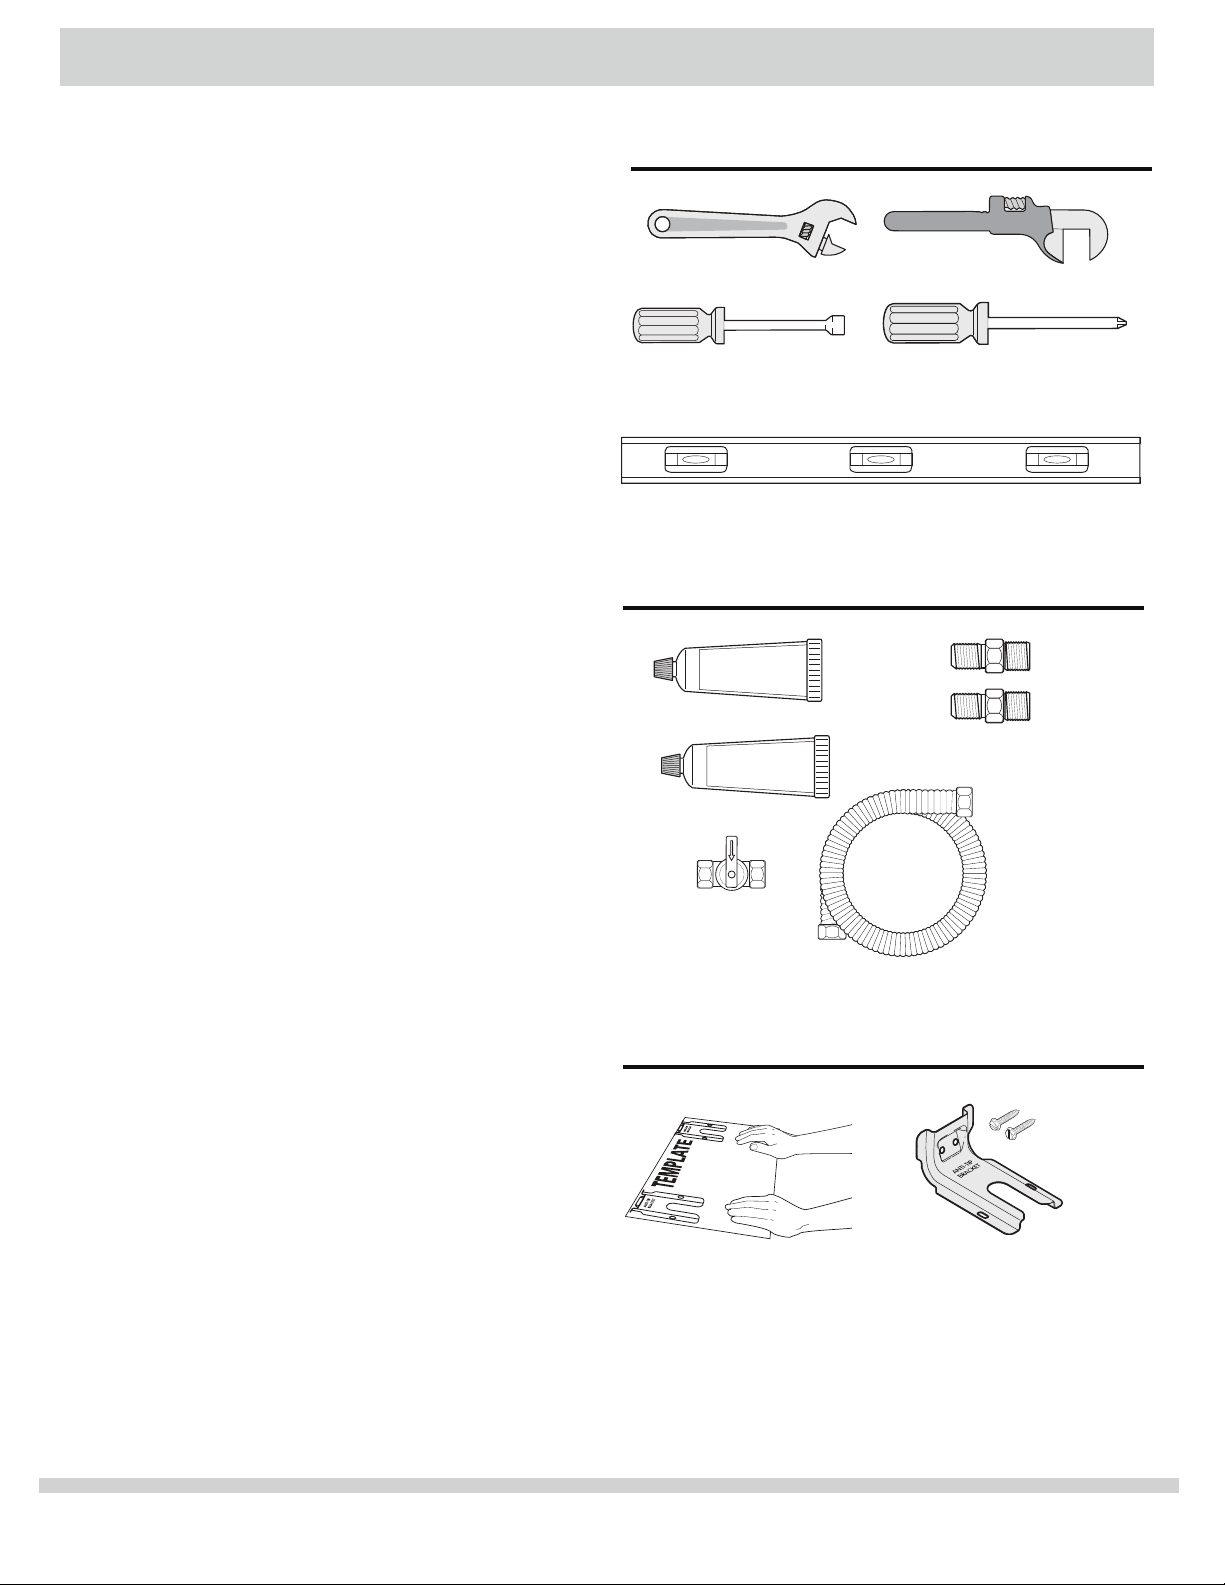
Tools you will need for Gas Supply Connection
(Wear safety glasses when using tools):
• Adjustable wrench and pipe wrench (Figs. a & e)
For burner flame adjustment:
• Phillips head and small flat-blade screwdrivers (Figs. b & f)
For Range Installation:
• Level (Fig. d)
Materials provided in this kit:
• Pipe joint sealant that resists action of
LP/Propane gas (Fig. h)
• Leak Detection Solution (Fig. i)
•
A new 7/8" flexible metal appliance gas line connector.
Because solid pipe restricts moving the range, we
recommend using a new flexible conduit for each new
installation and additional re-installations. (Fig. k)
• Two Flare union adapters
(3/4" MIP x 7/8" OD Flare Union)(Fig. l)
Other Required Materals:
• Gas line manual shut-off valve (Fig. j)
Tools
Materials
Fig. a
Fig. b
THREAD
SEALANT
Fig. h
LEAK
DETECT
Fig. i
Fig. e
Fig. f
Fig. d
Fig. l
Materials supplied with appliance:
• Anti-Tip Template (Fig. n)
• Anti-Tip bracket; includes 2 mounting screws (Fig. m)
Fig. j
Fig. k
Materials supplied with appliance
Fig. m
Fig. n
4
Page 5
GAS RANGE INSTALLATION INSTRUCTIONS
Provide an adequate gas supply.
1
Please note: Operation at elevations above 2000 ft.,
appliance rating shall be reduced at the rate of 4 percent for
each 1000 ft. above sea level.
A convertible pressure regulator is
connected to the manifold and MUST be connected
in series with the gas supply line. If the LP/Propane
conversion kit has been used, follow instructions provided
with the kit for converting the pressure regulator to LP/
Propane use.
Care must be taken during installation of range not to
obstruct the flow of combustion and ventilation air.
For proper operation, the maximum inlet pressure to the
regulator should be no more than 14 inches of water column
pressure. The inlet pressure to the regulator must be at least
1 inch greater than regulator manifold pressure.
Example: If regulator is set for natural gas 4 inch manifold
pressure, inlet pressure must be at least 5 inches; if regulator
has been converted for LP/Propane gas 10 inch manifold
pressure, inlet pressure must be at least 11 inches.
Leak testing of the appliance shall be conducted according to
the instructions in step 4g.
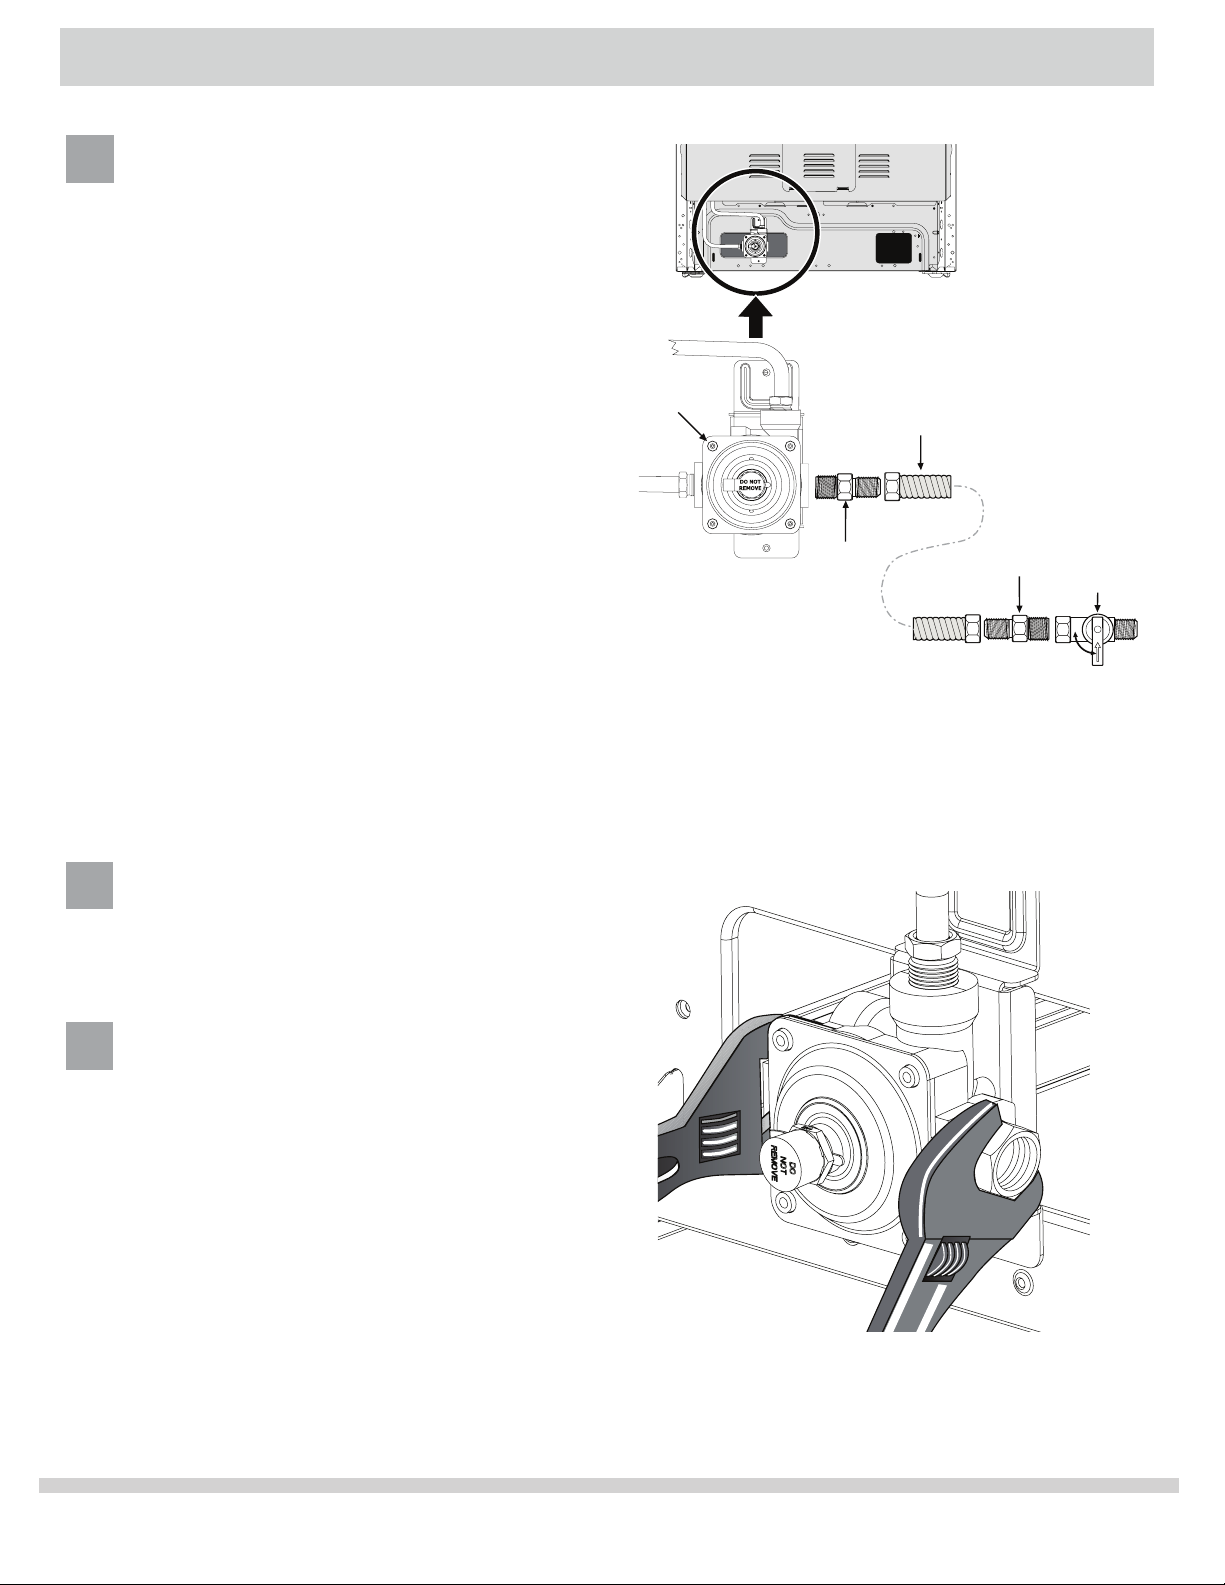
Pressure
regulator Flexible appliance
Flare
union
adaptor
Fig. 8 - gas supply connections
Be sure to stabilize the left side of the gas pressure
regulator before tightening ANY fittings to the pressure
regulator. Do not allow pressure regulator to turn on
pipe when tightening fittings (Refer to Fig. 9).
conduit
Flare
union
adaptor
Manual
shut-off
valve
ON
OFF
Seal wall openings.
2
Seal any openings in the wall behind the range and in the
floor under the range after gas supply line is installed.
Connect range to gas supply.
3
Note: To prevent leaks use pipe joint sealant on all male
(outside) pipe threads. Do not allow gas pressure
regulator to turn on pipe when tightening fittings.
a. Install an external manual gas shut-off valve to gas
supply line in an accessible location outside of range. Be
sure you know where and how to shut off the gas supply
to the range (See Fig. 8).
b. Install 3/4” flare union adapter to gas pressure regulator
using no more than 15ft./lbs. of torque
(Refer to Fig. 8).
Fig. 9
5
Page 6
GAS RANGE INSTALLATION INSTRUCTIONS (CONT.)
f.
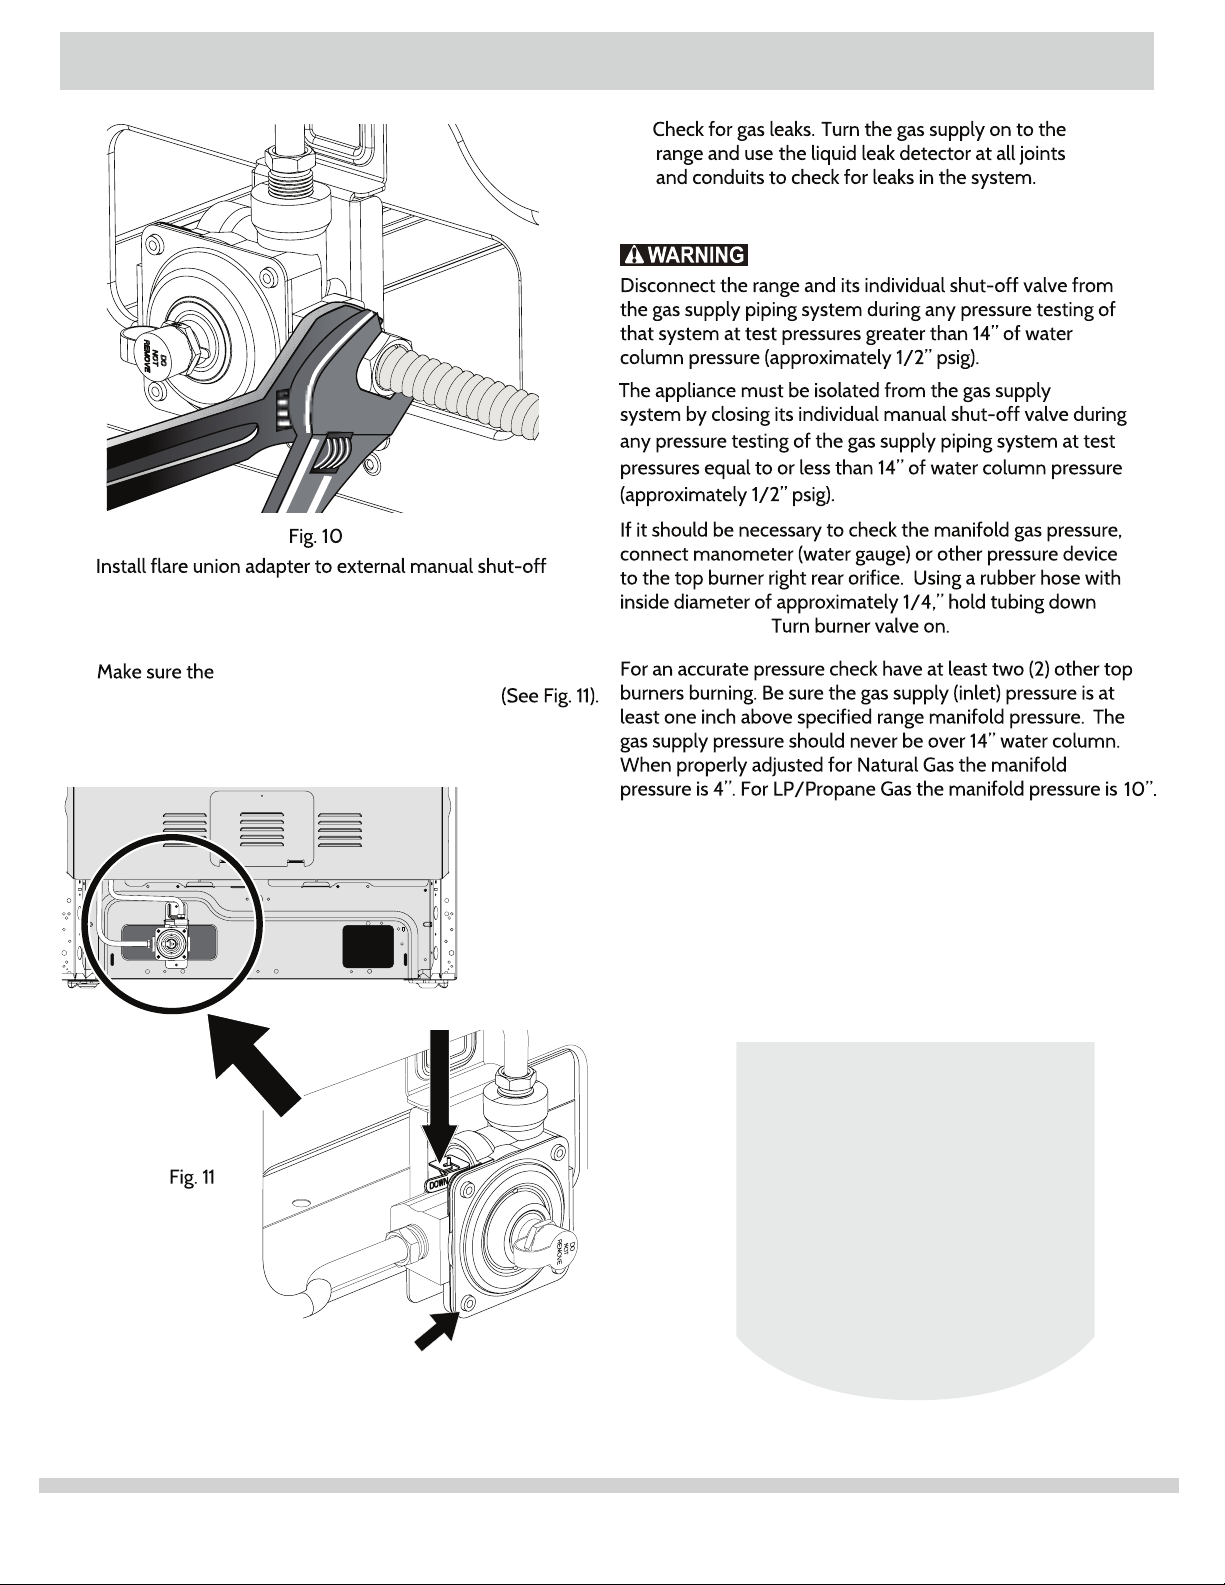
Checking manifold gas pressure
Do not use flame to check for gas leaks.
c.
valve (See Fig. 8).
Attach flexible appliance conduit to flare
d.
on shut-off valve (See Fig. 8).
e.
service shut-off valve on pressure
regulator (if provided) is set to the ON position
union adaptor
tight over orifice.
piping
Service shut-off valve
(shown in ON position)
Pressure
regulator
Limited Warranty
Smart Choice® Parts and Accessories are
warranted to be free from defects in material
and workmanship for a period of 90 days from
date of purchase. If this product is found to be
defective, retur n to place of purchase for
replacement. Smart Choice® Parts & Accessories
shall not be liable for damages or delays caused
by defects in material or workmanship,
improper installation, consequential loss,
service call costs, installation or reinstallation
costs, or by failure due to normal wear.
Made In The USA With Globally
Sourced Components
6
 Loading...