

Page 1
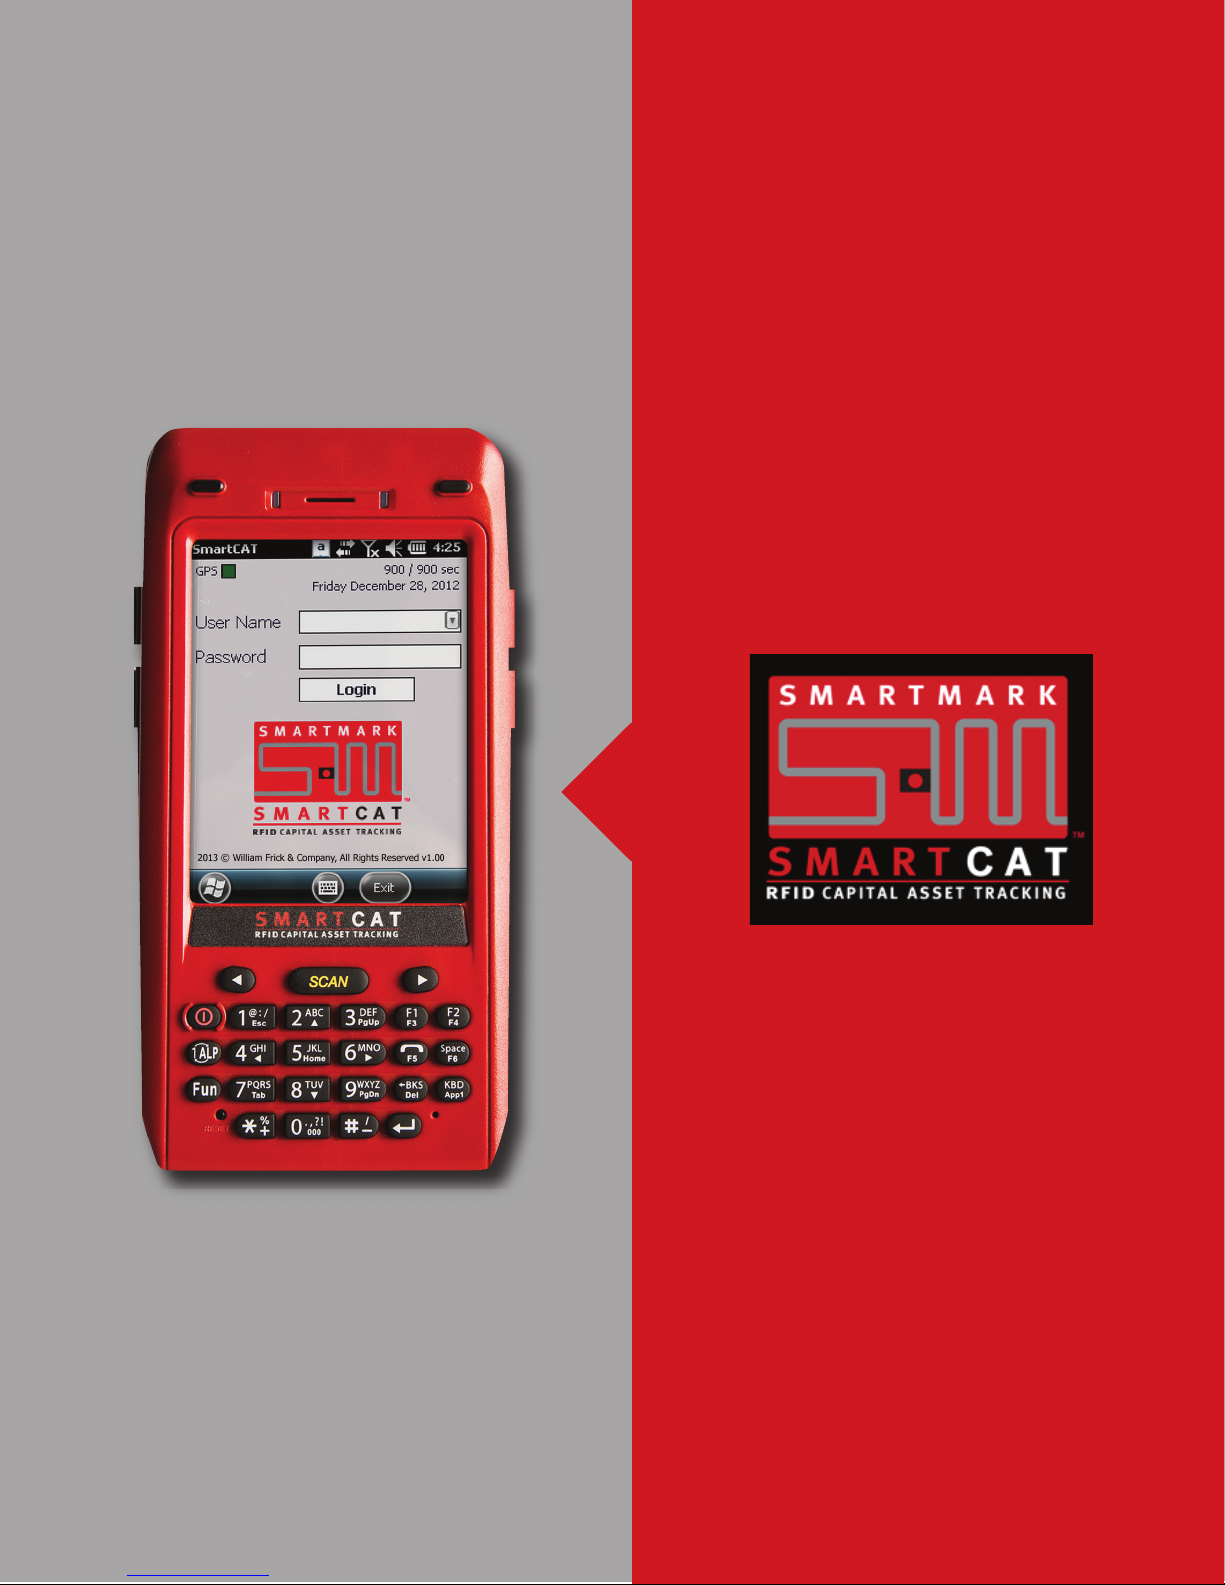
Users
Manual
V 1.0
Distributed Exclusively by
COVER
William Frick & Company
Page 2

TABLE OF CONTENTS
System Requirements & Reader Specs ............................................... 3
Reader Specs ...................................................................................... 4
SmartCAT™ Kit ...................................................................................... 5
Kit Accessories ................................................................................... 6
Reader Components ........................................................................... 7
Icons ................................................................................................... 8
SmartCAT Setup .......................................................................... 9-11
SmartCAT Configuration ................................................................... 12
SmartCAT Folder and File Overview ................................................ 13
Customizing the Configuration File .......................................... 14 - 20
SmartCAT User Guide ................................................................ 21 - 27
Troubleshooting ............................................................................... 28
FAQ’s ................................................................................................. 29
User Manual V1
© 2013 William Frick & Company All Rights Reserved
2
Page 3
SYSTEM REQUIREMENTS & READER SPECS
SmartCAT™ can only be used with a computer
utilizing Microsoft Windows.
Windows Mobile Device Center will automatically
launch for users using Windows Vista and 7.
If you don’t have Windows Mobile Device Center
please download from the following link:
http://www.microsoft.com/en-us/download/details.aspx?id=14.
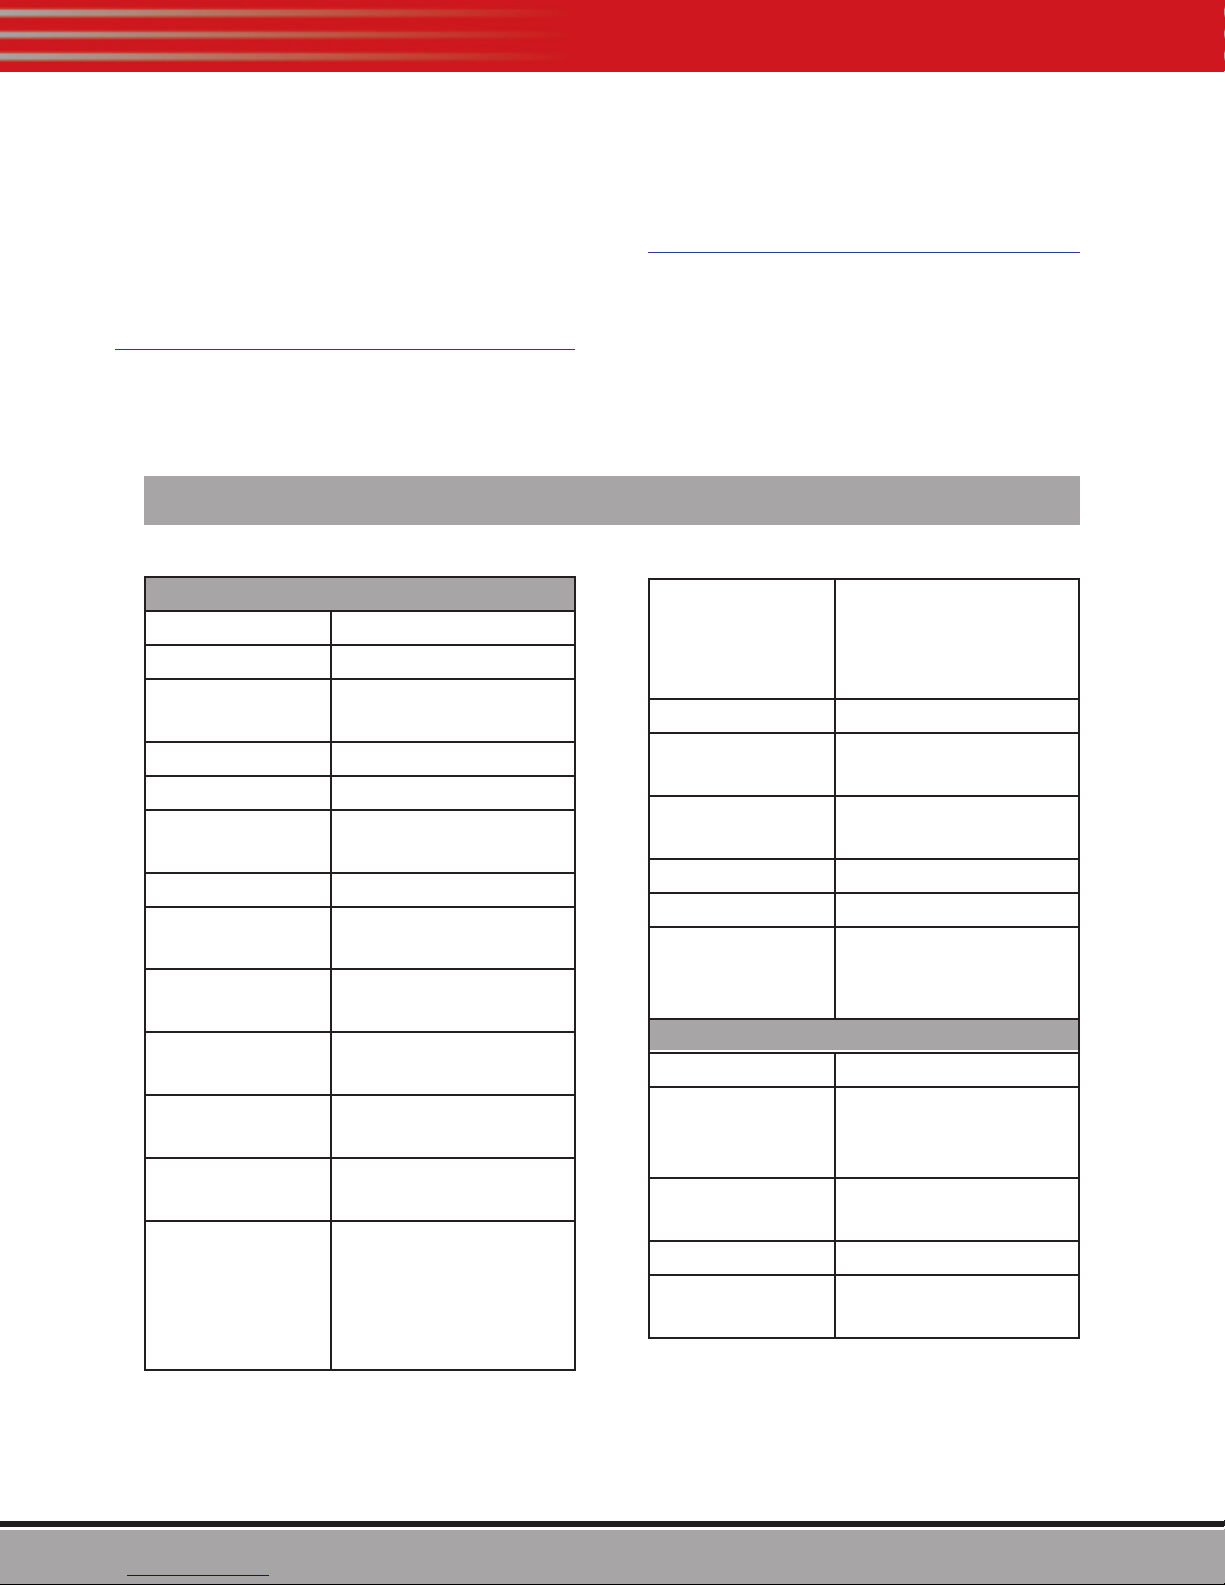
READER SPECS
Baseline Specifications
RFID Reader RFID UHF reader
Scanner 1-D bar code
Networking Wire-
less
Communications USB host & client
Operating System Windows Mobile 6.5
Display 3.5” color QVGA touch
CPU Marvel PXA320, 820MHz
Memory 256MB RAM / 256MB
Battery 3,000 mAh lithium poly-
Expansion Slot 1 Micro SD slot, 1 SIM
Weight without
gun battery
Weight with gun
battery
Dimensions without gun handle
WLAN 802.11b/g
screen
ROM
mer
slot
1.22 lbs / 0.55Kg
1.42 lbs / 0.65KG
6.25” (L) x 3.1” (W) x
4.6” (H)
15.9cm (L) x 7.9cm (W) x
11.7cm (H)
You must have Windows ActiveSync 3.7 or higher,
if you are using Windows XP or earlier. Download
ActiveSync 4.5 at:
http://www.microsoft.com/en-us/download/details.aspx?id=15
Dimensions with
gun handle
Scanner 2-D bar code scanner
Camera 3 mega-pixel fixed focus
Body Network Wireless Bluetooth v2.0,
Cellular Network Wireless HSDPA
Location Services GPS
Battery Additional capacity
Physical Characteristics
Ingress Protection IP65
Drop 1.5 Meters (5 feet) - 6
ESD Contact ± 4KV / ± Air
Humidity 0-95% at 104°F / 40°C
Operating Temp 14°F to 122°F / -10°C to
6.25” x 3.1” (W) x 5.3”
(H)
15.9cm (L) x 7.9cm (W) x
13.5cm (H)
with flash
Class II (SPP)
4,400mAh high capacity
battery
axis (1 foot greater than
MIL-STD-810 G)
8KV
50°C
3
smartcatrfid.com
Page 4
READER SPECS CONT.
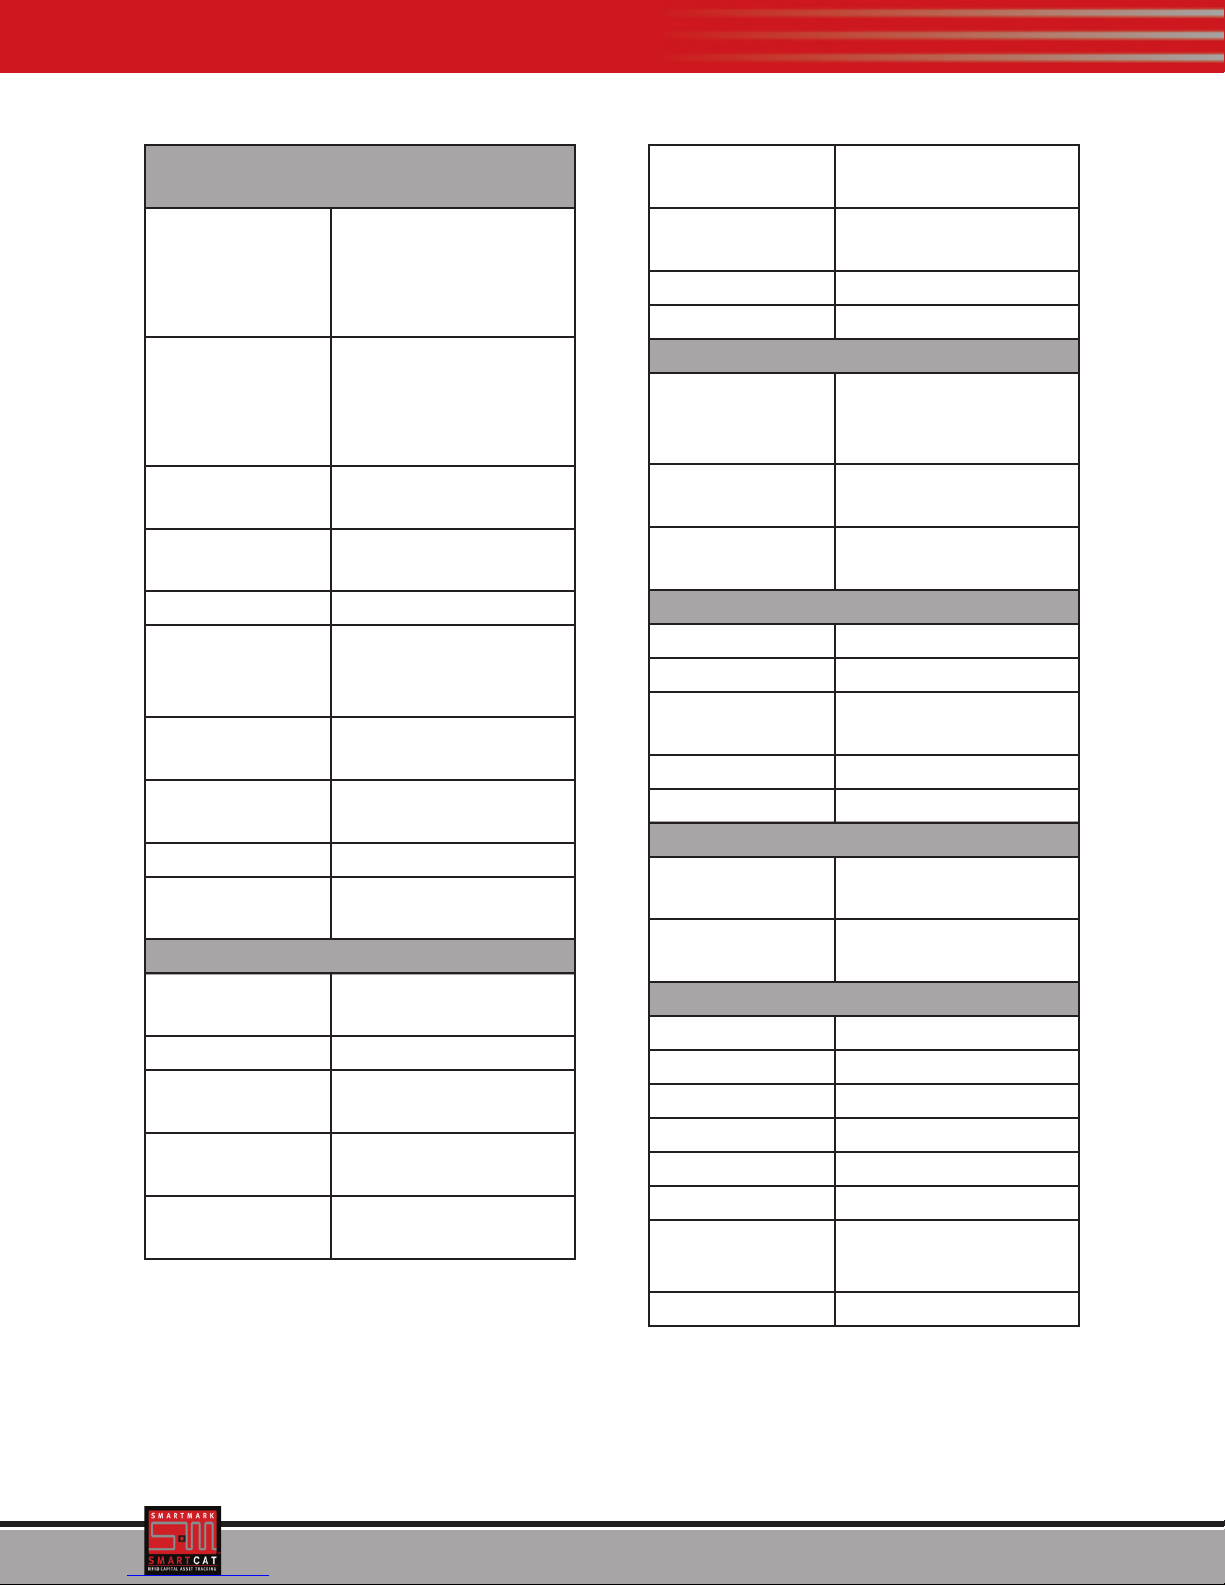
Physical and Environmental
Characteristics
Dimensions without gun handle
Dimensions with
gun handle
Weight without
gun battery
Weight with gun
battery
Ingress Protection IP65
Drop 5 feet (1.5 Meters) - 6
Operating Temperature
Storage Temperature
Humidity 0-95% at 104°F / 40°C
ESD Contact ± 4KV / ± Air
Performance Characteristics
Processor Marvell™ PXA320
Operating System Windows Mobile 6.5
Memory 256MB RAM / 256MB
Display 3.5” color QVGA touch
Audio Phone Receiver; Earphone
6.25” (L) x 3.1” (W) x
4.6” (H)
15.9cm (L) x 7.9cm (W) x
11.7cm (H)
6.25” x 3.1” (W) x 5.3”
(H)
15.9cm (L) x 7.9cm (W) x
13.5cm (H)
1.22 lbs / 0.55Kg
1.42 lbs / 0.65Kg
axis (1 foot greater than
MIL-STD-810 G)
14°F to 122°F / -10°C to
50°C
-20°F to 140°F / -30°C
to 60°C
8KV
820MHz
ROM
screen
Jack
Communication
Port
Expansion Slot 1 Micro SD slot, 1 SIM
Keypad 29 Key
Notifications Vibrator, Speaker, LED’s
Power Supply
Main Battery Lithium ion 3.7V
Backup Battery Lithium polymer 3.7V,
Adapter Input 100VAC ~ 240VAC;
Network Characteristics
Wireless LAN WLAN (802.11 b/g)
Bluetooth Class2, v2.0 (SPP Only)
GPS A-GPS with Internal
Antenna Internal LAN and WLAN
Cellular Network Wireless HSDPA
Data Capture Devices
Barcode Engine 1D Laser Scanner or
Camera 3.0 mega-pixel autofocus
UHF 900MHz RFID Reader
Frequency 850MHz - 930 MHz
Reading Range 0ft – 23ft/0m – 7m
Writing Range 0ft – 10ft/0m – 3m
Antenna Gain 2 dBi
Speed 62.5 kbps
RF Output 1W EIRP
Protocol EPC Gen2 ISO 18000 6C
Multi-Reading Anti collision
RS-232 serial port; USB
1.1
slot
3,000mAh; 4,400mAh in
pistol grip
100mAh
Output 5VDC 3A
Antenna
2D Imager
with flash
ISO 18000 6B
User Manual V1
4
Page 5
SmartCAT™ KIT
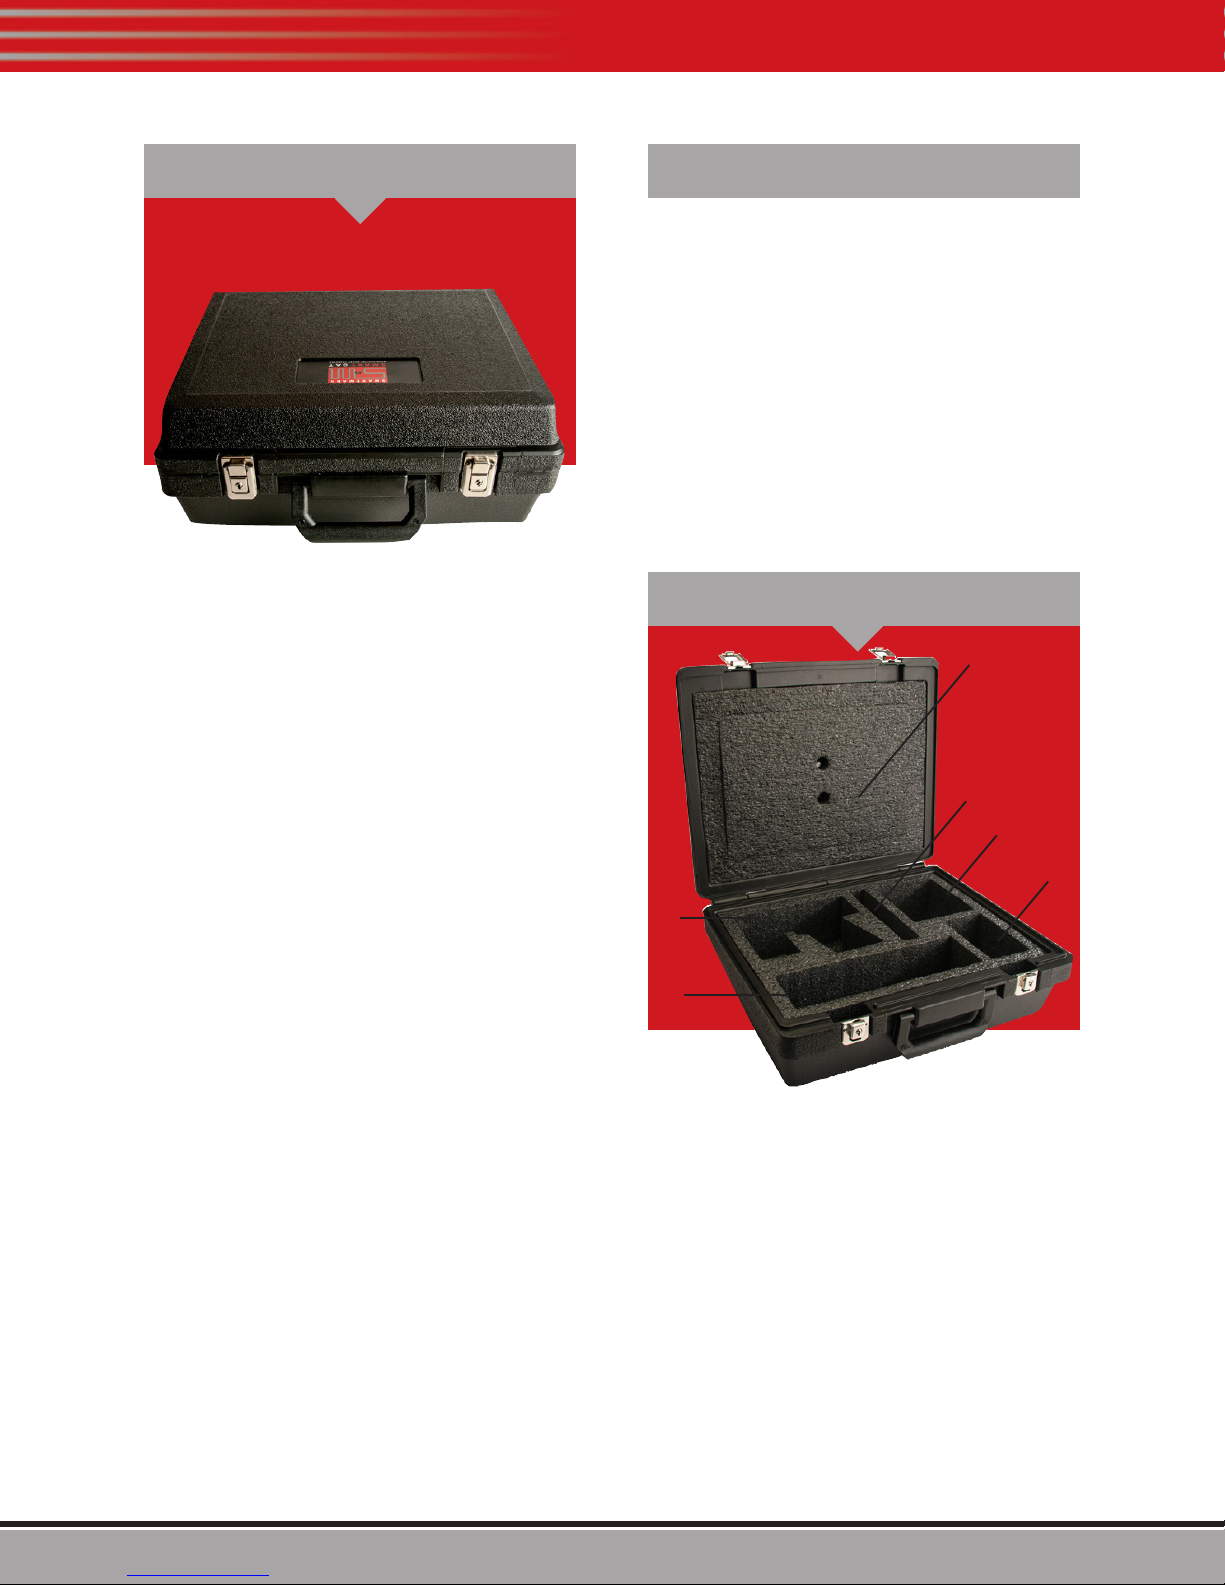
Case
Included in Kit:
1. Reader pistol grip, hand strap and stylus
come assembled
2. Reader Leather Sleeve
3. Cradle (docking station) for USB connection
and charging reader battery
4. Extra Battery and USB Sync Cable
5. 12 Volt Car Charger, AC Charger,
Adapter and AC Cable
6. Storage Compartment Area- Quick
Start Guide
Located:
6
2
3
4
1
5
5
smartcatrfid.com
Page 6
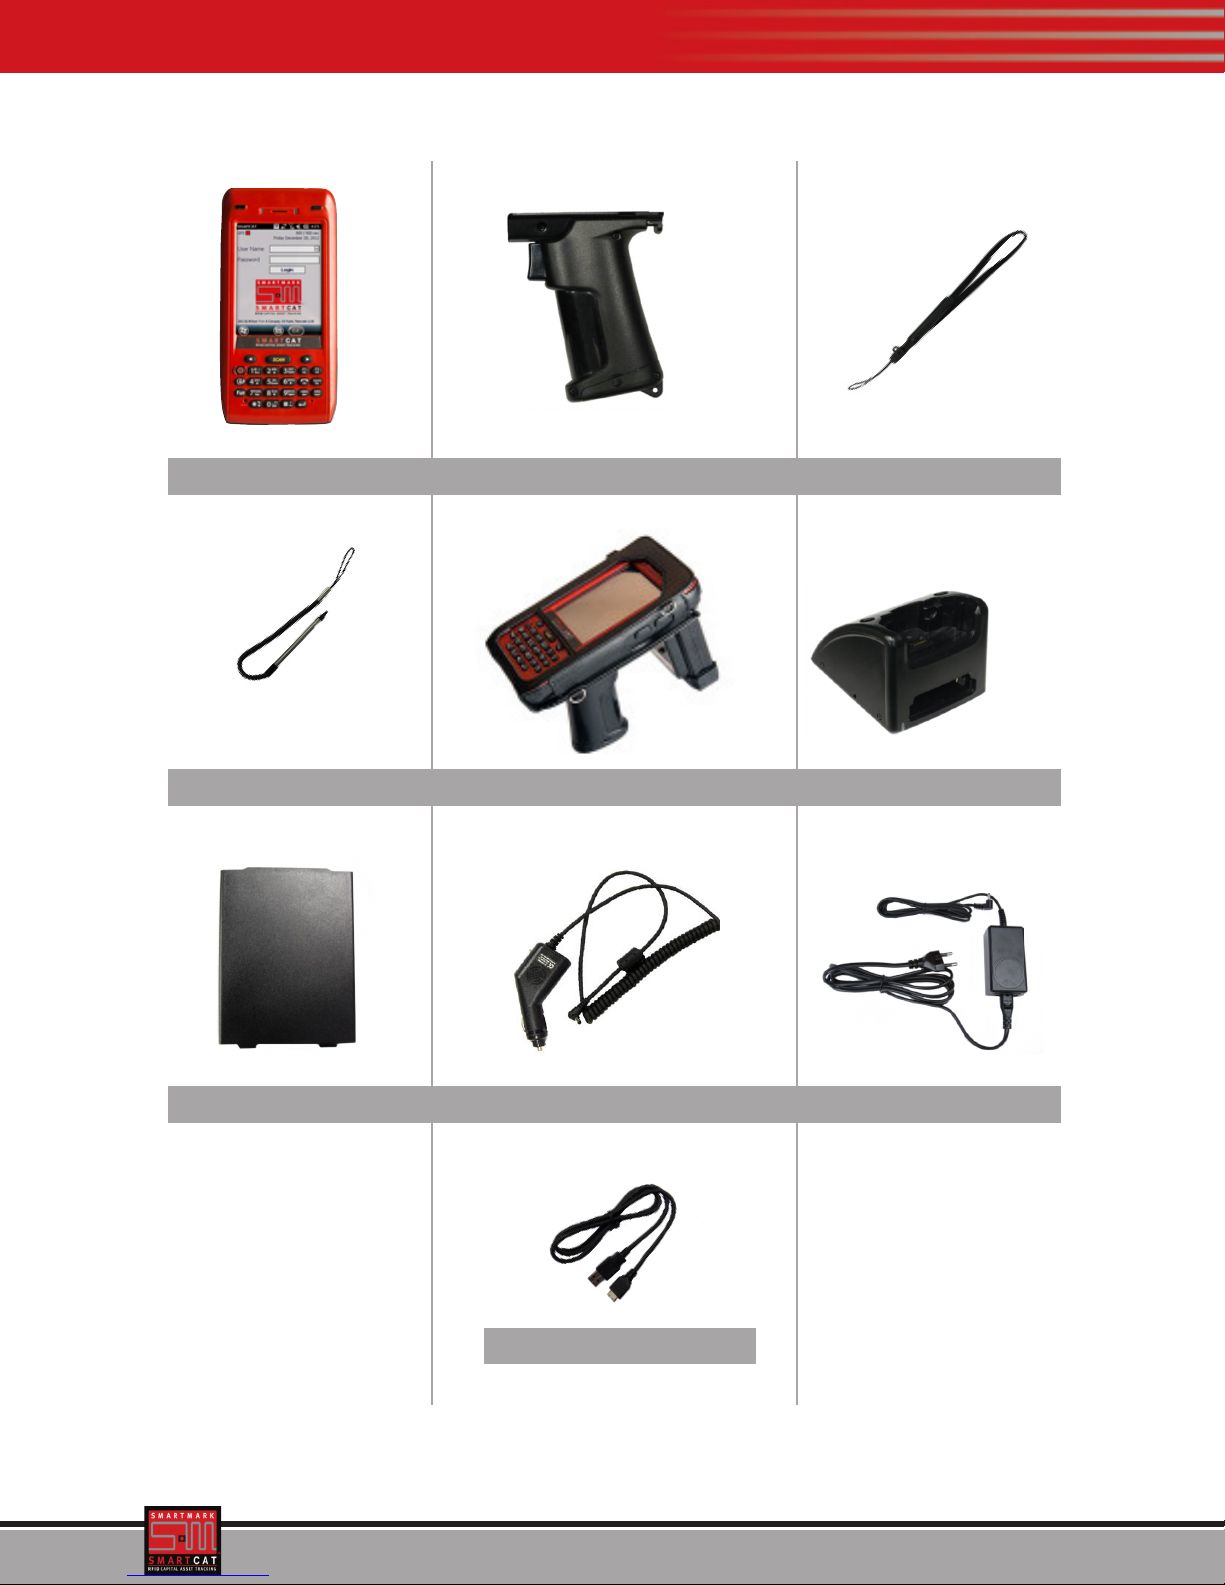
KIT ACCESSORIES
Reader
Stylus Reader Cover Case
Pistol Grip
Hand Strap
Cradle
Battery (2)
User Manual V1
12 Volt Car Charger
USB Sync Cable
6
Adaptor and AC Cable
Page 7
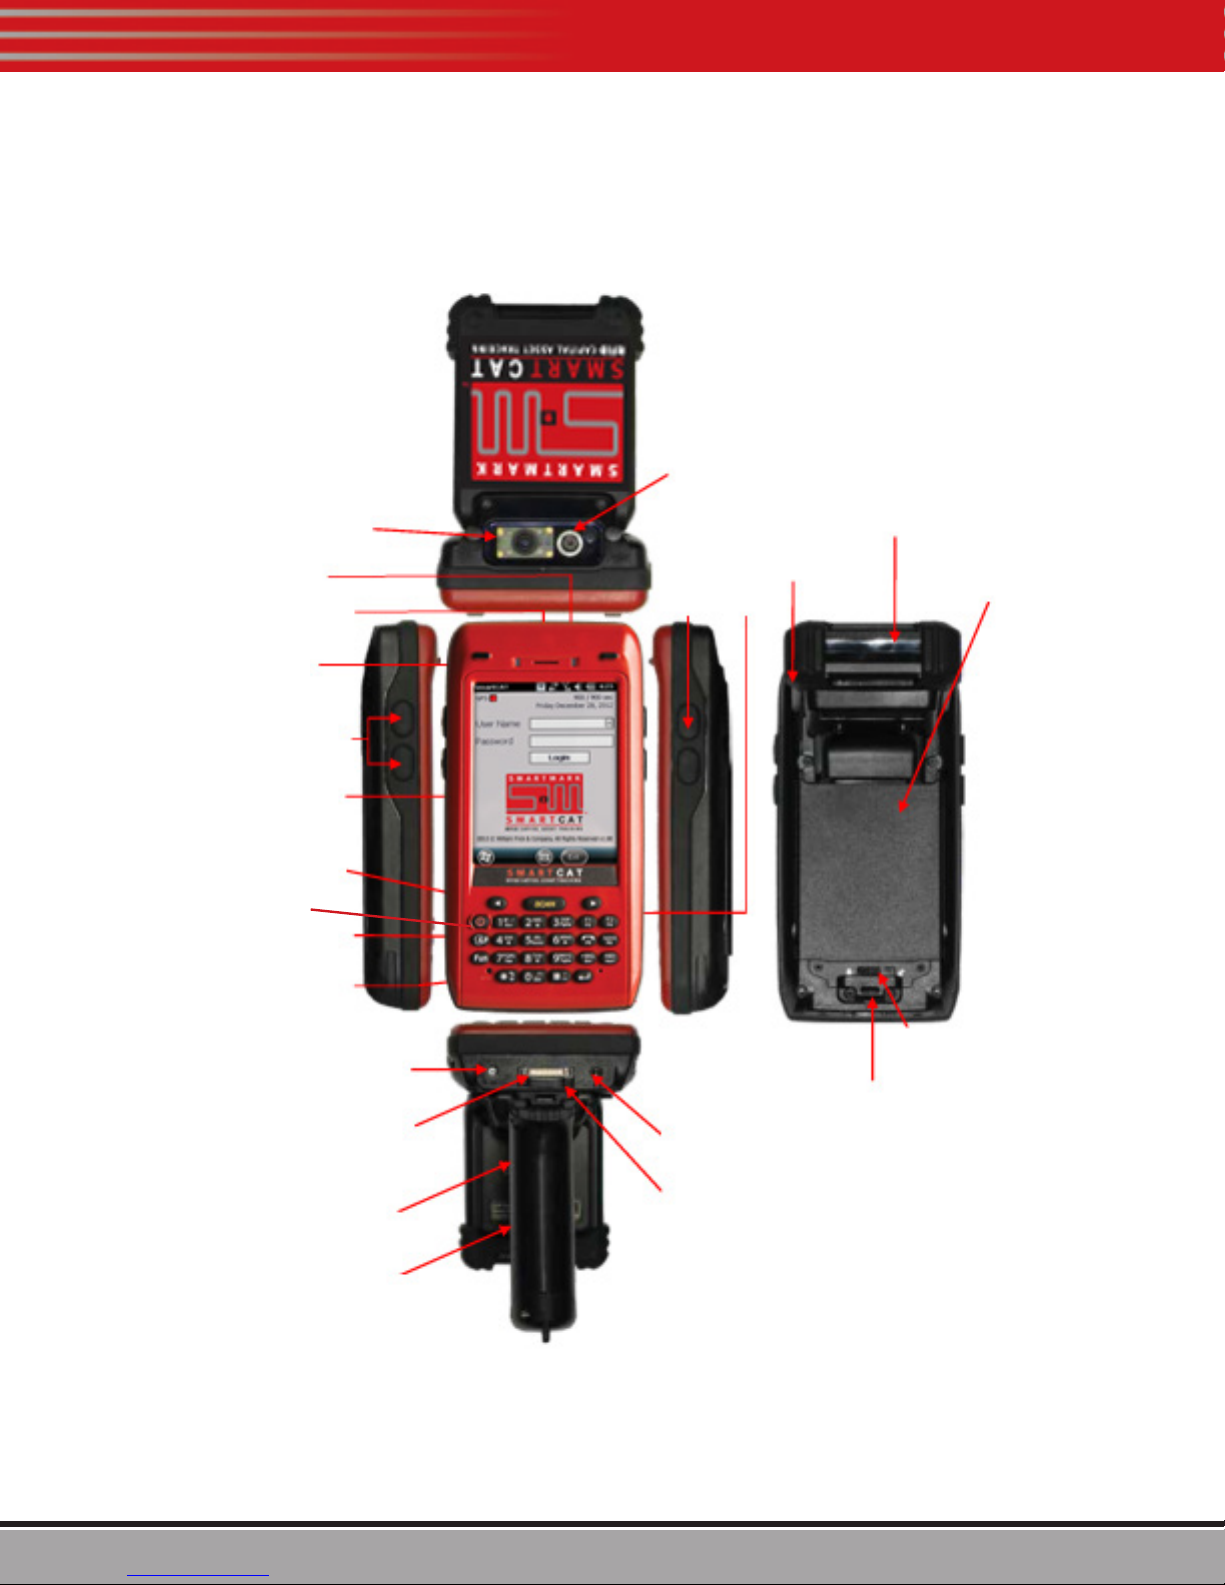
READER COMPONENTS
Camera
Barcode Scanner
WLAN LED
Phone Speaker
Charge Status
LED
Volume
Touch Screen
Left/Right Arrows
Power Button
Keypad
Reset Button
DC Power Jack
Cradle Connector
Function
Buttons
Earphone Jack
Speaker
RFID Reader
Battery
Battery Latch
Hand strap Hole
Trigger Button
Pistol Grip
USB Sync Connector
7
smartcatrfid.com
Page 8
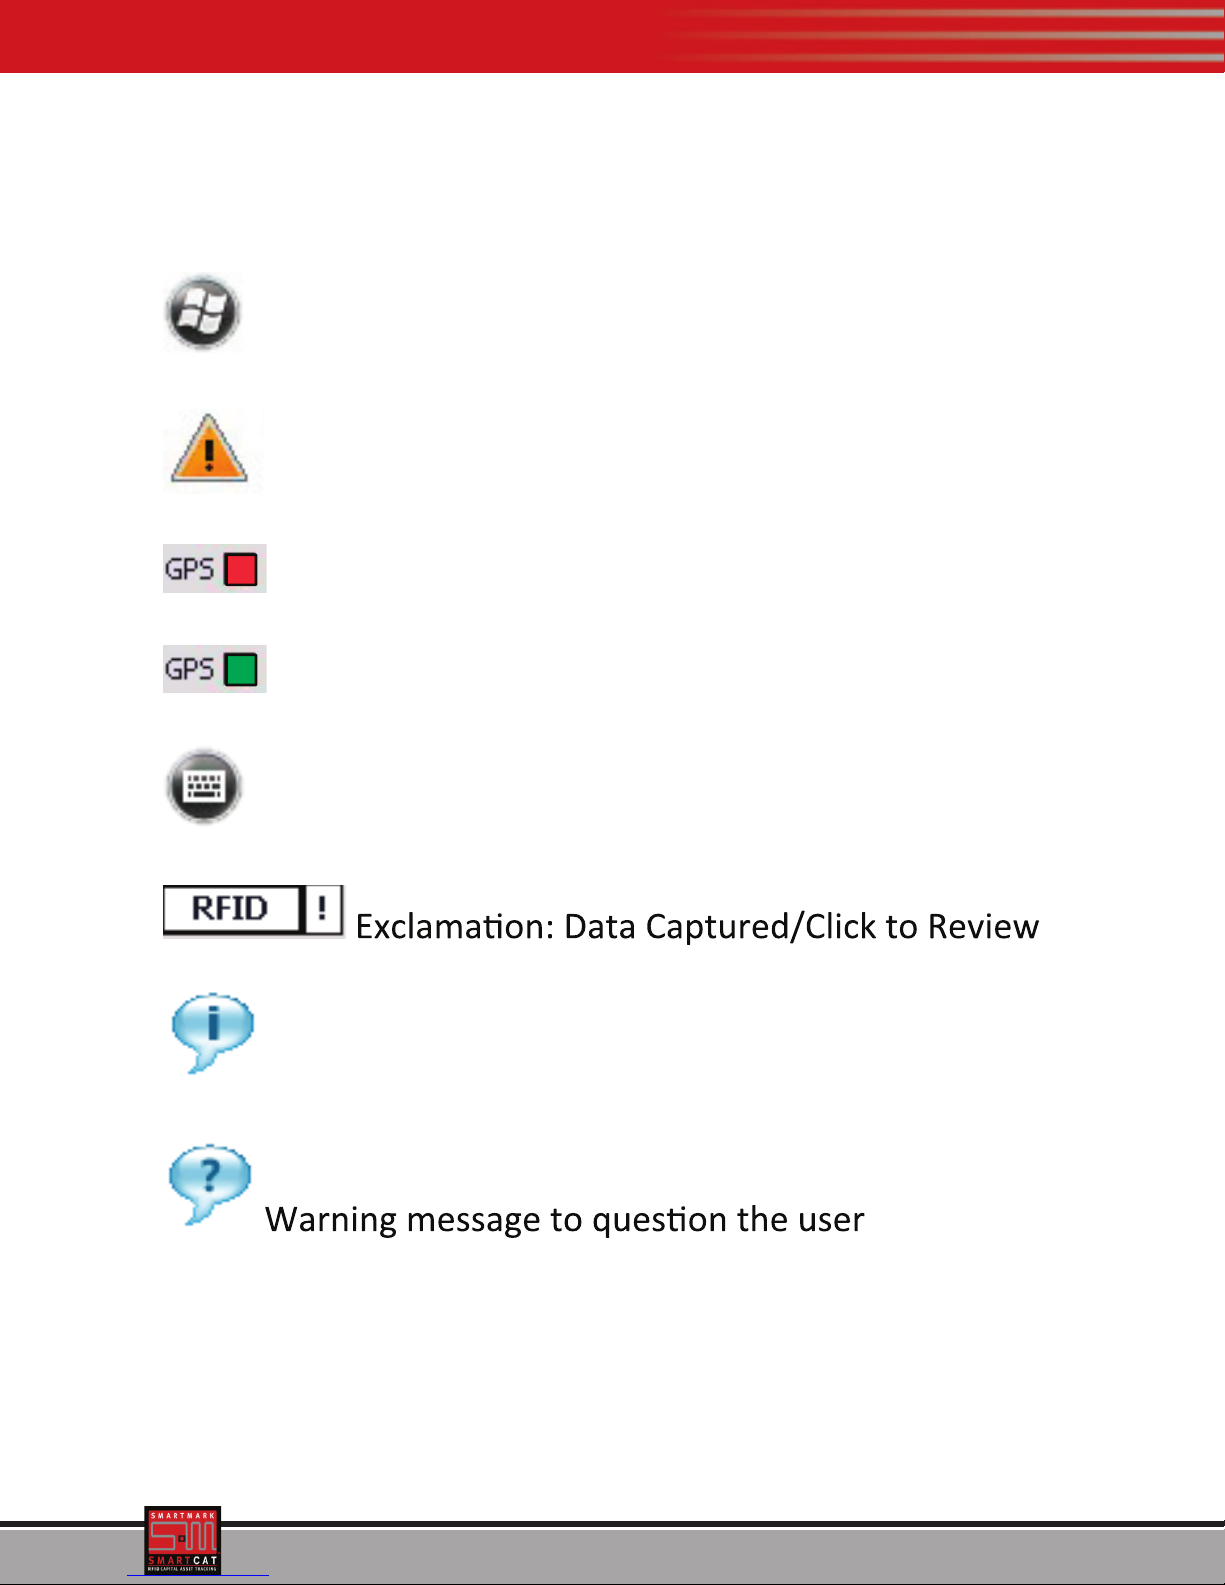
ICONS
APP ICONS
Windows Start Menu
Warning/Missing data/App not running
GPS signal NOT Acquired
GPS signal Acquired
Touch Screen Keyboard
Warning message to inform the user
* Required Field
User Manual V1
8
Page 9
Introduction
SmartCAT™ is an all-in-one RFID-based capital
asset tracking system. The fully programmable
SmartCAT application (app) organizes asset data
collected on the SmartCAT Windows Mobilebased ruggedized handheld READER.
NOTE: For basic READER use questions, please
refer to the READER User Guide. You can find it
at http://www.SmartCATrfid.com/support/download
SmartCAT™ SETUP
the power button and checking the remaining battery on screen. Connect AC charger to
the charger if the upper left hand light is red,
the READER is charging, if it is green, the
READER is charged. If not fully charged, keep
the AC wire connected to the cradle and
plugged in to continue charging.
2. With the READER in the cradle, plug the USB
cable from the cradle to your computer (this
can be done while the READER is charging).
For Windows Vista and Newer - Windows
Mobile Device Center Users
Initial Setup
Before utilizing SmartCAT, the admin must first
customize the application by performing the
following instructions. The application is
configured by using spreadsheets on a PC and
transferring the spreadsheet from the computer
to the READER.
NOTE: It is recommended to use Microsoft Excel
to perform the following tasks. Excel will be
used as a spreadsheet example throughout this
manual.
1. Connect the READER to the cradle and confirm that the READER is charged by pressing
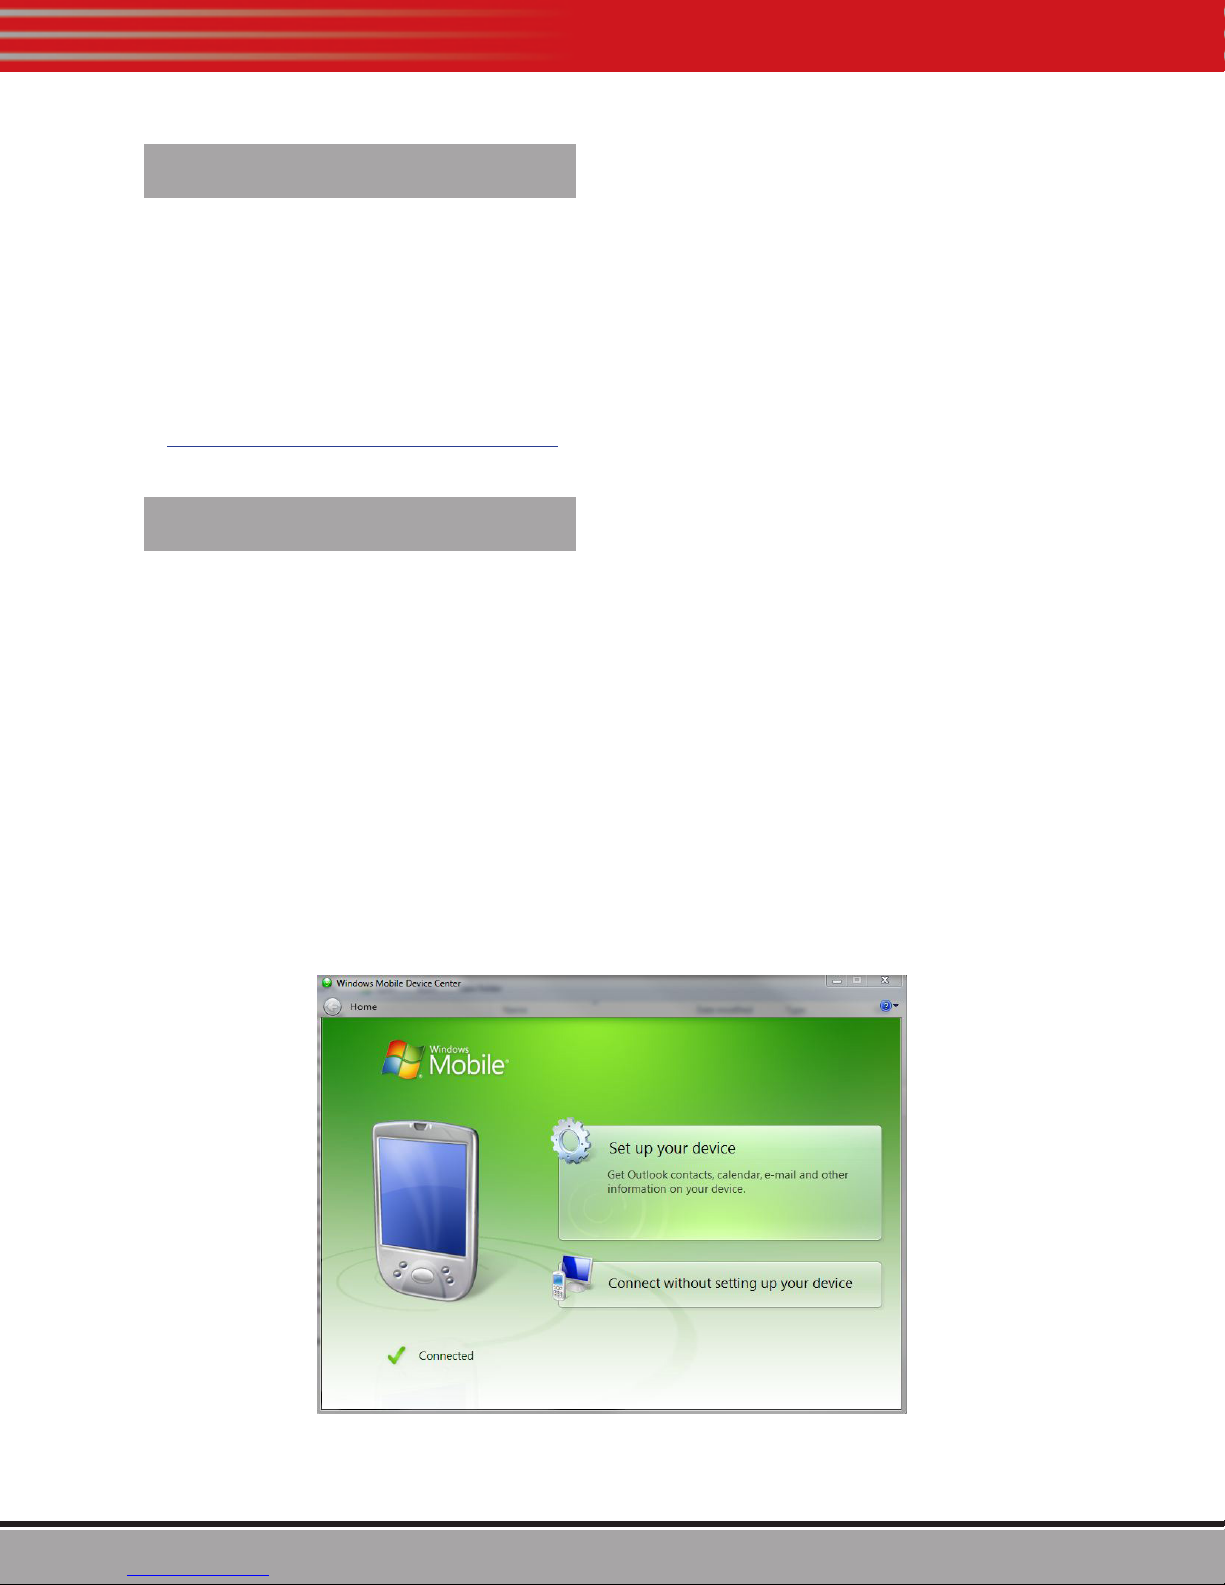
3. Once the USB cable is connected, ‘Windows
Mobile Device Center’ will begin loading
and the following screen will display on your
computer. Click “Connect without setting up
your device”
NOTE: Do not disconnect the USB while loading. Load time will depend on the speed of your
computer.
4. Select “File Management” and “Browse the
contents of your device”
5. Open the reader drive (AlienHH> ‘\’)
Go to Step 6
9
smartcatrfid.com
Page 10
For Windows XP and Older - ActiveSync 4.5
Users
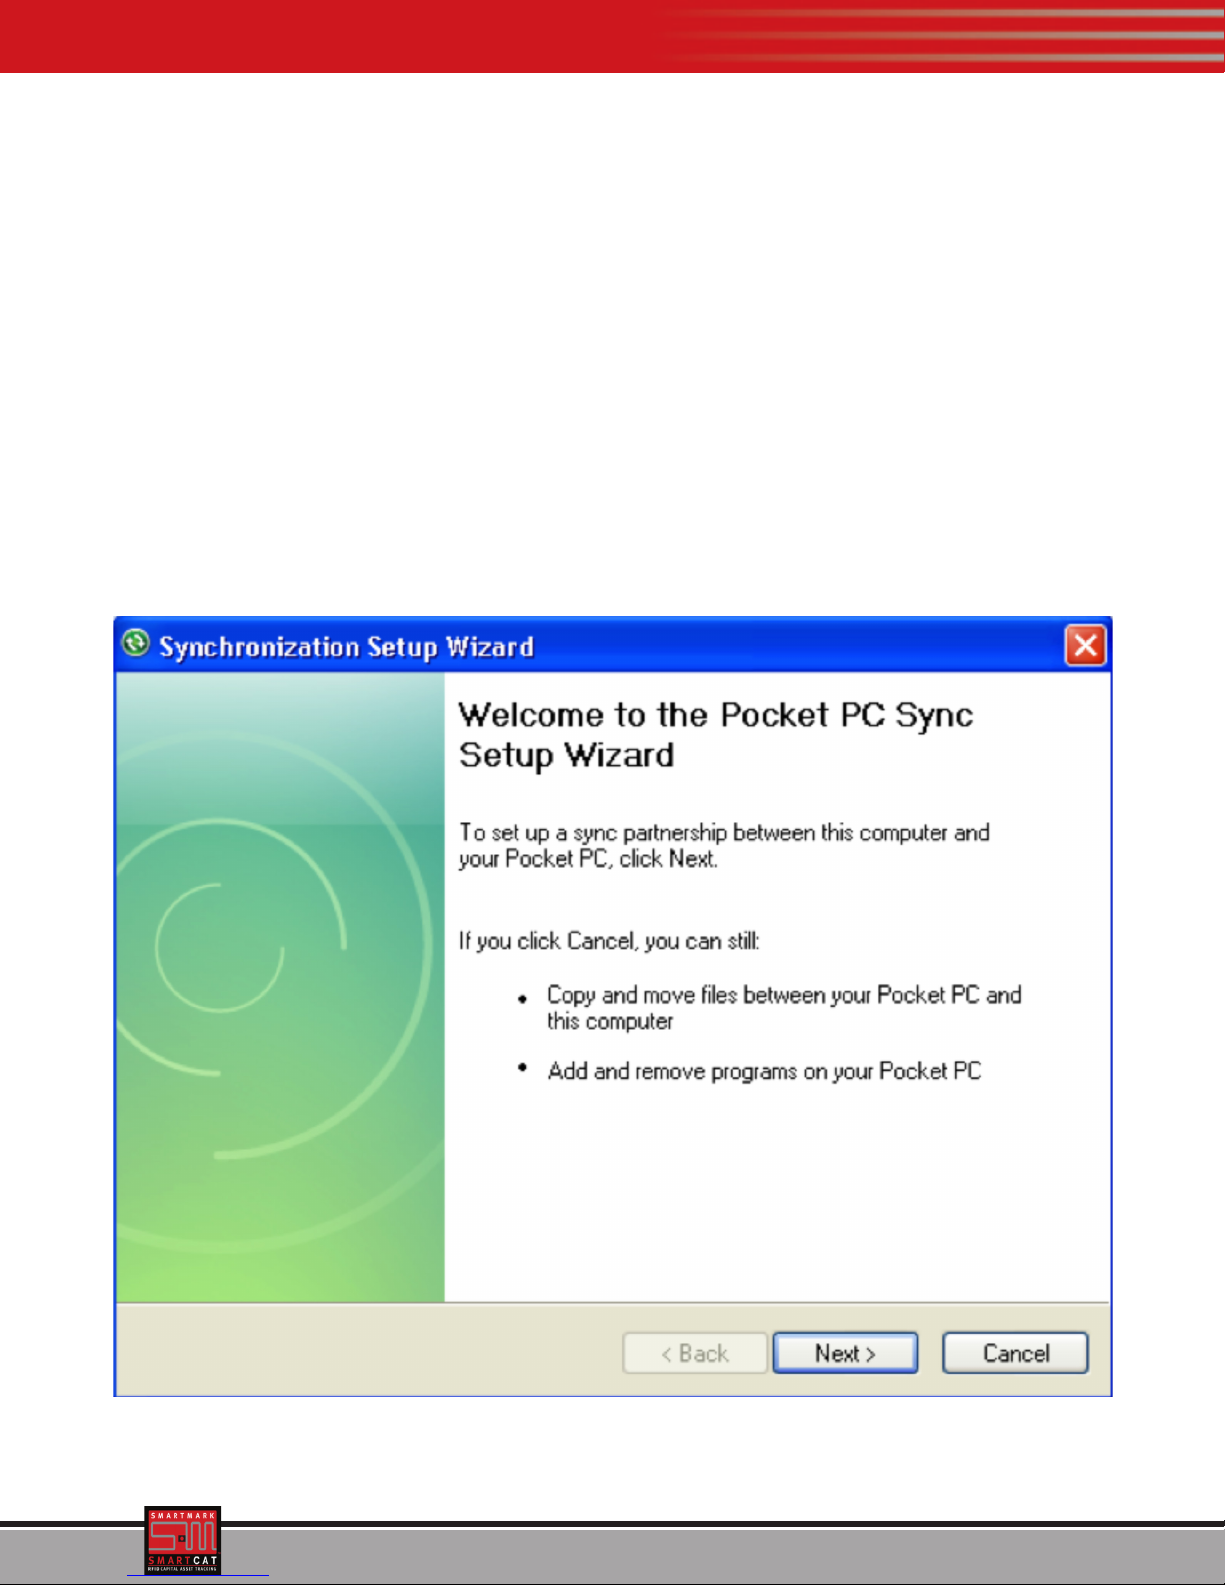
3. Once the USB cable is connected, the following screen (Sychronization Setup Wizard) will
display on your computer. Click “Cancel”.
NOTE: Do not disconnect the USB while loading.
Load time will depend on the speed of your
computer.
4. Select “Explore” on the following screen
(Microsoft Activesync)
5. Open the reader drive (My Windows
Mobile-Based Devices>‘\’)
Go to step 6
User Manual V1
10
Page 11
SmartCAT™ SETUP CONT.
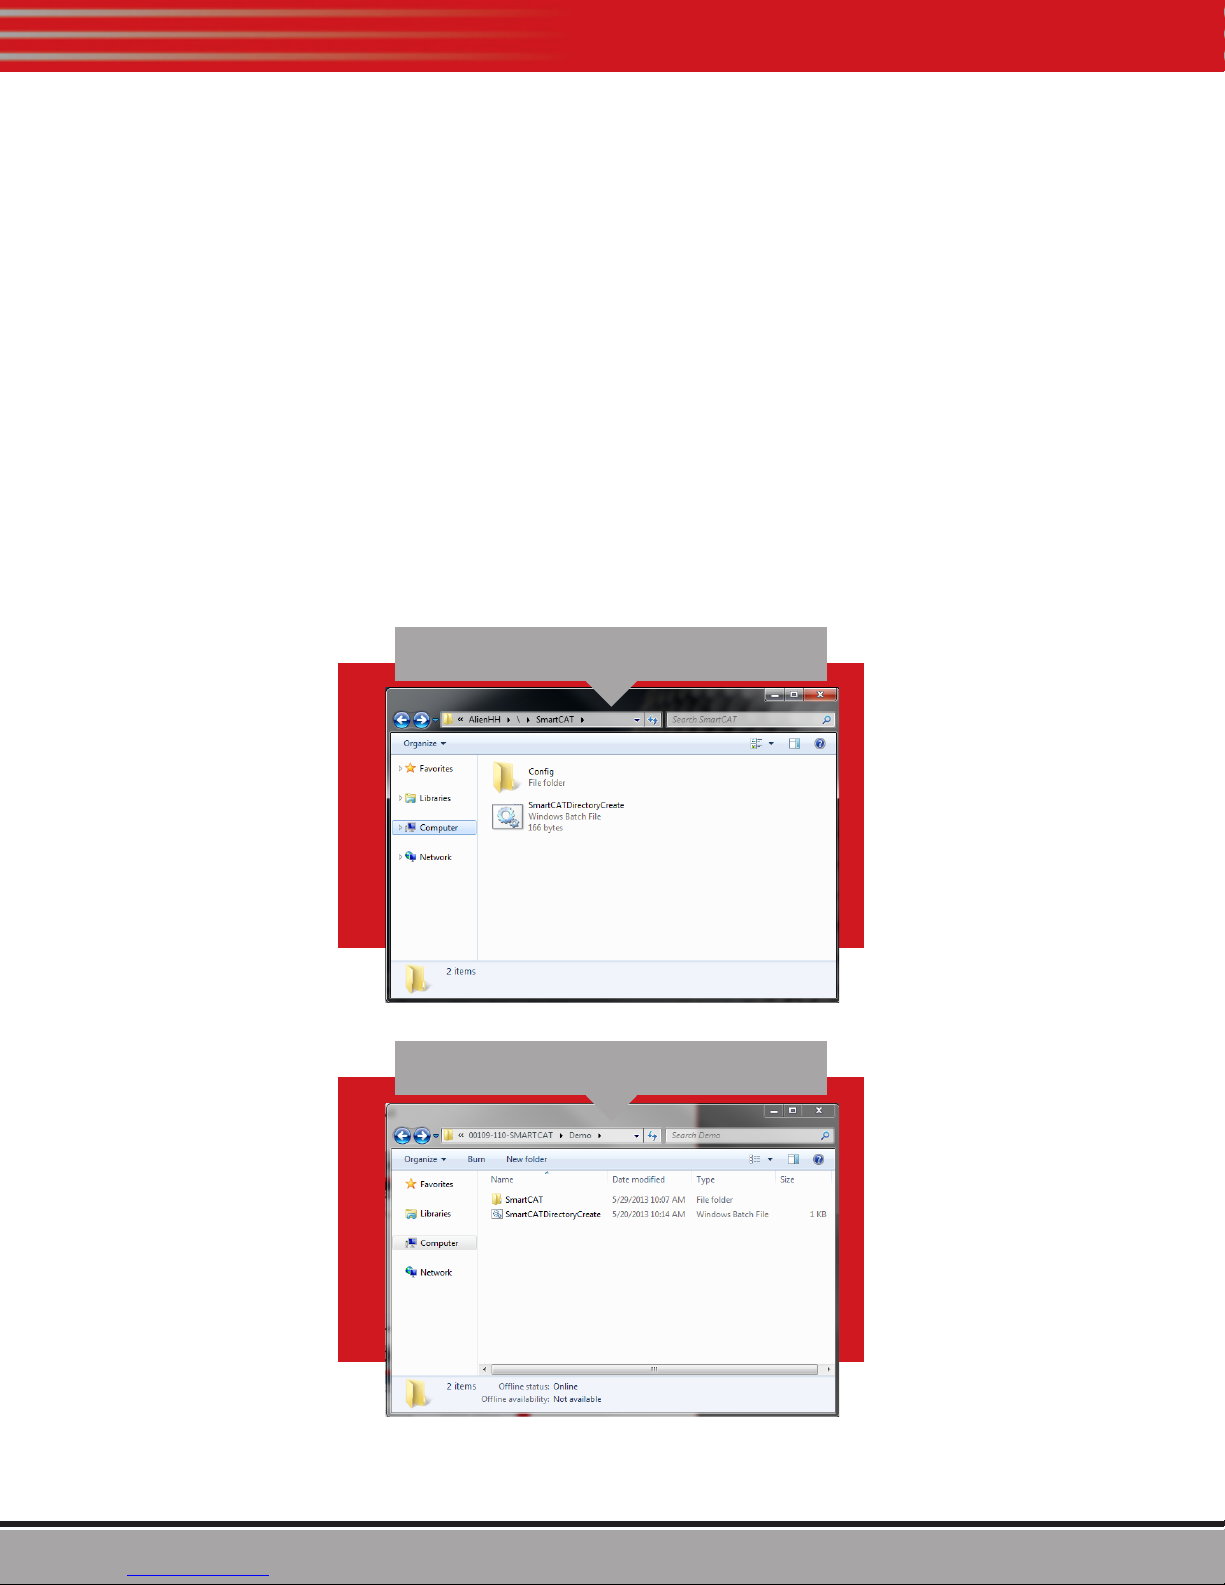
6. Open the SmartCAT™ folder.
7. Select a drive on your computer where you
would like to store your SmartCAT files.
8. Copy and paste (or drag and drop) the
SmartCATDirectoryCreate batch file from
the device drive into the desired drive on
your computer.
9. Double click and run the newly created
SmartCATDirectoryCreate batch file on
your computer.
10. Within a few seconds, a folder titled SmartCAT will appear in the selected drive.
Reader Drive
11. Open the Master Config folder, in the
SmartCAT folder.
12. Cut and paste the Config folder from the
device drive to this folder on your computer.
SmartCAT>Master Config Folder
NOTE: It is extremely important to follow all
steps and that you create a separate folder on
your computer to store these files. Files can only
be edited on a computer, not the READER itself.
Computer
Drive
11
smartcatrfid.com
Page 12
SmartCAT™ CONFIGURATION
Overview - Before Configuration
SmartCAT™ is configured by using spreadsheets
located in the SmartCAT™ folder on your PC (if
you do not have a SmartCAT folder on your PC,
then refer to the Initial Setup section). MS Excel
will be used as a spreadsheet example throughout this manual.
Reader
NOTE: The spreadsheets that you will be
customizing will have example data filled in (first
time use). Delete this data, unless otherwise
stated, before customizing your information.
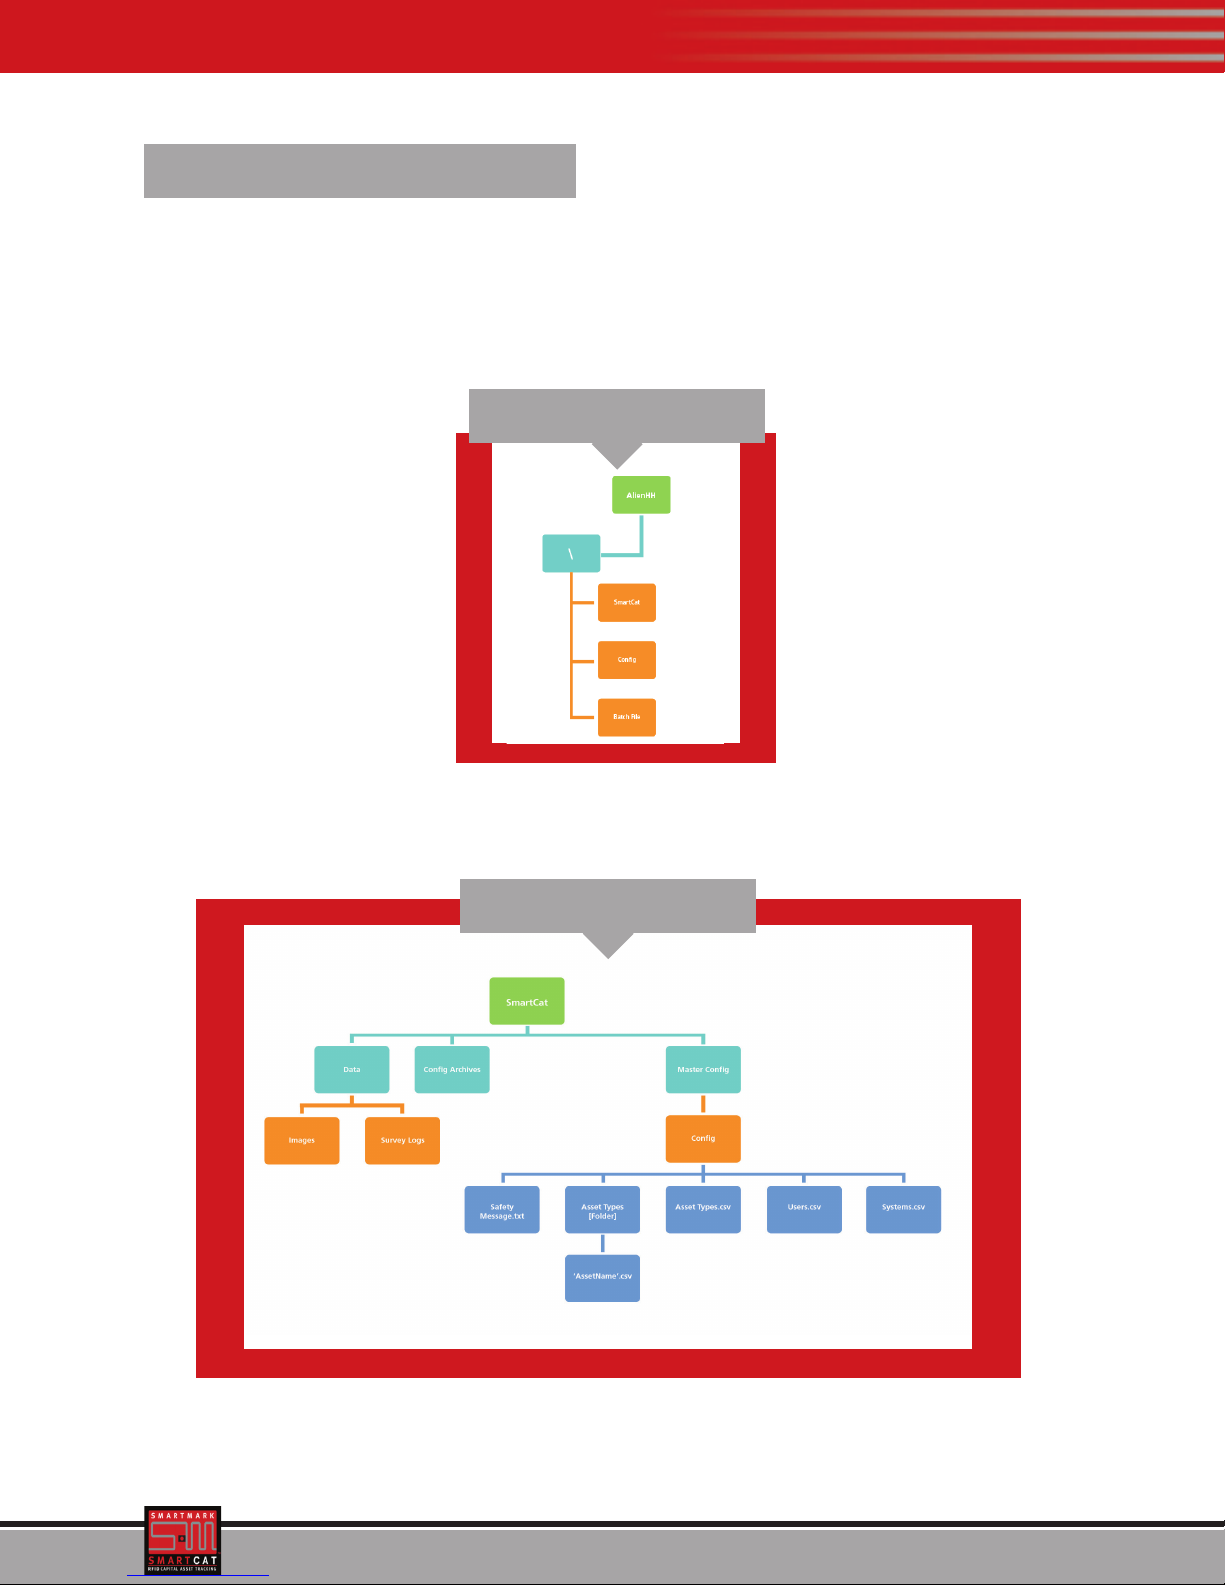
Before beginning your SmartCAT customization,
familiarize yourself with the folders and files
within the SmartCAT folder. Refer to the
following chart and file/folder descriptions.
This diagram explains how to navigate through the SmartCAT
directories onyour Reader.
PC
This diagram explains how to navigate through
User Manual V1
the SmartCAT directories on your PC.
12
Page 13

SmartCAT™ FOLDER AND FILE OVERVIEW
mended to save a time and dated copy of the
Customizing the Configuration
This section is a brief overview of the configuration files and folders that the administrator will
customize and upload to the READER.
SmartCAT™ (folder)
The SmartCAT folder on your computer contains
all of the following files and folders. This is where
the administrator will create, edit and customize
the configuration files and captured user data.
Data (folder)
The Data folder contains the Images folder and
Log Files.
current configuration files in the Config Ar-
chives folder.
After a change has been made to the current
configuration files within the Config folder, the
files must be saved and then transferred to the
READER (refer to SmartCAT User Manual page
20).
Users.csv (spreadsheet)
The Users.csv configuration file contains user in-
formation such as the user names and passwords
for each user granted access to the READER.
Each person that the administrator would like
to grant SmartCAT access to should have a user
name and password.
Images (folder)
The Images folder contains all pictures that
have been taken using the SmartCAT application.
The images are time and date stamped for your
convenience and organization.
Log Files (xml)
The Log Files contain collected survey data
such as scanned automated data entries (RFIDs,
barcodes, GPS).
Config Archives (folder)
The Config Archives folder contains a backup
of all of the previously created configuration files
that the administrator has kept over time.
Master Config (folder)
The Master Config folder contains the current
Config folder. See the following Config (folder)
section.
Config (folder)
The Config folder contains the most current and
up-to-date configuration files that are being read
from SmartCAT. The configuration files in the
Config folder are able to be edited by the admin.
Before the administrator changes the configuration files in the Config folder, it is highly recom-
System.csv (spreadsheet)
The System.csv file contains the license key and
other optional information that the administrator
can decide to customize, such as a system name,
time out option, GPS (on/off) and low memory
alert.
Safety Message.txt (spreadsheet)
This is a customized message that the adminis-
trator would like to appear every time the user
logs into the SmartCAT app on the READER. The
user must accept the message before moving on.
AssetTypes.csv (spreadsheet)
The AssetTypes spreadsheet lists the assets that
the users will be collecting data for.
AssetTypes (folder)
This folder is not to be confused with the .csv file
‘AssetTypes.’ This folder contains the survey files
(survey questions) that belong to the asset types
mentioned in the ‘AssetTypes.csv’ files.
AssetName.csv (spreadsheet)
Contains information about the assets that are
being tracked and/or inspected by the users. It
holds questions and/or directions the administrator has set for a particular asset to be inspected.
13
smartcatrfid.com
Page 14
CUSTOMIZING THE CONFIGURATION FILES
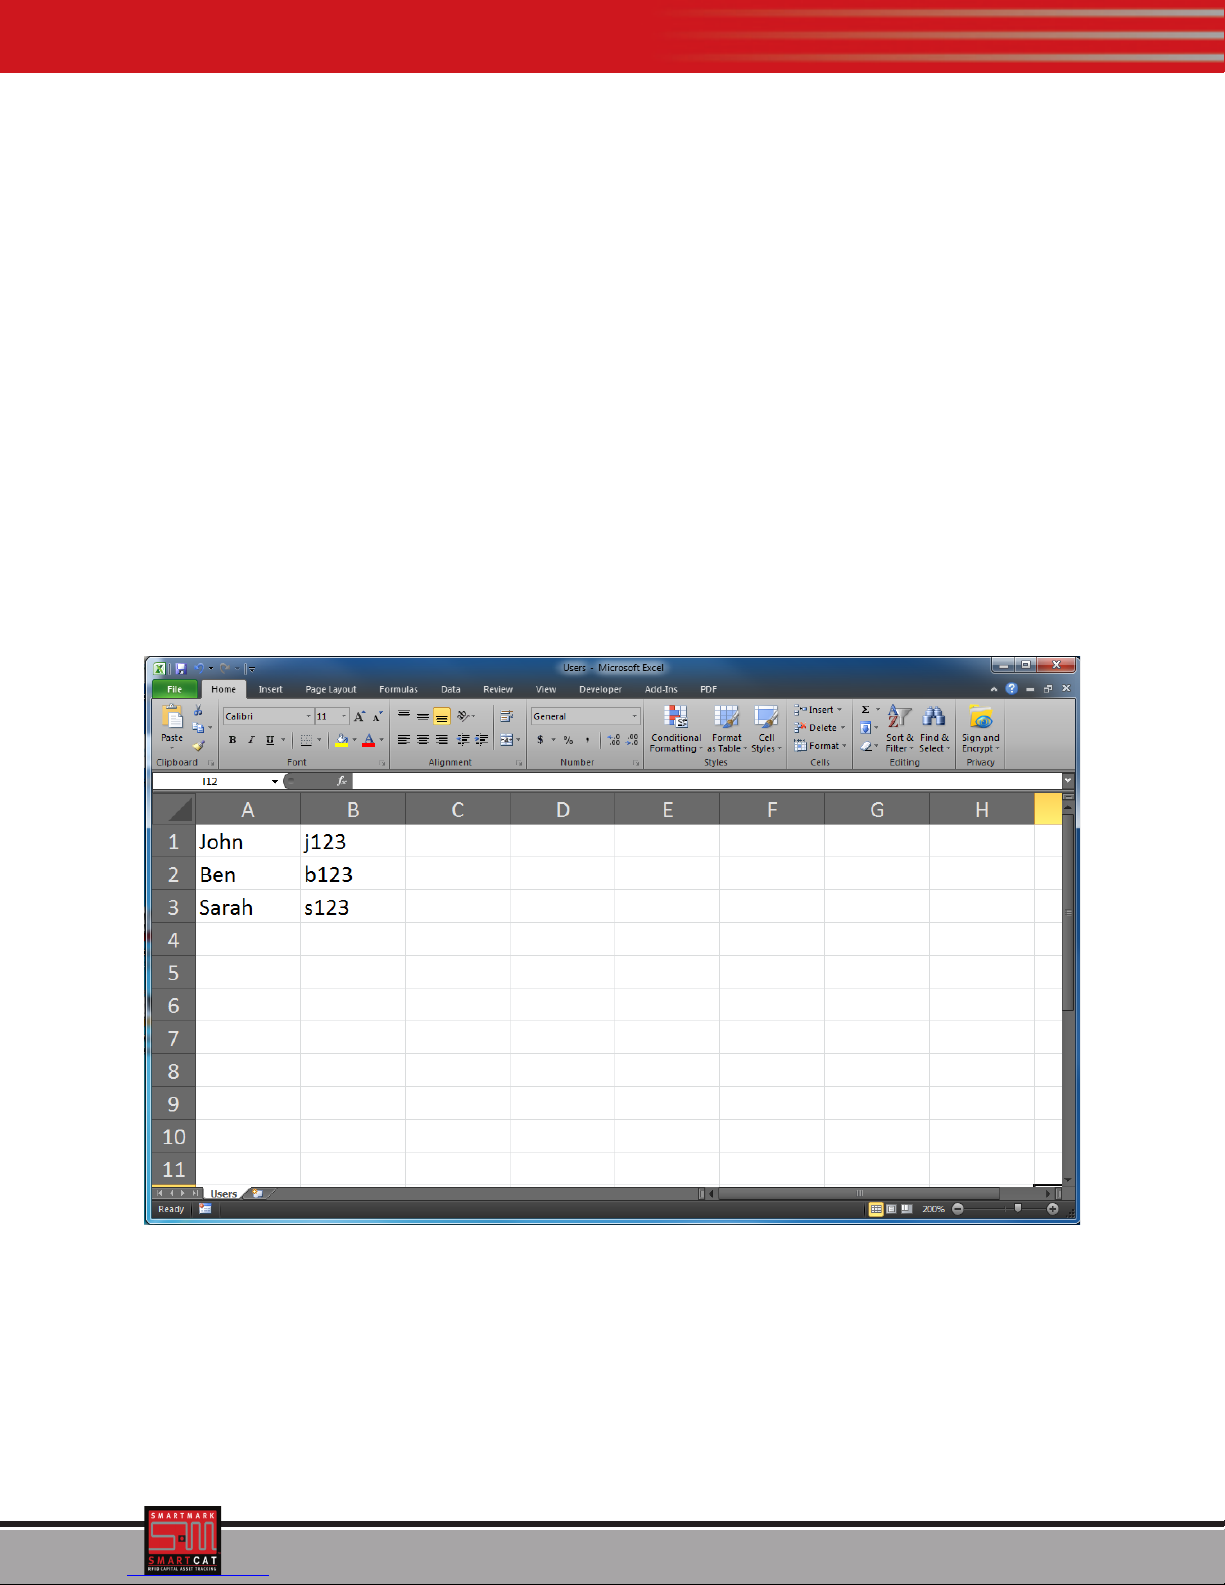
Customizing the “Users” Spreadsheet
1. On your PC, open:
SmartCAT™>MasterConfig>Config>
Users. csv
NOTE: There will be an example user name and
password for your reference.
( Username: John Password: j123)
Delete this example before continuing.
2. List all user names in the rows of column A.
3. Enter your desired user passwords next to
the corresponding user names in column B.
4. For your reference, you may also use column
C to enter the users’ full names. This informa-
tion will not show up on the reader.
NOTE: There is no restriction on length or the
use of special characters (#$%^&). It is, however,
advisable to keep the password and user name
restricted to alphanumeric entries in order to
reduce complications while using the reader.
5. Save updates to file.
6. Press YES on the pop-up.
7. While closing the file, save again when
prompted.
User Manual V1
14
Page 15
CUSTOMIZING THE CONFIGURATION FILES CONT.
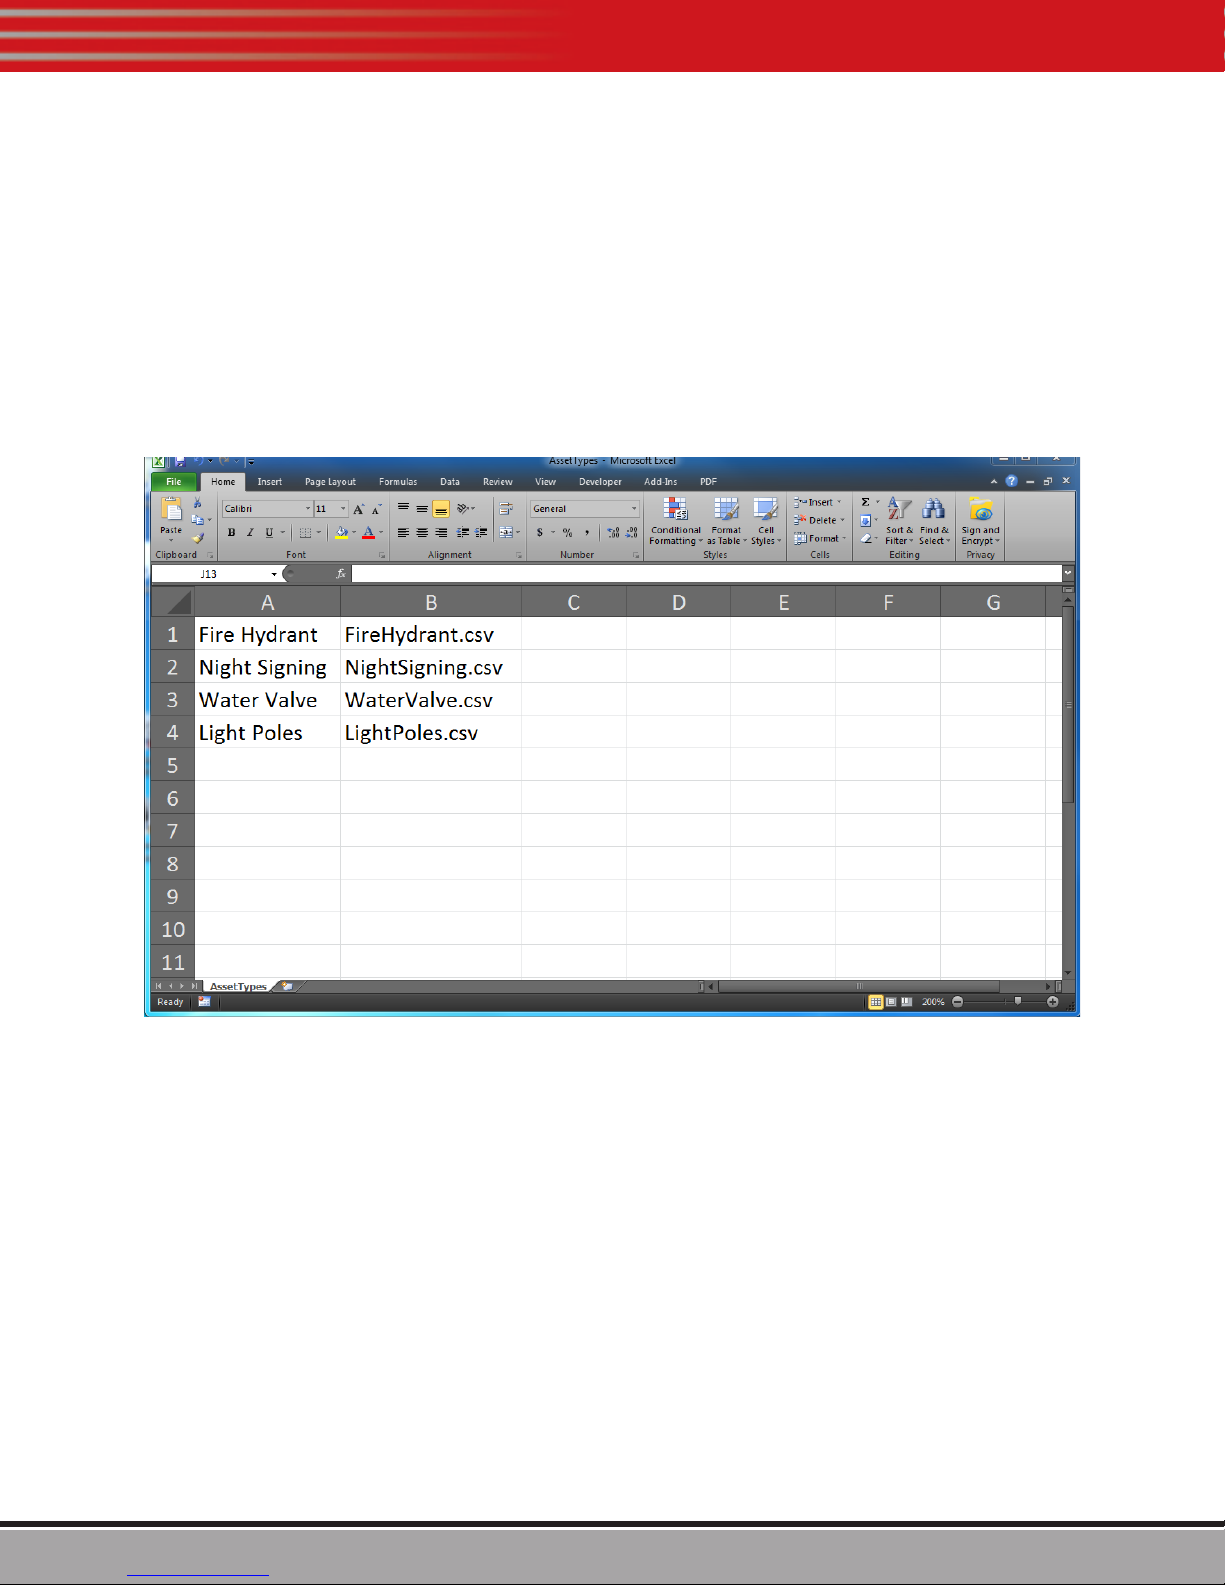
track in column A.
Customizing the AssetTypes Spreadsheet
1. On your PC, open: SmartCAT™>Master
Config>Config>AssetTypes.csv
NOTE: There will be an example asset type for
your reference. Delete this example before continuing.
2. List all asset types that you would like to
3. Type the asset type file names next to the
corresponding asset type in column B. The
asset name should be the asset type “.csv”
Refer to example spreadsheet image below.
4. Save updates to file.
5. Press YES on the pop-up.
15
smartcatrfid.com
Page 16
CUSTOMIZING THE CONFIGURATION FILES CONT.
Column *Header/Description
Customizing the “Survey Questions”
Spreadsheet
These will be the survey questions that appear on
the READER while the user is tracking the asset.
1. Each asset type will require its own survey
questions spreadsheet, and will need to be
saved exactly as the asset type file name in
column B on the AssetTypes spreadsheet
for the corresponding asset.
2. On you computer, open:
SmartCAT™>Master Config>Config>
AssetTypes>Example.csv
3. Select File Save As and save this as a new
file in the same folder. Save file as it appears
in column B in the AssetTypes spreadsheet.
Example: If the title in column B in the Ass-
setType spreadsheet is “FireHydrant.csv”
then save the spreadsheet as “FireHydrant”
4. In the drop down menu for save as type,
select CSV (comma delimited).
5. Save
6. Click “OK” to save only the active sheet
(pop-up warning).
7. Click YES when asked if you want to keep the
workbook in this format (pop-up).
A
B
C
D
(and every
column
following
D)
REQUIRED FIELD
Do you want this to be a required
field? Type TRUE if you would like it
to be a required field, leave blank if
you would not like it to be a required
field.
DATA COLLECTION FIELD
How would you like the data to be
collected? Either: RFID, Barcode,
Camera or leave it blank for text options (manual or drop down).
LABEL
How would you like the instruction
or question to appear? The text in
this column will be the header of the
column containing the data collected
for this question or direction.
Make sure each question is unique in
order to cleanly export data.
ANY DATA IN THE FOLLOWING
COLUMNS ARE DROP DOWN
OPTIONS
Drop down options. If left blank, a
text box will appear on the READER
for manual text entry as opposed to
a drop down option.
User Manual V1
8. Fill in the fields. Refer to the following chart:
*Header text may be changed if desired, but the
action will stay the same.
NOTE: There will be a set of example questions
for your reference. Delete this example (not the
headers) before continuing.
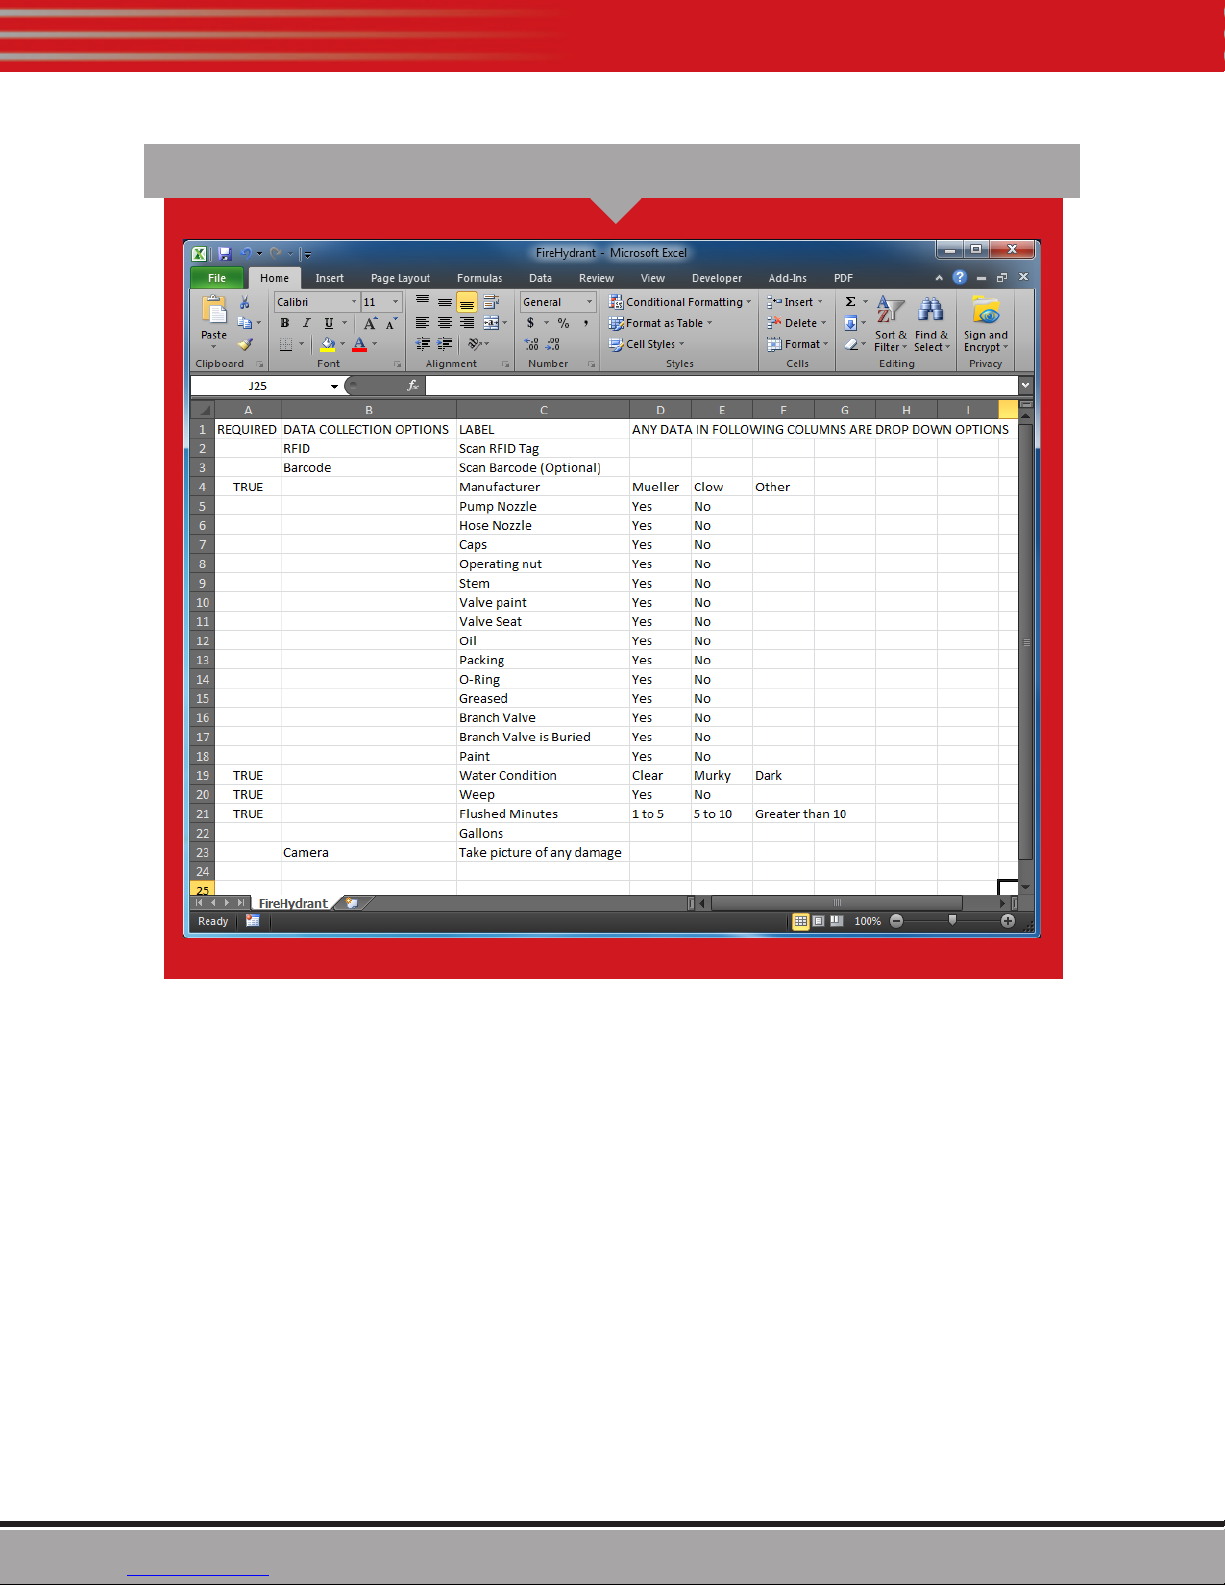
9. Delete example rows 2-6. Enter desired data.
10. Save updates to file.
11. Press YES on the pop-up.
Example spreadsheet on following page.
16
Page 17
CUSTOMIZING THE CONFIGURATION FILES CONT.
Example - Survey Questions Spreadsheet
17
smartcatrfid.com
Page 18
CUSTOMIZING THE CONFIGURATION FILES CONT.
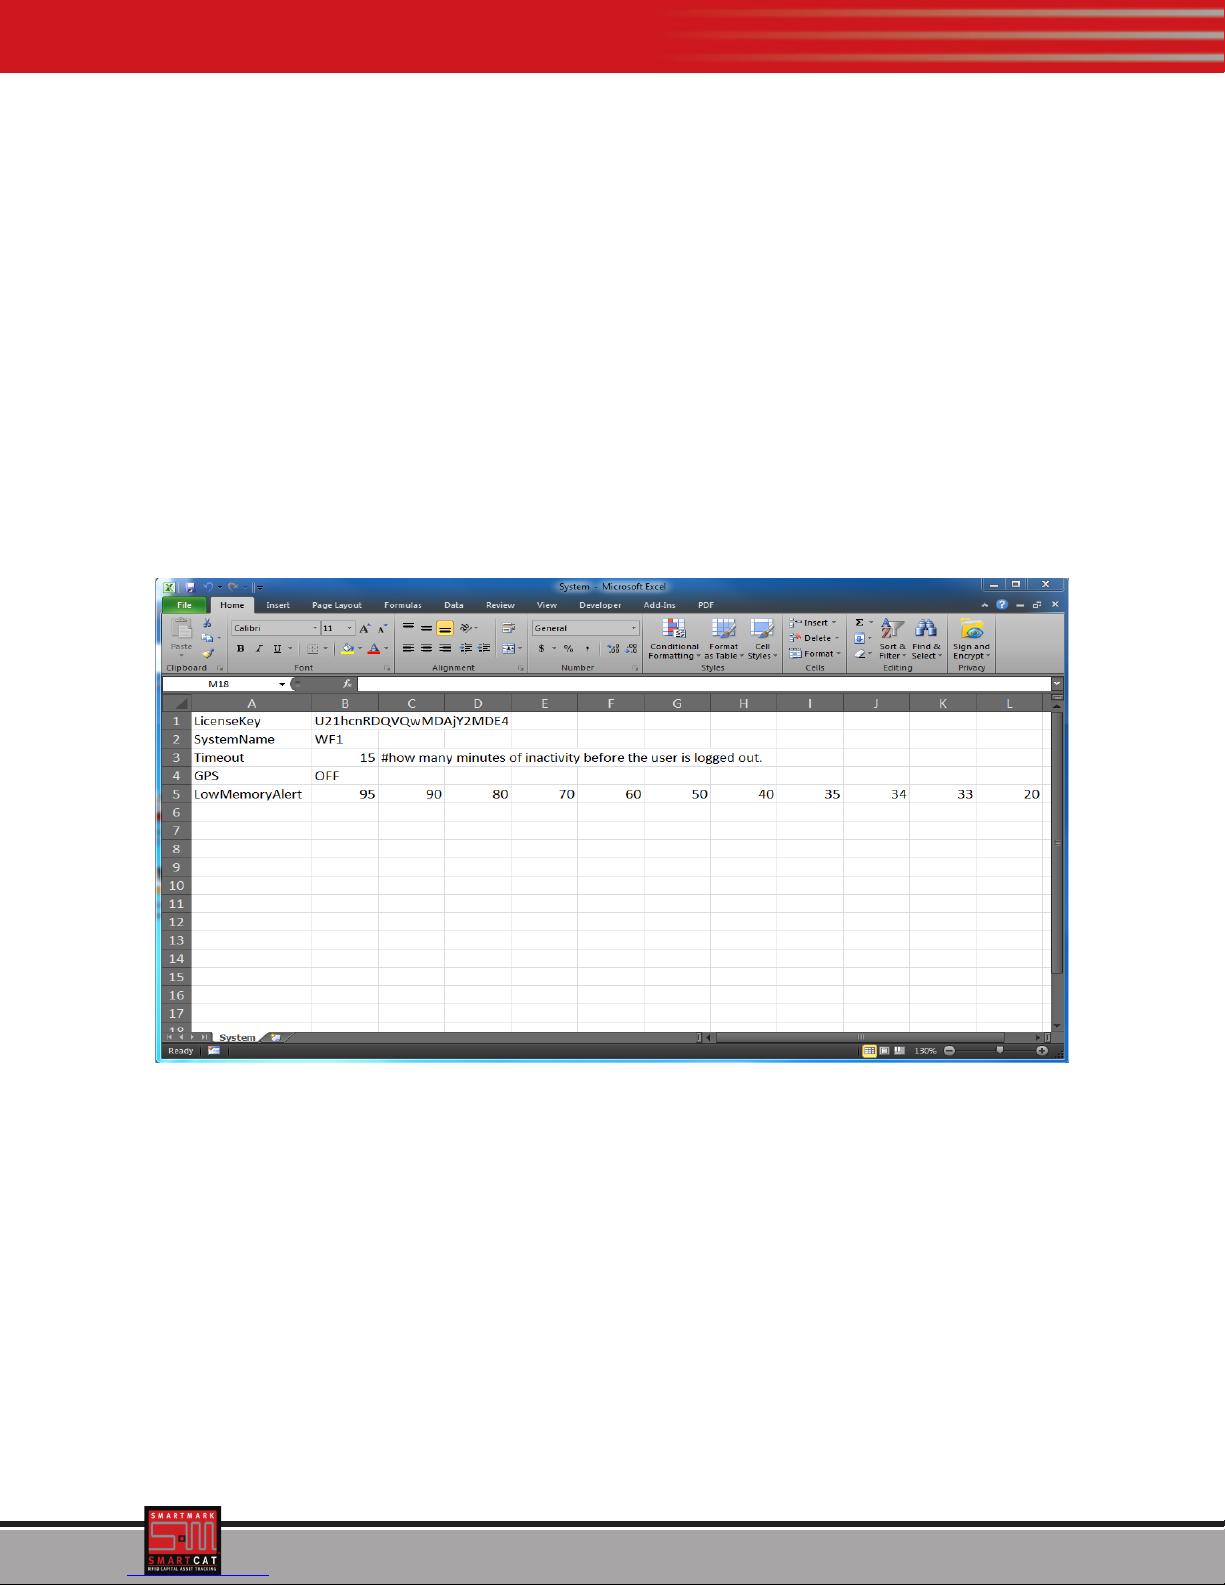
Customizing the “System” Spreadsheet
1. Open SmartCAT™>Master Config>
Config folder>System.csv
2. Leave row 1, column A as is (default text).
NOTE: Deleting column A will prevent the
app from functioning. If column A is deleted,
call the SmartCAT customer support center at:
1-855-SMRTCAT (767-8228).
3. Row 2, column B, enter a name for the
READER.
4. Row 3, column B, enter the minutes of
inactivity before the user is logged out of the
session.
5. Row 4, column B, select if you would like the
GPS to be on or off. Type ON or OFF in this
cell.
6. Row 5, column B, enter percentage of
memory storage capacity when you would
like to have the alert message appear.
7. Save updates to file.
8. Press YES on the pop-up.
NOTE: Row 1, column A is the only row that
cannot be deleted and/or altered. All other
columns and rows can be customized and/or
rearranged.
User Manual V1
18
Page 19
CUSTOMIZING THE CONFIGURATION FILES CONT.
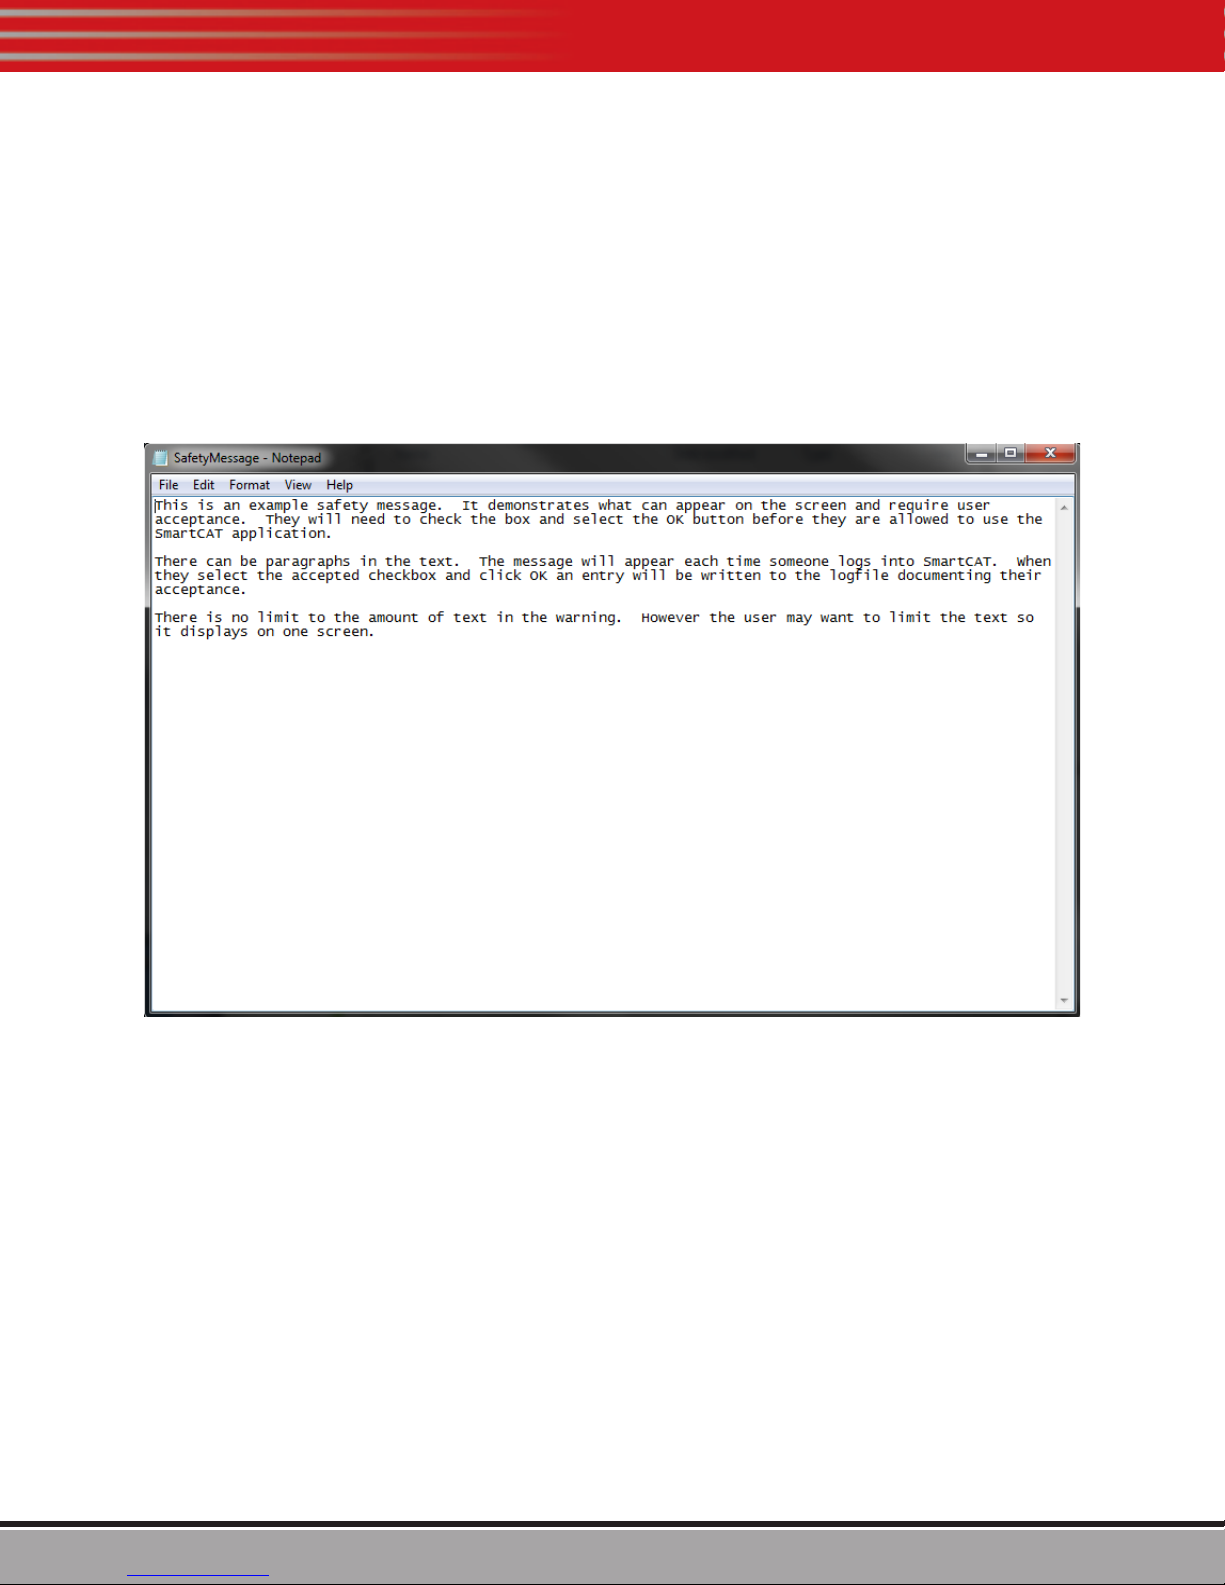
Customizing the “SafetyMessage” text file
1. Open SmartCAT™>MasterConfig>Config>
SafetyMessage.txt
2. A note pad will appear on the computer
screen.
3. Delete existing sample text.
4. Fill in text that you would like the user to
see and accept every time they log into the
SmartCAT app. If you would not like a safety
message to appear, then delete the
SafetyMessage folder on your computer.
5. Save updated message.
19
smartcatrfid.com
Page 20
CUSTOMIZING THE CONFIGURATION FILES CONT.
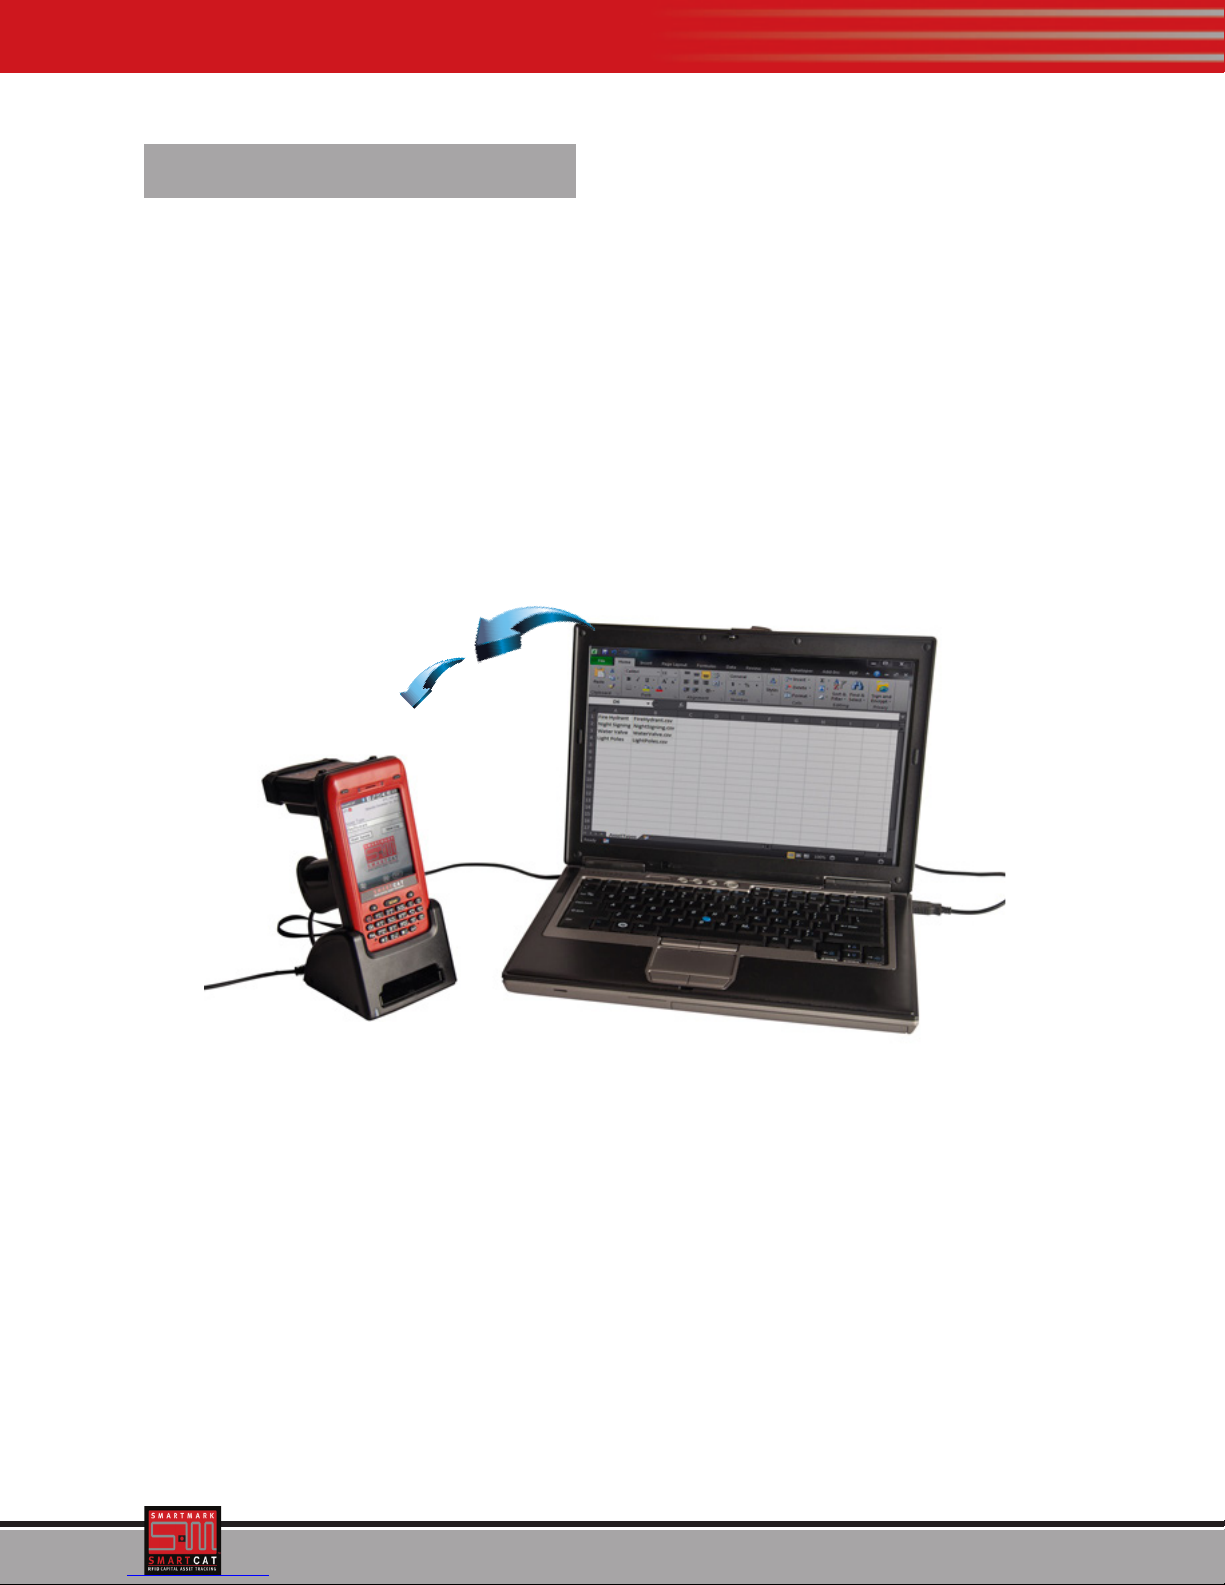
1. Copy the Config folder on your PC drive.
Sync Files to Reader
Transfer folders from PC drive to READER
drive
Once all of your files and folders are customized,
you will then transfer the SmartCAT files on your
PC to the READER.
For Windows Vista and Newer - Windows
Mobile Device Center Users
2. Paste the folder in the READER device drive:
Computer>AlienHH>\>SmartCAT™.
For Windows XP and Older - ActiveSync 4.5
Users
2. Paste the folder in the READER device drive:
Computer>Mobile Device>My Windows
Mobile-Based Device>SmartCAT™.
User Manual V1
20
Page 21
SmartCAT™ USER GUIDE
Using the SmartCAT™Application
on the READER
Use the stylus pen to select information on the
touch screen.
NOTE: The screen will black out after being idle
for a certain amount of time. Press the power
button to turn the screen back on. Refer to the
READER User Manual to change the setting.
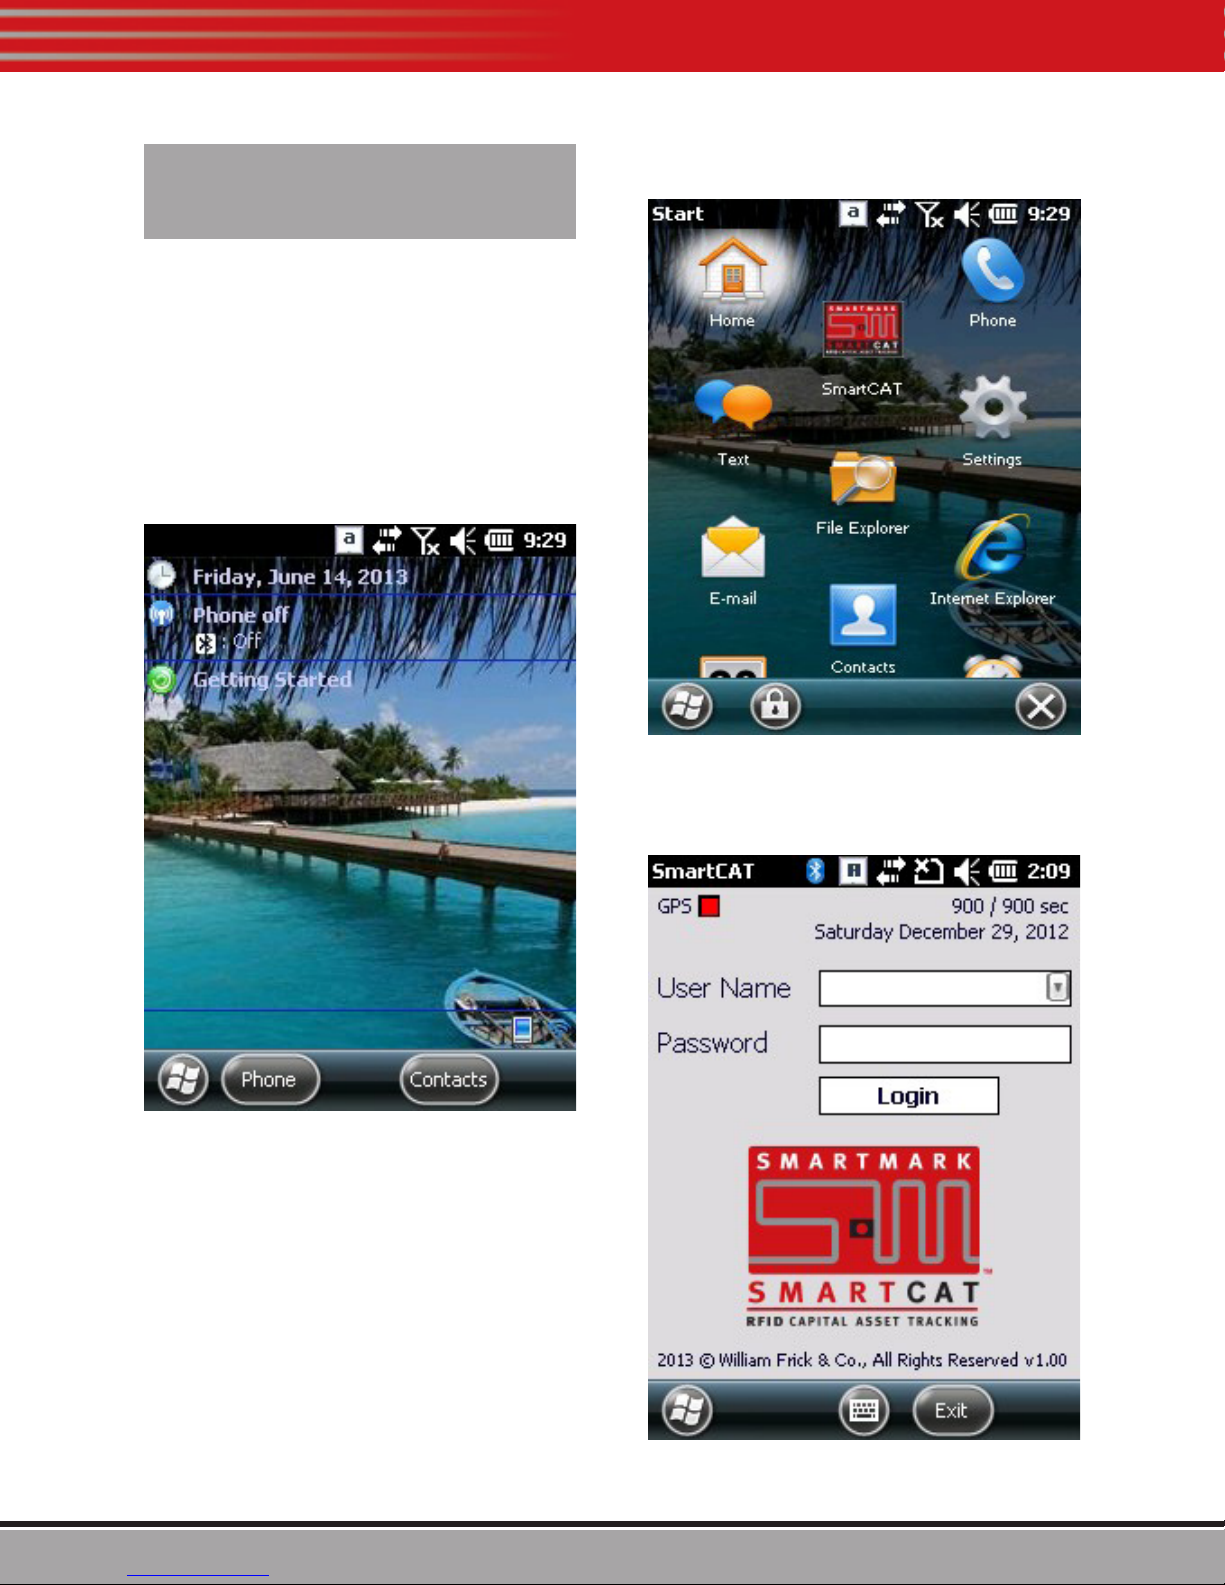
1. Turn on the READER. The following screen
will display.
3. The Home screen will display. Select the
SmartCAT icon.
2. Select the Windows icon.
4. Select your User Name from the drop down.
5. Select the keyboard icon and enter the appropriate password.
21
smartcatrfid.com
Page 22
SmartCAT™ USER GUIDE CONT.
6. Select the Login button.
7. Read the safety message (skip this step if a
safety message does not appear).
8. Select the Accept box.
9. Select OK.
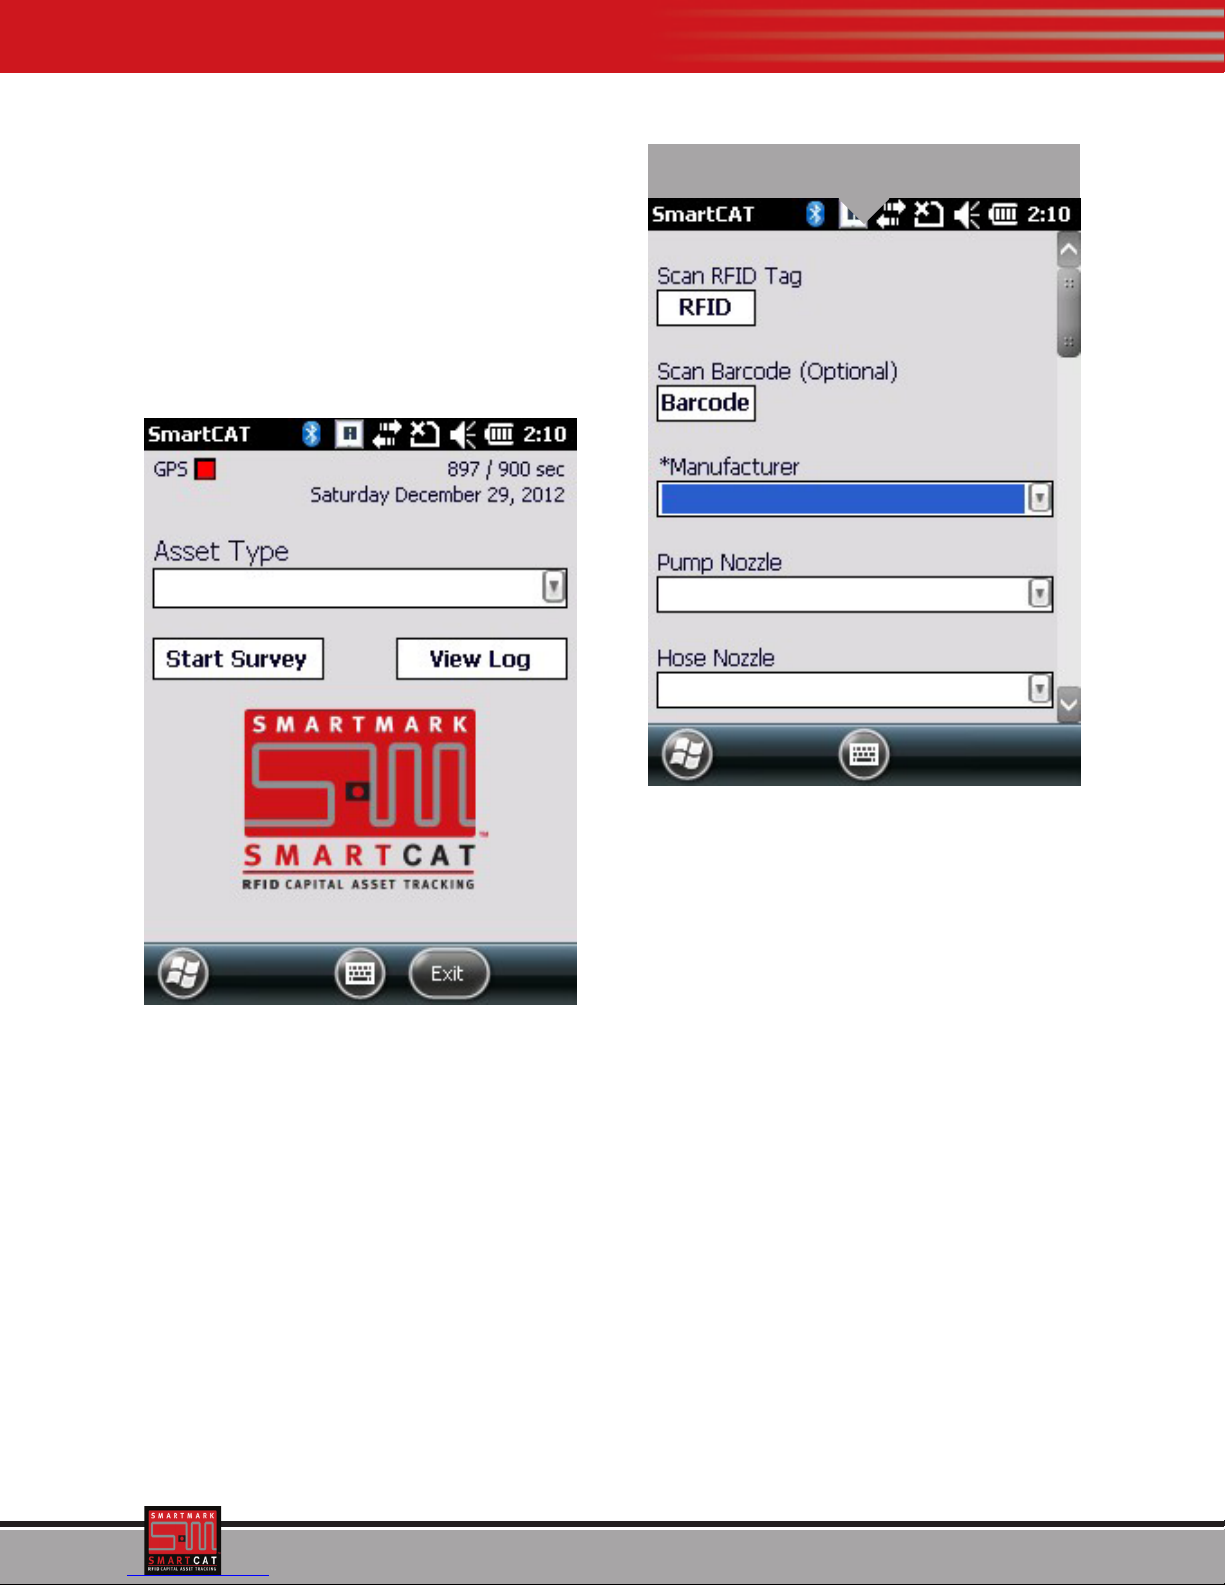
10. Once logged in, select the Asset Type that
you will be surveying in the Asset Type drop
down.
Example Survey
11. Select Start Survey
12. Once the survey begins, the following screen
will appear.
13. Answer questions from top to bottom. An
asterisk “*” before a question/command
means that it is a required field. Refer to the
following sections for instructions on how to
fill out the RFID, Barcode and Camera
options.
User Manual V1
22
Page 23
SmartCAT™ USER GUIDE CONT.
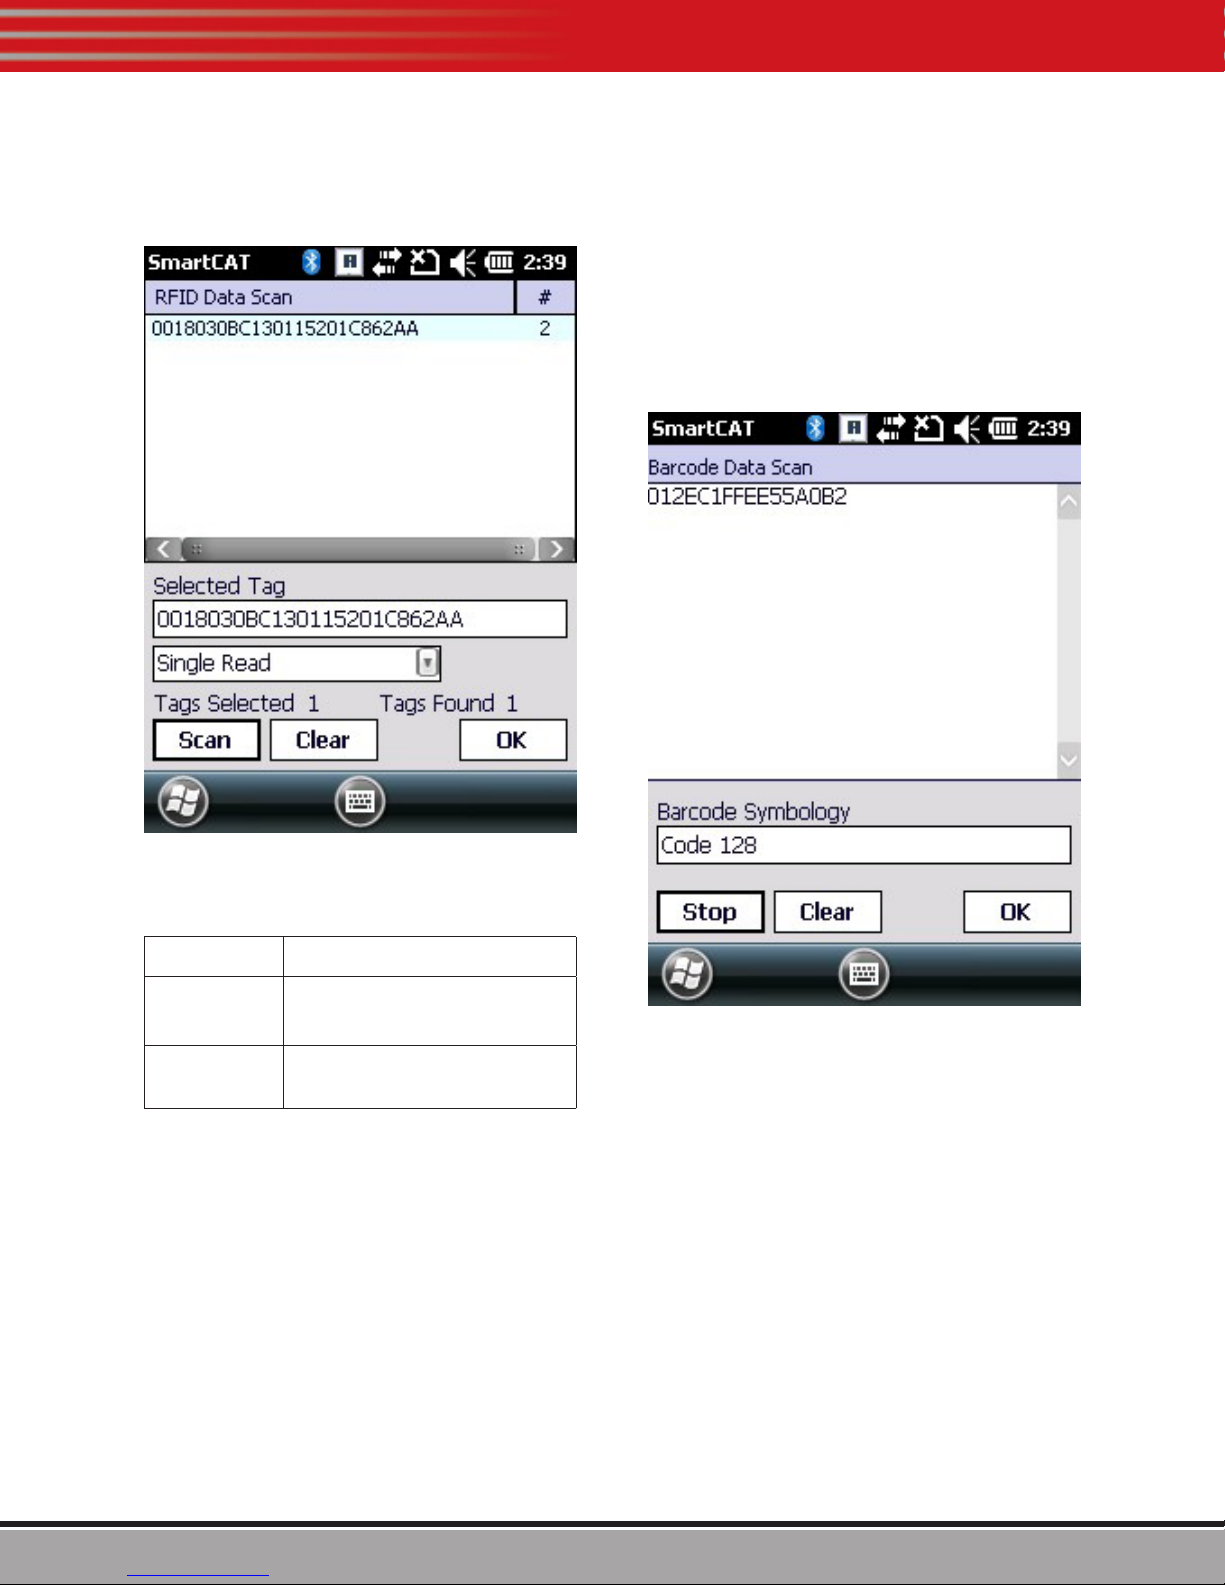
RFID:
When RFID is selected, the following screen will
display:
4. If selecting multiple tags, select the desired
tag(s) on the display screen.
5. Select OK on the display screen and move on
to the remaining questions.
Barcode:
When Barcode is selected, the following screen
will display:
1. In the drop down box, select either Single
Read, Multi Read or Multi Read/Multi Select.
Single Read Reads one RFID tag
Multi Read Reads multiple tags (user
selects one)
Multi Read/
Multi Select
2. Point the READER in the direction of the RFID
tag.
3. Either press the trigger on the pistol grip or
select the scan button on the touch screen.
If selecting multiple reads, you may need to
press the trigger repeatedly until the desired
tag(s) is selected.
Reads multiple tags (user able
to select multiple tags at once)
1. Point the READER at the Barcode.
2. Confirm that the right data has been captured.
3. Either press the trigger on the pistol grip or
select the scan button on the touch screen.
4. Select OK on the display screen and move on
to the remaining questions.
23
smartcatrfid.com
Page 24
SmartCAT™ USER GUIDE CONT.
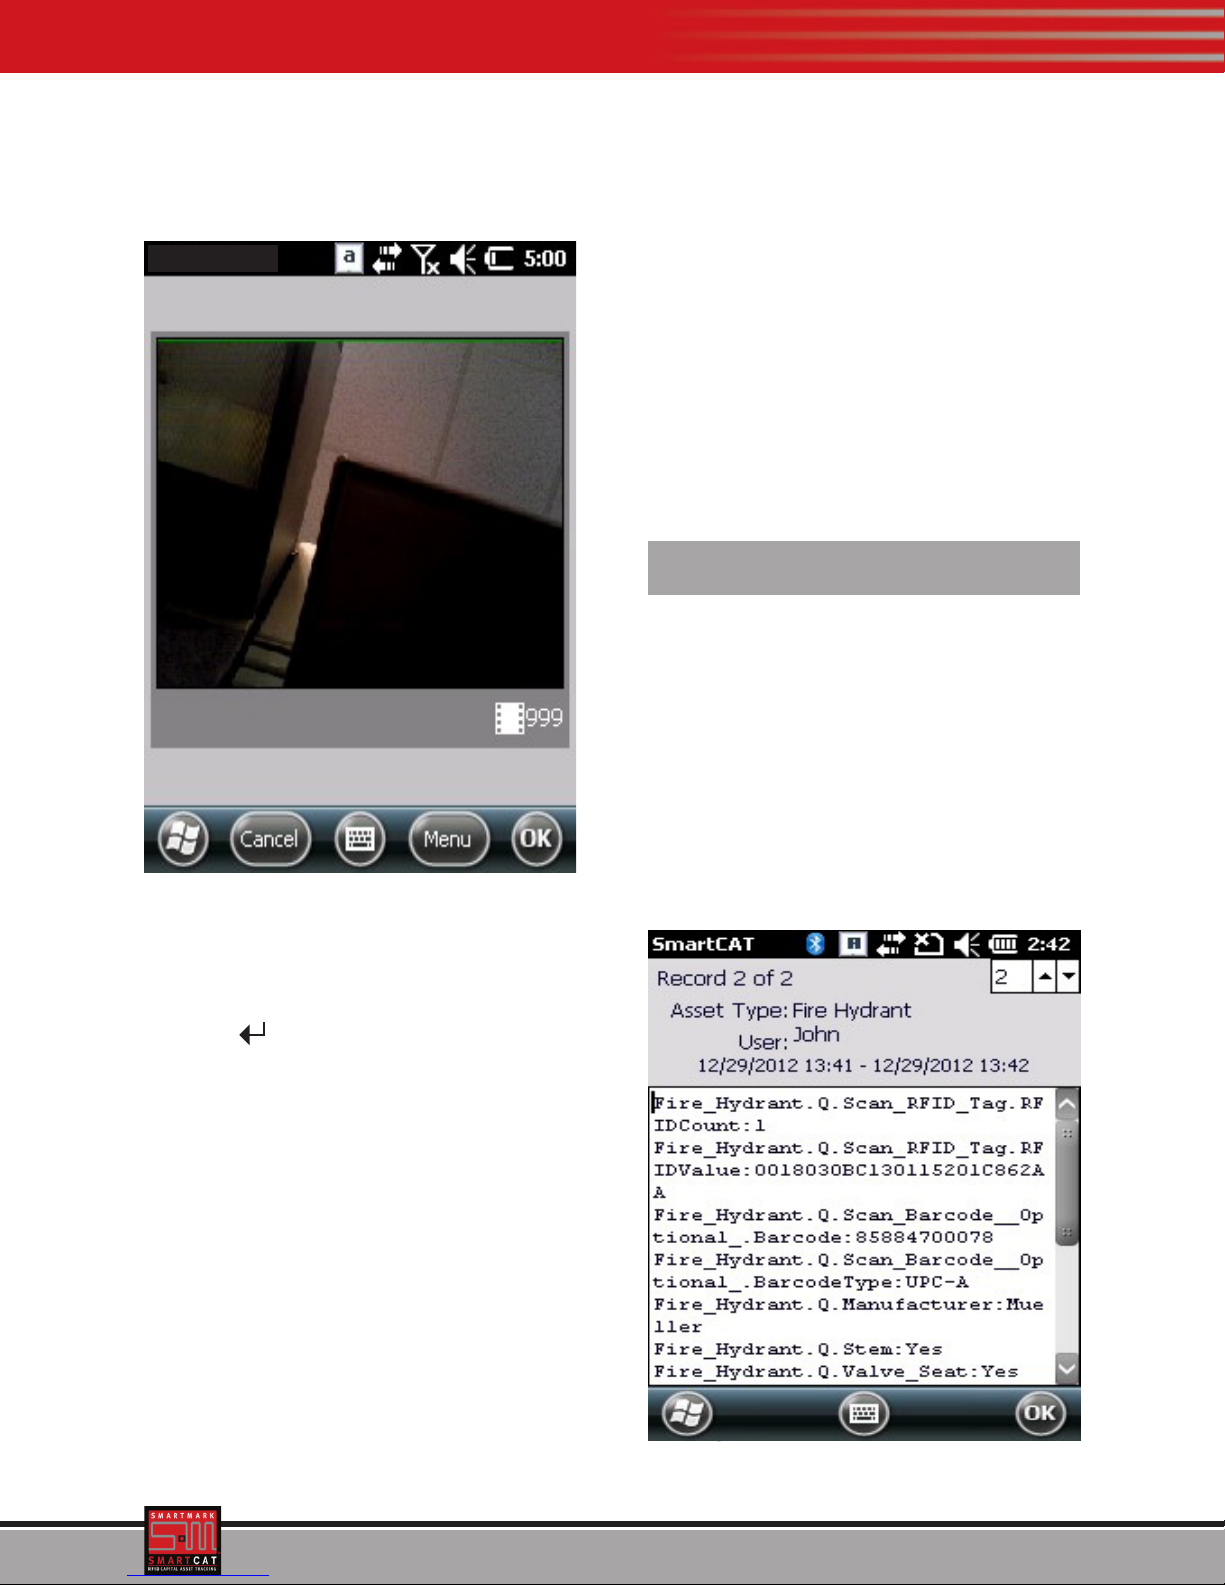
Camera:
When Camera is selected, the following screen
will display:
Example
b. Select “Flash” from the list of options
c. Select “On”
2. ResolutionChange
a. Within the Camera mode, select the
“Menu” option on the windows bar at the
bottom of the screen.
b. Select “Resolution” from the list of
options
c. Select the desired resolution
Note: Higher resolution results in higher image
file size.
After Survey Completion
Select either Save to save the survey; Cancel
to cancel the survey; or Review to review the
survey questions and answers.
If reviewing the survey, select Back to make
changes or Finish to save the survey.
1. Point the READER at the object that you
wish to take a picture of. View in the display
screen.
2. Hold the READER still and press the hard
Enter button on the reader keyboard
3. Hold the READER still for a few seconds after
pressing the Enter button to avoid blurring
the picture.
4. If satisfied with the picture, select OK on the
display screen and move on to the remaining
questions.
Camera Settings:
1. Flash Operations
a. Within the Camera mode, select the
“Menu” option on the windows bar at the
bottom of the screen.
Once the survey is saved, the User is unable to
make changes or go back.
The User now has the option to start a new survey, view survey log by selecting the View Log
button or to exit out of the SmartCAT app.
User Manual V1
Data Upload
24
Page 25

SmartCAT™ USER GUIDE CONT.
1. Mount the READER to the cradle.
2. Connect the USB cable from the cradle to
your computer USB port.
For Windows Vista and Newer - Windows
Mobile Device Center Users
3. Once the USB cable is connected, ‘Windows
Mobile Device Center’ will begin loading
and the following screen will display on your
computer. Click “Connect without setting up
your device”
NOTE: Do not disconnect the USB while loading. Load time will depend on the speed of your
computer.
4. Select “File Management” and “Browse the
contents of your device”
5. Open the reader drive (AlienHH> ‘\’)
Go to Step 7
For Windows XP and Older - ActiveSync 4.5
Users
3. Once the USB cable is connected, the following screen (Sychronization Setup Wizard) will
display on your computer. Click “Cancel”.
NOTE: Do not disconnect the USB while loading.
Load time will depend on the speed of your
computer.
4. Select “Explore” on the following screen
(Microsoft Activesync)
5. Open the reader drive (My Windows
Mobile-Based Devices>‘\’)
Go to step 7
25
smartcatrfid.com
Page 26
SmartCAT™ USER GUIDE CONT.
7. Open SmartCAT™ folder.
8. Cut the Data folder (right click on folder and
select “cut”).
NOTE: It is important to remove the old Data
folder from your device. Copying the folder without deleting it will create a new log file for the
next set of surveys, which will make organizing
the folders more difficult.
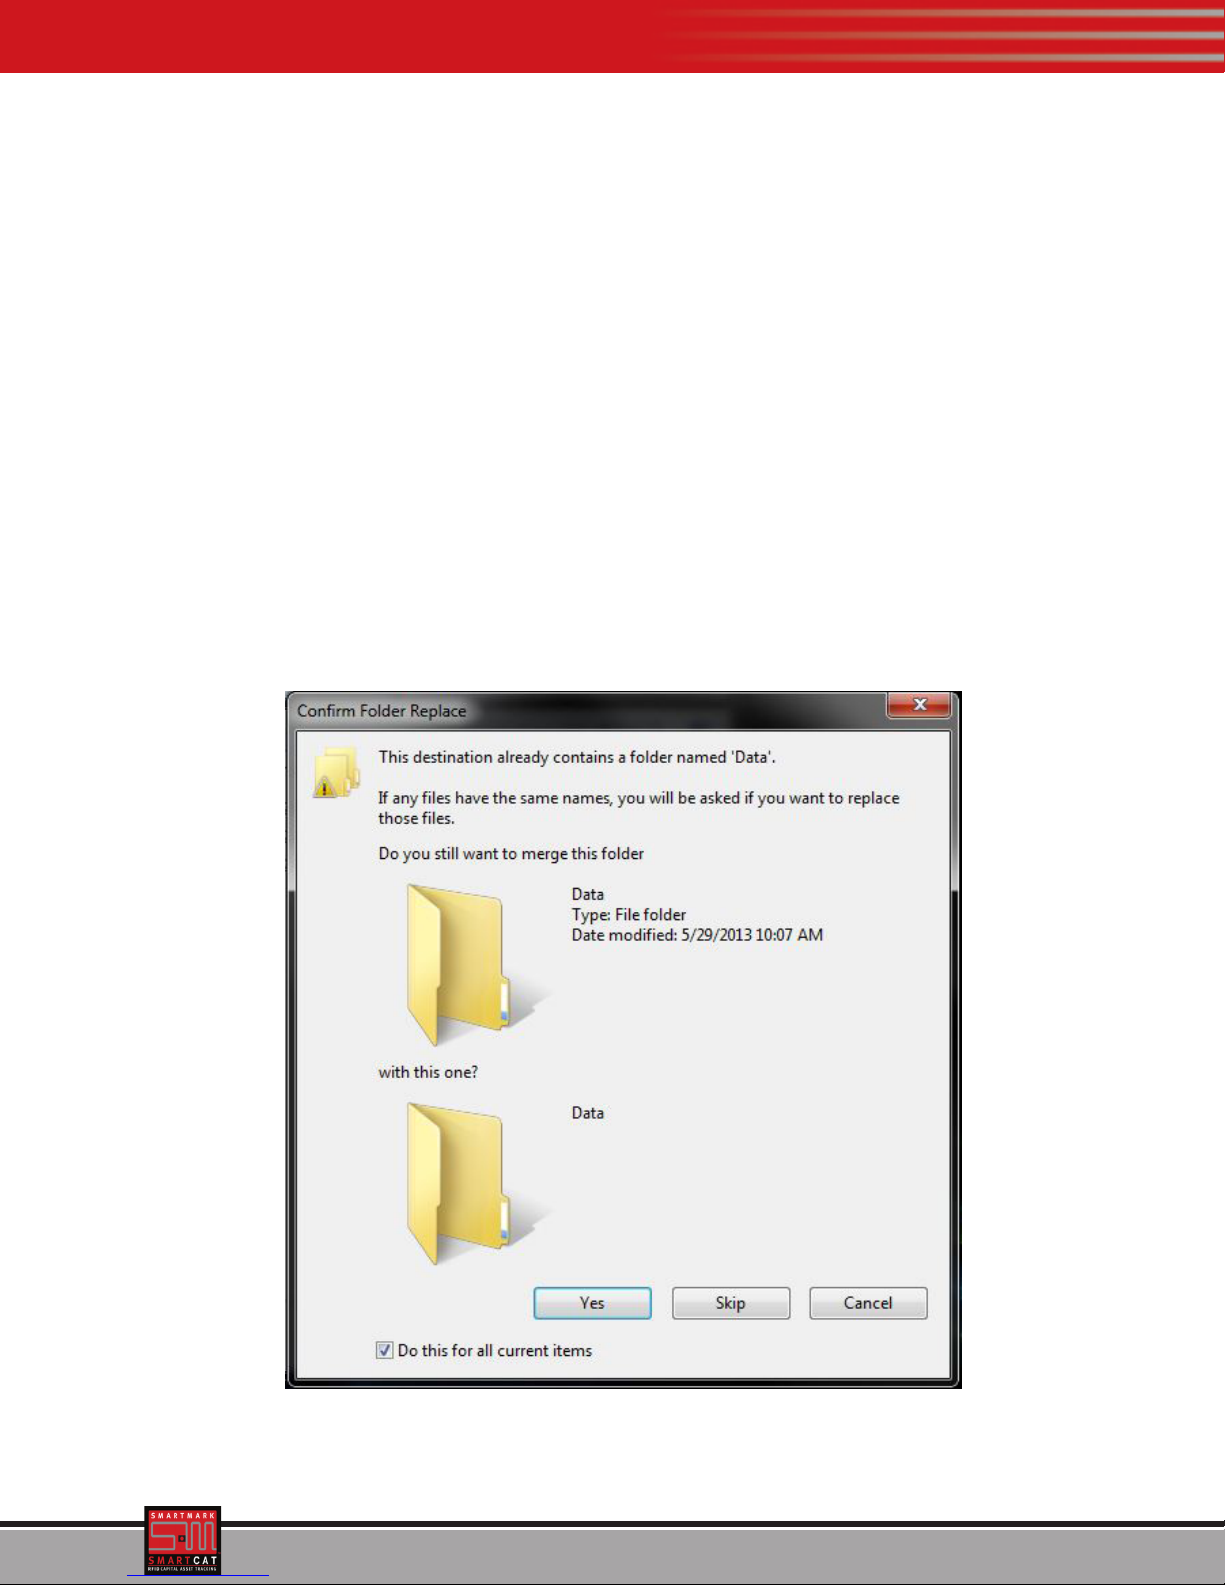
9. Open the SmartCAT folder on your computer drive (Computer>SmartCAT).
10. Paste the Data folder into the SmartCAT
folder (right click in drive and select “Paste”).
The below screen will appear.
11. Check the “Do this for all current items” box.
12. Click YES.
13. Open the Data folder on your computer
drive (Computer>SmartCAT>Data). Confirm
that the newest log file is in the Data folder.
Images captured will be in the Images folder. For convenience/organizational purposes,
all files are date, time and device ID stamped.
User Manual V1
26
Page 27
SmartCAT™ USER GUIDE CONT.
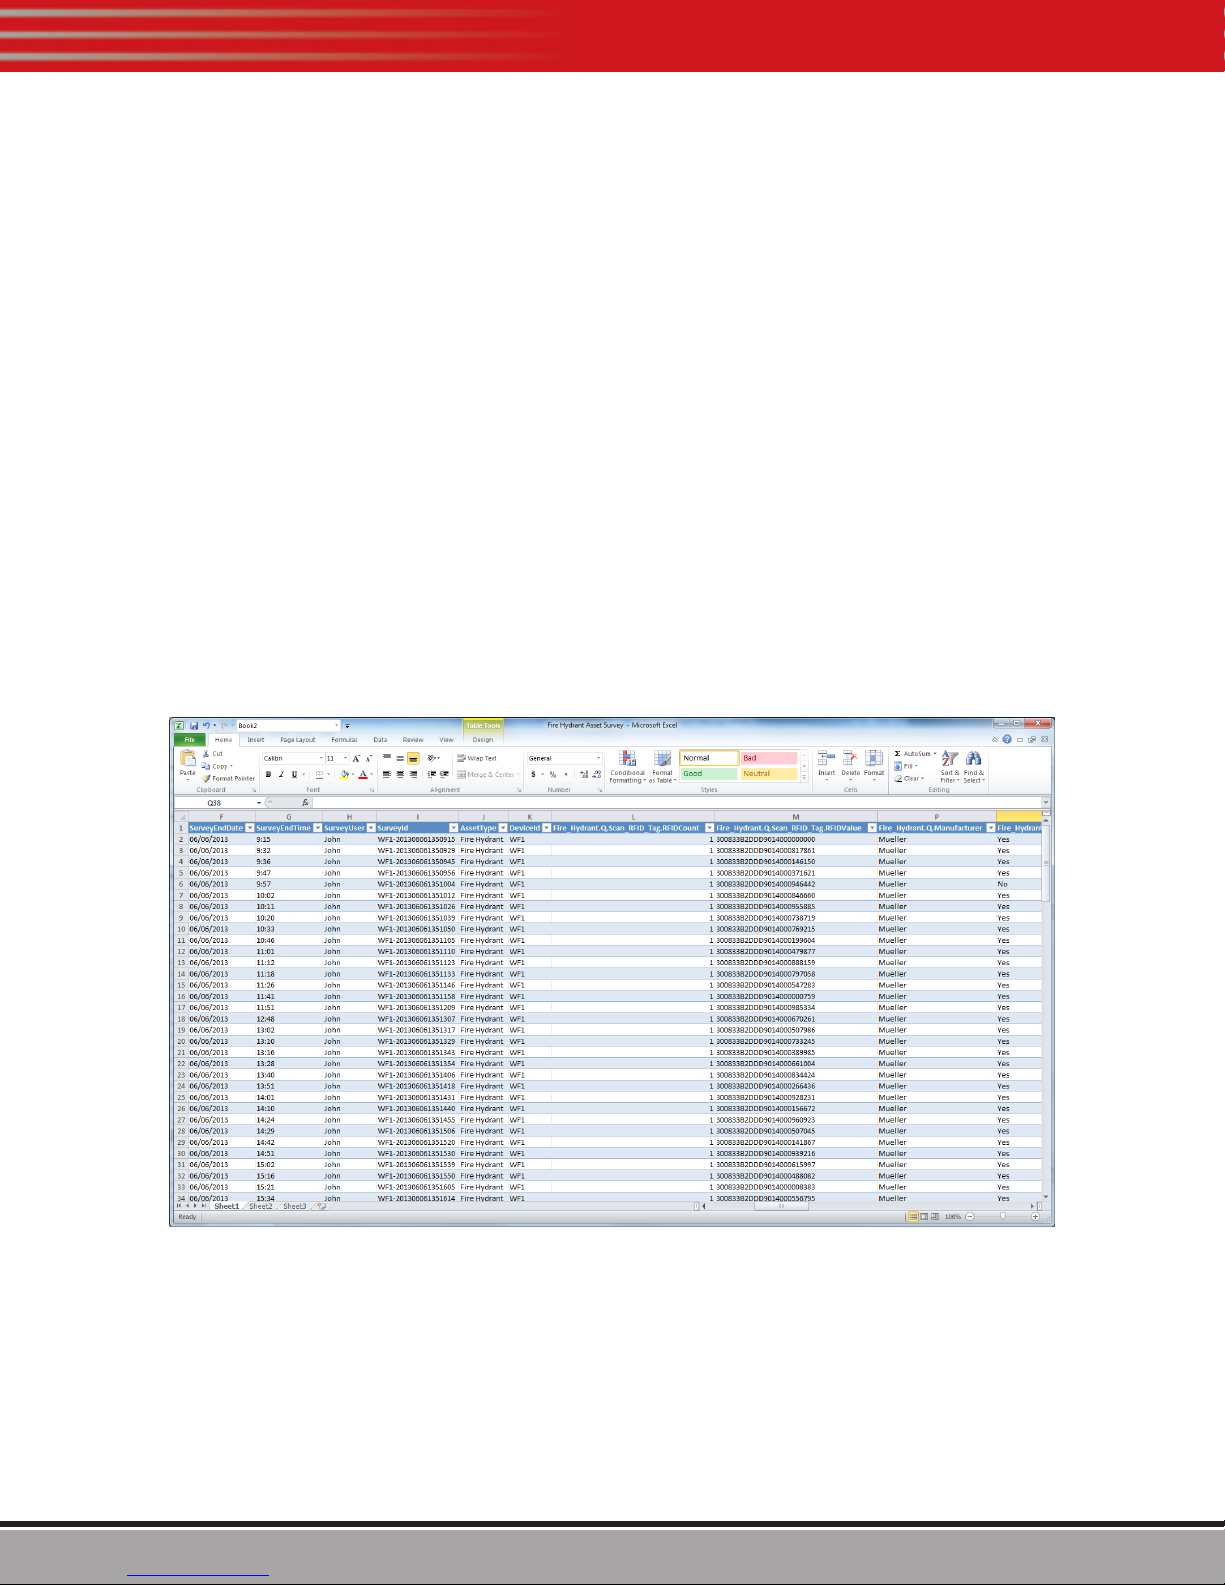
Convert Log Files to CSV
1. Open MS Excel.
2. Open the log file that you would like to convert (Computer>SmartCAT™>Data).
3. On the pop-up, make sure that “As an XML
table” is selected.
4. Click OK.
5. Click OK, if the message “Excel will create a
schema based on XML data” appears.
6. File>Save As
7. Name log file so that it is easy for you to
identify, organize and recover in the future.
8. In the “Save as type” drop down, select CSV
(Comma delimited) or any other format you
prefer.
9. Click Save.
10. Click OK on pop-up.
11. Click Yes in next pop-up.
27
smartcatrfid.com
Page 28
TROUBLESHOOTING
Before Calling for Service
Review the following troubleshooting guide and FAQ section before calling for service.
SmartCAT™ Customer Service: 1-855-SMRTCAT (767-8228).
Problem Cause Solution
Time and date on the READER
changes every time the battery
runs out.
The screen on the READER locks
every time a picture is captured.
Unable to save configuration file. The READER’s Window CE
The READER loses charge in
under five hours.
READER is mounted in the
cradle but is not charging.
This is normal operation. Always keep your READER charged to
avoid this issue. Every time the READER battery dies, it is very important to
check the time and date before use.
The READER is sensitive to
low lighting conditions.
operating system does not
allow direct editing.
Certain functions on the
READER use more power
than others.
The cradle is not plugged in
with the charging adapter.
In order to avoid data loss, switch on
your flash and adjust the resolution on
the camera to the maximum setting in
low lighting conditions. This will help
prevent a screen lock and system crash.
Refer to pg. 24 in this User Manual.
Copy files that you would like to edit
in the SmartCAT folder on your PC.
Edit the files from your PC and then
transfer them to your READER. Refer to
pg. 11 of this User Manual.
Keep the extra battery charged in the
cradle for backup.
The READER can only be charged using a charging adapter; and does not
charge with the USB cable in the PC.
READER displays an error that
says “LicenseKey must be entered in the system config file for
SmartCAT to run.”
User Manual V1
A LicenseKey was not entered properly in the config
files before transfer.
28
The cradle needs to be plugged into
either the wall outlet or car adapter.
Refer to the Customizing the “Sys-
tem” Spreadsheet section in this
manual. (pg. 17)
If the steps in this section were
preformed according, contact the
SmartCAT Customer Service Center at:
1-855-SMRTCAT (767-8228).
Page 29

FAQS
Does SmartCAT™ also work as
asset management software?
No. SmartCAT™ is an asset tracking and data
collecting application. Data exports in ‘.csv’ or
‘.xml’ format and can be sorted and compiled in
a simple database that reads and manipulates
software such as Microsoft Excel.
Will the READER automatically
sync to the computer when
connected?
No. The files have to be transferred manually in
order to load data from your computer to the
READER and vise versa.
Can I export data from
SmartCAT into CSV format?
Yes; though, this must be done manually through
MS Excel.
Are there any limitations to the
number of data capture options
able to be used in a survey?
No.
Is there a multilingual version
of this device/application
available?
No. The app is only available in English but has
been designed to be as universally understood as
possible.
Can configuration files be
accessed through the reader?
No. The config files that populate the data on the
app cannot be opened with your reader. These
files can only be accessed through the administrator’s computer.
What format does SmartCAT
store data in
SmartCAT collects and stores data in Extensible Markup Language (XML) format. XML is a
universal format that is both human and machine
readable, and can be exported into a wide range
of software programs including, but not limited
to, MS Excel.
Can the SmartCAT application
run on other readers?
No. The SmartCAT app was developed specifically
for the READER in which it is installed. Any unauthorized copying or installation of the SmartCAT
software will not only limit the app’s functionality but will also be an infringement of copyright
laws.
What Barcode types can I read
using the application?
The application is designed to recognize all 1D
and 2D barcodes.
Can the SmartCAT application
write tags?
No. SmartCAT cannot be used to write and encode RFID tags; however, there are other options
available on your READER for writing tags. Additional information about writing tags using the
reader can be found in the READER user manual
at: http://www.SmartCATrfid.com/support/down-
load
SmartCAT Technical Support also provides information on encoding tags. http://www.smart-
catrfid.com/support/tag-encoding
29
smartcatrfid.com
Page 30

FAQS
I can’t copy my configuration
file to the reader. I keep
getting the error message
“Cannot copy ‘File’. The device
has either stopped responding
or has been disconnected”.
Make sure that you didn’t accidently open the
file on the reader or have the software running
on the reader. Either close the configuration file
or exit the software on the reader. The file should
copy just fine now.
Can the data collected by
SmartCAT be exported into an
asset management software?
Yes. SmartCAT saves the data collected in XML
format that can be converted into CSV or any
other format to best suit your needs.
We have found that CSV and Excel worksheets
work best for asset management softwares. You
can find the procedure to convert XML to CSV or
other file formats in the SmartCAT user manual.
Refer to the section ‘Convert Log Files to CSV’ on
Page 27.
My reader wont connect to my
computer with Windows 7 OS.
What should I do?
Please make sure you have “Windows
Mobile Device Center” on your computer.
If not, download it from the following link
http://www.microsoft.com/en-us/download/details.aspx?id=14.
If you have “Windows Mobile Device Center”
and the reader still refuses to connect, cold
reset your device. This can be done by pressing
the power and reset button together until
the unit restarts.
My data export is duplicated
and is not lined up in order.
What should I do?
Please make sure that the questions in the
“Survey Questions” spreadsheet are unique.
If you need to have the same question asked
repeatedly in the same survey, please number
the questions in order to capture and export
data cleanly.
Can the READER wirelessly
sync to my computer?
Yes. The READER is Wi-Fi capable and you can
also use a Sim Card to attain network connectivity but these are features that SmartCAT does not
deal with.
If you need assistance please contact SmartCAT
tech support or refer to the READER user manual
that can be found
at: http://www.SmartCATrfid.com/support/down-
load.
User Manual V1
30
 Loading...