

Smart Cabling & Transmission HM44 User Manual
1
4x4 Seamless Multiviewer/Matrix/Videowall
ITEM NO.: HM44
HM44 4x4 HDMI Seamless Matrix is the perfect solution for displaying content from up to four sources
on four HDTV displays. Each of the sources can be individually scaled. Seamless switching ensures no
frame loss during picture transitions. Eight preset buttons allow the user to store and recall
custom-configured routing presets. Build in OSD menu simplifies system configuration. The HM44
HDMI Seamless Matrix is a great solution for small and large commercial venues that require content
from four sources displayed on four displays instantly and without any loss of picture.
HM44 4x4 Seamless Multiviewer/Matrix/Videowall
Input and Output resolutions up to 1080p Full HD and 1920x1200 (WUXGA)
Support LPCM7.1 @ 192KHz, Dolby True HD, DTS-HD MA
HDMI1.3, DVI1.0, and HDCP 1.4 compliant
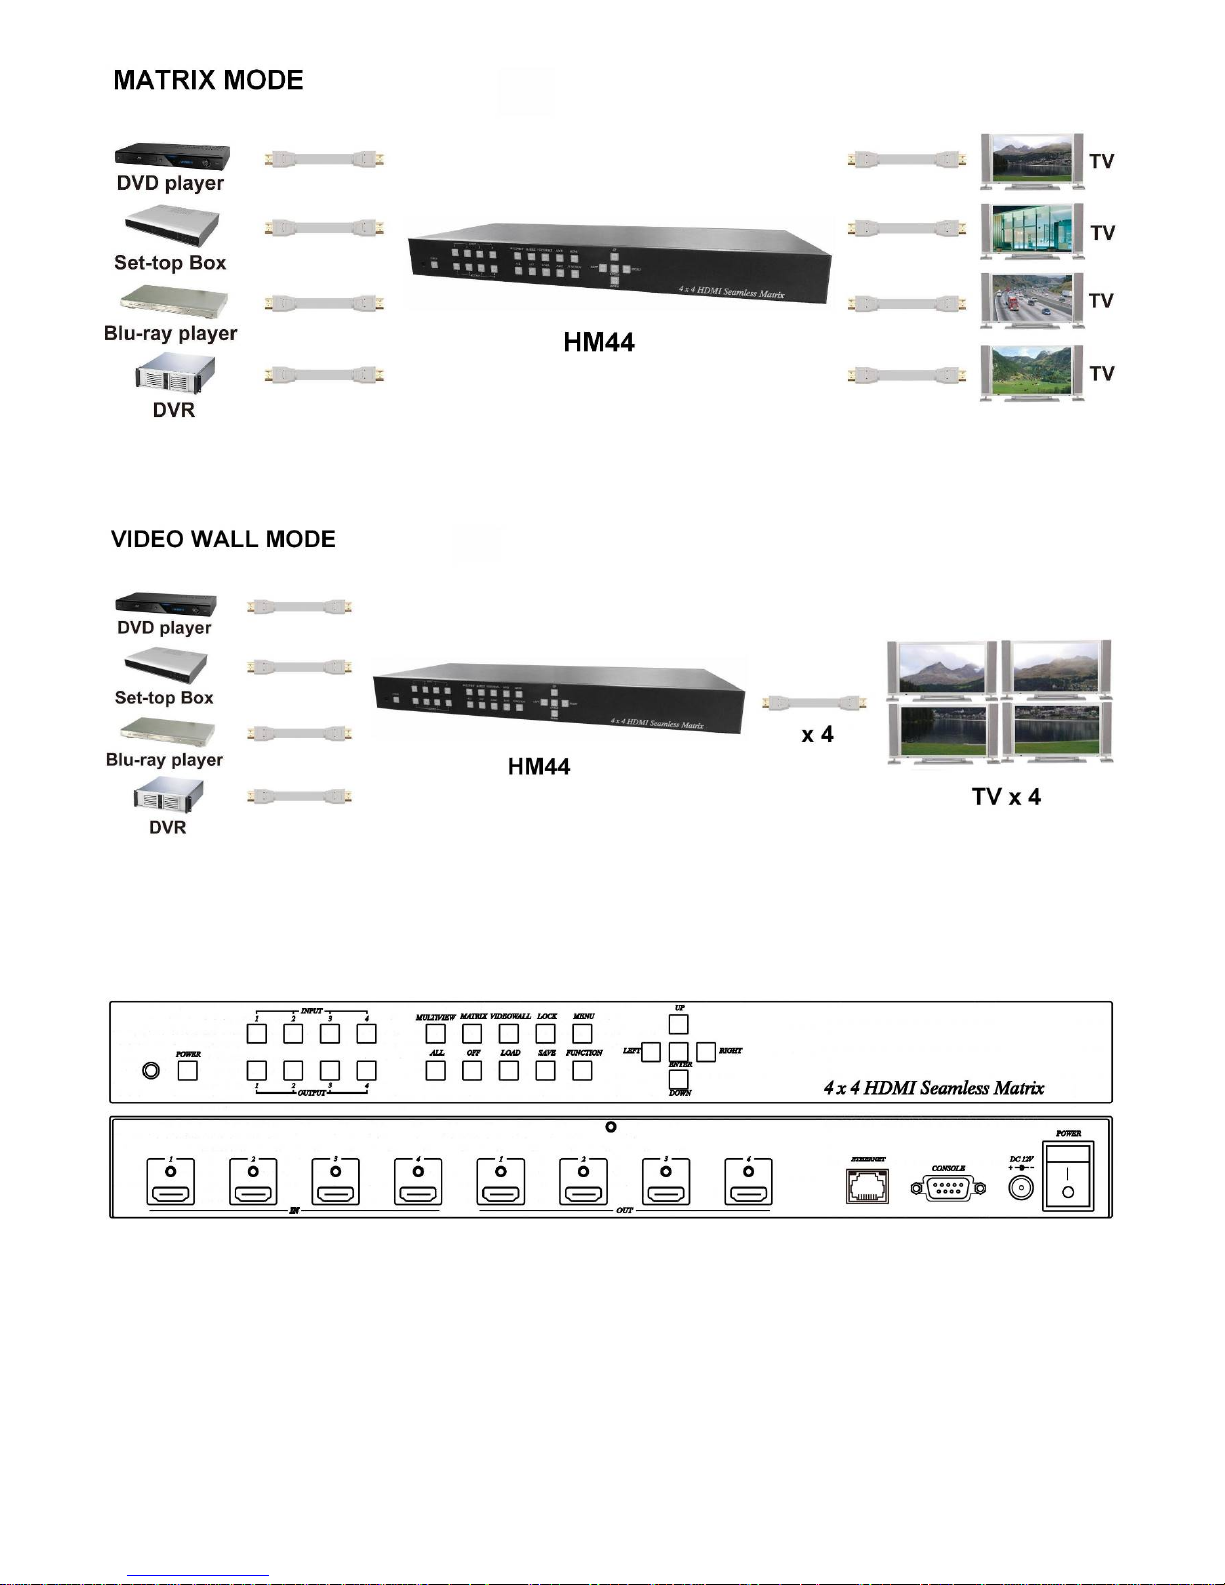
Video-Wall mode supports 2 x 2 Video-Wall with 4 selectable input sources
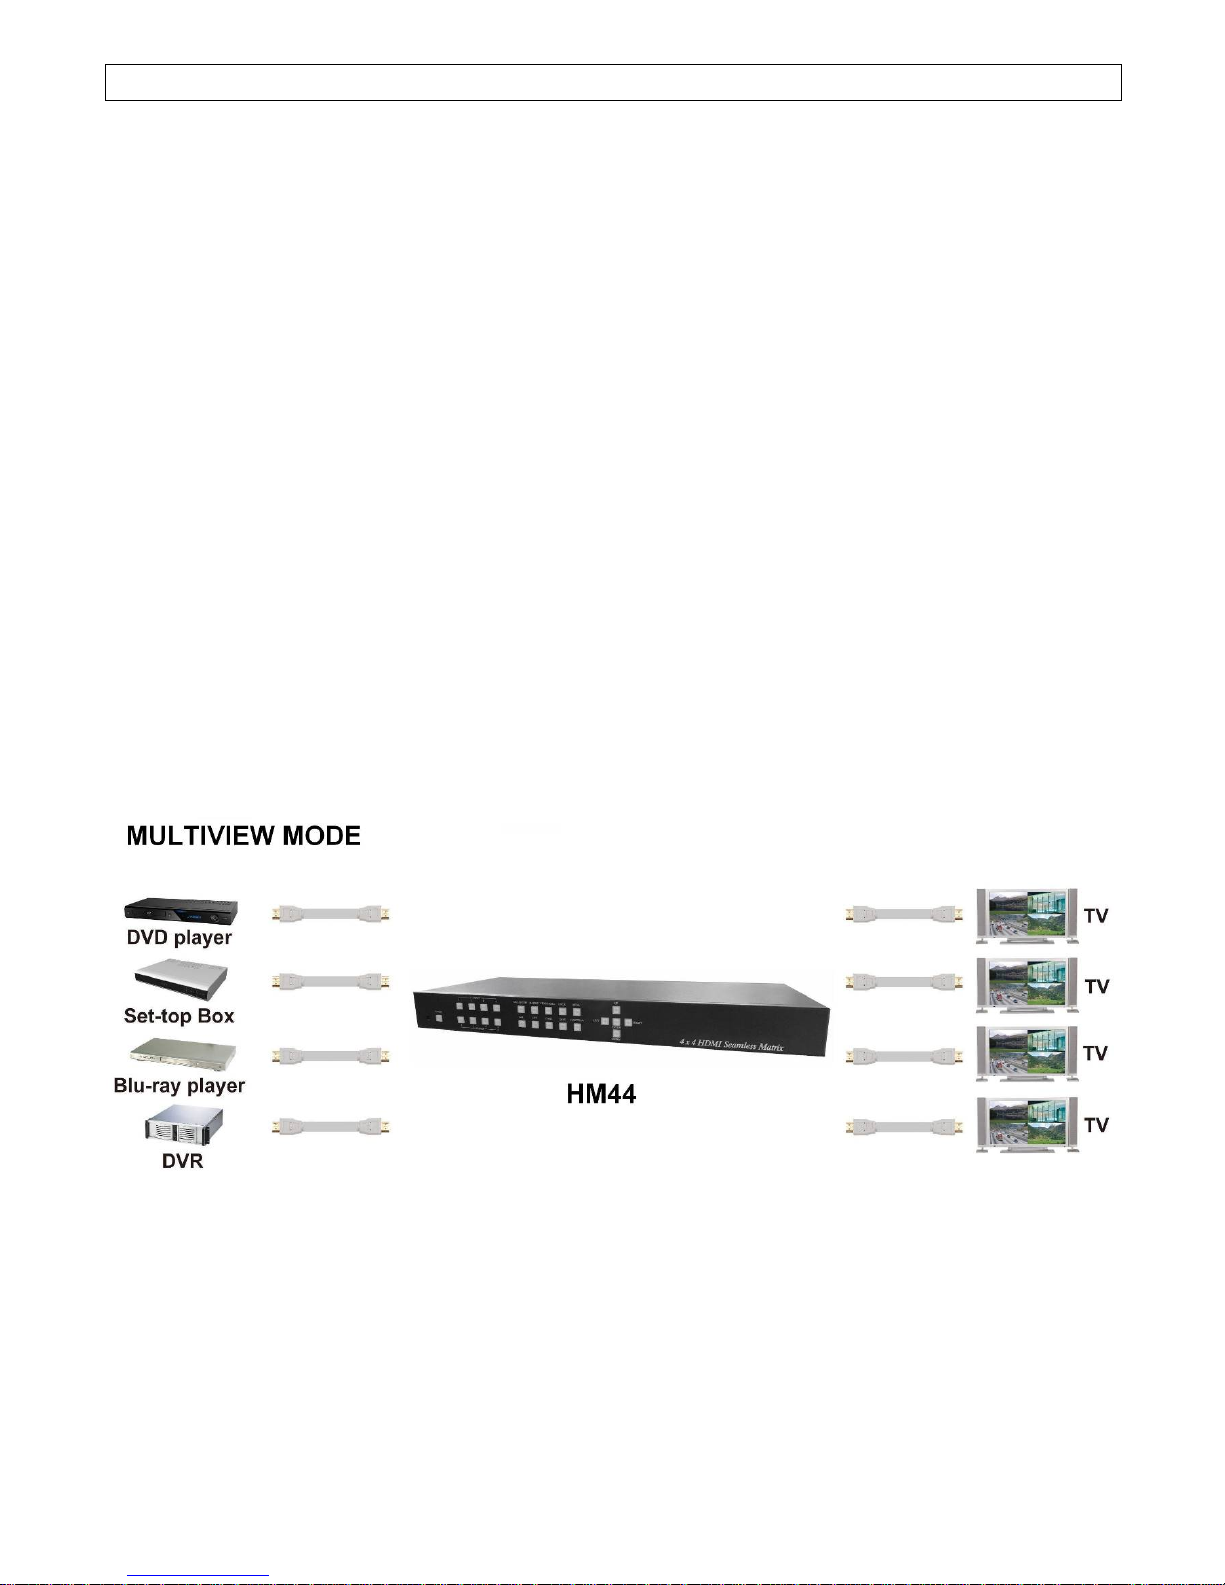
Support 4 input and 4 multiview windows seamless switching
Multiview mode support scales and sizes each picture.
Multiview mode support PIP, POP and set PIP priority
Support panel button, IR remote, RS232, Web GUI and APP control
Support OSD menu setting
Field-upgradable firmware for both web server and RS232.
Application View:
2
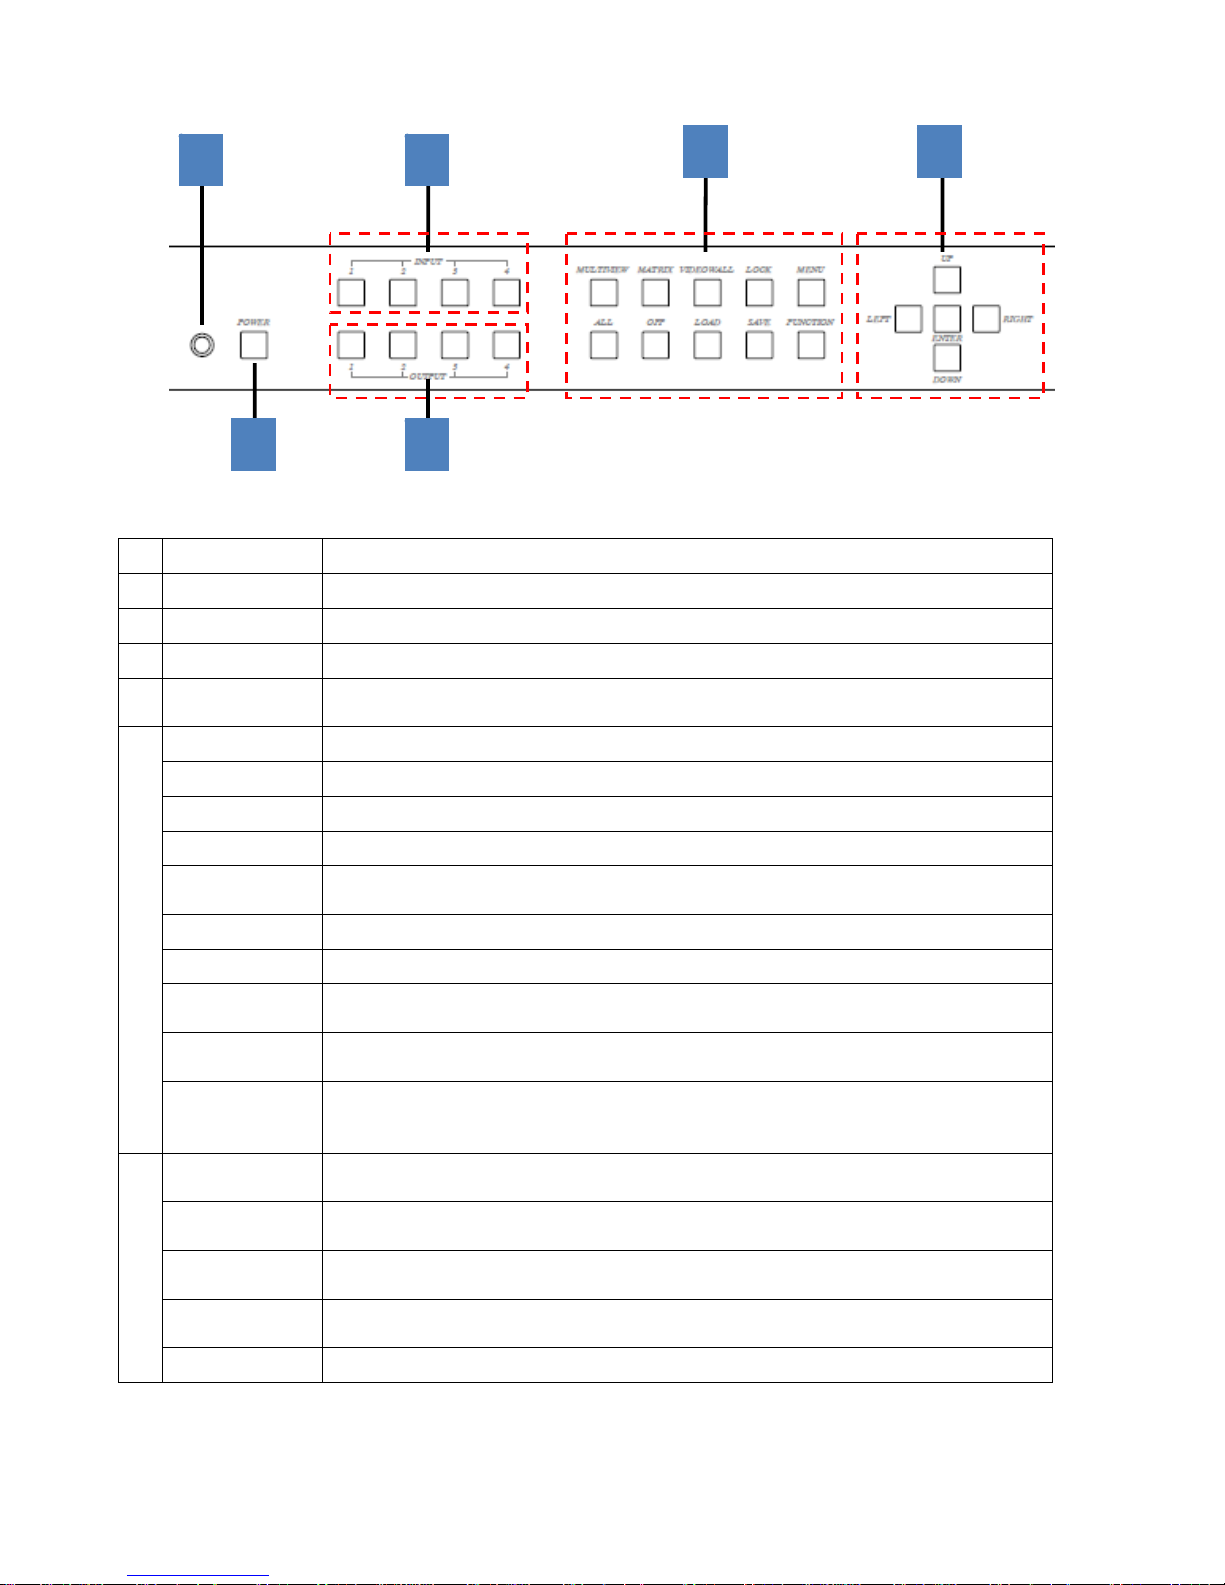
Panel View :
3
Front Panel Function:
Panel Button Function:
No. Function Name Description
1 IR
Receiving IR remote signal
2 POWER Power on / standby
3 INPUT 1~4 Press these buttons to select the desired input
4 OUTPUT 1~4
Press these buttons to select the desired output (not available for videowall
mode)
5
MULTIVIEW
Enter Multiview mode (All output display same screen)
MATRIX Enter Matrix mode
VIDEOWALL Enter videowall mode
LOCK
Use this button to lock / unlock panel button and prevent accidental changes.
MENU
Enter OSD menu
Back to upper level of menu
ALL Select all output (not available for videowall mode )
OFF Turn off the selected output (not available for videowall mode )
LOAD
Load layout/source in Multiview and Matrix mode from scene 1~8
Load screen position in VIDEOWALL mode from scene 1~4
SAVE
Save current layout/source in Multiview and Matrix mode to scene 1~8
Save screen position in VIDEOWALL mode to scene 2~4
FUNCTION
Switch different PIP/POP layout in Multiview Mode
Bezel correction (adjust screen position) in VIDEOWALL MODE
Not available in MATRIX MODE
6
UP
Move menu function up in OSD
Move screen position up in videowall mode.
DOWN
Move menu function down in OSD
Move screen position down in videowall mode.
LEFT
Move menu function left in OSD
Move screen position left in videowall mode.
RIGHT
Move menu function right in OSD
Move screen position right in videowall mode.
ENTER Execution selected function
1
2
3
6
4
5

4
Operating:
Multiview mode:
Output/input selection:
1. Press OUTPUT 1~4 buttons to select the desired output windows (A~D), button LED will light on. You could select
multiple outputs at the same time.
2. Press INPUT 1~4 buttons to switch to desired input
3. Press ENTER to quit the input selection.
Window layout selection:
1. Press FUNCTION button to enter layout selection.
2. Press INPUT /OUTPUT 1~4 to select desired layout, total 8 sets.
3. Press ENTER to quit the layout selection.
Save scene:
1. Press SAVE button.
2. Press INPUT /OUTPUT 1~4 to save current windows layout and source of windows.
3. Press ENTER to confirm.
Load scene:
1. Press LOAD button.
2. Press INPUT /OUTPUT 1~4 to load saved layout/source.
3. Press ENTER to confirm.
Matrix mode:
Output/input selection:
1. Press OUTPUT 1~4 buttons to select the desired output monitor, button LED will light on. You could select multiple
OUTPUT at the same time.
2. Press INPUT 1~4 buttons to switch to desired input
3. Press ENTER to quit the input selection.
Save scene:
1. Press SAVE button.
2. Press INPUT /OUTPUT 1~4 to save current source of output.
3. Press ENTER to confirm.
Load scene:
1. Press LOAD button.
2. Press INPUT /OUTPUT 1~4 to load saved output/source, total 8 sets.
3. Press ENTER to confirm.
Videowall mode:
Input selection:
1. Press INPUT 1~4 buttons to switch to desired input
Bezel correction:
1. Press FUNCTION button.
2. Press OUTPUT 1~4 to select the monitor to adjust screen position, shift depends on output resolution.
3. Press INPUT 1~4 to select the monitor to adjust screen position, shift depends on input resolution.
4. Press UP, DOWN, LEFT or RIGHT button to shift the screen.
5. Press ENTER to quit the position adjustment.
Save scene:
1. Press SAVE button.
2. Press INPUT 2~4 to save current position of each screen.
3. Press ENTER to confirm.
Load scene:
1. Press LOAD button.
2. Press INPUT 1~4 to load saved position of each screen(1 is factory default), total 4 sets.
3. Press ENTER to confirm.
5
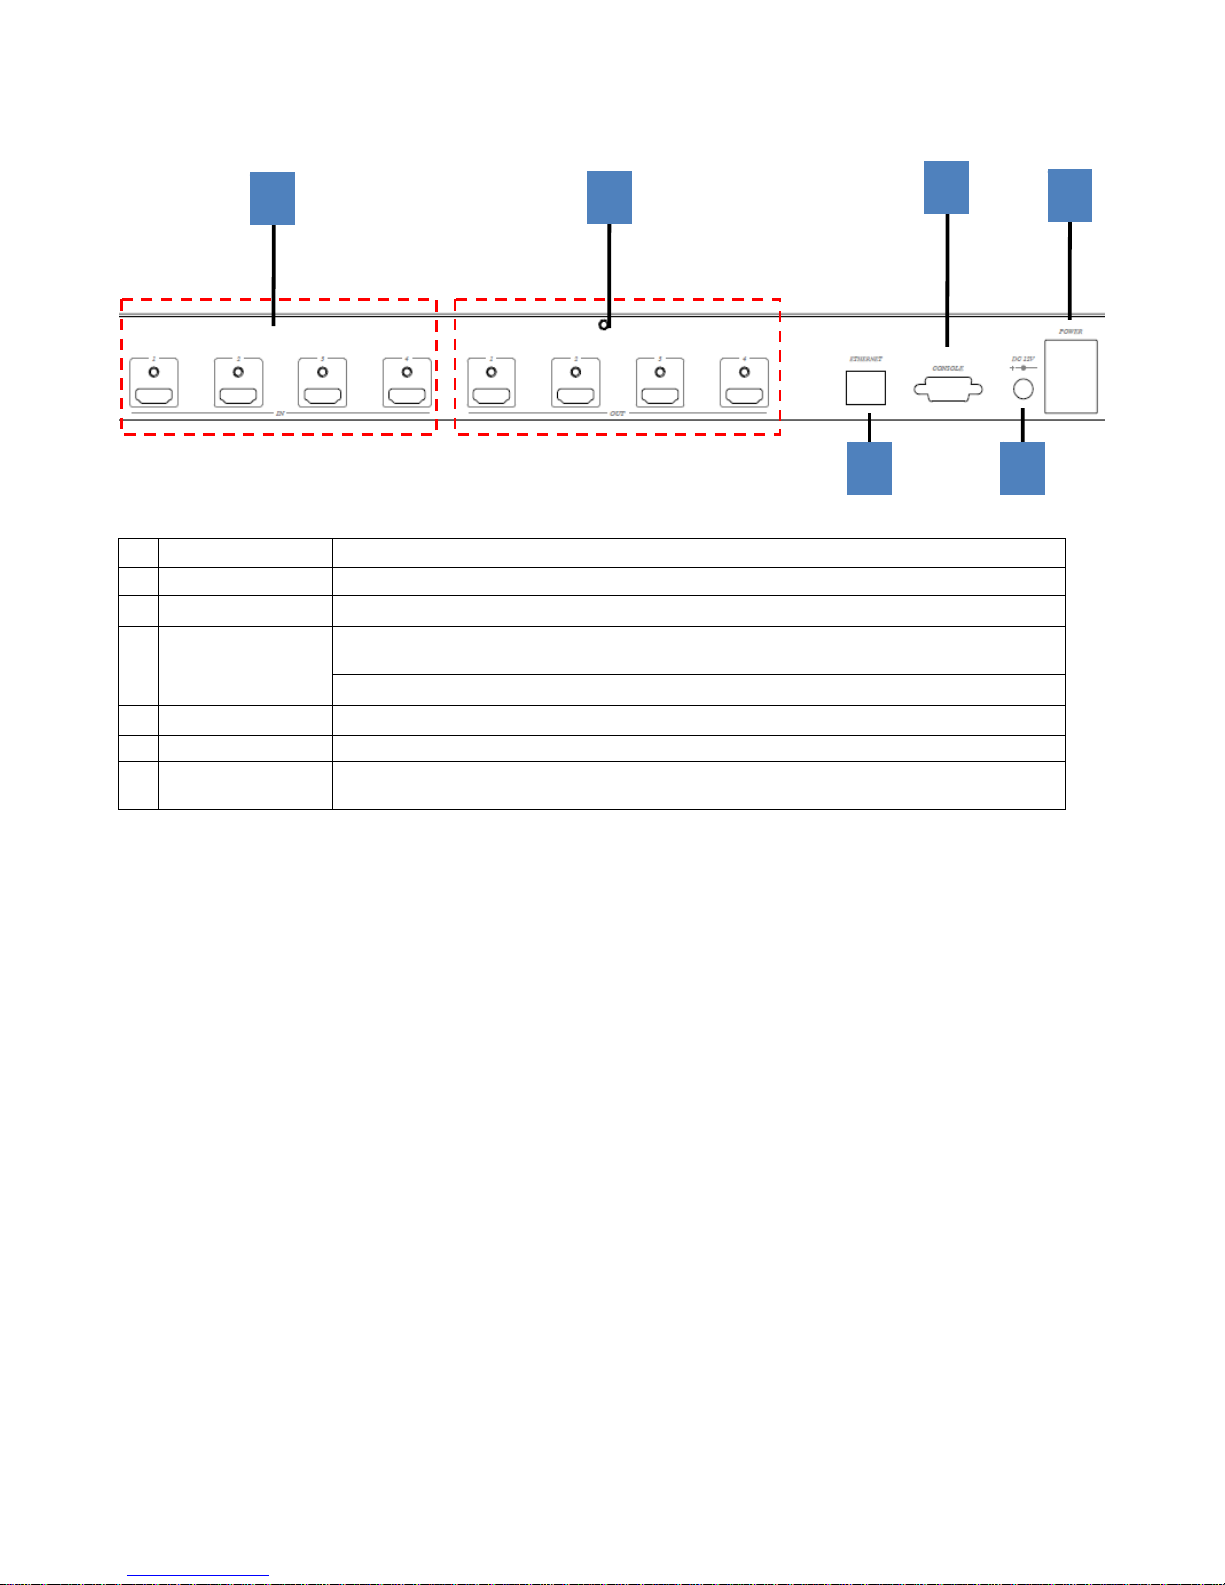
Rear Panel Function:
Panel Connector Function:
No. Name Description
1 INPUT 1~4 HDMI Input 1~4
2 OUTPUT 1~4 HDMI Output 1~4
3 ETHERNET
Yellow LED: Link
Green LED: Data transmit/receive
WebGUI control / Web firmware update
4 RS232 RS232 control / firmware update
5 DC12V External power supply
6 I/O
I: Power on
O: Power off
1
2
3
4
5
6
6
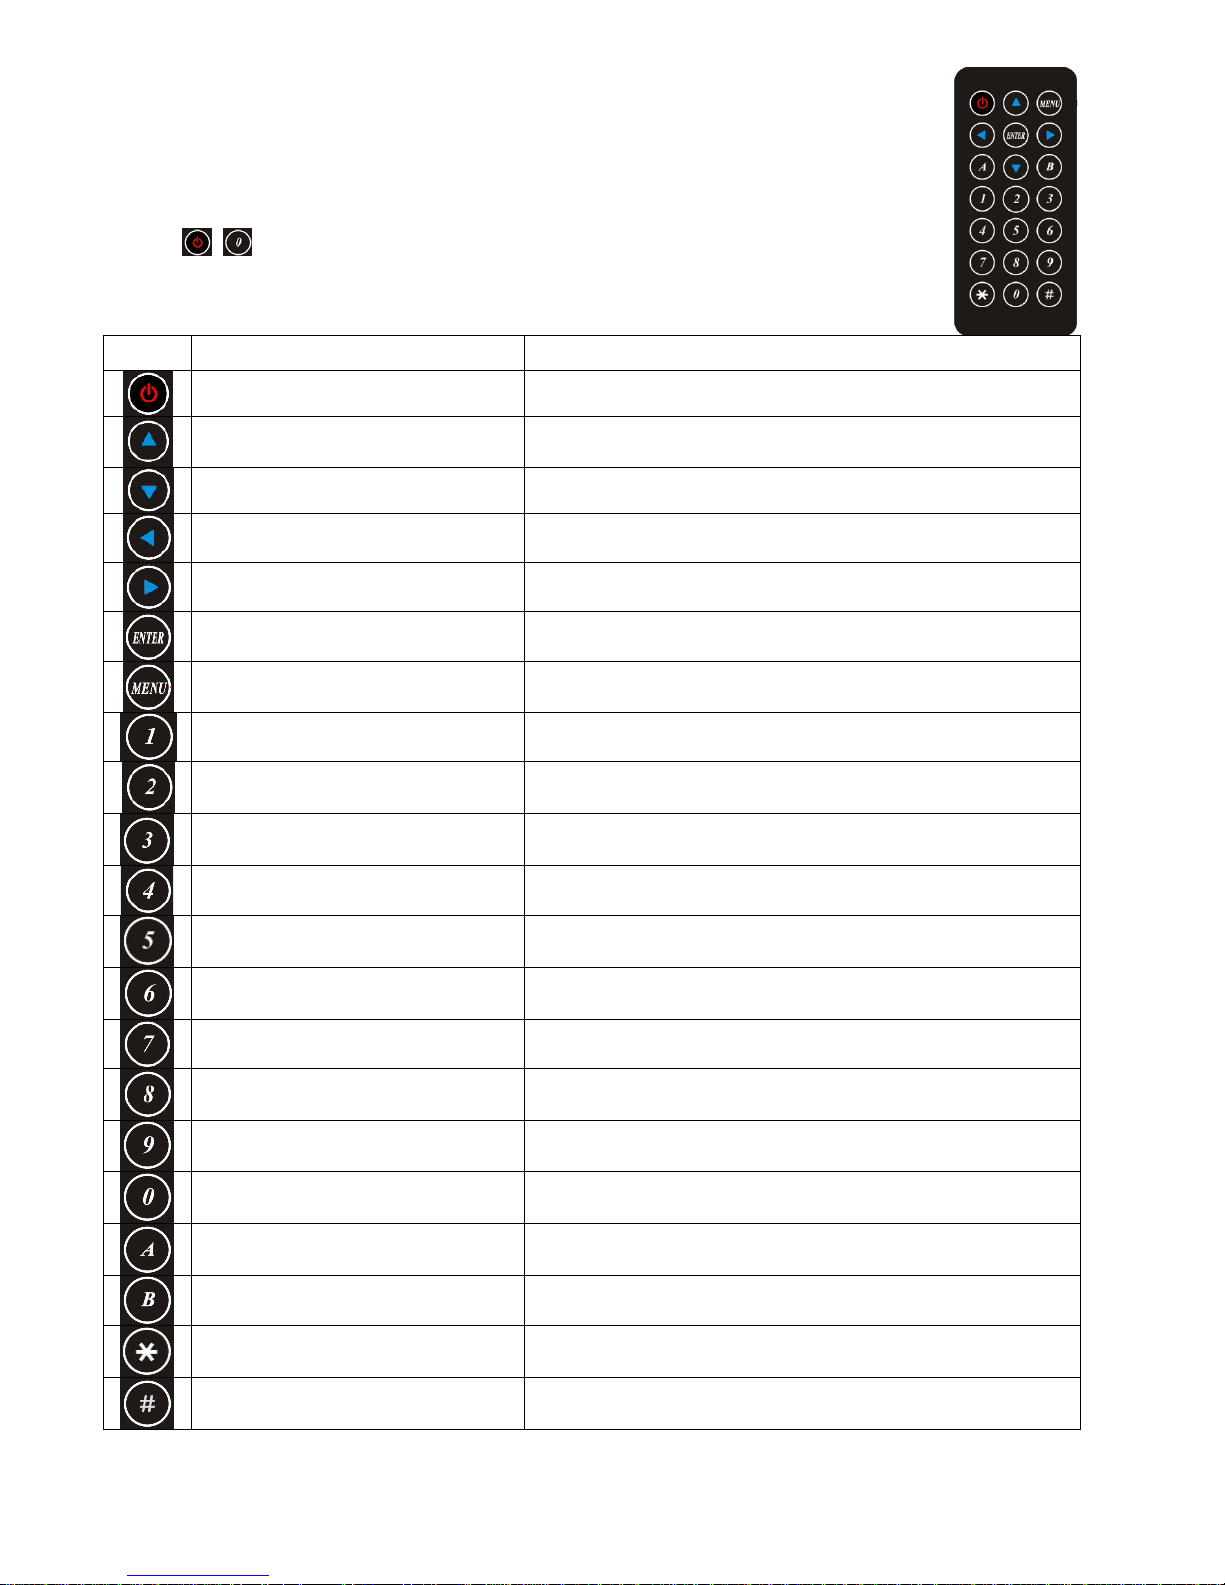
IR Remote Control (IR01) :
Initial at first time use the remote control or after change battery of remote control, the IR
remote control and the equipment IR Remote ID must be using same. The default IR
Remote ID is 0.
To setting the Remote ID, Press and hold power button, then press button 0 to complete the
setting.
+ .(for example)
Remote Control Button Function:
Symbol Function Name Description
POWER Power on / standby
UP Move menu function up in OSD
DOWN Move menu function down in OSD
LEFT Move menu function left in OSD
RIGHT Move menu function right in OSD
ENTER Execution selected function
MENU
Enter OSD menu
Back to upper level of menu
Quick output/input selection
Press to select output 1
Switch to input 1 if output have been selected
Quick output/input selection
Press to select output 2
Switch to input 2 if output have been selected
Quick output/input selection
Press to select output 3
Switch to input 3 if output have been selected
Quick output/input selection
Press to select output 4
Switch to input 4 if output have been selected
Reserved
Reserved
Multiview Switch to Multiview Mode
Matrix Switch to Matrix mode
Videowall Switch to Videowall mode
Turn off video Turn off video if output have been selected
Reserved
Reserved
Reserved
Reserved
7
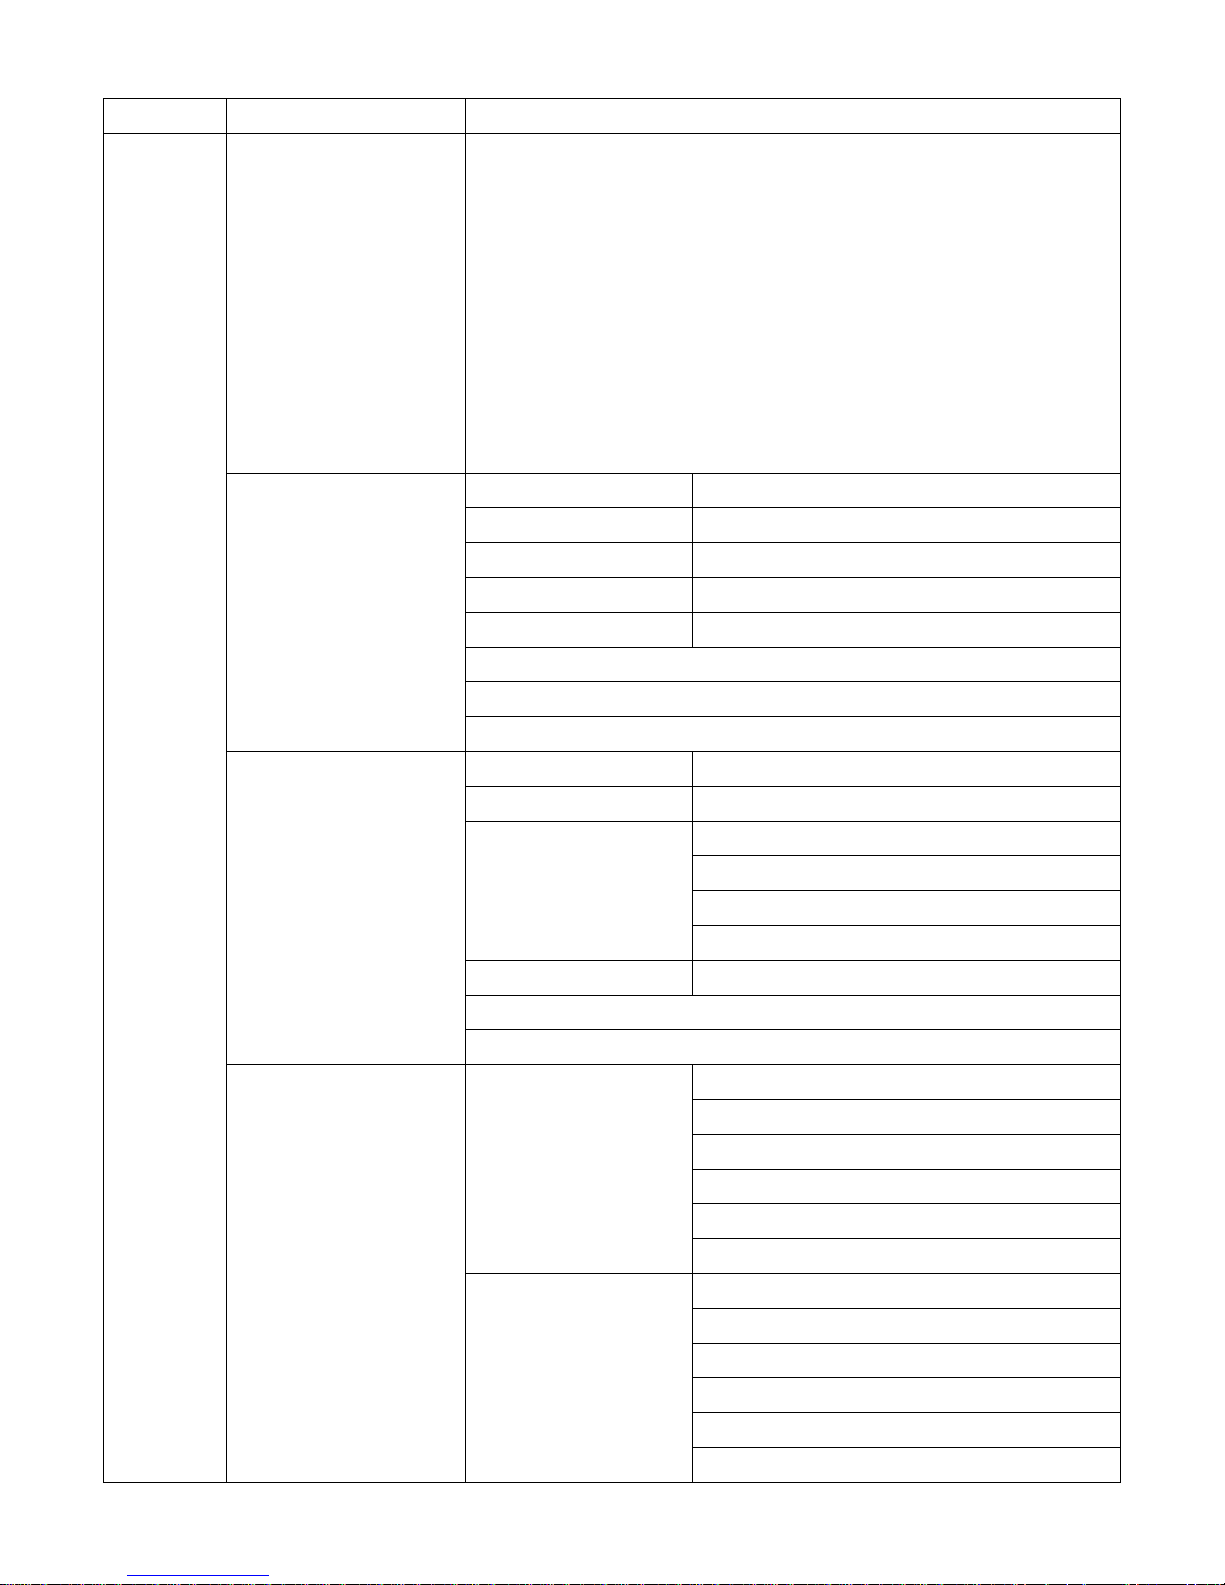
OSD MENU :
MAIN SUB MENU DESCRIPTION
SETUP
OUTPUT RESULTION 480P 1366x768
576P 1440x900
720P50 1600x1200
720P60 1680x1050
1080P24 1920x1200
1080P50 BACK
1080P60, Default EXIT
1024x768
1280x800
1280x1024
PICTURE SETTING OUT SELECT
OUT1~OUT4, Default OUT1
CONTRAST 0~100, Default 50
BRIGHTNESS 0~100, Default 50
SATURATION 0~100, Default 50
HUE 0~100, Default 50
RESET
BACK
EXIT
OSD SETTING MENU TIMEOUT
0~100, Default 20
INFO TIMEOUT
0~100, Default 5
INFO POSITION RIGHT TOP
LEFT TOP , Default
RIGHT BUTTON
LEFT BUTTON
INFO DISPLAY
ON, OFF, Default ON
BACK
EXIT
EDID INPUT1 EDID
1080P 2CH, Default
1080P MLT
OUTPUT 1
OUTPUT 2
OUTPUT 3
OUTPUT 4
INPUT2 EDID
1080P 2CH, Default
1080P MLT
OUTPUT 1
OUTPUT 2
OUTPUT 3
OUTPUT 4
 Loading...