

Page 1

Manual
Page 2

Page 3

Warranty 2
General care 2
Grid Pad Go and Grid Pad Rugged
Overview 3 - 4
Pairing the Bluetooth speaker 5 - 6
Batteries and power 6
Grid Pad Pro
Overview 7 - 9
Batteries and power 9 - 10
Auditory feedback and headphones 11
Switch input 12 - 13
Shoulder strap 14
Flip out feet 15
Environment control 16 - 17
Mounting 18
Contents
Grid Pad Eye
Overview 19
Alea eye gaze camera setup 19
Attaching other eye gaze cameras 20
Statement of compliance 20
Please read this booklet before using the machine.
This booklet does not replace the full manual for the tablet computer part of your device or the software. It provides a quick
guide for what you should know to get the best from your system.
1
Page 4

Warranty
Grid Pad devices are covered under the standard warranty for 2 years.
General care of Grid Pad devices
Make sure that hard objects cannot press against the screen.
Cleaning
The touchscreen should be cleaned using a clean microbre cloth.
To minimise the risk of infection, the machine should also be cleaned with a detergent wipe.
Optionally, this can be followed with an alcohol-based wipe AFTER cleaning with the detergent wipe.
The machine should not be immersed in water, or cleaned with a wet cloth, gels, polishes or any abrasive cleaning product.
Protection
Avoid exposure to water, including heavy rain. The screen seal will protect it against moisture, but the device is not designed
to be waterproof.
Avoid dropping your Grid Pad. The machines are sufciently robust for normal use, but are not designed to be stood on or
dropped from a height.
Repairs
Do not attempt to open the Grid Pad Go, as there are no user serviceable parts inside. If you want to discuss a repair please
contact your local reseller.
2
Page 5

Charging Grid Pad Go 8
Charge the device as shown in the diagram below:
Turning on Grid Pad Go 8
Turn on the device as shown in the diagram below:
Charging Grid Pad Go 11
Charge the device as shown in the diagram below:
Turning on Grid Pad Go 11
Turn on the device by pressing the power button in the top
right corner for 1 second:
Grid Pad Go
3
Page 6

Grid Pad Rugged
Charge and turn on the device as shown in the diagram below:
What is included with Grid Pad Go and Grid Pad Rugged
The systems consists of a tablet computer running Windows and Grid 3 software.
• 8” or 10” tablet computer with Windows
• Grid 3 software for communication and computer control
• Rugged case (Grid Pad Go only)
• Shoulder strap
• Bluetooth speaker system with neck strap
4
Page 7

Bluetooth speaker
The Grid Pad Go and Grid Pad Rugged are supplied with a high quality Bluetooth speaker.
The Bluetooth speaker has been paired with the device.
The speaker comes complete with a charger. Please charge it regularly - we recommend it be charged every time you
charge the Grid Pad Go. A red light will show when the speaker is charging.
When the power switch on the right hand side is turned on, a short tune will play. A blue light will intermittently ash when
connected to the Grid Pad Go.
5
Page 8

Pairing the Bluetooth speaker
Should you need to re-pair the Bluetooth speaker with your device please follow the steps below:
When you turn the speaker on for the rst time, it’s already in pairing mode.
1. Slide the power switch on your speaker to the On position.
2. On your device go to:
PC Settings > PC and Devices > Bluetooth > Bluetooth On. It will now automatically search.
Click BlackBerry Mini Stereo Speaker.
If you receive a prompt to enter a passkey on your Grid Pad Go device, type 0000.
If the Bluetooth connection is lost, you can press and hold the Play/Pause/Call function button on the speaker for 5 seconds
to turn on pairing mode at any time.
If there is no sound
Turn off the Bluetooth speaker and check the sound from the computer. If you hear anything then the Bluetooth speaker
needs charging.
If there is no sound, check Grid User Settings – Speech Settings – Public Voice that you have a voice selected and whether
the volume is set to a suitable level.
If still no sound, click on Windows Audio Settings in Public Voice settings and check the sound is not muted or set too low.
Batteries and power
The batteries for the Grid Pad Go and Grid Pad Rugged devices can last up to 8 hours per full charge under light use. As we
are not able to control the way that the computer is used, we cannot guarantee the battery life.
6
Page 9

Powering Grid Pad Pro 11
Charge the device as shown in the diagram below.
Turn on the device by pressing the power button in the top
right corner for 1 second:
Turning on Grid Pad Pro 13
Charge the device via the socket in the bottom right corner.
Turn on the device by pressing the power button on the right
of the device.
Grid Pad Pro
7
Page 10

Charging Grid Pad Pro 18
Charge the device as shown in the diagram below:
Turning on Grid Pad Pro 18
Turn on the device by pressing the power button on the right
hand side of the device:
8
Page 11

What is included with Grid Pad Pro
The system consists of a 11”, 13” or 18” tablet computer running Windows and Grid 3 software.
• 11”, 13” or 18” tablet computer with Windows
• Grid 3 software for communication and computer control
• High quality amplication
• Headphone socket for auditory scanning
• Switch input
• Radio switch input
• Shoulder strap
• Flip out feet for desk use
• Infrared environment control
• Radio environment control
• Mounting plate to work with Rehadapt or DAESSY systems
To operate the Grid Pad Pro turn on the device as described above. All of the adaptations are connected by USB and will
work when you turn your device on.
Batteries and power
The batteries for the Grid Pad Pro 11 and 13 can last up to 8 hours per charge. The Grid Pad Pro 18 can last up to 5 hours.
Battery life varies depending on the device usage and user settings.
9
Page 12

Hot-swappable battery
The Grid Pad Pro 13 includes a hot-swappable external battery. This allows you to increase the time you can use the device
by swapping a at battery for a charged one.
You do not need to shutdown the device before swapping the batteries.
To remove the battery, simply squeeze the top corners to release.
Squeeze the top corners to release battery
10
Charging the hot-swappable battery
The Grid Pad Pro 13 device charges the external battery
when it is plugged in to the mains.
Charging one external battery takes approximately 2 hours.
Additional external batteries and a 6 battery charging dock
are available as accessories.
Page 13
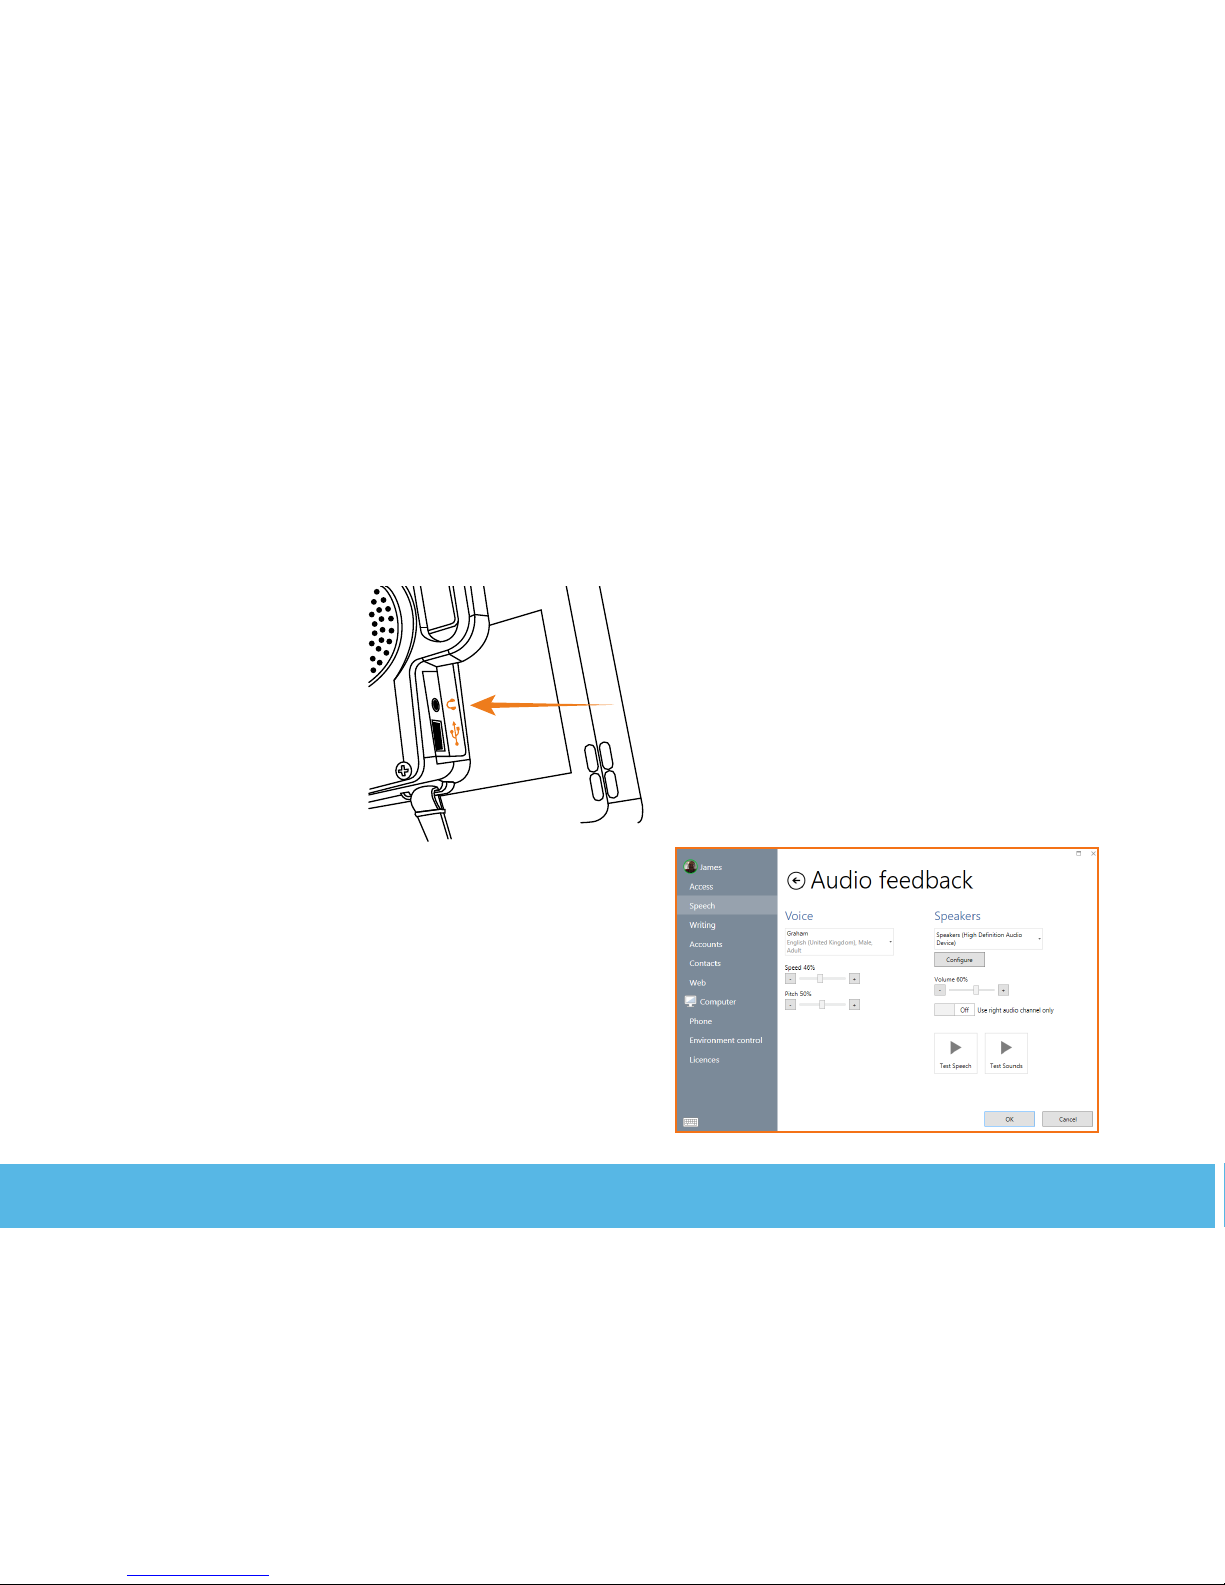
Auditory feedback and headphones
You can use headphones with the Grid Pad Pro for private listening to your application or for auditory scanning. This is
particularly useful for switch users that want to hear what a selection will say before they select it. You need to set this up in
Grid 3 and then plug your headphones into the Grid Pad as shown below:
To setup auditory scanning in Grid 3
Go to Settings > Speech > Audio feedback.
Select ‘Use right channel only’.
The audio channels will be split as required.
Plug headphones in here
11
Page 14

Switch input
You can plug up to two switches into the Grid Pad Pro. The ports are clearly labelled 1 and 2. Your switches must have the
standard 3.5mm jack connection.
USB port
Switch ports
12
Page 15

Radio switches
It is also possible to connect switches wirelessly to the Grid Pad using a wireless switch transmitter (sold separately). If you
order the transmitter with the device then it will be paired and ready to use.
If you need to use your radio switch close to other users, you can change the channel to stop them from interfering.
To change the channel, open the transmitter as described in the radio switch manual.
1. Change the transmitter channel by setting the rotary switch to 2, 4 or 6 (different to other transmitter modules).
2. Clear the previous setting by pressing the radio switch reset button for 10 seconds, using a ne point such as a
paper clip.
3. Connect a switch to socket 1 on the transmitter and keep it pressed while momentarily pressing the push button on
the receiver.
4. Repeat with a switch connected to socket 2 on the transmitter
5. Reassemble the case.
Radio switch reset button
13
Page 16

Shoulder strap
The Grid Pad Pro 11 comes with a shoulder strap so you can easily carry the device around. You need to attach the strap to
the device as shown in the picture below:
14
Page 17

Flip out feet
The ip out feet have been designed to give you the perfect angle for using the device on a desk or table.
The Grid Pad Pro 18 includes ip out feet at the bottom edges of the device. Simply ip out the feet to position the screen in
an upright position.
15
Page 18

Environment control
Infrared
Infrared environment control can be trained to work with most household devices that have an infrared remote control. This
typically includes TVs and video systems, music centres and much more.
To create a cell in Grid 3 that can control an infrared accessory, we advise you refer to the software manual. However, to
make a simple cell to complete this action:
1. Enter ‘Edit mode’ then double click on the cell you want to control the signal.
2. Choose Enviroment control from the Create cell menu.
3. Choose the type of accessory you would like to control, then select the Action. Click Ok to create the cell.
4. Under the Command menu select learn and follow the on screen instructions. Note if you are asked to congure
the transmitter, choose GEWA.
See the diagram for the location of the infrared learning window on the Grid Pad devices.
Safety note
This unit is designed for environment control. For safety critical functions, such as to call for help or to open the door to
leave the building in an emergency, or for any other function on which your safety depends, you should consider the use of a
simple environment control transmitter, such as the GEWA Prog, or a single action controller as a backup.
Infrared transmitters
Infrared learning window
16
Page 19

Radio control
The Grid Pad Pro devices also contain a radio transmitter that can be used to control a range of accessories. These include
mains sockets (and therefore lamps, fans and heaters) as well as alarms and intercoms. In most cases this will be Easywave radio transmission. If your supplier uses Z-Wave please speak to them about pairing accessories. If you purchased the
sockets with the device then they will already be paired.
Programming a socket:
1. Plug the socket into the mains.
2. In Grid 3 create a new cell and insert the command ‘Easy Wave’.
3. Press the programming button on the socket once. The LED will start to ash in this
pattern:
4. Click ‘Test button’.
5. The LED on the socket will now be solid for a few seconds before ashing again.
Press the programming button three more times to conrm the pairing.
6. Exit ‘Edit mode’ in Grid 3 and select your cell. It should turn the socket on.
7. To create an ‘off’ cell repeat the process but choose ‘Button 1b’ and press the button
on the socket twice when learning for the rst time.
17
Page 20

Mounting the Grid Pad Pro
The Grid Pad Pro is tted with a mounting plate designed to work with Daessy and REHAdapt mounting systems.
Mounting safety
It is important to mount your device safely. Failure to do so could cause damage to the device or injury to the user. Please
read the safety information that will come with the mounting equipment you use.
Our devices are supplied with a special dual mounting plate, as shown in the picture:
18
Page 21

Grid Pad Eye
The Grid Pad Eye provides the same functionality as the Grid Pad Pro but includes the option of eye gaze access. Please
read the information about Grid Pad Pro before you use your device.
Grid Pad Eye is available in 11”, 13” and 18” and is compatible with a variety of eye gaze cameras.
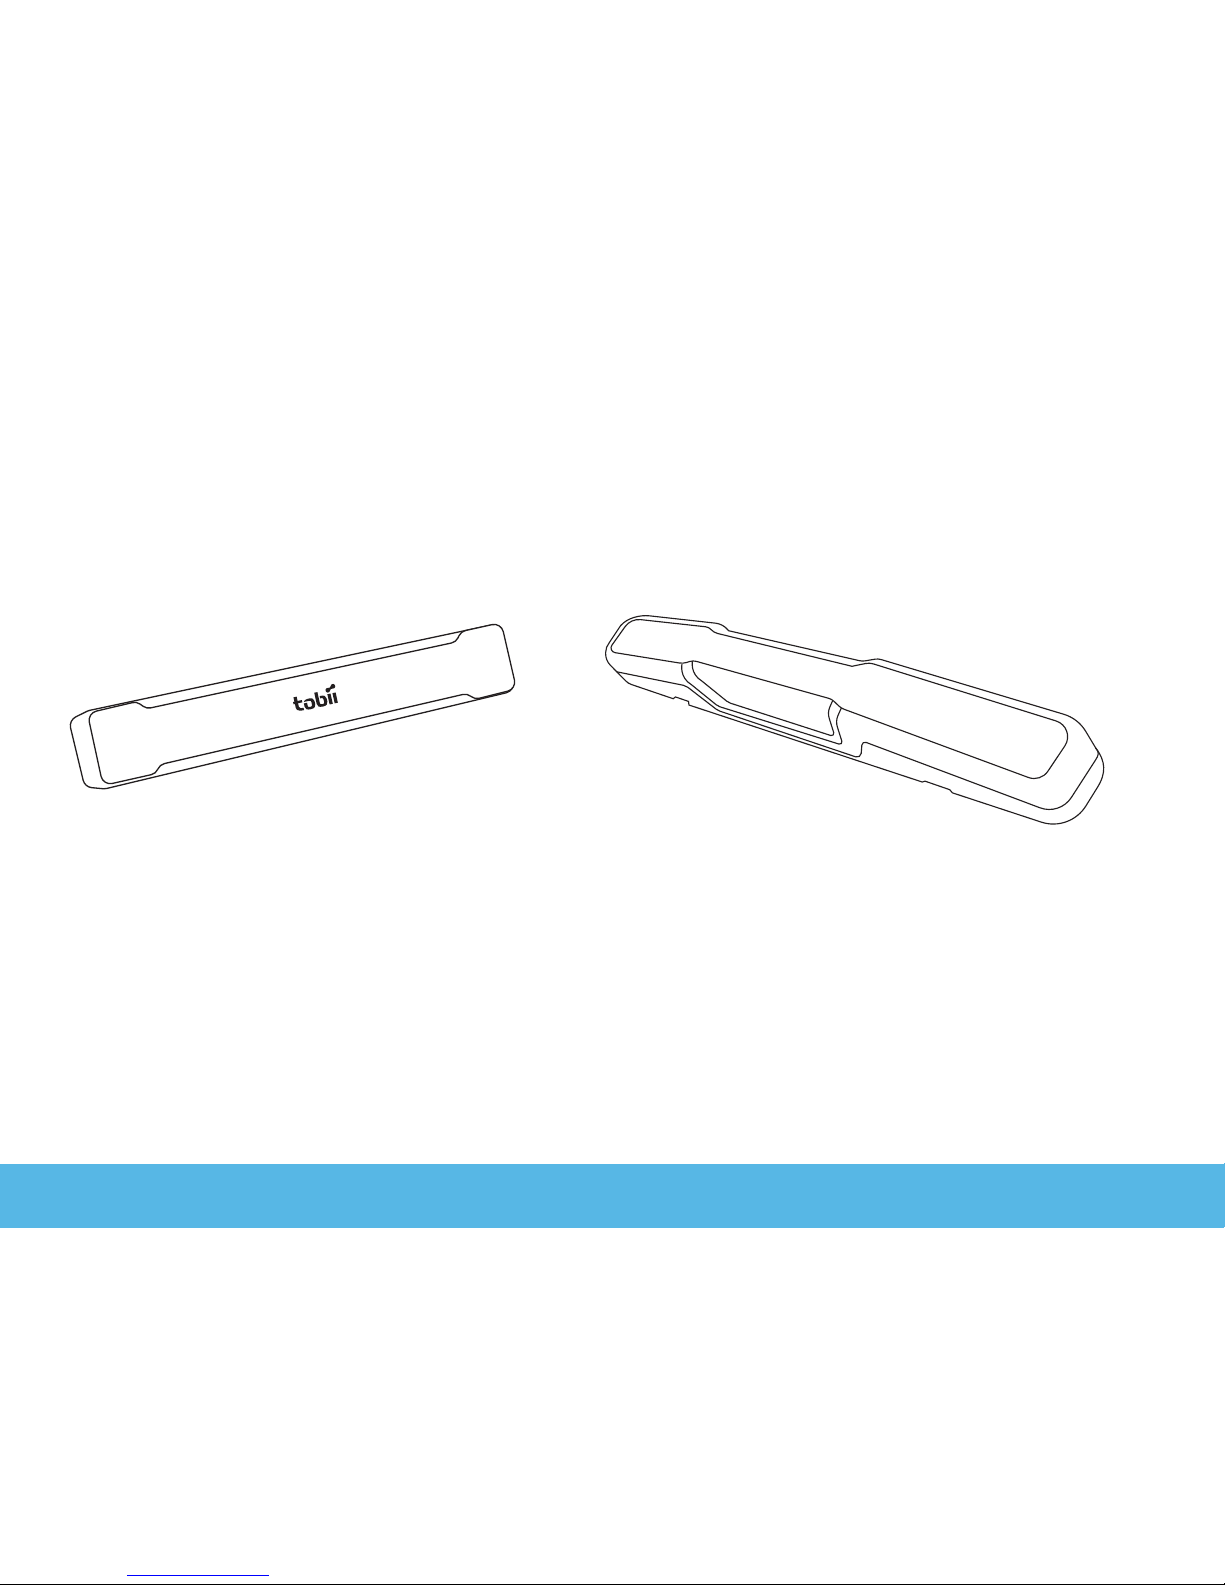
Attaching an Alea Intelligaze camera to the Grid Pad Eye
You may need to attach the Alea Intelligaze camera to the mount as shown in the diagram below:
Screws are included to
attach the camera to the
plate.
19
Page 22
Connecting other eye gaze cameras
To attach other eye gaze cameras such as the Tobii PCEye Go or myGaze to your device, use the screws provided.
Statement of compliance
This apparatus complies with the requirements of directive 93/42/EEC concerning medical devices.
This Product is subject to Directive 2002/96/EC of the European Parliament and the Council of the European Union on
waste electrical and electronic equipment (WEEE), and should not be disposed of as unsorted municipal waste. Please
utilise your local WEEE collection facilities in the disposal of this product.
20
Page 23

Notes
21
Page 24

Smartbox Assistive Technology Limited
Smart House
4a Court Road, Malvern
Worcestershire, WR14 3BL, UK
www.thinksmartbox.com
 Loading...