


SMARTBoard® 480
Interactive whiteboard
User’s guide

Product registration
If you register your SMART product, we’ll notify you of new features and software upgrades.
Register online at smarttech.com/registration.
Keep the following information available in case you need to contact SMARTSupport.
Serial number:
Date of purchase:
FCC warning
This equipment has been tested and found to comply with thel imits for a Class A digital device, pursuant to Part 15 of the FCC Rules. T hese l imits are designed to provide
reasonable protection against harmful interference when the equipment is operatedin a commercial environment.This equipment generates, uses andcan radiate radio
frequency energy and, if not installedand used in accordance wi th the manufacturer’s instructions, may cause harmful i nterferenceto radio communications. Operation of
this equipment in a r esidential area is li kely to causeharmful interferencein which case the user wi ll be required to correct the interference at his own expense.
Trademark notice
SMARTBoard, SMARTNotebook,DViT, SMARTInk, smarttech, the SMART logo and all SMART taglines are trademarks or registered trademarks of
SMARTTechnologiesULC in the U.S. and/or other countries. Micr osoft and W indows are either registered trademarks or trademarks of Mi crosoft Corporation in the U.S.
and/or other countries. All other third-party product and company names may be trademarks of their respective owners.
Copyright notice
© 2012 SMARTTechnologiesULC. All rights reserved. No part of this publication may be reproduced, transmitted, transcribed, stored i n a retrieval system or translated
into any language in any form by any means without theprior w ritten consent of SMARTTechnologiesULC. Informationi n this manual is subject to change without notice
and does not represent a commitment on the part of SMART.
Oneor m ore of the following patents: US6320597; US6326954; US6741267; US6803906; U S6954197; U S7151533; U S7184030; U S7236162; US7342574; US7379622;
US7532206; US7619617; US7629987; U S7692625; U S7751671; U S7757001; U SD612396; USD616462; U SD617332; andU SD636784. Other patents pending.
07/2012

Important information
Before you install and use your SMARTBoard® 480 interactive whiteboard, read and understand the
safety warnings and precautions in this user’s guide and the included warnings document. The
included warnings document describes the safe and correct operation of your SMARTBoard
interactive whiteboard and its accessories, helping you to prevent injuries and equipment damage.
N O T E
In this document, the term “interactive whiteboard” refers to your interactive whiteboard and its
accessories and options.
i


Contents
Important information i
Chapter 1: Introducing your SMARTBoard 480 interactive whiteboard 1
Introduction 1
Features 2
How does your SMARTBoard interactive whiteboard work? 3
Computer requirements 4
Accessories and replacement parts 4
Installation tips 4
Chapter 2: Connecting your interactive whiteboard to a computer 7
Overview 7
Installing SMARTProductDrivers 8
Orienting your interactive whiteboard 8
Chapter 3: Using your interactive whiteboard 11
Using the Floating Tools toolbar 12
Using gestures, dual touch and dual write 13
Chapter 4: Maintenance and troubleshooting 19
Tips for trouble-free performance 19
Cleaning your interactive whiteboard 20
General troubleshooting 20
Transporting your interactive whiteboard 23
Contacting SMART Support 24
Appendix A: Hardware environmental compliance 25
Index 27
iii


Chapter 1
480 interactive whiteboard
Introduction 1
Features 2
Feature highlights 2
DViT technology 2
Multitouch gestures 2
Dual touch 2
Dual write 2
Durable surface 2
How does your SMARTBoard interactive whiteboard work? 3
Windows computers 3
Computer requirements 4
Accessories and replacement parts 4
Installation tips 4
Extending your USB cable 4
Avoiding electromagnetic interference (EMI) 5
Introduction
Your SMART product is a wall-mounted, front projection interactive whiteboard. It enables you to do
everything that you can do at your computer—open and close applications, scroll through files, hold
meetings with others, create new documents or edit existing ones, visit websites, play video clips
and more—by touching the interactive surface with your finger or the included pen. When you connect
your interactive whiteboard to a computer and a projector, your computer image displays on the
interactive surface. You can write over any application in digital ink, and then save these notes to a
file in SMARTNotebook™ collaborative learning software for future reference and distribution.
Your SMARTBoard 480 interactive whiteboard is a full-speed USB 1.1 bus powered device with no
external power supply. Because USB is the primary connectivity mode, your interactive whiteboard
receives power from the computer through the included 3 m (9' 10") USB cable. There’s no power
switch on your interactive whiteboard. It’s always running when your computer is turned on.
1

C H A P T E R 1
Introducing your SMARTBoard 480 interactive whiteboard
Features
Your SMARTBoard 480 interactive whiteboard is durable and reliable. It features a rugged, hardened
interactive surface, a damage-resistant pen and SMART’s proprietary DViT® (Digital Vision Touch)
technology. Your interactive whiteboard measures 195.6 cm (77") diagonally and has a 4:3 aspect
ratio.
Feature highlights
DViT technology
Two digital cameras, one in each of the interactive whiteboard’s top corners, track the position of your
finger or the pen as it moves across the interactive surface.
Multitouch gestures
Your interactive whiteboard supports multitouch gestures (Windows® only). You can use two fingers
to resize an object on a page, to rotate an object, to zoom in and out and more.
Dual touch
Your interactive whiteboard supports dual touch (Windows only). Two users can use their fingers to
simultaneously perform mouse functions.
Dual write
Your interactive whiteboard has limited support for dual write (Windows only). Two users can use
their fingers to simultaneously write on the interactive whiteboard.
Durable surface
The interactive surface is scratch-resistant, dent-resistant and optimized for projection.
2

C H A P T E R 1
Introducing your SMARTBoard 480 interactive whiteboard
How does your SMARTBoard interactive
whiteboard work?
Your interactive whiteboard functions as an input device for your computer, enabling you to work in
any application on your connected computer. You need two additional components to use your
interactive whiteboard: a computer and a digital projector. These components work together as
follows:
l Your computer runs an application and sends the image to your projector.
l Your projector casts the image onto your interactive whiteboard.
l Your interactive whiteboard detects contact with its screen and sends each contact point,
along with Pen tool information, to the connected computer.
SMARTProductDrivers translates the information into mouse clicks and digital ink.
When you touch your interactive whiteboard’s surface, the touch of your finger becomes a mouse
click and you can control your computer from your interactive whiteboard. When you use a pen tool,
SMARTProductDrivers changes the pointer to a colored pen, which enables you to write over your
desktop or any open application with digital ink.
When you install SMARTProductDrivers, a Floating Tools toolbar appears on your desktop. You can
change pen settings such as the transparency, color and width of the ink. You can then save your
notes to a file in SMARTNotebook software. You can also customize other tools, such as the width
of the eraser tool you use to erase your notes.
Windows computers
SMARTNotebook collaborative learning software includes SMARTInk™ and
SMARTProductDrivers. SMARTInk works with SMARTProductDrivers to enable you to write on
your screen in digital ink using your interactive product’s pen or your finger.
SMARTInk starts automatically when you start your computer, and the
SMARTInk toolbar appears in the title bar of each open window on your
computer.
N O T E
SMARTNotebook software doesn’t display the SMARTInk toolbar because it includes its own ink
tools that you can use to write directly in your file.
3

C H A P T E R 1
Introducing your SMARTBoard 480 interactive whiteboard
You can press SMARTInk to select ink properties and to perform common tasks such as
capturing your notes.
SMARTInk includes SMARTInk Notes which enable you to write in digital ink anywhere on your
desktop. When you write outside of the open windows on your computer, a SMARTInk Note appears
and you can write inside the note.
SMARTInk also includes the SMARTInk Document Viewer, which enables you to view your
PDFfiles and to write over them in digital ink.
For more information on using SMARTInk, see the SMARTInk user’s guide
(smarttech.com/kb/170191).
Computer requirements
To successfully power your interactive whiteboard and run SMARTProductDrivers, your computer
must meet certain minimum requirements. For your interactive whiteboard’s computer requirements,
see the SMARTBoard 480 interactive whiteboard specifications (smarttech.com/kb/154638).
Accessories and replacement parts
For a full list of items that you can order for your SMARTBoard 480 interactive whiteboard, go to
smarttech.com/accessories.
Contact your authorized SMARTreseller (smarttech.com/wheretobuy) to order accessories and
standard replacement parts for your SMARTBoard 480 interactive whiteboard.
Installation tips
For the installation instructions for your SMARTBoard 480 interactive whiteboard, see the
SMARTBoard 480 interactive whiteboard installation guide (smarttech.com/kb/154700).
Extending your USB cable
The USB cable included with your SMARTBoard 480 interactive whiteboard is within the limit defined
by the USB standard for maximum length. Your interactive whiteboard has a built-in 1.5 m (5') USB
cable and a 3 m (9' 10") USB cable is also included.
4

C H A P T E R 1
Introducing your SMARTBoard 480 interactive whiteboard
I M P O R T A N T
The combined USB cables connected from your interactive whiteboard to your computer should not
exceed 5 m (16').
However, if this cable isn’t long enough to reach from your computer to your interactive whiteboard,
you can use a bus-powered hub, such as the active USB extension cable (Part No. USB-XT) to
extend your USB connection.
Avoiding electromagnetic interference (EMI)
You can take some precautions to prevent EMI to your interactive whiteboard:
l Don’t route USB cables parallel to power cables.
l Cross USB cables over power cables at a 90º angle to reduce the risk of interference on the
USB cables.
l Don’t route USB cables close to common sources of EMI, such as electric motors or
fluorescent lighting ballasts.
l Don’t bend USB cables sharply.
l Don’t use USB plug adapters or passive USB wall plates.
5


Chapter 2
whiteboard to a computer
Overview 7
Matching your computer’s resolution to your projector’s resolution 7
Installing SMARTProductDrivers 8
Orienting your interactive whiteboard 8
Overview
Your SMARTBoard 480 interactive whiteboard’s USB interface enables you to connect your
interactive whiteboard to your computer. Because the included USB cable provides both a digital
signal and power from your computer to your interactive whiteboard, you don’t need an additional
power supply.
I M P O R T A N T
Your SMARTBoard 480 interactive whiteboard system supports one interactive whiteboard per
computer connection on a primary display only.
Matching your computer’s resolution to your projector’s resolution
Ensure that the resolution settings for your projector and computer match. If your computer’s
resolution doesn’t match the projector’s native resolution, the image doesn’t properly fill your
interactive whiteboard’s surface and can shimmer or appear distorted.
Set the projector to its optimal image resolution by following the instructions included with your
projector, and then set your computer’s resolution to match. If you need help changing your
computer’s resolution, see the instructions included with your operating system.
You might need to adjust your computer’s refresh rate to obtain the best results. Set the computer to
an initial refresh rate of 60 Hz, and then adjust this rate up or down to determine the ideal refresh rate.
For more information on changing your computer’s refresh rate, see the instructions included with
your operating system.
7
C H A P T E R 2
Connecting your interactive whiteboard to a computer
Installing SMARTProductDrivers
You can install SMARTProductDrivers on any computer that meets certain minimum operating
specifications using the software installation DVD included with your SMART product or from
smarttech.com/downloads.
N O T E
You must install SMARTProductDrivers 10.7 or later on your Windows computer, or
SMARTProductDrivers 10.2 SP1 or later on your Linux® computer in order to write in digital ink
and to touch on the interactive whiteboard’s surface.
For your interactive whiteboard’s system requirements, see the SMARTBoard 480 interactive
whiteboard specifications (smarttech.com/kb/154638).
I M P O R T A N T
l Disconnect the SMARTBoard 480 interactive whiteboard from your computer while you
install SMARTProductDrivers.
l There are no status lights on your SMARTBoard 480 interactive whiteboard.
SMARTProductDrivers must be installed to view the interactive whiteboard’s status.
Orienting your interactive whiteboard
After you install SMARTProductDrivers on your computer, orient your interactive whiteboard.
Orienting your interactive whiteboard ensures the greatest possible level of writing and touch
accuracy. Orient your interactive whiteboard any time your projector or interactive whiteboard has
been moved since you last used it, or whenever the mouse pointer isn’t properly aligned with the pen
or your finger when you touch the interactive surface.
g To orient your interactive whiteboard
On the interactive surface, click the SMART Board icon in the notification area, and then
1.
select Orient.
The Orientation screen opens.
2. Pick up the pen from the pen tray.
3. Beginning at the first target on the screen, touch the center of the target firmly with the tip of the
pen and hold the pen steady until the target moves to the next point.
8

C H A P T E R 2
Connecting your interactive whiteboard to a computer
4. Repeat step 3 until you arrive at the last point.
N O T E
The orientation procedure consists of four touches.
5. At the last point, touch the center of the target, pause and release the pen.
The Orientation screen closes.
9


Chapter 3
whiteboard
Using the Floating Tools toolbar 12
Using gestures, dual touch and dual write 13
Single-finger gestures 14
Selecting and deselecting an object (clicking) 14
Displaying menu options (right-clicking) 14
Dragging an object, scroll bar or window 14
Double-clicking 14
Displaying the next and previous page 15
Multi-finger gestures 15
Displaying menu options (right-clicking) 15
Enlarging an area or object 15
Reducing the scale of an object 16
Scrolling horizontally or vertically 16
Rotating an object 16
Best practices for gestures and tools 16
When you touch your interactive whiteboard’s surface, the interactive whiteboard registers the
horizontal and vertical (or x and y) coordinates on the interactive surface. Your computer’s mouse
driver interprets those coordinates and moves the pointer to the corresponding point on the projected
image.
To open an application on your interactive whiteboard, press twice consecutively on the application’s
icon. When you press twice to open an application, it’s the same as double-clicking your mouse to
open an application on your computer. Similarly, each time you press once on your interactive
whiteboard’s surface, it’s the same as a single left click.
N O T E
If necessary, move the mouse or touch the interactive whiteboard’s surface or press any key on
your keyboard to bring your computer out of standby mode.
11

C H A P T E R 3
Using your interactive whiteboard
Using the Floating Tools toolbar
You must install and run SMARTProductDrivers on your connected computer to have use of the
Floating Tools toolbar. While you work on your interactive whiteboard, the toolbar floats over your
desktop and any open application. Use your finger or the provided pen tray pen to select a tool from
this customizable toolbar to click, write, erase and open SMARTNotebook software on your
interactive whiteboard.
For more information on how to use SMARTNotebook software, see smarttech.com/support.
g To open the Floating Tools toolbar
Press the SMARTBoard icon in the notification area, and then press Show Floating Tools.
N O T E S
l SMARTNotebook software includes additional toolbars which allow you to control digital ink
pens and other drawing tools.
l You’re unable to use the Right-click tool from the Floating Tools toolbar on your
SMARTBoard 480 interactive whiteboard.
12

C H A P T E R 3
Using your interactive whiteboard
l You can move this toolbar to either the left or right side of the screen.
l You can move this toolbar lower on your screen so younger students can reach it.
l You’re unable to rotate this toolbar horizontally.
Using gestures, dual touch and dual write
Your interactive whiteboard supports multitouch gestures, dual touch and dual write with your
Windows computer.
I M P O R T A N T
Gestures, dual touch and dual write require the Windows 7 or Windows XP operating systems and
the latest version of SMARTProduct Drivers and SMARTNotebook software
(smarttech.com/downloads).
Multitouch gestures enable you to use pre-determined commands on your interactive whiteboard
without using the keyboard or mouse. With a series of two-finger touches on your interactive
whiteboard screen, you can navigate pages, change the look of an object and more.
Dual touch enables two users to touch the interactive whiteboard and to simultaneously perform
mouse functions.
Dual write enables two users to use their fingers to write on the interactive whiteboard at the same
time.
N O T E
Dual write has limited functionality with your SMARTBoard 400 series interactive whiteboard.
Before you use these features, enable your interactive whiteboard to recognize them.
g To enable gestures, dual touch and dual write
Press the SMARTBoard icon in the notification area, and then press SMARTSettings.
1.
The SMARTSettings window appears.
2. Press SMARTHardware Settings.
3. Select Mouse and Gesture Settings from the drop-down menu.
4. Select Multitouch Mode.
13

C H A P T E R 3
Using your interactive whiteboard
5. Press Apply.
6. Press OK.
Single-finger gestures
You can perform some gestures using one finger, including selecting an object and double-clicking.
Single-finger gestures include the following:
Selecting and deselecting an object (clicking)
Quickly press and release the interactive surface to select or deselect
an object or option. This performs a standard mouse click.
N O T E
This gesture starts programs if your operating system is set to start
applications on a single click.
Displaying menu options (right-clicking)
Press and hold the screen with your finger.
In SMARTNotebook software, Windows and Microsoft® Office
programs, the right-click menu appears.
Dragging an object, scroll bar or window
Press and hold an object or scroll bar on the screen. Keep your finger
on the screen and slowly move the object or scroll bar. When you
reach the position you want, release your finger.
Double-clicking
Quickly press and release the interactive surface twice in the same
spot. This performs a standard double-click.
N O T E
This gesture starts programs if your operating system is set to start
applications on a double-click.
14

C H A P T E R 3
Using your interactive whiteboard
Displaying the next and previous page
Press the screen, and then quickly press again directly to the right of
that point to display the next page.
Press the screen, and then quickly press again directly to the left of
that point to display the previous page.
Multi-finger gestures
You can perform some gestures using two or more fingers, including scaling, scrolling and
manipulating objects. Multi-finger gestures include the following:
Displaying menu options (right-clicking)
Using two fingers on the same hand, press and hold the screen with your left finger and then to press
the screen once with your right finger.
Lift your left finger from the screen, and then select a menu item with any finger.
Enlarging an area or object
Use one finger on each hand to press in the center of the area or
object, and then drag your fingers away from each other.
15

9 0 °
9 0 °
C H A P T E R 3
Using your interactive whiteboard
Reducing the scale of an object
Use one finger on each hand to press the screen at opposite ends of
the area or object, and then drag your fingers toward each other.
This gesture either scales an object on a page, or the entire page,
depending on the application.
Scrolling horizontally or vertically
Use two fingers on the same hand to press the screen.
Keeping your fingers on the screen, move up, down, left or right on the
page. Release your fingers when you’re satisfied with the view.
Rotating an object
Place one finger on either side of the object you want to rotate. Keep
one finger stationary, and quickly move your second finger around the
object. Release your fingers from the screen when you’re satisfied
with the angle.
Best practices for gestures and tools
Follow these guidelines when you use gestures and tools with your interactive product.
Hold your fingers perpendicular (90°) to the interactive surface at the contact point.
16

C H A P T E R 3
Using your interactive whiteboard
Keep your thumb and other fingers away from the interactive surface. They can generate
unintentional commands.
Keep your other hand, elbows and loose clothing away from the interactive surface. They can
generate unintentional commands.
For “click” commands, quickly tap your finger on the interactive surface. Also, make sure you lift your
finger far enough away from the interactive surface between presses so that your finger is out of the
interactive whiteboard cameras’ view.
17


Chapter 4
troubleshooting
Tips for trouble-free performance 19
Cleaning your interactive whiteboard 20
General troubleshooting 20
Adjusting the projected image 20
Resetting your interactive whiteboard 20
Preventing USB cable issues 21
Troubleshooting tips 21
Transporting your interactive whiteboard 23
Contacting SMART Support 24
Tips for trouble-free performance
Your SMARTBoard interactive whiteboard is durable, but take care to prevent any damage to it and
its parts.
l Replace the pen when the nib wears out.
l Don’t touch the interactive surface with sharp or pointed objects.
l Don’t use adhesive tape on the interactive surface.
l Don’t set up and use your interactive whiteboard in an area with excessive levels of dust,
humidity or smoke.
l Don’t use low-odor dry-erase markers because they can be very difficult to erase. Use
standard (high-odor) dry-erase markers that show a warning to use them only in well-ventilated
areas.
19

C H A P T E R 4
Maintenance and troubleshooting
Cleaning your interactive whiteboard
With proper care, your interactive whiteboard will provide years of trouble-free service. Follow these
tips to keep your interactive whiteboard clean.
l To clean dust, dirt and finger grease, wipe the writing surface with a damp cloth or sponge. Use
mild soap, if required.
l Don’t spray cleaner directly onto the interactive surface. Instead, spray a light amount of
cleaner on a cloth and then gently wipe the interactive surface.
l Don’t allow excess cleaner to flow onto the frame’s reflective surfaces.
l Don’t touch the digital cameras located in the top corners of the frame. Don’t attempt to clean
the digital cameras without specific instructions from SMART Technologies.
l If ink is accidentally used on your interactive whiteboard, remove the ink as soon as possible.
Ink becomes more difficult to remove the longer it stays on the display surface.
C A U T I O N
Do not use harsh chemicals or abrasive cleaners on your interactive whiteboard.
I M P O R T A N T
l Before you clean your interactive whiteboard, disconnect its USB cable.
l To view dirt or streaks more easily, set your projector to standby (lamp off) mode.
General troubleshooting
Adjusting the projected image
If your projector isn’t installed in a fixed location, you can correct many image problems by shifting
your projector so that the projected image fits squarely on the interactive surface. Optimally, each
side of the image should extend almost to the edge of the interactive surface.
For more information on your projector, go to smarttech.com/support.
Resetting your interactive whiteboard
You can reset your interactive whiteboard by disconnecting and then reconnecting the USB cable.
This turns the power off and back on, restarting all components of your interactive whiteboard.
20

C H A P T E R 4
Maintenance and troubleshooting
Preventing USB cable issues
To troubleshoot some common cable routing issues, try disconnecting accessories such as USB
hubs and USB extension cables that are connected to your interactive whiteboard.
The basic system consists of the SMARTBoard 480 interactive whiteboard, USB cable, computer
hardware, computer operating system and SMARTProductDrivers. You can try isolating and
replacing each component to identify the cause of the connectivity issue.
Troubleshooting tips
This section describes some symptoms, causes and solutions for problems that you could
experience with your interactive whiteboard.
Try the troubleshooting tips in the following table to quickly resolve most issues with your product.
N O T E
These procedures vary, depending on your version of Windows operating system and your system
preferences.
Symptoms Cause Solution
No image is projected on
your interactive
whiteboard, or a “No Input”
message appears.
Your projector isn’t receiving
a video signal.
Your computer is in standby
mode.
Your computer is off. Turn on your computer (or press your
Check the video cable connections.
Ensure that the correct video input is
selected on your projector.
Ensure that your projector is on, and that
it’s connected to a power source.
If you’re using a laptop computer, turn on
the external video connection. Refer to
your laptop’s user’s guide for more
information.
Move the mouse, or touch the interactive
surface or any key on your keyboard to
bring your computer out of standby
mode.
computer’s reset button), and then log on
as usual.
21

C H A P T E R 4
Maintenance and troubleshooting
Symptoms Cause Solution
The projected image is
blurry, too large or doesn’t
completely fill your
interactive whiteboard’s
screen.
The SMARTBoard
icon doesn’t appear in the
notification area.
The orientation procedure
doesn’t proceed to the
second point.
Your projector’s position,
zoom and focus settings
aren’t adjusted.
Your computer’s video
resolution settings don’t
match your projector’s
native resolution.
SMARTBoard Tools isn’t
running.
SMARTProductDrivers
isn’t installed
Your computer may be
sending input to an
application other than the
interactive whiteboard’s
orientation screen.
Adjust the projector’s position, zoom and
focus settings. Refer to your projector’s
user’s guide for more information.
Consult your projector’s user’s guide for
the correct computer video resolution,
and then select Start > Control Panel >
Display and change the video resolution
to match your projector.
Start SMARTBoard Tools by selecting
Start > All Programs > SMART
Technologies > SMART Board Tools
2012.
Install SMARTProductDrivers on your
computer. For details about installing
SMARTProductDrivers, see Installing
SMARTProductDrivers on page 8.
Press ALT+TAB on your keyboard to
adjust your operating system’s focus to
the interactive whiteboard’s orientation
screen.
The interactive surface
doesn’t respond when you
touch it, the pointer moves
erratically or gaps appear
when you draw or write.
Your interactive whiteboard
isn’t oriented.
SMARTBoard Tools isn’t
running.
SMARTProductDrivers
isn’t installed.
Not all components of
SMARTProductDrivers are
installed on your computer.
Orient your interactive whiteboard. For
more information about orienting your
interactive whiteboard, see Orienting
your interactive whiteboard on page 8.
Start SMARTBoard Tools by selecting
Start > All Programs > SMART
Technologies > SMART Board Tools
2012.
Install SMARTProductDrivers on your
computer. For details about installing
SMARTProductDrivers, see Installing
SMARTProductDrivers on page 8.
Remove and install
SMARTProductDrivers again on your
computer.
22

C H A P T E R 4
Maintenance and troubleshooting
Symptoms Cause Solution
There is a small red × on
the SMARTBoard
icon.
SMARTProductDrivers is
unable to detect your
interactive whiteboard.
SMARTBoard service isn’t
running.
Not all components of
SMARTProductDrivers are
installed on your computer.
Ensure that the USB cable is connected
from your computer to your interactive
whiteboard and that the USB cable isn’t
longer than 3.5 m (11' 6").
Start SMARTBoard service:
In the notification area, press the
1.
SMART Board icon, and then
press SMARTSettings.
The SMARTSettings window
opens.
Select About Software and
2.
Product Support > Tools >
Diagnostics.
The SMART Board Diagnostics
window opens.
Select Service > Start.
3.
Close the SMART Board
4.
Diagnostics window, and then
close SMARTSettings.
Remove and then install
SMARTProductDrivers again on your
computer.
The multitouch gestures
don’t work as expected.
Multitouch gestures aren’t
enabled.
Enable multitouch gestures. For details
on enabling multitouch gestures, see
Using gestures, dual touch and dual
write on page 13.
Transporting your interactive whiteboard
Save your original SMARTBoard interactive whiteboard packaging so that it’s available if you need to
transport your interactive whiteboard. When required, repack your interactive whiteboard with all of
the original packaging. This packaging was designed with optimal shock and vibration protection. If
your original packaging is no longer available, you can purchase the same packaging directly from
your authorized SMARTreseller (smarttech.com/wheretobuy).
23
C H A P T E R 4
Maintenance and troubleshooting
Contacting SMART Support
SMART Support welcomes your call. However, if you experience difficulty with your SMART
product, consider contacting your authorized SMART reseller (smarttech.com/wheretobuy) first. Your
reseller can often resolve the issue without delay.
Before you contact SMART Support, ensure the following:
l You know the serial number of your interactive whiteboard.
l The computer specifications and operating system meet the minimum system requirements for
SMARTProductDrivers.
l The USB cable is connected properly to your computer and interactive whiteboard.
l Device drivers are installed on your operating system.
l The interactive surface and bezels aren’t optically obstructed.
l You oriented your interactive whiteboard.
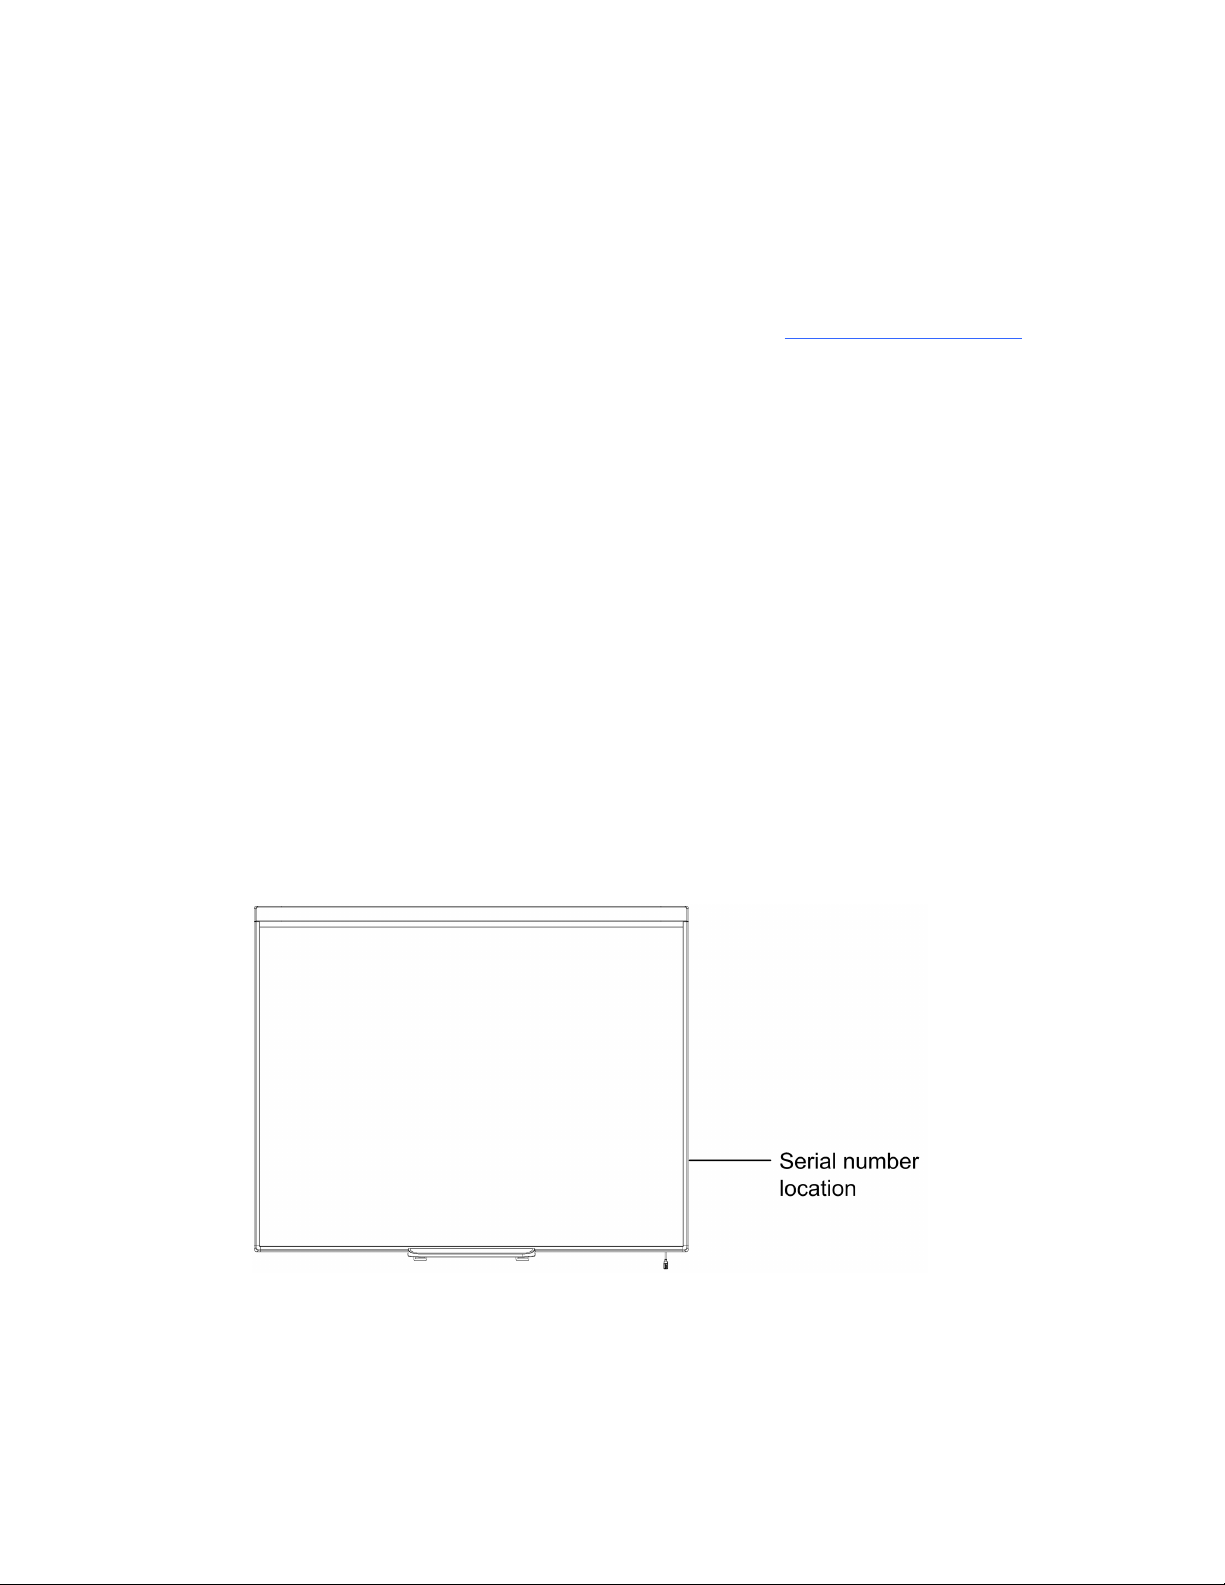
g To determine your interactive whiteboard’s serial number
Look on the lower right edge of your interactive whiteboard’s frame when you’re facing the front of
your interactive whiteboard. The serial number is also on the back of the interactive whiteboard. The
format of the serial number is SB480-xx-xxxxxx.
24

Appendix A
compliance
SMART Technologies supports global efforts to ensure that electronic equipment is manufactured,
sold and disposed of in a safe and environmentally friendly manner. For your interactive whiteboard’s
environmental compliance information, see the SMARTBoard 480 interactive whiteboard
specifications (smarttech.com/kb/154638).
25


Index
A
accessories 4
USB cable 4
adjusting projected image 20
aspect ratio 2
C
cleaning 20
erasing ink 20
computer
connecting to interactive whiteboard 7
matching resolution to projector 7
refresh rate 7
system requirements 4
contacting SMART Support 24
D
Digital Vision Touch (DViT) technology 2
dual touch / dual write 2
dust 19
I
installation
connecting to computer 7
SMART Product Drivers 8
M
maintenance 19
multitouch gestures 2, 13
O
orientation 8
P
parts
accessories 4
projector
adjusting image 20
resolution 7
G
gestures 13
best practices 16
multi-finger 15
single-finger 14
H
humidity 19
27
R
replacement parts 4
resetting your interactive whiteboard 20
resolution
computer 7
projector 7
S
serial number 24

I N D E X
SMART Board 480 interactive whiteboard
features 2
how it works 3
resetting 20
SMART Ink 3
SMART Notebook software 1, 3
SMART Product Drivers
floating tools 12
installing 8
orienting your interactive whiteboard 8
SMART Support 24
T
transporting 23
troubleshooting 20
U
USB cable 4
28


SMARTTechnologies
smarttech.com/support
smarttech.com/contactsupport
 Loading...