

Smart-Azz GT28 User Manual

1
SMART-AZZ.COM
PET / PERSONAL GT28 TRACKER
USER MANUAL
Email: support@smart-azz.com
Website: www.smart-azz.com

2
Table of Contents
1. General Instructions 3
1.1 Precautions before installation 1.3 Battery Charging
1.2 Installing Battery & SIM Card 1.4 QUICK Demo of your Tracker
2 General Description 6
2.1 Data format of SMS messages 2.4 No GPS Data
2.2 Geofence feature 2.5 Last Valid GPS position data
2.3 Battery LOW level alert
3 Operation and Command mode 7
3.1 Single GPS position mode 3.4 Geofence Mode
3.2 Tracking Mode 3.5 Power Saving mode
3.3 Last Valid GPS coordinates 3.6 “Battery Low” Warning Activation
4 Initialization / Programming mode 8
4.1 Password (Security Code) 4.5 Geofence
4.2 GPS Data Format 4.6 SMS Checking Time
4.3 Tracking mode 4.7 Default Mode
4.4 Tel. mode (override call ID)
5 Recall mode (To review system data) 11
5.1 GPS Data format settings 5.5 Power Save setting
5.2 Tracking mode settings 5.6 Battery Voltage
5.3 Tel. mode (overriding caller ID) 5.7 SMS Checking Time
5.4 Geofence setting 5.8 “Battery Low” Warning Setting
6 Geofence mode description 12
7 Timing criteria 13
8 Tracking Mode 14
9 GPS accuracy and time to Fix 15
12 General SMS Command structure - overview 16
13 Command and Instruction List for SMS messages 17

3
1. GENERAL INSTRUCTION
1.1 PRECAUTIONS BEFORE INSTALLATION
1. Prepare a SIM card for GSM communication.
2. Use a mobile phone to confirm that a PIN code has not been set on the SIM card,
and that it can dial out and receive telephone calls and SMS messages without
problems.
3. Before installing the SIM card, make sure to disconnect all power from the Tracker
unit.
1.2 INSTALLING BATTERY & SIM CARD
Due to the tight fit of the top and bottom part of the housing, the sequence is
recommended below:
Unscrew the 4 screws in the bottom plate. (In the middle of the bottom plate there are 2
lips on the sides that snap into the top plate.)
Hold the unit on its sides between the index finger and thumb, and squeeze the sides together
while separating the top and bottom halves of the unit with your finger nail. If done correctly, this
should not take a lot of pressure, and should come apart easily. Be sure to check how the small
USB cover should be reinstalled when closing the unit again.
4
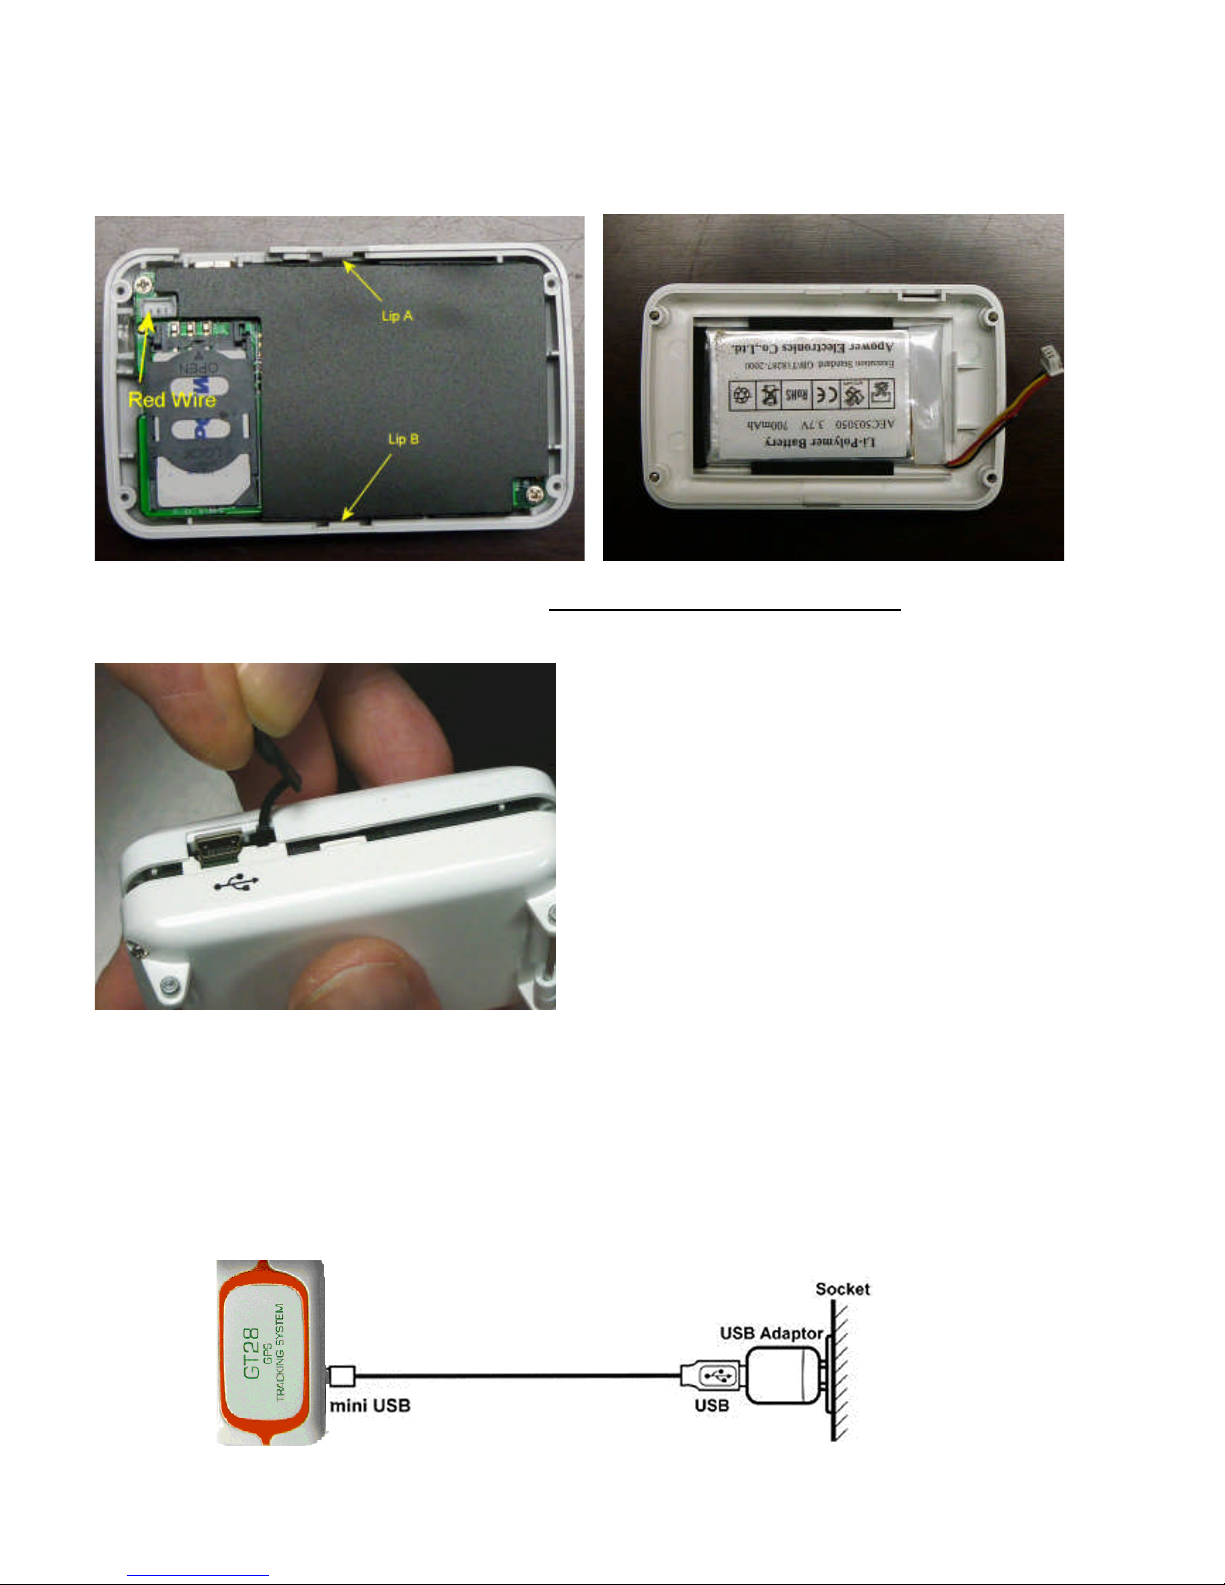
Insert the SIM card and lock the SIM card holder by sliding it into its locking position.
Place the battery into the bottom housing as shown below. Connect the battery wire with the red
wire facing the outer pin, as shown below.
Close the housing and snap-in the Lip on the opposite side of the USB cover first, then take the
plastic USB cover and carefully put in the opening as shown in the picture below.
Then snap the housing parts together and tighten the screws.
1.3 BATTERY CHARGING
With the supplied AC-DC Charger the battery can be charged. Fully charge the battery for
at least 6 hours before using it.
USB connects to the USB AC/DC adapter

5
1.4 QUICK Demo of your Tracker
1. Install an Activated SIM card in the unit and note down the number. Ensure that
NO PIN number is set and that card is activated. Disable call-forwarding and voice
mail messaging. Initially activate the SIM card for the first time with a normal mobile
phone, or whichever way is necessary.
2. Install the battery in the unit: Connect the battery plug to the connector inside the
unit. Fully charge it for about 6 hours, or until the red LED turns off. Place unit in an
area of good satellite reception for a few minutes, preferably outside.
3. Type and Send SMS: 1234-R-TRK to your tracker mobile phone number and you
should get information about the general Settings of the Tracking Mode. You should
Receive a SMS after about 30-45 seconds similar to this: TRK:
T0003R020C010
Note: If you do not receive any reply, please re-check the SIM card and battery
connection. If you still do not receive a reply, this is most likely due to a problem with
the SIM card or GSM network you are attempting to use.
4. Type and Send SMS: 1234-S This command will instruct the tracker to send one
Single (S-single) GPS position (If GPS is not available, GSM cellular network “Node”
information is sent). Expect to receive a SMS back with data similar to this: (Or a
Google Maps Link)
Single Mode
Lon 114* 10’ 15.475”E Longitude coordinates
Lat 22* 17’ 49.146”N Latitude coordinates
Height: 10.5m Height above sea level
LOC 07:58:23 Time
16-12-2009 Day, month and year

6
2. General Description
The Tracker can be operated by standard SMS messages from a mobile phone, or via
GPRS internet connection. With a standard SMS message, the GPS position data can
be requested and will then be sent back to the requested user mobile phone via a reply
SMS from the Tracker. The number and the time sequence of these GPS data blocks
and other parameters are fully programmable by an instruction SMS.
2.1 Data Format of SMS Command Messages:
The data has to comply with an exact format able to be read by the tracker module.
The format is: [Password]-[mode]-[Sub-Group1]-[Sub-Group2]
Password : Factory default password (security code) is 1234
Mode : Select the operating mode. This can be a Direct command,
Set-up command, or a Recall command.
Sub-Group1 : ON / OFF commands; or Set-up (Initialization) or Request group.
Sub-Group2 : Parameters of the set-up group. Information like Telephone
numbers, setting string of T and C mode, data format for GPS
information (DMS,Google,Ddec) etc.
2.2 Geo-Fence feature:
The tracker has a “geo-fencing” feature. If activated, the instructed party will receive a
SMS when the Tracker unit exits and enters the set boundary area.
2.3 Battery Low alert:
When the Internal battery is nearly discharged and reaches a predetermined low voltage
level, the charge LED starts blinking and later a SMS message will be sent to indicate a
“Battery Low” situation. (Please note that this feature is turned OFF by Default. It will have
to be activated with the message 1234-BATLOW-ON, if required.)
2.4 No GPS data:
If no GPS data can be retrieved from the GPS receiver the unit will transmit the current
GSM tower location “Node” information.
2.5 Last valid GPS position data:
The “LAST” valid GPS position data can be recalled via SMS message. This may be a
position of quite some time ago if powersave mode is used.
 Loading...