

Page 1

SignWare-Pro
User’s Guide
SignWare-Pro v1.2
www.smartavi.com
Page 2

Table of Contents
Introduction ......................................................................................................................................... 3
Disclaimer Notice ................................................................................................................................. 4
What’s in the Box? ............................................................................................................................... 5
Limited Warranty Statement ............................................................................................................... 6
Section 1 -Setting up the SignWare-Pro Server Software
1. Getting Started ..................................................................................................................... 7
2. Installing SignWare-Pro Server ............................................................................................ 8
3. Setting up the SignWare-Pro Client ..................................................................................... 9
4. Navigating the SignWare-Pro Client .................................................................................. 10
5. Updating the SignWare-Pro Client ..................................................................................... 12
Section 2 -Using the SignWare-Pro Server Software
6. Running SignWare-Pro Server Software for the first time ................................................. 13
6.1 Firewall ............................................................................................................................ 14
6.2 User Manager .................................................................................................................. 15
7. Task Manager ..................................................................................................................... 17
8. Creating and working with schedules …............................................................................. 20
8.1 Super Schedules ............................................................................................................... 23
9. Template Creator................................................................................................................ 24
10. Creeping Line Editor ........................................................................................................ 31
11. Registration and Activation ............................................................................................. 38
Specifications ..................................................................................................................................... 39
Server Requirements ......................................................................................................................... 39
Alphabetical Index ............................................................................................................................. 40
2
Page 3

Introduction
Congratulations on your purchase of the SignWare-Pro Digital Signage Solution. Please read the
instructions carefully before using.
SignWare-Pro is a digital signage solution that creates new marketing and information sharing
portals to reach target audiences with real time information. SignWare-Pro attracts audiences by
displaying your message using vivid, high-quality video and animation replacing traditional signs and
posters.
SignWare-Pro uses your IP network to remotely manage, control, and broadcast your
information to target audiences in specific locations across the globe. Because it uses a closed
network, your information is safe and secure.
SignWare-Pro is capable of playing back all industry standards, such as Flash files, Video
.MPG, HTML, QuickTime, Power Point, .JPG’s, Java Applets, and more.
SignWare-Pro is the ultimate solution that provides both hardware and software for the display
and management of your digital content. It is highly cost effective and easy to use. It is the
perfect solution for both small-scale and large-scale projects.
3
Page 4

Disclaimer Notice
The information contained in this document is subject to change without notice. SmartAVI
makes no warranty of any kind with regard to this material, including but not limited to, implied
warranties of merchantability and fitness for particular purpose.
SmartAVI will not be liable for errors contained herein or for incidental or consequential
damages in connection with the furnishing, performance or use of this material.
No part of this document may be photocopied, reproduced, or translated into another language
without prior written consent from SmartAVI, Inc.
4
Page 5
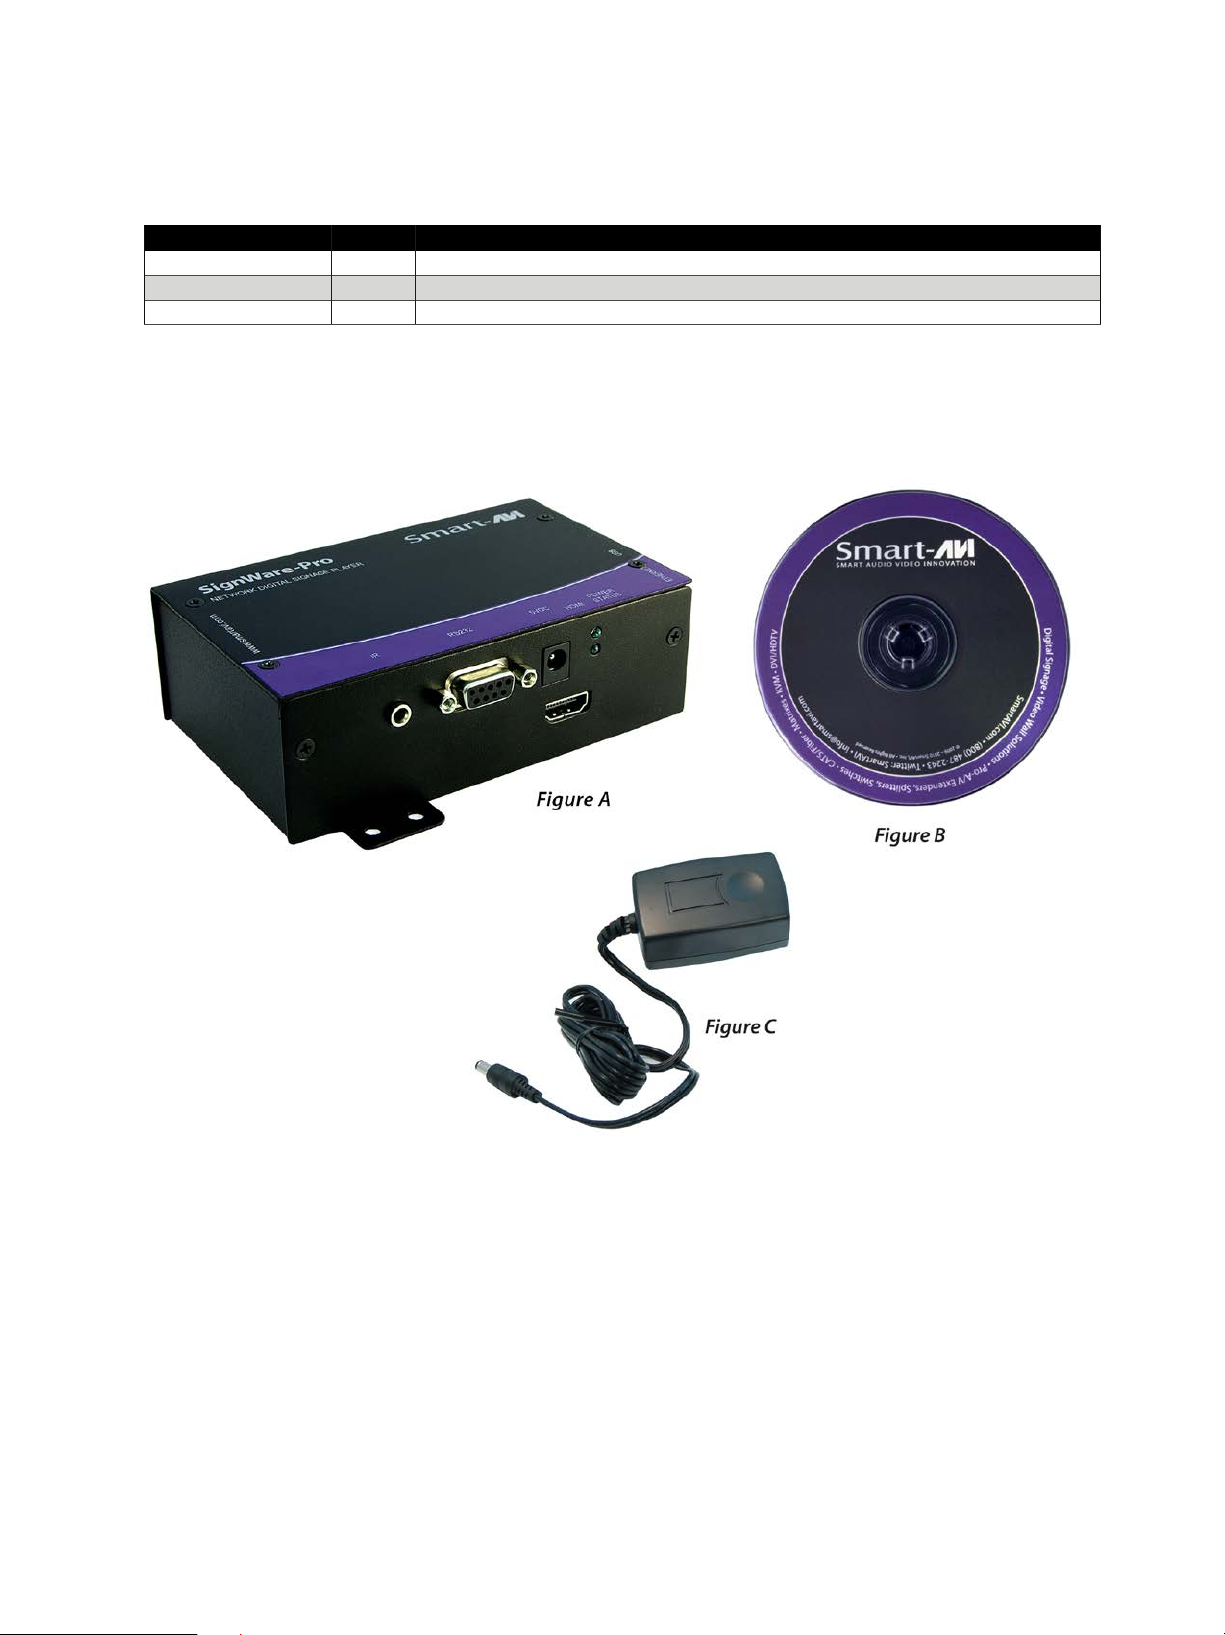
What’s in the Box?
PART NO.
QTY
DESCRIPTION
AP-SNWP-8GS
1
SignWarePro Client* - Figure A
AP-SNW-SW
1
SignWare-Pro Software -Figure B
PS5VD3A*
1
5-Volt 3-Amp Power Supply* - Figure C
5
Page 6

Limited Warranty Statement
A. Extent of Limited Warranty
1. SmartAVI, Inc. warrants to the end-user customers that the SmartAVI product specified above
will be free from defects in materials and workmanship for the duration of 1 year, which duration
begins on the date of purchase by the customer. Customer is responsible for maintaining proof of
date of purchase.
2. SmartAVI’s limited warranty covers only those defects which arise as a result of normal use of the
product, and do not apply to any:
a. Improper or inadequate maintenance or modifications.
b. Operations outside product specifications.
c. Mechanical abuse and exposure to severe conditions.
3. If SmartAVI receives, during Applicable warranty period, a notice of defect, SmartAVI, Inc. will, at
its discretion, replace or repair the defective product. If SmartAVI is unable to replace or repair the
defective product covered by the SmartAVI warranty within a reasonable period of time, SmartAVI
shall refund the cost of the product.
4. SmartAVI shall have no obligation to repair, replace or refund unit until customer returns
defective product to SmartAVI.
5. Any replacement product could be new or like new, provided that it has functionality at least
equal to that of the product being replaced.
6. SmartAVI limited warranty is valid in any country where the covered product is distributed by
SmartAVI.
6
Page 7
Section 1 Setting up the SignWare-Pro Server Software
1. Getting Started
This quick setup guide will instruct you on how to install and setup the SignWare-Pro software
onto your Server (Host PC) and how to setup the SignWare-Pro client.
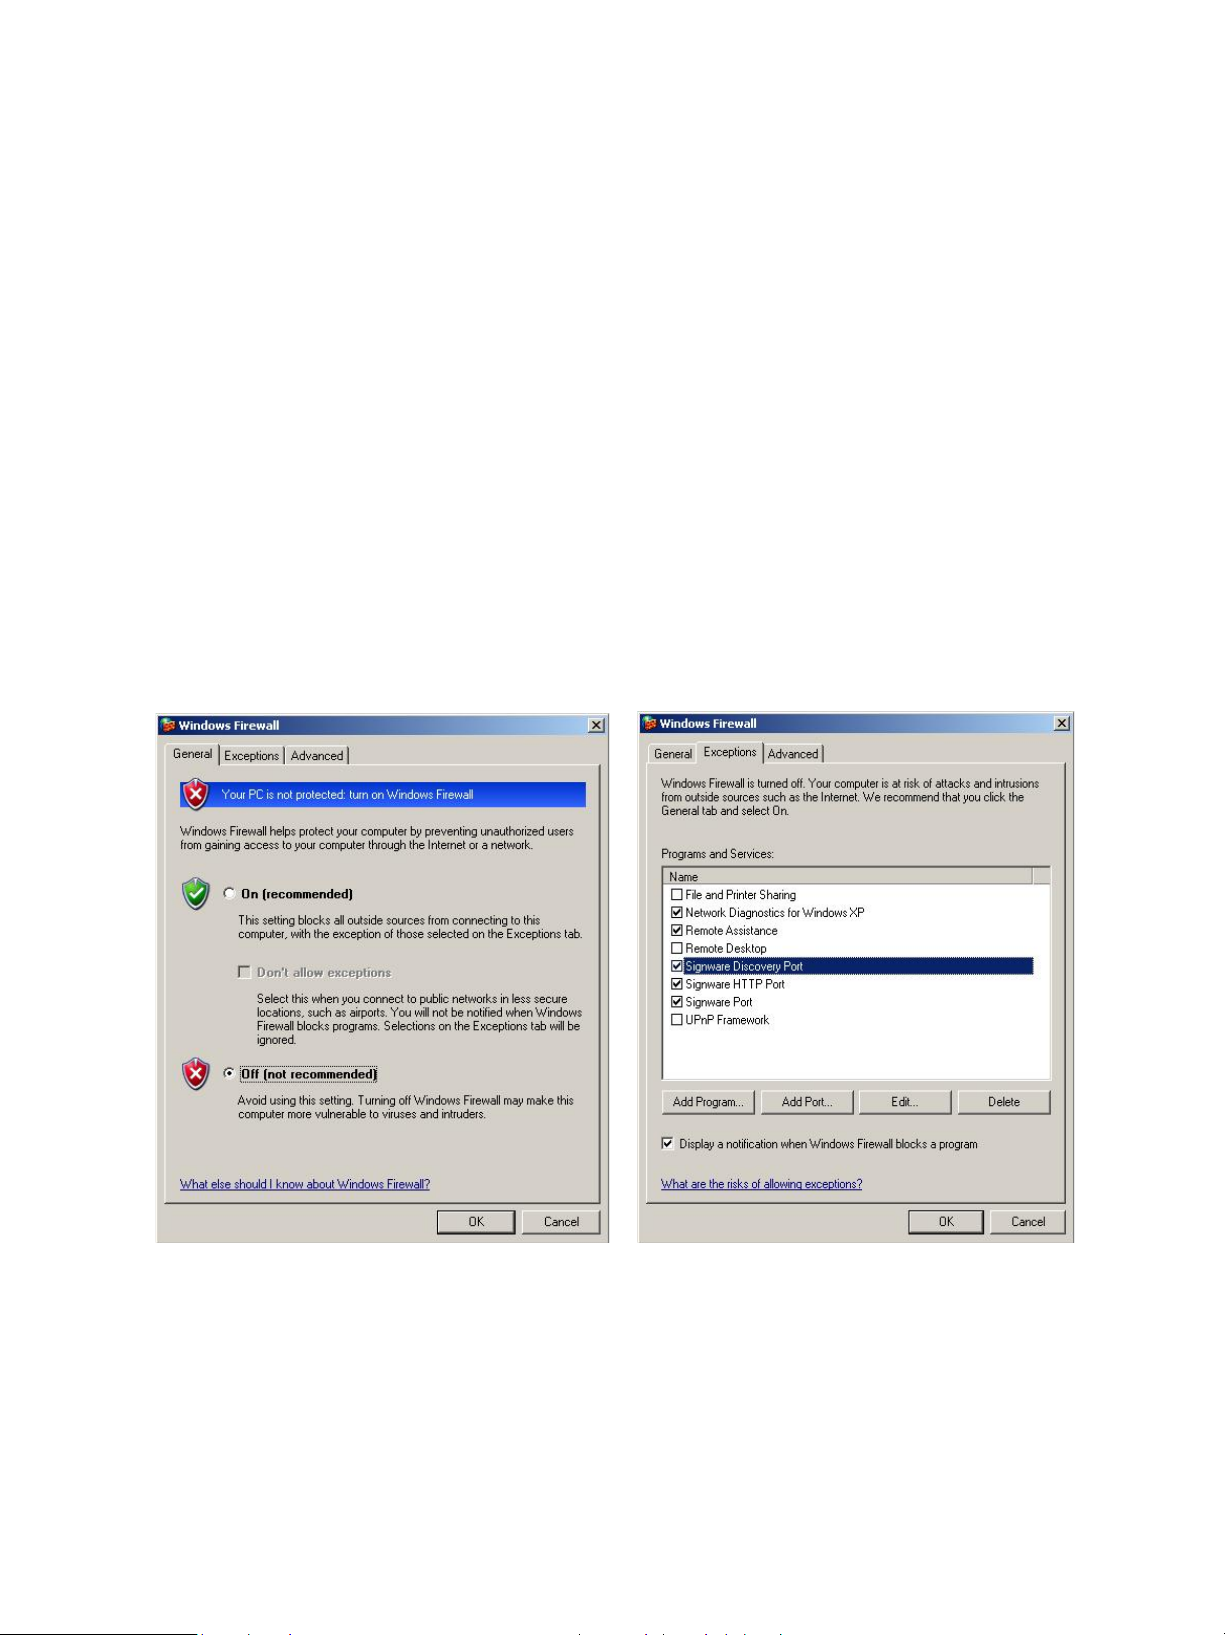
To ensure proper installation of the server software;
• Please make sure you are running Windows XP Professional with Service Pack 2 or 3,
Windows 2003 or Windows Vista.
• Make sure that you are logged in as the system administrator.
• Turn off the Windows firewall. (see Figure 1.1 for Windows XP) You can alternately select
SignWare-Pro under the exceptions tab. (Figure 1.2)
• If you do not wish to turn off your firewall, please refer to Part 7.1 of the manual.
Figure 1.1 Figure 1.2
7
Page 8

2. Installing SignWare-Pro Server
SignWare-Pro Server requires a unique serial number to be installed. You will find your key on back
of the SignWare-Pro Server CD sleeve. In addition, you must complete the online registration for
your copy of SignWare-Pro Server. If you do not register within the thirty-day window, your
SignWare-Pro Server software will become disabled. A registration window will open automatically.
If you wish to register at a later date, simply select Help/Registration. For more help on registration,
refer to Part 13 of the manual.
1. Double click on the SignWare-Pro Server Setup executable. Read the License Agreement
then click ‘I Agree’
2. Enter in your name and organization and enter the unique serial number (IN ALL CAPS)
provided to you. Important: When entering the serial number, please make sure it is typed
with ALL CAPS, or registration will not give you a 30 day grace period. (Figure 2.1)
3. The next window will be to choose components, make sure “SignWare-Pro Server” is
checked. (Figure 2.2)
4. Choose the installation location you would like to install the SignWare-Pro Server. Click
‘Next’.
5. Before the installation completes, you will be asked to create a password for the
Administrator account. You must sign in as the Administrator for the first time you load the
SignWare-Pro Manager. For more information on the User Manager, go to Section 2 of the
manual.
Figure 2.1 Figure 2.2
8
Page 9
3. Setting up the SignWare-Pro Client
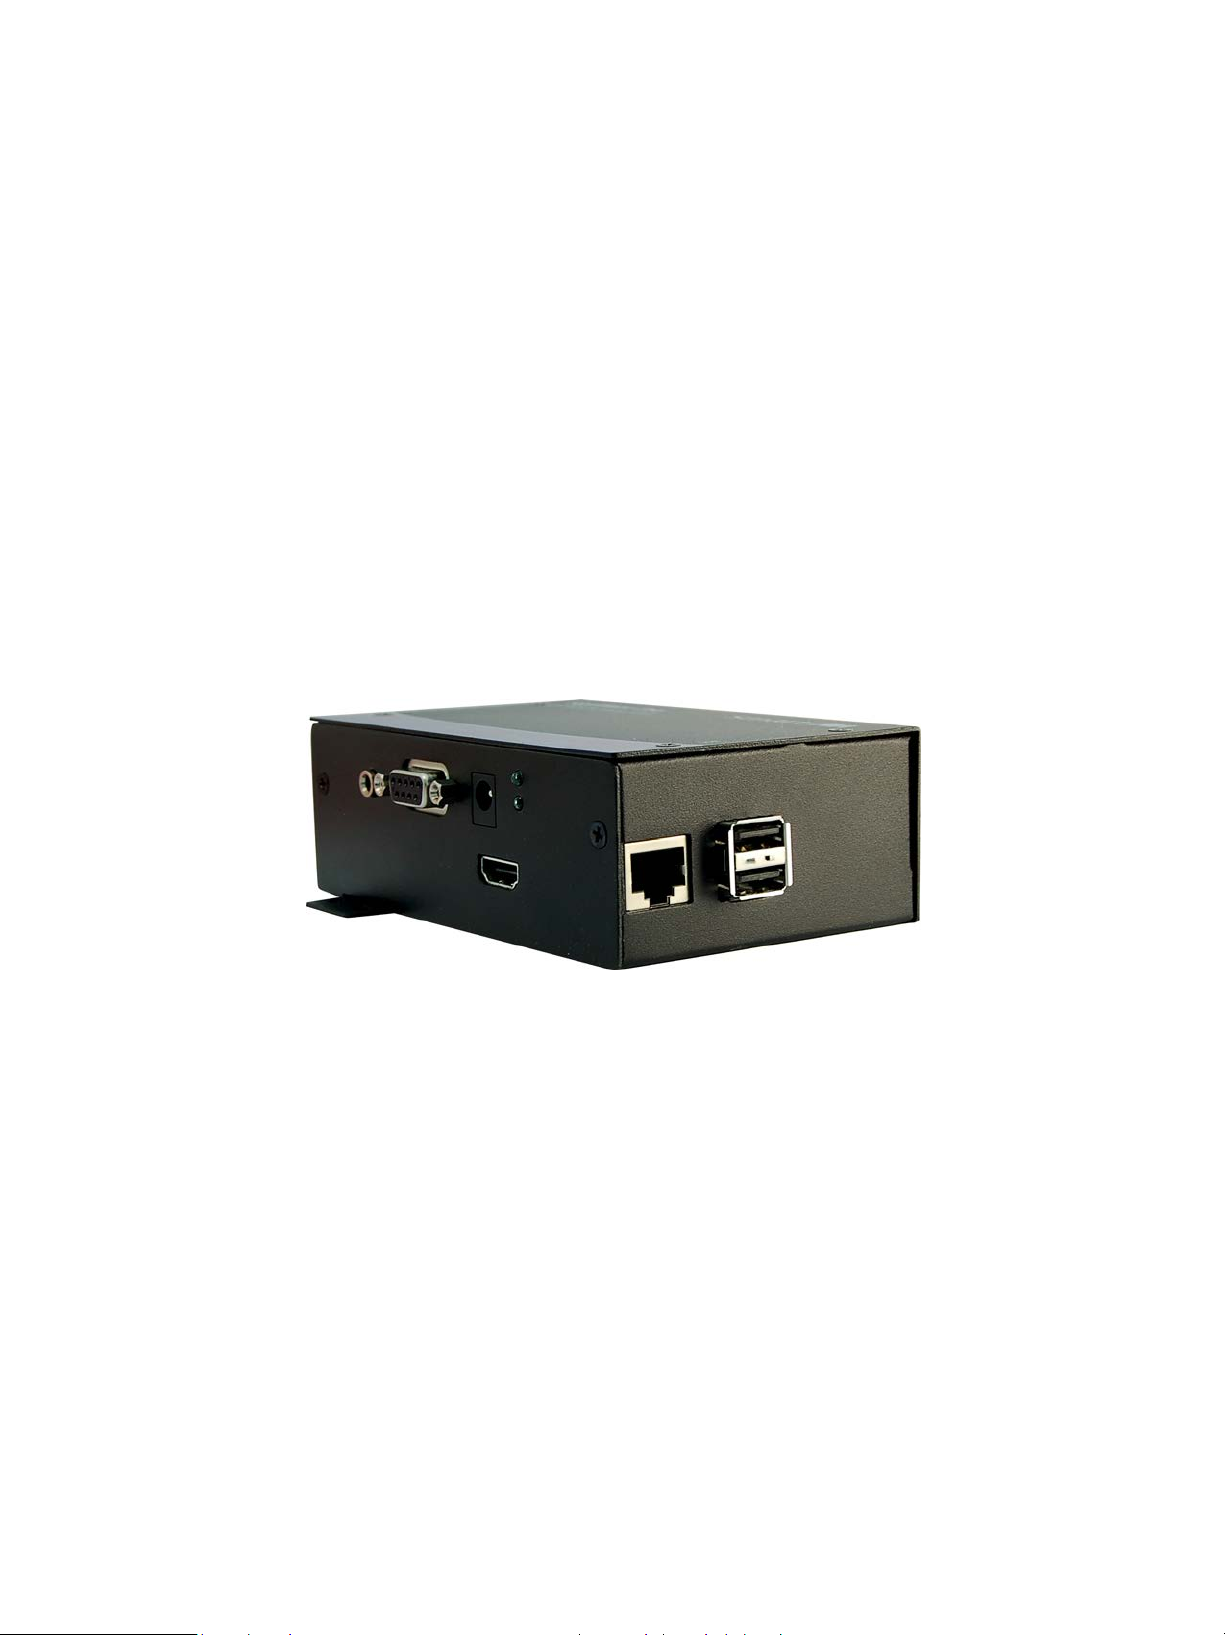
1. Setting up the SignWare-Pro Client
a. Connect the power supply cable to the SignWare-Pro client and plug the cable into a
grounded power outlet. (Figure 3.1)
b. Attach the HDMI from the monitor or display to the HDMI port on back of the client.
c. Connect the SignWare-Pro client to a router using CAT5 cable. (If you will be using a
wireless router, please refer to your router’s manual for additional information).
Turn on the display connected to the client.
The monitor should display the SignWare-Pro splash screen.
Once the kernel has booted, you will be brought to a black screen with a blue status bar at the
bottom.
Figure 3.1
9
Page 10

4. Navigating the SignWare-Pro Client
1. Once you’ve logged in, connect the keyboard and press CTRL+ALT+2 to open the
SignWare-Pro Configuration Panel (Figure 4.1).
(Figure 4.1)
2. Network
(Figure 4.2)
Settings i.
DHCP
Check this box if you would like your SignWare-Pro Client to receive an IP
•
Address from your network.
• If you need to set a Static IP, uncheck this box to manually set your IP, Netmask,
10
Page 11

Gateway, and DNS.
3. Resolution Settings (Figure 4.2)
• Use the ‘Tab’ key (Figure 4.2) to tab to the Resolution drop down box and use the
arrow keys to scroll through the different selections. Press the ‘OK’ button to
select the resolution.
4. SignWare-Pro Server Settings
i. Server
• If your SignWare-Pro Client is unable to find your Server on the network, manually
type in the IP Address of your Server.
ii. User
• This is the default username that is linked to your Server. Please leave this setting
as is.
iii. Password
• This is the default password that is linked to the User. Please leave this setting as is.
11
Page 12
5. Updating the SignWare-Pro Client
In an effort to produce the best digital signage system on the market, we will continue to make
upgrades to our products.
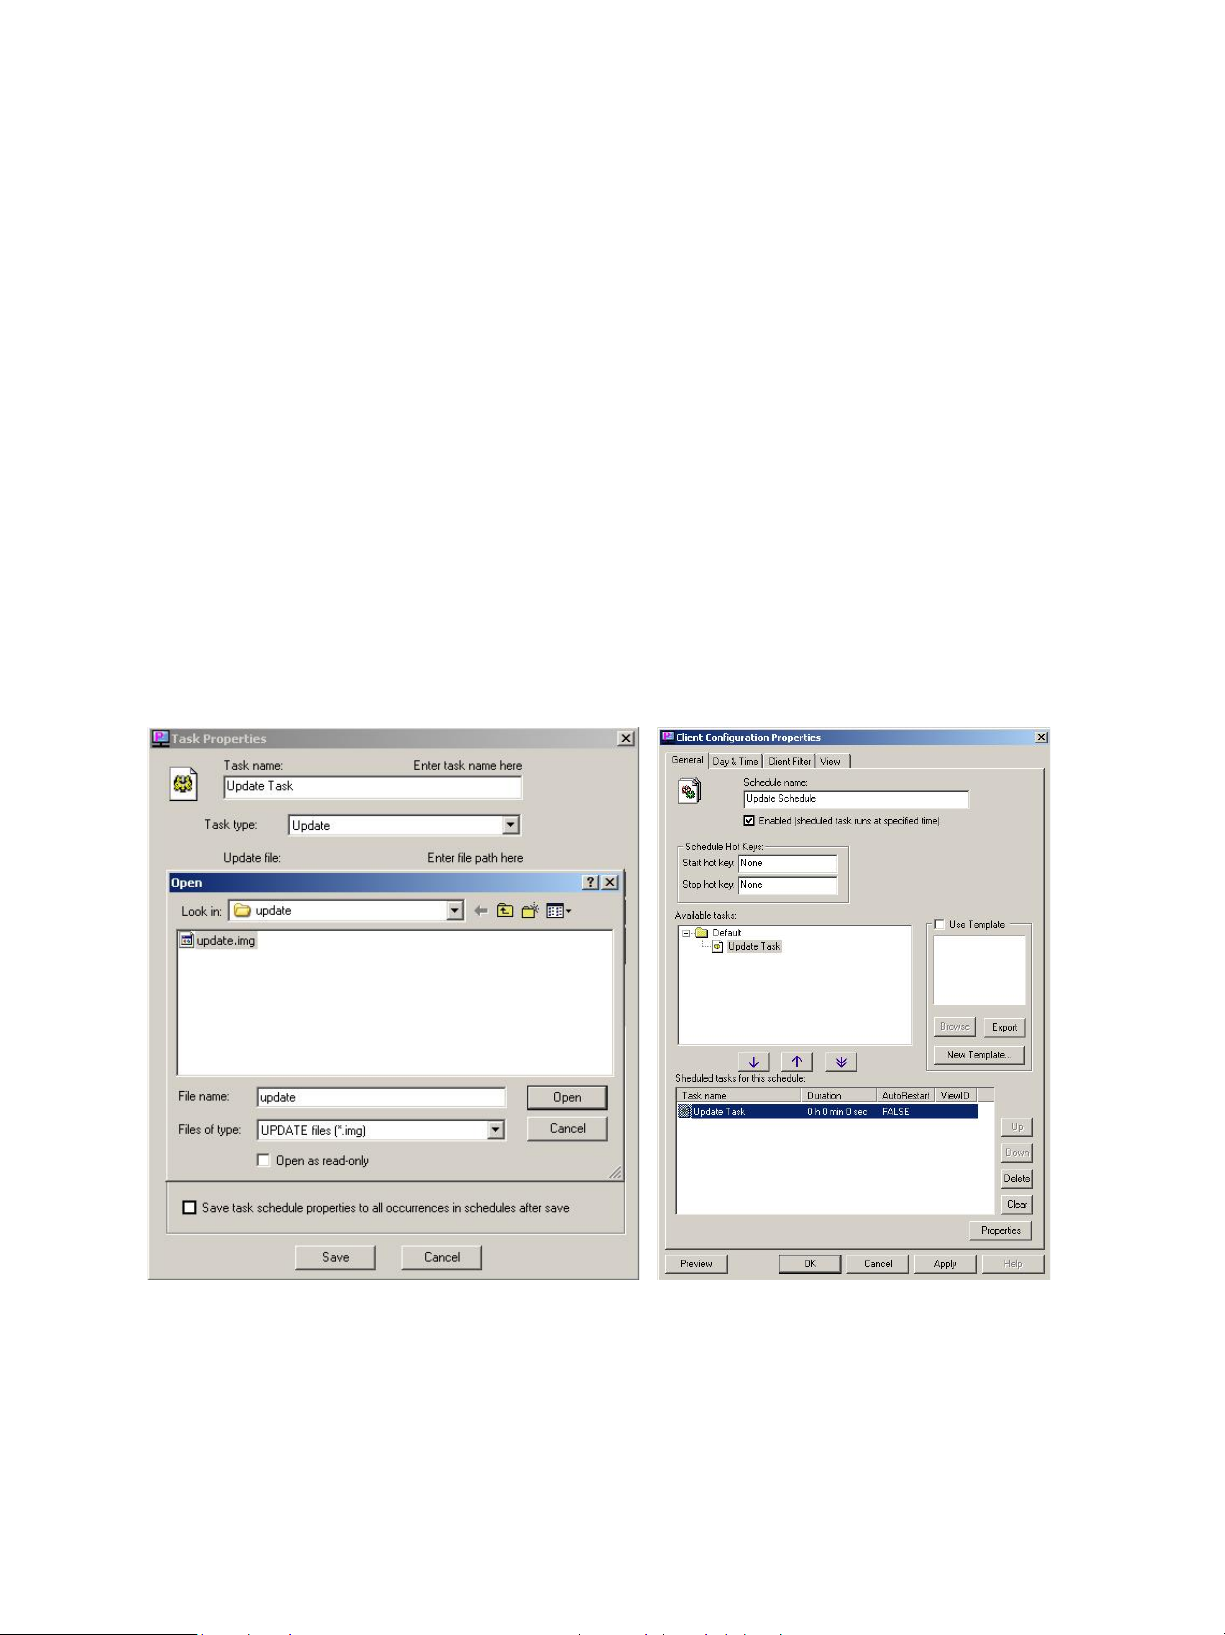
To update to the newest version of the SignWare-Pro client, you will need to do the following;
1. Unpack the SignWare-Pro update file onto your server.
2. In Task manager create “Update” task and point to update.img as the task data. (Figure 6.1)
Important: update.inf should be placed in the same directory as flash.img or the update will
not work.
3. In Task manager, create a new schedule and add the update task you created in Step 2.
(Figure 6.2)
4. Right-Click the schedule and select ‘Start’ to run the update.
5. After updating, the SignWare-Pro client will reboot automatically.
6. You may need to reconfigure client settings again.
IMPORTANT: DO NOT TURN OFF OR UNPLUG THE CLIENT during this operation. If you do so, the
SignWare-Pro client will no longer operate and you will need contact customer support for a new system
file.
Figure 6.1 Figure 6.2
12
Page 13
Section 2 Using the SignWare-Pro Server Software
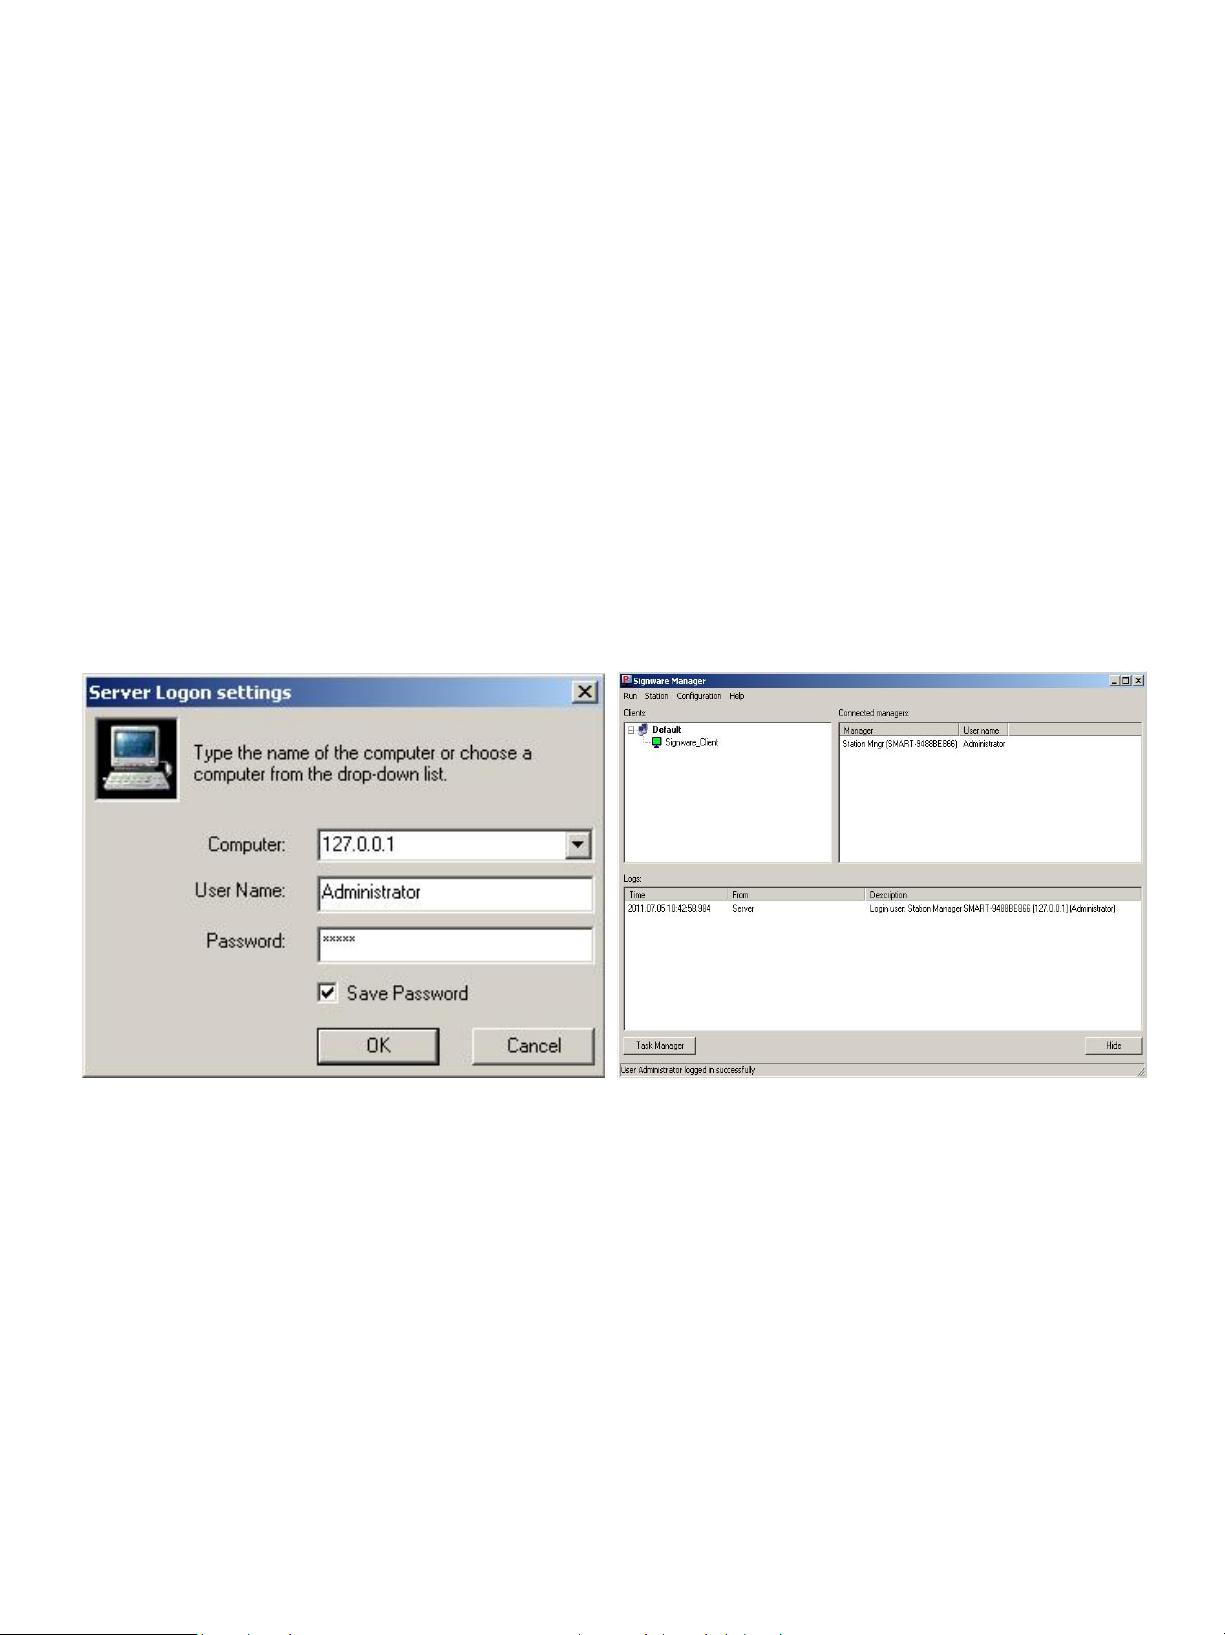
6. Running SignWare-Pro Server Software for the first time
1. Double click on the SignWare-Pro Server Station Manager icon either on your desktop or
start menu.
2. You will first be prompted with a ‘Server Logon settings’ dialog box. The default IP address is
127.0.0.1. In the user name and password fields use the new Administrator user and
password you created in the installation process and click ‘OK’. (Figure 6.1)
3. Once the SignWare-Pro Server Station Manager is loaded. You will see the following;
a. Connected SignWare-Pro clients
b. Loopback IP. (127.0.0.1)
c. Your user name and password. Click Save Password to stay logged in. (Figure 6.2)
Figure 6.1 Figure 6.2
13
Page 14

6.1 Firewall
SignWare-Pro uses the TCP/IP suite to communicate between the server and client, proper
settings of your firewall and routers will be needed.
After the installation of SignWare-Pro Manager, and the initial start of the software, you will be
asked to by the windows firewall to unblock, or keep blocking SignWare-Pro Manager. You want to
make sure you unblock it.
The port used for communication is ‘13325’ UDP and TCP. This will be used when forwarding
ports in your router, when using SignWare-Pro via WAN.
14
Page 15

6.2 User Manager
Our user manager now allows SignWare-Pro users to manage and control their own user database.
Windows logins are no longer required. Each user created is allowed a set of permissions.
The user rights are described as followed:
• Administrator: Full access to everything, only user that is able to create and manage users.
• Task Manager: Allowed to access and control the task manager and selectable clients
assigned by the administrator.
• Station Manager: allowed to access and control the station manager.
• Client: used for the SignWare-Pro clients to connect to the signage server only.
During the installation, you will be asked to create the administrator password. If you click ‘Cancel’,
you will be assigned default usernames and passwords. (Figure 6.2.1)
To have different users log in, always click on ‘Configuration’ then ‘Login server.’ Click ‘Save
Password’ while logged in. To log out, uncheck ‘Save Password’. (Figure 6.2.2)
Figure 6.2.1 Figure 6.2.2
15
Page 16

After you log into the SignWare-Pro manager, you can create new users by clicking ‘Run,’ then
clicking on ‘User Manager’ (Figure 6.2.3)
To create a new user, right click or click on ‘User’ then ‘New User.’ The user properties window will
open. Here is where you enter in your new user information (Figure 6.2.4):
• User name: The name of the new user.
• Full name: The real name of the user.
• Description: The description of the user.
• Password: The password for that user.
• User rights: Select the rights you want this user to have.
Figure 6.2.3 Figure 6.2.4
Click ‘Save’. You will then see the new user in the list. (Figure 6.2.3)
16
Page 17

7. Task Manager
The main feature of SignWare-Pro is the Task Manager. This is where you set up and manage all of
your presentations.
To open the Task Manager:
• Select Run then click on the Task Manager. (Figure 7.1)
Figure 7.1
Once you are in the Task Manager you can begin setting up your presentations.
Tasks: are individual presentations such as movies, PowerPoint presentations or Flash files; in order
to run a Task it must be placed into a schedule.
Schedules: are used to schedule a Task or a series of Tasks to run together at a specific time and
day.
17
Page 18

Setting up Tasks: In the Task menu option, you can create, delete, and view the properties of all the
files you wish to run on SignWare-Pro.
Figure 7.2
To create a new task:
1. Select Task and select ‘New Task’. (Figure 7.2)
2. Select the type of file you are going to use. (Figure 7.3)
3. Select the file located on your hard drive. Once the task has been added, you can configure
the following properties;
a. The duration of the task (setting the duration to 0:0:0 will cause the program to run
indefinitely.
b. Operation on End of Task,
i. Here you can set what will happen upon completion of the Task if it is included in a
schedule.
ii. Run Next Task will open up the next task in the schedule upon completion.
iii. Restart Current Task will cause the task to repeat itself.
Note: You can override these configurations in the ‘Schedule Properties’ menu. (Part 8)
18
Page 19

Figure 7.3
Creating Schedules
A schedule is where you combine all of the different tasks that you’ve created in step 8 and put
them into one place. From here you create the programming schedule. You can select a variety of
task to run at specific times, run once, or loop continuously. If you use the template feature
(described in step 10) you will select which tasks will run in which window.
Schedules can be as complex or as simple as you like. You can control hundreds of tasks to run
at specific times or simply have one or two tasks set to loop continuously.
19
Page 20

8. Creating and working with schedules
1. In the Task Manager select ‘Schedule’ and click ‘New Schedule’. The Schedule Properties
Dialog will appear. (Figure 8.1)
2. In the ‘General’ tab give your schedule a name. (optional)
3. Begin populating the schedule with various tasks. These tasks can be videos, images, web
pages, PowerPoint Presentations, etc.
a. To do this you must use your mouse to highlight one of the tasks you created in the
previous step. (Figure 8.2)
b. With the task highlighted click the arrow just to move the task into your schedule.
(Figure 8.2)
c. The task within the schedule will run in order starting from the task at the top of the list.
You can arrange tasks by selecting them and using the up and down buttons.
d. You also have the option of deleting the task from the schedule or clearing the schedule
entirely.
Figure 8.1 Figure 8.2
Once you have added your tasks to the schedule, you are ready to modify the tasks properties
20
Page 21

Modifying Tasks within the Schedule
4. While in the ‘Schedule Properties’ dialog, double-click the task you wish to modify from the
‘Scheduled Tasks’ section. This brings up the ‘Schedule Task Properties’ dialog. From here
you are given several options; (Figure 8.3)
a. Operation on end of task
i. Run next task in schedule: This option will run the next task that you’ve added to
the schedule once the task has ended.
ii. Restart current task: This will restart the current task once it has finished. Use this
selection to loop your task indefinitely.
iii. Wait for end of task period and then start next task in schedule: Use this Selection
if you’ve set a specific duration for the task.
b. Duration: Lets you configure how long you would like the task to be displayed on your
screen. Setting this to 0:0:0 will automatically stop the task once it has ended. This is
primarily used for video and flash movies.
c. Use View: If you are using templates*, this control lets you select which view to display
your task. (Figure 8.4)
d. Click ‘OK’ to save your settings.
*More about templates in Part 10.
Figure 8.3 Figure 8.4
21
Page 22

5. Day and Time: Use the ‘Day and Time’ tab to control when and for how long the schedule
will play. The Day and Time dialog controls the following;
a. Schedule start type: This feature selects how the schedule will operate. (Figure 8.5)
b. Run at user logon: This will start the schedule as soon as the user is logged on.
c. Run once: Select a specific time and date for the schedule to run. (Figure 8.6)
d. Run periodically: Set the time and date for your schedule to play. This option allows
you to alternately control a variety of schedules.
Figure 8.5 Figure 8.6
22
Page 23

8.1 Super Schedules
Super Schedules were designed to allow multiple schedules to run in one, also allowing a drag
and drop friendly user interface.
To use the Super Schedule, open up the Task Manager and then click on ‘Schedule’ then select
‘New Super Schedule’.
1. In the Setup Schedule tab, this is where you will setup your multiple schedules. Click on
‘Add’. In the window that opened you can name your schedule and select the duration.
Then click ‘Ok’. (Figure 8.1.1)
2. Select a schedule in the list, then with the media icon, drag and drop it into the blue box. A
Task Properties window will appear just like the normal Task Properties. Browse for your
media. Click ‘Save’. You can now add more schedules to your Super Schedule. (Figure 8.1.2)
3. The Day & Time tab has the same functionality as the one in the normal Schedule. (Part 9)
4. The Client Filter tab will allow you to specify the clients that will download and run your
Super Schedule.
5. The View tab must always remain checked on View 1.
Click ‘Ok’ and your new Super Schedule will be shown in the Schedule list.
Figure 8.1.1 Figure 8.1.2
23
Page 24

9. Template Creator
The Template creator is powerful feature of SignWare-Pro. Templates allow users to create and
assign regions. This gives you the ability to run several tasks simultaneously on one screen. The
result is the integration of high-resolution graphics with dynamic video and scrolling text messages
and news feeds.
To create a template and assign tasks:
1. Use your mouse to select the schedule you wish to use for your template.
2. From the schedule menu select “New Template…” (Figure 9.1)
3. Select the resolution of your client’s display. (Figure 9.2)
Figure 9.1 Figure 9.2
24
Page 25

4. To create your first region click on the ‘Add View’ icon and drag your mouse across the
white display editor. (Figure 9.3)
Figure 9.3
25
Page 26

5. You may continue adding, deleting, resizing, and moving regions until you are satisfied.
(Figure 9.4)
Figure 9.4
26
Page 27

6. You can also assign a background image to your layout by clicking the ‘Properties’ icon and
selecting an image from your hard drive. (Figure 9.5)
Figure 9.5
27
Page 28

7. Once you are satisfied with your layout, save the template file on your computer hard
drive. (Figure 9.6)
Figure 9.6
28
Page 29

Now you are ready to assign views. This is where you select which task will be displayed into the
different regions you’ve just created.
8. From the ‘Schedule Properties’ dialog double click on any of the tasks for this schedule. This
will bring up the ‘Schedule Task Properties’ dialog. (Figure 9.7)
Figure 9.7
29
Page 30

9. Select the view from the dropdown menu you where you would like the task displayed.
Then click “ok” (Figure 9.8)
Figure 9.8
30
Page 31

10. Creeping Line Editor
SignWare-Pro Creeping Line Editor enables you to create a scrolling marquis anywhere on your
screen. You can use RSS feeds, text from a file, or simply type text directly into the editor.
1. Opening the Creeping Line Editor.
a. From the SignWare-Pro Server Manager select ‘Run’ and click ‘Creeping Line Editor’
(Figure 10.1)
Figure 10.1
31
Page 32

2. To create and edit scrolling text, select ‘Options’ and click ‘Creeping line options’
(Figure 10.2)
a. In the ‘General’ tab Creeping Line Property Sheet you are given several options;
b. Input text: Type your text directly into the editor. (Figure 10.3)
c. Use RSS: Input the URL of the RSS feed of your choice. (Figure 10.4)
d. Control the speed of your scrolling text.
e. Preview the text directly on your desktop.
Figure 10.2
32
Page 33

Figure 10.3 Figure 10.4
3. Customizing fonts
a. Select the ‘Font’ tab to adjust the size, style and color of your font. (Figure 10.5)
Figure 10.5
33
Page 34

4. Adjust window text and transparency. (Figure 10.6)
a. In the Text Window and Transparency dialog box you are given several adjustment
options.
i. Background Color
ii. Window Border:
• Transparency
• Transparent Color
Figure 10.6
34
Page 35

5. Set the position of your creeping text.
a. The Window Position dialog lets you decide where you would like the scrolling text to
appear on your screen.
i. You have the option of either docking your window to the top or bottom of your screen.
(Figure 10.7)
Figure 10.7
Note: You can preview your changes anytime by clicking the ‘Preview’ button.
6. Save your changes.
a. To accept your changes click the ‘OK’ button on your Creeping Line Property Sheet.
b. To save your work select ‘File’ and click either ‘Save’ or ‘Save As’ from the section menu.
(Figure 10.8)
c. Name your file and save on your hard drive.
35
Page 36

Figure 10.8
The new Creeping Line Manager allows SignWare-Pro users to add multiple Creeping Lines in Tasks
rather than in a Schedule. You can now add multi Creeping Lines into specific Tasks.
36
Page 37

To add Creeping Lines into a Task:
1. Click on the Task Properties of the Task you want to add the Creeping Line into.
2. Click on the button that is labeled ‘Background Manager’ (Figure 10.10)
3. In the Creeping Line Manager, you can add existing Creeping Lines or create new ones. To
create a new one, click on ‘Edit’. To add existing Creeping Lines, click on ‘Add’ and browse
for your file. (Figure 10.11)
4. You can add more than one Creeping Line in each task. To stop a previous Creeping Line in a
different Task that is running in one Schedule, click on ‘Stop previous Background.’
5. ‘Enable Background documents below:’ must be checked for the Creeping Lines to play.
6. You can change the Creeping Lines in Tasks that are already placed in Schedules by going to
your Task properties via the Schedule Properties.
Figure 10.10 Figure 10.11
37
Page 38

11. Registration and Activation
SignWare-Pro software requires registration and activation for successful use of the SignWare-Pro
Manager software after 30 days.
To register, go to ‘Help’ and click ‘Registration’ (Figure 11.1)
Next, click the link that says ‘Get key from WWW’. (Figure 11.2)
Next you want to fill out the form completely, and make sure the Product at the top says SignWarePro. After you have completed the form, click the ‘Register Now’ button. A new window will open;
this contains your activation code. Copy the code, close the window, and paste it in the Register
Product window in the ‘Activation key:’ field. (Figure 11.3)
Lastly, click the button that says ‘Save Changed Registration Information’. The Product Registration
Status will say ‘Product has been registered’ (Figure 11.4) Click ‘Ok’ to close the window.
Note: Make sure you save your activation code in a safe place; it will be needed for product
upgrades.
Figure 11.1 Figure 11.2
Figure 11.3 Figure 11.
38
Page 39

Specifications
39
Page 40

Alphabetical Index
Creating and working with schedules ............................................................................................... 22
Creeping Line Editor .......................................................................................................................... 34
Disclaimer Notice ................................................................................................................................ 4
Firewall .............................................................................................................................................. 16
Getting Started .................................................................................................................................... 7
Installing SignWare-Pro Server ........................................................................................................... 8
Introduction ........................................................................................................................................ 3
Limited Warranty Statement .............................................................................................................. 6
Navigating the SignWare-Pro Client .................................................................................................. 10
Registration and Activation ............................................................................................................... 43
Running SignWare-Pro Server Software for the first time ................................................................. 15
Server Requirements ......................................................................................................................... 44
Setting up the SignWare-Pro Client ..................................................................................................... 9
Specifications ..................................................................................................................................... 44
Super Schedules ................................................................................................................................. 25
Task Manager .................................................................................................................................... 19
Template Creator ............................................................................................................................... 27
Updating the SignWare-Pro Client ..................................................................................................... 14
User Manager .................................................................................................................................... 17
What’s in the Box? .............................................................................................................................. 5
40
Page 41

Notes
41
Page 42

Notes
42
Page 43

© Copyright 2011 Smart-AVI, All Rights Reserved
NOTICE
The information contained in this document is subject to change without
notice. Smart-AVI makes no warranty of any kind with regard to this
material, including but not limited to, implied warranties of
merchantability and fitness for any particular purpose.
Smart-AVI will not be liable for errors contained herein or for incidental or
consequential damages in connection with the furnishing, performance or
use of this material.
No part of this document may be photocopied, reproduced or translated
into another language without prior written consent from Smart-AVI.
For more information, visit www.smartavi.com.
SmartAVI, Inc. / Twitter: smartavi
11651 Vanowen St. North Hollywood, CA 91605
Tel: (818) 503-6200 Fax: (818) 503-6208
http://www.SmartAVI.com
www.smartavi.com
43
 Loading...