

Page 1
USER MANUAL
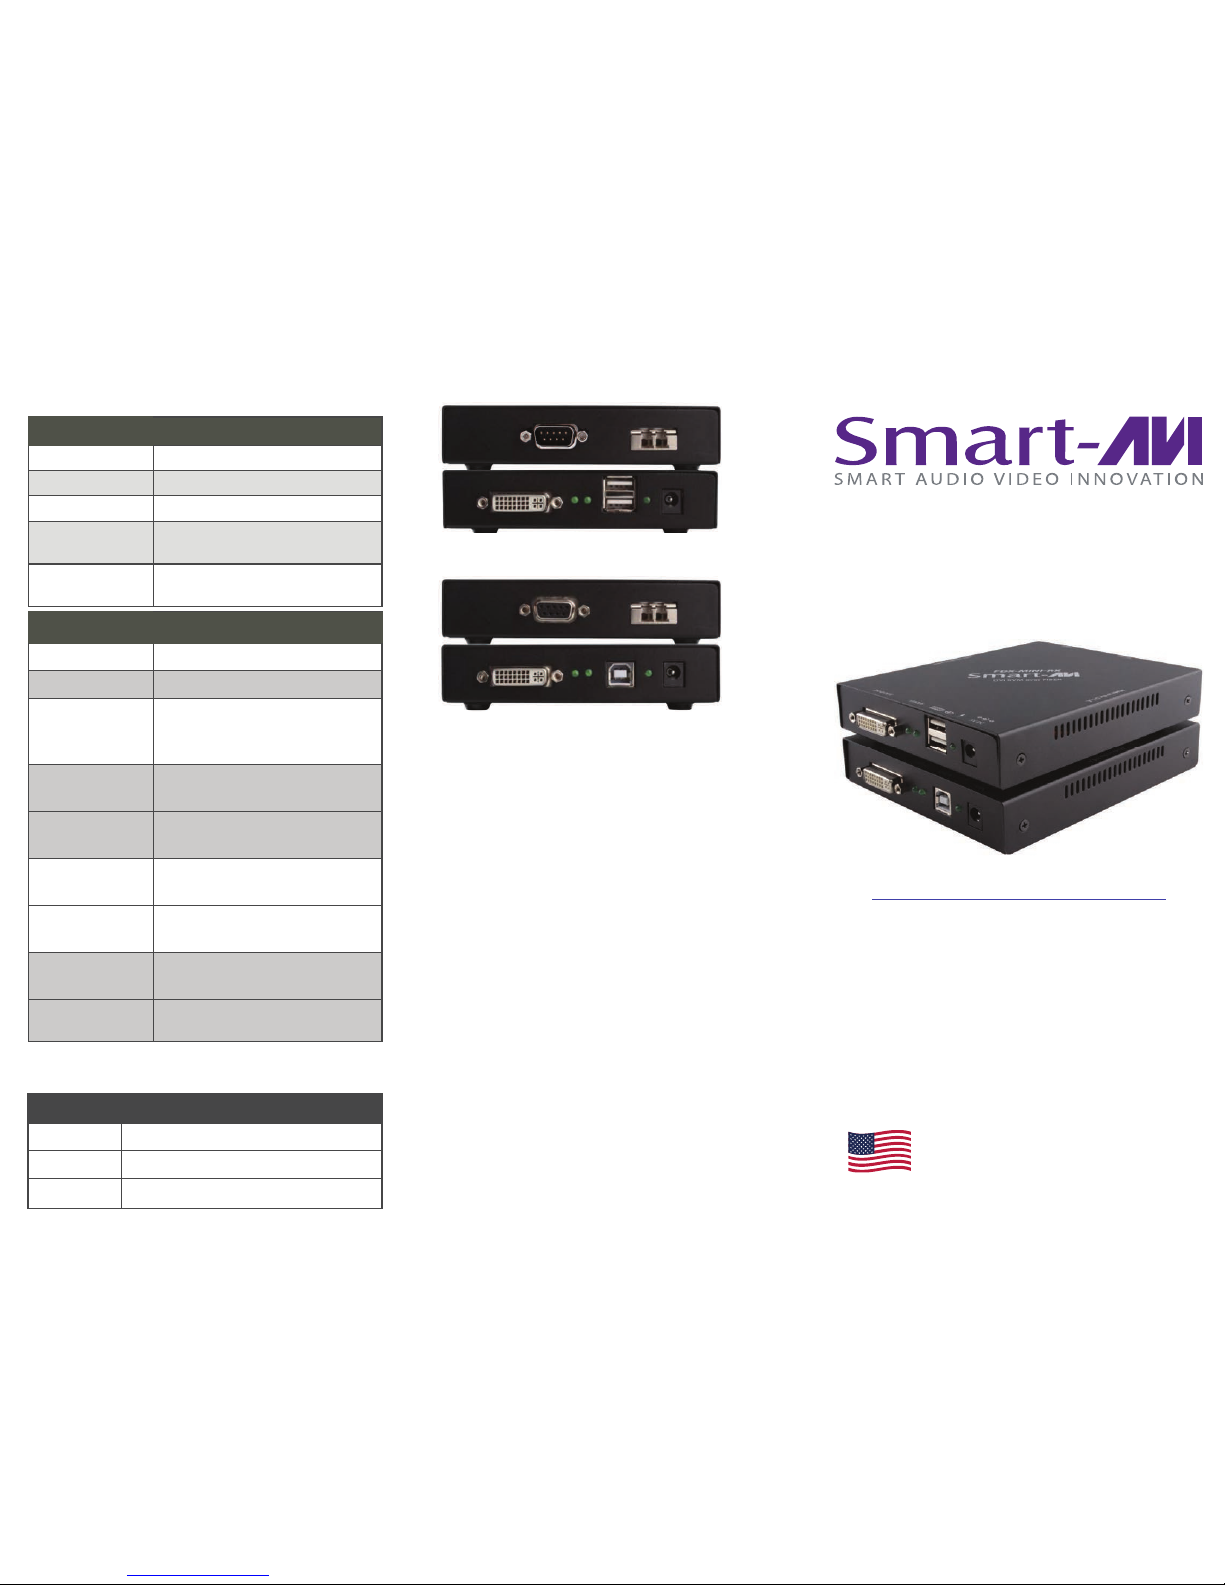
FDX-MINI
VIDEO
Input Interface DVI-D Female (Single Link)
Output Interface DVI-D Female (Single Link)
Max Resolution 1920x1200 @ 60Hz
DDC Internal Table;
Can be reprogrammed
Laser Output
Power
Class 1; EN 60825-1 2007; EN
60825-2 A2 2010
TECHNICAL SPECIFICATIONS
KVM DVI-D Fiber Optic Extender
For the Extension of any DVI-D, USB Keyboard, Mouse,
and RS-232 Signal up to 1,400 Feet
FDX-MINI Receiver
FDX-MINI Transmitter
WHAT’S IN THE BOX?
PART NO. DESCRIPTION
FDX-MINI-TX FDX-MINI Multimode Transmitter
FDX-MINI-RX FDX-MINI Multimode Receiver
PS5VD4A Power Supply 5V 4A (2)
OTHER
RS-232 9600 bps only
USB USB Keyboard and Mouse ONLY
Fiber Extender
• 738 Feet @ Multimode 62,5μ
• 1400 Feet @ Multimode 50μ
• Fiber-Plug type LC
Dimensions
FDX-MINI-TX
W 4.75” x D 6.25” x H 1.06”
Weight
FDX-MINI-TX
.35 lbs
Power
FDX-MINI-TX
External 100-240 VAC/
5VDC@4A @ 20W
Dimensions
FDX-MINI-RX
W 4.75” x D 6.25” x H 1.06”
Weight
FDX-MINI-RX
.55 lbs.
Power
FDX-MINI-RX
External 100-240 VAC/
5VDC@4A @ 20W
NOTICE
The information contained in this document is subject
to change without notice. SmartAVI makes no warranty
of any kind with regard to this material, including but
not limited to, implied warranties of merchantability
and fitness for particular purpose.
SmartAVI will not be liable for errors contained herein
or for incidental or consequential damages in
connection with the furnishing, performance or use of
this material.
No part of this document may be photocopied,
reproduced, or translated into another language
without prior written consent from SmartAVI
Technologies, Inc.
20160613
Designed and Manufactured in the USA
Page 2
INTRODUCTION
For reliable, uninterrupted and long-distance DVI-D KVM
extension, the FDX-Mini provides the best solution with its
fiber optic extension capabilities. FDX-MINI enables longdistance transmission of high-resolution DVI-D, USB Keyboard and Mouse, and RS-232 over a conventional and
inexpensive multimode fiber optic cable. Users can bridge
large gaps that they ordinarily could not with this compact
device.
FEATURES
Top Signal Quality at Maximum Extension Over
Multimode Fiber (1,400 ft.)
Superior Image Quality at all Resolutions
Video Resolutions up to 1920x1200 at 60Hz
Programmable EDID
Supports USB Keyboard & Mouse
Supports HDMI Input and Output (with an adapter)
Supports DVI Output
Supports RS-232 Control (9600 bps only)
Fiber Plug Type LC
Compatible With all Operating Systems
Compact Metal Casing
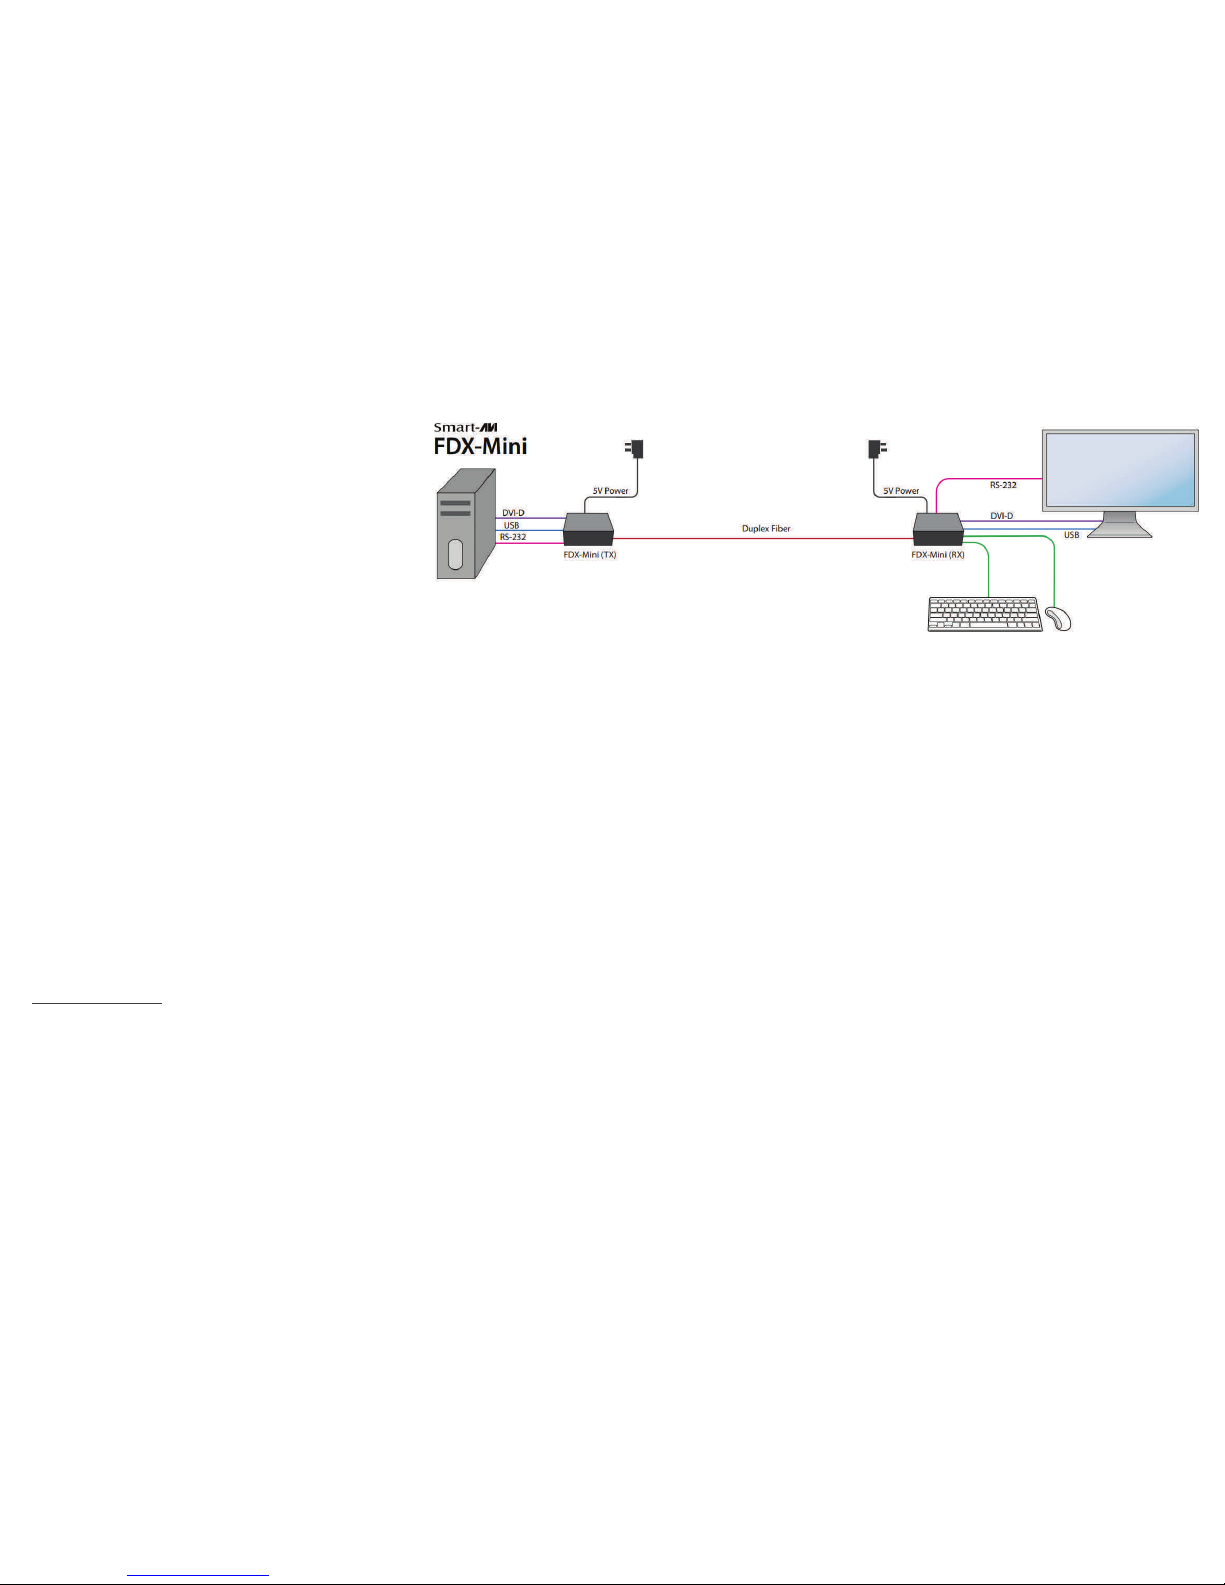
APPLICATION DIAGRAM
CONNECTING THE FDX-MINI
1. Turn off all devices.
2. Connect a multimode fiber optic cable between the TX and RX (maximum cable length is 1,400 ft.).
3. Connect the DVI-D cable, RS-232 cable (optional), and USB cable from the computer to their appropriate ports on the TX .
4. Power on the computer and connect the provided 5VDC power supply to the TX.
5. Connect a USB keyboard and Mouse to the USB ports on the RX. Note: Only a keyboard and a mouse
may be connected to these ports. Connecting other devices to these USB ports may cause damage to
the unit. Optionally connect an RS-232 control-enabled device to the DB9 connector on the RX.
6. Connect the monitor or display to the DVI-D out of the RX and power on the monitor only.
7. Connect the supplied 5VDC power supply to the RX.
NOTE: The FDX-MINI is HDMI compatible. (With DVI to HDMI Adapters)
EDID (Monitor Settings) LEARNING
FDX-MINI is capable of “learning” and remembering what type of display monitor is connected to it. Once
everything is connected, during power up, if the EDID stored in the memory of the FDX-MINI does not
match the EDID of the monitor connected on the RX, the EDID learning process will start automatically.
The learning process may take a few seconds. During this process, the Status LEDs on the TX & RX will
rapidly flash. Once the LEDs have stopped flashing, the EDID has been learned and stored.
If EDID learning fails or you connect a different monitor to the RX and need to learn a new EDID:
1. Cycle power on the RX. (Un-plug and plug in) This should force EDID learning.
2. If learning still fails, unplug the power for the TX and RX units and connect the monitor to the DVI input
port of the TX unit. Power on the monitor. Power on the TX & RX units. The TX Status LEDs should rapidly flash as the EDID is learned and stored. Now re-connect the computer to the TX DVI port and reconnect the monitor to the RX DVI port.
WHY FIBER OPTIC?
SmartAVI has created a full line of fiber optic extender
products, understanding that this technology is superior to
traditional cabling.
Fiber optic cables are:
Capable of transmitting over very long distances with no
signal loss.
Immune to electromagnetic interference. In situations
where there is considerable interference, fiber optic
cabling is the only solution.
Much more secure because they cannot be easily
tapped. For this reason, military and law enforcement
agencies use fiber optic cables for the transmission of
sensitive data.
Relatively inexpensive and small enough to be routed
through small spaces.
 Loading...