

Page 1
MXU-88 Plus
User Manual
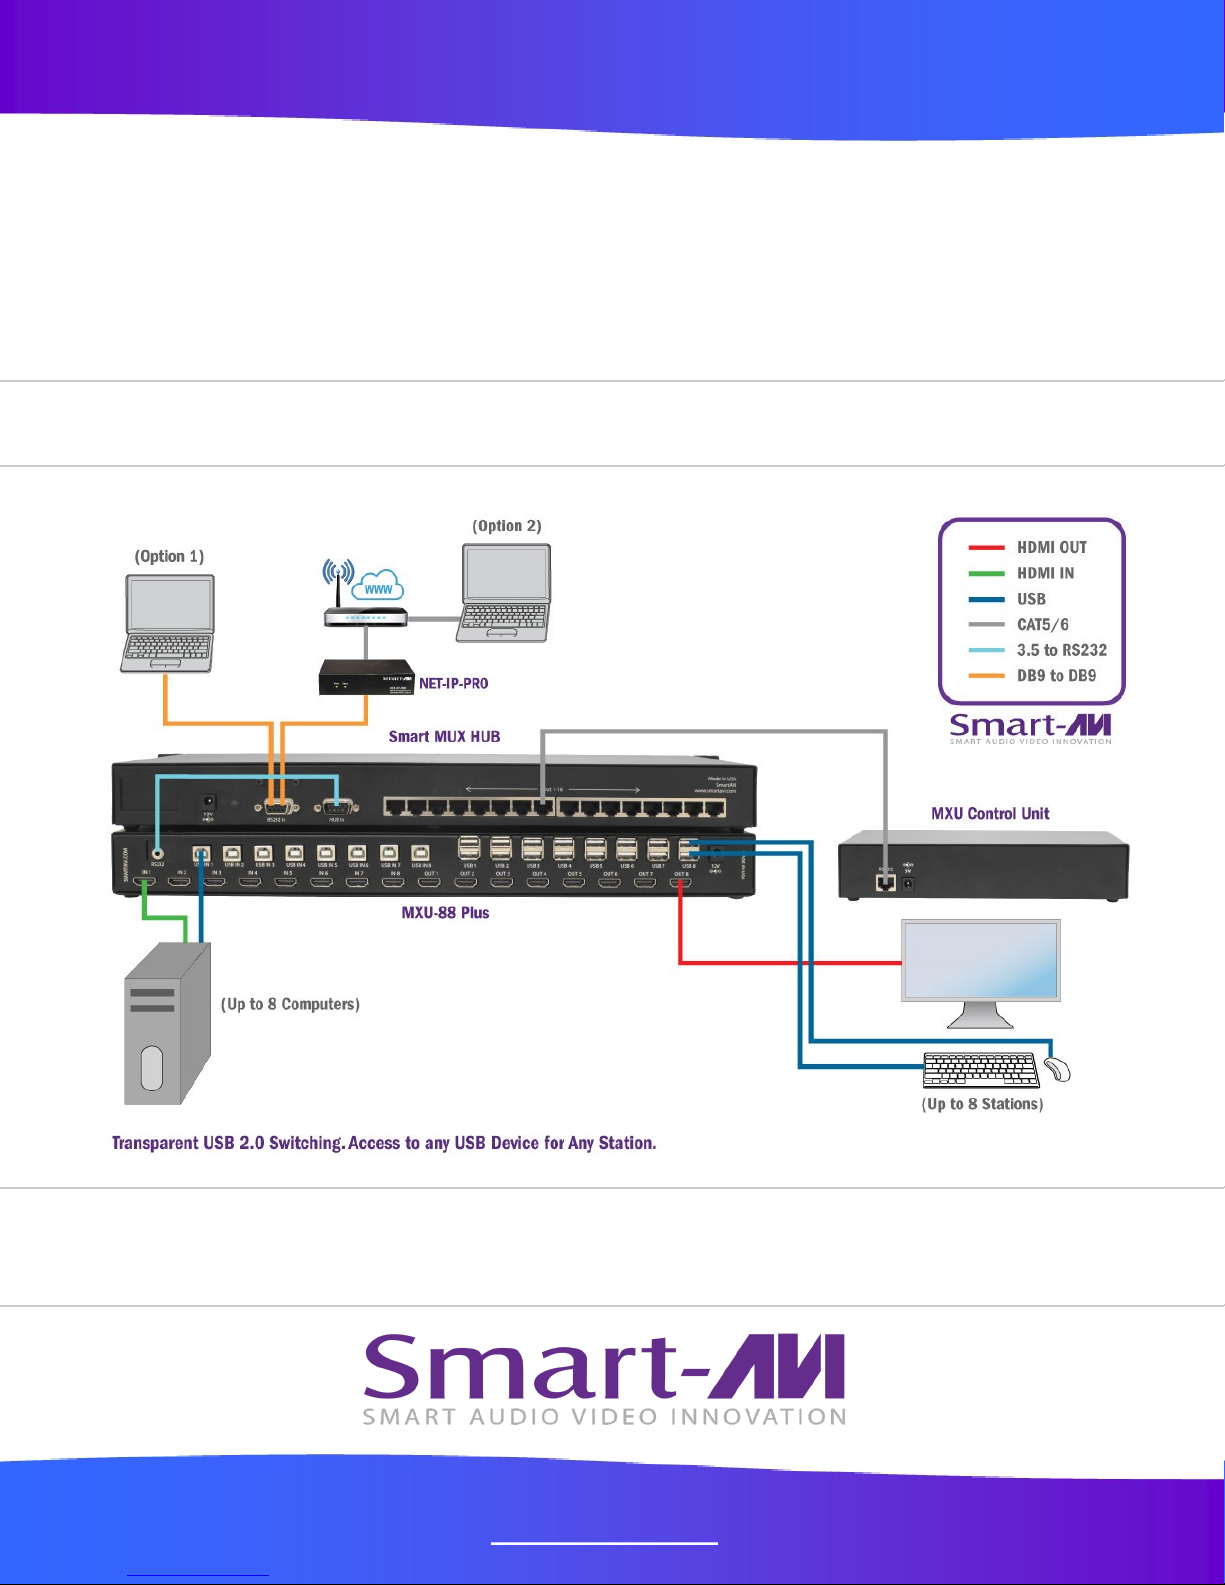
8X8 4K HDMI / USB 2.0 Matrix Switch with Remote Control
Remote access and control of up to 8 computers with 4K HDMI
and transparent USB 2.0 from up to 8 connected stations
Made in U.S.A. www.SmartAVI.com 1-800-AVI-2131
1
Page 2
TABLE OF CONTENTS
WHAT'S IN THE BOX? 2
PRODUCT PHOTOS 3-4
INTRODUCTION
FEATURES
APPLICATIONS 5
TECHNICAL SPECIFICATIONS
HARDWARE INSTALLATION
FRONT PANEL CONTROL
CONTROL VIA ETHERNET 10-11
LIMITED WARRANTY STATEMENT 12
5
5
6-7
8
9
WHAT'S IN THE BOX?
PART NO. QTY DESCRIPTION
MXU88-S 1 8X8 4K HDMI USB 2.0 Matrix Switch
SC-HUB16 1 16 Port RS232 Selector SmartMux Communication HUB
SC-RM8 1 MXU Controller Unit
CST2RS232 1 3.5mm to RS232 cable
PS12VD5A 1 Power Adapter
PS12VD3A 1 Power Adapter
PS5VD2A 1 Power Adapter
1 Quick Start Guide
Brackets for mounting can be ordered from SmartAVI.
2
Page 3

MXU-88
Front View
Rear View
3
Page 4
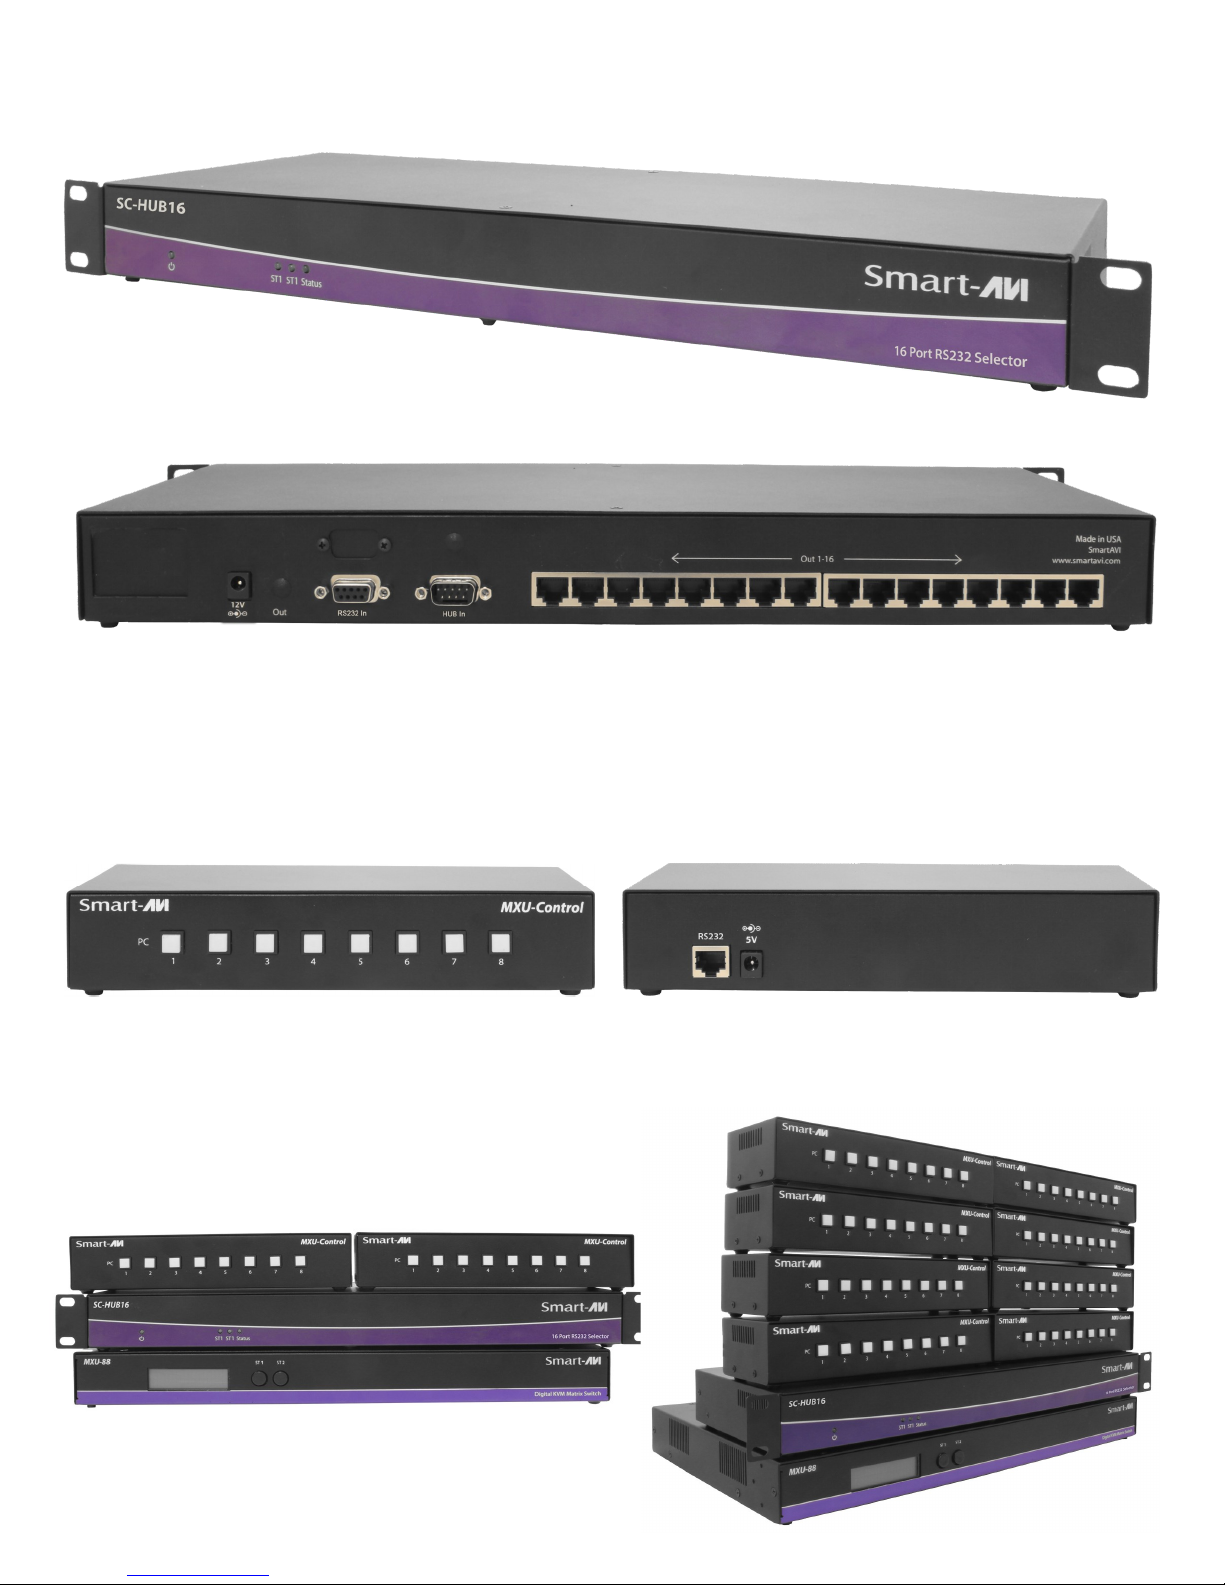
Smart MUX HUB
Rear View
MXU-Control Unit
Front View Rear View
MXU-88 Plus Installed
4
Page 5

INTRODUCTION
The MXU-88 Plus is the latest upgrade to one of SmartAVI’s most powerful and efficient matrix switching
solutions. This 8X8 switching hub grants up to eight users shared remote access to as many as eight remote work stations and transparent USB 2.0 devices. Great for applications such as multi-user remote
supervision or group-based video editing projects, the MXU-88 Plus excels even more at expediting workflow for digital devices of various kinds.
Capable of displaying HDMI-based video at resolutions up to 4K (3840×2160 @ 30Hz), the MXU-88 Plus
is perfect for non-emulation KVM operations where a high degree of picture clarity is imperative. Better
yet, the MXU-88 Plus is easy to control, outfitted with a simple two-button front panel interface and a webbased command console via Ethernet connection. The MXU-88 Plus’s 16-port USB 2.0 output is ideal for
transparent peripherals like keyboads, mice, external hard-drives, cameras, printers, scanners, streaming
devices, and more. For comprehensive matrix switching and USB 2.0 device control remotely made easy,
choose the MXU-88 Plus matrix switch powered by SmartAVI!
The MXU-88 is an ideal solution for medical, industrial, studio and defense applications, where it is not
practical or safe to have multiple workstations in close proximity to each other. An operator can switch to
any connected computer from any connected station with ease.
FEATURES
Remote control via SmartMUX HUB and MUX Control Units
(8) HDMI inputs with resolutions up to 4K (3840x2160 @ 30Hz)
(8) HDMI outputs with resolutions up to 4K (3840x2160 @ 30Hz)
(8) USB 2.0 Type B inputs—(8) Dual USB 2.0 Type A outputs
Supports digital audio over HDMI
Supports DVI-D with adapters
Supports USB keyboard-mouse control (NO EMULATION)
Supports USB peripheral devices (external hard-drives, scanners, printers, etc...)
Simple two-button front panel control with LCD display for control and status
Full web-based control console over Ethernet
Learns and stores EDID information
HDMI 1.4 & HDCP Compliant
Control Sun, Mac or PC computers from one workstation
Plug-and-play ready for immediate use
APPLICATIONS
Audio/Visual Presentations
Schools & Universities
Retail Store Displays
Conference Centers
Server Collocation
Business Lobbies
Shopping Centers
Control Rooms
Digital Signage
Dealer Rooms
5
Wall Displays
Restaurants
Education
Hospitals
Security
Page 6

TECHNICAL SPECIFICATIONS
VIDEO
Supported Resolutions
Video Bandwidth 300 MHz
HDMI Version HDMI 1.4
Input Interface (8) HDMI Type A 19-pin Female TMDS (DVI-D with adapter)
Output Interface (8) HDMI Type A 19-pin Female TMDS (DVI-D with adapter)
Max Cable length Up to 20 ft.
Audio Stereo Embedded in HDMI signal
4Kx2K (3840x2160@30Hz), 1080p, 1080i, 720p, 480p,
Supports all DVI-D Resolutions
USB
Signal Type USB 2.0, 1.1 and 1.0
Input
(8) USB Type B Female (No Emulation)
Output (16) USB Type A Female
CONTROL
Front Panel Buttons
Ethernet (TCP/IP) (1) RJ-45
OTHER
Power Adapter PS12VDC5A
Dimensions 17.06” W x 2” H x 10.4” D
Weight 8.8 lbs.
Working Temp. 32 to 122°F (0 to 50 °C )
Working Humidity Up to 85% RH (no condensation)
Storage Temp. -4 to 149 °F (-20 to 65 °C )
Storage Humidity Up to 90% RH (no condensation)
6
Page 7

TECHNICAL SPECIFICATIONS Continued
Smart MUX Communication HUB
CE Approval Yes
Control Connectors DB9 Male / DB9 Female
Signal RS232 half duplex +/- 12V
User Connector 16 RJ45, RS232 TTL +/5V
Remote Power POE
Data Format 5 to 8 bits
Interface RS-232 async
Speed 300 bps to 76.8 kbps
Power
Switches Code Operated
Weight 3.8 lbs
115/230 TO 12vdc 3a
MUX Controller
CE Approval Yes
Signal RS232 half duplex +/- 12V
User Connector 16 RJ45, RS232 TTL +/5V
Remote Power POE
Optional 5VDC
Data Format 5 to 8 bits
Interface RS-232 async
Speed 300 bps to 76.8 kbps
Power Internal via POE
Switches Code Operated
Weight 2 lbs
7
Page 8

HARDWARE INSTALLATION
Connecting the Smart Mux Hub to the MXU-88 Is quick and easy.
1) Connect the 3.5mm proprietary serial cable to the MXU-88 round serial connection located on the back
far left, looking at the back of the unit. Connect the other end, to the db9 connection on the “Smart Mux
Hub” labeled RS232 located to the left of the RJ 45 connections.
2) Connect the ac adapter.
Connecting the “Mux Control Units” to the “Smart Mux Hub” is just as easy.
Only the first 8 RJ connections are active. The rest are for future development.
1) Connect a CAT5 or 6 utp cable to any of the active RJ45 connections. Connect the other end to the
”Mux Control Unit”. That’s it!! Maximum cable length is 200’. Ac adapters are not necessary in most situations when connecting to the “Mux Control Units”. Power is supplied through the attached cabling.
Using the “Mux Control Units”
Once everything is connected and powered on, the buttons on the “Mux Control Unit” are illuminated.
Pressing any of the 8 buttons will display the content of that connection on your screen.
For mouse and keyboard control of the input you are watching, long press the button. The button led will
flash. And you are now have total control of the computer you are viewing.
KVM extenders can be used to extend placement of Displays and USB devices.
8
Page 9

FRONT PANEL CONTROL
Use the ST2 button to navigate to the desired menu item. Pressing ST1 and ST2 at the same time will execute the selection.
USB:
Change which computer is connected to which keyboard / mouse.
Press ST2 to move from IN port to IN port.
Press ST1 when the cursor is on the IN port you want to change the OUT port # connected
to it.
Press ST1 & ST2 simultaneously to connect the ports.
Press ST2 to move to another IN port or press ST1 & ST2 simultaneously to exit back to the
main menu.
Video:
Change which computer is connected to which monitor.
Press ST2 to move from IN port to IN port.
Press ST1 when the cursor is on the IN port you want to change the OUT port # connected
to it.
Press ST1 & ST2 simultaneously to connect the ports.
Press ST2 to move to another IN port or press ST1 & ST2 simultaneously to exit back to the
main menu.
EDID:
Press ST2 to move from menu item to item. Press ST1 and ST2 simultaneously to enter the
EDID sub menu.
Learn: Will load and store the EDID from the display connected to port 1.
Info: Will display the name of the EDID currently in use.
Exit: Will exit back to the main menu.
IP:
Press ST1 & ST2 simultaneously to display the IP address in use by the MXU-88.
9
Page 10

CONTROL VIA ETHERNET
On the front panel of the MXU-88 press the ST2 button until the cursor is by the IP selection. Press ST1 &
ST2 simultaneously to display the IP address in use by the MXU-88. Enter the IP address into a web
browser of your choice. You should see the MXU-88 login page. The username is admin and the password
is admin. Then the main webpage will display as shown in Figure 7-1. The left column of numbers represents the output port. The top row of numbers represent the input ports. Using your mouse click on the
box at the intersection of the input with the output to execute the desired connection. The video and usb
connections can be changed independently.
There is also a button you can click on to learn the EDID of the monitor connected to output port 1 and a
button that will display the EDID in use.
Figure 7-1
10
Page 11

CONTROL VIA ETHERNET (Continued)
From the main webpage you can select IP Config and a webpage will display with fields allowing to set the
network settings for the MXU-88.
Figure 8-1
11
Page 12

LIMITED WARRANTY STATEMENT
A. Extent of limited warranty
Smart-AVI Technologies, Inc. warrants to the end-user customers that the Smart-AVI product specied above
will be free from defects in materials and workmanship for the duraon of 1 year, which duraon begins on
the date of purchase by the customer. Customer is responsible for maintaining proof of date of purchase.
Smart-AVI limited warranty covers only those defects which arise as a result of normal use of the product,
and do not apply to any:
a. Improper or inadequate maintenance or modicaons
b. Operaons outside product specicaons
c. Mechanical abuse and exposure to severe condions
If Smart-AVI receives, during applicable warranty period, a noce of defect, Smart-AVI will at its discreon
replace or repair defecve product. If Smart-AVI is unable to replace or repair defecve product covered by
the Smart-AVI warranty within reasonable period of me, Smart-AVI shall refund the cost of the product.
Smart-AVI shall have no obligaon to repair, replace or refund unit unl customer returns defecve product
to Smart-AVI.
Any replacement product could be new or like new, provided that it has funconality at least equal to that of
the product being replaced.
Smart-AVI limited warranty is valid in any country where the covered product is distributed by Smart-AVI.
B. Limitaons of warranty
To the extant allowed by local law, neither Smart-AVI nor its third party suppliers make any other warranty or
condion of any kind whether expressed or implied with respect to the Smart-AVI product, and specically
disclaim implied warranes or condions of merchantability, sasfactory quality, and tness for a parcular
purpose.
C. Limitaons of liability
To the extent allowed by local law the remedies provided in this warranty statement are the customers sole
and exclusive remedies.
To the extant allowed by local law, except for the obligaons specically set forth in this warranty statement,
in no event will Smart-AVI or its third party suppliers be liable for direct, indirect, special, incidental, or con-
sequenal damages whether based on contract, tort or any other legal theory and whether advised of the
possibility of such damages.
D. Local law
To the extent that this warranty statement is inconsistent with local law, this warranty statement shall be
considered modied to be consistent with such law.
12
Page 13

NOTICE
The information contained in this document is subject to change without notice. SmartAVI makes
no warranty of any kind with regard to this material, including but not limited to, implied warranties
Of merchantability and fitness for particular purpose. SmartAVI will not be liable for errors contained
herein or for incidental or consequential damages in connection with the furnishing, performance or
use of this material. No part of this document may be photocopied, reproduced, or translated into
another language without prior written consent from SmartAVI Technologies, Inc.
20180219
11651 Vanowen St. North Hollywood, CA 91605
Designed and Manufactured in the USA
800.AVI.2131
Tel: (818) 503-6200 | Fax: (818) 503-6208
SmartAVI.com
13
 Loading...