

Page 1
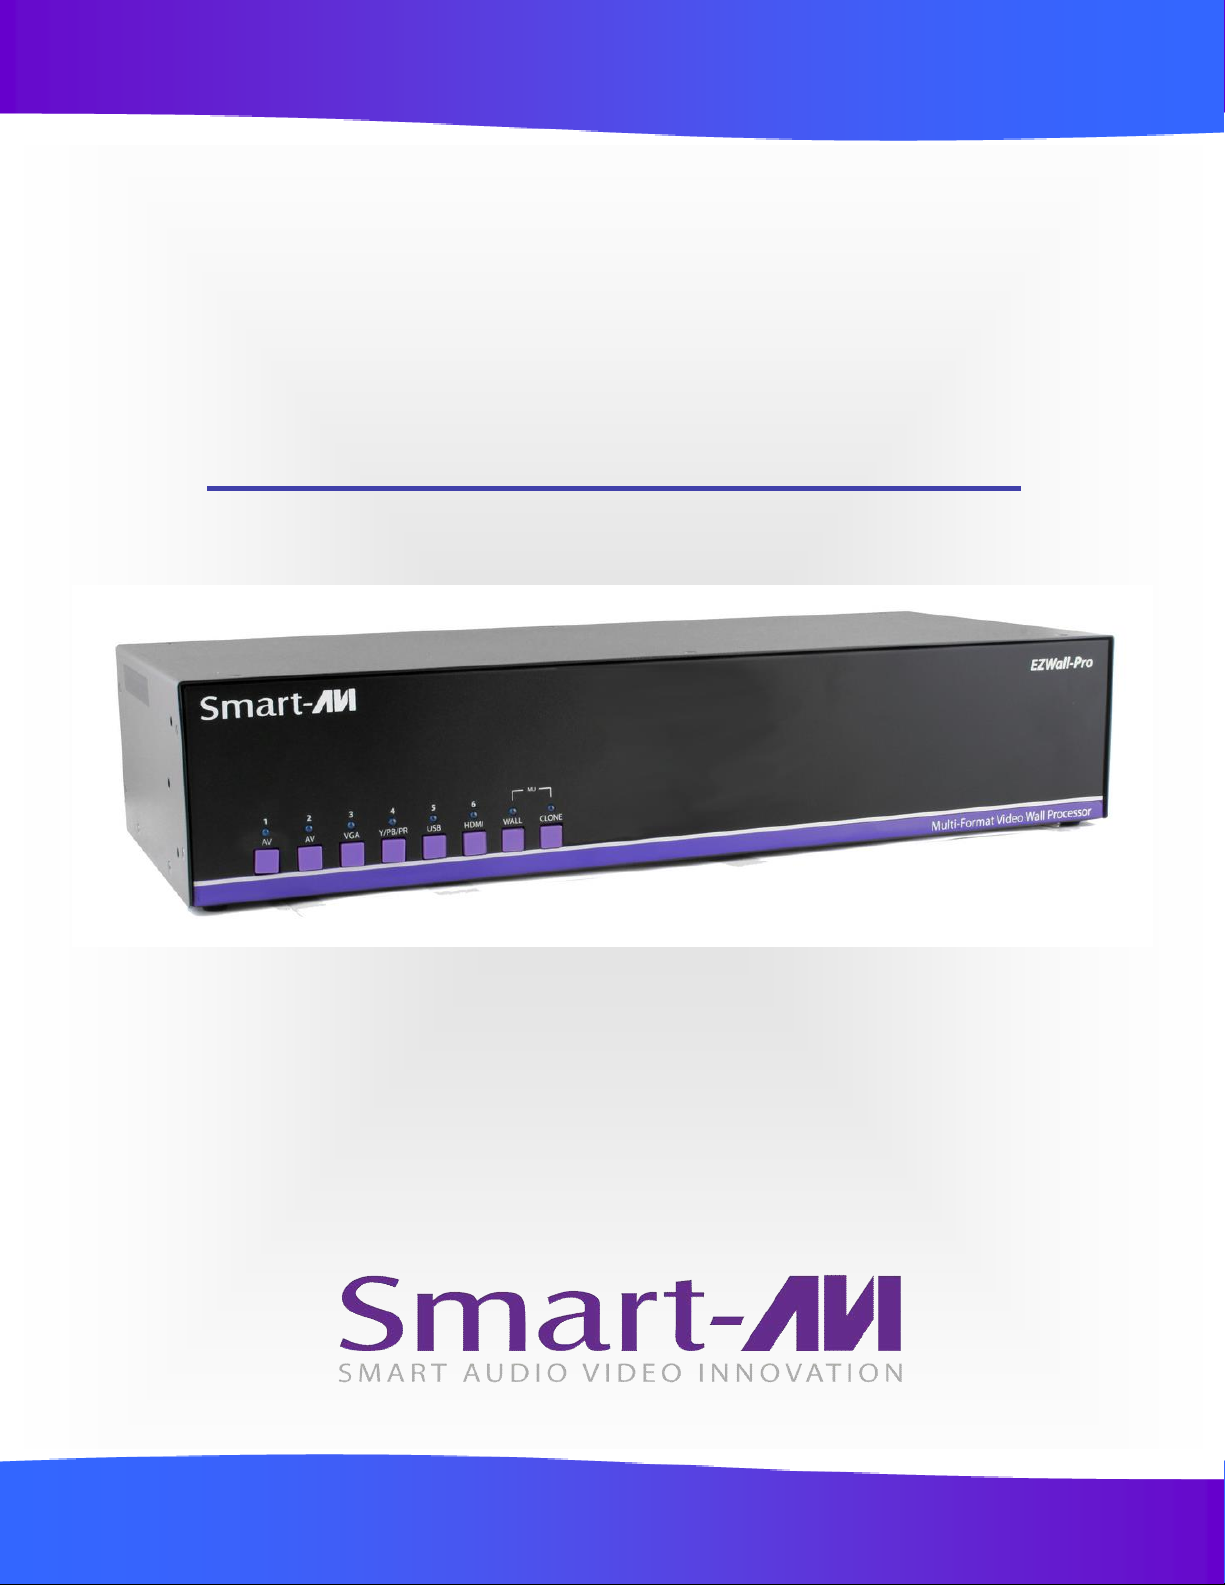
EZWall-Pro
User Manual
Multi-Format Video Wall Processor
2x2 HD Video Wall Controller
HDMI, VGA, Composite and Y/Pb/Pr Inputs
Integrated USB Media Player
Page 2
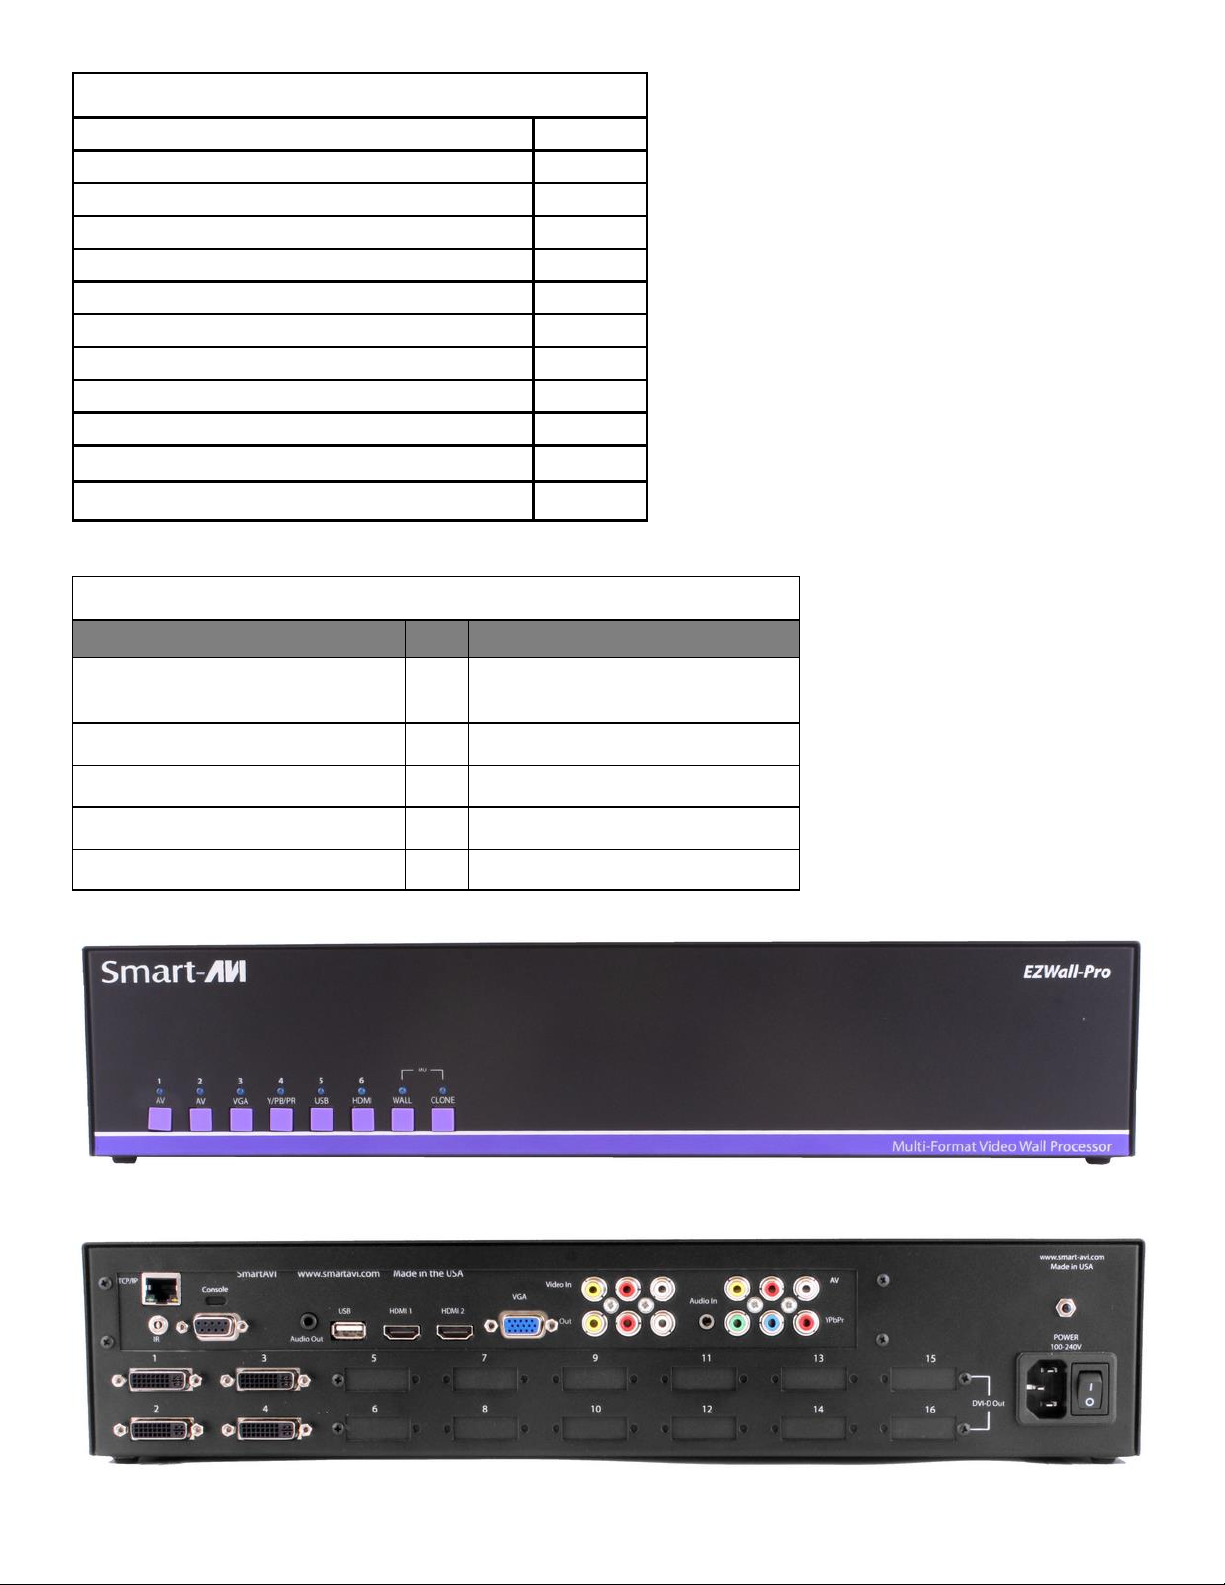
TABLE OF CONTENTS
WHAT'S IN THE BOX? 2
INTRODUCTION 3
FEATURES 3
APPLICATIONS 3
TECHNICAL SPECIFICATIONS 4
HARDWARE INSTALLATION 5
FRONT PANEL CONTROL 6
RS-232 COMMANDS 7
IR REMOTE CONTROL 8
CONTROL VIA ETHERNET 9-11
FIRMWARE UPDATE 12-13
LIMITED WARRANTY STATEMENT 14
WHAT'S IN THE BOX?
PART NO. QTY DESCRIPTION
EZW2X2-S 1
CCPWR06 1 Power supply cord
EZ-RMT (NEC 38 KHz) 1 IR Remote Control
SM-EYE 1 IR Receiver
EZWall-Pro: 2X2 Video Wall Controller
1 Quick Start Guide
Figure 2-1
Figure 2-2
2
Page 3

INTRODUCTION
Thank you for choosing Smart-AVI EZWall-Pro for your video wall solution. The EZWall-Pro offers top-notch
HD DVI output for five different type of signal inputs. Create striking 2x2 wall displays easily with simple signal-switching and flexible connectivity. The EZWall-Pro even features a fully-integrated USB media player,
perfect for populating your displays with enticing digital content.
Capable of expanding any supported video input to four large-scale screens at 1080p, the EZWall-Pro showcases stunning picture quality and SmartAVI products’ signature ease of use. In this guide, you will learn how
to install and optimize your experience with the EZWall-Pro using basic steps. We will cover setting the hardware up, activating and connecting your systems, and offer helpful tips on how to best use EZWall-Pro’s excellent selection of picture modes to enhance your video wall. Congratulations again on choosing EZWall-Pro
and SmartAVI as your go-to video wall solution!
FEATURES
· Four screen (2x2) multi-Layout, multi-format video wall controller
· Outputs: (4) DVI single-link
· Inputs: (2) HDMI, (1) VGA, (2) Composite AV, (1) Y/Pb/Pr
· Integrated USB Media Player for digital video, imagery and audio
· Internal EDID learning
· 1080p (1920x1080 @ 60Hz) Full HD resolution output
· No additional hardware or software required
· Supports control via Front Panel Buttons
· Supports control via IR Remote control
· Supports control via RS-232
· Supports control via TCP/IP
· HDCP and HDMI 1.4 compliant
· Easy to set-up
· Easy to use
APPLICATIONS
· Corporate or Educational Presentations
· Airport Installations
· Wall Displays
· Digital Signage
· Dealer Rooms
· Control Rooms
· Shopping Centers
· Security
· Point-of-Sale
· Entertainment Venues
· Corporate Lobbies
· Restaurants
3
Page 4
TECHNICAL SPECIFICATIONS
VIDEO
Output Resolutions Up to 1080P (1920x1080@60Hz)
Input Resolutions Up to 1080P (1920x1080)
Input Video Signal 1.2 volts
Input DDC Signal 5 volts
Outputs (4) DVI-D
DVI Format Single-link
Inputs (2) HDMI, (1) VGA, (2) AV Composite, (1) Y/Pb/Pr, (1) USB 2.0 Type A
HDCP Compliance 1.0/2.0
Audio (1) 3.5 mm input, (1) 3.5 mm output
CONTROL
Front Panel Tactile Switches
RS-232 DB9 Female, 9600, N, 8, 1, no flow control
IR Remote Control EZ-RMT (NEC 38 KHz)
Ethernet (TCP/IP) RJ-45
OTHER
Power 100-240 VAC
Dimensions 17.125” W x 3.5” H x 7.25” D
Weight 7.6 lbs.
USB MEDIA PLAYER USB player requires the IR Remote Control for navigation and media selection.
Signal Type USB 2.0, 1.1, and 1.0 (Type A)
Video Formats * MJPEG, MPEG-1, MPEG-2, MPEG-4, Vvid, DivX H.264
Max Resolution 1920x1080 @30fps
Max Data Rate 20 Mbps
Audio Formats * MP3, WMA, AAC, MP2, PCM, AC3
Photos Max Resolutions * JPEG - 15360x8640, BMP - 9600x6400, PNG - 9600x6400
Other
Max TXT resolution: 1200x800
Max ANSI/UNICODE GB/UTF8 file size: 1MB
*PLEASE NOTE: EZWall-Pro only supports the primary formats listed above. Any unlisted formats are not
compatible with EZWall-Pro.
4
Page 5
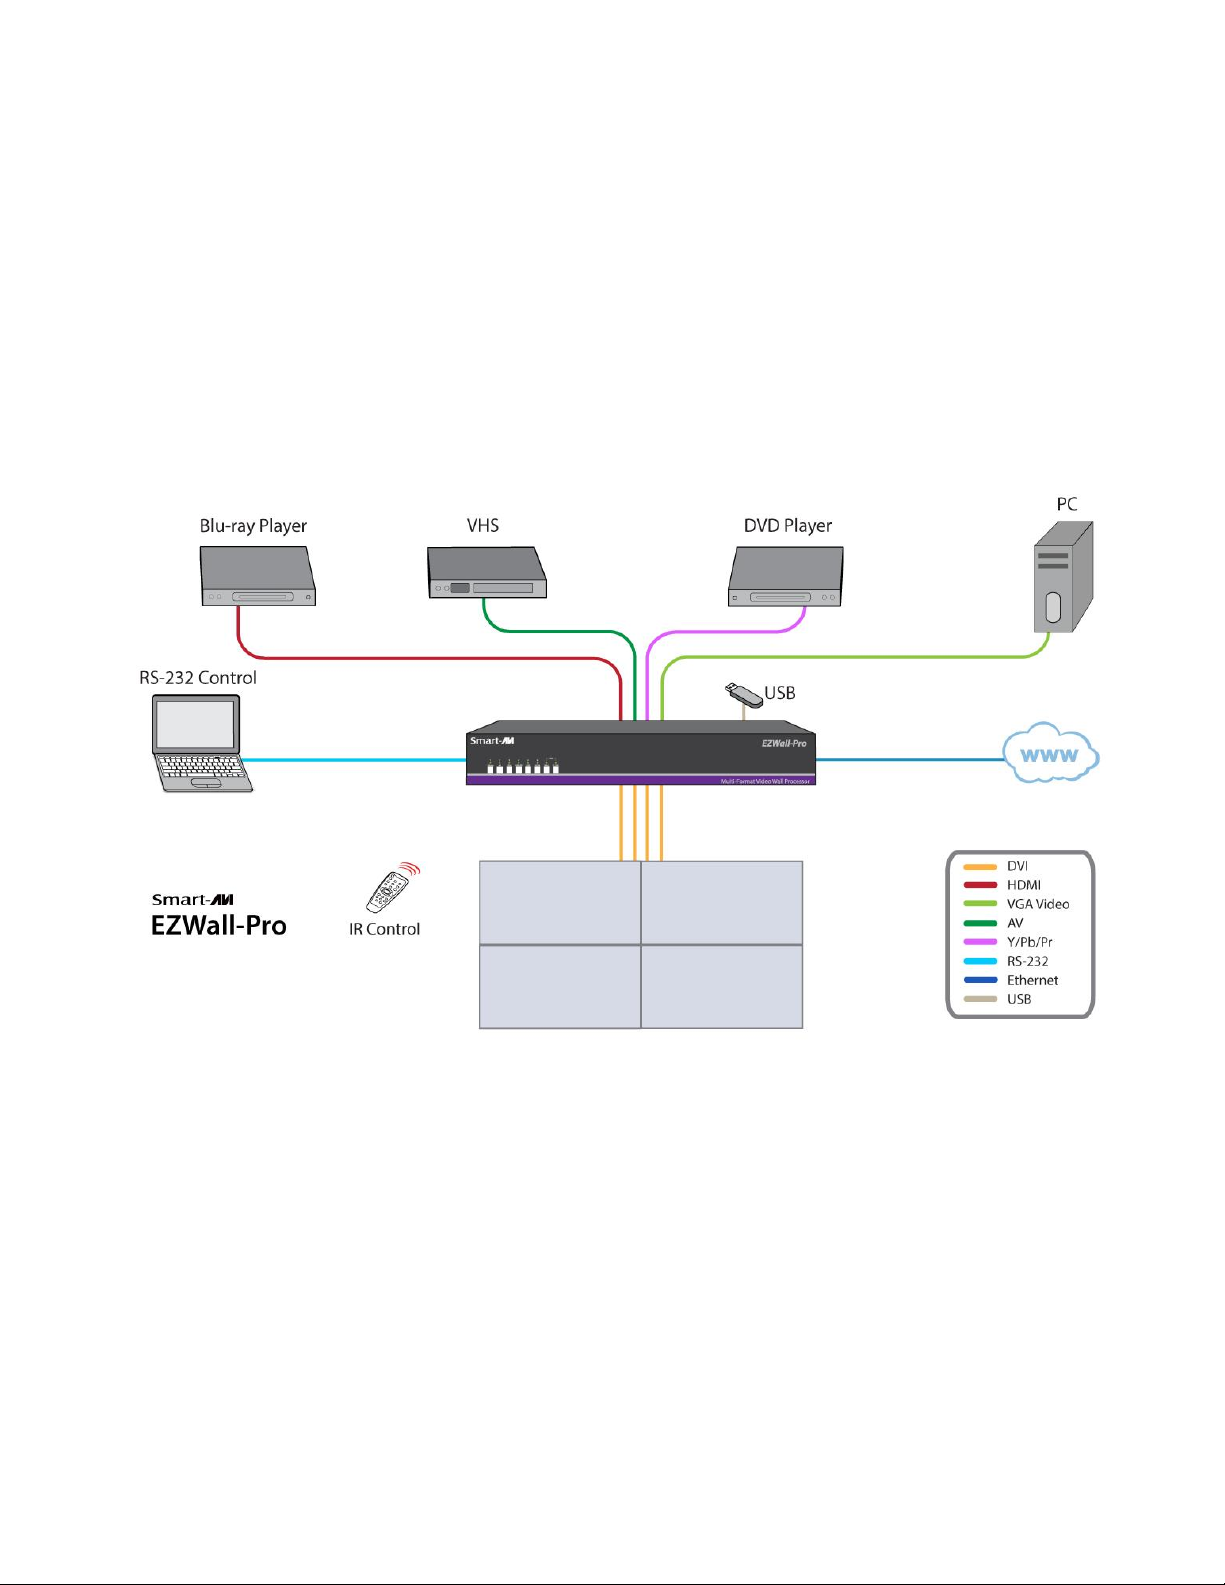
HARDWARE INSTALLATION
1. Position EZWall-Pro conveniently and keep it unplugged.
2. Connect DVI output cables between the EZWall-Pro and your video wall screens
3. Connect any input to their corresponding signal source (Blu-Ray player, computer, etc)
4. Optionally connect the IR receiver to the IR input jack at the back of the EZWall-Pro.
5. Optionally connect an RS-232 cable from a PC to the RS-232 port of the unit for additional
control.
6. Optionally connect an Ethernet cable to the EZWall-Pro for additional control over the internet (TCP/IP)
7. Turn on the EZWall-Pro.
8. Wait for a few seconds for the unit to initialize.
Figure 5-1
5
Page 6

FRONT PANEL CONTROL
To switch to Video Wall mode, press the WALL button.
To switch to Clone mode, press the CLONE button.
To switch between listed sources, press:
1. AV 1
2. AV 2
3. VGA
4. Y/PB/PR
5. USB *
6. HDMI (Press once for HDMI 1 and twice for HDMI 2)
Figure 6-1
Figure 6-2
* USB player requires the IR Remote Control for navigation and media selection.
6
Page 7

RS-232 COMMANDS
The EZWall-Pro may also be controlled via RS-232 commands. This feature requires that an RS-232 card is installed in your computer or a USB to RS-232 adapter. Check the RS-232 connections on your computer and
the EZWall-Pro to determine if you need a male to male, female to female or male to female cable.
Establish a connection to EZWall-Pro:
1. Connect a straight-through RS-232 cable to the RS-232 connector on the PC.
2. Connect the other end of the cable to the RS-232 port of the EZWall-Pro.
3. Power on the device.
If you are using a USB to COM port adapter and need to identify the COM port used do the following:
1. Click on the start button.
2. Click on Control Panel.
3. Click on Device Manager.
4. Click on the arrow next to Ports (COM & LPT).
You should see the name of your adapter and the COM port number in use.
Setting up the Terminal Application:
Run the terminal client of your choice such as HyperTerminal or PuTTY.
Select the correct COM port on the PC.
Use the following connection settings: 9600, N, 8, 1, no flow control.
Once the connection is established type //? And hit enter. The EZWall-Pro should respond with a firmware
version number and a list of available commands.
COMMAND DESCRIPTION
//? Help (List of Commands)
//B Boot EZWall-Pro
//C Clone display mode
//I# Select input (# = 1=HDMI1, 2=HDMI2, 3=VGA, 4=AV1, 5=AV2, 6=YPBPR, 7=USB*)
//QA Query IP Address
//QC Query available video Configurations
//QM Query current Mode
//QF Query Firmware version
//QS Query current Status
//V default Video Configuration (2X2)
//W Wall
//Z Sleep
//nxn switch to Video Configuration (//2X1, //3X1, //4X1, //2X2, //1X2 etc.) See Figure 8-2
Figure 7-1
* USB player requires the IR Remote Control for navigation and media selection.
7
Page 8

IR REMOTE CONTROL
BUTTON DESCRIPTION
AV1 Select AV1
AV2 Select AV2
VGA Select VGA Input
YPbPr Select YPbPr Input
HDMI
USB Select USB Mode **
Center Button USB Mode Enter
▲
▼
◄
►
Enter USB Mode Enter
Exit USB Mode Back
Wall Select Wall Mode
Clone Select Clone Mode
F1 Wall Mode
F2 1X2 Mode *
F3 2X1 Mode *
F3 X2 (Press twice) 3X1 Mode *
F3 X3 (Press 3 times) 4X1 Mode
* Note that when not using all four displays the unused displays will
be a clone of output #1
Select between 2 HDMI Inputs. Press
once for HDMI 1 and twice for HDMI 2
Volume Up
Volume Down
USB Mode Left
USB Mode Right
** USB player requires the IR Remote Control for navigation and me-
Figure 8-2
Figure 8-1
8
Page 9

CONTROL VIA ETHERNET
EZWall-Pro TCP/IP control is a feature that allows mode switching and other configurations to be controlled
remotely via HTTP. Manage your EZWall-Pro with ease from anywhere in the world.
First you must find the IP address for the EZWall-Pro. Finder.exe (Smart IP-Finder) is conveniently available on our
website;Download and execute the IP
address Finder software for your product.
The EZWall-Pro and its IP address should appear in the display as shown in Figure 9-1.
Enter the IP address into a web
browser of your choice. You
should see the EZWall-Pro Home/
Welcome page as shown in Figure
9-2.
Figure 9-1
Figure 9-2
9
Page 10

CONTROL VIA ETHERNET (Continued)
Click on the LOG IN tab in the top tool bar.
Enter the User ID and Password in the Login page.
The User ID and Password are case sensitive.
User ID = admin, Password = 1234
You can change the User ID and password by clicking the ADMINISTRATION button. See Figure 10-1
Click the Network Settings tab in the top toolbar
to configure your network settings.
See Figure 10-2.
Figure 10-1
10
Figure 10-2
Page 11

CONTROL VIA ETHERNET (Continued)
You can use the internal web page to set
the EZWall-Pro to Wall Mode or Clone
Mode and set the desired source*. See
Figures 11-1 and 11-2.
Figure 11-1
Figure 11-2
* USB player requires the IR Remote Control for navigation and media selection.
11
Page 12

FIRMWARE UPDATE
Identify the COM port on your PC.
1. Click the Start button in the lower left corner of your Windows PC.
2. Click on Control Panel.
3. Click on Device Manager.
4. Click on the arrow next to "Ports (COM & LPT)".
5. You should see the COM port number.
Download and install the chip45boot2 GUI software in your PC.
Copy the website location below into your browser and download the
chip45boot2 firmware installer software.
Contact Smart-AVI support for the current firmware.
1. Power OFF the EZWall-Pro.
2. Connect the RS-232 cable from the computer to the RS-232 port of the EZWall-Pro.
3. Open the chip45boot2 GUI.
4. Connect to your active COM port using: 9600 Baud, No parity, 8 data bits, 1 stop bit, No flow control.
5. Initially the Status light in the lower right side of the chip45boot2 window will be dark. Status will appear
next to it. The boot loader in the EZWall-Pro is only accessible for a few seconds after you power up the EZWall-Pro. Immediately after turning on the power switch on the EZWall-Pro you must click the "Connect to
Boot loader" button in the chip45boot2
window. You only have a second to connect. If you connect successfully to the
boot loader the Status light will turn
green and connected will appear next to
it. If it doesn't connect the Status light
will turn red and Failed will appear next
to it. If you fail to connect, power off the
EZWall-Pro and try again. See Figure 12-
1.
12
Figure 12-1
Page 13

FIRMWARE UPDATE (Continued)
Click on the "Select Flash Hexfile" button.
Navigate to and select the .hex firmware file.
Click the "Program Flash" button. A green
progress bar will display under the "Program
Flash" button. The Status light will turn yellow and display "Uploading".
See Figure 13-1.
Upon successful completion the Status light
will turn green and display Done!
See Figure 13-2.
Figure 13-1
13
Figure 13-2
Page 14

LIMITED WARRANTY STATEMENT
A. Extent of limited warranty
Smart-AVI Technologies, Inc. warrants to the end-user customers that the Smart-AVI product specified above
will be free from defects in materials and workmanship for the duration of 1 year, which duration begins on
the date of purchase by the customer. Customer is responsible for maintaining proof of date of purchase.
Smart-AVI limited warranty covers only those defects which arise as a result of normal use of the product,
and do not apply to any:
a. Improper or inadequate maintenance or modifications
b. Operations outside product specifications
c. Mechanical abuse and exposure to severe conditions
If Smart-AVI receives, during applicable warranty period, a notice of defect, Smart-AVI will at its discretion
replace or repair defective product. If Smart-AVI is unable to replace or repair defective product covered by
the Smart-AVI warranty within reasonable period of time, Smart-AVI shall refund the cost of the product.
Smart-AVI shall have no obligation to repair, replace or refund unit until customer returns defective product
to Smart-AVI.
Any replacement product could be new or like new, provided that it has functionality at least equal to that of
the product being replaced.
Smart-AVI limited warranty is valid in any country where the covered product is distributed by Smart-AVI.
B. Limitations of warranty
To the extant allowed by local law, neither Smart-AVI nor its third party suppliers make any other warranty or
condition of any kind whether expressed or implied with respect to the Smart-AVI product, and specifically
disclaim implied warranties or conditions of merchantability, satisfactory quality, and fitness for a particular
purpose.
C. Limitations of liability
To the extent allowed by local law the remedies provided in this warranty statement are the cus-
tomers sole and exclusive remedies.
To the extant allowed by local law, except for the obligations specifically set forth in this warranty statement,
in no event will Smart-AVI or its third party suppliers be liable for direct, indirect, special, incidental, or consequential damages whether based on contract, tort or any other legal theory and whether advised of the
possibility of such damages.
D. Local law
To the extent that this warranty statement is inconsistent with local law, this warranty
statement shall be considered modified to be consistent with such law.
14
 Loading...