

Page 1
SMART Slate WS200
User Guide
Page 2

Product Registration
If you register your SMART product, we will notify you of new features and
software upgrades.
Register online at www.smarttech.com/registration
.
Keep the following information available in case you need to contact SMART
Technical Support.
Serial Number: ________________________________________________
Date of Purchase: ________________________________________________
FCC (Federal Communications Commission) Warning
This equipment has been tested and found to comply with the limits for a Class B digital device, pursuant to Part 15 of
the FCC Rules. These limits are designed to provide reasonable protection against harmful interference in a
residential installation. This equipment generates, uses and can radiate radio frequency energy and, if not installed
and used in accordance with the instructions, may cause harmful interference to radio communications. However,
there is no guarantee that interference will not occur in a particular installation. If this equipment does cause harmful
interference to radio or television reception, which can be determined by turning the equipment off and on, the user is
encouraged to try to correct the interference by one of the following measures:
- reorientate or relocate the receiving antenna.
- increase the distance between the equipment and receiver.
- connect the equipment into an outlet on a circuit different from that to which the receiver is connected.
- consult the dealer or an experienced radio/TV technician for help.
This device complies with Part 15 of the FCC Rules. Operation is subject to the following two conditions: (1) This
device may not cause harmful interference, and (2) this device must accept any interference received, including
interference that may cause undesired operation.
FCC Caution
Any changes or modifications not expressly approved by the party responsible for compliance could void the user’s
authority to operate this equipment.
FCC Radiation Exposure
This equipment complies with FCC radiation exposure limits set forth for an uncontrolled environment. End users
must follow the specific operating instructions for satisfying RF exposure compliance. This transmitter must not be
collocated or operating in conjunction with any other antenna or transmitter.
IC Statement
Operation is subject to the following two conditions: 1) this device may not cause interference and 2) this device must
accept any interference, including interference that may cause undesired operation of the device.
Trade-mark Notice
The SMART logo, SMART Board and smarttech are trade-marks or registered trade-marks of SMART Technologies
ULC in the US and/or other countries. The Bluetooth word mark is owned by the Bluetooth SIG, Inc. and any use of
such marks by SMART Technologies ULC is under licence. All other third-party product and company names may be
trade-marks of their respective owners.
Copyright Notice
©2009 SMART Technologies ULC. All rights reserved. No part of this publication may be reproduced, transmitted,
transcribed, stored in a retrieval system or translated into any language in any form by any means without the prior
written consent of SMART Technologies ULC. Information in this manual is subject to change without notice and does
not represent a commitment on the part of SMART.
Patent No. US6320597; US6326954; US6741267; US7151533; US7499033; CA225230. Other patents pending.
11/2009
Page 3

Important Information
WARNINGS
– Do not puncture, crush, heat or disassemble the battery, expose it to fire or
any liquid, short its terminals, or abuse the battery in any other way because
this can cause the battery to explode or ignite, and can cause personal injury
or a fire.
– If the battery leaks, ensure that you do not get battery fluid in your eye. If you
do, immediately rinse the affected eye with water and seek medical attention.
– Do not install the battery backwards or reverse the polarity. Do not install other
battery types in the SMART Slate WS200 wireless slate. Both of these actions
can cause damage to the slate and can cause personal injury or a fire.
– If the SMART Slate WS200 becomes excessively warm or emits an unusual
smell whilst the battery is charging, immediately disconnect the charging
cable from the slate and turn off the slate.
– When you dispose of the lithium ion battery, cover the terminals with adhesive
tape to prevent possible contact with conductive material. As an additional
precaution, do not transport the battery with conductive material. If the battery
comes into contact with conductive material, the battery can short, and cause
personal injury or a fire.
– When regulations require that wireless devices are turned off, for example, on
commercial aircraft, ensure that the SMART Slate WS200 is turned off and
can not be turned on accidentally.
– Do not use the SMART Slate WS200 in a facility control system or any other
environment that requires extremely high reliability, or where the use of a
wireless device can cause interference; the slate can interfere with or cause
other electronic devices to malfunction, or other wireless devices can interfere
with or cause the slate to malfunction. Where use is prohibited, turn off the
slate to prevent the possibility of it interfering with or causing other electronic
devices to malfunction. SMART does not accept any liability for direct or
consequential damages.
Page 4

ii | IMPORTANT INFORMATION
Page 5

Contents
1 Overview ............................................................................................................... 1
About Your SMART Slate WS200 .................................................................. 1
Tethered Pen ........................................................................................... 2
USB Charging Cable................................................................................ 2
USB Wireless Adapter.............................................................................. 3
2 Setting Up Your SMART Slate .............................................................................. 5
Attaching the Pen Tether ......................................................................... 6
Removing the Battery-Insulating Film ...................................................... 7
Charging Your Slate................................................................................. 8
Installing Your USB Wireless Adapter...................................................... 8
Creating a Wireless Connection with Your Computer.............................. 9
Installing SMART Product Drivers.......................................................... 10
Installing a Paper Underlay .................................................................... 10
Connecting Your SMART Slate With Built-In or Third-Party Wireless
Adapters................................................................................................. 12
3 Using Your Slate ................................................................................................. 13
About the Workspace ................................................................................... 13
Turning On and Connecting the Slate .................................................... 14
Using the Pen......................................................................................... 14
Using the Slate Buttons.......................................................................... 15
Using the Tools on the Icon Strip ........................................................... 16
Checking the Battery Charge ................................................................. 16
Locking Your Slate ................................................................................. 16
Storing the Pen ...................................................................................... 17
Storing the USB Wireless Adapter ......................................................... 17
Page 6

iv | CONTENTS
Locking Up Your Slate ........................................................................... 17
4 Customizing Your Slate....................................................................................... 19
The SMART Notebook Control Panel........................................................... 19
Changing the Functions of the Slate and Pen Buttons .......................... 20
Customizing the Pen and the Eraser...................................................... 21
Changing the Tip Feel............................................................................ 21
Changing the Icon Strip.......................................................................... 22
Customizing the Appearance of the Paper Underlay ............................. 25
Changing How the Slate Maps to Your Display ..................................... 26
Changing Mouse and Gesture Settings ................................................. 27
5 Troubleshooting .................................................................................................. 29
Determining Whether Your Slate Is Connected to
Your Computer....................................................................................... 29
Re-establishing the Wireless Connection............................................... 30
Deleting a Wireless Connection and Creating a New One..................... 30
Understanding Your Slate’s LED States ................................................ 31
Troubleshooting Pen Issues................................................................... 32
A Hardware Environmental Compliance................................................................. 33
Waste Electrical and Electronic Equipment Regulations (WEEE Directive). 33
Restriction of Certain Hazardous Substances (RoHS Directive) .................. 33
Batteries........................................................................................................ 34
Packaging ..................................................................................................... 34
Covered Electronics Devices........................................................................ 34
China’s Electronic Information Products Regulations................................... 34
US Consumer Product Safety Improvement Act .......................................... 34
B Customer Support ............................................................................................... 35
Online Information and Support.................................................................... 35
Training......................................................................................................... 35
Technical Support......................................................................................... 35
Page 7

v| CONTENTS
Dispatch and Repair Status .......................................................................... 35
General Inquiries .......................................................................................... 36
Warranty ....................................................................................................... 36
Registration................................................................................................... 36
Page 8

vi | CONTENTS
Page 9
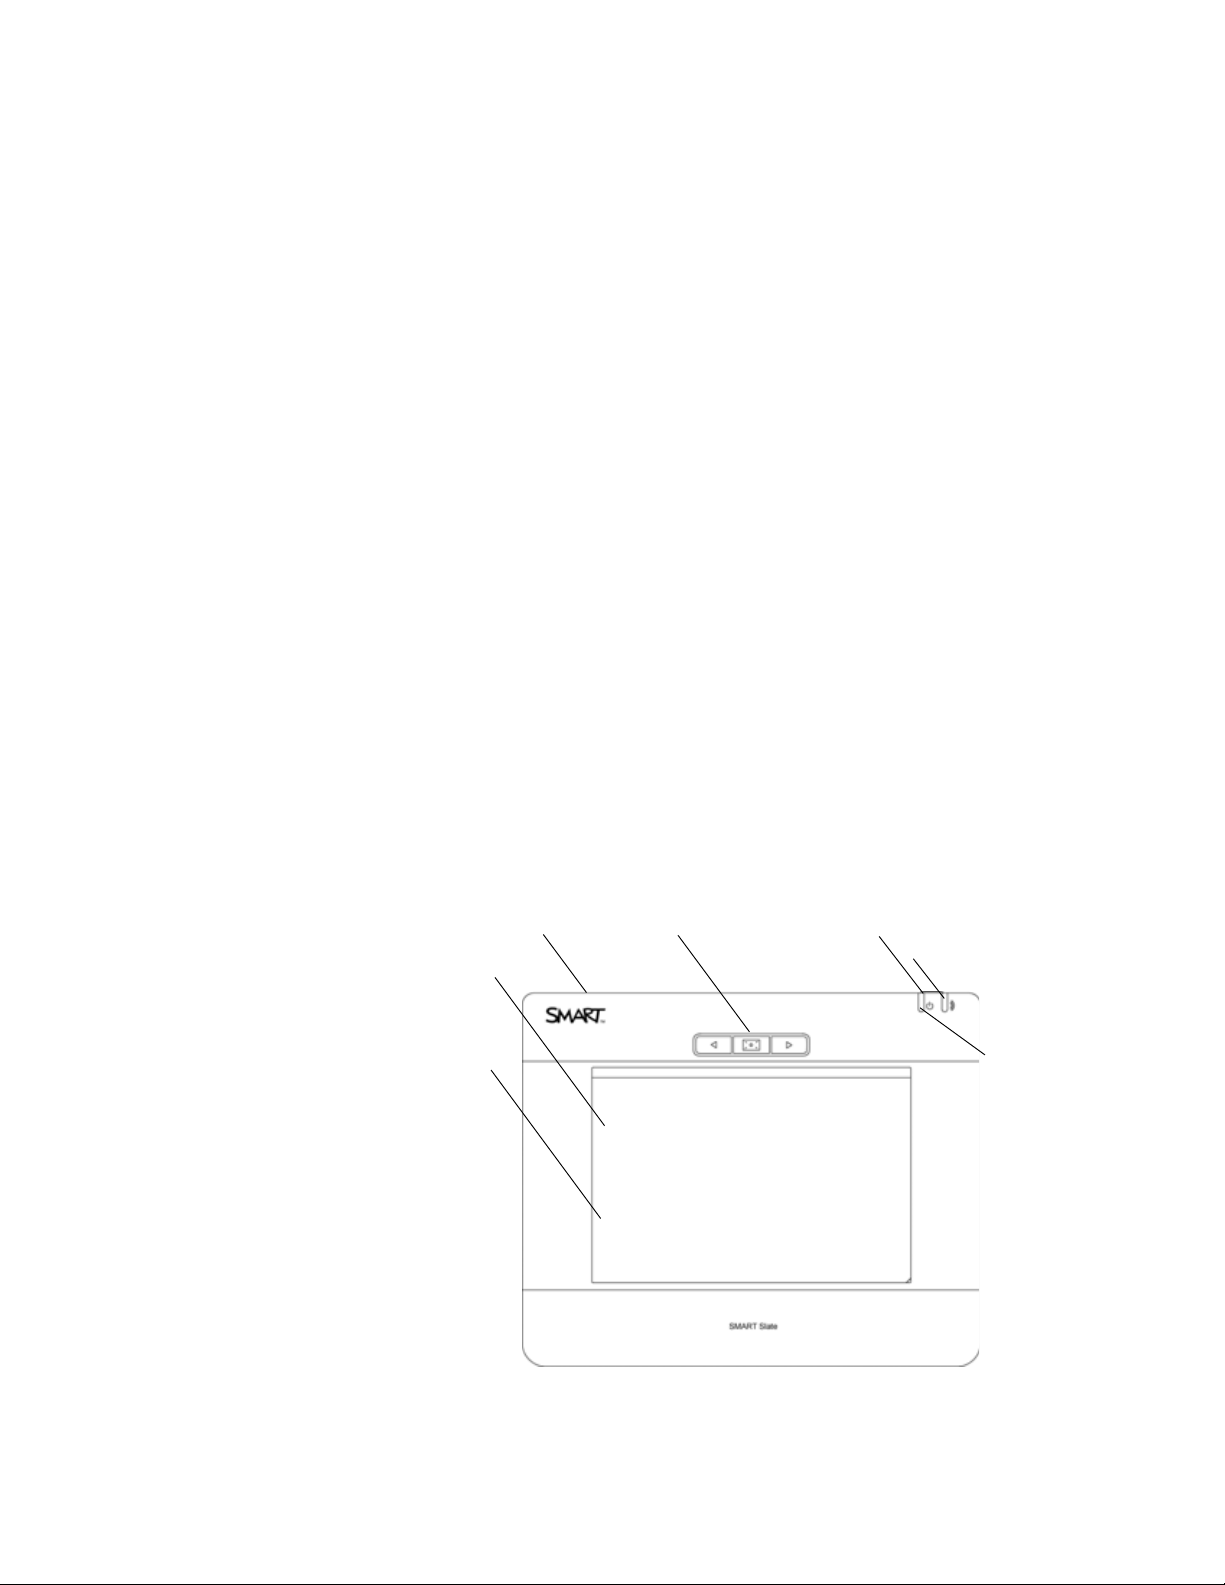
Chapter 1
Customizable Buttons Power Switch
Power LED
Status LED
Underlay and
Underlay Cover
Workspace
Security Slot
Overview
About Your SMART Slate WS200
The SMART Slate connects wirelessly to your computer and a SMART Board™
interactive whiteboard, allowing you to write notes, use programs and perform normal
computer operations from a distance of up to 10 m (32').
• You can customize a printed underlay with an icon strip of the tools and links that
you use most frequently.
• You can change the function of the three buttons on the slate.
• You can use the pen storage compartment to store the pen when you are not
using it.
• You can use the storage compartment on the back of the slate to store the USB
wireless adapter when you are not using the adapter.
• You can use the Kensington® security slot to lock the slate when you are not
using it.
Page 10
2 | CHAPTER 1 – OVERVIEW
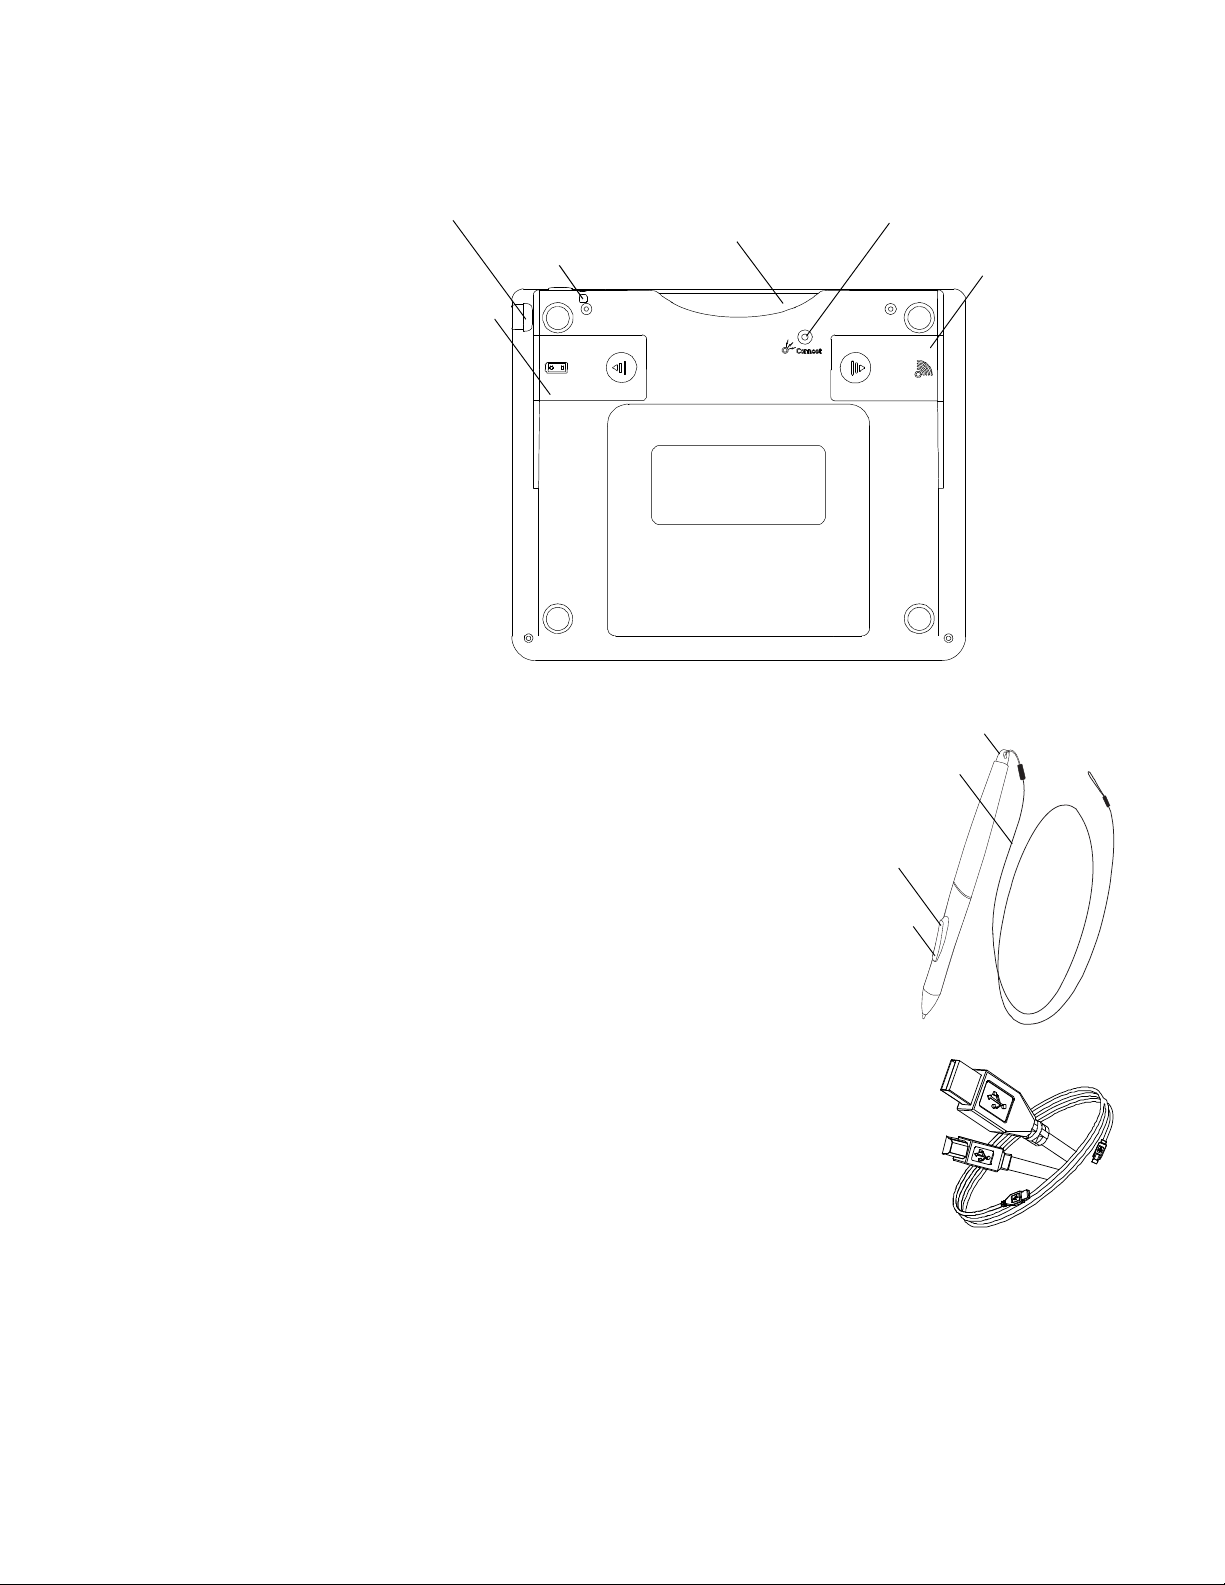
Pen Tether Slot
Pen Storage Compartment
Battery
Compartment
USB Wireless Adapter
Storage Compartment
Connect Button
USB Charging Cable Receptacle
Upper Rocker
Switch
Eraser
Tether
Lower Rocker
Switch
Tethered Pen
The pen controls the pointer on your display.
Move the pen above the workspace of the slate
to move the pointer. When you touch the pen to
the slate your computer registers the point of
contact as a left click. Touch the pen to the slate
to write notes and use computer programs. The
pen has a rocker switch and an eraser that you
can customize. The tether attaches the pen to
the slate so you don’t misplace the pen.
USB Charging Cable
You can charge your slate by connecting it to your
computer with the USB charging cable. Your slate
comes with an installed lithium ion battery. It takes
six hours to fully charge the battery, which lasts for
more than 24 hours.
Page 11
3 | CHAPTER 1 – OVERVIEW
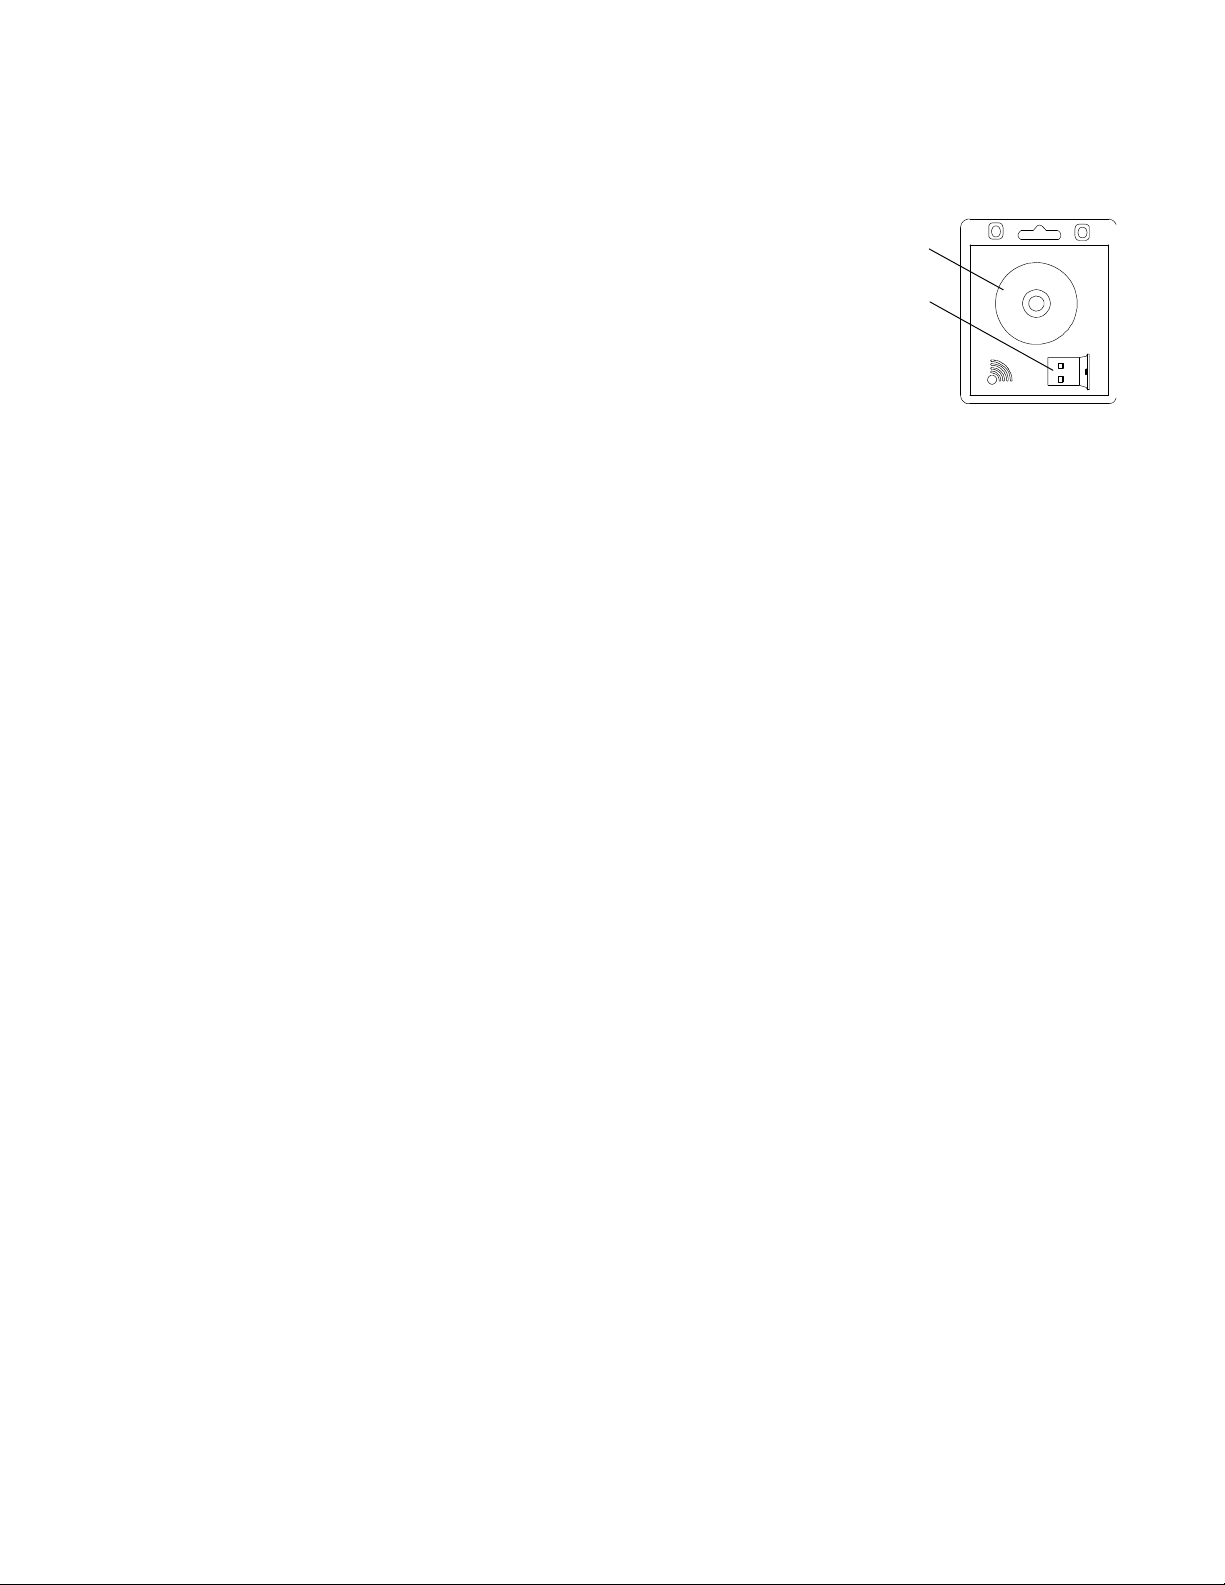
Installation CD
USB Wireless
Adapter
USB Wireless Adapter
You can order your slate with the USB wireless
adapter and installation CD. The USB adapter
uses Bluetooth® technology to create a wireless
connection between your slate and your
computer.
Page 12

4 | CHAPTER 1 – OVERVIEW
Page 13

Chapter 2
Setting Up Your
SMART Slate
There are a few things you need to do before you use your slate. This chapter
describes the following set up tasks:
• Attaching the pen tether (page 6)
• Removing the battery-insulating film (page 7)
• Charging the slate (page 8)
• Installing the USB wireless adapter (page 8)
• Creating a wireless connection to your computer (page 9)
• Installing SMART Product Drivers on your computer (page 10)
• Installing a paper underlay (page 10)
• Connecting your slate using built-in or third-party wireless adapters (page 12)
Page 14
6 | CHAPTER 2 – SETTING UP YOUR SMART SLATE
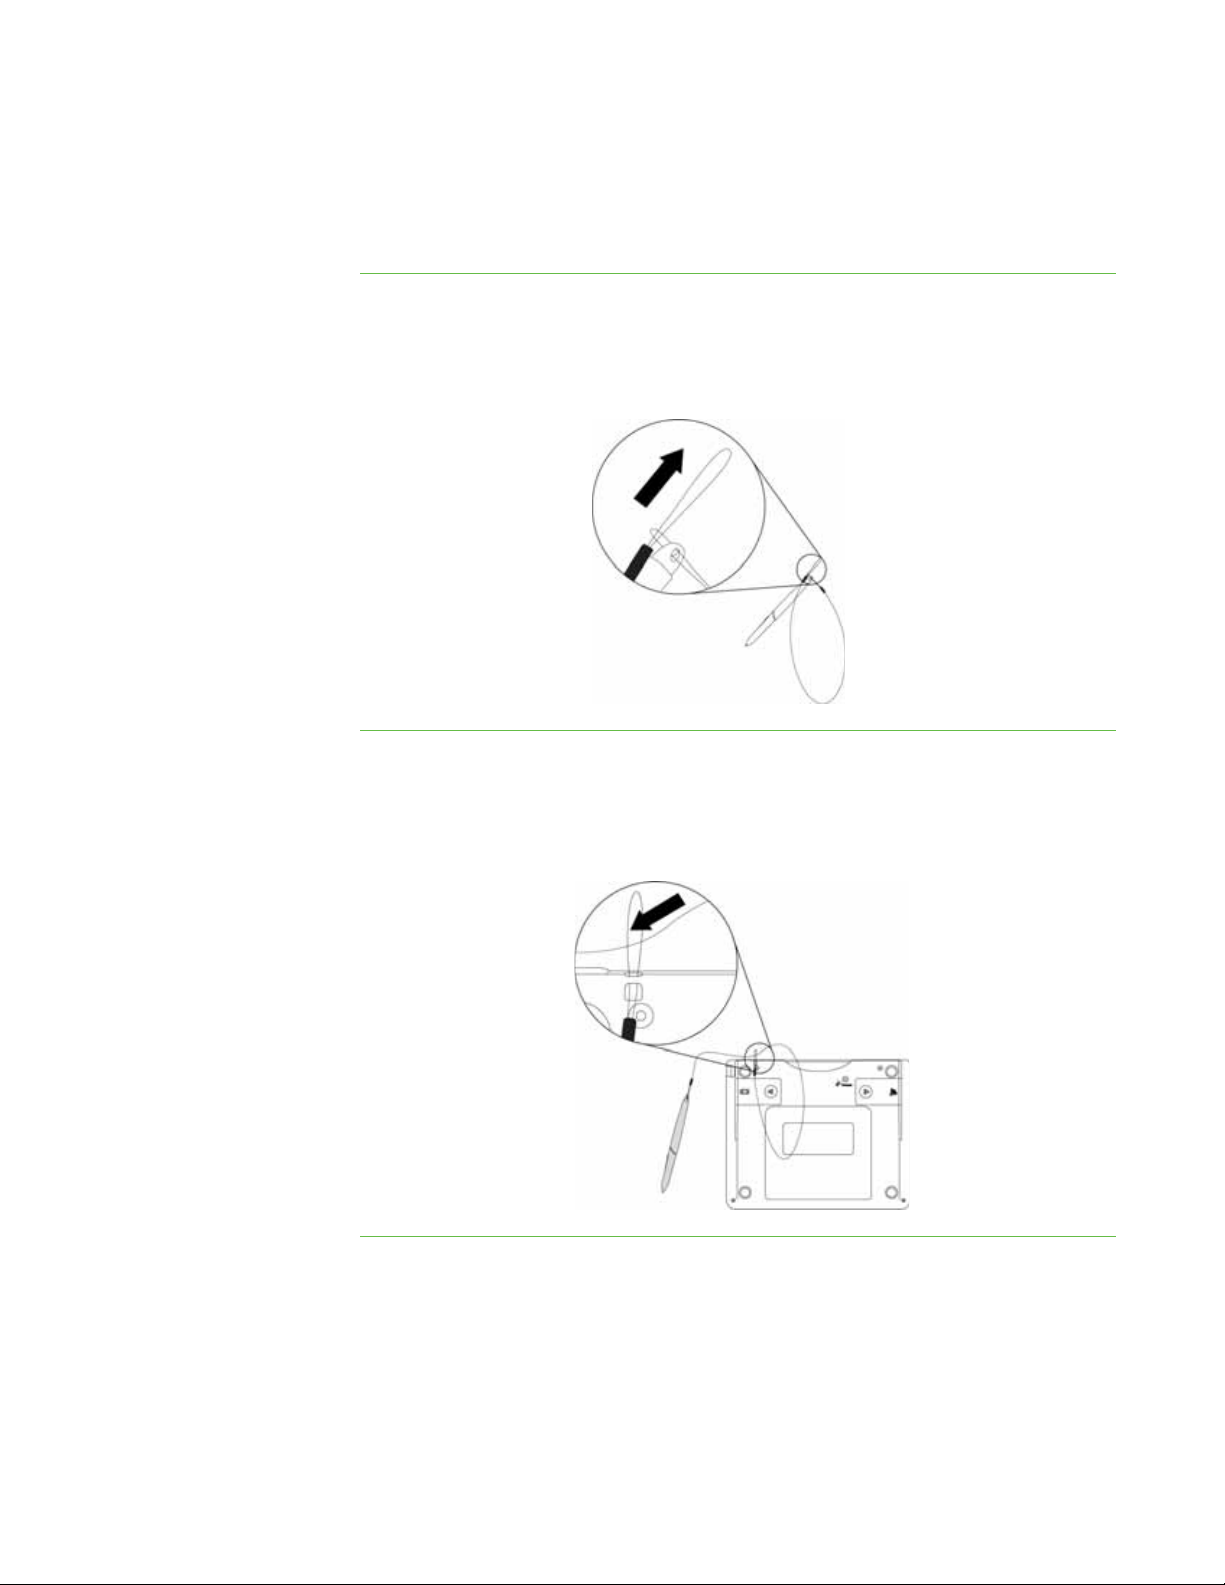
Attaching the Pen Tether
The tether connects the pen to the slate so that you don’t misplace the pen.
To attach the tether to
the pen
To attach the tether to
the slate
1. Thread one tether loop through the hole at the end of the pen.
2. Feed the other tether loop through the first loop as shown in the diagram below,
and then pull the tether so that the first loop is snug.
1. Place the other tether loop through the tether slot in the slate.
2. Feed the pen, with the tether attached, through the loop as shown in the diagram
below, and then pull the tether so that the loop is snug.
Page 15
7 | CHAPTER 2 – SETTING UP YOUR SMART SLATE
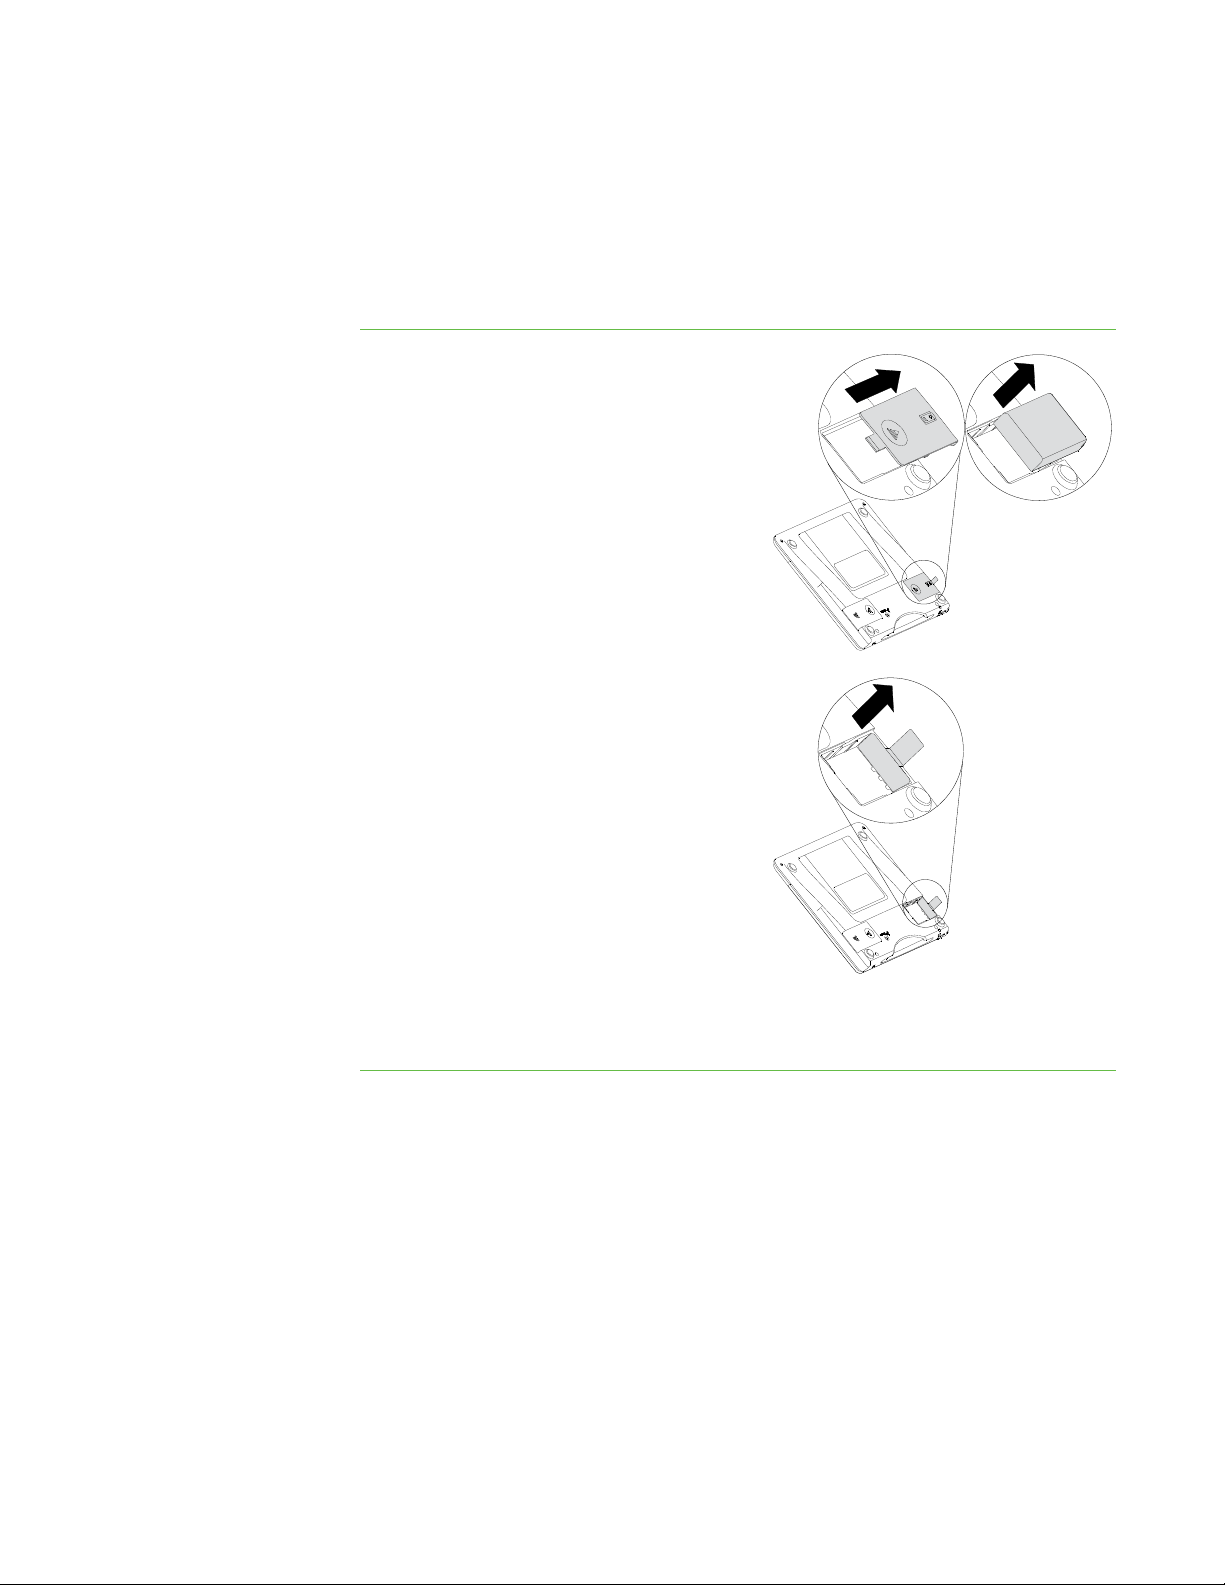
Removing the Battery-Insulating Film
Your slate comes with a lithium ion battery installed. There is a small sheet of
insulating film in the battery compartment that prevents battery power discharge.
Remove the insulating film before you charge and use your slate.
To remove the
insulating film
1. Remove the battery compartment cover
and then remove the battery.
2. Remove the battery insulating film from
the battery compartment.
3. Replace the battery in the battery compartment and then replace the battery
compartment cover.
Page 16

8 | CHAPTER 2 – SETTING UP YOUR SMART SLATE
Charging Your Slate
The slate’s lithium ion battery powers the slate so that your movement is not restricted
by a power cable. You can charge the slate by connecting it to your computer with the
USB charging cable. It takes six hours to charge the slate. A fully charged slate lasts
for more than 24 hours of continuous use.
WARNING
If the SMART Slate WS200 becomes excessively warm or emits an unusual smell
whilst the battery is charging, immediately disconnect the charging cable from the
slate and turn off the slate.
To charge your slate 1. Turn on your computer.
2. Connect the USB charging cable to your computer.
3. Connect the charging cable’s USB mini connector to your slate.
The slate will start to charge and the power LED will glow green.
To install the USB wireless
adapter
Installing Your USB Wireless Adapter
Your slate comes with a USB wireless adapter and an adapter installation CD. The
USB adapter uses Bluetooth technology to create a wireless connection between your
slate and your computer.
1. Insert the USB wireless adapter installation CD into your computer’s CD drive and
then follow the on-screen instructions.
2. Connect the USB wireless adapter to your computer’s USB receptacle.
Page 17
9 | CHAPTER 2 – SETTING UP YOUR SMART SLATE
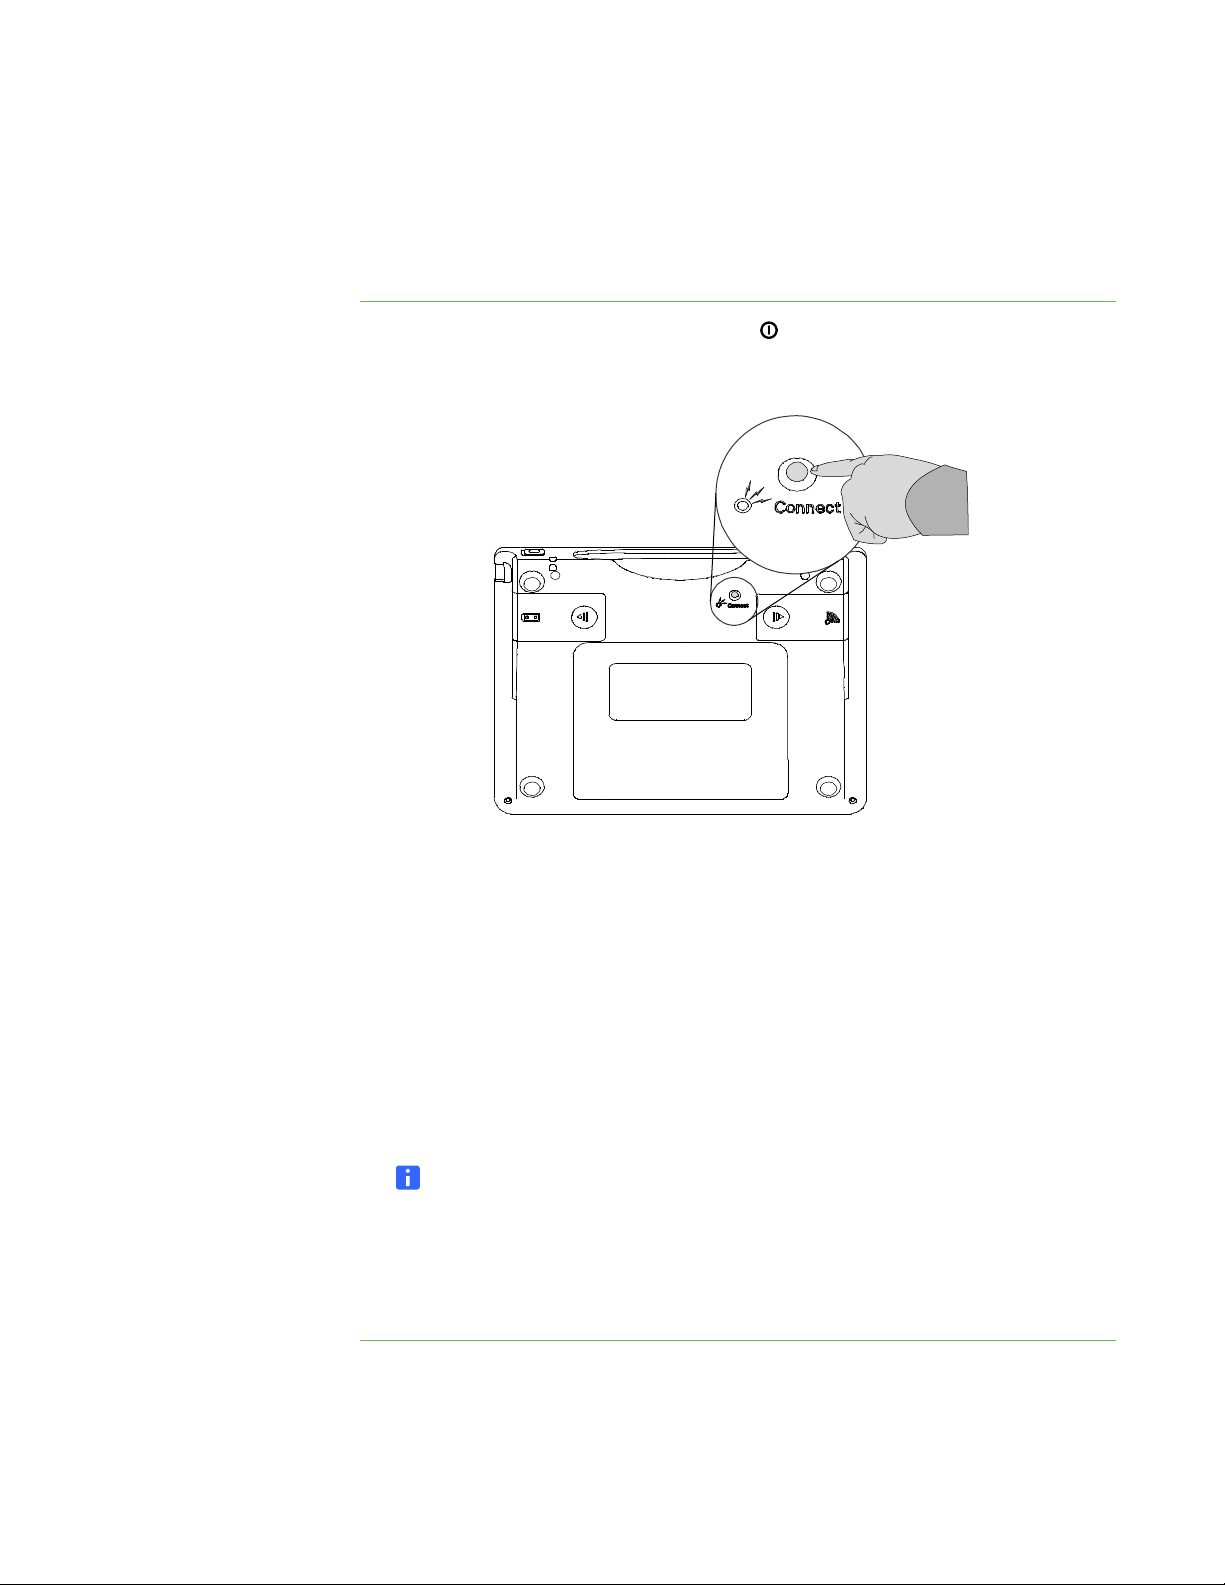
Creating a Wireless Connection with Your Computer
Once you have installed the USB wireless adapter, you can create a wireless
connection between your slate and your computer.
To create a wireless
connection
1. Slide the power switch to the on position .
2. Press the Connect button on the back of the slate.
The status LED on the slate blinks green.
3. Double-press the Bluetooth icon in your computer’s notification area.
The Bluetooth Settings window appears.
4. Press New Connection.
The Add New Connection Wizard appears.
5. Select the Express Mode check box and then click Next.
6. Click SMART Slate WS200 in the list of devices, click Next and then complete
the steps in the connection wizard.
NOTE
If a dialogue box appears asking you to enter a pass key, type 0000 in the
pass key box and then click Next.
When your slate is wirelessly connected to your computer, the status LED on the
slate stops blinking amber and glows pale green.
Page 18
10 | CHAPTER 2 – SETTING UP YOUR SMART SLATE
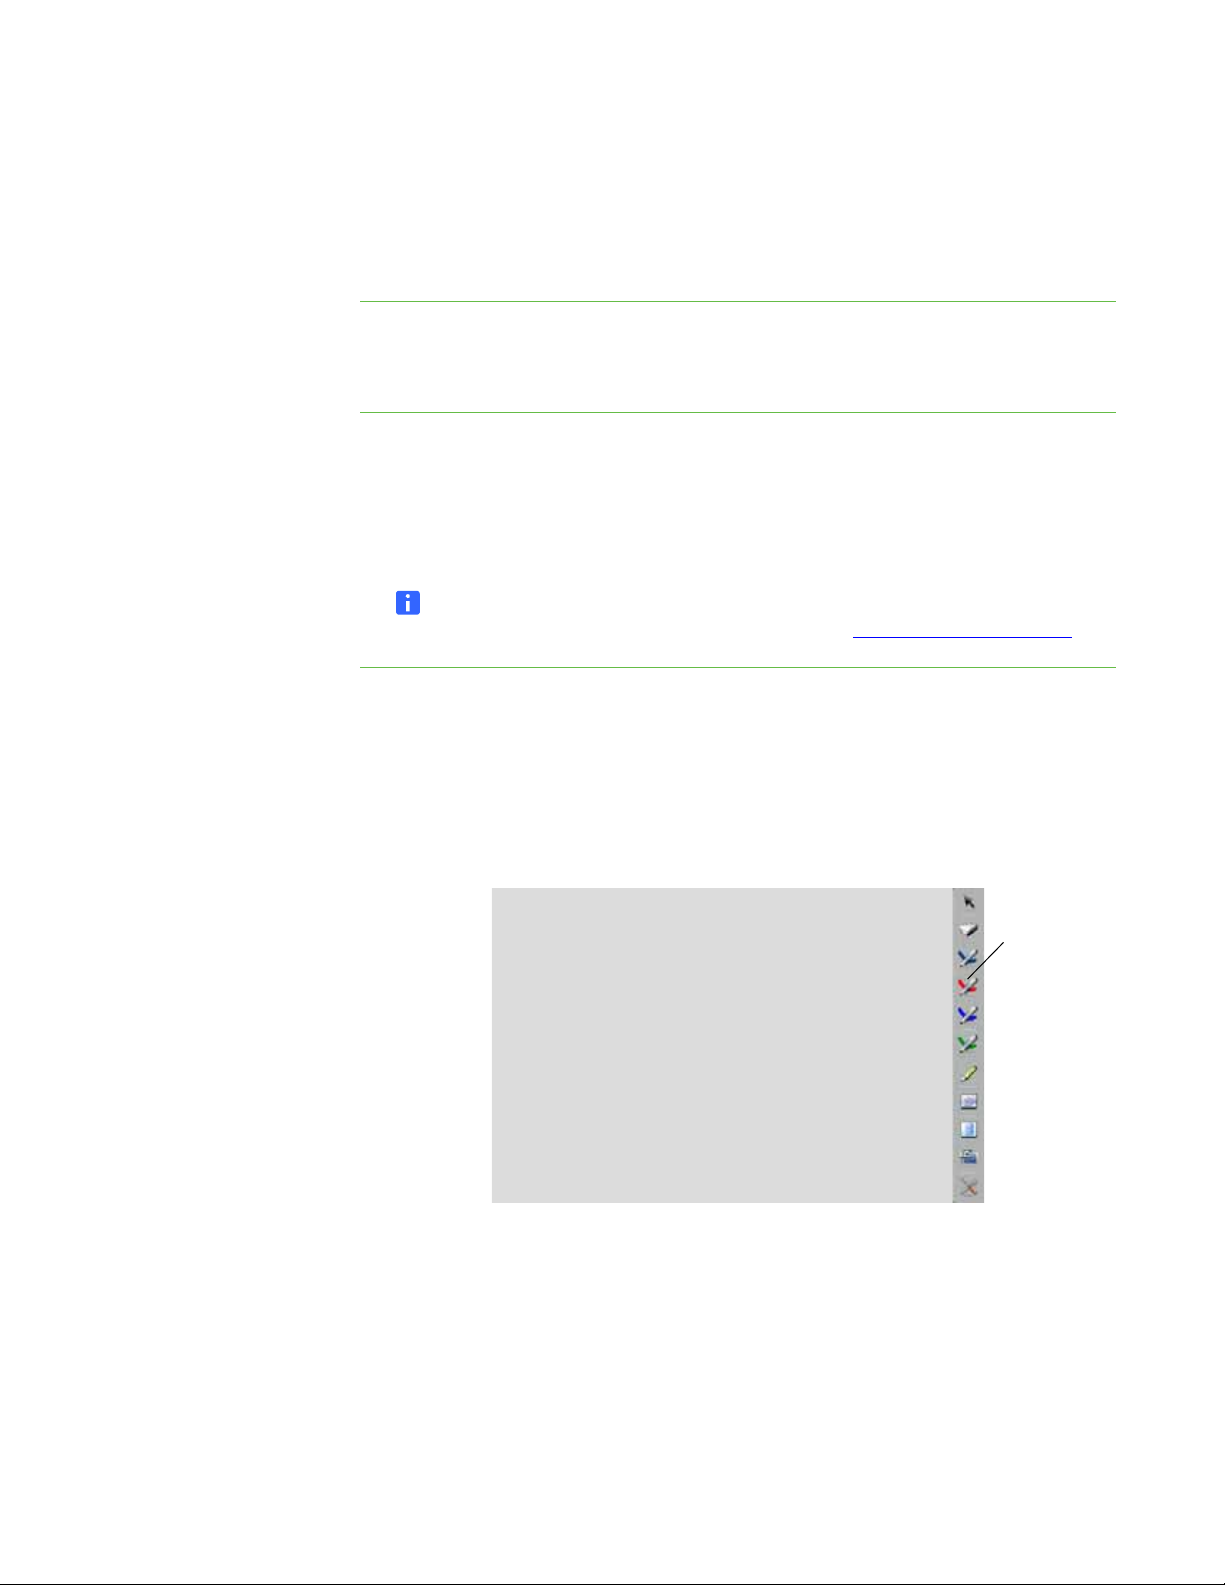
Icon Strip
Installing SMART Product Drivers
Your SMART Slate WS200 comes with a SMART Product Drivers CD. SMART
Product Drivers enable your computer to connect to the slate.
To install SMART
Product Drivers
To update SMART
Product Drivers
Insert the SMART Product Drivers CD into your computer’s CD drive and then follow
the on-screen instructions.
1. Press the SMART Board icon in your computers’s notification area, and then
select Check for Updates.
The SMART Product Update window appears.
2. If a driver update is available press Update.
NOTE
You can also download driver updates from the SMART Support website.
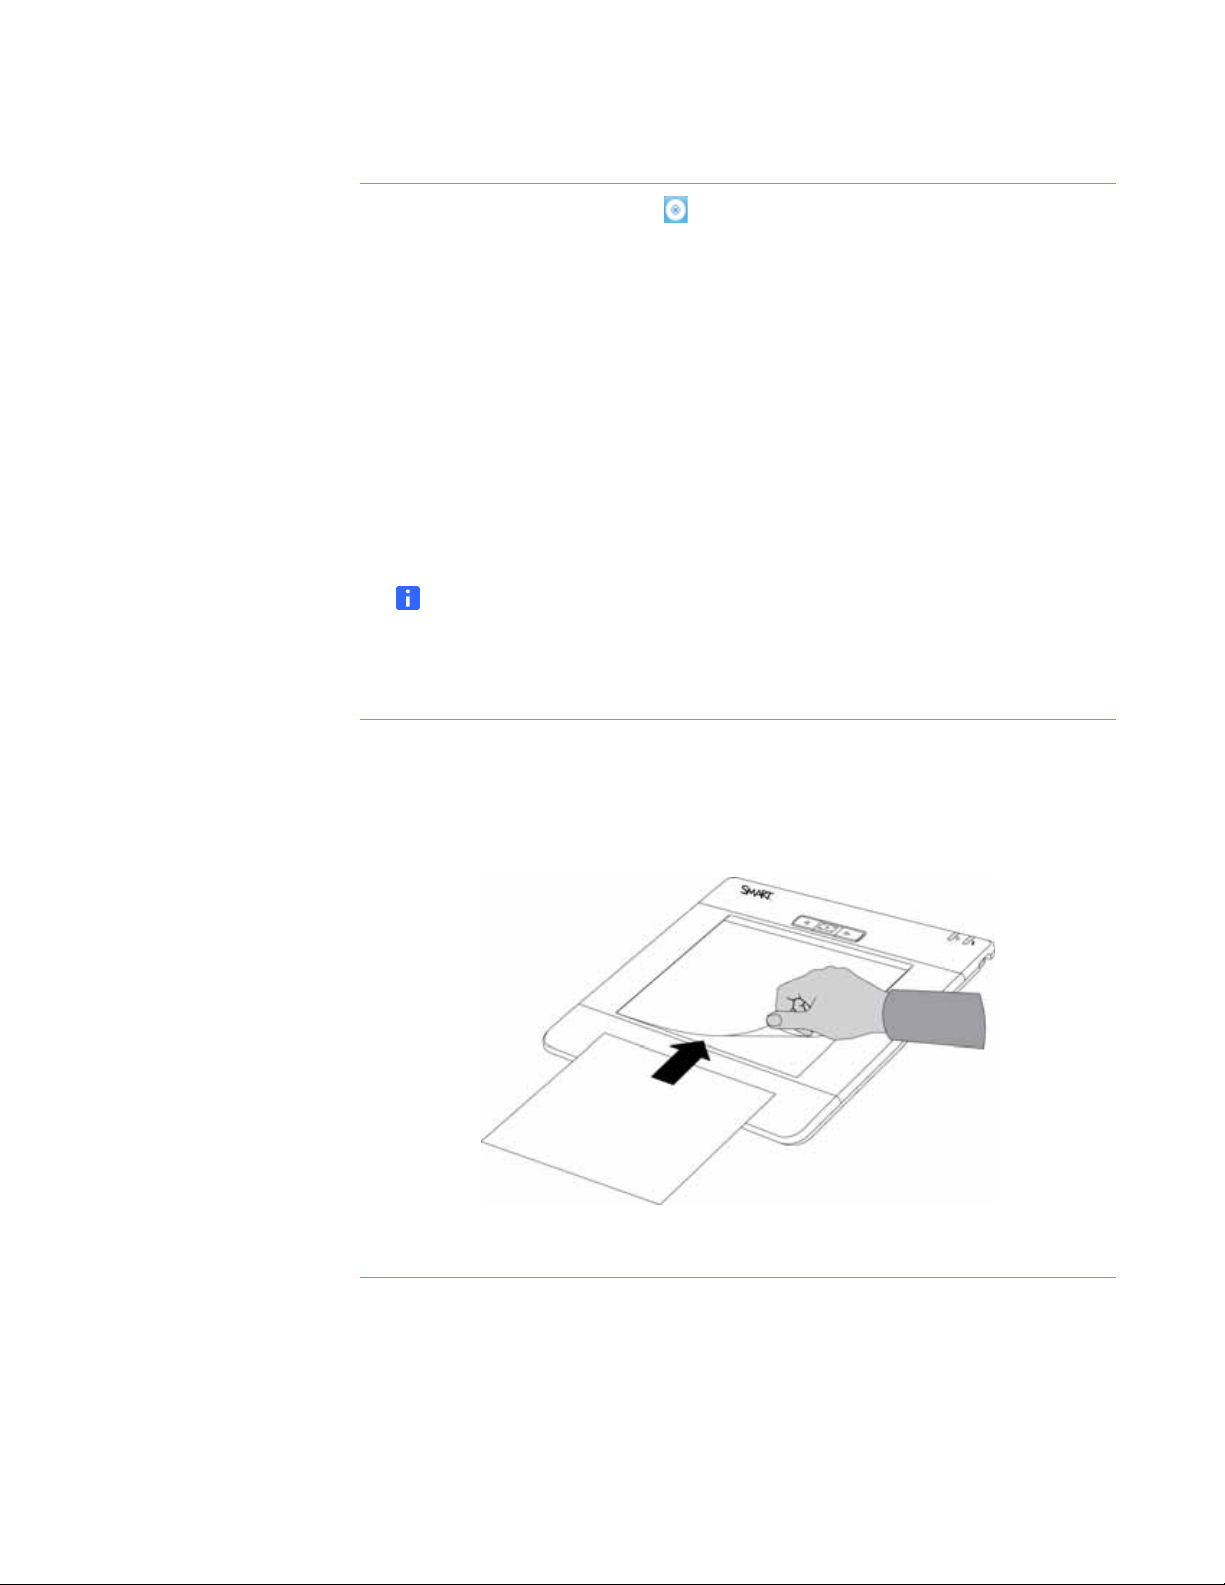
Installing a Paper Underlay
An underlay is a sheet of paper with an icon strip that you place under the underlay
cover on the workspace. You can customize the underlay and icon strip and then print
the underlay (see page 22). To use a tool, touch the pen to the tool’s icon on the
icon strip.
Page 19
11 | CHAPTER 2 – SETTING UP YOUR SMART SLATE
To print an underlay 1. Press the SMART Board icon in your computer’s notification area, and then
select Control Panel.
2. Press SMART Hardware Settings and if you have more than one SMART
product connected, press SMART Slate.
3. Select Set Up Underlay and Icon Strip from the first drop-down list.
4. Select an existing underlay from the colour scheme drop-down list.
5. Press Print.
The Print dialogue box appears.
6. In your printer preferences, select landscape orientation and then print the
underlay.
NOTE
If you print the underlay in portrait orientation, your printer may scale the
underlay to fit the page, making the underlay smaller than the slate
workspace.
To install the underlay 1. Trim the excess paper from the edges of the underlay.
2. Lift the underlay cover from the lower right-hand corner with your fingers.
3. Slide the underlay beneath the underlay cover.
4. Lower the underlay cover.
Page 20

12 | CHAPTER 2 – SETTING UP YOUR SMART SLATE
Connecting Your SMART Slate With Built-In or Third-Party
Wireless Adapters
If you are unable to order a SMART USB wireless adapter, you can use your
computer’s built-in Bluetooth adapter or buy a third-party USB wireless adapter.
IMPORTANT
Ensure that your wireless Adapter has Bluetooth wireless technology version 2.1
with EDR.
Refer to your computer or your third-party wireless adapter’s product documentation
for installation and connection information.
Page 21

Chapter 3
Using Your Slate
This chapter describes the following topics for using your slate:
• Turning on and connecting the slate (page 14)
• Using the pen (page 14)
• Using the slate buttons (page 15)
• Using the tools on the icon strip (page 16)
• Checking the battery charge (page 16)
• Locking your slate (page 17)
• Storing the USB wireless adapter (page 17)
• Locking up your slate (page 17)
About the Workspace
The slate’s workspace represents the screen of your display. If you move the pen to
the top right-hand corner of the workspace, the pointer moves to the top right-hand
corner of your display. If you move the pen to the lower right-hand corner of the slate,
the pointer moves to the lower right-hand corner of your display. If you have more than
one display, you can change the settings so the slate’s workspace represents two
displays (see page 26). The workspace is the only area on the slate that detects
the pen.
The strip on the right side of the workspace is for common tools. When you touch the
pen to an icon on this strip, the pointer turns into the tool you selected. You can
change the tools that appear in the icon strip (see page 20).
Page 22
14 | CHAPTER 3 – USING YOUR SLATE
Turning On and Connecting the Slate
Once you create a wireless connection between your slate and your computer (see
page 9), your slate automatically connects with your computer when you turn on the
slate.
IMPORTANT
Do not press the Connect button on the back of your SMART Slate if you have
already created a wireless connection. If you do, delete the SMART Slate WS200
connection in the Bluetooth Settings window and then create a new connection
(see page 30).
NOTE
If you connect your slate to more than one computer, the slate searches for the
last computer it was connected to when you turn the slate on. If you want to
connect the slate to a computer other than the one you last used with the slate,
delete the SMART Slate WS200 connection in the Bluetooth Settings window and
then create a new connection (see page 30).
To turn on the slate Slide the power switch to the on position .
The power LED will glow green and the status LED will glow pale green, indicating
that the slate is on and connected to your computer.
Using the Pen
The pen controls the pointer on your display. The pen has a rocker switch, with an
upper and lower position, and an eraser.
NOTES
– You can change the functions of the rocker switch and the eraser (see
page 20).
– You can perform common tasks, such as writing and erasing digital ink, by
selecting a tool from the icon strip (see page 16).
To move the pointer on
your display
Move the pen a few millimetres above the workspace.
NOTE
You can also move the pointer by touching and sliding the pen on the workspace.
See page 27 for information on disabling the hover setting.
To perform a left click
Touch the pen to the workspace.
Page 23

15 | CHAPTER 3 – USING YOUR SLATE
To perform a right click Press the upper rocker switch and then touch the pen to the workspace.
To write in digital ink Press the lower rocker switch as you touch and slide the pen on the workspace.
If the application that you are writing on is not Ink Aware (not integrated with SMART
Notebook software), anything that you write or draw appears on a transparent layer
over the current application. You can close the transparent layer by clicking the Close
button in the upper right-hand corner of the screen.
To erase digital ink
Flip the pen upside down and touch and slide the pen on the workspace.
Using the Slate Buttons
The slate has three buttons above the workspace. You can change the functions of
these buttons so that the tools you use most are easily accessible (see page 20).
To open SMART Notebook
software
To move back one page Press the left arrow slate button to move back one page in SMART Notebook
To move forward
one page
Press the centre slate button.
software.
Press the right arrow slate button to move forward one page in SMART Notebook
software.
Page 24
16 | CHAPTER 3 – USING YOUR SLATE
Using the Tools on the Icon Strip
Touch the pen to a tool on the underlay icon strip. You can add or remove tools, Web
links and application links in the SMART control panel (see page 20).
To use a tool on the
icon strip
To check the
battery charge
1. Touch the pen to the tool on the icon strip that you want to use.
The pointer changes to the tool you select.
NOTE
The area along the right-hand side of the slate workspace is for selecting icon
strip tools. If you don’t have an underlay and you touch this area with the pen,
you select a tool.
2. Touch the pen to the workspace.
Checking the Battery Charge
You can check the battery charge in the SMART Notebook control panel.
1. Press the SMART Board icon in your computer’s notification area and then
select Control Panel.
The SMART Notebook control panel appears.
2. Press SMART Hardware Settings.
NOTE
If you have more than one SMART product connected to your computer,
press SMART Slate in the list of devices.
The battery charge status appears in the upper right-hand corner.
Locking Your Slate
You can lock the SMART Slate and stop it from interacting with your computer and
display.
To lock the slate Press the SMART Board icon in your computer’s notification area and then select
Other SMART Tools > Lock SMART Slates Only.
The slate is unable to interact with your computer and the SMART Slates Locked
window appears.
Page 25
17 | CHAPTER 3 – USING YOUR SLATE
To unlock the slate Press the Click to unlock icon in the SMART Slates Locked window.
OR
Press the SMART Board icon in your computer’s notification area and then select
Other SMART Tools > Unlock SMART Slates.
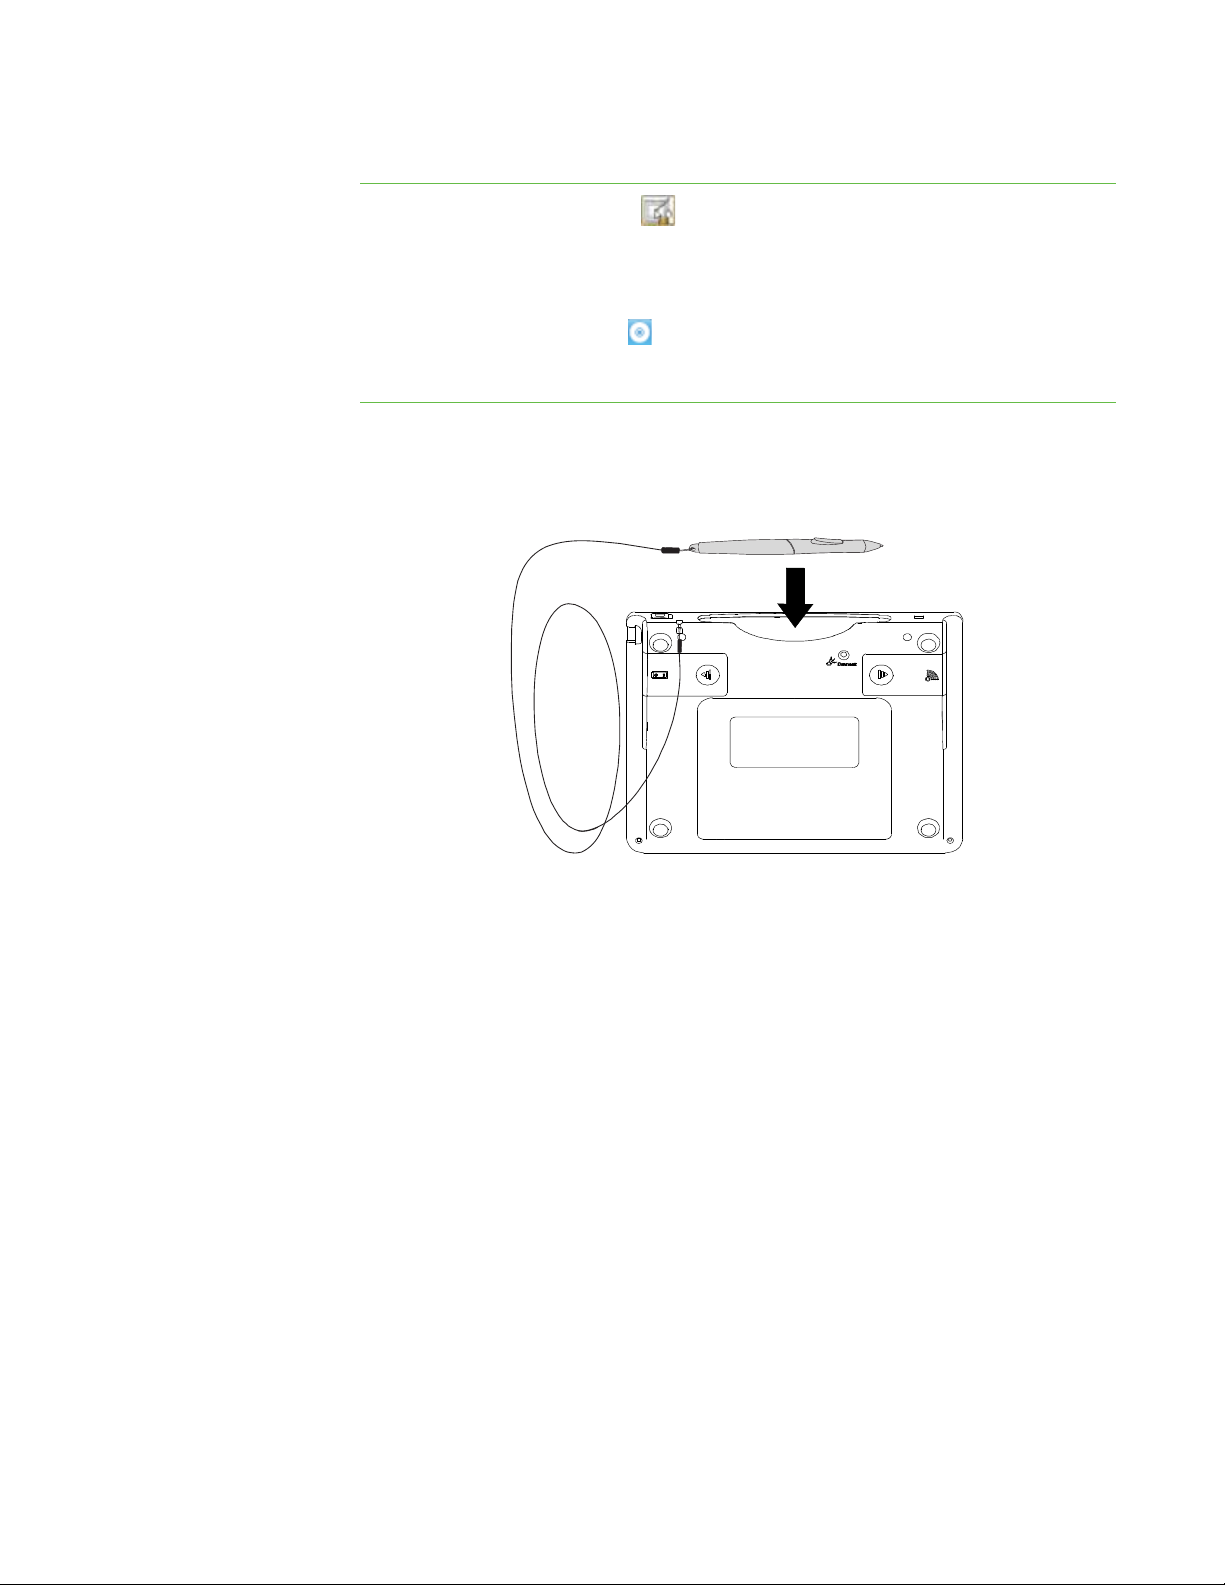
Storing the Pen
You can store the pen in the storage compartment when you are not using it.
Storing the USB Wireless Adapter
You can store the USB wireless adapter in the storage compartment on the back of
the slate. A foam pad in the storage compartment prevents the USB wireless adapter
from rattling.
Locking Up Your Slate
Your slate has a Kensington security slot, which allows you to use a lock to secure
your slate from theft.
Page 26

18 | CHAPTER 3 – USING YOUR SLATE
Page 27

Chapter 4
Customizing Your
Slate
This chapter describes tasks for customizing your slate:
• Changing the functions of the slate and pen buttons (page 20)
• Customizing the pen and the eraser (page 21)
• Changing the tip feel (page 21)
• Changing the icon strip (page 22)
• Customizing the appearance of the paper underlay (page 25)
• Changing how the slate maps to your display (page 26)
• Changing mouse and gesture settings (page 27)
To o p e n the
SMART Notebook
control panel
The SMART Notebook Control Panel
You can customize many of your slate’s features from the SMART Notebook control
panel. You can change the functions of buttons, change digital ink styles, create a
custom icon strip on a paper underlay and change other features.
1. Press the SMART Board icon in your computer’s notification area and then
select Control Panel.
The SMART Notebook control panel appears.
2. Press SMART Hardware Settings.
NOTE
If you have more than one SMART product connected to your computer,
press SMART Slate in the list of devices.
Page 28

20 | CHAPTER 4 – CUSTOMIZING YOUR SLATE
Changing the Functions of the Slate and Pen Buttons
You can change the functions of the slate buttons, the pen rocker switch and the pen
eraser.
To change the functions of
the slate and
pen buttons
1. In the SMART Notebook control panel, use the drop-down lists to select a function
for the button that you want to change. You can select the following options for the
slate buttons:
Function Description
Print Page Print the current SMART Notebook page.
Next Page Display the next SMART Notebook page.
Previous Page Display the previous SMART Notebook page.
Clear Screen Clear the current SMART Notebook page.
Right-click Perform a right click.
Middle-click Perform a middle click.
Keyboard Starts the on-screen keyboard.
Floating Tools Starts the Floating Tools.
Notebook Software Starts SMART Notebook software.
Screen Capture Starts the screen capture tools.
Disabled Assign no function to the button.
For the pen buttons, you can select any of the functions listed above, or these
pen-specific functions:
Function Description
Eraser Erase digital ink with the pen.
Pen Write digital ink with the pen.
2. Press OK to save your changes.
Page 29

21 | CHAPTER 4 – CUSTOMIZING YOUR SLATE
Customizing the Pen and the Eraser
You can change the line transparency, colour, line thickness and fill effect as well as
the eraser thickness.
To change the line
transparency
To change the ink
line style
To change the eraser
thickness
1. In the SMART Notebook control panel, select Pen and Button Settings from the
first drop-down list.
2. Select Pen from one of the pen drop-down lists and then press Customize.
The Properties dialogue box appears.
3. Use the Object transparency slider to change the line transparency.
4. Press Save Tool Properties to save your changes.
1. In the SMART Notebook control panel, select Pen and Button Settings from the
first drop-down list.
2. Select Pen from one of the pen drop-down lists, and then press Customize.
The Properties dialogue box appears.
3. Press Line Style.
4. Select a colour, a thickness and any other line styles.
5. Press Save Tool Properties to save your changes.
1. In the SMART Notebook control panel, select Pen and Button Settings from the
first drop-down list.
2. Select Eraser from one of the pen drop-down lists, and then press Customize.
3. Press an eraser thickness and then press OK to save your changes.
Changing the Tip Feel
The tip feel is the amount of pressure you need to apply for the pen to register a
contact point with the slate. You can increase or decrease the pen’s touch sensitivity
with the Tip Feel slider.
To change the pen tip feel In the SMART Notebook control panel, move the Tip Feel slider to change the tip feel
and then press OK to save your changes.
Page 30
22 | CHAPTER 4 – CUSTOMIZING YOUR SLATE
Changing the Icon Strip
You can add tools or links to the icon strip on the underlay, change the order icons and
remove them.
To add a tool to
the icon strip
1. In the SMART Notebook control panel, select Set Up Underlay and Icon Strip
from the first drop-down list.
2. Press Configure Icon Strip.
3. Select the tool you want to add to the icon strip in the Available Tools column and
then press Add.
The tool you select appears in the Current Toolbar column.
NOTE
You can have up to 11 tools on the icon strip. If you already have 11 tools on
the icon strip, you must remove a tool before you can add another one.
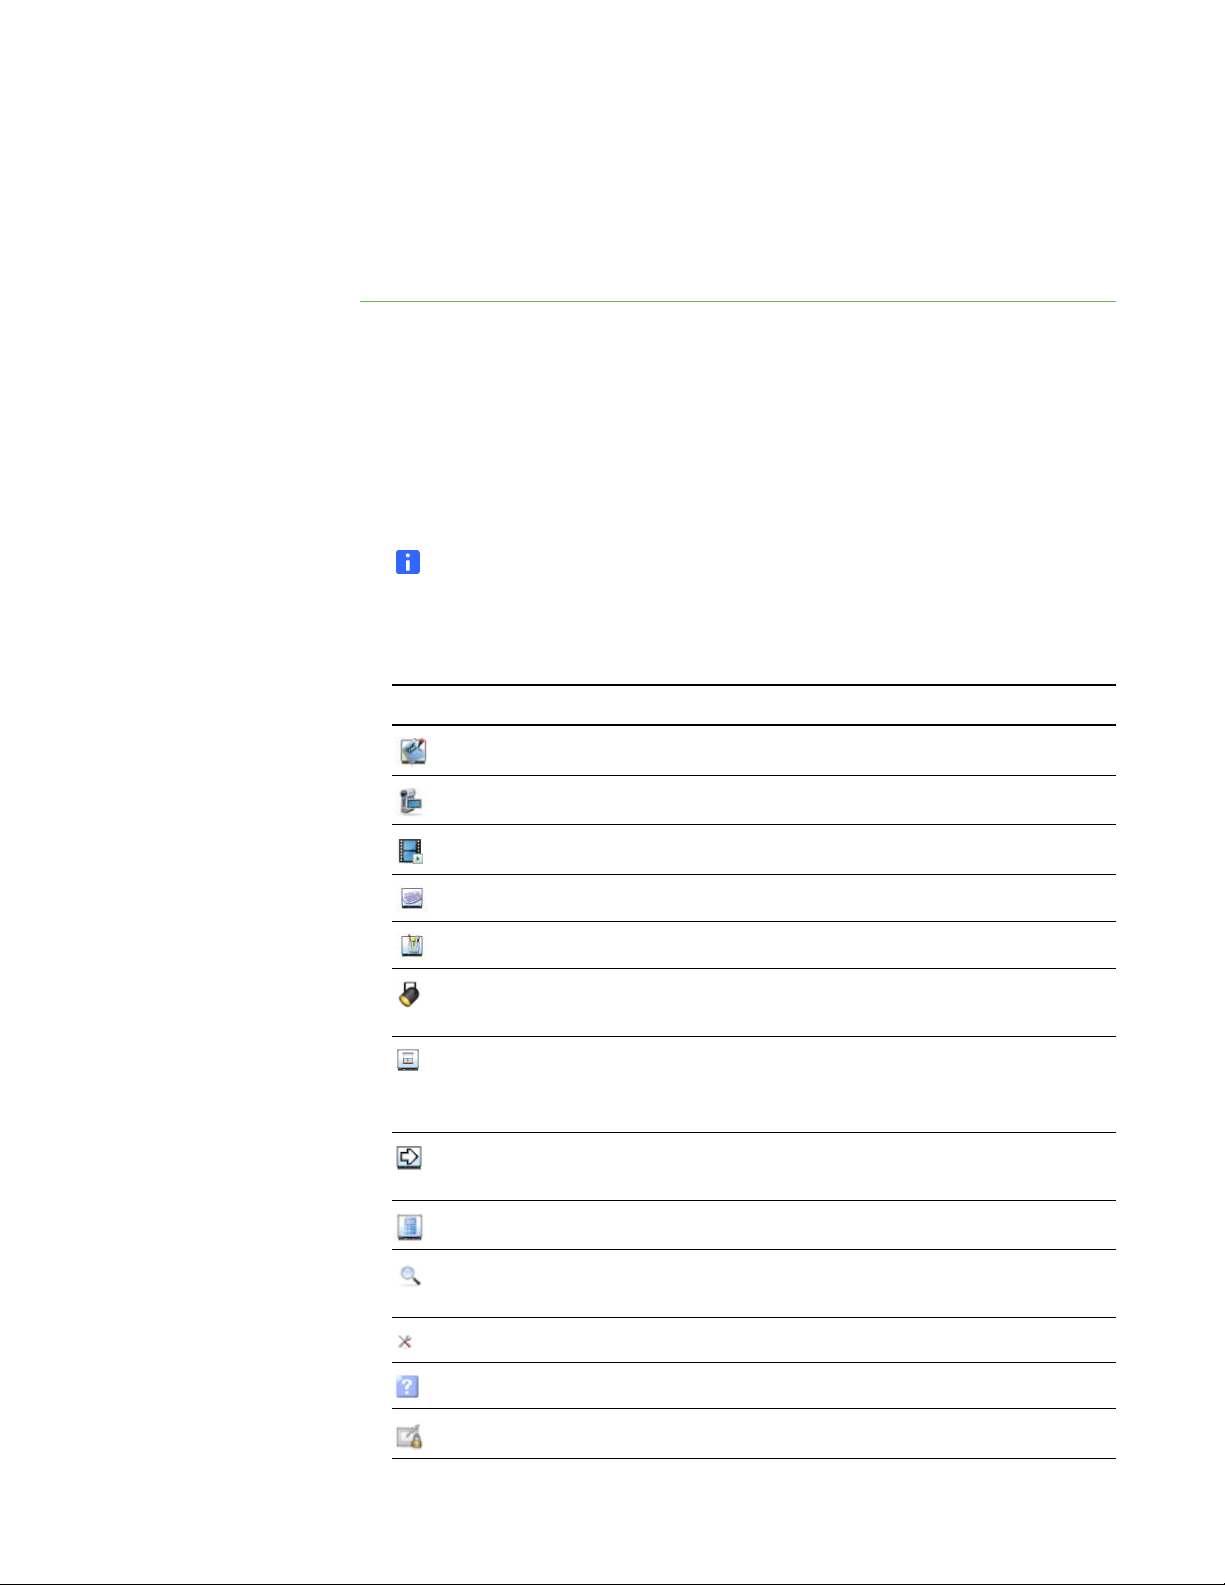
You can add from the following tools from the Launch tab:
Tool Function
Notebook
Recorder
Video Player
Keyboard Starts the SMART Keyboard.
Starts SMART Notebook software.
Starts SMART Recorder.
Starts SMART Video Player.
Floating Tools
Screen Spotlight
Screen Shade
Pointer
Calculator
Magnifier Starts the Magnifier, which allows you to magnify an
Control Panel Starts the SMART Notebook control panel.
Help Launches SMART Notebook Help.
Lock Airliners
Starts Floating Tools.
Starts the Spotlight tool, which draws attention to an
area of your display.
Starts the Screen Shade, which covers the
information on your display allowing you to reveal it
gradually.
Inserts a pointer on your display that draws attention
to information on your display.
Starts the Calculator.
area of the screen.
Locks slates from interacting with your computer.
Page 31
23 | CHAPTER 4 – CUSTOMIZING YOUR SLATE
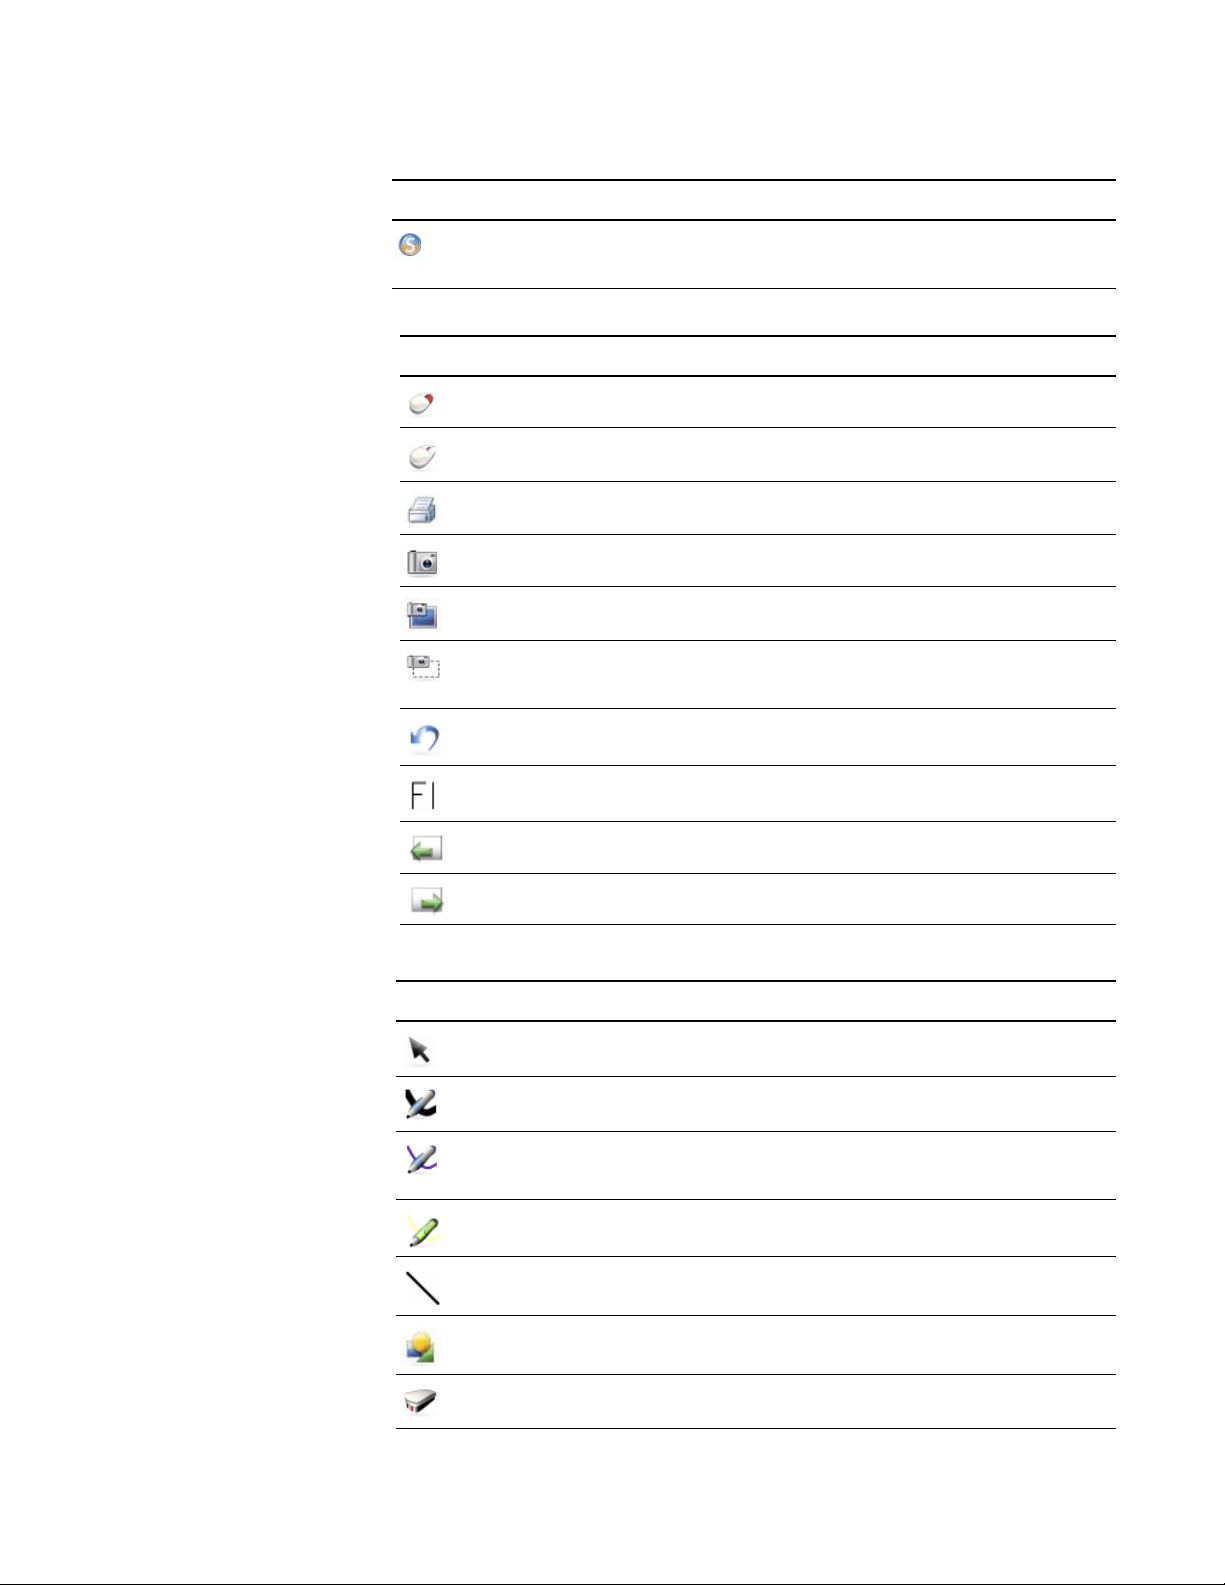
Tool Function
Start/Stop Senteo Quiz
Starts or stops a SMART Response (formerly
Senteo) quiz.
You can add these tools from the General tab:
Tool Function
Right-click
Middle-click
Print...
Screen Capture Toolbar
Full Screen Capture
Area Capture
Your next pen touch is a right click.
Your next pen touch is a middle click.
Opens the Print dialogue box.
Starts the Screen Capture toolbar.
Takes a screen capture of the entire screen.
Allows you to touch the pen on the workspace to
take a screen capture of an area.
Undo
Help
Reverses the previous action.
Launches Help for the active window.
Page Up
Page Down
Displays the previous SMART Notebook page.
Displays the next SMART Notebook page.
You can add these tools from the Tools tab:
Tool Function
Select
Pen
Creative Pen
Select text and objects.
Write in digital ink.
Draw a line of rainbow colours, smiley faces, stars
and more.
Highlighter
Line
Shape
Eraser
Highlight in digital ink.
Draw a line.
Create a variety of shapes.
Erase digital ink.
Page 32

24 | CHAPTER 4 – CUSTOMIZING YOUR SLATE
To remove a tool from
the icon strip
To add a link to
the icon strip
To add a shortcut to an
application or folder
1. In the SMART Notebook control panel, select Set Up Underlay and Icon Strip
from the first drop-down list.
2. Press Configure Icon Strip.
3. Select the tool that you want to remove from the icon strip in the Current Toolbar
column and then press Remove.
The tool you select appears in the Available Tools column.
1. In the Control Panel, select Set Up Underlay and Icon Strip from the first dropdown list.
2. Press Configure Icon Strip.
3. Press Link to Website.
The Link to Website... dialogue box appears.
4. Type the Web address that you want to link to and then press OK.
The link appears in the Current Toolbar column.
1. In the SMART Notebook control panel, select Set Up Underlay and Icon Strip
from the first drop-down list.
To arrange the tools on
the icon strip
To change the position of
the icon strip
2. Press Configure Icon Strip.
3. Press Browse.
The Open dialogue box appears.
4. Browse to and select the application or folder that you want to create a shortcut to
and then press Open.
The shortcut appears on the icon strip.
1. In the SMART Notebook control panel, select Set Up Underlay and Icon Strip
from the first drop-down list.
2. Press Configure Icon Strip.
3. Select the tool that you want to move and then press Move Up or Move Down to
change its position on the icon strip.
1. In the SMART Notebook control panel, select Set Up Underlay and Icon Strip
from the first drop-down list.
2. Press Configure Icon Strip.
Page 33
25 | CHAPTER 4 – CUSTOMIZING YOUR SLATE
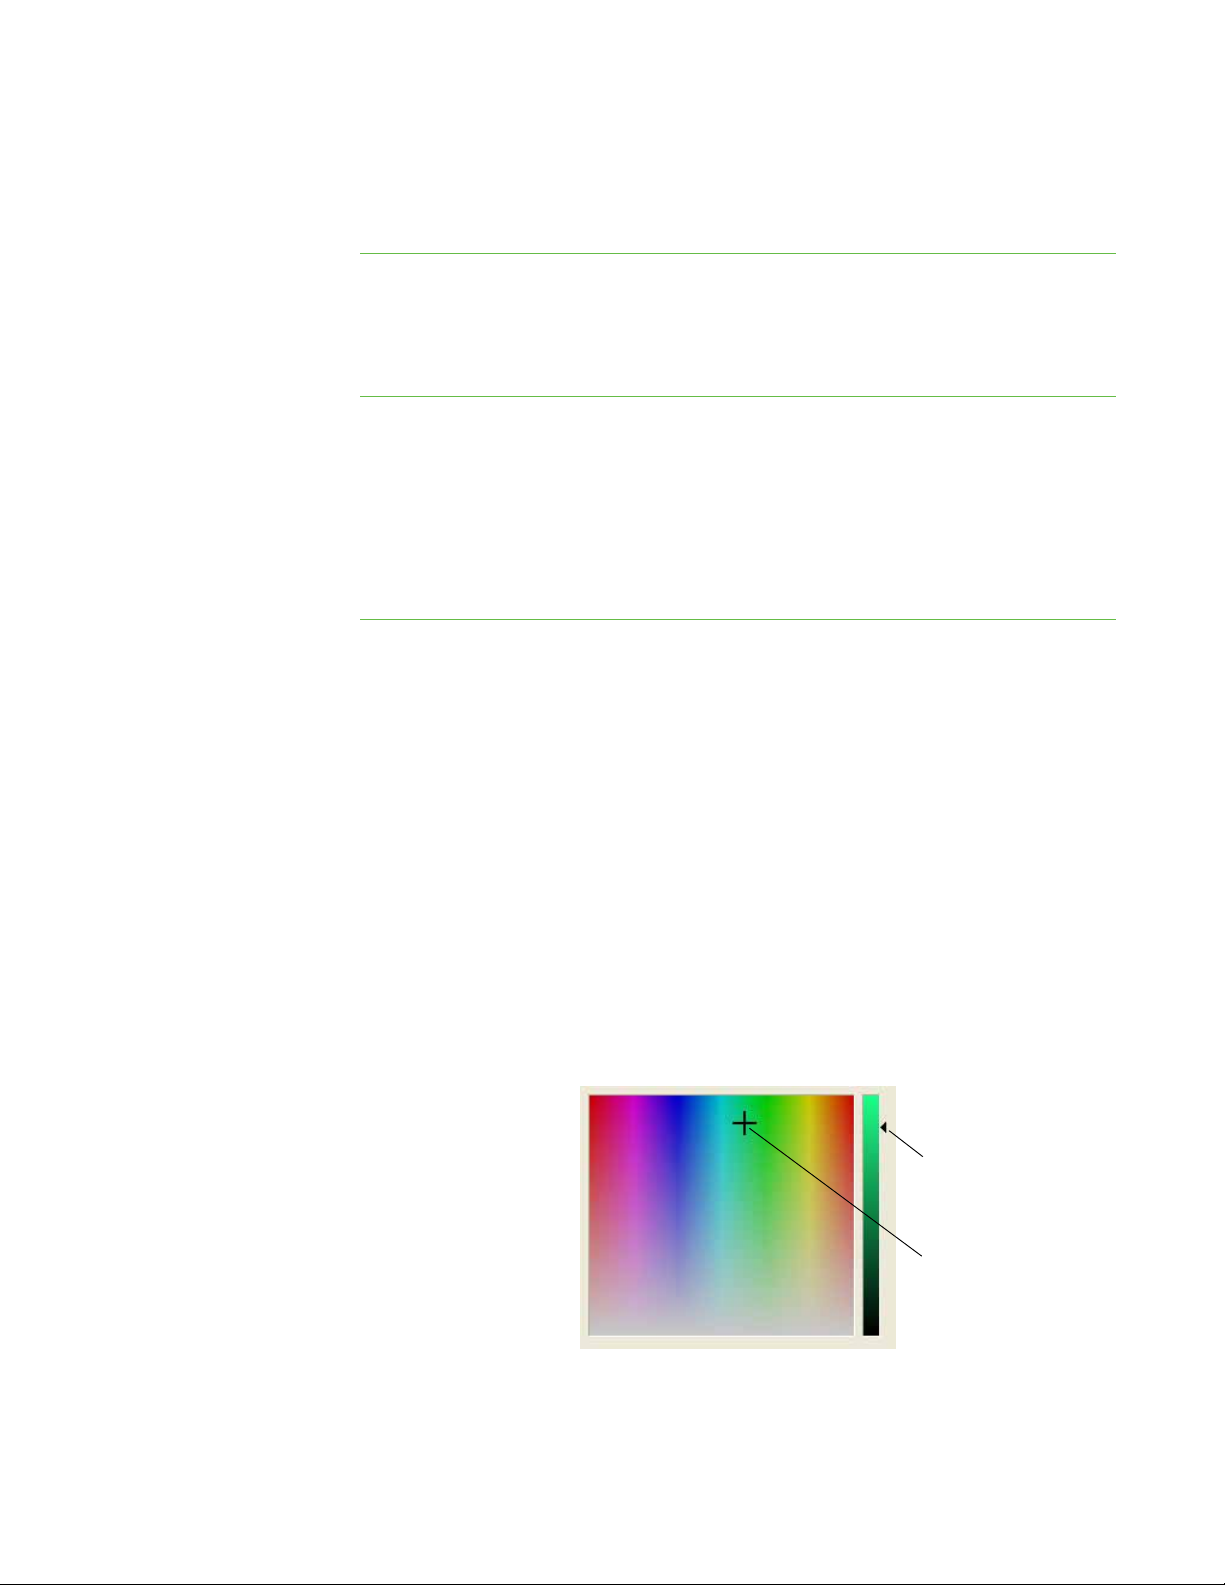
Colour Slider
Colour Crosshair
3. In the Position Icon Strip drop-down list, select where you want the icon strip to
appear.
Customizing the Appearance of the Paper Underlay
You can customize the appearance and layout of the underlay.
To add lines to the
underlay background
To change the
underlay colour
1. In the SMART Notebook control panel, select Set Up Underlay and Icon Strip
from the first drop-down list.
2. Press Customize Underlay.
3. Select the Horizontal Lines check box to add horizontal lines to the background.
4. Select the Vertical Lines check box to add vertical lines to the background.
1. In the SMART Notebook control panel, select Set Up Underlay and Icon Strip
from the first drop-down list.
2. Press Customize Underlay.
3. Select the Centre Colour check box to change the centre colour.
OR
Select the Icon Strip Colour check box to change the icon strip colour.
The Select Colour dialogue box appears.
4. Select one of the colour palettes from the basic colours.
OR
Move the colour slider and the colour crosshair to create a custom colour, press
Add to Custom Colours and then select the colour.
5. Press OK.
The colour of the centre of the underlay changes.
Page 34

26 | CHAPTER 4 – CUSTOMIZING YOUR SLATE
To insert an image onto
the underlay
1. In the SMART Notebook control panel, select Set Up Underlay and Icon Strip
from the first drop-down list.
2. Press Customize Underlay.
3. Under Image Properties, press Add.
The Open dialogue box appears.
4. Browse to and select the image file that you want to insert onto the underlay.
5. Press Open.
The image appears in the centre of the underlay.
6. Move the Transparency slider to adjust the image transparency.
7. Select the image position (either centred or stretched) from the Position
drop-down list.
8. Press OK.
Changing How the Slate Maps to Your Display
By default, your slate’s workspace represents one display. If you have more than one
display, you can choose the display that you want the workspace to represent, or you
can set the workspace to represent two displays.
To change how your slate
maps to your display
1. In the SMART Notebook control panel, select Orientation/Alignment Settings
from the first drop-down list.
2. From the second drop-down list, select one of the following settings:
Setting Function
Display 1 The slate workspace represents display 1.
Display 2 The slate workspace represents display 2.
Entire Surface The slate workspace represents both displays.
3. Press OK to save your changes.
Page 35
27 | CHAPTER 4 – CUSTOMIZING YOUR SLATE
Changing Mouse and Gesture Settings
You can change the mouse and gesture settings for your slate.
To change the mouse and
gesture settings for
your slate
1. In the SMART Notebook control panel, select Mouse and Gesture Settings from
the first drop-down list. You can change the following settings:
Setting Function
Double-Click
Zone
Enable Mouse
Assist
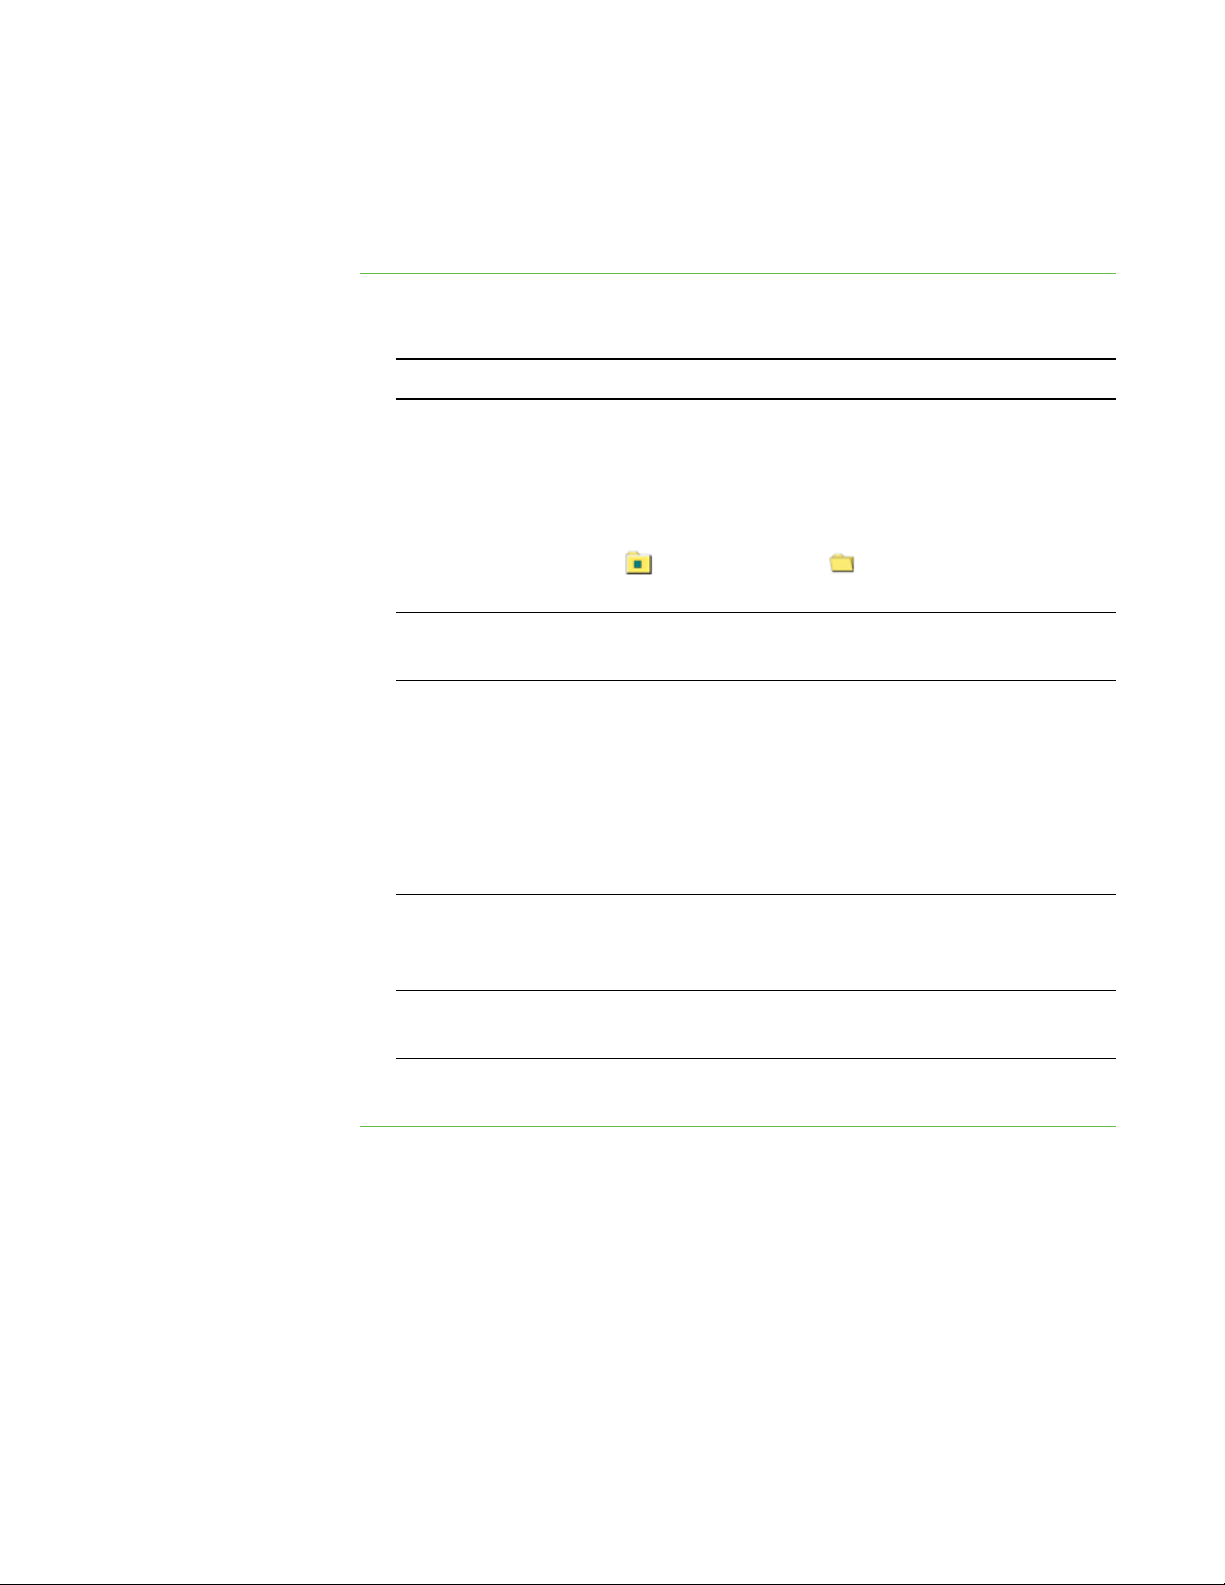
Enable Hover The hover setting is the default pen setting and allows you to
You can increase or decrease the zone that registers as a
double click. For a small double-click zone, ensure that the
second pen touch is in the same spot on the workspace as
the first pen touch. If you find it difficult to double click,
increase the double-click zone. Double-click the Test Area
folder . If the folder opens then the double-click zone
is adequate.
Mouse Assist helps to move your pointer to clickable objects
on your display, such as the Close button and scroll bars.
move the pointer on your display without touching the pen to
the workspace. You can disable the hover setting by clearing
the selection of the Enable Hover check box.
To move the pointer when the hover setting is disabled,
touch the pen to the slate and then slide the pen on the
workspace.
Enable SingleTouch Gestures
Enable Pop-Up
Messages
2. Press OK to save your changes.
You can use single-touch gestures, such as right click (when
you touch and hold the pen to the workspace, you perform a
right click).
Pop-up messages appear when you select the right-click tool
or when you clear your digital ink.
Page 36

Page 37
Chapter 5
Troubleshooting
This chapter describes the following troubleshooting topics:
• Determining whether your slate is connected to your computer (page 29)
• Re-establishing the wireless connection (page 30)
• Deleting a wireless connection and creating a new one (page 30)
• Understanding your slate’s LED states (page 31)
• Troubleshooting pen issues (page 32)
Determining Whether Your Slate Is Connected to
Your Computer
If your computer is not responding to your SMART Slate, check whether your slate is
connected to the computer.
To determine whether
your slate is connected
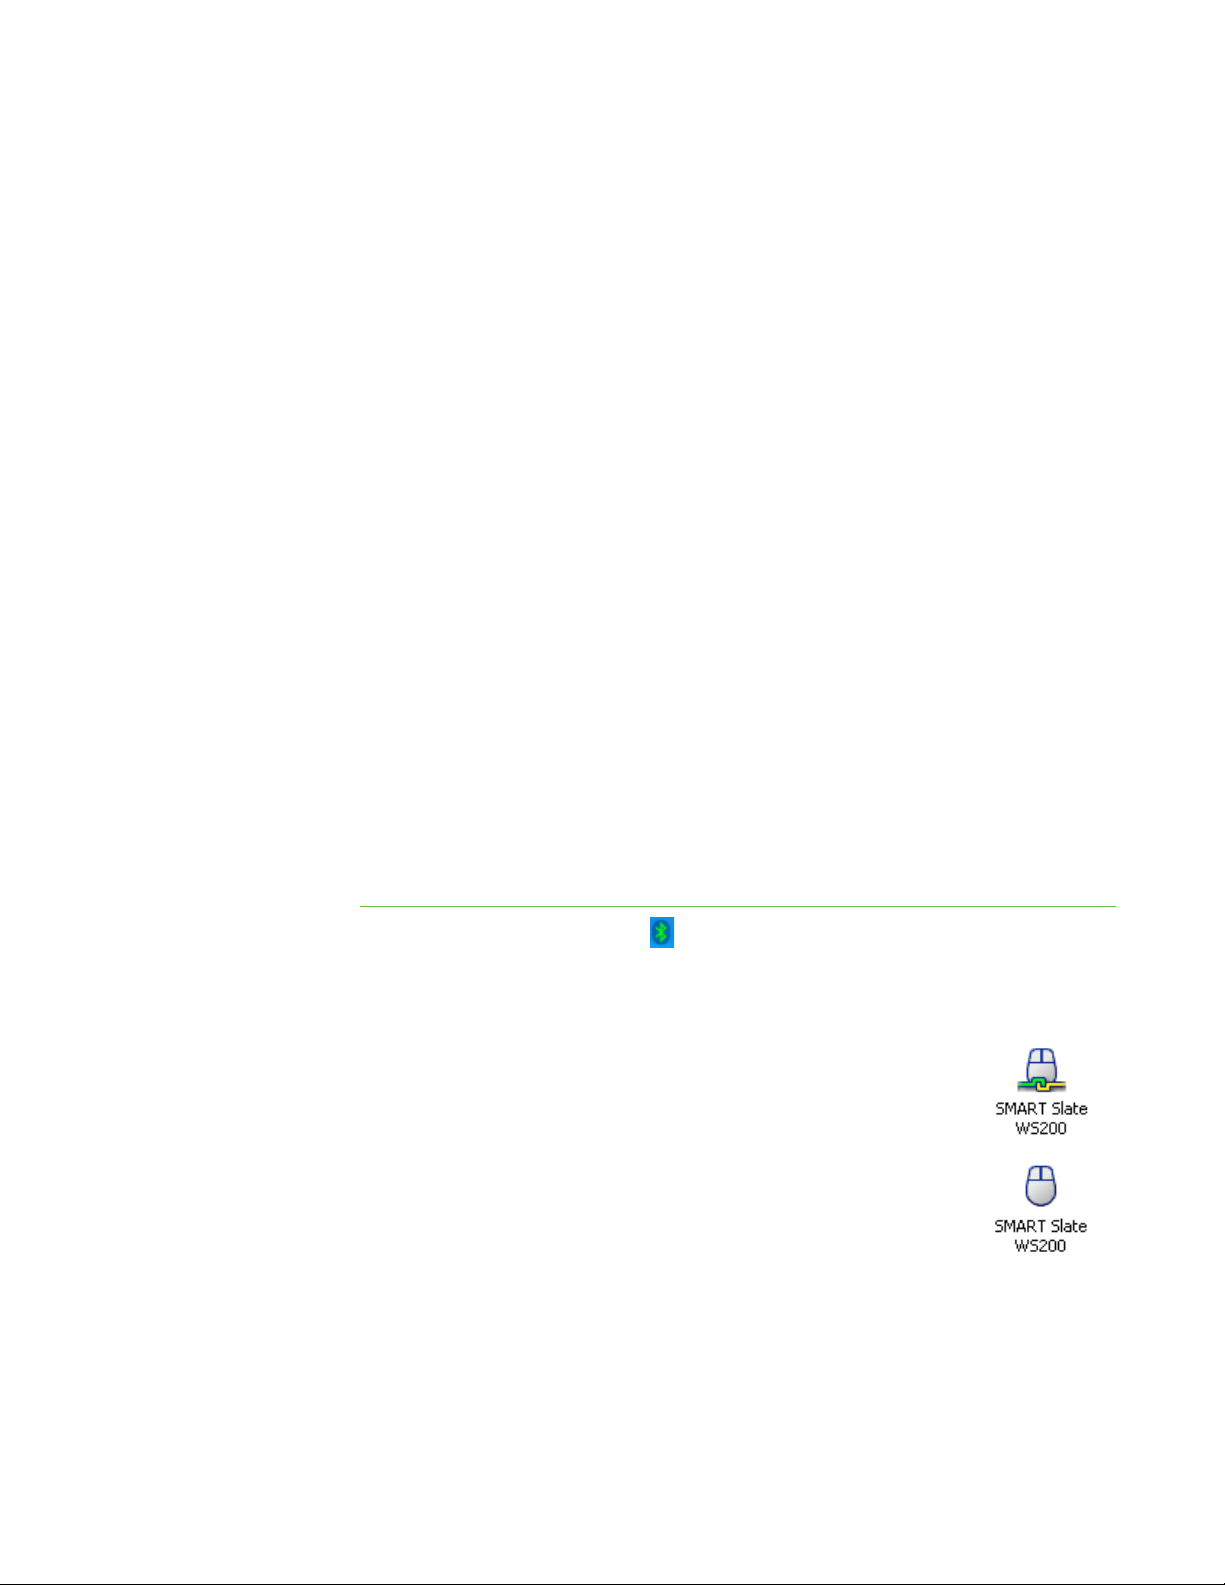
Double-press the Bluetooth icon in your computer’s notification area.
The Bluetooth Settings window appears.
If your slate is connected to your computer, you will see this SMART
Slate WS200 icon:
If your slate is not connected to your computer, you will see this
SMART Slate WS200 icon:
OR
Page 38
30 | CHAPTER 5 – TROUBLESHOOTING
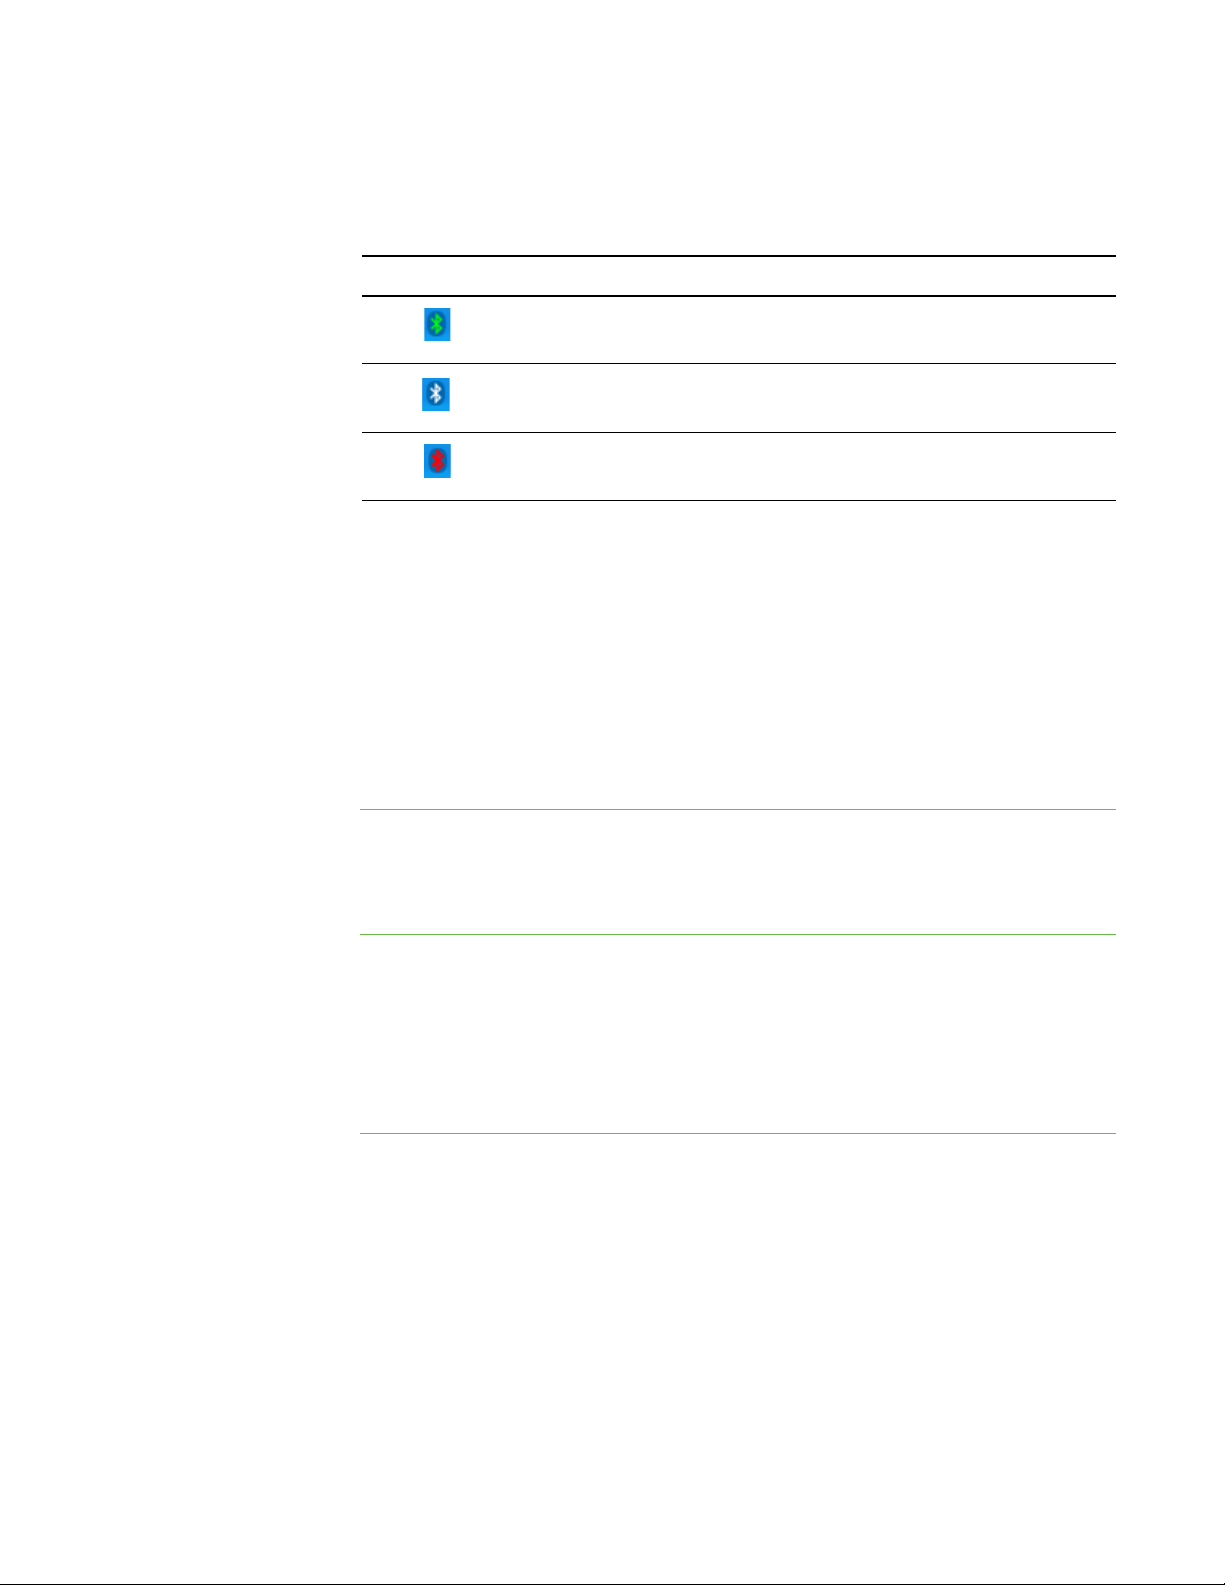
You can determine whether your slate is connected by the colour of the Bluetooth icon.
The following table describes what the different colours of the Bluetooth icon mean:
Bluetooth Icon Description
To re-establish the
wireless connection
Green
White
Red
OR
If your slate is connected to the computer, the SMART Slate appears in the list of
devices in the SMART Notebook control panel.
Your computer detects the USB wireless adapter and your slate is
connected to your computer.
Your computer detects the USB wireless adapter, but your slate is
not connected to your computer.
Your computer does not detect the USB wireless adapter and your
slate is not connected to your computer.
Re-establishing the Wireless Connection
If you restart your computer whilst your SMART Slate is wirelessly connected, your
computer is unable to find the slate and the slate’s status LED will glow amber.
Once your computer has started, press one of the customizable buttons on the slate.
The slate reconnects to the computer and the slate’s status LED will glow green.
To delete and create a
wireless connection
Deleting a Wireless Connection and Creating a New One
If you are unable to re-establish a wireless connection, delete the SMART Slate
WS200 connection in the Bluetooth Settings window and then create a new wireless
connection.
1. Double-press the Bluetooth icon in your computer’s notification area.
The Bluetooth Settings window appears.
2. Select the SMART Slate WS200 icon and then press Delete.
The Bluetooth Settings dialogue box appears.
3. Press Yes .
4. Turn on your slate and press the Connect button.
5. Press New Connection in the Bluetooth Settings window.
Page 39
31 | CHAPTER 5 – TROUBLESHOOTING
The Add New Connection Wizard appears.
6. Select the Express Mode check box, press Next and then complete the steps in
the wizard.
NOTE
If a dialogue box appears asking you to enter a pass key, type 0000 in the
pass key area and then press Next.
When your slate is wirelessly connected to your slate the status LED on the slate
will stop flashing and will glow green.
Understanding Your Slate’s LED States
The following table describes the power LED states:
Power LED State Description
Green The battery is fully charged.
OR
The USB charging cable is connected to your computer and your
computer is powering via your slate.
Amber and
Blinking Amber
Red and
Blinking Red
Off The battery is not connected. Check the battery compartment
The following table describes the status LED states:
Status LED State Description
Green Your slate is connected to your computer.
Dark Green The pen is touching the workspace.
The battery charge is low. Connect the USB charging cable to
charge the battery.
The battery is completely drained. Connect the USB charging
cable to charge the battery.
and ensure that the battery is properly installed.
OR
The battery insulation film is in the battery compartment.
Remove the battery insulating film (see page 7).
Blinking Green The slate is searching for your computer to create a wireless
connection.
Amber The slate was once connected to your computer, but the
wireless connection is lost.
Page 40

32 | CHAPTER 5 – TROUBLESHOOTING
Troubleshooting Pen Issues
If you encounter issues using the pen, refer to the following table:
Symptom Solution
You are unable to use the pen
to select or write on the
interactive pen display.
OR
When you write or draw with the
pen, you see a pointer instead
of digital ink.
You are unable to double-click. Adjust the double-click zone. In the SMART
You are unable to use the
rocker switch.
Soften the pen’s tip feel. In the SMART Notebook
control panel, select SMART Hardware Settings
> Pen and Button Settings and then adjust the
Tip Feel slider.
Notebook control panel, select SMART Hardware
Settings > Mouse Settings and then adjust the
mouse setting.
• Ensure that the lower and upper rocker switch
buttons are set to the functions that you want.
In the SMART Notebook control panel, select
SMART Hardware Settings > Pen and
Button Settings and then select the functions
from the drop-down lists.
• If the issue persists, contact SMART Technical
Support.
Page 41

Appendix A
Hardware
Environmental
Compliance
SMART Technologies supports global efforts to ensure that electronic equipment is
manufactured, sold and disposed of in a safe and environmentally friendly manner.
Waste Electrical and Electronic Equipment
Regulations (WEEE Directive)
Waste Electrical and Electronic Equipment regulations apply to all electrical and
electronic equipment sold within the European Union.
When you dispose of any electrical or electronic equipment, including SMART
Technologies products, we strongly encourage you to properly recycle the electronic
product when it has reached the end of its life. If you require further information,
please contact your reseller or SMART Technologies for information on which
recycling agency to contact.
Restriction of Certain Hazardous
Substances (RoHS Directive)
This product meets the requirements of the European Union’s Restriction of Certain
Hazardous Substances (RoHS) Directive 2002/95/EC.
Consequently, this product also complies with other regulations that have arisen in
various geographical areas and that reference the European Union’s RoHS directive.
Page 42

34 | APPENDIX A – HARDWARE ENVIRONMENTAL COMPLIANCE
Batteries
Batteries are regulated in many countries. Check with your reseller to find out how to
recycle used batteries.
Packaging
Many countries have regulations restricting the use of certain heavy metals in product
packaging. The packaging used by SMART Technologies to ship products complies
with applicable packaging laws.
Covered Electronics Devices
Many US states classify monitors as Covered Electronic Devices and regulate their
disposal. Applicable SMART Technologies Products meet the requirements of the
Covered Electronic Devices regulations.
China’s Electronic Information
Products Regulations
China regulates products that are classified as EIP (Electronic Information Products).
SMART Technologies products fall under this classification and meet the requirements
for China’s EIP regulations.
US Consumer Product Safety
Improvement Act
The United States has enacted the Consumer Product Safety Improvement Act which
limits the lead (Pb) content in products. SMART Technologies is committed to
complying with this initiative.
Page 43

Appendix B
Customer Support
Online Information and Support
Visit www.smarttech.com/support to view and download user’s guides, how-to and
troubleshooting articles, software and more.
Training
Visit www.smarttech.com/trainingcenter for training materials and information about
our training services.
Technical Support
If you experience difficulty with your SMART product, please contact your local
reseller before contacting SMART Technical Support. Your local reseller can resolve
most issues without delay.
NOTE
To locate your local reseller, visit www2.smarttech.com/st/en-US/Where+to+Buy
All SMART products include online, telephone, fax and e-mail support:
Online www.smarttech.com/contactsupport
Telephone +1 403 228 5940 or
Freephone 1 866 518 6791 (US/Canada)
(Monday to Friday, 5am – 6pm Mountain Time)
Fax +1 403 806 1256
Email [email protected]
Dispatch and Repair Status
Contact SMART’s Return of Merchandise Authorisation (RMA) group, Option 4,
+1 866 518 6791, for in-transit damage, missing part and repair status issues.
.
Page 44

36 | APPENDIX B – CUSTOMER SUPPORT
General Inquiries
Address SMART Technologies
3636 Research Road NW
Calgary, AB T2L 1Y1
CANADA
Switchboard +1 403 245 0333 or
Freephone +1 888 42 SMART (US/Canada)
Fax +1 403 228 2500
Email [email protected]
Warranty
Product warranty is governed by the terms and conditions of SMART’s “Limited
Equipment Warranty” that was dispatched with the SMART product at the time
of purchase.
Registration
To help us serve you, register online at www.smarttech.com/registration.
Page 45

Page 46

Freephone 1 866 518 6791 (US/Canada)
or +1 403 228 5940
www.smarttech.com
 Loading...