

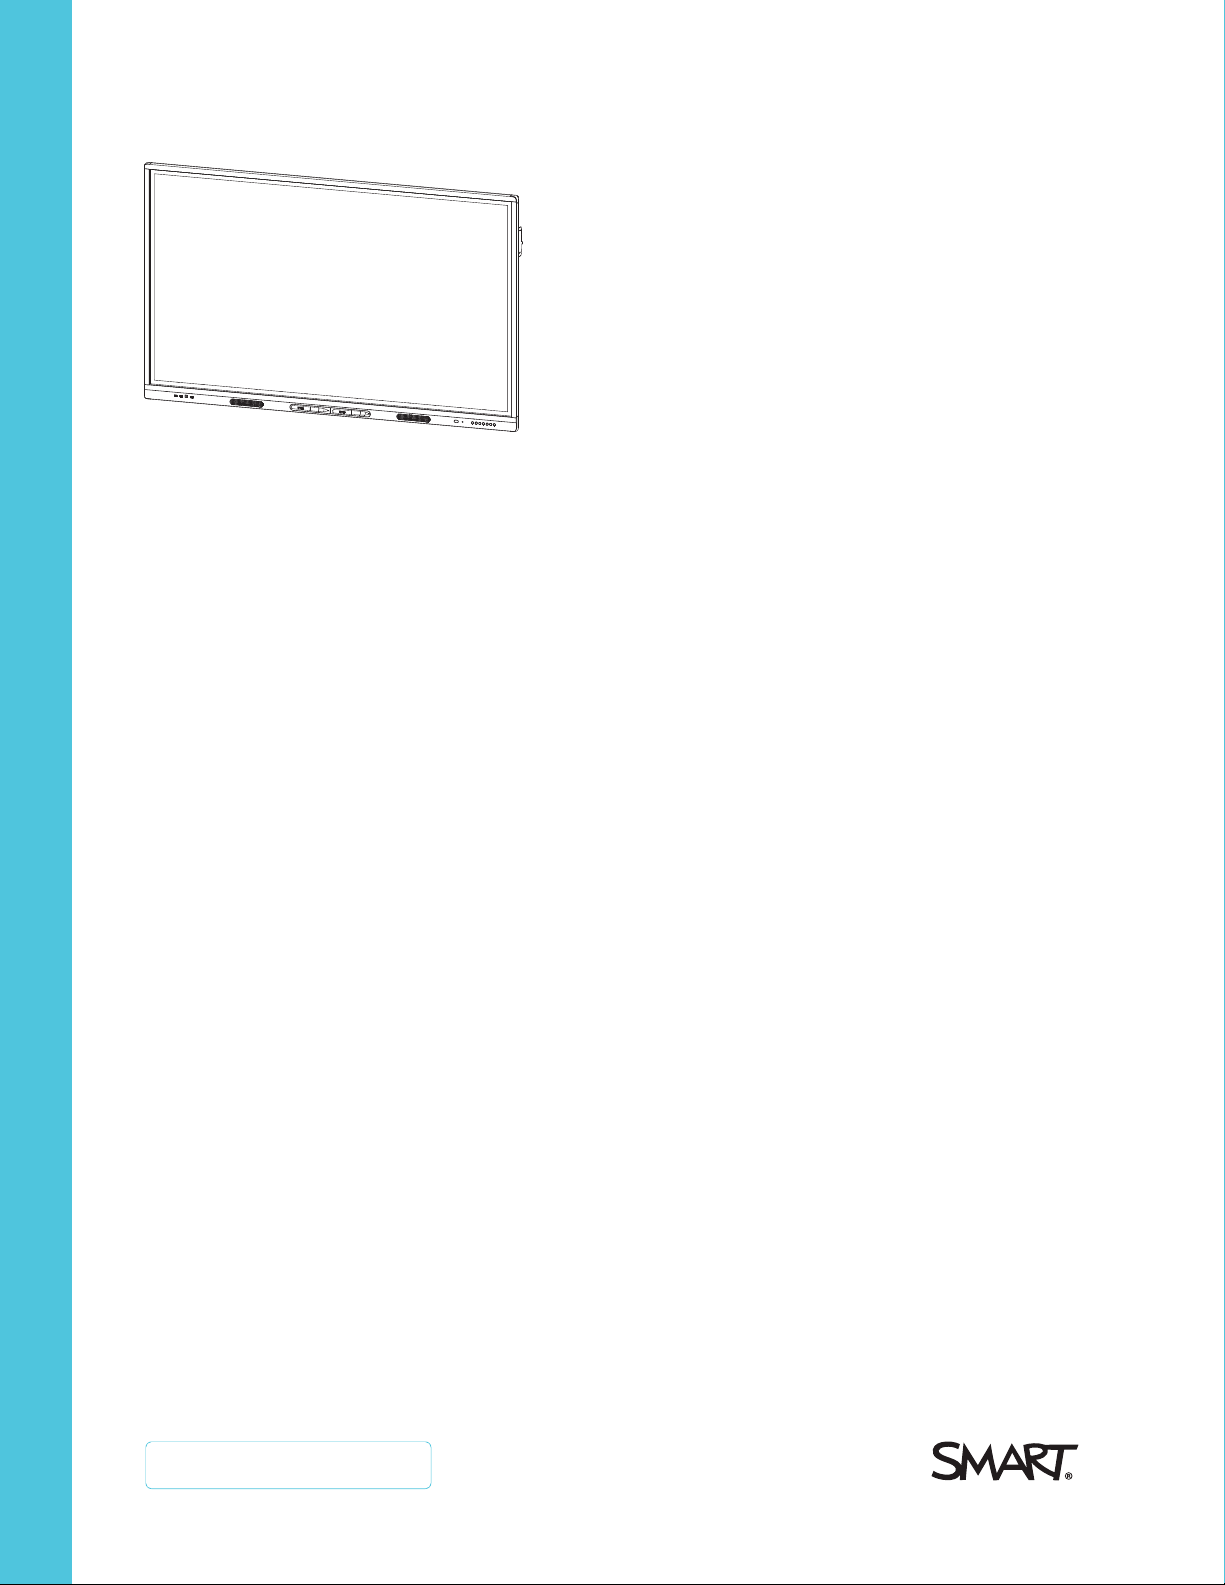
SMARTBoard MX series
interactive displays
USER’S GUIDE
SBID-MX265 | SBID-MX275 | SBID-MX286
SBID-MX365 | SBID-MX375 | SBID-MX386
Was this document helpful?
smar ttech.com/docfeedback/171284

Learn more
This guide and other resources for SMARTBoardMX series interactive displays are
available in the Support section of the SMARTwebsite (smarttech.com/support).
Scan this QRcode to view these resources on your mobile device.
Trademark n ot ice
SMARTBoard , smarttech, the SMART lo go and all SMART taglines are trad emarks or re gis tere d trad emarks of SMARTT echnolo gie sULC in the U.S. and/or other co untries. All
third-party pro duct and company names may be trad emarks o f their re spe ctive owner s.
Copyrigh t no tice
© 2 020S MARTTechnolo gie sU LC. All rig hts r es er ved . No part of this publi cation may be re pr od uced, transmitted, transcrib ed , stor ed in a retri eval sy stem or translated into
any language i n any form by any means without the pri or w ritten consent of SMARTTe chnolog ies ULC. Information i n this manual is subje ct to change without notice and d oe s not
rep re se nt a commitment on the part of SMART.
This p rod uct and/or use there of is co ver ed by o ne or more of the follo wing U .S. p atents:
www.smarttech.com/patents
July 29, 2 020
smar ttech.com/kb/171284 2
Important information
NOTE
Refer to the installation and maintenance guide for important
information about installing and maintaining the display (see
More inform ation on page15).
WARNING
l Do not open or disassemble the display. You r isk
electrical shockfrom the high voltage inside the casing.
Opening the casing also voids the warranty.
l Do not stand (or allow children to stand) on a chair to
touch the surface of the display.
l To reduce the risk of fire or electricshock,do not expose
the display to r ain or moisture.
l Do not insert objects inside the cabinet ventilation holes,
because they couldtouch dangerous voltage points and
cause electric shock,fire or product damage which may
not be covered by the war ranty.
l Do not place heavy objects on the power cable. Dama ge
to the cable could cause shock,fire or product dam age
which may not be covered by the warr anty.
l If the glass is broken, do not touch the liquid crystal. To
prevent injury, handle glass fragments with car e when
disposing of them.
l Disconnect all of the display’s power cables from the wall
outlet and seek assistance fr om qualified ser vice
personnel if any of the following occur:
o
The power cable or plug is dam aged
o
Liquid is spilled into the display
o
Objects fall into the display
o
The display is dropped
o
Structural damage, such as cracking, occurs
o
The display behaves unexpectedlywhen you
follow operating instructions
l Before inserting or removing the iQ appliance from the
display, turn off the display using the switch at the back of
the display. See Open Pluggable Slot computer (OPS)
disclaimer for more inform ation.
ENERGYSTAR®
ENERGY STAR is the government-backedsymbol
for energy efficiency,providing simple,credible,
and unbiased information tha t consumers and
businesses rely on to make well-informed
decisions. ENERGY STAR-certifiedproducts are
the simple choice for energy efficiency, making it easy for
consumers and businesses to make purchases that save them
money and protect the environment. The U.S.EPA ensur es that
each product that earns the label is independently certified to
deliver the quality,performance, and savings that users have
come to expect.
As shipped,your display delivers ENERGY STAR performance
and savings. H owever, changing some settings may increase
energy consumption beyond the limits required for ENERGY
STARcertification. For example, increased brightness and
contrast will increase power consumption.
Please consider the environment when you choose non-ENERGY
STARsettings.
Federal Communication Commission
interference statement
FCC
Suppliers Declarat ion of Conformity
47 CFR § 2.1077 Compliance Information
Unique Identifier: IDX65-1, IDX65-2, IDX75-1, IDX75-2, IDX861, IDX86-2
Responsible Part y – U.S. Contact Information
SMART Technologies Inc.
2401 4th Ave., 3rd Floor
Seattle,WA 98121
compliance@smarttech.com
This device complies with Par t 15 of the FCC Rules.Operation is
subjectto the following two conditions:
1. This device may not cause harmful interference, and
2. this device m ust accept any interference received, including
interference that may cause undesired operation.
smar ttech.com/kb/171284 3

Important information
NOTE
This equipment has been tested and found to comply with the
limits for a Class A digital device,pursuant to part 15 of the FCC
Rules.These limits are designed to provide reasonable
protection against harmful interference when the equipment is
operated in a commer cial environment. This equipment
generates, uses, and can radiate radio frequency energy and,
if not installed and used in accordance with the instruction
manual, may cause harmful interference to radio
communications. Operation of this equipment in a residential
area is likelyto cause harmful interference in which case the
user will be required to correct the interference at his own
expense.
CAUTION
Any changes or modifications not expressly approved by the
party responsible for compliance could voidthe user’s authority
to operate this equipment.
Restriction
Operations in the 5.15-5.25GHz band ar e restr icted to indoor
usage only.
IEEE 802.11b or 802.11g operation of this product in the USA is
firmware limited to channels 1 thr ough 13.
Innovation, Science and Economic
Development Canada statement
This device complies with RSS-247of the Innovation, Science and
Economic Development Canada Rules.Operation is subjectto the
following two conditions:
1. This device may not cause harmful interference, and
2. this device m ust accept any interference received, including
interference that may cause undesired operation.
Radiation exposure statement
This equipment complies with I SED radiation exposure limits set
forth for an uncontrolled environment. This equipment should be
installedand operated with minimum distance of 20 cm between
the antenna of this device and all nearby persons. This transmitter
must not be co-located or operated in conjunction with any other
antenna or transmitter.
Cet appareil est conforme à la norme I SED CNR-247 pour les
appareils radio a gréés. Son fonctionnement est soumis aux deux
conditions suivantes:
1. le dispositif ne doit pas produire de brouillage pr éjudiciable,
et
2. ce dispositif doit accepter tout brouillage reçu, y compris un
brouillage susceptible de provoquer un fonctionnement
indésirable.
CAUTION
i. the device for operation in the band 5150-5250 MHz is
only for indoor use to reduce the potentialfor harmful
interference to co-channel mobile satellite systems;
ii. the m aximum antenna gain permittedfor devices in the
bands 5250-5350 MHz and 5470-5725MHz shall
comply with the e.i.r.p.limit;and
iii. the maximum antenna gain permitted for devices in the
band 5725-5825 MH z shall comply with the e.i.r.p.limits
specified for point-to-pointand non point-to-point
operation as appropriate.
iv. Users should also be advised that high-power radar s ar e
allocated as primary users (i.e., priority users) of the
bands 5250-5350 MHz and 5650-5850 MHz and that
these radars could cause interference and/or dama ge to
LE-LAN devices.
Radiation exposure statement
This equipment complies with FCC radiation exposure limits set
forth for an uncontrolled environment. This equipment should be
installedand operated with minimum distance of 20 cm between
the antenna of this device and all nearby persons. This transmitter
must not be co-located or operated in conjunction with any other
antenna or transmitter.
ADVERTISSEMENT
i. les dispositifs fonctionnant dans la bande 5 150-5 250
MHz sont réservés uniquement pour une utilisation à
l’intérieur afin de réduire les risques de brouillage
préjudiciable aux systèmes de satellites mobiles utilisant
les mêmes cana ux;
ii. le gain maximal d’antenne permis pour les dispositifs
utilisant les bandes 5 250-5 350 MHz et 5 470-5 725
MHz doit se conformer à la limite de p.i.r.e.;
iii. le gain maximal d’antenne permis (pour les dispositifs
utilisant la bande 5 725-5 825 MHz) doit se conformer à
la limite de p.i.r.e.spécifiée pour l’exploitation point à point
et non point à point, selon le cas.
iv. De plus, les utilisateurs devraient aussi être avisés que
les utilisateurs de radars de haute puissance sont
désignés utilisateurs principaux (c.-à-d., qu’ils ont la
priorité) pour les bandes 5 250-5 350 MHz et 5 650-5
850 MHz et que ces ra dars pourraient causer du
brouillage et/ou des dommages aux dispositifs LAN-EL.
Déclaration d’exposition aux radiations
Cet équipement est conforme aux limites d’exposition aux
rayonnements ISED établies pour un environnement non
contrôlé.Cet équipement doit être installé et utilisé avec un
minimum de 20 cm de distance entre la source de rayonnement
et votre corps. Cet émetteur ne doit pas être co- implantés ou
exploités conjointement avec une autre antenne ou émetteur.
smar ttech.com/kb/171284 4
Important information
Compliance to Malaysia specification
The SMART Technologies ULC Interactive
Display SBI D-MX265,SBI D-MX275, and SBIDMX285 meet the Malaysian requirements as
defined by the CertifyingAgency, SIRIM QAS
International.
United Arab Emirates – TRA
registration details
Regulatory model SBID-MX065, SBID-MX065, SBID-MX075,
SBID-MX086
OPS – Regulatory model AM40
smar ttech.com/kb/171284 5

Contents
Important information 3
Chapter 1: Welcome 8
Identifying your specific model 8
Features 9
Components 10
Accessories 14
More information 15
Chapter 2: Getting started 17
Waking up the display and putting it back to sleep 17
Using the front control panel 17
Using the remote control 19
Using touch 20
Writing, drawing and erasing 21
Chapter 3: Using the iQ experience 22
Switching to the iQ experience 22
Using the Home screen 22
Using the Apps Library 23
Using the Files Library 23
Using kapp Whiteboard 23
Using SMARTNotebook Player 24
Using Browser 24
Using Screen Share 24
Using screenshots 25
Installing third-party apps 25
Cleaning up the display 25
Chapter 4: Connecting and using the Intel Compute Card 26
Chapter 5: Connecting and using computers 27
Installing SMART software on computers you want to connect to the display 27
Setting the resolutions and refresh rates of computers you want to connect to the display 28
Connecting computers to the display 28
Viewing a connected computer’s input 29
Using SMART software on connected computers 29
Chapter 6: Troubleshooting 30
Resolving general issues 31
smar ttech.com/kb/171284 6

Contents
Resolving issues with power 31
Resolving issues with image or video quality 32
Resolving issues with audio 35
Resolving issues with touch and digital ink 35
Resolving issues with remote management 37
Resolving issues with the iQ experience 38
Resolving issues with the Intel Compute Card 38
Resolving issues with software 38
Referring to the SMART knowledge base for additional troubleshooting information 39
Contacting your reseller for additional support 39
smar ttech.com/kb/171284 7

Chapter 1
Identifying your specific model 8
Identifying your SMARTBoard MX series interactive display model 9
Identifying your iQ appliance model 9
Features 9
Components 10
iQ appliance (and Intel Compute Card) 11
Screen 12
Pens 12
Front connector panel 13
Front control panel 13
Remote control 13
Remote control sensor 13
Status light 14
Ambient light sensor 14
Internal speakers 14
Accessories 14
SBA-100 projection audio system 14
SMART Audio 400 classroom amplification system 14
USB extenders 15
SMARTPCM8 series OPS PC 15
More information 15
This chapter introduces the SMARTBoard® MX series interactive displays.
Identifying your specific model
SMART offers several different models of the SMARTBoard MX series interactive display and iQ
appliance.
smar ttech.com/kb/171284 8

Chapter 1
Welcome
Identifying your SMARTBoard MX series interactive display model
The following models of SMARTBoard MX series interactive display are available:
Model Screen size (approximate)
SBID-MX365 65" (165 cm)
SBID-MX375 75" (190 cm)
SBID-MX386 86" (218 cm)
SBID-MX265 65" (165 cm)
SBID-MX275 75" (190 cm)
SBID-MX286 86" (218 cm)
Refer to the specifications for detailed technical information for this model, including product dimensions
and weights (see More information on page15).
Identifying your iQ appliance model
The iQ appliance is installed in the accessory slot to enable iQ functionality. SMARToffers several different
iQ appliance models. Use the Identifying your iQ appliance model wizard to identify the specific model of
iQ appliance installed in your display.
Features
The SMARTBoard MX series interactive display is the hub of your classroom or meeting room. PC-free
embedded computing provides one-touch access to collaborative tools, including a whiteboard, wireless
screen sharing, and a web browser. There’s no need for wires, cables or manual software and firmware
updates.
The display includes the following features:
Feature Description More information
iQ technology The display’s iQ appliance provides one-touch access to
collaborative tools, including a whiteboard, wireless screen
sharing and a web browser.
Intel® Compute
Card
Models with an AM50 appliance can use an Intel Compute
Card to provide a complete Windows 10 solution at your
fingertips, without the need for an external PC or cables.
Page22
Page26
smar ttech.com/kb/171284 9
Chapter 1
Welcome
Feature Description More information
Touch support You can do everything on the display that you can do at your
computer—open and close applications, meet with others,
create new documents or edit existing ones, visit websites,
play and manipulate videos, and so on—by touching the
display’s surface.
You can use an array of gestures within applications, including
panning, scaling, rotating and zooming in and out.
The display’s support for up to 10 simultaneous touch, writing
and erase points enables you and other users to interact with
1
Writing and
drawing support
objects on the screen at the same time.
You can write over applications in digital ink using one of the
supplied pens, and then erase the digital ink using your palm.
Up to two users can write or draw digital ink on the screen at
the same time.
Remote control You can use a remote control with the SMARTBoard MX
series interactive display.
Audio support The display includes integrated speakers for presenting audio
from connected input sources.
Page20
Page21
Page19
N/A
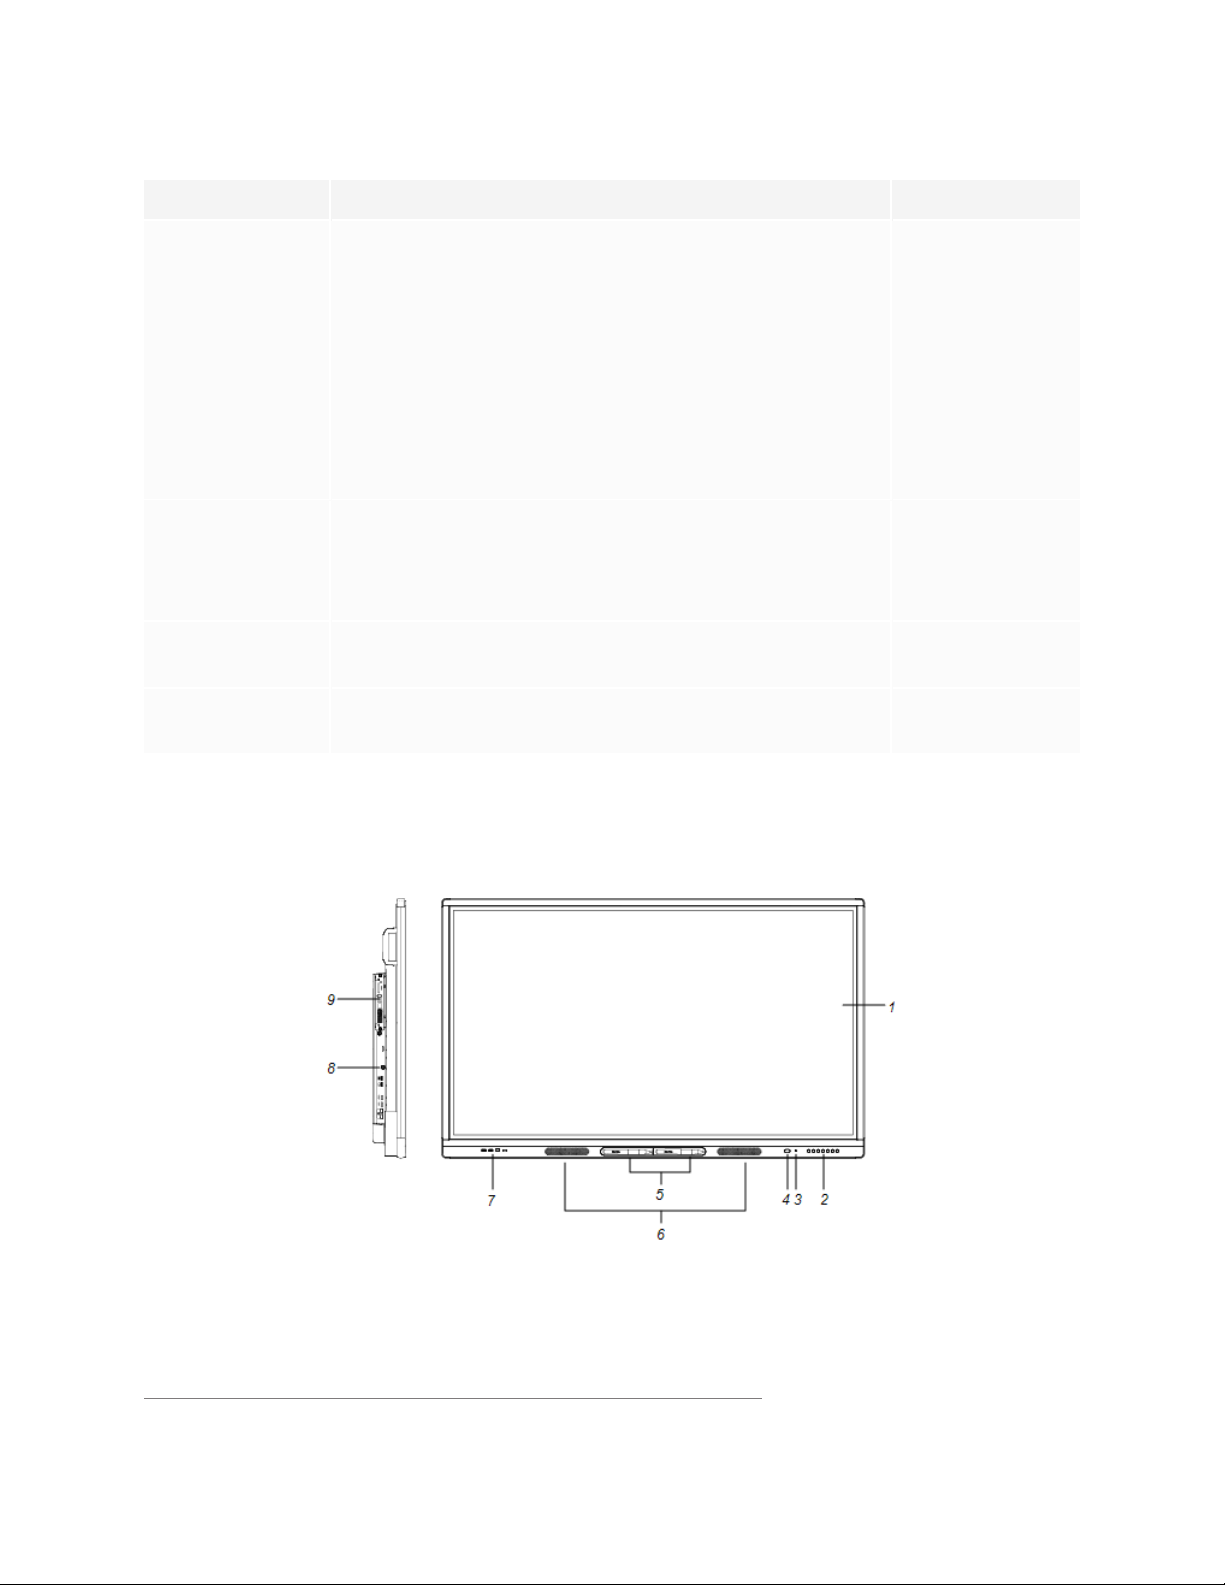
Components
The display consists of the following components:
1
Requires SMART Product Drivers to be installed.Some applications might not support all touch points.
smar ttech.com/kb/171284 10

Chapter 1
Welcome
No. Name More information
Pictured
1 Screen Page12
2
Front control panel Page13
3 Light sensor Page14
4 Remote control sensor / status light Page13
5
6
7 Front connector panel
8
Pen (×2) Page12
Speakers Page14
Page13
Side connector panel See SMARTBoard MX
series interactive
displays installation and
maintenance guide (
smarttech.com/kb/171257
).
9
iQ appliance (and Intel Compute Card) Page11
Not pictured
10
9
AC switch See SMARTBoard MX
series interactive
displays installation and
maintenance guide (
smarttech.com/kb/171257
).
11 Bottom connector panel See SMARTBoard MX
series interactive
displays installation and
maintenance guide (
smarttech.com/kb/171257
).
12 Remote control Page13
iQ appliance (and Intel Compute Card)
The iQ appliance is inserted in the accessory slot on the back of the following models:
l SBID-MX265
l SBID-MX275
smar ttech.com/kb/171284 11

Chapter 1
Welcome
l SBID-MX286
l SBID-MX365
l SBID-MX375
l SBID-MX386
Take advantage of iQ technology and access collaborative tools.
With the SBID-MX365, SBID-MX375, and SBID-MX386 models, you can insert an Intel Compute Card in the
appliance to provide a complete Windows 10 solution at your fingertips, without the need for an external
PC or cables.
TIP
Use the Identify your iQ appliance model on the SMART support site to identify your model of iQ
appliance.
For more information about the iQ experience, see Chapter 3: Using the iQ experience on page22.
Screen
The following are the dimensions for the display:
Model Diagonal Active touch area Active image area
SBID-MX365 64 1 /2" (163.9cm) 57 3/8" × 32 3/4" (145.7 cm ×
83.3cm)
SBID-MX375 74 1/2" (189.3 cm) 66 1/2" × 38" (168.8 cm × 96.6cm) 65" × 36 1/2" (165 cm × 92.8cm)
SBID-MX386 85 5/8" (218.4 cm) 763/8" × 43 3/4" (194.1 cm ×
111.2cm)
SBID-MX265 64 1/2" (163.9 cm) 57 3/8" × 32 3/4" (145.7cm ×
83.3cm)
SBID-MX275 74 1/2" (189.3 cm) 66 1/2" × 38" (168.8 cm × 96.6cm) 65" × 36 1/2" (165 cm × 92.8cm)
SBID-MX286 85 5/8" (218.4 cm) 763/8" × 43 3/4" (194.1 cm ×
111.2cm)
56 1/4" × 31 5/8" (142.9 cm × 80.4
cm)
74 5/8" × 42" (189.5 cm × 10 6.6cm)
56 1/4" × 31 5/8" (142.9 cm × 80.4
cm)
74 5/8" × 42" (189.5 cm × 10 6.6cm)
Pens
The display comes with two pens.
The display’s bottom frame includes magnetic holders for the pens. Remove a pen from its holder and use
the pen to draw digital ink.
smar ttech.com/kb/171284 12
Chapter 1
Welcome
CAUTION
When you return a pen to the magnetic holder, make sure it’s centered in its holder to keep it from falling
and being damaged.
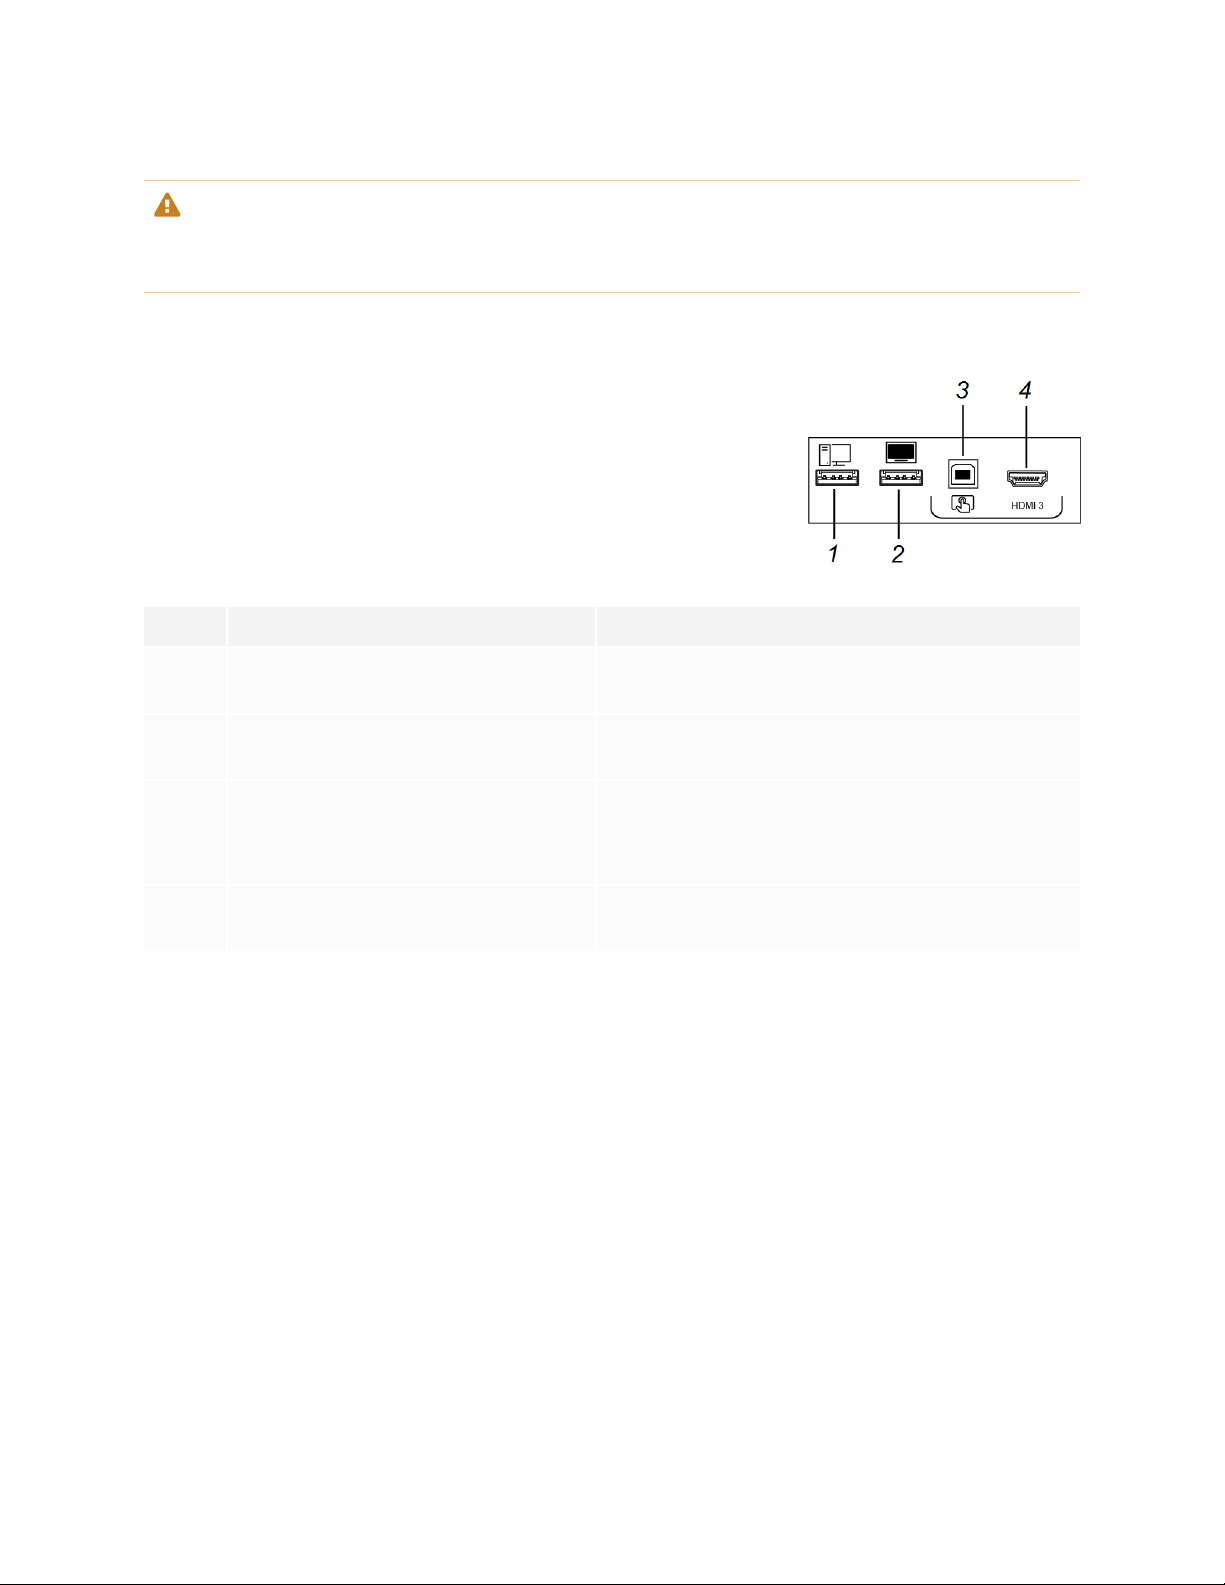
Front connector panel
The front connector panel includes connectors for USB peripherals and a
computer or other input source.
No. Name Procedure
1 USB 2.0 Type-A connector Connect USB drives and other devices that you want
to use with the currently selected input source.
2 USB 2.0 Type-A connector Connect a USBdrive to update the display’s
firmware.
3 USB 2.0 Type-B connector
4 HDMI 3 input connector Connect a computer or other input source to the
Connect a USB cable to the display and computer to
provide touch control of the computer connected to
HDMI 3.
display (see page29).
Front control panel
The front control panel contains the Power, Input Select, Menu, Freeze, Mute and volume control buttons.
For more information about the front control panel, see Using the front control panel on page17.
Remote control
The remote control is an alternative to the front control panel for controlling the display.
For more information about the remote control, see Using the remote control on page19.
Remote control sensor
The status light blinks green and red when it registers a button being pressed on the remote control.
smar ttech.com/kb/171284 13

Chapter 1
Welcome
Status light
The status light blinks green and red when it registers a button being pressed on the remote control.
When the status light is red, the display is in a low power state. To wake the display, press the Power button
on the front control panel or POWERon the remote control.
Ambient light sensor
The ambient light sensor can detect the room brightness and adjust the display’s brightness. Make sure
Auto is enabled in Brightness and volume in the display’s settings. See SMARTBoard MX series interactive
displays installation and maintenance guide (smarttech.com/kb/171257).
Internal speakers
The display includes two 10 W rms integrated speakers. You can also connect external speakers.
Accessories
Accessories for the display include the following:
l SBA-100 projection audio system
l SMART Audio 400 classroom amplification system
l USB extenders
l SMART PCM8 series OPS PC
SBA-100 projection audio system
The SBA-100 projection audio system consists of two 14 W speakers and is intended
for wall-mounted displays. You can control volume using the display’s front control
panel or the digital volume controls in a connected computer’s operating system.
For more information, see the SBA-100 projection audio system specifications
(smarttech.com/kb/171146).
SMART Audio 400 classroom amplification system
The SMART Audio 400 classroom amplification system provides high-quality audio
amplification. The system comes with a teacher microphone and optional student
microphone. Multiple speaker options are available, including wall- and ceiling-mounted
speakers. The amplifier receives audio signals from the microphones and translates
them into crystal-clear sound through the speakers.
smar ttech.com/kb/171284 14

Chapter 1
Welcome
For more information, see the SMART Audio 400 classroom amplification system specifications
(smarttech.com/kb/171137).
NOTE
The SMARTAudio 400 classroom amplification system is available only in Canada and U.S.
USB extenders
As noted in the SMARTBoard MX series interactive displays installation and maintenance guide
(smarttech.com/kb/171257), the USB connection between the display and computer should be no longer
than 16'(5m). If you need to connect a computer that is more than 16' (5 m) from the display, use one of the
following USB extenders:
Extender Specifications
USB-XT smarttech.com/kb/119318
CAT5-XT-1100 smarttech.com/kb/170202
SMARTrecommends only using USBextenders with the USB connectors on the side and bottom
connector panels on the display.
For more information, see:
l Troubleshooting and extending the USB 2.0 and USB 3.0 connection to your SMART interactive
display
l USBcables and connectors
SMARTPCM8 series OPS PC
The optional SMARTPCM8 series OPS PC (smarttech.com/kb/171429) provide a fully functional Windows
10 solution at your fingertips, without the need for an external PC or cabling.
More information
In addition to this guide, SMART provides the following documents for the display:
Document Link
SBID-MX165, MX175, MX186, MX265, MX275, MX286, MX365, MX375, and
MX386 installation instructions
Installation and maintenance guide smarttech.com/kb/171257
smar ttech.com/kb/171284 15
smarttech.com/kb/171274

Chapter 1
Welcome
Document Link
SBID-MX265 specifications smarttech.com/kb/171240
SBID-MX275 specifications smarttech.com/kb/171259
SBID-MX286 specifications smarttech.com/kb/171260
SBID-MX365 specifications smarttech.com/kb/171369
SBID-MX375 specifications smarttech.com/kb/171367
SBID-MX386 specifications smarttech.com/kb/171368
Comparison smarttech.com/kb/171161
These documents are available in the Support section of the SMART website (smarttech.com/support).
Scan the QR code on the cover of this guide to view the SMARTBoard MX series interactive displays
pages in the Support section.
smar ttech.com/kb/171284 16

Chapter 2
Waking up the display and putting it back to sleep 17
Using the front control panel 17
Adjusting audio 18
Freezing the screen 18
Using the remote control 19
Using touch 20
Writing, drawing and erasing 21
This chapter explains how to wake the display when it’s asleep, how to view connected computers’ input
and how to interact with the display.
Waking up the display and putting it back to sleep
To wake the display, press the Power button on the front control panel.
To return the display to a partial sleeping state, press the Power button on the front control panel.
For information about turning the display off, see SMARTBoard MX series interactive displays installation
and maintenance guide (smarttech.com/kb/171257).
Using the front control panel
The front control panel contains the Power, Input Select, Menu, Freeze,
Mute and volume control buttons.
No. Name SMARTBoard MX procedure
1 Power Press to wake the display.
Press to again enter Sleep mode.
2
Input select Press to switch input source.
smar ttech.com/kb/171284 17

Chapter 2
Gett ing started
No. Name SMARTBoard MX procedure
3
4 Freeze
Menu Press to open the display’s settings.
Press to freeze and unfreeze the screen. See
Freezing the screen below
5
6
7
Mute Press to mute or unmute the volume.
Volume decrease Press to turn down the volume.
Volume increase Press to turn up the volume.
Adjusting audio
You can use the buttons on the front control panel to increase and decrease the volume. You can also use
the buttons on the remote control.
Freezing the screen
You can temporarily freeze the image on the screen by pressing the Freeze button on the front control
panel (see Front control panel on page13).
NOTES
l Freezing the screen does not pause any applications that are running on the connected computer. It
simply freezes the display of those applications.
l Touch and ink are still active.
To unfreeze the screen, press the Freeze button on the front control panel again.
smar ttech.com/kb/171284 18

Chapter 2
Gett ing started
Using the remote control
The table below lists the functions available for the remote control.
NOTE
The buttons listed in this table and highlighted in gray in the image above are the only ones that have an
effect on the display. Pressing the other buttons will make the remote control sensor flash, but they have
no effect.
No. Name Function
1 MUTE Mute or unmute the volume
2 SOURCE Open the input source menu
3 INFO Press to show the display’s detected resolution
and refresh rate for the current input source
4 SYS Open the display’s settings
5 AUDIO Change the display’s audio mode
6 VOL + / VOL - Increase or decrease volume
7 [Number buttons] Press buttons on the number pad to customize
settings
smar ttech.com/kb/171284 19

Chapter 2
Gett ing started
No. Name Function
8 POWER Wake the display.
Enter Sleep mode.
9 FREEZE Freezes the screen.
Freezing the screen does not pause any
applications running on the connected computer.
It simply freezes the display of those
applications.
Using touch
By touching the display’s surface, you can do everything on the display that you can do at your computer.
You can also use an array of gestures within applications.
NOTE
Not all gestures work in all applications. Refer to an application’s documentation to learn which gestures
it supports.
Pan (one finger) Pan (two fingers) / scroll
Pinch to zoom in / scale (enlarge) Pinch to zoom out / scale (reduce)
smar ttech.com/kb/171284 20

Chapter 2
Gett ing started
Rotate Flick
Writing, drawing and erasing
The display includes two pens, which you can use to write or draw in digital ink. You can erase digital ink
using gestures or the eraser tool in the apps.
NOTE
When you’re viewing a connected computer’s input, SMARTInk enables you to write or draw in digital ink
over applications, files, folders, websites and any other open window on the computer.
To write or draw in digital ink
1. Pick up one of the display’s pens.
2. Use the pen to write or draw in digital ink.
To erase digital ink
Move your fist or palm over the digital ink you want to erase.
smar ttech.com/kb/171284 21

Chapter 3
Switching to the iQ experience 22
Using the Home screen 22
Using the Apps Library 23
Using the Files Library 23
Using kapp Whiteboard 23
Using SMARTNotebook Player 24
Using Browser 24
Using Screen Share 24
Using screenshots 25
Installing third-party apps 25
Cleaning up the display 25
Switching to the iQ experience
Press Input on the front control panel.
1.
The Input selection menu appears.
2. Tap OPS.
The iQ experience appears on the display’s screen.
To view a connected computer’s input, see Viewing a connected computer’s input on page29.
Using the Home screen
The Home screen in the iQ experience shows recent files and favorite apps and files. You can also start
sharing with the display by tapping in the upper right corner. You can change the display’s background
to personalize the display.
smar ttech.com/kb/171284 22

Chapter 3
Using the iQ experience
To show the Home screen
Tap the Home button at the bottom of the screen.
To learn how to use the other features of Home screen, see Understanding the Home Screen.
Using the Apps Library
The Apps Library contains the Browser, SMARTNotebook Player and kapp Whiteboard apps. You can also
add apps from the web and SMART’s app store or install third-party apps.
To open the Apps Library
From the Home screen, tap Apps Library .
To learn how to use the other features of Apps Library, see Understanding the Apps Library.
Using the Files Library
The Files Library contains kapp Whiteboard sessions, whiteboards, SMART Notebook files that have been
shared with the display, PDFs, and screenshots. If a USB drive is connected to the display, the files on the
USB drive are also available in the Files Library. Although these files can be viewed on the display, they are
not saved on the display.
To open Files Library
From the Home screen, tap Files Library .
To learn how to use the other features of Files Library, see Understanding the Files Library.
Using kapp Whiteboard
For Pro models only
Using kapp Whiteboard, you can write and erase notes on the display just as you do on a traditional dry
erase board. You can also save your notes for later reference and share them using the SMARTkapp® app.
To learn how to use the display’s pens and eraser to write, draw and erase in Whiteboard, see Writing,
drawing and erasing on page21.
smar ttech.com/kb/171284 23

Chapter 3
Using the iQ experience
To learn how to use the other features of kapp Whiteboard, see Using the kapp Whiteboard.
Using SMARTNotebook Player
For education models only
Use SMARTNotebook Player to open, view, and interact with SMARTNotebook software files. Notebook
Player makes it easy to present SMARTNotebook files and play SMART lab™ activities on the display.
SMARTNotebook Player is also the default whiteboard for education models.
You can also install the Notebook Player app on your iOS device to view and control SMART Notebook
files from the device.
To learn more about SMARTNotebook Player, see Working with SMART Notebook files and whiteboards
on your display.
Using Browser
You can use Browser to view web sites on the display.
To learn more about Browser, see Browsing the internet on your display.
Using Screen Share
You can share the screens from computers and mobile devices on the display wirelessly using Screen
Share.
Screen Share supports the following devices:
l Chromebook™ laptops, using Google™ Cast Chrome™browser extension
l Windows computers, using Miracast
l Mac computers and iOS devices, using AirPlay
l Android™ devices, using Cast Screen
To learn how to use the other features of Screen Share, see Sharing your device’s screen to the display.
1
, Google Cast Chromebrowser extension, or AirParrot
1
Windows 10 operating system only
smar ttech.com/kb/171284 24

Chapter 3
Using the iQ experience
Using screenshots
When using the Browser or Screen Share apps, you can write or draw on an annotation layer and save the
screenshot to the Files Library.
To learn more about screenshots, see Writing and drawing over apps.
Installing third-party apps
You can install third-party apps from the Google Play Store using SMARTRemote Management.
To learn more about installing third-party apps, see Deploying third-party apps on your display.
Cleaning up the display
After you’ve finished using the display, open the launcher and tap Clean Up to clean up the display
for the next user.
To learn more, see Preparing the display for the next user.
smar ttech.com/kb/171284 25

Chapter 4
Compute Card
With the SBID-MX365, SBID-MX375, and SBID-MX386 models, you can insert an Intel Compute Card in the
compute card’s slot on the AM50 iQ appliance and then view the Intel Compute Card’s Windows 10
operating system on the display.
CAUTION
Install the AM50 iQ appliance and Intel Compute Card before turning on the display for the first time.
IMPORTANT
If you’re installing an AM50 iQ appliance in a display, make sure the display’s firmware is updated to 1.8.7
or later. The display may not function properly if the display’s firmware is not updated. See the
SMARTBoard MX series interactive displays installation and maintenance guide
(smarttech.com/kb/171257).
TIP
If the Intel Compute Card meets the minimum requirements for SMART software, you can install the
SMART software included with the display on the Intel Compute Card. For more information about
installing software, see Chapter 5: Connecting and using computers on page27.
To switch to the Intel Compute Card
Press Input on the front control panel.
1.
The Input selection menu appears.
NOTE
Inputs with devices connected are blue, and inputs without a connection are black.
2. Tap Compute Card.
smar ttech.com/kb/171284 26

Chapter 5
Installing SMART software on computers you want to connect to the display 27
Setting the resolutions and refresh rates of computers you want to connect to the display 28
Connecting computers to the display 28
Viewing a connected computer’s input 29
Using SMART software on connected computers 29
Installing SMART software on computers you want to connect to the display
The displays come with a one-year subscription for SMART Learning Suite (including SMART Notebook
software and SMART Learning Suite Online). You can download SMART Notebook software from
smarttech.com/downloads and install it on a room computer.
You can purchase additional copies of SMART software to install on other computers. Contact your
authorized SMART reseller (smarttech.com/where) for more information.
NOTE
In addition to SMART Notebook software, you need to install the following software on any computers
you connect to the display:
Software Description
SMART Product Drivers Enables connected computers to detect input from the display
SMART Ink Enables you to write and draw in digital ink over applications, files,
folders, websites and any other open window
smar ttech.com/kb/171284 27

Chapter 5
Connecting and using computers
Setting the resolutions and refresh rates of computers
you want to connect to the display
The following table presents the recommend resolutions and refresh rates for the display’s input sources:
Input source Resolution Refresh rate
HDMI 1 and HDMI 2 3840×2160 60Hz
HDMI 3 1920×1080 60Hz
VGA 1920×1080 60Hz
If possible, set connected computers to these resolutions and refresh rates. See the connected computers’
operating system documentation for instructions.
Connecting computers to the display
You can connect computers to the display and then view the computers’ input on the display’s screen.
NOTES
l To connect computers using the side and bottom connector panels, see SMARTBoard MX series
interactive displays installation and maintenance guide (smarttech.com/kb/171257).
l For full interactivity, connect a USB cable to the associated USB Type-B receptacle on the
connector panel or convenience panel (as shown in the above diagrams and install SMART Product
Drivers and SMART Ink on the connected computer).
smar ttech.com/kb/171284 28

Chapter 5
Connecting and using computers
l If your display is configured with firmware 2.0.6 (and later), you can configure the HDMI version for
each HDMI connector as either HDMI 1.4 or HDMI 2.0. This allows you to connect HDMI 1.4 devices
that are incompatible with HDMI 2.0 connectors and would otherwise appear as DVI devices, see
the SMART Board MX series interactive displays installation and maintenance guide
(smarttech.com/kb/171257).
l Your organization’s installers might have connected cables to the side and bottom connector panels
or the front control panel and run the cables behind a wall or under the floor to a desk or table where
you can place your computer.
Viewing a connected computer’s input
To view a connected computer’s input
1. Connect a device to the display’s HDMI 1, HDMI 2, HDMI 3, or VGA connectors.
NOTE
To enable touch control of the device, connect a USB cable to the associated USB port.
Press Input on the front control panel.
2.
The Input selection menu appears.
NOTE
Inputs with devices connected are blue, and inputs without a connection are black.
3. Tap the input you want to view.
The display looks for a connection, and the computer’s desktop appears on the display’s screen.
Using SMART software on connected computers
After you’ve connected a computer to the display and used the Input app to view its input on the display,
you can use the SMART software to present content and enable collaboration.
For information on SMART Learning Suite (including SMARTNotebook software), see SMARTNotebook 18.
smar ttech.com/kb/171284 29

Chapter 6
Resolving general issues 31
Resolving issues with power 31
Resolving issues with image or video quality 32
Resolving issues with audio 35
Resolving issues with touch and digital ink 35
Resolving issues with remote management 37
Resolving issues with the iQ experience 38
Resolving issues with the Intel Compute Card 38
Resolving issues with software 38
Referring to the SMART knowledge base for additional troubleshooting information 39
Contacting your reseller for additional support 39
Finding the display’s serial number 39
Finding the iQ appliance serial number 39
Finding the Intel Compute Card serial number 40
The following information helps you resolve a variety of common issues with the display, including issues
with:
l Remote control
l Power
l Video
l Image quality
l Audio
l Touch and digital ink
l Remote management
l iQ experience
l Intel Compute Card
l Software
l SMART PCM8 series OPS PC
smar ttech.com/kb/171284 30

Chapter 6
Troubleshooting
Resolving general issues
Issue Solutions
You’ve forgotten the lock screen
Contact SMARTSupport.
password.
You forgot the Settings security
Contact SMARTSupport.
password.
The display can’t connect to a 5GHz
wireless network.
The message “The boar d is not
compatiblewith the inserted iQ
The wireless network may be operating on bands that the display doesn’t support.
Contact your network administrator.
See "The board is not compatible with the inserted iQ appliance" message appears on
a SMART Board MX series interactive display.
appliance” appears on the screen.
The pen is broken. Contact SMARTSupport.
The Freeze button is not working. See The Freeze button is not working on SMART Board MX series interactive displays.
Resolving issues with power
Issue Solutions
The display doesn’t turn on and its
power light isn’t lit.
l Make sure the power cable is securely fastened to the power outlet and the display.
NOTE
If the power cable is plugged into a power bar, make sur e the power bar is securely
fastened to the power outlet a nd turned on.
l Make sure the switch on the back of the display is in the ON (I) position.
l Make sure the power outlet is working by testing it with a different device.
l Make sure the power cable is wor king by testing it with a different device.
The display turns on but nothing
l Press the Power button to wake the display.
shows on the screen.
NOTE
The status light is red when the display is in a low power state.
l If the status light is solid green, see Resolving issues with image or video qualityon the
next page.
l Restart the display.
The display doesn’t turn on when you
use a connected computer’s m ouse or
l Make sure the computer is on.
l If the status light is red, press the display’s Power button to wake the display.
keyboard.
You’re experiencing other issues with
power, or the previous solutions don’t
See Referr ing to the SMART knowledge base for additionaltr oubleshooting information
on page39.
resolve the issue.
smar ttech.com/kb/171284 31

Chapter 6
Troubleshooting
Resolving issues with image or video quality
Issue Solutions
You’re experiencing the following or
similar issues with image quality:
l There ar e lines or snow on the
screen.
l The image is flickering or
flashing.
You’re experiencing the following or
similar issues with video:
l The videois distorted.
l There is visual noise.
l The image is dim.
There ar e bright spots on the screen.
NOTE
It is norma l for some areas of the
screen to be slightly brighter than
other, but these variations should
be minor.
l Make sure the display’s firmwar e is updated to 1.8.7or later. The display may not work
properly if the display’s firmware is not updated. See the SMARTBoard MX series
interactive displays installation and maintenance guide (smarttech.com/kb/171257).
l Make sure any connected computers are on and not in Standby mode.
l Set the connected computers’ resolution and refresh rate to values that the display
supports.
l Restart the display and any connectedcomputers.
l Make sure the cable is not longer than the maximum specified in the display’s
specifications.
l Make sure the cable is securely connected to the video connectors on the display and
the computer.
l If the video connection uses and extender or goes through a wa ll socket, try connecting
the display and computer directly.
l Replace the videocable to determine if the issue is with the cable.
l Make sure the iQ appliance is securely installed in the accessory slot and its power light
is on.
l Make sure your computer’s video driver is up to date.
l Open the on-screen display menu. If it appears correctly, the issue is with the video
input.
l Take a photograph of the screen that shows the variation in brightness and send it to
SMART support. If SMART support determines that the issue is with the screen and the
display is under warranty, you may be eligible for a replacement.
l Make sure the cable is not longer than the maximum specified in the display’s
specifications.
l Make sure the cable is securely connected to the video connectors on the display and
the computer.
l If the video connection uses and extender or goes through a wa ll socket, try connecting
the display and computer directly.
smar ttech.com/kb/171284 32

Chapter 6
Troubleshooting
Issue Solutions
Colors don’t appear correctly. l Minor differences in colors across displays are common. This issue is not unique to
SMART products.
l If you’re using a VGA video input,use a different cable or connect a different source to
see if the issue is with the cable or input source.
l Make sure the cable is not longer than the maximum specified in the display’s
specifications.
l Make sure the cable is securely connected to the video connectors on the display and
the computer.
l If the video connection uses and extender or goes through a wa ll socket, try connecting
the display and computer directly.
l Perform a factory reset.
l Take a photograph of the screen that shows the issue with color and send it to SMART
support. I f SMART support determines that the issue is with the screen and the display is
under warranty, you m ay be eligible for a replacement.
The image is cut off or shifted to the
left or right.
The image doesn’t fill the entire
screen.
A persistent image appears on the
display.
The display is on, but nothing shows
on the screen.
l Adjust the connected computers’ video settings,particularly zoom, crop, underscan and
overscan.
See the computer’s operating system documentation.
l If the computer’s desktop is entirely black, change it to gray or a different color.
l If the computer’s desktop is extended across multiple screens, duplicate the desktop
across the screens or use the display as the only screen.
l Make sure the cable is not longer than the maximum specified in the display’s
specifications.
l Make sure the cable is securely connected to the video connectors on the display and
the computer.
l If the video connection uses and extender or goes through a wa ll socket, try connecting
the display and computer directly.
Adjust the connected computers’ video settings,particularly underscan or overscan.
See your computer’s operating system documentation.
See I mage persistence or burn in on LCD displays.
l Make sure any connected computers are on and not in Standby mode.
l
Make sure the screen is working by pressing Input on the front control panel and
selecting the corr ect input sour ce for your device.
l Restart the display and any connectedcomputers.
l Replace the videocable connecting the computer to the display to determine if the issue
is with the cable.
l If the video source is HDCP-protected,make sur e it’s connected to an HDMI port that
supports a compatible version of HDCP.The H DMI 3 port supports only HDCP 1.4. Be
sure to connect devices that use HDCP 2.2 to the HDMI 1 or HDMI 2 port.
smar ttech.com/kb/171284 33

Chapter 6
Troubleshooting
Issue Solutions
A computer is connected to the
display, but only a “No Signal”
message appears on the screen.
If an AM50 iQ appliance with an Intel
Compute Card is installedin the
display and a “No Signal” message
appears on a blue screen.
No image appears on a deviceyou’ve
connected to the display’s H DMI OUT
connector.
The image from a device connected to
the VGA port is cut-off or not centered.
l Connect the computer to one of the display’s video input connectors.
NOTE
In the input source menu, video input connectors that have a device connected are
blue.
l Make sure the computer is the currently selectedinput.
l Make sure the connected computer’s video connector is configured to output a
supported videosignal. See No video display output fr om a laptop.
l If you’re using two connected video cables, use one longer cable or move the computer
so it’s within a single cable length of the display.Make sure the cable length is within the
maximum length specified in the display’s specifications.
l The computer is using a video resolution or r efresh rate that the display doesn’t
support. Set the computer to a supported resolution and refresh rate.
l Make sure the computer hasn’t entered Sleepmode. Press a key on your computer’s
keyboard to wake it up.
Make sure the Windows operating system on the Intel Compute Card hasn’t entered
Sleep mode. Tap the display’s screen to wake up the operating system.
See Using a secondary display.
l Make sure the computer’s background is not a dark or solid-black image.
l Switch to a different video input source, then switch back to the VGA input.
You’re experiencing other issues with
videoor image quality,or the previous
solutions don’t resolve the issue.
See Referr ing to the SMART knowledge base for additionaltr oubleshooting information
on page39.
smar ttech.com/kb/171284 34

Chapter 6
Troubleshooting
Resolving issues with audio
Issue Solutions
You’re experiencing the following or
similar issues with audio:
l No sound is coming from the
speakers.
l Sound is coming from the
speakers, but the volume is low.
l The sound is distorted or
muffled.
A whine or buzzing sound is coming
from the back of the display.
l Turn up the computer’s volume.
l If you’re using external speakers, make sur e the speakers are turned on.
l Make sure the cables connecting the display to the computer are securely fastened.
NOTES
o
The display’s stereo 3.5 mm in connector works with the VGA input.
o
Connectingan audio cable to the display’s stereo 3.5 mm out connector
disables the internal speakers.
o
If you’re using the display’s S/PDIF out connector to connect a sound bar or
receiver for external speakers, See SMARTBoard M X series interactive
displays user ’s guide (smar ttech.com/kb/171257).
l Adjust the volume on the display and the connected computer, and make sure both ar e
not muted.
l Make sure the display is set as the default audio device for the connected computer.
See the connected computer’s operating system documentation.
l If you’re using the display’s integrated speakers, set the volume for the computer and
any running applications to 80%, and then adjust the display’s volume.
OR
If you’re using external speakers, set the volume for the computer, any running
applications and the display to 80%, and then adjust the speakers’ volume.
l If you’re connecting a computer to the VGA connector, make sure an ana log audio
cable is also connected from your computer’s audio output to the display’s analog audio
input.
l Alldisplays emit some electrical noise.Such sounds may be more noticeablewith some
displays than with others. However, if you hear noise fr om the front of the display,
contact SMARTSupport.
l Make sure all devices are connected to the sa me power outlet or power bar .
l If the computer is connected to the display with analog audio cables (for example,3.5
mm audio cable with the VGA video input), make sure you are using high-quality cables
with electromagnetic interference (EMI) protection. Make sure audio cables don’t run
alongside power cables.
l Use a digital HDMI connection for video and audio. Audio hum is far less common with
digital connections than it is with analog.
You’re experiencing other issues with
audio, or the pr evious solutions don’t
See Referr ing to the SMART knowledge base for additionaltr oubleshooting information
on page39.
resolve the issue.
Resolving issues with touch and digital ink
Issue Solutions
You’re experiencing the following or
similar issues with touch and digital ink:
smar ttech.com/kb/171284 35
l If you’re using two pens, make sure they’re at least 2" (5 cm) apart.

Chapter 6
Troubleshooting
Issue Solutions
l When users touch or wr ite on
the screen, the pointer or digital
ink appear s in the wrong place.
l Touch is not workingor is not
accurate.
l Touch control and digital ink are
intermittent.
l The display only responds to
touch on part of the screen.
l Digital ink disappear s as you
write.
l Make sure you a re not holding the pen near its tip, and that the pen is at a right angle
(90°) to the screen.
l Restart the display.
l If touch interactivity is slow, close some open applications on the computer.
l Make sure the pen nib is not worn. Replacement pens are available from the Store for
SMART Par ts (see smarttech.com/Support/PartsStore).
l Make sure you a re using a SMARTBoard MX series interactive display pen.
l Use a known working pen fr om another SMARTBoard MX series interactive display to
checkif the issue is being caused by the pen.
l Clean the optical touch sensors.
See the SMARTBoard MX series interactive displays installation and maintenance
guide (smar ttech.com/kb/171257).
l Make sure SMART Product Drivers and SMARTInk are installed and running on any
connected computers, and orient your display.
See the SMARTBoard MX series interactive displays installation and maintenance
guide (smar ttech.com/kb/171257).
l Update the firmware.
l Confirm with the installers that the computer is connected to the display with only a
single cable.
l If touch interactivity is slow, close some open applications on the computer.
l Make sure the USB cable is securely fastened to both your computer and the display.
l Make sure the USB cable is not longer than the maximum specifiedin the display’s
specifications.
l Use a USB 2.0 cable and ma ke sure it’s connected to the corr ect USB connector that’s
associated with the video input source.
See the SMARTBoard MX series interactive displays installation and maintenance
guide (smar ttech.com/kb/171257).
l Make sure the latest version of SMART Product Drivers is installed on your computer.
SMARTBoard MX series interactive displays require SMARTProduct Drivers 12.10 or
later.
See sm ar ttech.com/downloads.
l Remove any USB cable extenders. For best results, use a USB cable that’s no longer
than 16' (5 m) .
l Remove any external infrar ed light sources such as sunlight, incandescent or arc lights,
desk lamps and infrar ed audio devices or move the display to another location in the
room.
l Remove the display fr om the wa ll,calibrate it and confirm if this resolves the issue. If it
does, check the wall and wall mount for issues.
The display responds to touch but not
to writing with a pen.
l Make sure you a re using a SMARTBoard MX series interactive display pen.
l Make sure the pen nib is not worn. A worn pen nib m ight be interpreted as a finger
touch. Replacement pens are available from the Store for SMART Parts (see
smar ttech.com/Support/PartsStore).
l Reinstall or update SMART Product Drivers.
smar ttech.com/kb/171284 36

Chapter 6
Troubleshooting
Issue Solutions
The display doesn’t respond to touch
at all.
l A red X appearing on the SMART Product Drivers icon in your Windows task bar or Mac
menu bar indicates that no display is connected. I f a red X appears, open SMART
Settings and use the connection wizar d for assistance.
l Make sure any connected computers have detected the display’s USB connection and
installeddrivers. On Windows computers, open Device Ma nager and make sure there is
no red X or yellow explanation mark (!) over the display’s icon. On Mac computers, open
System I nformation and ensur e there are no error messa ges in the display’s row.
You can’t write or draw in Microsoft®
Office.
l Make sure you’re using Microsoft Office 2013 or later.
l Reinstall or update SMART Product Drivers and SMARTInk.
l Refer to the SMART Ink user’s guide (smar ttech.com/kb/171190) for more information
about inking in Microsoft applications.
You’re experiencing other issues with
touch and digital ink,or the previous
See Referr ing to the SMART knowledge base for additionaltr oubleshooting information
on page39.
solutions don’t resolve the issue.
Resolving issues with remote management
Issue Solutions
You’re experiencing general issues
with r emote management.
l Make sure all the cable connections ar e secure.
l Be awa re that some commands work only when the display is on.
l Restart the display and the remote management system.
l Configure the serial interface settings.
Usingthe command
setpowerstate=on doesn’t turn on
the display
l The display doesn’t respond to a
control command
l Commands are not followed by
a command prompt that
indicates the display is r eady to
receive the next command.
You’re experiencing other issues with
remote management, or the previous
solutions don’t resolve the issue.
l Add spaces around the operator symbol (=).
l
Ensure Power on RS232 is enabled in the display’s on-screen settings menu ( ). If the
display’s firmwar e is version 1.9.2 or earlier, disable Power saving mode in the display’s
on-screen settings menu. See the SMARTBoard MX series interactive displays
installation and maintenance guide (sma rttech.com/kb/171257) for more information.
l The display is in a Power Saving mode in which the RS-232control system is not yet
operating.
Ensure the display is in a power state in which the RS-232 control system is ready to
receive commands. Ensure Power on RS232is enabled in the display’s on-screen
settings menu ( ). If the display’s firmware is version 1.9.2or ear lier, disable Power
saving mode in the display’s on-screen settings menu.
l The display's firmware has not been updated to version 1.8.4or later. Check the
firmware version in the display's on-screen settings menu. See the SMARTBoard MX
series interactive displays installation and maintenance guide
(smarttech.com/kb/171257).
l Commands might have been incorrectly term inated with a carr iage retur n (0 x0d) a nd a
line feed (0x0a).
Terminate commands with only a carriage retur n (0 x0d).
See Referr ing to the SMART knowledge base for additionaltr oubleshooting information
on page39.
smar ttech.com/kb/171284 37

Chapter 6
Troubleshooting
Resolving issues with the iQ experience
For information on resolving issues with the iQ experience, including the Whiteboard, SMARTNotebook
Player, Browser, Input and Screen Share apps, see Troubleshooting iQ system software.
Resolving issues with the Intel Compute Card
Issue Solutions
An AM50 iQ appliance with
Intel Compute Card is
installed in the display but you
can’t select Intel Compute
Card from the Input Selection
Menu.
An AM50 iQ appliance with
Intel Compute Card is
installed in the display but you
can’t connect to a network.
Make sure the display’s firmware is updated to 1.8.7 or later. The
l
display may not work properly if the display’s firmware is not
updated. See the SMARTBoard MX series interactive displays
installation and maintenance guide (smarttech.com/kb/171257).
Make sure the Intel Compute Card is properly installed in AM50 iQ
l
appliance’s Compute Card port. Eject and reinsert the Intel Compute
Card. See Ejecting and inserting the Intel Compute Card.
The AM50 iQ appliance may have been installed after the display
l
was turned on for the first time. Restore the display’s factory
settings. See SMARTBoard MX series interactive displays
installation and maintenance guide (smarttech.com/kb/171257).
NOTE
Restoring factory settings resets all options to their default values.
Connecting the AM50 iQ appliance to a network:
o
wirelessly,
o
connect an Ethernet cable to the AM50 iQ appliance’s RJ45
jack from a network switch on the wall, or
o
connect an Ethernet cable to the AM50 iQ appliance and to the
display that is connected to a network with a wired or wireless
connection.
For information on resolving issues with the Intel Compute Card, including the drivers, see Troubleshooting
the iQ appliance (AM50) and Intel Compute Card.
Resolving issues with software
For information on resolving issues with SMART software, see the following pages in the Support section of
the SMART website:
l Troubleshooting SMART Notebook 18
l Troubleshooting SMART Learning Suite Online
smar ttech.com/kb/171284 38

Chapter 6
Troubleshooting
l Troubleshooting SMART Ink 5
l Troubleshooting SMART Product Drivers 12
Referring to the SMART knowledge base for additional troubleshooting information
Refer to the SMART knowledge base for additional troubleshooting information:
community.smarttech.com/s/topic/0TO0P000000Xt5yWAC/mx-series
Contacting your reseller for additional support
If an issue you’re experiencing with the display persists or isn’t covered in this guide or the knowledge
base, contact your authorized SMART reseller (smarttech.com/where).
Your reseller might ask you for the serial number for the display or the iQ appliance.
Finding the display’s serial number
You can find the display’s serial number in the following ways:
l Look on the bottom frame
l Look on the back of the display
l In the display’s settings, under About.
NOTE
You can access the display’s settings using the Menu button on the front control panel.
Finding the iQ appliance serial number
You can find the iQ appliance’s serial number in the following ways:
l
In the iQ settings. See SMART Board MX series interactive displays installation and maintenance
guide (smarttech.com/kb/171257).
l Look on the iQ appliance
NOTE
You need to remove the iQ appliance from the display to locate the serial number.
smar ttech.com/kb/171284 39

Chapter 6
Troubleshooting
Finding the Intel Compute Card serial number
You can find the Intel Compute Card’s serial number in the following ways:
l Look on the label on the back of the Intel Compute Card. For information about ejecting the Intel
Compute Card from the iQ appliance, see Ejecting and inserting the Intel Compute Card.
NOTE
The serial number appears after S/N.
l From the Intel Compute Card's command prompt, execute the wmic bios get serialnumber
command.
smar ttech.com/kb/171284 40

SMARTTECHNOLOGIES
smar ttech.com/support
smar ttech.com/contactsupport
smar ttech.com/kb/171284
 Loading...