

Page 1

Page 2

1
1. Contents
1. Contents................................................................................................................................................................ 1
2. Important safety instructions ................................................................................................................................ 2
3. General Information .............................................................................................................................................. 3
4. Delivery contents .................................................................................................................................................. 3
5. Description ............................................................................................................................................................ 3
5.1. Front panel .................................................................................................................................................. 3
5.2. Rear panel ................................................................................................................................................... 3
5.3. Card reader ................................................................................................................................................. 4
5.4. CI interface .................................................................................................................................................. 4
5.5. Remote control ............................................................................................................................................ 5
6. Installation (Getting started) ................................................................................................................................. 6
6.1. Connecting receiver to Antenna, TV Set, Multichannel Audio System ...................................................... 6
6.1.1. Connecting to satellite and terrestrial antenna .................................................................................. 6
6.1.2. Satellite setup .................................................................................................................................... 8
6.1.3. Terrestrial antenna setup ................................................................................................................... 9
6.1.4. Connecting to TV-set and Multichannel Audio System ..................................................................... 9
6.1.5. Connecting to the Network .............................................................................................................. 11
7. Receiver setting up ............................................................................................................................................. 13
7.1. Switching on .............................................................................................................................................. 13
7.2. Main menu ................................................................................................................................................. 13
7.3. Channel search ......................................................................................................................................... 13
7.4. Channel editor ........................................................................................................................................... 16
7.5. Favorite manager ...................................................................................................................................... 17
7.6. Electronic program guide .......................................................................................................................... 18
7.7. Media player .............................................................................................................................................. 20
7.8. Recordings ................................................................................................................................................ 20
7.8.1. Schedule .......................................................................................................................................... 20
7.8.2. Records ............................................................................................................................................ 21
7.9. System settings ......................................................................................................................................... 22
7.9.1. Language ......................................................................................................................................... 22
7.9.2. Record options ................................................................................................................................. 23
7.9.3. CI & CAS .......................................................................................................................................... 23
7.9.4. Parent menu .................................................................................................................................... 23
7.9.5. System functions .............................................................................................................................. 24
8. Receiver Control ................................................................................................................................................. 25
8.1. Channel switching ..................................................................................................................................... 26
8.2. Volume control .......................................................................................................................................... 27
8.3. Time shift ................................................................................................................................................... 27
8.4. Selection of audio track and subtitles ....................................................................................................... 27
8.5. Television, radio ........................................................................................................................................ 27
8.6. Recordings ................................................................................................................................................ 27
8.7. Channel list ................................................................................................................................................ 27
8.8. Playback window ....................................................................................................................................... 29
9. Technical Specifications ..................................................................................................................................... 31
Page 3

2
This symbol indicates important instructions accompanying the product.
This symbol indicates dangerous voltage inside the product that presents
a risk of electric shock or personal injury.
2. Important safety instructions
Please read this manual carefully before using this product.
Before connecting the AC power cord to the outlet, make sure the voltage designation of the digital
receiver corresponds to the local electrical supply. If you are unsure of your power supply, ask your local
power company.
Never insert metal parts into the cabinet openings of the digital receiver as it may cause the electric shock
danger.
To avoid electric shock, never touch the inside of the digital receiver. Only a qualified service personnel
should remove the case of the receiver.
Never use your digital receiver if the power cord is damaged. Do not leave any things on the power cord,
and keep the cord away from the place where people can trip over it.
Be sure to hold the plug, not the cord, when disconnecting the receiver from an electric socket.
Two position bi-stabile ON-OFF push-push power network switch turns the receiver on and off. Its function
is described in Installation, chapter 6. Power network switch does not turn off the receiver from power
network totally. There remain, however, some parts with voltage. It is power network plug that completely
disconnects receiver from power network. Power network outlet must be easily reached for this reason.
Batteries shall not be exposed to excessive heat such as sunshine, fire etc.
For sufficient ventilation, leave a space of at least 10cm all around the receiver.
Do not cover the ventilation openings of the receiver with newspapers or curtains etc.
Do not place naked flame sources on the apparatus (e.g. lighted candles).
Take attention to the environmental aspects of the battery disposal. Do not throw away batteries together
with the domestic waist. Use only special gathering points.
Use the apparatus only in moderate climates (not in tropical climates).
Ventilation openings are made in the digital receiver cabinet. To prevent overheating, these openings
should not be blocked or covered. Also, avoid using the receiver on a bed, sofa, rug, or other soft
surface.This can block the ventilation openings in the bottom of the cabinet. If you put the receiver in a
bookcase or some other enclosed space, be sure an adequate ventilation is provided.
Do not expose the digital receiver to extreme temperature conditions or to extreme humidity conditions.
Avoid drips and splashes. Be sure no objects filled with liquid are placed on the top of the apparatus
(e.g.vases).
Do not place the digital receiver on an unstable cart, stand, tripod, bracket, table, or floor where it can fall
down. A falling product, drops and scratches can cause serious damage to the appliance.
Do not clean the front with keton-type materials (e.g. acetone), ethyl alcohol, toluene, ethyl acid, methyl, or
chloride - these may damage the panel.
In case your digital receiver does not operate normally or there are any unusual sounds or smells coming
from it, unplug it immediately and contact an authorized dealer or service centre.
High temperature can cause problems. Don`t use your digital receiver in direct sunlight, and keep it away
from heaters, stoves, fireplaces, and other sources of heat.
Unplug the power network plug when the apparatus is left unused for an extended period of time. It is
recommended to disconnect the receiver from power network in case of a thunderstorm.
To reduce the risk of fire, electric shock or annoying interference, use the accessories recommended in
chapter 4.
If the receiver is broken, do not try to service it yourself. Contact qualified service personnel.
Unplug power cable from the AC outlet before any service.
Be sure the service technician uses authorized replacement parts or their equivalents. Unauthorized parts
may cause fire, electric shock or other hazard.
Following any service or repair, be sure that the service personnel performs a safety tests to certify that
your digital receiver is in safe operating order.
Page 4
3
3. General Information
Skyter 3D HD receiver enables receiving television and radio programs in satellite DVB-S/S2 and terrestrial DVB-T
standards. The device can be used together with an analogue or digital TV-set, audio amplifiers, home network
routers and other home devices. Skyter 3D HD is able to receive “DVCrypt” system encoded channels.
4. Delivery contents
- DVB-S/S2 and DVB-T digital receiver Skyter 3D HD 1 pc
- Remote control 1 pc
- HDMI cable 1 pc
- User’s setup Guide 1 pc
5. Description
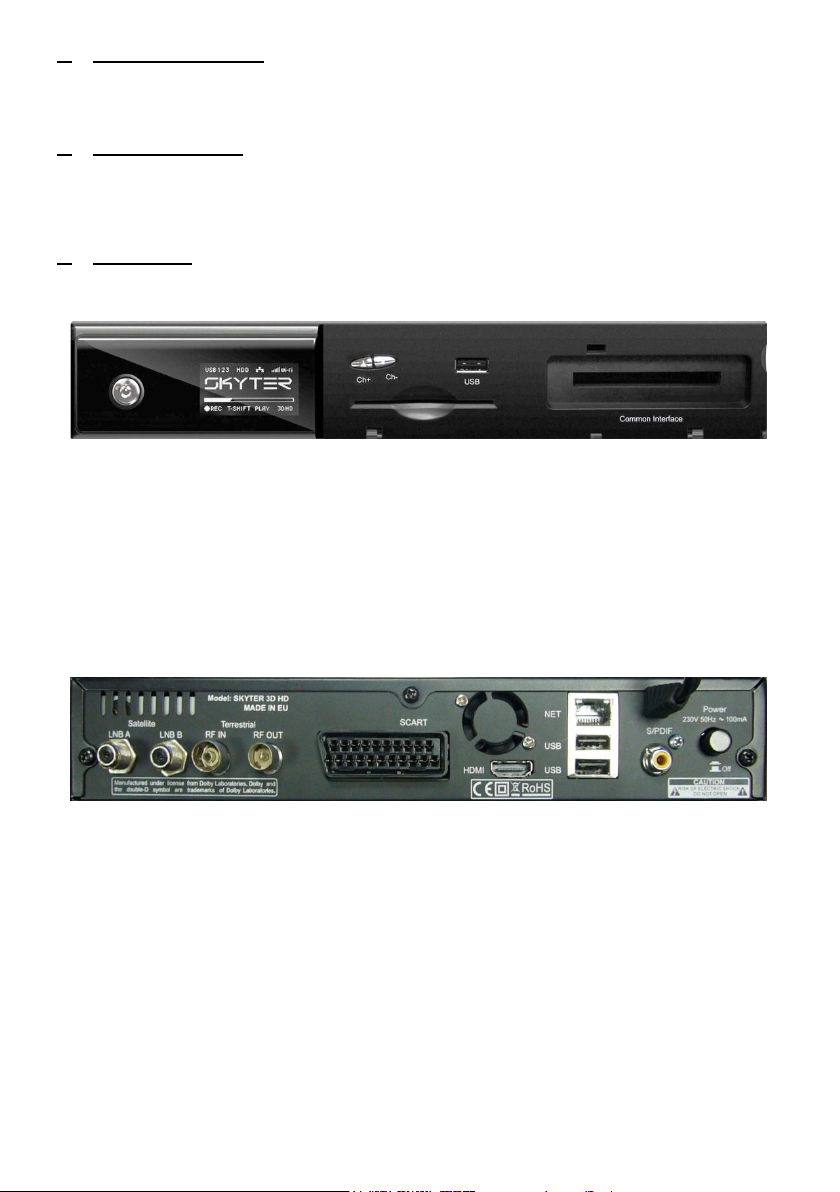
5.1. Front panel
Fig. 1 Front panel
1. Power button
2. Remote control sensor
3. Standby indicator - green is ”on”; red is “off” (standby)
4. 1,54” graphic OLED display
5. Channels up/down buttons
6. “DVCrypt” card reader
7. USB 2.0 connection „max 0,5Amp”
8. CI interface slot
5.2. Rear panel
Fig. 2 Rear panel
1. Satellite LNB A & LNB B (satellite dish A & B input signals).
It is used to connect satellite dish / dishes to the receiver. (RF cable/cables are used). In case twin LNB
configuration is used, pls use two RF cables to connect A & B inputs with the satellite dish. In case single
LNB configuration is required, pls use one RF cable connected to LNB A input. LNB A input signal is
provided for both A & B inputs. Fully protected 14/18v LNB supply and DISEq commands are provided
separately for LNB A & LNB B inputs.
2. Terrestrial RF IN (Terrestrial RF antenna input). It is used to receive RF signal from terrestrial antenna. 5v
of antenna supply is fully protected (0,1Amp current limit) and can be switched on in menu.
3. Terrestrial RF OUT (Terrestrial RF output). It is used to connect RF terrestrial antenna to other devices:
analogue TV, etc.
4. SCART. It is used to connect a receiver to a TV-set with a SCART cable.
5. HDMI. It is used to connect a receiver to a TV-set or to a multichannel sound decoder with HDMI cable.
6. NET, RJ45 Ethernet port. It is used to connect a receiver to a LAN router with RJ45 Ethernet cable.
7. USB ports. The receiver has 2 USB 2.0 interface ports „max power 1,0Amp each”. They are used for
various USB external devices connection (keyboards, HDD, etc.).
8. S/PDIF, coaxial output. It is used to connect a receiver to a multichannel sound decoder.
Page 5

4
9. Power button
10. Power cable
5.3. Card reader
1. A card reader is integrated into the receiver and enables to decode the channels encoded by the
“DWCrypt” system.
2. The channel cards are to be inserted into the card reader with the contact chip placed down.
5.4. CI interface
1. CI interface slot is integrated into the receiver and enables to decode the channels using external CI
module.
2. The CI module is to be inserted into CI slot.
Page 6
5
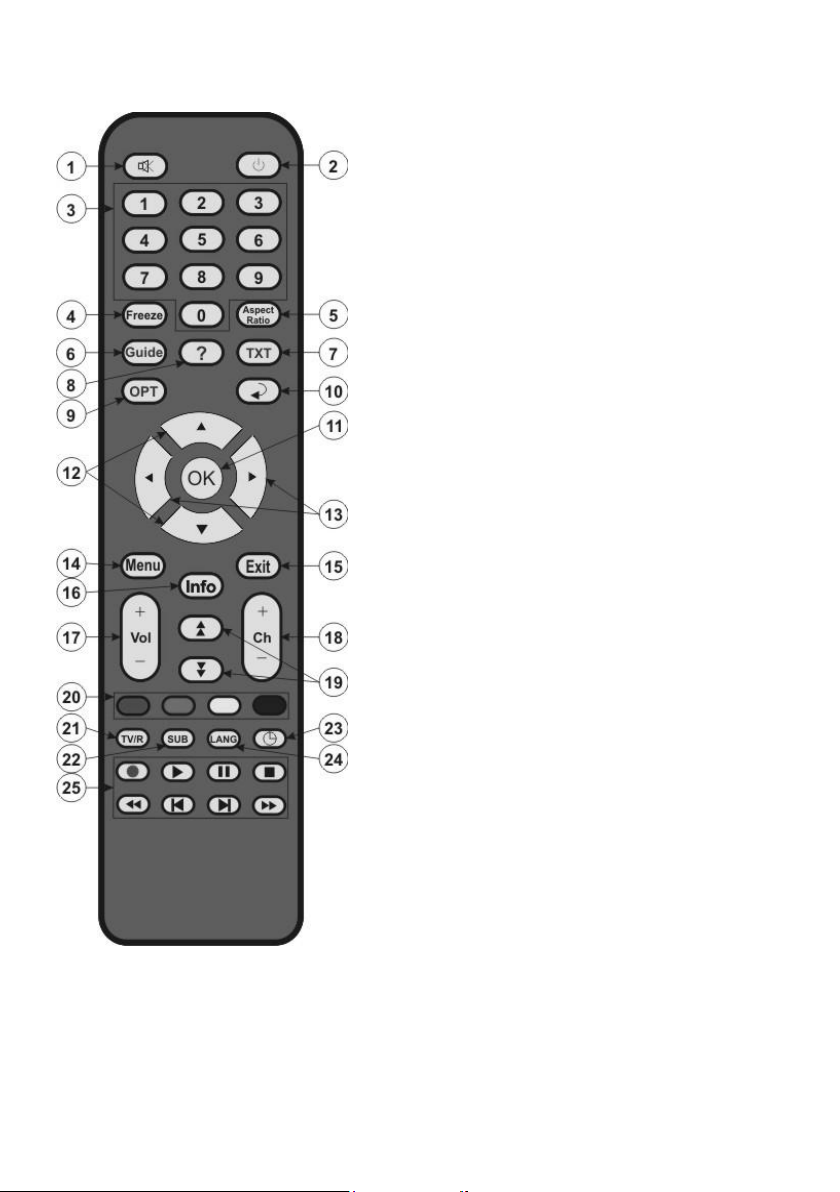
5.5. Remote control
1. MUTE
Press to turn the volume off
2. STANDBY
Press to switch the receiver on / off (standby mode) .
3. 0-9
Number buttons. Press to select TV channels, radio
channels or menu options
4. Freeze/Pause
Press to stop / play the picture in time shift mode.
5. ASPECT RATIO
Press to change aspect ratio for 4:3 video.
6. Guide
Press to show electronic program guide.
7. Text
Press to switch the teletext on / off.
8. HELP
Press to enter a help window.
9. OPTION
Context options menu. Direct access to system
settings menu.
10. RETURN
Press to switch back to the previous channel.
11. OK
Press to display the channel list or confirm the choice
in the menu list.
12. /
Press to change the displayed options and channels
to be selected.
13. /
Press to enter / navigate on time shift mode.
When “menu” function is active – press for left / right
line movement .
14. MENU
Press to open / one step back the menu tree.
15. EXIT
Press to exit from the menu. Changes are not saved.
16. info
Press to display relevant information about the current
channel or program on the TV screen.
17. VOL + / -
Press to increase / decrease the volume.
18. Channel + / -
Press to switch the channels.
19. Page up/down
Press to page up/down on various menu list.
20. Coloured (hot buttons)
Red, green, yellow, blue buttons can be programmed
to control the most frequently used functions. Contextdependent buttons.
21. TV/Radio
Press to switch from DVB television, IP television or
radio channel mode and back.
22. Subtitle
Press to turn the subtitles on/off.
23. Timer
Press to enter a schedule recording menu.
24. Language
Press to select an audio track.
25. Media player keys
Press for media player control.
Fig. 3 Remote control
Page 7

6
6. Installation (Getting started)
Please read this manual before installing the receiver
Place the receiver close to a TV-set or any other home devices to connect them together using the cables available
in the set. The following important rules must be followed:
- Do not place the receiver close to heat sources.
- Do not place the receiver close to radio waves emitting devices (e.g. mobile phones)
- Place the receiver in the direct access of the remote control
- All plug connection must be done before receiver plugged in to mains power outlet
6.1. Connecting receiver to Antenna, TV Set, Multichannel Audio System
6.1.1. Connecting to satellite and terrestrial antenna
Skyter 3D HD is equipped with two independent DVB-S/S2 inputs LNB A and LNB B accordingly. Depending on your
satellite dish installation, you can use single, dual/twin LNB & cable or Unicable (TM) configuration. In case you have
twin LNB and cable installation or Unicable (TM), each tuner can select any satellite signal independently. In case of
single cable LNB connection to LNB A input, signal for both tuners loops internally. The type of satellite dish
installation is selected in MENU>Settings>System settings>Antenna setup>Satellite LNB configuration>LNB
connected. See Fig. 5.
Fig. 4 Connecting to antennas, network and TV
Page 8
7
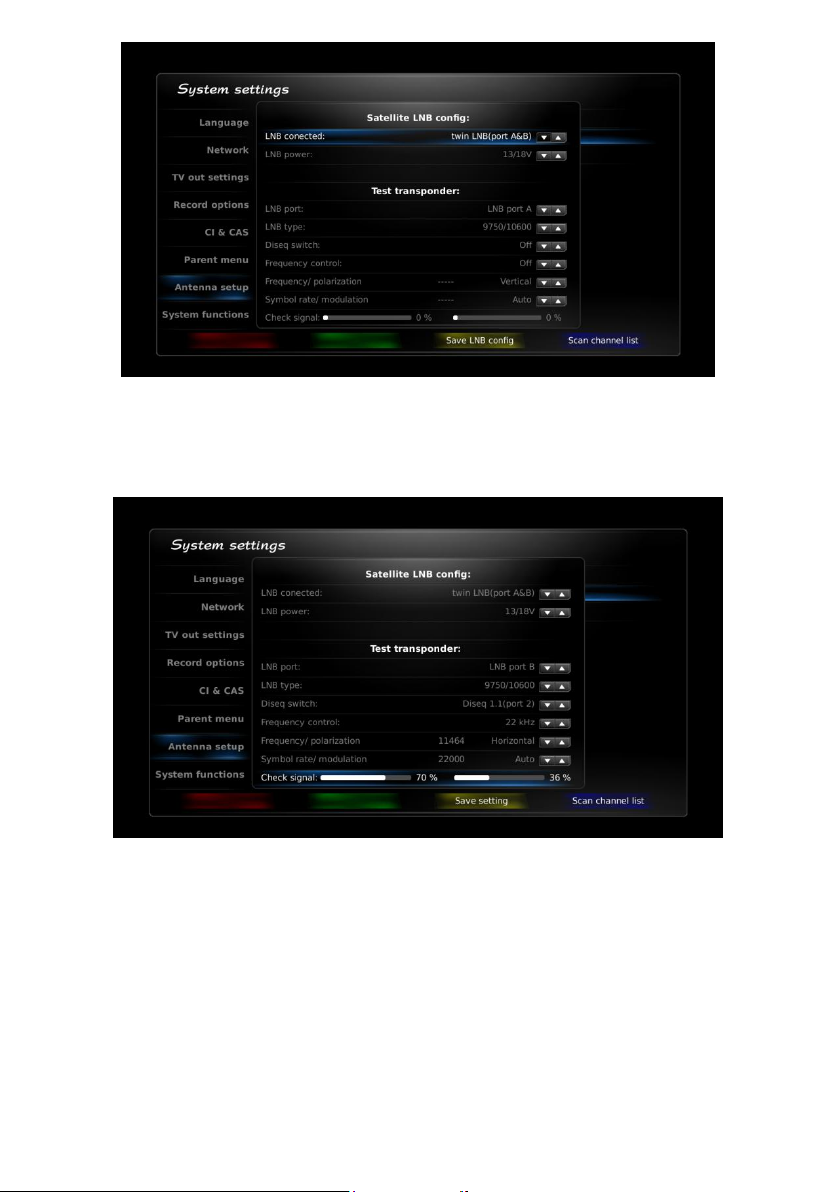
Fig. 5 Satellite LNB configuration
During satellite dish LNB and cables installation you can easily check the signal and the list of the channels available
on the selected frequency by entering test transponder parameters into the Test transponder section in the
Satellite LNB configuration window. Then move the cursor on the “check signal” line and the STB starts tuning on
the test transponder parameters.
Fig. 6 Satellite LNB configuration, check signal
In case the signal was successfully locked, you can quickly scan the programs on the selected frequency by
pressing the blue button. It helps to identify the satellite (See Fig 6). The programs list is seen on the screen and is
not saved. As soon as you finish LNB configuration, press yellow button to confirm and save your configuration. Pls
note, that test transponder parameters are not saved.
Page 9
8
Fig. 7 Satellite LNB configuration, programs quick scan
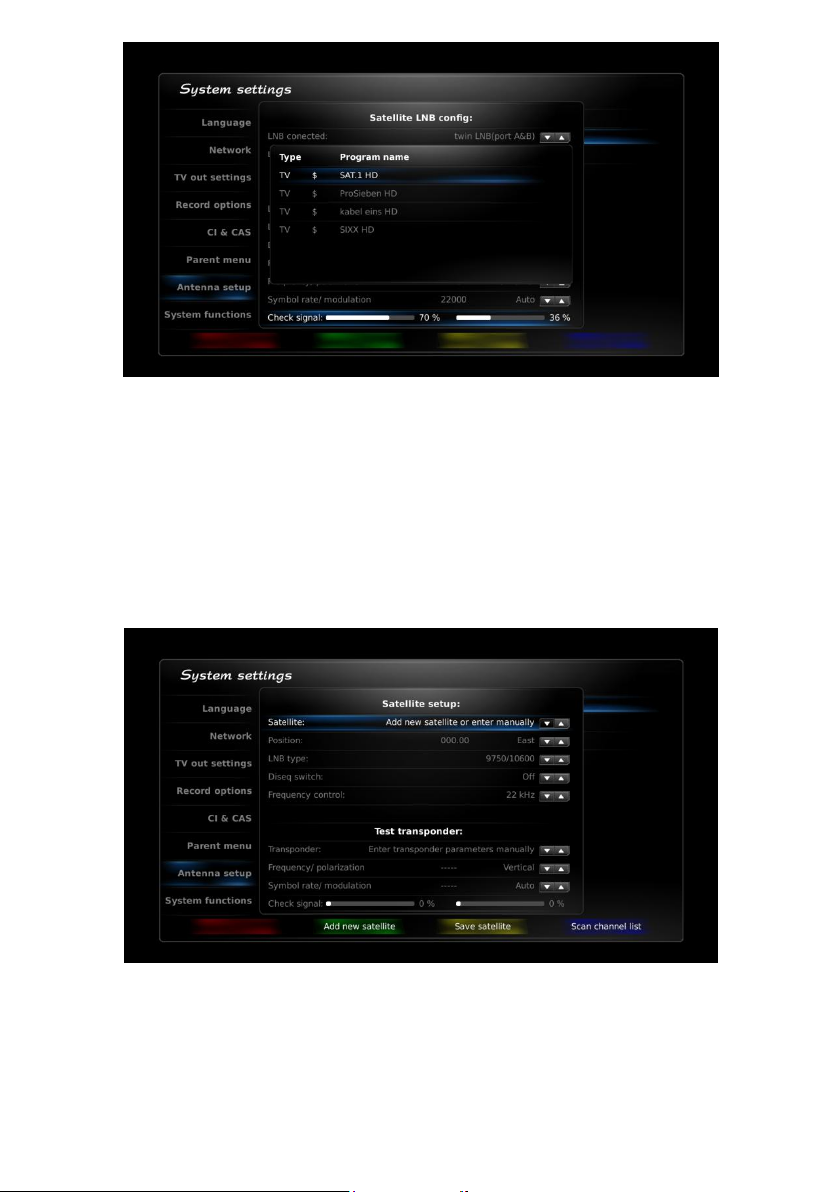
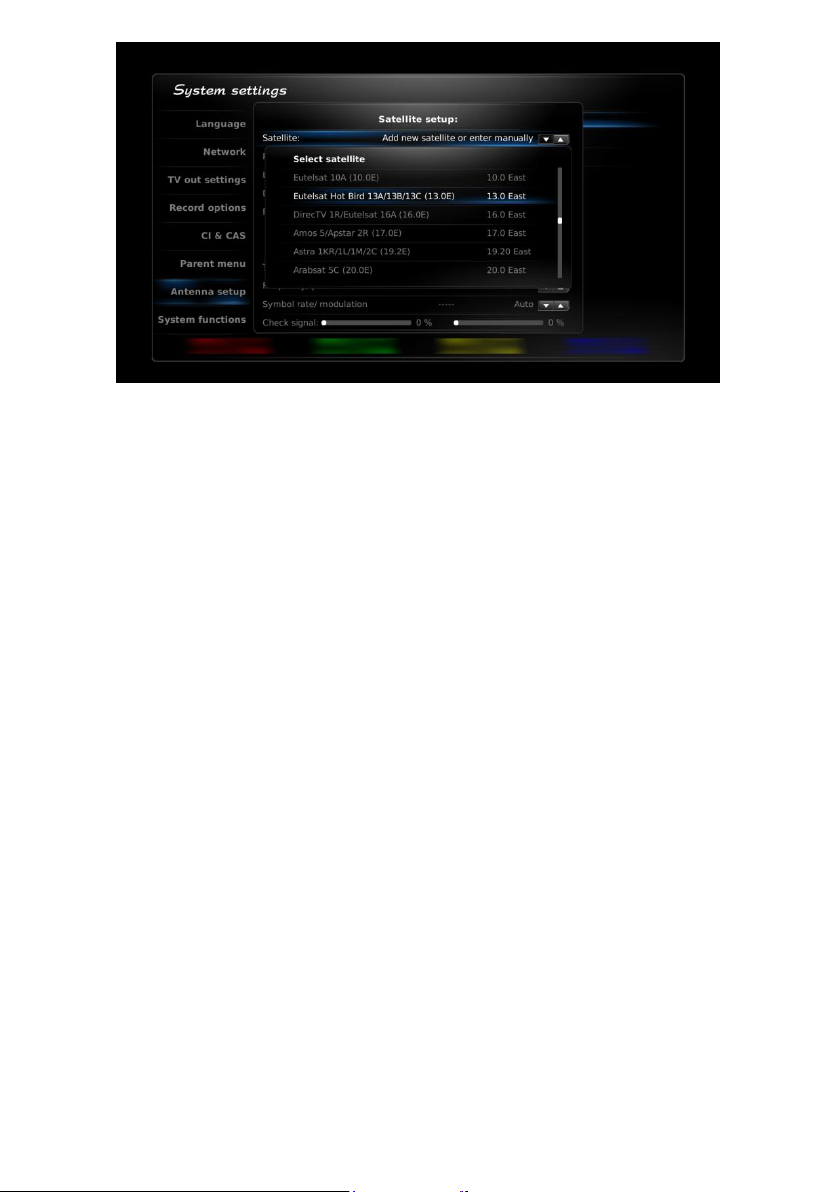
6.1.2. Satellite setup
Before start the program search, add you dish system installation satellite, you plan to search programs on.
MENU>Settings>System setting>Antenna setup>Satellite setup. Press green button to select a satellite from the
list. Then insert the satellite dish installation parameters (LNB frequency type, Diseq port or none, frequency control).
During the satellite installation you can easily check the signal and the list of channels available on the selected
frequency by using menu’s Test transponder section. If a signal is successfully locked, you can quickly scan
programs from the selected transponder by pressing blue button. It helps to identify the satellite. See Fig 8 and Fig
9. No information is saved this time. When the Satellite configuration is finished, press yellow button to confirm and
save you satellite configuration. When a screen keyboard opens, please type or confirm the satellite’s name and
press “ok”. A new satellite is now added to the list. You can edit or delete it from this menu using a yellow button.
Fig. 8 Satellite list
Page 10
9
Fig. 9 Adding a new satellite
6.1.3. Terrestrial antenna setup
Terrestrial antenna is connected to RF IN input. If your antenna is equipped with an amplifier (active antenna),
Skyter 3D HD can supply voltage to power it. It is selected by MENU>Settings>System setting>Antenna
Setup>Terrestrial antenna setup>Antenna power. The supply voltage is 5volt and 100mAmp current. You can
easily install your terrestrial antenna by setting your region transmitter frequency and tune position of antenna by
looking on the signal bar. Press yellow button to confirm and save you configuration.
6.1.4. Connecting to TV-set and Multichannel Audio System
Two ways are possible for connecting a receiver to a TV-set - with HDMI or with SCART cable.
HDMI is more preferable as it gives you a possibility to get HD quality on a TV screen. By default, Skyter 3D HD
reads EDID table of the supported formats from the connected TV-set and install a TV mode accordingly. You also
can adjust the modes manually, but be careful – some modes can not be supported by your TV-set and no picture is
available. In this case connect a TV-set with SCART cable (SCART signal is always available), choose HDMI video
menu and set AUTO EDID mode ON. AUTO EDID set ON means that the receiver reads EDID table from the
connected TV-set and set up a resolution. If a frame rate is the same as video content being played, the picture
quality is the best possible. If a video content resolution and frame rate is not supported by the connected TV-set
(no equivalent mode is available on the EDID table read) Skyter 3D HD selects the nearest possible mode,
supported by the connected TV-set.
Page 11

10
If a user does any changes in MENU>Settings>System setting>TV out settings>HDMI video, he needs to press
APPLY button to get the immediate effect. If AUTO EDID option is selected ON, a resolution and a frame rate
selected are used by the receiver as the initial setting mode only. If AUTO EDID option is selected OFF, a resolution
and a frame rate selected are used by receiver permanently. In some cases (eg TV-projector) EDID connected
monitor has 1080p format but doesn’t have 1080i. In most cases if a TV-set supports 1080p, it usually supports
1080i as well. If Forced to 1080i for interlaced is selected ON, the system sets HDMI for 1080i even if EDID has
1080p (not 1080i) .
Fig. 12 Connecting to a TV-set and Multichannel Audio System
Fig. 13 TV settings and HDMI video configuration
Page 12

11
You can also select the type of audio signal to HDMI and S/PDIF output. PASS THROUGH means that the receiver
delivers selected audio track in compressed mode on the selected output. Decoded stereo PCM means that the
receiver delivers selected audio track in decoded stereo mode on selected output. Due to limited number of audio
codecs integrated, not all audio signals have audio signal in Decoded stereo PCM mode. You can select HDMI
Audio out on MENU>Settings>System setting>TV out settings>HDMI audio and S/PDIF out
MENU>Settings>System setting>TV out settings>S/PDIF separately.
You can also control the equipment connected via HDMI cable. TV or AV receiver supports CEC. If CEC is selected
ON, the receiver switches ON TV and AV receiver, connected via HDMI. If an option Force TV stand-by is
selected, the receiver switches off all connected equipment as well. Pls note that Control TV volume option is not
mandatory for most TV-sets, and is usually supported only by AV receiver.
Option Convert 4:3 SD video works only for SD video with 4:3 aspect ratio. If NO is selected, no conversion
happens. If ON is selected, the system converts 4:3 video material in to 16:9 screen to keep to right geometry. If
scale is selected, the system fits video material as is.
Fig. 14 TV settings and HDMI audio configuration
6.1.5. Connecting to the Network
Skyter 3D HD is equipped with 10/100Mbit LAN and 150Mbit WLAN interfaces. In MENU>Settings>System
settings>Network you can see the available network and connection.
Page 13

12
Fig. 15 Network list
If a LAN cable is plugged into the network, you can see actual link speed. By selecting a corresponded network
connection, you can connect to the selected WLAN Access Point (AP). Press OK to see or adjust network setting.
The receiver requests AP for connection. If it is a password protected network, the screen keyboard opens for
password input. The receiver remembers the passwords for the few last successfully connected AP and next time
connects to it automatically. To delete a stored password of the selected Access from the database of the receiver,
select “Forget Access point” option. Press blue button and enter the name of the hidden WLAN to connect it.
In case 3G modem is attached to USB port, the PPP (modem) line appears on the network list. Pls note, that a
modem can be connected only to rear USB ports due to power requirement. Both rear USB ports can supply 1Amp
current and Front USB port can supply only 0.5Amp. By selecting PPP connection you can also scan, connect and
change the available option for 3G/GSM connection. Pls note, that not all types of modems are supported by the
system software. The supported modems are listed on the website. Press red button to select default connection
internet route. In case the default connection is available, the receiver links to internet via this connection. If the
default connection is not available, the receiver tries to link internet via any other available network connection. LAN
is always preferable in this case. Press yellow button to switch OFF WLAN adapter completely. Press green button
to check if an internet connection is available and to see the actual network internet route.
Fig. 16 Network connection menu
Page 14

13
7. Receiver setting up
7.1. Switching on
Plug the receiver into a power outlet. After the advertising screensaver, the installation guide is displayed on the TV
screen. Select menu, language, time zone and the receiver starts terrestrial channels auto scanning. You can press
EXIT button to stop this dialog. All selections saved during the dialog can be changed later in the main menu.
7.2. Main menu
The main menu includes a lot of settings for the receiver configuration. Press MENU button on the remote control to
enter the main menu. Press / buttons for Menu lines selection. The selected line is highlighted. Press OK to
enter the selected menu line window. Press MENU to return back to the previous menu window. Press EXIT to exit
from the main menu. To enter the settings and recordings sub menu , select relevant line and press right button.
Fig. 17 Main menu
7.3. Channel search
After a new satellite is added, you can search programs on it.
For automatic satellite search MENU>Settings>Channel search>Satellite Auto search, the receiver requires the
list of transponders on the selected satellite. Thus, during automatic satellite search the receiver searches channels
according to the transponder list only. You can add new transponder data, save them, edit them or delete them on
MENU>Settings>Chanel search>Satellite transponders. See Fig 18.
Page 15

14
MENU>Settings>Channel search>Satellite auto search you can select a satellite from the list of previously added
ones and scan channels either on the selected transponder only or on all transponders available. Press blue button
to check the list of channels available on the selected transponder. (no information is saved). You can also select
network scan ON. In this case, when channels search is finished on the selected transponder, the receiver checks
NIT table. In case NIT table is available, the receiver takes the transponders table from NIT and search channels on
these transponders as well. If you select search style = update, the system adds new found channels. Alternatively,
if you select complete search, the system deletes all channels from the selected satellite and replace them with the
newly scanned. If you select style = full, the system updates all channels only from the scanned transponders. You
can also set up various filters. Filters help to mark scanned channels for their future storage in the database of the
receiver. Press red button to start the search.
Fig. 18 Satellite transponder
MENU>Settings>Channel search>Satellite Manual search searches the channels on the selected transponder by
entering it manually See Fig 20. The tuner is loaded by all tune parameters when you move the cursor to the Level
position. The search options are the same as for the auto search.
Fig. 19 Satellite auto search
Page 16

15
Fig. 20 Manual search
For Terrestrial channels search the Terrestrial antenna is needed to be plugged in first. By Terrestrial search menu
MENU>Settings>Chanel search>Terrestrial search you can select the programs manually (by channel frequency)
or automatically (by all terrestrial band) search.
As soon as channels search is finished, the list of the programs is displayed in the programs extract window. See
Fig 22.
Filters, set up in the search window, make the system sort the channels in the list. Press OK to select programs in
the list.( See check box on this screen.) Only selected programs are saved into the system database.
Fig. 21 Terrestrial search
Page 17

16
Fig. 22 Channels search
When search is finished, press red button to save search results or changes, or press EXIT button to exit
from the search window without saving search results or changes. In the latter case, pop up window
“Waiting…” is displayed on the TV screen. Please wait for a few seconds for the system to save the search
result into the channel database.
Fig. 23 IPTV provider setup
For IPTV setup a new IPTV provider is needed to be added. Select MENU>Settings>Chanel search>IPTV setup,
add a new provider and set it up. You can select various types of IPTV Meddleware or just load a play list from the
file. The list of created IPTV operators is available in the menu. You can temporary activate or desactivate any of
them.
7.4. Channel editor
Select the MENU>Settings>Channel editor. You may move, sort, rename or lock the channels you consider as
inappropriate for your children in this manager window.
The channel list and the colored buttons which have the same function as those on the remote control are displayed
in the Channel editor window. Press buttons 0...9 on the remote control to select the desired channel. Press /
Page 18

17
buttons to move from one channel to another and back. Press / buttons to jump every twelve channels.
Press EXIT button to exit from the channel manager window.
As soon as the programs search is finished, the channels are displayed in the sequence they are transmitted by a
broadcaster. Press red button Sort on the remote control to sort the channels according to the offered criteria. The
sorting criteria query will be displayed on the screen. Press / buttons to select the desired option. Press OK
button to confirm your choice.
If you want to lock the selected channel, press green button Lock on the remote control. The request Enter
password appears on the screen. Default password is 0000. Enter the password and press Apply. The lock icon
appears next to the selected channel. To unlock a channel, press green button and enter a password. When you
exit from channel manager window, the receiver always requires to enter a password when turning on the locked
channel. There is no possibility to bypass this feature, because having locked at least one channel, the programs
search and defaults are automatically locked and may be unlocked only after entering a password. For more
information regarding locking the receiver and changing the password refer to chapter 7.9.4 Parent menu.
There is the option to rename programs. As soon as programs search is finished, the programs are presented in the
channel list under the names transmitted by a broadcaster. If you want to give your own name for a selected
program, press the yellow button Rename. Keyboard window and the line for entering the desired name of a
program are displayed at the TV screen. Press / and < / > buttons on the remote control to select letters and
functions, and press OK to enter the selected ones. Press Enter key on the keyboard to save a new program name
and then press OK.
If you want to change the order of the channel in a channel list, choose a channel and press OK button. Icon with
arrows appears next to the selected channel. Press / buttons to move the channel up or down in the list. Select
a new place for the channel and press OK to confirm. To exit from the channel manager the system will ask you to
confirm the changes made. Then, the system saves the changes into the database.
Fig. 24 Channel editor. Move
7.5. Favorite manager
Select the line MENU>Settings>Favorite editor from menu and press OK button. This editor allows to add
channels into four default channel lists: News, Movie, Sport, Other. Alternativel, you can also add new lists (max 16
in total ) or edit the name of any. You can also delete any newly added list except four defalt ones.
Page 19

18
Fig. 25 Favorite editor
Favorite editor window shows the channel list and colored buttons duplicating the functions on the remote control.
The background image is the channel played at the moment To select the desired channel, press buttons 0...9 on
the remote control or press / buttons to move from one channel to another and back or press /
buttons to jump every twelve channels and press OK.
E.g. You‘d like to add ProSiben HD and SAT.1 HD channels to the News list. Select ProSiben HD channel, then
select SAT.1 HD(both will be marked by blue dots), press green button on the remote control, pop-up window opens,
select News list and press OK.
Favorite editor on the right side shows the avalible lists and indicates the current one. If you like to delete ProSiben
HD from the News list, press right button to move the cursor to the right of the window. Then select News list and
press OK. Now the News list is selected as the current one and is displayed on the left side of the window. You
can move to the left of the window, select ProSiben HD, press OK to switch to this channel, then press red Delete
button. ProSiben HD channel is now deleted from the News list only.
Pls note that if you delete any channel from All Channel list, this means you delete this channel completly. The
channel is deleted from all lists and STB memory. To get it back you need to search the channel on the transponder
again.
You can also use yellow/blue button to select the channels in the current list. Then you can delete or add them into
other lists.
If you move focus to the right of the window you can delete, add or edit names to the lists. Pls note, that first four lists
are default ones and can‘t be deleted. If you press green or yellow button, the keyboard appear for you to move the
cursor on the keyboard and press OK on the selected letters. As soon as you are ready, move the cursor on Enter
button and press OK.
7.6. Electronic program guide
Press OK button to select GUIDE line.
Page 20

19
Fig. 26 Electronic program guide
The background image of the channel watched at the moment and the channel list is displayed in the Electronic
Program Guide (EPG) window. Programs schedule Information on the current channel is displayed on the right of
the window, the channel list is on the left of the window. Press / buttons on the remote control to select the
desired channel.
Press > / < buttons to switch to right/left part of the window. Press / buttons to navigate inside the programs
schedule. Press REC button to select the program scheduled for recording (see section 8.2.1).
Press TIMER button to select the program scheduled as reminder. Receiver switches to the selected channel at the
time when the program starts.
Press Info button to see the Information about the program selected.
Fig. 27 Electronic program guide. Info
To go back from EPG window, press MENU; to exit from menu window, press EXIT.
Note
EPG information is visible only if a broadcaster provides it. Otherwise, the word “Unavailable” appears
Page 21

20
7.7. Media player
You can access the internal HDD or external USB storage using media player menu MENU>MEDIA PLAYER.
Select this menu to display the list of the connected devices and the available UPNP/DLNA network servers. You
can press INFO button and see the disc information. Select the one you need using the cursor, press OK and you
can browse files on this device. Press OK button to play the files with the supported content. During the playback
you can use </> button to search inside the played file. Search progress bar appears at the bottom of the screen.
Press INFO button and see the media file information.
Press INFO button on disk to retrieve disk information.
7.8. Recordings
This menu allows to operate the current records and to schedule future records.
Fig. 28 Recordings.
7.8.1. Schedule
This menu allows to schedule your record tasks.
Press MENU>RECORDINGS>Schedule and press OK to enter the Recordings schedule window. In case you
schedule the records in GUIDE menu, they are displayed as new record tasks in the recordings schedule window.
You can delete, edit or add new recording tasks. Use green button to sort the tasks in the list.
Program/title. The record task is scheduled according to the channel name and program name criteria.
Date/time. The record task is scheduled according to first start time and date criteria.
Duration. The record task is scheduled according to records duration criteria.
Mode. The record task start is scheduled (single, weekly, daily).
Status. „Scheduled“ status means the record is planned.
„Stopped“ means nothing is done with the planned record.
„Running“ means the record is in process now.
You can edit any field to sort the records task by pressing yellow button. Then press Apply to save the changes.
Press blue button to add new record task.
Press red button to delete any task even if it is in „running status“. In this case the recording is stopped immediately
and a partially recorded stream is saved. Executed single mode tasks are deleted automatically from the task list.
Press STOP to stop all running tasks .
Page 22

21
Fig. 29 Recordings schedule.
7.8.2. Records
This menu allows to operate with the records done by the receiver. Press MENU>RECORDINGS>Records and
press OK. Records window is open. The list includes all new records (scheduled and immediate). Program/title channel name and program name of a recorded content criteria.
Date/time- record start time and date criteria.
Duration – record duration criteria.
Status: “recorded” means - recorded but not viewed.
“viewed” means recorded and viewed (at least one second of video has been played).
“archive” means archived to keep this video for future play back.
“locked” means password is requested for future play back.
At the bottom of the window the selected records program title extension is provided.
Press Info to see complete program/title information for the selected record.
Press blue button to select records for future activation – blue dot mark appears.
Press red button to delete the selected or current records.
Press yellow button to change the status of the selected or current records.
Use green button to sort the records list.
Fig. 30 Recordings, records.
Page 23

22
Fig. 31 Recordings, records, info
7.9. System settings
This main menu window allows you to change the receiver system settings by customizing it.
To select sub menu in the System setting window, select the requested sub menu and press right button to enter it.
Fig. 32 System settings
7.9.1. Language
MENU>System settings>Language This function selects user’s menu language and provides adequate sound, title
and text languages. All languages can be selected separately. Choosing each language, you can select an
additional (alternative) language in case the language selected by you is not available. In case a broadcaster fails to
transmit the languages selected, audio, title and text language will be the original language of broadcaster’s
transition. System scans the program and selects audio and text language according to the menu setup. During the
channel play back you can select another audio and text language and the system remembers your choice.
Page 24

23
Fig. 33 Language
7.9.2. Record options
MENU>System settings>Record option you can change options for record functionality.
Continuous time shift function – “yes” means the system starts to record video stream 5 seconds later after
channel is on. Press left button to search recorded video. Press right button to return to real time.
Time shift max file size – you can select the max size of video stream data recorded in time shift mode.
Delete marked records older than – each time booting system checks the records database and delete records
with “played” status older than selected in this option. If you want to save records for long, you can change their
status to “archived”. Press yellow button to confirm and save all the changes made in this menu.
Fig. 34 Record options
7.9.3. CI & CAS
MENU>System settings>CI & CAS This menu gives you an access to CI module menu and DWCrypt conditional
access system. CI menu is available only if CI module is attached. The structure of CI menu is generated by the
attached module. DWCrypt menu is available only if a compatible smart card is inserted.
7.9.4. Parent menu
MENU>System settings>Parent menu allows you to change the password, to set an age limit so that any
Page 25

24
program classified above this age by a broadcaster is restricted, and to lock the menu.
To change the parent menu settings, enter the password. Default password is 0000. Change the default password
when you enter the parent menu for the first time. Enter a new password consisting of 4 numbers, enter it again to
confirm and press “apply”.
Do not forget your password. Otherwise, to unlock the menu, you need to apply to the service companies
for receiver software rewriting.
Fig. 35 Parent menu
Broadcasters usually provide information on age limits for each channel. Child age line allows you to set the child
age for watching age-restricted channels. If the age set is less than the age specified by the channel broadcaster,
the channel is automatically locked. Every time you turn on this cannel, the system requests to enter the password
to unlock it. Programs search and default menus are automatically locked as well.
This function also locks all menus which allow settings changes or the receiver options changes – channel search
menu, system setting menu, favorite menu, channel manager menu. Enter the password to access.
7.9.5. System functions
Check SW update from USB
You can update you software and download the latest available version from www.skyter.tv. Create NXP folder on
the USB flash drive. Save the file with updates on USB flash drive inside nxp folder. Attach it to system. Select this
menu option and the system scans USB flash drive and shows the available software. Pls note, that any attempts to
update the system with any not official software cause No Warranty case!
Backup channel database
You can save and download you setting and channel base back into system.
We recommend you to save you channel database each time before the system software update. You can always
restore you channel list and settings in case the system database format changes during the update.
Standby mode
Standby mode. Active STBY means that CPU is permanently in load by OS(Operational System) and is capable for
immediate operation, only tuners and peripherals are partially switched off. Active STBY provides less power saving
but faster wake up.
Passive STBY mode means that CPU is shut down and only standby controller is alive. Some time is needed to
wake up the system and to load the OS (Operational System). In passive mode max power is saved (less 1Watt.) In
case Stand-by mode is selected passive and you press off button on the remote control, the system switches on the
active mode immediately. If no further action follows on the local keyboard or on the remote control within the next
10 sec, the system switches into passive mode and CPU shuts down. Quick wake up is possible within 10 sec active
mode. If no signal follows, the system goes to Standby mode after the selected time.
System time
System time setting (correction) is provided automatically. You can select the option to “synchronize from the
internet or DVB”.
Page 26

25
In case the Internet is selected, the system boots and searches ntp server. If the server is inaccessible, the system
synchronizes the date and the time from the first selected DVB channel. The system continues checking ntp server
every 10 sec, and as soon as the server is accessed the system synchronizes the date and the time from the
internet again.
In case DVB option is selected, the system synchronizes the date and the time from the first selected DVB channel
and then from the channel selected in the menu.
Time zone and Daylight saving time must be set correctly in the system Time window. It is recommended to select
local programs. When all settings are entered, press Apply. The time is synchronized and the window is closed. The
time shown by set-top-box is always accurate and is corrected in winter and summer periods. If you don‘t want to
save time settings, press Exit button to leave menu.
Location
System obtains you location based on IP address or it is selected manually.
Defaults
In case you have made too many settings in the receiver and it is difficult to restore some undesired settings or some
wrong settings have appeared in your receiver, you can restore defaults. Select Defaults line and press OK. The
defaults are restored and installation guide appears on the TV screen.
System reboot
Select this option to reboot system any time needed.
Fan speed mode
You can select fan speed three options. “Auto” means that fan speed depends on the system temperature.
Format HDD
HDD is factory format. If you change HDD, use this option to format it again.
Media server setup
Skyter media server can be found in your home network together with other connected media playback devices.
Select Media server as “yes”. Now it is seen in your home network by your media playback equipment (PC or
SmartTV). This allows you to play records and see live channels in the corresponding folders. Select Media server
name option to change the name of your Skyter in the network.
Select Renderer enable ON if you want the receiver to play directly from UPNP connected device media content.
Eg tablets etc.
IPTV server enable set ON - your receiver works as IPTV server.
Play list is available at http://receiver_ip/iptv.xml
Fig. 36 Time.
8. Receiver Control
The receiver is controlled by the remote control and the front panel keys, see 5.5: Remote control and front panel
keys Fig1. Press STANDBY button or power button on the front panel to turn the receiver on and off. When the
receiver is on, light-emitting diode on the front plate of the receiver is off, and when it is off, the diode is red. The
receiver can also be turned on by pressing any 1...9 buttons. If the receiver is turned on by pressing STANDBY
Page 27

26
button, the last active channel is displayed, and if it is turned on by pressing one of 1...9 buttons, the selected
channel is displayed.
8.1. Channel switching
To turn on the desired channel enter the number of the channel assigned in the channel list pressing 0...9 buttons,
or press / buttons to switch the channels or use channel keys on front panel. while switching the channels, the
infobar appears on the TV screen.
It contains the following information:
1. Type of channel: S-satellite, T-terrestrial.
2. Number, name of the channel watched at the moment.
3. A current broadcasting program name (if a broadcaster has provided such information).
4. Name program of the next broadcasting (if a broadcaster has provided such information).
5. Name of the cannel list which is on.
6. Transmitter’s name.
7. Provider’s name.
8. Current time.
9. Program progress bar: the current program time position.
10. Status icon, DVB signal and signal power.
11. Info icon, IPTV buffering low. Indicate low data flow from server.
12. Status icon, Mute.
13. Info icon, Archive available. Indicate that current program has archive.
14. Status icon, media server active connection.
15. Info icon, multilingual program.
16. Status icon, Schedule recording running indicator
17. Info icon, Teletext available.
18. Status icon, time shift play/pause running
19. Info icon, Dolby audio indicator.
20. Status icon, Immediate recording running
21. Info icon, Pay TV channel indicator.
22. Info icon, HD content indicator.
23. Program progress bar: time till end of current program.
24. Current date
Fig. 37 Infobar
Page 28

27
Press INFO to call the info bar, and double press EXIT button to close it. Double press INFO to see the detailed
information on the program broadcasted. This information requires comprehensive description and is necessary for a
broadcaster, when the problems of video or audio quality occur. That’s why this manual doesn’t include its detailed
description.
8.2. Volume control
Use - / + buttons to control channel volume. The indicator shows the volume set level and appears on the TV
screen. Press MUTE button to turn the volume off, if necessary. “Volume off logo” appears on the TV screen. Double
press MUTE button to turn the volume on again.
8.3. Time shift
Press FREEZE button to enter time shift mode. Picture is paused at that moment, the time shift/pause icon appears
on the screen. Press FREEZE again and video is playing again with the time delay. Time shift/playback icon appears
on the screen. To see the time delay length press INFO. The search line appeas on the screen. Use / keys
to move inside the time shifted video. Press / keys to jump 1 min back/forward. Press I / Ikeys to
jump 5 min back/forward. Press stop to return to real time mode.
8.4. Selection of audio track and subtitles
You can quickly select an audio track (in the desired language) by pressing LANG (LANGUAGE) button. The
window with all available languages appears on the screen. Use / buttons to select and press OK to confirm.
If there is subtitle information, you may turn it on, turn it off or select the language by using SUB (SUBTITLE) button.
It is the same as the language selection.
8.5. Television, radio
Channel mode such as DVB television, IP television or radio can be selected by pressing TV/R button. The following
window appear on the TV screen: DVB, Radio, IPTV. You can select the type of channels and the channel lists.
8.6. Recordings
Press TIMER to enter directly into the recordings schedule menu.
8.7. Channel list
Press OK to enter directly into the channel list.
Press button to select the channel list optional view.
Fig. 38 Channel list
Page 29

28
Right part of the window shows and follows the selected program information available. Press Info button and a popup window appears showing the extended program guide information.
Press / keys or blue button to select active favorite channel list instead of all channels. New favorite list is
selected as current after channel change is switched.
Press yellow button to select the channels of a selected broadcaster. Use green button to filter by Transmitters.
Press Red button to search channel on channel list by name.
To start the immediate record of play back screen (with no other menu opened), press REC button on the remote
control media player section. To stop the immediate record, press stop button on the remote control media player
section.
If you have single LNB connection and recording schedule run at the same time, you can switch the channel only on
the same satellite/polarization/band. Not accessible channels are dark in the channel list.
Fig. 39 Channel list optional view
Fig. 40 Channel list, GUIDE pop up
Page 30

29
Current channel is marked bold. Select it by cursor and press OK to open GUIDE pop up window to view current
channel info. Press Guide to open Guide pop up window to view other channels info. Press OK to close pop up
window.
Fig. 41 Channel list, GUIDE pop up with archive
Channel with archive (IPTV or hybrid source) are marked red. To start archived program playback, select it by cursor
and press OK. Press STOP to stop archive and go back to real time mode. Use / keys to search within archived
videos.
8.8. Playback window
During playback (playback window), press button to select and switch within last 10 channels viewed. If only one
channel is available as viewed, button switches directly to this channel with no pop up window open. The archive
program in the channel list is marked by the icon. In case archive program is selected the system starts playing it
from the moment it was stopped.
Fig. 42 Playback window, pop up with archive
Page 31

30
Color buttons in playback window have the same functions as in channel list window.
Red button opens sleep timer pop up window.
Fig. 42 Playback window, pop up TV/R
TV/R button opens IP / DVB easy switch pop up window.
Press OPT button to open system set up window.
Aspect Ratio button only functions if you play 4:3 video. You can adjust aspect conversion. This set up is stored for
currently viewed channel.
.
Page 32

31
9. Technical Specifications
Tuner & Demodulator DVB-T:
- Frequency Range: 51 MHz - 858 MHz
- Input Signal Level 45 dBμV – 75 dBμV
- Demodulation 16/32/64/128/256 QAM
DUAL Tuner & Demodulator DVB-S/S2:
- Frequency Range: 950 MHz - 2150 MHz
- Demodulation QPSK, 8PSK
- DiSEQ control and 22Khz
Video Decoding:
- MPEG-2 MP@ML ISO/IEC 13818-2
- High Profile level 4.1 H.264 @ 30fps
- Video Resolution 720x576 PAL, 720p, 1080i,
1080p
- Aspect Ratio 4:3; 16:9
Audio Decoding:
- MPEG layer II,III
- Dolby Digital Plus
Power supply:
- 176-264VAC ±10 %; 50Hz internal
- Power Consumption,
max. 50 W
stby. <1W(passive mode)
Input / Output Connectors:
- SCART TV
- HDMI
- IEC 60169-2 (Female) RF Input
- IEC 60169-2 (Male) RF Output
- dual F LNB A&B
- RJ45
Physical Specifications:
- Size (WxDxH): 262 x 215 x 52 mm
- Weight (Net) 1400 g
Environment:
- Operating Temperature 0oC to +45oC
- Storage Temperature -10oC to +70oC
- Relative humidity, max. 95 %
Manufactured under license from Dolby Laboratories. Dolby and the double-D symbol are registered trademarks of Dolby laboratories.
DVB and the DVB logos are trademarks of the DVB project.
HDMI, the HDMI Logo and High-Definition Multimedia Interface are trademarks or registered trademarks of HDMI Licensing LLC
 Loading...