

Page 1
Installation
Guide
Interactive Pen Display
®
Sympodium DT770
Page 2
Registration Benefits
In the past, we've made new features available as free software
upgrades. Register your SMART product to be notified of free upgrades.
Keep the following information available in case you need to contact
SMART Technical Support:
Serial Number
Date of Purchase
Register online at www.smarttech.com/registration
FCC Warning
This equipment has been tested and found to comply with the limits for a Class A digital device, pursuant to Part 15 of
the FCC Rules. These limits are designed to provide reasonable protection against harmful interference when the
equipment is operated in a commercial environment. This equipment generates, uses and can radiate radio frequency
energy and, if not installed and used in accordance with the manufacturer's instructions, may cause harmful
interference to radio communications. Operation of this equipment in a residential area is likely to cause harmful
interference in which case the user will be required to correct the interference at his own expense.
Trademark Notice
SMART Board, Sympodium, Notebook, DViT and the SMART logo are trademarks of SMART Technologies Inc.
Windows is either a registered trademark or a trademark of Microsoft Corporation in the U.S. and/or other countries.
Macintosh and Mac OS are trademarks of Apple Computer, Inc., registered in the U.S. and other countries. All other
third-party product and company names may be the trademarks of their respective owners.
Copyright Notice
© 1992–2005 SMART Technologies Inc. All rights reserved. No part of this publication may be reproduced, transmitted,
transcribed, stored in a retrieval system or translated into any language in any form by any means without the prior
written consent of SMART Technologies Inc. Information in this manual is subject to change without notice and does not
represent a commitment on the part of SMART.
Portions of the software that ships with this product are copyrighted by Intel Corporation.
Portions of the software that ships with this product are copyrighted by ParaGraph, a business unit of Vadem.
U.S. Patent Nos. 5,448,263; 6,141,000; 6,326,954; 6,337,681; 6,741,267; 6,747,636; 6,803,906; 6,919,880;
6,947,032.
Canadian Patent No. 2,058,219. Other U.S., Canadian and foreign patents pending.
Printed in Canada 10/2005
and
Page 3
Important Information
WARNING
WARNING
CAUTION
CAUTION
If the screen is damaged, don’t touch any liquid that leaks from it. This liquid is an
irritant. If the liquid makes contact with your skin, eyes or mouth, immediately rinse
the area with running water for at least 15 minutes. Consult a physician if the liquid
makes contact with your eyes or mouth.
Don’t open or disassemble the Sympodium® DT770 interactive pen display. You
risk electrical shock from the high voltage inside the casing. Also, if you open the
casing, you void your warranty.
Don’t use the DT770 in a facility control system or any other environment that
requires extremely high reliability; the DT770 can interfere with or cause other
electronic devices to malfunction, or other wireless devices can interfere with or
cause the DT770 to malfunction. Where use is prohibited, turn off the DT770 to
prevent the possibility of it interfering with or causing other electronic devices to
malfunction. SMART doesn’t accept any liability for direct or consequential
damages.
Only use the power adapter that came with the DT770, because other adapters
won’t work properly, can damage the DT770, and can create a fire hazard. If you
use a different power adapter, you’ll void your warranty.
CAUTION
CAUTION
CAUTION
CAUTION
Take care not to scratch, mark or otherwise damage the cameras and optical
components in the front of the DT770.
Don’t touch the interactive screen with sharp, metallic objects that could scratch the
screen’s coating.
The tethered pen is a sealed unit that contains electronics but no batteries. If you
attempt to open the tethered pen, you’ll damage these electronics. This will make
the tethered pen unusable and void the warranty.
If you transport the interactive pen display over a distance, we strongly urge you to
completely repackage it using the original packaging. This packaging was
designed with optimal shock and vibration protection. If the original packaging is no
longer available, pack all components with as much padding as reasonably
possible to ensure that they are not exposed to excessive vibration or shock. Do
not include loose components in the packaging that could mark, scratch or
otherwise damage the interactive screen during the journey.
Important Information i
Page 4

Other Precautions
For proper installation, read this guide carefully and observe the following precautions.
• Don’t place sharp or heavy objects on the DT770.
• Turn off your DT770 and shut down your computer before connecting any cables. Otherwise
you can damage the DT770 or your computer.
• Don’t set the resolution of the DT770 to greater than 1280 × 1024.
• Don’t block the DT770’s ventilation holes. Doing so can cause the DT770 to overheat.
• If you move the DT770, hold it on the sides or the back. Don’t apply pressure to the screen.
• Avoid setting up and using the DT770 in an area with excessive levels of dust, humidity and
smoke or where it’s exposed to direct sunlight, severe temperature changes, heat from other
appliances, water or any other liquid. Operate the DT770 in an environment with a
temperature range between 41°F and 95°F (5°C to 35°C) and with a humidity range of 20% to
80% (non-condensing). However, you can store the DT770 in an environment with a
temperature range of -4°F to 140°F (-20°C to 60°C) and a humidity range of 20% to 80%
(non-condensing).
• Don’t modify the power cord. Handle it carefully and avoid bending it excessively. Don’t place
the power cord in an area where it’s likely to be stepped on or pinched by items placed on or
against it. If you must run a cable over the floor, lay it flat, in a straight line, and secure it to the
floor with tape or a cable management strip of contrasting color.
• Your DT770 comes with a power plug that works with your country’s power outlets. If the
power plug is a three-prong, grounding-type power plug (designed to fit into a grounding-type
power outlet) and you’re unable to insert the plug into the outlet, contact an electrician to
replace the outlet. Don’t modify the power plug.
• If possible, unplug the DT770 before any thunderstorms. However, don’t touch the unit or the
unit’s power plug during a thunderstorm, as there is a risk of electrical shock.
• Unplug the DT770 if you won’t use it for an extended period.
• Don’t hit or drop the DT770 or subject it to intense shock or vibration.
• If the DT770 requires replacement parts, use parts that are specified by SMART Technologies
Inc.
ii Important Information
Page 5

Table of Contents
Important Information............................................................................................................... i
Other Precautions ..................................................................................................................... ii
Overview ................................................................................................................................... 1
Interactive Screen .....................................................................................................................2
Tethered Pen ............................................................................................................................2
Pen Tool Buttons.......................................................................................................................3
Function Buttons ......................................................................................................................3
Display Control Buttons.............................................................................................................3
Room Control Interface Button..................................................................................................4
Connection Panel...................................................................................................................... 4
Power Supply ............................................................................................................................ 4
The Power and Status LEDs..................................................................................................... 4
Mono Stand............................................................................................................................... 5
Installing the DT770................................................................................................................. 7
Determining the Best Location for Your DT770 ........................................................................7
Removing the Connection Panel’s Protective Cover ................................................................8
Connecting the DT770 .............................................................................................................. 8
Integrating a Monitor or a Projector...........................................................................................9
Connecting the Tethered Pen ................................................................................................... 9
Reattaching the Connection Panel’s Protective Cover ...........................................................10
Mounting the DT770 on a Mono Stand ................................................................................... 11
Securing the DT770 ................................................................................................................12
Turning on the DT770 .............................................................................................................12
Installing SMART Board Software...........................................................................................12
Matching the Screen and Computer Resolutions.................................................................... 13
Orienting the Screen ...............................................................................................................14
Using the DT770..................................................................................................................... 15
Touching the Interactive Screen ............................................................................................. 15
Using the Pen Tool Buttons .................................................................................................... 16
Using the Eraser ..................................................................................................................... 18
Using the Function Buttons .....................................................................................................18
Using the Room Control Interface Button ............................................................................... 20
Customizing Buttons ...............................................................................................................20
Setting the Pen Tool Defaults ................................................................................................. 21
Enabling Pen Touch Only or Finger Touch Only Mode........................................................... 21
Cleaning the DT770................................................................................................................ 23
Cleaning the Interactive Pen Display ...................................................................................... 23
Cleaning the Tethered Pen .....................................................................................................24
Table of Contents iii
Page 6

Troubleshooting..................................................................................................................... 25
Checking the Power of the Interactive Pen Display ................................................................ 25
Checking the Status of the Interactive Pen Display ................................................................26
Image Problems ......................................................................................................................26
Control and Writing Problems .................................................................................................27
Troubleshooting Summary Table ........................................................................................... 27
Calibrating the Cameras .........................................................................................................28
Appendix A: Adjusting the Screen Settings........................................................................ 29
Waste Electrical and Electronic Equipment (WEEE) Regulations .................................... 31
Customer Support ................................................................................................................. 33
Training ...................................................................................................................................33
Contacting SMART Technical Support ................................................................................... 33
General Inquiries..................................................................................................................... 34
Warranty.................................................................................................................................. 34
Registration ............................................................................................................................. 34
Sending Feedback ..................................................................................................................34
Obtaining More Information on SMART Products...................................................................34
Index........................................................................................................................................ 35
iv Table of Contents
Page 7

Overview
The Sympodium® DT770 interactive pen display works with your computer and SMART Board™
software to create an interactive presentation environment. The DT770 includes dynamic and
interactive tools for creating presentations and lessons. You can control applications and create
notes using your finger or the tethered pen, all while facing the audience.
The DT770 interactive pen display is a 17" (43.2 cm) LCD interactive screen. The DT770 uses
Dual-touch, DViT™ (Digital Vision Touch) technology to detect the location of either your finger or
the battery-free, tethered pen.
Room Control
Interface Button
Interactive
Screen
Function Buttons
Pen Tool Buttons
Display Control
Buttons
Power Button
Indicators
Magnetic Pen
Recess
USB Hub
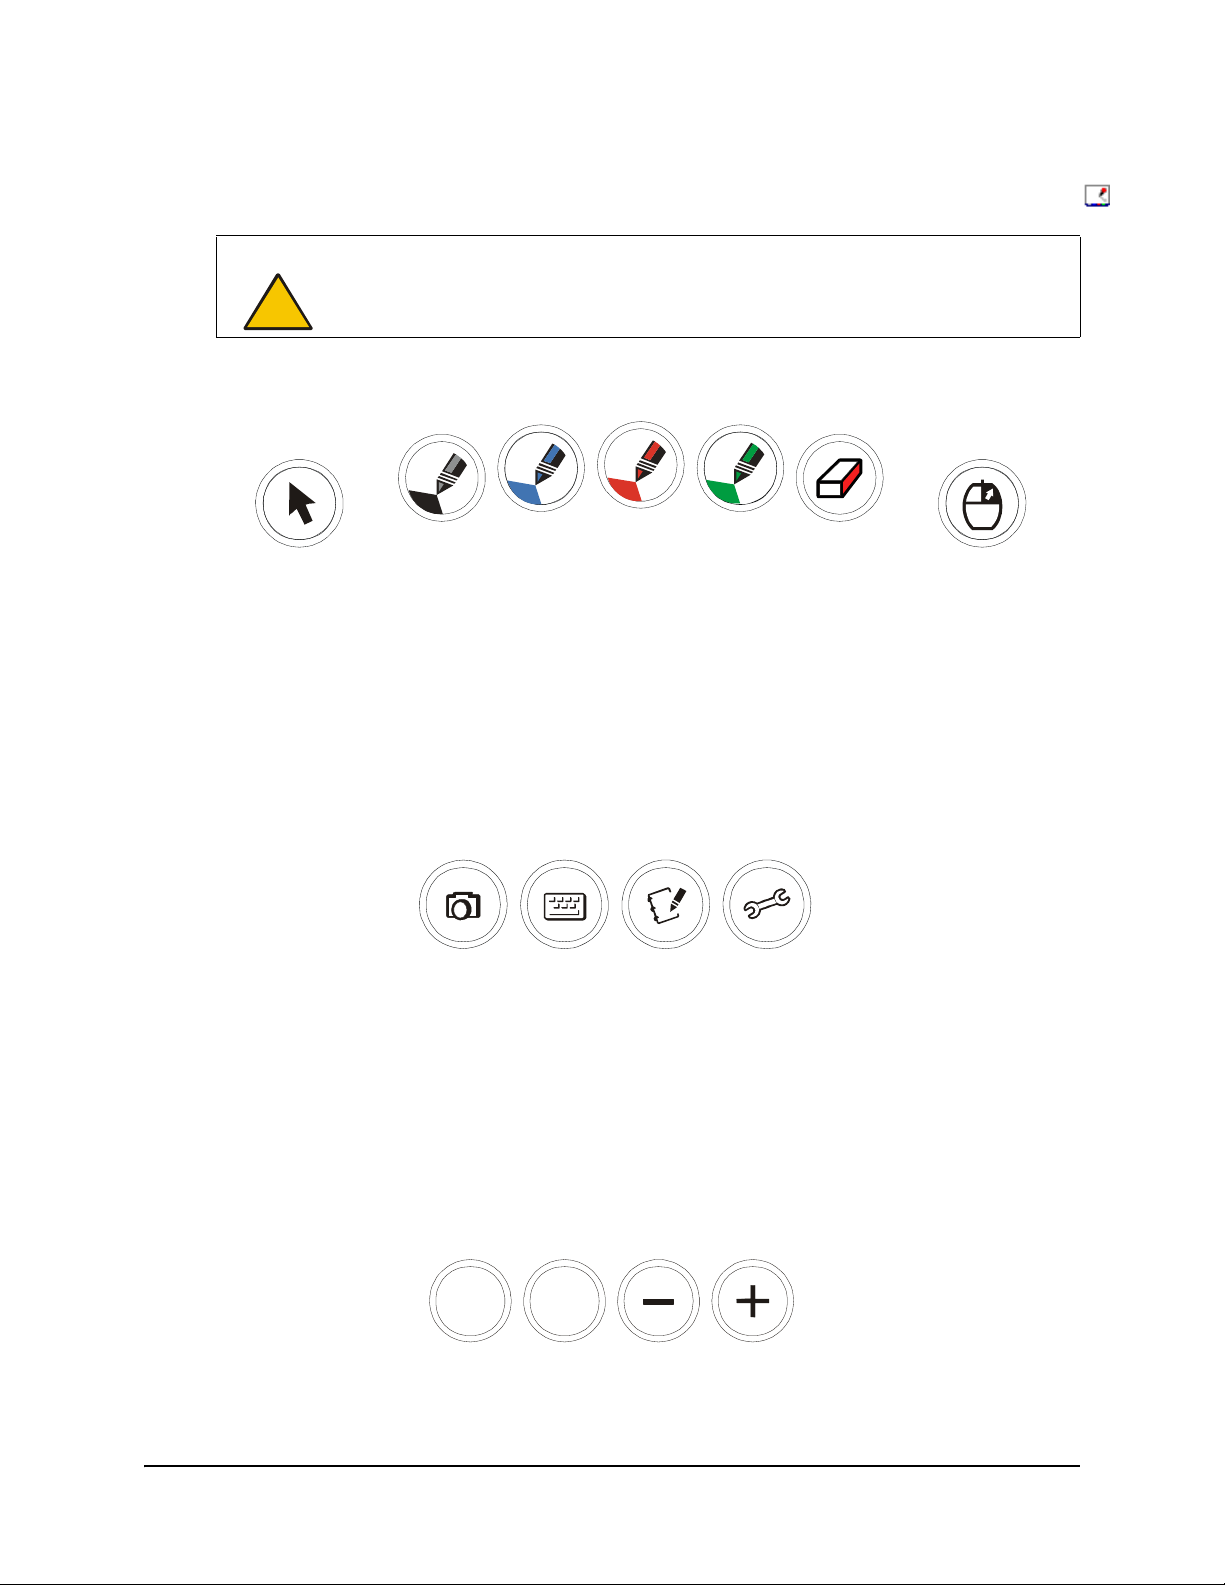
On the frame of the DT770, you’ll find:
• the main Power button for the DT770
• two light emitting diodes (LEDs) that indicate the DT770’s power and status
• four function buttons that provide immediate access to specific SMART Board tools, such as
Notebook™ software and the Floating Tools
• seven pen tool buttons you can use to left-click, right-click, and to create and remove digital
ink
• four display control buttons, which give you access to the screen’s display settings
• a room control interface button, which gives you access to room control interface menus (room
control system not supplied)
• a magnetic pen recess where you can store the pen when it’s not in use
Overview 1
Page 8
• a USB 2.0 high speed hub to which you can connect a USB memory storage device
This guide describes how to install and use the DT770 with your computer and integrate the
DT770 with a projector or monitor. For information on using SMART Board software, refer to the
SMART Board Software User’s Guide and the SMART Board software online Help. While reading
the SMART Board Software User’s Guide and the online Help, keep in mind that the DT770 works
like a projected SMART Board interactive whiteboard in the following ways:
• a touch on the DT770 with a finger is equivalent to a touch on the interactive whiteboard with a
finger
• the DT770’s tethered pen (when used with the pen tool buttons) functions like the interactive
whiteboard’s pen tray pens
• the DT770’s function buttons behave like the interactive whiteboard’s control panel buttons
Interactive Screen
The interactive screen tracks the position of objects, such as the tethered pen or your finger. This
screen acts as both an input device and an output device.
Tethered Pen
You can use the tethered pen to control and manipulate items on your screen and to create or
remove digital ink.
Tethered Pen
You can’t use your finger and the tethered pen at the same time. If the pen is in its pen recess, the
DT770 detects contact between any object and the interactive screen. However, if you remove the
pen from the pen recess, the DT770 detects contact between the pen and interactive screen but
ignores any other contact.
Pen Recess
2 Overview
Page 9
NOTE: For the DT770 to interpret the location of the tethered pen, the connected computer must
be running SMART Board tools. You’ll know that SMART Board tools are running if you can see
the SMART Board icon in the system tray or the Dock.
CAUTION
Don’t touch the interactive screen with sharp, metallic objects that could scratch the
screen’s coating.
Pen Tool Buttons
The pen tool buttons in the top-middle of the DT770’s frame include:
• the Pointer button (also left-click)
• the Black, Blue, Red and Green digital ink buttons
• the Eraser button
• the Right-Click button
For information on the pen tool buttons, see page 16.
Function Buttons
The function buttons in the top-left of the DT770 give you quick access to:
• screen capture tools
• the SMART Keyboard
• Notebook software
• Floating Tools
For information on the function buttons, see page 18.
Display Control Buttons
MENU
AUTO
SELECT
You can configure the display settings using the display control buttons in the top-right of the
DT770. For information on adjusting the display settings, see page 29.
Overview 3
Page 10
Room Control Interface Button
You can open room control interface menus using the button in the top-left of the DT770 (room
control system not supplied).
Connection Panel
12VDC IN
Serial
Analog RGB IN Analog RGB OUT
USB
USB
Pen Tether
The DT770 connection panel includes:
• a type B USB connector for communication with a computer
• a two-port type A USB hub for connecting other USB devices, such as a mouse or keyboard
• an HD DB15 video input port for connecting the video cable from your computer
• an HD DB15 video output port for connecting a video cable to a projector or a monitor
• a connector for the tethered pen
• an RS-232 serial port for communication with a computer or control system
• a power connector for the power cable
There is also an additional type A USB port on the right side of the DT770’s frame for connecting
other USB devices.
NOTE: When you initially receive your DT770, the connection panel is inaccessible because of a
protective cover. You can remove this cover using the supplied screwdriver.
Power Supply
The Sympodium DT770 interactive pen display uses a single 12V DC power supply, which comes
with an appropriate, country-specific power cable to connect to a power outlet.
NOTE: The power input is designed for both 120V AC and 220V AC operation. However, you’ll
never need to adjust the voltage as the DT770 switches to the appropriate voltage automatically.
The Power and Status LEDs
The two light emitting diodes (LEDs) in the top-right of the DT770 provide an indication of its power
and status:
• the Power indicator is illuminated and green when the DT770 is turned on
4 Overview
Page 11
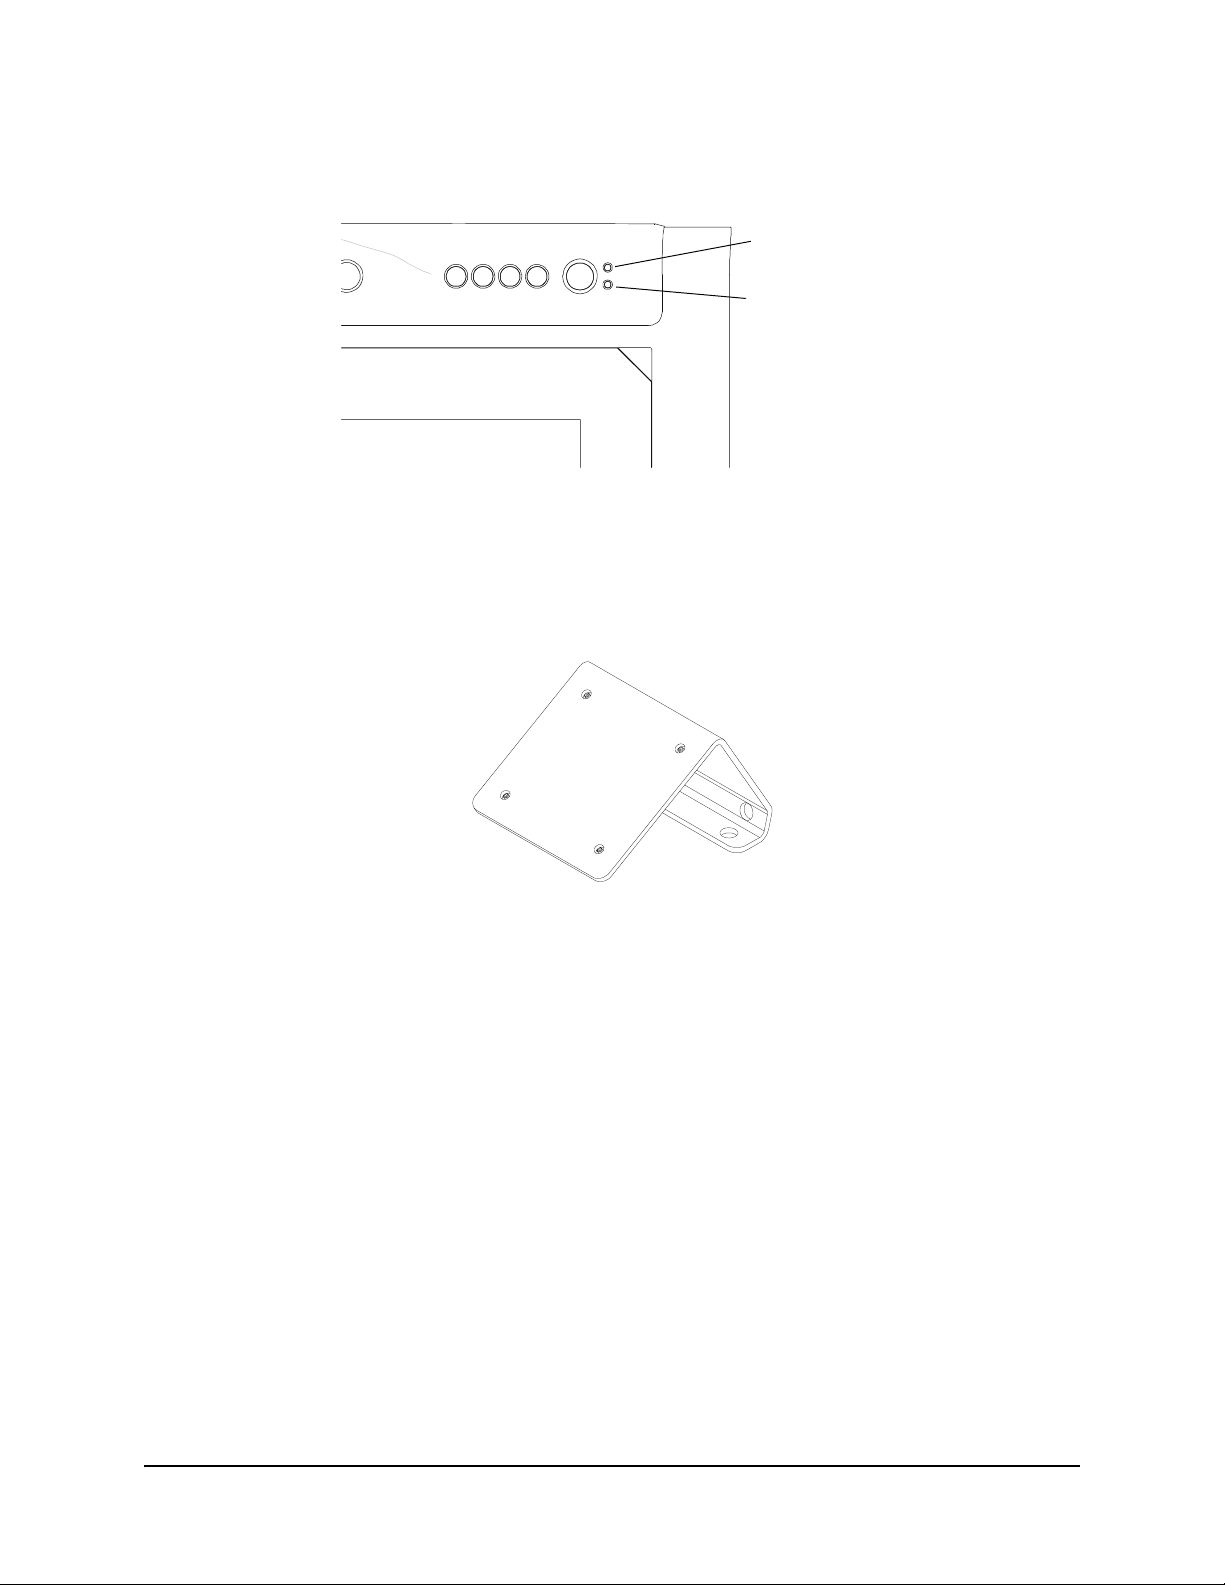
• the Status indicator is illuminated and green when the DT770 is communicating with SMART
Board software correctly
Power Indicator
Status Indicator
For information on the Power and Status indicators, see page 25.
Mono Stand
If you want to mount the DT770 at an angle of 30° or 45° degrees, you can install the DT770 on
the supplied mono stand.
NOTE: You will receive the mono stand in a separate box from the DT770 interactive pen display.
Overview 5
Page 12

6 Overview
Page 13
Installing the DT770
This chapter tells you how to:
• determine the best location for the DT770 (this page)
• remove the connection panel’s back cover (page 8)
• connect the DT770 (page 8)
• integrate a monitor or a projector (page 9)
• connect the tethered pen (page 9)
• reattach the connection panel’s back cover (page 10) (optional)
• mount the DT770 on a Mono Stand (page 11) (optional)
• secure the DT770 (page 12)
• turn on the DT770 (page 12)
• install SMART Board software (page 12)
• match your computer’s resolution setting to that of the interactive screen (page 13)
• orient the screen (page 14)
CAUTION
Turn off your DT770 and shut down your computer before you connect any cables.
Otherwise you may damage the DT770 or your computer.
NOTE: For information on adjusting the screen settings, see page 29.
Determining the Best Location for Your DT770
When you’re deciding where to place your interactive pen display, consider the location of the
computer and its components in relation to the DT770.
Install the DT770 in a cool, dry location without excessive levels of dust, humidity and smoke.
Operate the DT770 in an environment with a temperature range between 41°F and 95°F (5°C to
35°C) and with a maximum humidity of 80% (non-condensing). You can store the DT770 in an
environment with a temperature range of -4°F to 140°F (-20°C to 60°C).
NOTE: Take into consideration that the DT770 itself will generate heat whenever it’s turned on. To
maintain a consistent operating temperature, don’t block or cover any of the ventilation holes on
the back of the unit. Other external factors can affect the DT770, such as the heat generated by
control systems or other electronic equipment. Ensure there is adequate airflow around the
DT770.
Keep the computer keyboard and the mouse close to the DT770, as the tethered pen won’t
function until you install SMART Board software and open SMART Board tools.
Installing the DT770 7
Page 14

Removing the Connection Panel’s Protective Cover
When you initially receive your DT770, the connection panel is inaccessible because of a
protective cover.
To remove the protective cover
1. Place the DT770 facedown on a flat surface.
CAUTION
2. Loosen the captive screws in the protective cover with the supplied screwdriver.
Captive Screw
3. Pull the cover away from the connection panel.
4. Put the cover somewhere safe. You may wish to reattach it after you have connected the
DT770’s cables.
Place the DT770 down slowly and carefully to ensure you don’t damage the
buttons.
Don’t place the DT770 on a surface that will mark, scratch or damage the
screen or its optical components.
Protective Cover
Captive Screw
Connecting the DT770
Complete the following procedure to connect the DT770 to your computer.
NOTE: For best results, use a computer with a video card that supports SXGA resolution
(1280 × 1024), and set the refresh rate to 60 Hz or 75 Hz. If you use a video card that supports
lower resolutions only, this may affect image quality. Don’t set the resolution of the DT770 to
greater than 1280 × 1024 (SXGA).
To connect the DT770
1. If you haven’t already done so, shut down your computer.
8 Installing the DT770
Page 15

2. Connect the supplied VGA (RGB) video cable to the Analog RGB IN port on the DT770.
12VDC IN
Serial
Analog RGB IN Analog RGB OUT
USB
USB
Pen Tether
3. Connect the other end of the video cable to the monitor port on the computer.
4. Connect the supplied USB cable to the USB type B connector on the DT770. Connect the
other end of the cable to an available USB port on your computer.
NOTE: As an alternative, connect the supplied RS-232 cable to the Serial port on the DT770.
Connect the other end to an available serial port on your computer.
CAUTION
Connect the DT770 to your computer using either the USB cable or the
RS-232 cable. Don’t connect both cables.
5. Connect the power cable to the power supply. Connect the power supply to the 12VDC IN port
on the DT770 and plug the power cable into an outlet.
Integrating a Monitor or a Projector
If you connect a projector directly to the DT770, you can project whatever the DT770 displays. If
you connect a monitor directly to the DT770, you can display the same image on the monitor and
the DT770.
To connect a projector or monitor to the DT770
1. Connect a VGA (RGB) video cable (not supplied) to the Analog RGB OUT port on the DT770.
2. Connect the other end of the video cable to a video input port on your projector or monitor.
For more information, refer to the instructions that came with your projector or monitor.
Connecting the Tethered Pen
You must attach the pen to the DT770 by connecting the pen’s tether to the DT770’s connection
panel. This tether provides the power to the pen and the pen indicator.
To connect the tethered pen to the DT770
1. Connect the pen’s tether to the Pen Tether port.
2. Thread the tether through the cable management clips on the underside of the DT770 to
ensure that the tether is tidy and appropriately positioned for when you use the pen.
NOTE: You can thread the pen’s tether towards the bottom or the side of the DT770.
Installing the DT770 9
Page 16

3. Place the pen in the recess below the interactive screen so that it’s available for use. The
recess holds the pen magnetically.
Pen Recess
Reattaching the Connection Panel’s Protective Cover
If you wish, after you have connected all of the DT770’s cables, you can reattach the protective
cover.
To reattach the protective cover
1. Feed the cables through the semi cylindrical channel in the back of the DT770 so that when
you reattach the protective cover, it will not trap any of the cables. Then place the cover over
the connection panel.
NOTE: If you like, you can
feed the pen’s tether through
the gap at the bottom of the
cover, instead of through the
semi-cylindrical channel.
2. Tighten the captive screws using the supplied screwdriver.
Semi-cylindrical
channel
NOTE: For clarity, the
DT770 is shown
without the cables
10 Installing the DT770
Page 17

Mounting the DT770 on a Mono Stand
If you want to mount the DT770 at an angle of 30 or 45 degrees, you can install the DT770 on the
supplied mono stand.
NOTE: You can purchase and install the optional tilt stand from SMART and adjust the DT770 to a
variety of angles. As an alternative, you can purchase and install a tilt stand or mounting arm that
conforms to the 100 mm pattern set by the Video Electronics Standards Association (VESA). If you
install a VESA-compatible stand, ensure that the weight rating of the arm can support the DT770.
Use M4 screws (with a 0.7 mm pitch), and select a screw length that ensures no more than 10 mm
of the screw is threaded into the mounting plate.
To install the DT770 on the mono stand
1. If you have not done so already, place the DT770 facedown on a flat surface.
CAUTION
Place the DT770 down slowly and carefully to ensure you don’t damage the
buttons.
Don’t place the DT770 on a surface that will mark, scratch or damage the
screen or its optical components.
2. Loosen the four captive screws in the mono stand.
3. Align the captive screws in the mono stand with the four holes on the back of the interactive
pen display.
Top Edge of
the DT770
If you want the DT770 to be on a 30°
angle, align the mono stand so the
vertical part of the stand is near the top
edge of the DT770.
If you want the DT770 to be on a 45°
angle, align the mono stand so the
vertical part of the stand is near the
bottom edge of the DT770.
Bottom Edge
of the DT770
4. Tighten the four captive screws.
5. Place the DT770 face up, with its weight on the mono stand and the bottom edge of the
DT770.
Installing the DT770 11
Page 18

Securing the DT770
You can secure the DT770 by attaching a cable (not supplied) between an immovable object and
the Kensington® cable and lock device that’s built into the back of the unit.
Turning on the DT770
Press the Power button in the top right of the DT770.
Power Button
Power Button
Press the Power button again to turn off the DT770.
Installing SMART Board Software
You can install SMART Board software on your computer from the provided SMART Board
software CD. For complete details on installing and using this software, refer to the SMART Board
Software User’s Guide that came with your DT770.
To install SMART Board software
1. If you haven’t already done so, turn on the computer and the DT770.
2. Close all open applications on the computer.
3. Insert the SMART Board software CD into your CD drive.
The CD starts automatically. Follow the on-screen instructions.
NOTE: You’ll need to use the computer’s keyboard or mouse to perform the installation, as
your interactive pen display is not touch sensitive until you install and open SMART Board
tools.
If the CD doesn’t start automatically:
– (Windows operating systems) select Start > Run and enter x:\autorun.exe (where x: is
your CD drive)
– (Mac computers) open your CD drive and double-click the installation file.
12 Installing the DT770
Page 19

NOTE: If SMART Board software doesn’t recognize the DT770, activate the port manually
using an attached keyboard or mouse. For more information, refer to the SMART Board
software online Help. Also, if the DT770 is your secondary monitor, enable it. For further
information, refer to the instructions that came with your computer.
Since you must have SMART Board tools running to use the DT770, select the option to start
SMART Board tools automatically when you start your computer. You’ll know SMART Board
tools are running if you can see the SMART Board icon in the system tray or the Dock.
4. After you’ve installed the software, touch the interactive screen with your finger or the tethered
pen. The pointer appears underneath your finger or the tip of the pen.
NOTE: If the pointer doesn’t appear beneath your finger or the tip of the pen, orient the screen
(see below). If this doesn’t improve the pointer’s accuracy, refer to the Troubleshooting section
of this guide (page 25).
Matching the Screen and Computer Resolutions
For best results in most circumstances, set the computer’s resolution to match the DT770’s native
resolution of 1280 × 1024 (SXGA) and set the computer’s vertical refresh rate to 60 Hz or 75 Hz.
You must use the mouse to do this.
However, if your DT770 is connected to a Mac computer, and you see a black border at the top
and bottom of the DT770’s interactive screen, try a number of different resolutions to determine
which one produces the best results.
Also, if you’re integrating the DT770 with a projector, you must set your computer’s resolution to
match the projector’s resolution. For example, if your projector supports XGA (1024 x 768) but not
SXGA (1280 x 1024), set your computer’s resolution to XGA.
NOTE: Don’t set the resolution of the DT770 to greater than 1280 × 1024 (SXGA).
To set the resolution for the Windows operating system
1. Open the Windows Control Panel.
2. Press Display.
The Display Properties dialog box appears.
3. Press the Settings tab.
4. Move the slider to change the pixel setting to 1280 × 1024.
5. Press OK.
To set the resolution for the Mac OS X operating system
1. Press the System Preferences icon in the Dock.
2. Press Displays.
3. On the Display tab of the Monitors dialog box, press 1280 × 1024.
4. Close the dialog box.
Installing the DT770 13
Page 20

Orienting the Screen
To ensure that the pointer appears directly beneath your finger or the tethered pen when you touch
the DT770’s interactive screen, the computer needs to know the exact location of the image on the
screen. You can ensure the accuracy of the pointer by orienting the screen, which requires you to
touch a grid of red targets precisely using the tethered pen. Use the Quick (4 Points) orientation
level.
NOTE: If the image on the screen is distorted, match the resolution (see below) and adjust the
screen (page 29) before you orient the screen.
To change the orientation level to Quick (4 Points) (Windows Operating Systems)
1. Press the SMART Board icon in the system tray, and press Control Panel.
2. Select SMART Board Settings.
The SMART Board Settings dialog box appears.
3. From the Hardware Info & Settings list, select Alignment/Orientation Precision.
4. Press Quick (4 points).
5. Press OK.
To change the orientation level to Quick (4 Points) (Mac Computers)
1. Press the SMART Board icon in the Dock, and press Open Control Panel.
2. Press Advanced.
3. Press the Pick Orientation Precision tab.
4. Select Quick (4 Points).
To orient the screen
1. (Windows operating systems) Press the SMART Board icon in the system tray, and press
Orient.
(Mac computers) Press and hold the SMART Board icon in the Dock, and press Open Orient.
2. Follow the on-screen instructions.
For more details, see the SMART Board Software User’s Guide for your operating system.
14 Installing the DT770
Page 21

Using the DT770
The Sympodium DT770 interactive pen display is as easy to use as a pen on paper. By touching
your finger or the tethered pen to the screen, you can interact with computer applications
intuitively. In addition, you can access additional tools and features using the pen tool buttons and
function buttons. This chapter tells you how to interact with the screen using your finger or the
tethered pen, as well as how to use the pen tool and function buttons.
NOTE: You can use SMART Board software to make your presentations interactive and dynamic.
For further information on what you can accomplish with SMART Board software, refer to the
SMART Board Software User’s Guide or the online Help.
This chapter also includes information about customizing pen tool buttons and changing the
DT770’s default settings.
Touching the Interactive Screen
You can manipulate objects, select items, and create and remove digital ink by touching the screen
with your finger or the tethered pen.
NOTE: You can interact with the screen only if SMART Board tools are running on the computer.
You’ll know SMART Board tools are open if you can see the SMART Board icon in the system tray
or the Dock.
To use the tethered pen, lift it from the pen recess below the interactive screen, press the required
pen tool button and touch the screen with the tip of the pen. The different pen tool buttons are
discussed on the following pages.
When you lift the pen from the pen recess, the tethered pen indicator illuminates until you return it
to the pen recess.
Tethered Pen
Indicator
Using the DT770 15
Page 22

When you’re not using the tethered pen, place it in the recess on the front of the DT770, where it’s
held in place magnetically.
Pen Recess
NOTE: If you place the pen in the recess and the indicator still glows, move the pen from side to
side until the indicator stops glowing. The DT770 can detect objects other than the tethered pen
(such as your finger) only when the pen is correctly in the recess and the indicator is off.
To use your finger, ensure that the tethered pen is in the pen recess and that the pen’s indicator is
off. Then press the required pen tool button and touch the screen with your finger.
Using the Pen Tool Buttons
Use the pen tool buttons to control how the DT770 responds to your screen presses. You can use
the pen tool buttons to left-click (sometimes referred to as Mouse mode), right-click, write digital
ink (in black, blue, red or green) or erase when you press the screen.
Black Ink
Blue Ink
Pointer
Red Ink
Green Ink
Clicking and Mouse Mode
When you press the Pointer pen tool button, each screen press is interpreted as a left-click until
you press a different pen tool button.
Eraser
Right Click
16 Using the DT770
Page 23

Press the Pointer button and then press your finger or the tip of the tethered pen on the interactive
screen to activate an object. To double-click, press twice with your finger or the tethered pen. To
drag an object, press and hold it with your finger or the tip of the tethered pen and drag it to its new
location.
IMPORTANT
If the pointer doesn’t appear directly under your finger or the tip of the tethered pen,
orient the interactive pen display to improve the accuracy (page 14).
Right-Clicking
When you press the Right-Click pen tool button, the next contact with the interactive screen is
interpreted as a right-click. With the next contact, the previous touch behavior is restored.
For example, if you’re writing with black digital ink and then you press the Right-Click button, the
next contact with the screen is a right-click, and each successive contact will be black digital ink.
NOTE: You can customize the Right-Click button on the DT770 to perform a different function
(page 20).
Writing on the Screen and Saving Your Notes
When SMART Board tools are running on a connected computer, you can use the DT770’s Digital
Ink pen tool buttons to create notes over any computer application.
To create notes, press one of the Digital Ink pen tool buttons and write or draw on the screen, just
as you would write or draw on paper. As you do so, a stream of digital ink follows your finger or the
tethered pen.
NOTE: You can write notes over computer applications only if SMART Board tools are running on
the computer. You’ll know SMART Board tools are running if you can see the SMART Board icon
in the system tray or the Dock.
TIP
You can change the properties of the digital ink, including its color, line thickness,
line style and transparency. For more information, refer to the SMART Board
software online Help.
When you write over an application, you can save the note. However, the available save options
depend on whether that program is Aware (sometimes referred to as Ink Aware). An Aware
application recognizes a note as a program component, but a non-Aware application doesn’t.
NOTE: If you’re using the Windows version of SMART Board software, you can access a complete
list of Aware applications by selecting Ink Aware Application Settings in the SMART Board
Control Panel.
Using the DT770 17
Page 24

To save your note as part of the file in an Aware application, save the file as you normally would. In
some Windows applications, such as Microsoft Word and Excel, you can select additional toolbar
options, such as saving your note into a Notebook file or saving your note as text.
If your DT770 is connected to a computer with a Windows operating system, you can capture your
note and the application background and save them into a Notebook file for both Aware and nonAware applications Select the required option from the Capture toolbar to capture a specific area,
a window or the entire screen.
NOTE: If the Capture toolbar doesn’t appear automatically, you can open it by pressing the
Screen Capture Tools button on the DT770.
If your DT770 is connected to a Mac computer and you press the Screen Capture button, you
automatically capture the entire screen. There is no Capture toolbar for the Mac version of SMART
Board software.
Using the Eraser
When you press the Eraser pen tool button, you can touch the screen to remove your notes.
NOTE: If you create geometric shapes using the Floating Tools, you can’t remove these shapes
using the eraser. To remove a geometric shape, select it and press the Delete key.
To erase a note
1. Press the Eraser button on the DT770.
2. Drag your finger or the tethered pen over the unwanted note.
TIP
You can change the size of the eraser. For more information, refer to the
SMART Board Software User’s Guide.
Using the Function Buttons
You can press the function buttons to launch:
• Screen Capture tools: a set of tools you can use to capture an on-screen image and insert it
into Notebook software
• SMART Keyboard: a virtual keyboard that floats over the active application and lets you enter
typed text at the pointer location
• Notebook software: an application that helps you organize, save and share your notes
18 Using the DT770
Page 25

• Floating Tools: a virtual palette of tools
Open the Screen
Capture Tools
Open the
Keyboard
Open Notebook
Software
Open the
Floating Tools
NOTE: For more information on using or customizing the Screen Capture tools, the SMART
Keyboard, Notebook software or Floating Tools, refer to the SMART Board Software User’s
Guide or the SMART Board software online Help.
To open the Screen Capture tools
1. Press the Screen Capture function button on the DT770.
The Capture toolbar appears.
2. Select the option to capture a specific area, a window or the entire screen.
Your screen capture appears in a Notebook file.
NOTE: If your DT770 is connected to a Mac computer and you press the Screen Capture
button, you automatically capture the entire screen. There is no Capture toolbar for the Mac
version of SMART Board software.
To open the SMART Keyboard
1. Press the Keyboard function button on the DT770.
The SMART Keyboard appears over your application.
2. Press the on-screen keyboard’s keys with your finger or the tethered pen.
To open Notebook software
Press the Notebook Software function button on the DT770.
SMART Notebook software opens.
To open the Floating Tools
Press the Floating Tools function button on the DT770.
The Floating Tools appear.
NOTE: If your DT770 is connected to a Mac computer and you press the Floating Tools button,
the SMART Board Control Panel opens.
Using the DT770 19
Page 26

Using the Room Control Interface Button
You can press the Room Control Interface button to open room control interface menus (room
control system not supplied). For information on setting the file location of the room control
software, see page 20.
NOTE: This feature is not available if your DT770 is connected to a Mac computer. Instead, if you
press the Room Control Interface button, Online Help opens.
Customizing Buttons
If your DT770 is connected to a computer running a Windows operating system, you can
customize the four function buttons, the Right-Click pen tool button and the room control interface
button.
If your DT770 is connected to a Mac computer, you can customize the Keyboard function button
and the Right-Click pen tool button
To customize a button (Windows operating system)
1. Press the SMART Board icon in the system tray, and press Control Panel.
2. Press Pen and Button Settings.
3. If the dialog box displays more than one SMART product, press Sympodium.
The currently
selected SMART
product is
surrounded by a
blue border
4. Press the Customize Buttons button.
The Customize Buttons dialog box appears.
5. To change the function of a particular function or pen tool button, select the arrow alongside
the appropriate graphic and select the required function.
6. To set the file location of the room control software (not supplied), press Browse. Then,
navigate to and select the required .exe file, and press Open.
7. Press OK to apply the new settings.
To customize a button (Mac Computers)
1. Press the SMART Board icon in the Dock, and press Open Control Panel.
2. Press Pen Tray.
20 Using the DT770
Page 27

3. Press the large Pen Tray button on the left side of the dialog.
4. To change the function of the Keyboard function button or the Right-Click pen tool button,
press the arrow beside the appropriate graphic and select the function you’d like.
5. Press OK to apply the new settings.
Setting the Pen Tool Defaults
You can set up the DT770 so that a particular pen tool is active when you turn it on.
NOTE: This feature is not available if your DT770 is connected to a Mac computer.
To set the pen tool default
1. Press the SMART Board icon in the system tray (Windows operating systems) or in the Dock
(Mac computers), and press Control Panel.
2. Press Pen and Button Settings.
3. If the dialog box displays more than one SMART product, press Sympodium.
The currently
selected SMART
product is
surrounded by a
blue border
4. Press the Default Settings button.
The Sympodium Pen Tool Function dialog box appears.
5. Set the default pen tool function to either Last pen tool used or to a specific pen tool.
6. Press OK to apply the new setting.
Enabling Pen Touch Only or Finger Touch Only Mode
By default, the DT770 automatically switches between detecting your finger (when the tethered
pen is in the pen recess) and detecting the pen (when the tethered pen isn’t in the recess).
However, you can disable the DT770’s ability to detect your finger by switching to Pen Touch Only
mode. Similarly, you can disable the DT770’s ability to detect the tethered pen by switching to
Finger Touch Only mode.
NOTE: This feature is not available if your DT770 is connected to a Mac computer.
Using the DT770 21
Page 28

To enable Pen Touch Only or Finger Touch Only mode
1. Press the SMART Board icon in the system tray (Windows operating systems) or in the Dock
(Mac computers), and press Control Panel.
2. Press Pen and Button Settings.
3. If the dialog box displays more than one SMART product, press Sympodium.
The currently
selected SMART
product is
surrounded by a
blue border
4. Press the Default Settings button.
The Sympodium Pen Tool Function dialog box appears.
5. Set the Pen/Finger Touch setting to Automatically switch between pen and finger, Finger
Touch Only or Pen Touch Only.
6. Press OK to apply the new setting.
22 Using the DT770
Page 29

Cleaning the DT770
This chapter offers you advice on cleaning the DT770.
CAUTION
Take care not to scratch, mark or otherwise damage the cameras and optical
components on the front of the DT770.
Cleaning the Interactive Pen Display
Turn off the DT770 before you clean it.
Clean the interactive pen display surface regularly. Otherwise, dust can build up and diminish the
performance of the DT770.
Don’t spray glass cleaner directly onto the screen surface. Instead, spray the cleaner lightly on a
cloth and then gently wipe the screen surface. The DT770 uses digital cameras located inside the
frame. If excess glass cleaner flows into the crack between the frame and the writing surface, the
fluid can damage the cameras.
Camera
Camera
Mirror
WARNING
Take care when you clean the mirror as this is a sensitive optical component. Clean it rarely. Spray
standard glass cleaner onto a soft cotton cloth and gently wipe the mirror.
CAUTION
Don’t open or disassemble the Sympodium DT770 interactive pen display. You risk
electrical shock from the high voltage inside the casing. Also, if you open the
casing, you void the warranty.
Don’t use paper products to clean the mirror. They can scratch the mirror surface.
Cleaning the DT770 23
Page 30

Cleaning the Tethered Pen
To clean the tethered pen, gently wipe the pen with a damp cloth.
CAUTION
The tethered pen is a sealed unit that contains electronics but no batteries. If you
attempt to open the tethered pen, you’ll damage these electronics. This makes the
tethered pen unusable and voids the warranty.
24 Cleaning the DT770
Page 31

Troubleshooting
This chapter offers suggestions for troubleshooting your DT770.
Checking the Power of the Interactive Pen Display
The Power indicator shows whether power is reaching the interactive pen display.
If the Power Indicator is... this indicates that the DT770 is...
Illuminated and green turned on and receiving a video signal from your computer.
Illuminated and orange turned on but isn’t receiving a video signal from your computer.
Off turned off.
Power Indicator
If the power indicator is illuminated and orange, make sure that:
• the video cable is correctly connected to the DT770 and the computer
• the video cable isn’t bent or broken and doesn’t have bent or broken pins in either connector
NOTE: If you’re using a video cable adaptor, check those connections too.
• the computer is on and not in sleep or power management mode
If you still can’t see an image on the display, refer to Image Problems on page 26.
If the power indicator is off, make sure that:
• the DT770’s power cable is connected properly
• the DT770 is turned on
If the power indicator still doesn’t illuminate, contact SMART Technical Support (page 33).
Troubleshooting 25
Page 32

Checking the Status of the Interactive Pen Display
The Status indicator shows whether the interactive pen display is communicating with your
computer correctly.
Status Indicator
If the Status Indicator is... this indicates that the DT770...
Illuminated and green is communicating correctly with SMART Board software.
Flashing green is communicating with a computer that doesn’t have SMART
Board software installed.
Illuminated and orange can’t communicate properly with your computer.
Flashing orange can’t communicate properly with your computer or is running a
firmware upgrade utility.
Red isn’t communicating with SMART Board software.
Off is turned off.
If the Status indicator is illuminated and orange, or is flashing orange, contact SMART Technical
Support (page 33)
If the Status indicator is off, make sure that the Power indicator is on.
Image Problems
If you don’t see an image on the interactive pen display, check that the DT770 is turned on and
that you have connected the power and video cables correctly. If this doesn’t resolve the problem:
• Ensure that the computer resolution isn’t higher than 1280 × 1024 pixels
• Ensure the computer refresh rate is set to 60 Hz or 75 Hz.
• Change the contrast and brightness settings of the DT770 (page 29).
• Check that the computer’s video card is compatible with the DT770 by connecting the
computer to another monitor and verifying that the image is properly displayed. For further
information, refer to the instructions that came with your video card or your computer.
When you use the screen, there may be some anomalies in the image appearance. The following
irregularities aren’t necessarily indications that the screen is defective:
• A very small number of pixels are permanently illuminated, not illuminated at all or show an
incorrect color.
• The image flickers or appears striped.
26 Troubleshooting
Page 33

Control and Writing Problems
If the pointer doesn’t accurately follow the movement of the tethered pen or your finger, orient the
DT770 (page 14).
If the digital ink doesn’t appear as you expect, check the customizable pen settings within SMART
Board software. For more information on setting digital ink properties (such as color, line thickness,
line style and transparency) refer to the SMART Board software online Help.
NOTE: You can manipulate objects and create notes on the interactive pen display only if the
computer is running SMART Board tools. You’ll know that SMART Board tools are running if you
can see the SMART Board icon in the system tray or the Dock.
If you can’t manipulate objects or write notes using your finger, ensure that the tethered pen is in
the pen recess and that the pen’s indicator is off. If you place the pen in the recess and the
indicator still glows, move the pen to the side until the indicator stops glowing. The DT770 can
detect objects other than the tethered pen (such as your finger) only when the pen is correctly in
the recess and the indicator is off.
Troubleshooting Summary Table
The following table summarizes the symptoms, the likely causes and the remedies of potential
issues with the DT770.
Symptom Likely Cause Remedy
No LEDs are
illuminated
The video
image doesn’t
display on the
screen
You can see an
image on the
screen, you can
move the
pointer, but you
can’t write notes
over the
application
Power problem Check all the power connections. Ensure you’re using the
power adapter that came with the DT770.
Check that the computer is on, its USB port is active, and
that it’s sending out a video signal.
Check that the DT770 is turned on.
Display problem Check that the video cable is connected properly.
Check that the DT770 is turned on.
Check that the computer isn’t in standby mode.
Check that the computer’s resolution setting isn’t higher
than 1280 × 1024 and its refresh rate is set to 60 Hz or 75
Hz.
Reset the on-screen display settings (page 29).
SMART Board
tools aren’t
running
Check that SMART Board tools are running. You’ll know
that they are running if you can see the SMART Board icon
in the system tray or the Dock.
Troubleshooting 27
Page 34

Symptom Likely Cause Remedy
The white in an
image doesn’t
appear to be
white on the
screen
Multiple images
appear on the
interactive
screen
The image
ripples, flickers,
or has uneven
colors
Video image
problem
Video problem Use only the supplied video cable. Don’t extend the video
Screen setting
problem
Check the video connection.
Return the screen to the factory defaults (page 30).
If you like, adjust the color setting (page 29). For details on
the color management features of your operating system or
the application that you’re using, read the instructions
provided with your operating system or the application.
cable to more than 50' (15 m) unless the video signal is
amplified.
Check the phase settings in the On-Screen Display Menu
(page 29), and adjust them if necessary.
Check the contrast or brightness settings in the On-Screen
Display Menu (page 29), and adjust if necessary.
Reset the on-screen display settings (page 30).
Ensure your video card is compatible with the DT770.
Adjust your computer’s refresh rate.
Calibrating the Cameras
Digital cameras in the corners of the interactive screen are calibrated to recognize the position of
your finger on the screen’s surface. If the cameras lose their alignment for any reason, you may
experience “broken ink” (gaps in your writing) when you create notes using your finger, or an area
of the screen may no longer respond.
NOTE: If the cameras lose their alignment, this does not affect the accuracy or the writing ability of
the tethered pen.
Fortunately, you can realign the cameras by performing a simple calibration procedure. If you think
that you need to calibrate the DT770’s cameras, contact SMART Technical Support (page 33).
28 Troubleshooting
Page 35

Appendix A: Adjusting the Screen Settings
You can fine-tune the screen settings by using the DT770’s Display Control buttons and the OnScreen Display Menu. For a functional description of all the display settings, see the table below.
To adjust the screen display settings
1. Press the Menu button on the DT770.
MENU
AUTO
SELECT
Page 1 of the On-Screen Display Menu appears.
2. Select and edit the required screen display settings as follows.
Press the Menu button to display the next page of the On-Screen Display Menu.
Press the Auto Select button to scroll through the list of options on the current page.
If the currently selected option has a numerical setting, press the + button to increase the
setting. If the currently selected option has a Yes or No setting, press the + button to set the
option to Yes.
If the currently selected option has a numerical setting, press the
setting. If the currently selected option has a Yes or No setting, press the
- button to decrease the
- button to set the
option to No.
NOTE: You can’t use the tethered pen, mouse or keyboard to change the menu page, scroll
through the options or edit a value. You can only use the interactive pen display’s Display
Control buttons as described above.
Function Description
Fine-tunes the computer image based upon the incoming RGB signal.
NOTE: Some computers and graphics cards don’t allow Auto
Auto Adjustment
Adjustment to function correctly when you first connect the screen. If
the display doesn’t fit within the LCD panel border or if some portion of
the text appears blurred, adjust the clock and the phase (see below).
Increases or decreases image contrast
Contrast
NOTE: For optimal display clarity, set the Contrast to 65 or higher.
Brightness Increases or decreases image brightness
Horizontal
Position
Moves the screen image left or right
Vertical Position Moves the screen image up or down
Clock
Phase
Display Mode
Changes the display data frequency to match the frequency of your
graphics card. Reduces or eliminates horizontal distortion lines.
Changes the signal timing of the display to match your graphic card.
Reduces or eliminates horizontal distortion lines.
Displays the current display resolution and vertical and horizontal
refresh rates
Appendix A: Adjusting the Screen Settings 29
Page 36

OSD Off-Time
Sets the length of time before the On-Screen Display Menu turns off
automatically
Language Selects a language for the On-Screen Display Menu
Sharpness Increases or decreases image sharpness
Reset Resets all screen options to the factory default settings
Volume This function isn’t used
Mute This function isn’t used
Input Select This function isn’t used
Color Setting Adjusts the display’s red, blue and green settings
Color Adjustment
Red
Color Adjustment
Blue
Color Adjustment
Green
Adjusts the display’s red component
Adjusts the display’s blue component
Adjusts the display’s green component
3. Press the Menu button.
NOTE: The new settings are saved when you press the Menu button.
4. Repeat step 3 until the menu disappears.
To reset the screen display settings to the factory defaults
MENU
1. Press the Menu button on the DT770 twice.
AUTO
SELECT
Page 2 of the On-Screen Display Menu appears.
2. Press the Auto Select button four times to scroll to the Reset option.
3. Press the + button to reset the screen display settings.
30 Appendix A: Adjusting the Screen Settings
Page 37

Waste Electrical and Electronic Equipment (WEEE) Regulations
Waste Electrical and Electronic Equipment (WEEE) regulations apply to all electrical and
electronic equipment sold within the European Union.
When you dispose of any electrical or electronic equipment, including SMART products, we
strongly encourage you to contact your local WEEE recycling agency for recycling and disposal
advice.
Your SMART product required the extraction and use of natural resources for its production. It may
contain hazardous substances. By disposing of electrical and electronic equipment appropriately,
you lower the impact of these substances upon health and the environment and reduce the
pressure on natural resources. Recycling agencies can reuse or recycle most of the materials from
your product.
Please think about how you intend to dispose of any product that has a WEEE symbol or
accompanying WEEE guidelines.
If you need more information on the collection, reuse and recycling of electrical and electronic
equipment, please contact your local WEEE recycling agency.
Alternatively, contact your local reseller or SMART Technologies for information on the
environmental performance of our products.
Waste Electrical and Electronic Equipment (WEEE) Regulations 31
Page 38

32 Waste Electrical and Electronic Equipment (WEEE) Regulations
Page 39

Customer Support
Training
Do you need training on your SMART product? Visit http://smarttech.com/trainingcenter for free
training materials and information on our training services.
Contacting SMART Technical Support
SMART’s Technical Support team welcomes your call. However, you may first want to contact your
local reseller if you experience any difficulty with your SMART product, as they may be able to
solve the problem without delay.
All SMART products include free telephone, fax and e-mail support.
Telephone: 1.866.518.6791 (toll-free in Canada/U.S) or +1.403.228.5940 (all other countries)
(Available 7 a.m. – 6 p.m. Mountain time from Monday to Friday)
Fax: +1.403.806.1256
E-mail: support@smarttech.com
Website: www.smarttech.com/support
When you phone Technical Support, it’s helpful if you have access to your SMART product during
the call. The support representative may ask you for the following information:
• the serial number of the unit
• the version of the software that’s causing the problem and the version of your computer’s
operating system (if applicable)
NOTE: You can locate the serial number on the back of the unit and on the original packaging.
Serial Number
TIP
Write the DT770’s serial number in the front of this guide for future reference.
Customer Support 33
Page 40

General Inquiries
Main Switchboard: 1.888.42.SMART (toll-free in Canada/U.S.) or +1.403.245.0333 (all other
countries)
Fax: +1.403.228.2500
E-mail: info@smarttech.com
Address: SMART Technologies Inc.
1207 – 11th Avenue SW, Suite 300
Calgary, AB T3C 0M5
CANADA
Warranty
Product warranty is governed by the terms and conditions of SMART's "Limited Equipment
Warranty" that shipped with the SMART product at the time of purchase.
Registration
A User Registration card was included with your SMART product. To help us serve you, fill in and
mail this card to SMART Technologies Inc. or register online at www.smarttech.com/registration.
Sending Feedback
You can help us improve our technical documentation by e-mailing your comments to
TechnicalDocumentation@smarttech.com.
Obtaining More Information on SMART Products
Visit www.smarttech.com/support to:
• read technical bulletins, FAQs and tips
• download PDF versions of our user guides and more
34 Customer Support
Page 41

Index
A
Adjusting Screen Display Settings 29
C
Calibrating the Cameras 28
Cleaning the DT770
Connecting the DT770
Connecting the Tethered Pen
Connection Panel
23
8
9
4
Contacting SMART Technical Support
Creating Digital Ink
Customizing Buttons
17
20
D
Digital Ink 17
Display Control Buttons
Introduction
Using
3
29
DT770
Cleaning
Connecting
Installing
Introduction
Using
23
8
7
1
15
E
33
K
Kensington Cable and Lock Device 12
M
Monitor 9
Mono Stand
11
O
On-Screen Display Menu 29, 30
Orienting
14
P
Pen see Tethered Pen
Pen Tool Buttons
Clicking
Introduction
Using
Power Indicator
Introduction
Troubleshooting
Power Supply
Projector
Protective Cover
Reattaching
Removing
16
3
15
4
25
4
9
10
8
Erasing 18
F
Function Buttons
Introduction
Keyboard
Using
3
19
18
I
Image Problems 26
Installing SMART Board Software
Installing the DT770
Integrating a Monitor or Projector
Interactive Screen
7
2
12
9
R
Reattaching the Protective Cover 10
Removing the Protective Cover
8
Room Control Interface Button
Introduction
Using
4
20
S
Saving Notes 17
Screen Resolution
SMART Board Software
SMART Technical Support
Status Indicator
Introduction
Troubleshooting
Index 35
13
12
33
4
26
Page 42

T
Tethered Pen
Clicking
Connecting
Introduction
Using
Writing
Tilt Stand
16
9
2
15
17
11
Troubleshooting
Control and Writing
Image
26
Power
25
Status
26
27
Symptoms, Likely Causes and Remedies
U
Using the DT770 15
W
Writing Notes 17
27
36 Index
Page 43

SMART Technologies Inc.
1207 – 11 Avenue SW, Suite 300
Calgary, AB T3C 0M5
CANADA
Support +1.403.228.5940 or Toll Free 1.866.518.6791 (Canada/U.S.)
Support Fax +1.403.806.1256
support@smarttech.com www.smarttech.com
99-00580-01 REV A0
 Loading...