

Page 1
DRS-50 TRANS-LINGUAL
CINEMA
REPLACEMENT
DIALOG
SYSTEM
INSTALLATION AND
OPERATION MANUAL
Devices, Inc.
Copyright 2000
by SMART Devices, Inc.
5945 Peachtree Corners East
Norcross, GA 30071-1337
1-800-45-SMART
or
770-449-6698
TXL1D600.P65
Published 05/30/2000
Page 2

Version E, May, 2000
Copyright 2000 by SMART Devices, Inc.
5945 Peachtree Corners East
Norcross, GA 30071-1337
CONTACT:
SMART Devices Technical Support or Sales Department
8AM and 5PM, E.S.T., Monday - Friday
(800) 45-SMART
(770) 449-6698
(770) 449-6728 (FAX)
Technical Support: service@smartdev.com
International Sales: INTSales@smartdev.com
U.S. Sales: USSales@smartdev.com
LIMITED WARRANTY: SMART products and accessories are warranted
against malfunction or failure due to defects in workmanship or materials
for a period of one year from the date of shipment. If a problem occurs during the warranty period, the unit will be repaired, or replaced at our option,
without charge for materials or labor. If air freight is requested by the
dealer, the difference between air and surface charges will be billed to the
dealer. This limited warranty does not cover products that have been
abused, altered, modified, or operated in other than specified conditions.
Prior factory approval is required on all returns. Returned equipment or defective parts must be shipped freight prepaid to us by the dealer or customer.
Our limited warranty does not cover damages resulting from accident, misuse or abuse, lack of responsible care, or failures not attributable to manufacturing defects, except as provided herein. SMART Devices, Inc. makes
no warranties, express or implied, including warranties of merchantability
or fitness for a particular purpose.
RETURN POLICY: Factory authorization MUST be obtained before returning any product. A 15% restocking charge will be issued on unused equipment (in original box) that is returned for credit. Credit is issued to the
dealers account. The credit may be used against future purchases and no
cash transactions are offered. All returns must be shipped freight prepaid
by the dealer. Equipment returned without a factory RA (Return Authorization) will be refused.
Page 3

Cinema Dialog Replacement System
OVERVIEW, pg. 4
Description
Component Diagrams
INSTALLATION, pg. 6
DRS-50 Trans-Lingual
USER’S GUIDE
Rack Unit Installation
Remote Unit Installation
Wiring
Calibration
OPERATION, pg. 8
SCHEMATICS, pg. 10
SMART products are designed to deliver unsurpassed quality in workmanship and performance. The following information gives detailed instructions
on the installation and operation of the SMART DRS-50 Trans-Lingual. We
strongly encourage new owners of the DRS-50 to thoroughly read this entire manual before placing their new SMART product into service. This will
ensure that the DRS-50 will be operated properly to give the superior performance that it was designed to deliver.
Page 4
4 DRS-50 TRANS-LINGUAL
OVERVIEW
1. Description
The SMART DRS-50 Cinema Translingual is a dedicated
dialog replacement system designed as a simple and costeffective tool for presenting foreign language films in small
theatres. A live translator can dub over a soundtrack
channel at the touch of a button. The Translingual’s
features include
· Automatic soundtrack level attenuation and microphone
signal insertion
· Built in voice compression circuitry
· Adjustable soundtrack “hush” level and microphone
level
· Voice activated dubbing
· External hand or foot switch operation
· Projection to translation booth intercom system
· Translation output monitoring in projection booth
· Inputs for balanced and unbalanced microphones
The DRS-50 is designed as a seamless addition to the
Producer Cinema Audio System, in both aesthetics and
circuitry.
Page 5

4 5 6 7
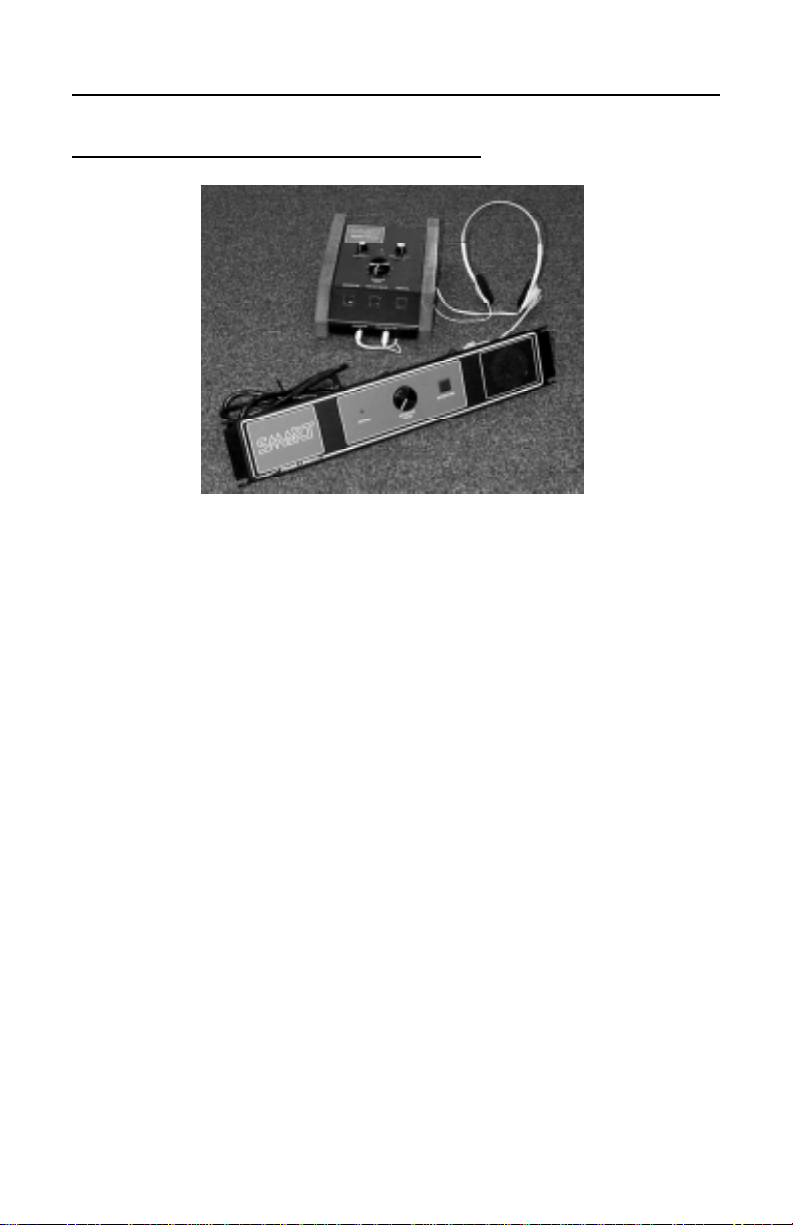
USER’S GUIDE 5
1 2 3
1. Rack Active indicator
2. Monitor Volume Level
3. Rack Intercom “push to
talk” button
4. VOX sensitivity level
5. Remote Active indicator
6. Headphone volume
level
7. Power/Mode dial
8. Remote Intercom “push
to talk” button
8 9 10 11 12
13 14 15
9. Headphone jack
10. Cough/Mute button
11. Microphone jack
12. Manual activate button
13. Remote (footswitch)
jack
14. Phoenix interface
connector
15. Balanced microphone
jack
Page 6

6 DRS-50 TRANS-LINGUAL
INSTALLATION
1. Rack unit installation
Confirm that the rack unit you have purchased is configured
for your AC voltage. For 220VAC, R79 should have a zero
Ohm resistor (a resistor with one black stripe). For 120VAC,
R80 and R81 should have zero Ohm resistors. R79, R80 and
R81 are located along the right edge of the rack unit circuit
board (looking at the back).
The DRS-50 fits into a 3.5 inch rack space (2 standard
rack units). Mount the front panel rack unit into a rack space
between the cinema processor and amplifiers. Plug the power
cable into the rack power strip.
2. Remote unit installation
The remote unit should be placed on a table at a
comfortable height for the translator. If you are using the
provided Fujikon headset, plug the 3.5mm microphone plug
into the jack marked “unbalanced mic”.
3. Wiring
Remote Communication Cable. A 12 conductor cable is
necessary to connect the remote unit to the rack unit. Special
insulation is recommended for the microphone wire pair. A 12
conductor cable with an insulated wire pair is available from
SMART (Part# TXLWIRE, specify footage required).
Check wires for continuity before running cable between
translation booth and projection booth. Once the cable has
been satisfactorily placed, wire the provided 12 pin Phoenix
connectors to the cables. Make sure the wiring on each end is
the same. The suggested wiring diagram with the SMART
cable part is as follows (from left to right looking at the back of
the rack unit at connector TB2):
Page 7

USER’S GUIDE 7
PIN SIGNAL WIRE COLOR
1 ON/OFF GREEN
2 V+ RED
3 V- BLUE
4 GND BLACK (insulated pair)
5 MIC RED (insulated pair)
6 LHEAD PURPLE
7 RHEAD YELLOW
8 GND RED\BLACK
9 ICM ORANGE
10 VOX RED\WHITE
11 MAN BROWN
12 GND BLACK
Make sure the remote unit’s VOX/MAN/OFF knob is set to
the OFF position. Plug the Phoenix connectors into the rear of
the rack and remote units.
Processor/Amplifier Connection. Using the provided 6
pin Phoenix connector plug, connect the output of the cinema
processor’s dialog channel (usually CENTER) to pins 1 (IN)
and 2 (GND) of connector TB1 on the rack unit. Connect the
output of the Translingual, pins 5 (GND) and 6 (OUT) to the
input of the appropriate amplifier.
4. Calibration
There are three adjustments available at the rack unit:
SOUNDTRACK HUSH LEVEL, VOICE COMPRESSION, and
MIC LEVEL.
SOUNDTRACK HUSH LEVEL. This potentiometer (R25)
controls the background level of the soundtrack when the
Translingual is in dub mode.
VOICE COMPRESSION. Pot R22 controls the amount of
compression applied to the microphone signal. This
compression minimizes the variation in volume of the speaker.
Page 8

8 DRS-50 TRANS-LINGUAL
MIC LEVEL. R54 sets the overall level of the microphone
signal when in dub mode.
These pots have been set at the factory for standard
operation. Test the Trans-Lingual in your auditorium with these
settings, and then adjust settings as desired.
OPERATION
REMOTE CONSOLE
OFF/MANUAL/VOX KNOB. Turning the dial to OFF
disrupts power to both the rack unit and the remote unit. The
Trans-Lingual bypasses the audio circuitry and provides a
straight feedthrough for the soundtrack signal. MANUAL
allows for non-VOX operation of the unit. Pressing the
MANUAL button or a remote switch will put the Trans-Lingual in
dubbing mode, and allow the microphone signal to be heard in
the auditorium. VOX mode engages the voice activation
circuitry, and triggers the dubbing when audio material is
detected at the microphone. The MANUAL and remote switch
buttons also operate normally in this mode.
VOX SENSITIVITY. This knob adjusts the level of
audio material that triggers the VOX circuitry. Turning the knob
clockwise increases the sensitivity, triggering the dubbing on
quieter signals.
MONITOR LEVEL. This knob controls the volume level
in the headphones. Turning the knob clockwise increases the
volume.
INTERCOM. Pushing this button allows the
microphone signal to be heard on the rack unit speaker,
without sending the signal into the auditorium.
Page 9

USER’S GUIDE 9
COUGH/MUTE. While this button is pushed, the VOX
detection circuit is deactivated.
MANUAL. Pressing this button engages the dubbing
action.
RACK UNIT
ACTIVE LED. This LED indicates when the Trans-
Lingual is in dubbing mode.
MONITOR LEVEL. This controls the volume of the
monitoring speaker in the rack unit. This speaker plays the
same material that is being heard in the auditorium. The
Intercom system has its own preset volume that overrides this
control, so that the volume may be kept low or off without
missing pages from the translation booth.
INTERCOM. By pressing this button and speaking into
the monitor speaker, someone in the projection booth may
communicate with the person in the translation booth. This
signal is only sent to the translators headphones, not into the
auditorium.
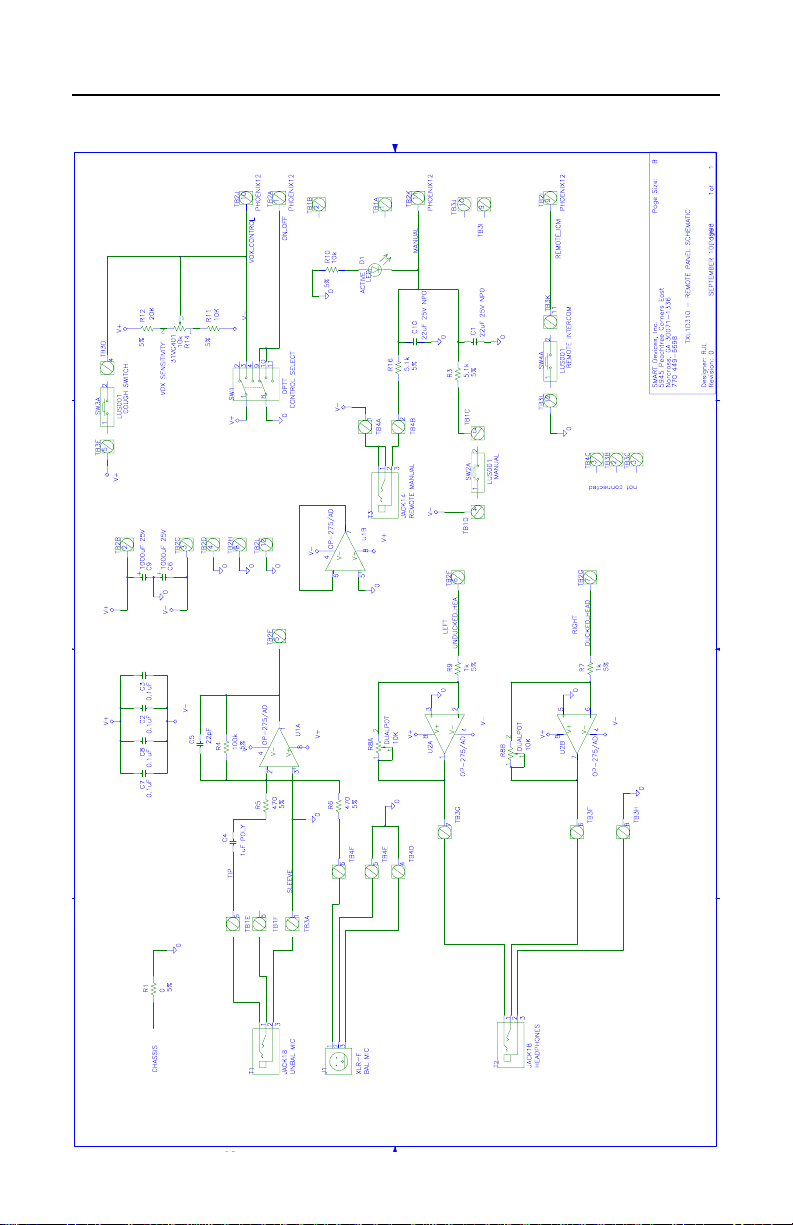
SCHEMATICS
on the next page
Page 10
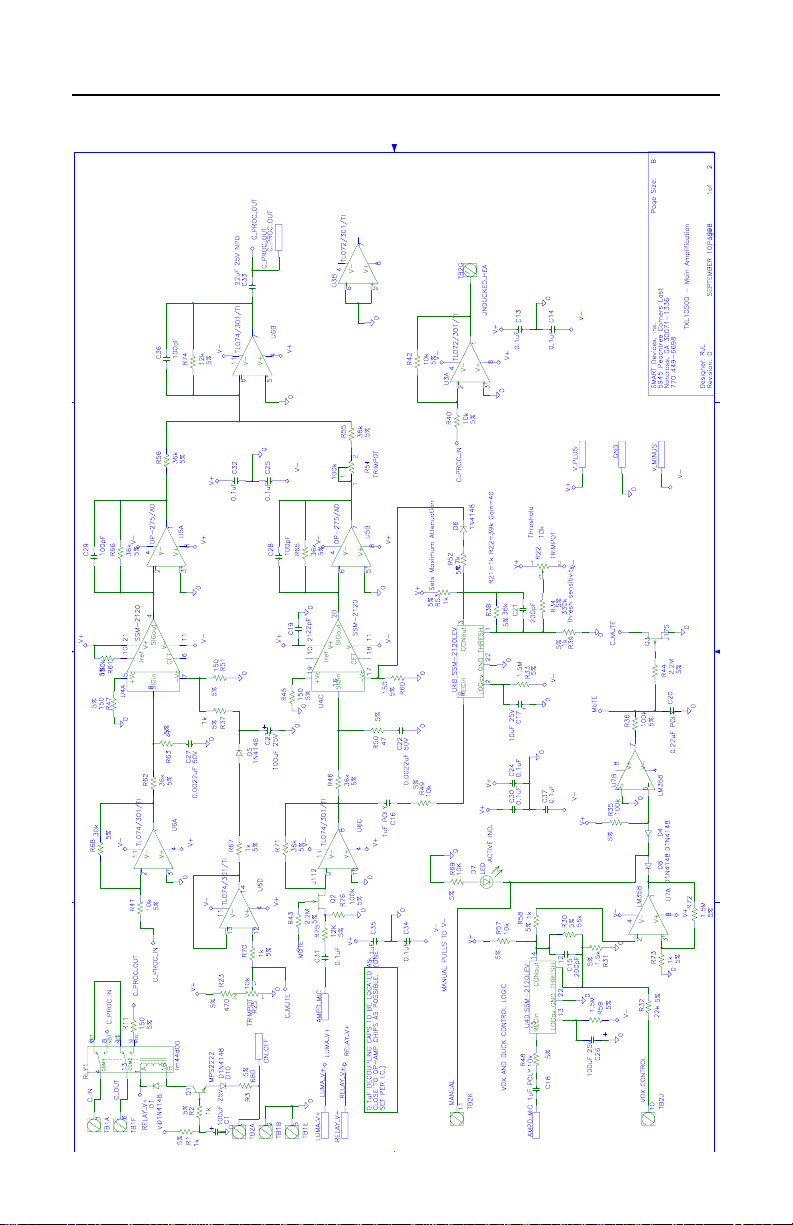
10 DRS-50 TRANS-LINGUAL
Page 11

USER’S GUIDE 11
Page 12
12 DRS-50 TRANS-LINGUAL
 Loading...